fontastic 262883 Manuale del proprietario
- Categoria
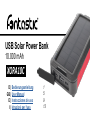
- Banche di potere
- Tipo
- Manuale del proprietario


1
2
3
4
5
6
7
8
11
10
9
12
Bedienungsanleitung
Bitte lesen Sie diese Bedienungsanleitung
sorgfältig, bevor Sie das Gerät benutzen.
Bewahren Sie diese Anleitung auf, damit Sie
jederzeit darauf zugreifen können.
Lieferumfang
• Fontastic
®
Powerbank XORA10C
• USB-Ladekabel
• Diese Bedienungsanleitung
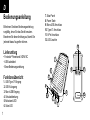
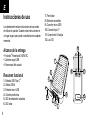
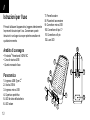
Funktionsübersicht
1. USB-Type-C
®
Eingang
2. USB-A Ausgang
3. Micro-USB Eingang
4. Schutzabdeckung
5. Akkustand-LED
6. Solar-LED
7. Solar-Panel
8. Power-Taste
9. Micro-USB Anschluss
10. Type-C
®
Anschluss
11. 8-Pin Anschluss
12. LED-Leuchte
D
1

Power Bank Auaden
Die Fontastic® Powerbank XORA10C ist mit einem
wiederauadbaren Lithium-Polymer Akku ausgestattet.
Verbinden Sie die Powerbank über den Micro-USB-
oder den Type-C Eingang (3,1) mit einem USB-Lade-
gerät. Die Akkustand-Anzeige (5) blinkt während des
Ladevorgangs. Nach vollständiger Ladung leuchten alle
vier LED‘s. Der Ladevorgang ist beendet. Trennen Sie
die Powerbank vom Ladegerät.
Hinweis: Laden Sie die Powerbank vor der ersten
Inbetriebnahme vollständig auf.
Die übliche Ladedauer beträgt ca. 4 Stunden, kann
aber je nach Leistung des verwendeten USB-Lade-
gerätes variieren.
Solarmodul:
Die Powerbank ist mit einem Solarmodul (7) ausgestat-
tet, welches sobald die Lichtverhältnisse ausreichend
sind, die Powerbank auädt. Die grüne LED (6) leuchtet,
wenn die Powerbank aktuell über das Panel aufgeladen
wird.
Hinweis: Das Solarmodul ist primär für den
Notbetrieb gedacht. Laden Sie die Powerbank wenn
möglich über das Stromnetz auf.
Akkustand der Powerbank überprüfen
Um den Akkustand zu überprüfen, drücken Sie die
Power-Taste (8). Die LED-Anzeige (5) leuchtet für einige
Sekunden und zeigt den Akkustand der Powerbank in
25%-Schritten an. 100% bedeuten, dass Ihre Power-
bank vollständig aufgeladen ist, 25% bedeuten, dass sie
fast leer ist und zeitnah aufgeladen werden sollte.
Geräte mit der Powerbank auaden
Um Geräte über die Powerbank aufzuladen, entnehmen
Sie das Kabel mit dem für Ihr Gerät passenden Stecker
D
2

aus dem Gehäuse (9, 10, 11) und verbinden Sie es
mit dem zu ladenden Gerät. Der Ladevorgang beginnt.
Trennen Sie nach Gebrauch das Kabel vom zu laden-
den Gerät. Neben den integrierten Kabeln steht ein
USB-A-Anschluss (2) zum Auaden externer Geräte zu
Verfügung. Önen Sie die Schutzabdeckung (4), um an
die Anschlüsse der Powerbank zu gelangen. Schließen
Sie das aufzuladende Gerät an ein USB-Kabel, und
dieses an den USB-A-Ausgang der Powerbank an. Der
Ladevorgang beginnt. Trennen Sie nach Gebrauch das
Kabel von der Powerbank.
Hinweis: Falls es beim Auaden eines Gerätes zum
Kurzschluss kommt, schaltet sich die Powerbank
ab. Stecken Sie das Kabel in den Micro-USB- oder
Type-C Eingang der Powerbank, und verbinden Sie
den USB-A Stecker des Kabels mit einem USB-Lade-
gerät oder einem Computer. Ein kurzer Ladeimpuls
reicht aus um die Powerbank wieder zu aktivieren.
LED-Leuchte:
Die integrierte LED-Leuchte (12) wird über die Power
Taste (8) bedient. Zum Einschalten und Ausschalten
halten Sie die Power Taste für ca. 3 Sekunden gedrückt.
Falls Sie Technischen Support benötigen, kontaktieren
Sie bitte unser Support-Team per E-Mail unter der Adresse
Technische Daten:
• Akku: 10.000 mAh Li-Polymer
• Micro-USB/Type-C-Eingang: DC 5V/2.0A
• Ladeleistung Solarmodul: Max. 1.2 W
• Ausgang USB-A: DC 5V/2A
• Ausgang Kabel mit Micro USB/8-Pin/Type-C: DC 5V/2.0A
• LED Ladestandsanzeige
• Schutz: Kurzschluss, Überladung, Entladung, Überstrom
• Material Gehäuse: ABS + Silikon
• Abmessungen: 168 x 77 x 22 mm
• Gewicht: 310g
D
3

Sicherheitshinweise:
• Önen Sie niemals das Gerät
• Tauchen Sie das Gerät nicht in Wasser und schützen
Sie es vor Feuchtigkeit.
• Verbinden Sie niemals den Stromausgang mit dem
Stromeingang oder umgekehrt.
• Kabel nie mit Gewalt anschließen.
• Halten Sie Elektrogeräte fern von Kindern.
• Entfernen Sie elektronische Geräte vom Netz, wenn
sie für längere Zeit nicht gebraucht werden.
• Benutzen Sie nie das Produkt wenn es sichtbare
Schäden aufweist.
Hinweis zum Umweltschutz:
Ab dem Zeitpunkt der Umsetzung der
europäischen Richtlinie 2012/19/EU in
nationales Recht gilt folgendes: Elektrische und
elektronische Geräte dürfen nicht mit
dem Hausmüll entsorgt werden.
Der Verbraucher ist gesetzlich verpichtet, elektrische
und elektronische Geräte am Ende ihrer Lebensdauer
an den dafür eingerichteten, öentlichen Sammelstellen
oder an die Verkaufsstelle zurückzugeben. Einzelheiten
dazu regelt das jeweilige Landesrecht. Das Symbol auf
dem Produkt, der Gebrauchsanleitung oder der Ver-
packung weist auf diese Bestimmungen hin.
Mit der Wiederverwertung, der stoichen Verwertung
von Altgeräten leisten Sie einen wichtigen Beitrag zum
Schutz unserer Umwelt. In Deutschland gelten oben
genannte Entsorgungsregeln, laut Batterieverordnung,
für Batterien und Akkus entsprechend.
Hiermit erklären wir, dass dieses Gerät die
CE Kennzeichnung gemäß den Bestimmungen
und Vorgaben trägt. Es entspricht somit den
grundlegenden Anforderungen der EMV-Richtlinie
2014/30/EU, sowie der Niederspannungsrichtlinie
2014/35/EU und der RoHS-Richtlinie 2011/65/EU.
Der vollständige Text der EU-Konformitätserklärung ist
unter der folgenden Internetadresse verfügbar:
www.d-parts.de/konfo
D
4

1
2
3
4
5
6
7
8
11
10
9
12
User Manual
Please read this user manual and follow the listed
safety instructions and tips. Keep this manual so that
you can access it at any time.
Scope of delivery
• Fontastic® Powerbank XORA10C
• USB charge cable
• This user manual
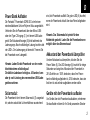
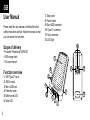
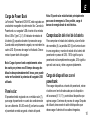
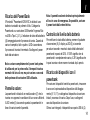
Function overview
1. USB Type-C
®
input
2. USB-A output
3. Micro USB input
4. Protective cover
5. Battery level LED
6. Solar LED
7. Solar panel
8. Power button
9. Micro USB connector
10. Type-C
®
connector
11. 8-pin connector
12. LED light
GB
5

Charge power bank
The Fontastic® Powerbank XORA10C is equipped with a
rechargeable lithium polymer battery. Connect the pow-
erbank to a USB charger via the micro USB or Type-C
input (3,1). The battery level indicator (5) ashes during
charging. When fully charged, all four LEDs light up. The
charging process is nished. Disconnect the power bank
from the charger.
Note: Charge the power bank completely before
using it for the rst time. The usual charging time is
approximately 4 hours, but may vary depending on
the power of the USB charger used.
Solar panel:
The powerbank is equipped with a solar module (7),
which charges the powerbank as soon as the light con-
ditions are sucient. The green LED (6) lights up when
the powerbank is currently charging via the panel.
Note: The solar panel is primarily intended for
emergency use. If possible, charge the powerbank
from the mains.
Check battery level of the power bank
To check the battery level, press the power button (8).
The LED indicator (5) will light up for a few seconds,
showing the powerbank‘s battery level in 25%
increments. 100% means that your powerbank is fully
charged, 25% means that it is almost empty and should
be charged promptly.
Charge devices using the power bank
To charge devices using the powerbank, remove the
cable with the appropriate plug for your device from the
case (9, 10, 11) and connect it to the device you want to
charge. The charging process will begin. Disconnect the
cable from the device to be charged after use.
In addition to the integrated cables, a USB-A port (2) is
available for charging external devices.
GB
6

Open the protective cover (4) to access the ports of the
power bank. Connect the device to be charged to a USB
cable, and this to the USB-A output of the power bank.
The charging process will begin. Disconnect the cable
from the powerbank after use.
Note: If a short circuit occurs while charging a de-
vice, the powerbank will shut down. Plug the cable
into the Micro-USB or Type-C input of the power-
bank, and connect the USB-A plug of the cable to a
USB charger or a computer. A short charging pulse
is enough to reactivate the powerbank.
LED Light:
The integrated LED light (12) is operated by the power
button (8). To switch on and o, press and hold the
power button for approx. 3 seconds.
If you need technical support, please contact our
support team by email at [email protected].
Technical data:
• Battery: 10,000 mAh Li-Polymer
• Micro USB/Type-C input: DC 5V/2.0A
• Charging power solar panel: Max. 1.2W
• Output USB-A: DC 5V/2A
• Output cable with Micro USB/8-pin/Type-C: DC5V / 2.0A
• LED charge level indicator
• Protection against: short circuit, overcharge, discharge,
overcurrent.
• Material case: ABS + silicone
• Dimensions: 168 x 77 x 22 mm
• Weight: 310g
Safety advice:
• Do not open the device.
• Do not hold the device under water.
• Keep it safe from humidity.
• Do not connect the power output to the power input or
vice versa.
• Do not connect the adapter to the device by using
force.
GB
7

• Keep the device away from children.
• Disconnect electronic devices from the power when
not using them for longer time.
• Do not use the device when it has visible defects.
Note on environmental protection:
After the implementation of the European
Directive 2012/19/EU in the national legal
system, the following applies: Electrical and
electronic devices may not be disposed of with
domestic waste. Consumers are obliged by law to return
electrical and electronic devices at the end of their
service lives to the public collecting points set up for this
purpose or point of sale. Details to this are dened
by the national law of the respective country.
This symbol on the product, the instruction manual or
the package indicates that a product is subject to these
regulations. By recycling, reusing the materials or other
forms of utilising old devices, you are making an
important contribution to protecting our environment.
We hereby declare, that this device carries
the CE mark in accordance with the
regulations and standards.
It therefore complies with the essential requirements
of the EMC Directive 2014/30/EU, as well as the Low
Voltage Directive 2014/35/EU and the RoHS Directive
2011/65/EU. The full text of the EU Declaration of
Conformity is available at the following Internet address:
www.d-parts.de/konfo
GB
8

1
2
3
4
5
6
7
8
11
10
9
12
E
9
Instrucciones de uso
Lea atentamente estas instrucciones de uso antes
de utilizar el aparato. Guarde estas instrucciones en
un lugar seguro para poder consultarlas en cualquier
momento.
Alcance de la entrega
• Fontastic® Powerbank XORA10C
• Cable de carga USB
• Este manual del usuario
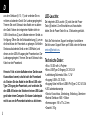
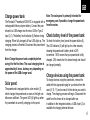
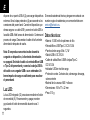
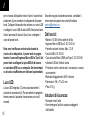
Resumen funcional
1. Entrada USB-Tipo-C
®
2. Salida USB-A
3. Entrada micro USB
4. Cubierta protectora
5. LED de estado de la batería
6. LED solar
7. Panel solar
8. Botón de encendido
9. Conector micro-USB
10. Conector tipo-C
®
11. Conector de 8 clavijas
12. Luz LED

E
10
Carga de Power Bank
La Fontastic® Powerbank XORA10C está equipada con
una batería recargable de polímero de litio. Conecta la
Powerbank a un cargador USB a través de la entrada
Micro-USB o Type-C (3.1). El indicador de estado de
la batería (5) parpadea durante el proceso de carga.
Cuando está completamente cargado, se encienden los
cuatro LED. El proceso de carga ha nalizado. Desco-
necta el power bank del cargador.
Nota: Carga el power bank completamente antes
de usarlo por primera vez. El tiempo de carga ha-
bitual es de aproximadamente 4 horas, pero puede
variar en función de la potencia del cargador USB
utilizado.
Panel solar:
El powerbank está equipado con un módulo solar (7),
que carga el powerbank en cuanto las condiciones de
luz son sucientes. El LED verde (6) se ilumina cuando
el powerbank se está cargando a través del panel.
Nota: El panel solar está diseñado principalmente
para uso de emergencia. Si es posible, carga el
banco de energía desde la red eléctrica.
Comprobación del nivel de la batería
Para comprobar el estado de la batería, pulse el botón
de encendido (8). La pantalla LED (5) se ilumina duran-
te unos segundos y muestra el estado de la batería del
powerbank en pasos del 25%. 100% signica que tu
powerbank está completamente cargada, 25% signica
que está casi vacía y debe cargarse rápidamente.
Carga de dispositivos con el
powerbank
Para cargar dispositivos a través del powerbank, extrae
el cable con el enchufe adecuado para tu dispositivo
de la carcasa (9, 10, 11) y conéctalo al dispositivo que
quieras cargar. Comienza el proceso de carga. Después
de utilizarlo, desconecte el cable del dispositivo que
desea cargar. Además de los cables integrados,

E
11
dispone de un puerto USB-A (2) para cargar dispositivos
externos. Abra la tapa protectora (4) para acceder a las
conexiones del power bank. Conecte el dispositivo que
desea cargar a un cable USB y conecte el cable USB a
la salida USB-A del banco de alimentación. Comienza el
proceso de carga. Desconecta el cable de la fuente de
alimentación después de usarla.
Nota: Si se produce un cortocircuito durante la
carga de un dispositivo, la fuente de alimentación
se apagará. Enchufa el cable a la entrada Micro-USB
o Tipo-C del power bank y conecta la clavija USB-A
del cable a un cargador USB o a un ordenador. Un
breve impulso de carga es suciente para reactivar
el powerbank.
Luz LED:
La luz LED integrada (12) se acciona mediante el botón
de encendido (8). Para encender y apagar, manten-
ga pulsado el botón de encendido durante unos 3
segundos.
Si necesita asistencia técnica, póngase en contacto con
nuestro equipo de asistencia por correo electrónico en
Datos técnicos:
• Batería: 10.000 mAh de polímero de litio
• Entrada Micro-USB/Tipo-C: DC 5V/2.0A
• Panel solar de carga: Máx. 1,2 W
• Salida USB-A: DC 5V/2A
• Cable de salida Micro USB/8 clavijas/Tipo-C:
DC 5V/2.0A
• Indicador LED de nivel de carga
• Protección contra: Cortocircuito, sobrecarga, descarga,
sobrecorriente
• Material de la carcasa: ABS + silicona
• Dimensiones: 168 x 77 x 22 mm
• Peso: 310 g

E
12
Instrucciones de seguridad:
• Nunca abra la unidad
• No sumerja el aparato en el agua y protéjalo de la
humedad.
• Nunca conecte la salida de alimentación a la entrada
de alimentación o viceversa.
• No conecte nunca los cables a la fuerza.
• Mantenga los aparatos eléctricos fuera del alcance de
los niños.
• Desenchufe los equipos electrónicos de la red eléctri
ca si no los va a utilizar durante mucho tiempo.
• Nunca utilice el producto si tiene daños visibles.
Nota sobre la protección del medio
ambiente:
A partir de la fecha de transposición de la
Directiva Europea 2012/19/EU a la legislación
nacional, se aplica lo siguiente: Los equipos
eléctricos y electrónicos no deben eliminarse
con la basura doméstica.
El consumidor tiene la obligación legal de devolver los
aparatos eléctricos y electrónicos al nal de su vida útil
en los puntos de recogida públicos habilitados para ello
o en el punto de venta. Los detalles están regulados
por la legislación nacional respectiva. El símbolo que
aparece en el producto, en las instrucciones de uso o
en el envase indica esta normativa.
Mediante el reciclaje, la recuperación de materiales u
otras formas de recuperación de aparatos viejos, usted
está haciendo una importante contribución a la
protección de nuestro medio ambiente.
Por la presente declaramos que este aparato
lleva el marcado CE de conformidad con la
normativa y las especicaciones.
Por lo tanto, cumple los requisitos esenciales de la
Directiva CEM 2014/30/UE, así como la Directiva de
baja tensión 2014/35/UE y la Directiva RoHS 2011/65/
UE. El texto completo de la declaración de conformidad
de la UE está disponible en la siguiente dirección de
Internet: www.d-parts.de/konfo

1
2
3
4
5
6
7
8
11
10
9
12
I
13
Istruzioni per l‘uso
Prima di utilizzare l‘apparecchio, leggere attentamente
le presenti istruzioni per l‘uso. Conservare queste
istruzioni in un luogo sicuro per poterle consultare in
qualsiasi momento.
Ambito di consegna
• Fontastic® Powerbank XORA10C
• Cavo di ricarica USB
• Questo manuale d‘uso
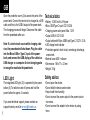
Panoramica
1. Ingresso USB-Type-C
®
2. Uscita USB-A
3. Ingresso micro USB
4. Copertura protettiva
5. LED di stato della batteria
6. LED solare
7. Pannello solare
8. Pulsante di accensione
9. Connettore micro-USB
10. Connettore di tipo C
®
11. Connettore a 8 pin
12. Luce LED

I
14
Ricarica del Power Bank
Il Fontastic® Powerbank XORA10C è dotato di una
batteria ricaricabile ai polimeri di litio. Collegare la
Powerbank a un caricatore USB tramite l‘ingresso Mic-
ro-USB o Tipo-C (3.1). L‘indicatore di stato della batteria
(5) lampeggia durante il processo di carica. Quando la
carica è completa, tutti e quattro i LED si accendono.
Il processo di ricarica è terminato. Scollegare il power
bank dal caricatore.
Nota: caricare completamente il power bank prima
di utilizzarlo per la prima volta. Il tempo di ricarica
normale è di circa 4 ore, ma può variare a seconda
della potenza del caricatore USB utilizzato.
Pannello solare:
La powerbank è dotata di un modulo solare (7) che la
ricarica non appena le condizioni di luce sono sucienti.
Il LED verde (6) si accende quando la powerbank è in
fase di ricarica tramite il pannello.
Nota: il pannello solare è destinato principalmente
all‘uso in caso di emergenza. Se possibile, caricare
il power bank dalla rete elettrica.
Controllo del livello della batteria
Per vericare lo stato della batteria, premere il pulsante
di accensione (8). Il display a LED (5) si accende
per alcuni secondi e mostra lo stato della batteria del
powerbank in passi del 25%. Il 100% signica che la
powerbank è completamente carica, il 25% signica che
è quasi scarica e deve essere ricaricata al più presto.
Ricarica dei dispositivi con il
powerbank
Per caricare i dispositivi tramite la powerbank, rimuovere
il cavo con la spina adatta al dispositivo dall‘alloggia-
mento (9, 10, 11) e collegarlo al dispositivo da caricare.
Inizia il processo di ricarica. Dopo l‘uso, scollegare il
cavo dal dispositivo da caricare.
Oltre ai cavi integrati, è disponibile una porta USB-A (2)

I
15
per la ricarica di dispositivi esterni. Aprire il coperchio di
protezione (4) per accedere ai collegamenti del power
bank. Collegare il dispositivo da caricare a un cavo USB
e collegare il cavo USB all‘uscita USB-A del power bank.
Inizia il processo di ricarica. Dopo l‘uso, scollegare il
cavo dal power bank.
Nota: se si verica un cortocircuito durante la
ricarica di un dispositivo, il power bank si spegne.
Inserire il cavo nell‘ingresso Micro-USB o Tipo-C del
power bank e collegare la spina USB-A del cavo a
un caricatore USB o a un computer. Un breve impul-
so di carica è suciente per riattivare la powerbank.
Luce LED:
La luce LED integrata (12) viene azionata tramite il
pulsante di accensione (8). Per accenderlo e spegnerlo,
tenere premuto il pulsante di accensione per circa 3
secondi.
Se avete bisogno di assistenza tecnica, contattate il
nostro team di supporto via e-mail all‘indirizzo
Dati tecnici:
• Batteria: 10.000 mAh ai polimeri di litio
• Ingresso Micro-USB/Tipo-C: DC 5V/2.0A
• Pannello solare di ricarica: Max. 1,2 W
• Uscita USB-A: DC 5V/2A
• Cavo di uscita Micro USB/8-pin/Type-C: DC 5V/2.0A
• ndicatore LED del livello di carica
• Protezione contro: cortocircuito, sovraccarico, scarica,
sovracorrente
• Materiale alloggiamento: ABS + silicone
• Dimensioni: 168 x 77 x 22 mm
• Peso: 310 g
Istruzioni di sicurezza:
• Non aprire mai l‘unità
• Non immergere l‘unità in acqua e proteggerla
dall‘umidità.

I
16
• Non collegare mai l‘uscita di alimentazione all‘ingresso
di alimentazione o viceversa.
• Non collegare mai i cavi con la forza.
• Tenere gli apparecchi elettrici lontano dalla portata dei
bambini.
• Scollegare le apparecchiature elettroniche dalla rete
elettrica se non vengono utilizzate per lungo tempo.
• Non utilizzare mai il prodotto se presenta danni visibili.
Nota sulla protezione dell‘ambiente:
A partire dalla data di recepimento della Direttiva
europea 2012/19/EU nell‘ordinamento nazionale,
si applica quanto segue: Le apparecchiature
elettriche ed elettroniche non devono essere
smaltite con i riuti domestici.
Il consumatore è obbligato per legge a restituire i
dispositivi elettrici ed elettronici al termine della loro vita
utile presso i punti di raccolta pubblici predisposti a tale
scopo o presso il punto vendita. I dettagli sono regolati
dalle rispettive leggi nazionali. Il simbolo sul prodotto,
sulle istruzioni per l‘uso o sull‘imballaggio indica queste
norme. Riciclando, recuperando i materiali o con altre
forme di recupero dei vecchi elettrodomestici, date un
importante contributo alla tutela dell‘ambiente.
Con la presente dichiariamo che questo
apparecchio reca il marchio CE in conformità
alle norme e alle speciche.
È quindi conforme ai requisiti essenziali della Direttiva
EMC 2014/30/UE, nonché alla Direttiva Bassa Tensione
2014/35/UE e alla Direttiva RoHS 2011/65/UE.
Il testo completo della Dichiarazione di conformità
dell‘UE è disponibile al seguente indirizzo Internet:
www.d-parts.de/konfo

Technische Daten und Irrtümer vorbehalten / Technical data and errors excepted
USB Type-C
®
and USB-C
®
are registered trademarks of USB Implementers Forum.
Registered trademarks are the property of their respective owners.
Fontastic, by D-Parts GmbH
Birkenweiher Str. 16 ● 63505 Langenselbold, Germany, www.d-parts.de V1_0223
-
 1
1
-
 2
2
-
 3
3
-
 4
4
-
 5
5
-
 6
6
-
 7
7
-
 8
8
-
 9
9
-
 10
10
-
 11
11
-
 12
12
-
 13
13
-
 14
14
-
 15
15
-
 16
16
-
 17
17
-
 18
18


fontastic 262883 Manuale del proprietario
- Categoria
- Banche di potere
- Tipo
- Manuale del proprietario
in altre lingue
- English: fontastic 262883 Owner's manual
- español: fontastic 262883 El manual del propietario
- Deutsch: fontastic 262883 Bedienungsanleitung
Documenti correlati
-
fontastic Xora20Q USB Solar Power Bank Manuale utente
-
-
-
-
-
fontastic Eris6 Manuale utente
-
-
-
-
Altri documenti
-
Silvercrest SPB 10000 A1 Operating Instructions Manual
-
Silvercrest SPB 5200 A1 Operating Instructions And Safety Instructions
-
Denver PQC-15005 Manuale utente
-
Denver PQC-10005 Manuale utente
-
Xiaomi Redmi 18W Fast Charge Power Bank 20000mAh (VXN430 Manuale utente
-