
ABUS Security Center • Linker Kreuthweg 5
86444 Aing • Germany • abus.com
NVR10020P
QUICK GUIDE

1. USB 2.0 Port
2. Power-On Button
3. Status LED
(Kodierung inBedienungs-
anleitung)
1. USB 2.0 port
2. Power On button
3. Status LED
(coding in user manual)
1. Port USB 2.0
2. Bouton de mise en marche
3. LED d‘état
(codage dans le mode d‘emploil)
1. USB 2.0-poort
2. Inschakelknop
3. Status-LED
(codering in bedieningsinstructiesl)
1. USB 2.0-port
2. Power-On-knap
3. Status-LED
(kodning i betjeningsvejledningen)
1. Porta USB 2.0
2. Pulsante Power-On
3. LED di stato
(codica nelle istruzioni per l‘uso)
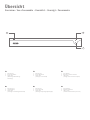
Übersicht
Overview • Vue d‘ensemble • Overzicht • Oversigt • Panoramica
2
1
3

1. Audio IN (RCA Audioeingang)
2. Audio OUT (RCA Audioausgang)
3. VGA (VGA Monitoranschluss)
4. HDMI (HDMI Monitoranschluss)
5. Alarm IN/OUT
6. LAN (RJ45-Anschluss für die
Netzwerkverbindung)
7. USB 3.0 port (Anschluss für USB-Geräte)
8. Erdung
9. 100 to 240 V AC (Anschluss für die
Stromversorgung)
10. Ein-und Ausschalter des Gerätes
11. 8 Netzwerkanschlüsse mit
PoE-Funktion für Kameras
1. Audio in (RCA audio input)
2. Audio out (RCA audio output)
3. VGA (VGA monitor connection)
4. HDMI (HDMI monitor connection)
5. Alarm in/out
6. LAN (RJ45 connector for network
connection)
7. USB 3.0 port (connecton for USB devices)
8. Grounding
9. 100 to 240 V AC (connection for
power supply)
10. Power switch
11. 8 Network interfaces with PoE
function for cameras
1. Audio IN (entrée audio RCA)
2. Audio OUT (sortie audio RCA)
3. VGA (raccordement écran VGA)
4. HDMI (raccordement écran HDMI)
5. Alarm IN/OUT
6. LAN (connexion RJ45 pour raccordement
au réseau)
7. Port USB 3.0 (connexion pour
appareils USB)
8. Mise à le terre
9. 100 à 240 V AC (branchement électrique)
10. Alimantation (interrupteur
marche/arrêt de l‘appareil)
11. 8 NInterfaces réseau avec
fonction PoE pour caméras
1. Audio in (RCA audio-ingang)
2. Audio out (RCA audio-uitgang)
3. VGA (VGA-monitoraansluiting)
4. HDMI (HDMI-monitoraansluiting)
5. Alarm IN/OUT
6. LAN (RJ45-aansluiting voor een
netwerkverbinding)
7. USB 3.0-poort (aansluiting voor USB-
apparaten)
8. Aarde
9. 100 naar 240 V AC (stroomaansluiting)
10. In- en uitschakelknop apparaat
11. 8 Netwerkinterfaces met PoE-functie
voor camera‘s
1. Audio in (RCA-audioindgang)
2. Audio out (RCA-audioindgang)
3. VGA (VGA-monitortilslutning)
4. HDMI (HDMI-monitortilslutning)
5. Alarm IN/OUT
6. LAN (RJ45-tilslutning til en
netværksforbindelse)
7. USB 3.0-port (tilslutning til USB-udsyr)
8. Jordforbindelse
9. 100 til 240 V AC (strømtilslutning)
10. Tænd og sluk på enheden
11. 8 Netværksgrænseader mødte PoE-
funktioner for kamera
1. Audio IN (ingresso audio RCA)
2. Audio OUT (uscita audio RCA)
3. VGA (porta per monitor VGA)
4. HDMI (porta per monitor HDMI)
5. Alarm IN/OUT
6. LAN (porta RJ45 per una connessione di rete)
7. Porta USB 3.0 (collegamento di
apparecchi USB)
8. Messa a terra
9. 100 a 240 V AC (allacciamento elettrico)
10. Interruttore di avvio/arresto
dell‘apparecchio
11. 8 Interfacce di rete con funzione
PoE per telecamere
11
1
2 3 4
5 6
7 8
9
10

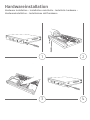
Hardwareinstallation
Hardware installation • Installation matérielle • Installatie hardware •
Hardwareinstallation • Installazione dell’hardware
21
43

5
i
i
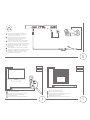
Lokale Bedienung
Local device operation
Fonctionnement du périphérique local
Werking van het lokale apparaat
Lokal enhedsdri
Funzionamento del dispositivo locale
Local
Lokal
Network
Netzwerk
Bedienung über Netzwerk
Device operation via network
Fonctionnement de l‘appareil via le réseau
Apparaatbediening via netwerk
Enhedsdri via netværk
Funzionamento del dispositivo tramite rete
Kameras nacheinander anschließen.
Erst wenn das Videobild erscheint, mit
der nächsten fortfahren.
Connect cameras one aer the other.
Only when the video image appears,
continue with the next one.
Connectez les caméras les unes après les
autres. Continuez avec l‘image suivante
uniquement lorsque l‘image vidéo apparaît.
Sluit camera‘s na elkaar aan. Pas als het
videobeeld verschijnt, gaat u verder met
het volgende.
Tilslut kameraer eer hinanden. Fortsæt
først med det næste, når videobilledet vises.
Collegare le telecamere una dopo l‘altra.
Solo quando appare l‘immagine video,
continua con il successivo.

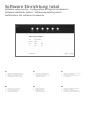
1. Wählen Sie die Systemsprache
2. Führen Sie die Aktivierung durch
3. Führen Sie die 6 Schritte des
Installationsassitenten durch
1. Select the system language
2. Perform the activation
3. Complete the 6 steps of the
installation wizard
1. Sélectionnez la langue du système
2. Eectuer l‘activation
3. Suivez les 6 étapes de l‘assistant
d‘installation
1. Selecteer de systeemtaal
2. Voer de activering uit
3. Voer de 6 stappen van de
installatiewizard uit
1. Vælg systemsprog
2. Udfør aktiveringen
3. Udfør de 6 trin i
installationsguiden
1. Seleziona la lingua del sistema
2. Eseguire l‘attivazione
3. Completare i 6 passaggi della
procedura guidata di installazion
Soware Einrichtung lokal
Soware setup locally • Conguration du logiciel localement •
Soware-installatie lokaal • Sowareopsætning lokalt •
Installazione del soware localmente

3
2
1
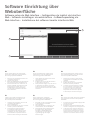
Soware Einrichtung über
Weboberäche
Soware setup via Web interface • Conguration du logiciel via interface
Web • Soware-instellingen via webinterface • Sowareopsætning via
Web-interface • Installazione del soware tramite interfaccia Web
Den IP-Installer können Sie im Download-
bereich unter folgendem Link downloaden:
abus.com/ger/products/NVR10020P
1. Prüfen Sie, ob die aktuellste Version des
IP-Installer installiert ist
2. Starten Sie die Suche
3. Rufen Sie Weboberäche der einzurichten-
den Kamera mit einem Doppelklick auf
4. Das Kennwort muss min. 8 und max. 16
Zeichen enthalten. Kennwort kann eine
Kombination aus Zahlen, Klein- und
Großbuchstaben und Sonderzeichen
sein und sollte mindestens zwei Arten
davon aufweisen
You can download the IP-Installer in the
download area under the following link:
abus.com/eng/products/NVR10020P
1. Check whether the latest version of the
IP installer is installed
2. Start the search
3. Double click to access the web interface
of the camera to be set up
4. Valid password range [8 - 16]. You can use
a combination of numbers, lowercase,
uppercase and special character for your
password with at least two kinds of them
contained.
Vous pouvez télécharger IP-Installer dans la
zone de téléchargement sous le lien suivant:
abus.com/fr/products/NVR10020P
1. Vériez que la version la plus récente
du programme d’installation IP est bien
installée
2. Démarrez la recherche
3. Double-cliquez pour ouvrir l’interface
Web de la caméra à paramétrer
4. Le mot de passe doit contenir au moins
8 et au maximum 16 caractères. Le mot
de passe peut être une combinaison
de chires, de lettres minuscules et
majuscules et de caractères spéciaux,
et doit indiquer au moins deux types.
U kunt de IP-Installer downloaden in het
downloadgedeelte via de volgende link:
abus.com/nl/products/NVR10020P
1. Controleer of de nieuwste versie van de
IP-Installer geïnstalleerd is
2. Start de zoekfunctie
3. Roep de webinterface van de in te stellen
camera op met een dubbelklik
4. Het wachtwoord moet minimaal 8
en maximaal 16 tekens bevatten.
Het wachtwoord kan bestaan uit een
combinatie van cijfers, kleine letters
en hoofdletters en speciale tekens en
moet ten minste twee typen aanduiden
Du kan downloade IP-installeren i
downloadområdet under følgende link:
abus.com/eng/products/NVR10020P
1. Kontrollér, om den mest aktuelle version
af IP-installeren er installeret
2. Start søgningen
3. Hent web-interface for kameraet, som
skal installeres, med et dobbeltklik
4. Adgangskoden skal indeholde mindst
8 og højst 16 tegn. Adgangskoden
kan være en kombination af tal,
små bogstaver og store bogstaver
og specialtegn og skal angive
mindst to typer
Puoi scaricare IP-Installer nell‘area di download
sotto il seguente link: abus.com/it/products/
NVR10020P
1. Assicurarsi che l’IP-Installer disponga della
versione più recente
2. Avviare la ricerca
3. Richiamare la piattaforma Web della tele-
camera da congurare con un doppio click
4. La password deve contenere almeno 8 e
un massimo di 16 caratteri. La password
può essere una combinazione di numeri,
lettere minuscole e maiuscole e caratteri
speciali e deve indicare almeno due tipi

3×
2×1×
1×
Die Installations-/Bedienungsanleitung können Sie unter folgendem Link downloaden: abus.com/ger/products/NVR10020P
You can download the user guide/installation instructions via the link below: abus.com/eng/products/NVR10020P
Les instruction de service/instructions d‘installation peuvent etre téléchargées sous le lien suivant : abus.com/fr/products/NVR10020P
De installatie-/gebruikershandleiding kunt u via de volgende link downloaden: abus.com/nl/products/NVR10020P
Du kan downloade installations-/betjeningsvejledningen pa folgende link: abus.com/eng/products/NVR10020P
Le istruzioni per l‘installazione e per l‘uso possono essere scaricate dal seguente link: abus.com/it/products/NVR10020P
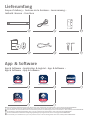
Lieferumfang
Scope of delivery • Contenu de la livraison • Leveromvang •
Indhold i kassen • Fornitura
App & Soware
App & Soware • Application & Logiciel • App & Soware •
App & Soware • App & Soware
Quick Guide
2× 1×
LITE
IP
+ EU, UK, AUS
ABUS Link Station Pro
ABUS Link Station Lite AUBS iDVR Plus
ABUS IP Installer
ABUS CMS
-
 1
1
-
 2
2
-
 3
3
-
 4
4
-
 5
5
-
 6
6
-
 7
7
-
 8
8


Abus 4043158166620 Manuale del proprietario
- Tipo
- Manuale del proprietario
- Questo manuale è adatto anche per
in altre lingue
- English: Abus 4043158166620 Owner's manual
- français: Abus 4043158166620 Le manuel du propriétaire
- Deutsch: Abus 4043158166620 Bedienungsanleitung
- Nederlands: Abus 4043158166620 de handleiding
- dansk: Abus 4043158166620 Brugervejledning
Documenti correlati
-
Abus FUBW50100 Guida Rapida
-
Abus FUZU50500 Quick Manual
-
-
-
Abus FUBE35001A Manuale utente
-
-
Abus FUBW35000A Manuale utente
-
-
-
Abus FUSG35000A Manuale utente