Philips GC 4914 Manuale del proprietario
- Categoria
- Ferri da stiro
- Tipo
- Manuale del proprietario

User manual
Register your product and get support at
www.philips.com/welcome
GC4900 series


2


6
Introduction
Congratulations on your purchase and welcome to Philips! To fully
benet from the support that Philips offers, register your product at
www.philips.com/welcome.
The new Philips PerfectCare Azur steam iron offers you an innovative
way to iron garments. We all know the fuss with traditional irons: choosing
the right temperature for tough and delicate fabrics, waiting for the iron
to warm up and cool down to avoid the risk of damaging clothes with
a too hot iron. Those hassles are things of the past with the new Philips
PerfectCare Azur steam iron.
Historically, wrinkle removal was done with a very hot soleplate, then
steam was added to enhance heat transfer and we could iron much faster.
Our research conrmed that the best way to remove wrinkles
effectively is a perfect combination of intense steam and
optimal soleplate temperature. The key to effective wrinkle
removal is the steam, not the soleplate temperature. To get
optimal steam, the soleplate temperature needs to be just
above the steam temperature.
In the past, a large amount of steam at this optimal temperature would
have led to water leakage. We have developed a unique steam chamber
that generates a consistent output of moisture-rich steam that penetrates
deep into the fabric for fast ironing with no risk of water leakage.
- Ironing is now really simple: no temperature adjustment, no scorching,
no waiting for the iron to heat up or cool down. Ironing takes less
time, no matter who does it. With this OptimalTEMP technology, every
single garment can be ironed effectively and safely.
This iron has been approved by The Woolmark Company Pty Ltd for the
ironing of wool-only products, provided that the garments are ironed
according to the instructions on the garment label and those issued by the
manufacturer of this iron, R1101. In the United Kingdom, Eire, Hong Kong
and India, the Woolmark trademark is a certication trademark.
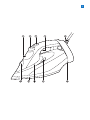
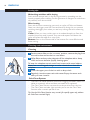
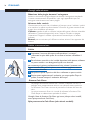
General description (Fig. 2)
1 Water tank lid
2 Spray button
3 Steam slider
4 Steam boost trigger
5 Mains cord
6 Cord winding area
7 Calc-Clean button
8 SmartLight/Calc-Clean reminder light
9 Soleplate
10 Spray nozzle
ENGLISH

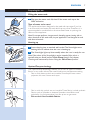
Preparing for use
Filling the water tank
1 Flipopenthewatertanklid,thenllthewatertankuptothe
MAX indication.
Type of water to be used
This appliance has been designed to be used with tap water. If you live
in an area with hard water, fast scale build-up may occur. Therefore, it is
recommended to use distilled or de-mineralized water to prolong the
lifetime of the appliance.
Note: Do not put perfume, vinegar, starch, descaling agents, ironing aids or
other chemicals in the water tank, as your appliance is not designed to work
with these chemicals.
Heating up
1 Insert the plug into an earthed wall socket. The SmartLight starts
ashingbluetoindicatethattheironisheatingup.
2 TheSmartLightlightsupbluesteadilywhentheironisreadyforuse.
Note: If the colour of the SmartLight is amber instead of blue, this is a
reminder that you should perform Calc-Clean function. See chapter
‘Cleaning and maintenance, section ‘Using the Calc-Clean function’.
OptimalTemp technology
The OptimalTemp technology enables you to iron all types of ironable
fabrics, in any order, without the need to adjust any temperature setting.
- Fabrics with these symbols are ironable, for example linen, cotton,
polyester, silk, wool, viscose and rayon.
- Fabrics with this symbol are not ironable. These fabrics include synthetic
fabrics such as Spandex or elastane, Spandex-mixed fabrics and
polyolens (e.g. polypropylene), but also prints on garments.
- Do not iron non-ironable fabrics.
ENGLISH 7

Steam settings
You can set different steam settings with the steam slider:
- No steam: to stop steam output when the iron is not in use.
During ironing, always choose ECO or MAX setting.
- ECO: (specic types only) to save energy, reduce the steam output,
and still have sufcient steam to iron your garments.
- MAX: to set the maximum steam output, perfect combination with
OptimalTemp setting.
For the best results and shortest ironing time, we strongly recommend that
you iron all ironable fabrics at the setting for maximum steam output.
1 Make sure there is enough water in the water tank.
2 Push the steam slider to the desired steam setting.
Note: The iron starts to produce steam when the SmartLight lights up
blue steadily.
Using the appliance
Ironing
With the OptimalTemp technology, you can iron every single garment
effectively and safely, even delicate fabrics like silk without having to worry
about temperature settings.
1 YoucanstartironingwhentheSmartLightstopsashingandlights
upbluesteadily.(Seechapter‘Preparingforuse’,section‘Heating
up’).
Features
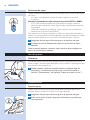
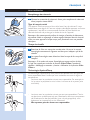
Spray function
You can use the spray function to moisten the garment to be ironed.
This helps to remove stubborn creases.
1 Make sure there is enough water in the water tank.
2 Pressthespraybuttonseveraltimestomoistenthegarmenttobe
ironed.
ENGLISH8

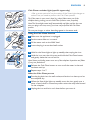
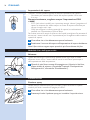
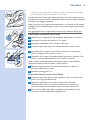
Steam boost function
A steam boost from the soleplate helps removing stubborn creases. The steam
boost enhances the distribution of steam into every part of the garment.
1 Pressandreleasethesteamboosttrigger.
For optimal steam boost performance, it is recommend to press the steam
boost trigger at intervals of 5 seconds.
Ironing with extra steam
1 For extra steam during ironing, press and hold the steam
boosttrigger.
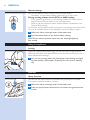
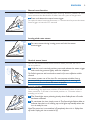
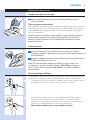
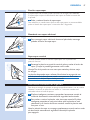
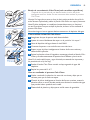
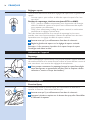
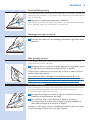
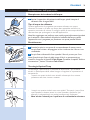
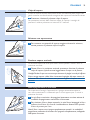
Vertical steam boost
You can also use the steam boost function when you hold the iron in
vertical position.
1 Holdtheironinverticalposition,pressandreleasethesteamtrigger
and touch the garment lightly with the soleplate.
Tip: Pull the garment with one hand to stretch it for more effective wrinkle
removal.
Hotsteamcomesoutoftheiron.Donotremovewrinklesfroma
garmentwhileyouarewearingitorsomebodyelseiswearingit.To
preventburns,donotdirectthesteamatpeople.
Safety Auto off
To save energy, the appliance switches off automatically when it has not
been moved for 2 minutes in horizontal position, or 3 minutes when is
standing on its heel.
1 TheSmartLightstartspulsatingslowlywhenSafetyAutooffmode
hasbeenactivated.
2 Toreactivatetheiron,simplymoveit.TheSmartLightashesblueto
indicate that the iron is heating up, and it lights up steadily when the
ironisreadyforuse.
Note: The steam iron is not switched off completely when it is in Safety Auto
off mode. Unplug the iron to switch it off.
ENGLISH 9

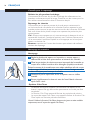
Ironing tips
Minimising wrinkles while drying
Start wrinkle removal early in the drying process by spreading out the
laundry properly after washing. Put the garments on hangers to make them
dry naturally with less wrinkles.
Shirt ironing
Start with the time-consuming parts such as collar, cuff links and sleeves.
Next, iron the bigger parts like front and back. By doing this, you prevent
wrinkling the bigger parts when you are busy ironing the time-consuming
ones.
Collar: When you iron a collar, start on its underside and iron from the
outside (the pointy end) inwards. Turn over and repeat. Fold down the
collar and press the edge for a crisp nish.
Buttons: Iron on the reverse side of the buttons for more effective and
faster ironing.
Cleaning and maintenance
Cleaning
1 Setthesteamslidertothe‘nosteam’position,removetheplugfrom
the wall socket and let the iron cool down.
2 Wipeakesandanyotherdepositsoffthesoleplatewithadamp
clothandanon-abrasive(liquid)cleaningagent.
Tokeepthesoleplatesmooth,avoidhardcontactwithmetalobjects.
Neveruseascouringpad,vinegarorotherchemicalstocleanthe
soleplate.
3 Cleantheupperpartoftheironwithadampcloth.
4 Regularly rinse the water tank with water. Empty the water tank
afteryouhaverinsedit.
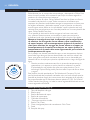
Calc-Clean System
- The Anti-Calc tablet prevents scale from clogging the steam vents. This
tablet is constantly active and does not need to be replaced.
- The Calc-Clean function removes the scale particles from the iron.
- The Calc-Clean reminder light reminds you to use the Calc-Clean
function after a certain period of use.
Tip: Use the Calc-Clean function every month (for specic types only, without
the Calc-Clean reminder light).
ENGLISH10

Calc-Clean reminder light (specic types only)
- After a certain period of use, the colour of the SmartLight changes to
amber. Then you need to perform the Calc-Clean process.
Tip: If the water in your area is hard (e.g. when akes come out of the
soleplate during ironing), use the Calc-Clean function more frequently.
Note: The SmartLight resets itself automatically and lights up blue the next
time you plug in the iron, even if you have not performed the Calc-Clean
process.
Donotputvinegarorotherdescalingagentsinthewatertank.
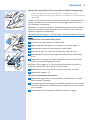
Using the Calc-Clean function
1 Make sure the appliance is unplugged.
2 Setthesteamsliderto‘nosteam’.
3 FillthewatertanktotheMAXlevel.
4 Insert the plug in an earthed wall socket.
5 WaitfortheSmartLighttolightupsteadily,thenunplugtheiron.
6 Holdtheironoverthesink,pressandholdtheCalc-Cleanbutton
andgentlyshaketheirontoandfro.
Note: Steam and boiling water come out of the soleplate. Impurities and akes
(if any) are ushed out.
7 ReleasetheCalc-Cleanbuttonassoonasallthewaterinthetank
hasbeenusedup.
8 Repeat steps 1 to 7.
After the Calc-Clean process
1 Puttheplugbackintothewallsocket,andlettheironheatuptolet
the soleplate dry.
2 WhentheSmartLightlightsupsteadily,movetheirongentlyovera
pieceofusedclothtoremoveanywaterstainsthatmayhaveformed
on the soleplate.
3 Unplugtheironandletitcooldownbeforeyoustoreit.
ENGLISH 11

Storage
1 Slidethesteamsliderto‘nosteam’.
2 Removetheplugfromthewallsocket.
3 Emptythewatertankandlettheironcooldowninasafeplace.
4 Windthemainscordaroundthecordwindingareaandxitwith
thecordclip.PutthemainscordbelowtheCordFixindicationto
ensure the mains cord does not touch the hot soleplate during
storage.
5 Storetheirononitsheelinasafeanddryplace.
Troubleshooting
This chapter summarises the most common problems you could have with
the appliance. If you are unable to solve the problem with the information
below, visit www.philips.com/support for a list of frequently asked
questions or contact the Consumer Care Centre in your country.
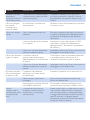
Problem Possiblecause Solution
The iron cannot
remove wrinkles from
the garment.
There is no steam during ironing. Put water inside the water tank. Set the
steam slider to MAX.
Water drips from the
soleplate after the iron
has been unplugged or
has been stored.
The steam slider is set to MAX. Set the steam slider to ‘no steam’.
You have put the iron in
horizontal position with water
still left in the water tank.
Empty the water tank.
The light on the iron is
amber instead of blue,
and keeps ashing.
The Calc-Clean reminder light
has been activated. This is a
regular reminder for you to
descale the appliance.
Perform the Calc-Clean process (see
chapter ‘Cleaning and maintenance’, section
‘Calc-Clean System’).
The SmartLight
pulsates slowly.
The Safety Auto-off mode is
active. The iron has switched
to standby mode (see chapter
‘Safety Auto-off’).
Move the iron to reactivate it. The iron
starts heating up again. Start ironing again
only when the SmartLight lights up steadily.
Dirty water and
impurities come out
of the soleplate during
ironing.
Hard water with impurities or
chemicals has formed akes
inside the soleplate.
Use the Calc-Clean function one or
more times (see chapter ‘Cleaning and
maintenance’, section ‘Calc-Clean System’).
The iron is plugged
in, but the soleplate is
cold.
There is a connection problem. Check the mains cord, the plug and the
wall socket.
ENGLISH12

Problem Possiblecause Solution
The iron does not
produce any steam.
There is not enough water in
the water tank.
Fill the water tank (see chapter ‘Preparing
for use’, section ‘Filling the water tank’.
The steam slider is set to ‘no
steam’.
Set the steam slider to MAX (see chapter
‘Preparing for use’, section ‘Steam settings’).
The iron is not hot enough yet
to produce steam.
Wait until the SmartLight has stopped
ashing and lights up steadily.
The iron does not
produce a steam boost.
You have used the steam boost
function too often within a very
short period.
Continue ironing in horizontal position
and wait a while before you use the steam
boost function again.
The iron is not hot enough yet
to produce a steam boost.
Wait until the SmartLight has stopped
ashing and lights up steadily.
Water droplets drip
onto the fabric during
ironing.
You have not closed the water
tank lid properly.
Press the lid until you hear a click.
You are ironing while the
SmartLight is blinking.
Wait until the SmartLight lights up steadily
before ironing.
You have put a chemical into the
water tank.
Rinse the water tank and do not put any
perfume or chemical into the water tank.
The iron leaves a shine
or an imprint on the
garment.
The surface to be ironed was
uneven, for instance because
you ironed over a seam or a
fold in the garment.
The iron is safe to use on all ironable
garments. The shine or imprint is not
permanent and disappears when you wash
the garment. Avoid ironing over seams or
folds. You can also place a cotton cloth over
the area to be ironed to avoid imprints.
ENGLISH 13

14
Introducción
Enhorabuena por la compra de este producto y bienvenido a Philips. Para
sacar el mayor partido de la asistencia que Philips le ofrece, registre su
producto en www.philips.com/welcome.
La nueva plancha de vapor Philips PerfectCare Azur le ofrece una forma
innovadora de planchar su ropa. Todos conocemos el esfuerzo que
requieren las planchas tradicionales: escoger la temperatura correcta para
los tejidos resistentes y delicados, esperar a que la plancha se caliente y
se enfríe para evitar daños en la ropa debido a que la plancha está muy
caliente. Estas complicaciones son cosa del pasado con la nueva plancha de
vapor Philips PerfectCare Azur.
En el pasado, la eliminación de las arrugas se hacía con una suela
muy caliente. Posteriormente, se introdujo el vapor para mejorar la
transferencia de calor, haciendo que planchar fuera mucho más rápido.
Nuestras investigaciones han conrmado que la mejor forma
de eliminar las arrugas de forma ecaz es una combinación
de vapor intenso con una temperatura óptima de la suela. La
clave para eliminar las arrugas de forma ecaz es el vapor, no
la temperatura de la suela. Para obtener un vapor óptimo, la
temperatura de la suela debe estar ligeramente por encima de
la temperatura del vapor.
En el pasado, una elevada cantidad de vapor a esta temperatura óptima
provocaba fugas de agua. Hemos desarrollado una exclusiva cámara de
vapor que genera una salida constante de vapor rico en humedad que
penetra bien en el tejido para planchar rápidamente sin riesgo de fugas de
agua.
- Planchar es ahora realmente sencillo: sin ajuste de temperatura, sin
quemaduras y sin esperar a que la plancha se caliente o se enfríe.
El planchado es más rápido, sea quien sea quien planche. Con la
tecnología OptimalTemp, podrá planchar toda la ropa de forma ecaz
y segura.
Esta plancha ha sido aprobada por The Woolmark Company Pty Ltd
para el planchado de productos realizados solo con lana, siempre que las
prendas se planchen según las instrucciones de la etiqueta de la prenda y
las proporcionadas por el fabricante de esta plancha, R1101. En el Reino
Unido, Irlanda, Hong-Kong y la India, la marca registrada Woolmark es una
marca registrada certicada.
Descripción general (g. 2)
1 Tapa del depósito de agua
2 Botón spray
3 Botón deslizante de vapor
4 Botón de supervapor
5 Cable de alimentación
6 Zona para enrollar el cable
7 Botón Calc-Clean
8 Piloto inteligente/piloto de recordatorio Calc-Clean
9 Suela
10 Boquilla del spray
ESPAÑOL

Preparación para su uso
Llenado del depósito de agua
1 Abralatapadeldepósitodeaguaylleneeldepósitohastala
indicaciónMAX.
Tipo de agua recomendada
Este aparato se ha diseñado para utilizarse con agua del grifo. Si vive en una
zona con agua dura, la cal se puede acumular rápidamente. Por lo tanto, es
recomendable utilizar agua destilada o desmineralizada para prolongar la
vida útil del aparato.
Nota: No eche en el depósito de agua perfume, vinagre, almidón, productos
desincrustantes, productos que ayuden al planchado ni otros productos
químicos, ya que el aparato no se ha diseñado para funcionar con estos
productos químicos.
Calentamiento
1 Conecteelaparatoaunenchufecontomadetierra.Elpiloto
inteligenteempiezaaparpadearenazulparaindicarquelaplanchase
está calentando.
2 Elpilotointeligenteseiluminaenazuldeformapermanentecuando
la plancha está lista para su uso.
Nota: Si el color del piloto inteligente es ámbar en lugar de azul, es un
recordatorio de que debe ejecutar la función Calc-Clean. Consulte la
sección “Cómo utilizar la función Calc-Clean” del capítulo “Limpieza y
mantenimiento”.
Tecnología OptimalTemp
La tecnología OptimalTemp le permite planchar toda clase de tejidos que
lo admitan, en cualquier orden, sin necesidad de ajustar la temperatura.
- Los tejidos con estos símbolos se pueden planchar, por ejemplo, el lino,
el algodón, el poliéster, la seda, la lana, la viscosa y el rayón.
- Los tejidos con este símbolo no se pueden planchar. Estos tejidos
incluyen tejidos sintéticos como el Spandex o el elastano, tejidos
mezclados con Spandex y poliolena (por ejemplo, el polipropileno).
Tampoco se puede planchar la ropa con impresiones.
- No planche tejidos que no se puedan planchar.
ESPAÑOL 15

Posiciones de vapor
Puede establecer diferentes posiciones de vapor con el control deslizante
de vapor:
- Sin vapor: para detener la salida de vapor cuando no se utiliza
la plancha.
Durante el planchado, elija siempre la posición ECO o MAX.
- ECO: (solo modelos especícos) para ahorrar energía, reduce la
salida de vapor, aunque el vapor sigue siendo suciente para planchar
las prendas.
- MAX: para establecer la salida de vapor máxima, una combinación
perfecta con el ajuste OptimalTemp.
Para obtener los mejores resultados y reducir el tiempo de planchado al
máximo, le recomendamos encarecidamente que planche todos los tejidos
que se pueden planchar con la posición de salida de vapor máxima.
1 Asegúresedequehayasucienteaguaeneldepósitodeagua.
2 Coloqueelcontroldeslizantedevaporenlaposicióndevapor
deseada.
Nota: La plancha empieza a producir vapor cuando el piloto inteligente se
ilumina en azul de forma continua.
Uso del aparato
Planchado
Con la tecnología OptimalTemp, puede planchar cada prenda de forma
ecaz y segura, incluso tejidos delicados como la seda, sin preocuparse por
las posiciones de temperatura.
1 Puedeempezaraplancharcuandoelpilotointeligentedejede
parpadearyseilumineenazuldeformacontinua(consultela
sección“Calentamiento”delcapítulo“Preparaciónparasuuso”).
Características
Función spray
Puede utilizar la función spray para humedecer la prenda que vaya a
planchar. Esto le ayudará a eliminar las arrugas rebeldes.
1 Asegúresedequehayasucienteaguaeneldepósitodeagua.
2 Pulsevariasveceselbotónsprayparahumedecerlaprendaque
vayaaplanchar.
ESPAÑOL16

Función supervapor
El supervapor de la suela ayuda a eliminar las arrugas más rebeldes.
El supervapor mejora la distribución del vapor en todas las zonas de
la prenda.
1 Pulseysuelteelbotóndesupervapor.
Para obtener un rendimiento óptimo del supervapor, es recomendable
pulsar el botón de supervapor a intervalos de 5 segundos.
Planchado con vapor adicional
1 Paraconseguirvaporadicionalduranteelplanchado,mantenga
pulsadoelbotóndesupervapor.
Supervapor vertical
También puede utilizar la función supervapor con la plancha en
posición vertical.
1 Sostengalaplanchaenposiciónvertical,pulseysuelteelbotónde
vaporytoquelaprendaligeramenteconlasuela.
Consejo: Tire de la prenda con una mano para estirarla y eliminar mejor
las arrugas.
Laplanchadesprendevaporcaliente.Noeliminelasarrugasdeuna
prendamientraslallevapuestausteduotrapersona.Paraevitar
quemaduras,nodirijaelvaporhaciapersonas.
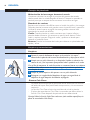
Desconexión automática de seguridad
Para ahorra energía, el aparato se apaga automáticamente si no se mueve
durante 2 minutos en posición horizontal u 3 minutos cuando está
colocado sobre su base de apoyo.
1 El piloto inteligente comienza a parpadear lentamente cuando el
mododedesconexiónautomáticadeseguridadestáactivado.
2 Paravolveraactivarlaplancha,solotienequemoverla.Elpiloto
inteligenteparpadeaenazulparaindicarquelaplanchaseestá
calentandoyseiluminadeformacontinuacuandolaplanchaestá
lista para su uso.
Nota: La plancha de vapor no se apaga completamente cuando está en modo
de desconexión automática de seguridad. Desenchufe la plancha
para apagarla.
ESPAÑOL 17

Consejos de planchado
Minimización de las arrugas durante el secado
Comience a eliminar las arrugas al principio del proceso de secado
distribuyendo bien la colada después de lavarla. Coloque las prendas en
perchas para que se sequen de forma natural con menos arrugas.
Planchado de camisas
Empiece con las zonas más difíciles, como el cuello, los puños y las mangas.
Después, planche las zonas más grandes, como la parte frontal y posterior.
Al hacerlo, evitará que se arruguen las zonas grandes mientras está
planchando las zonas más difíciles.
Cuello: Cuando planche un cuello, comience por la parte inferior y
planche desde el exterior (el extremo en punta) hacia dentro. Gire el
cuello y repita el proceso. Pliegue el cuello y presione el borde para
obtener un acabado rme.
Botones: Planche los botones del revés para obtener un planchado más
rápido y ecaz.
Limpieza y mantenimiento
Limpieza
1 Ajusteelcontroldeslizantedevaporenlaposición“sinvapor”,
desenchufelaplanchadelatomadealimentaciónydejequeseenfríe.
2 Limpieconunpañohúmedoyunlimpiadorlíquidonoabrasivolos
restosdecalylasimpurezasquepuedanhaberquedadoenlasuela.
Conelndemantenerlasuelalisa,eviteuncontactofuerteconobjetos
metálicos.Noutilicenuncaestropajos,vinagreniproductosquímicos
para limpiar la suela.
3 Limpie la parte superior del aparato con un paño húmedo.
4 Enjuagueconregularidadeldepósitodeaguaconagua.Vacíeel
depósitodeaguadespuésdehaberloenjuagado.
Sistema Calc-Clean
- La pastilla antical evita que las partículas de cal obstruyan los oricios
de salida del vapor. Esta pastilla está siempre activa y no es necesario
sustituirla.
- La función Calc-Clean elimina las partículas de cal de la plancha.
- El piloto de recordatorio Calc-Clean le recuerda que debe utilizar la
función Calc-Clean después de periodo de uso determinado.
Consejo: Utilice la función Calc-Clean cada mes (solo modelos especícos, sin
piloto de recordatorio Calc-Clean).
ESPAÑOL18

Botón de recordatorio Calc-Clean (solo modelos especícos)
- Después de un periodo de uso determinado, el color del piloto
inteligente cambia a ámbar. En ese momento debe realizar el proceso
Calc-Clean.
Consejo: Si el agua de su zona es dura (es decir, salen partículas de cal de la
suela durante el planchado), utilice la función Calc-Clean con mayor frecuencia.
Nota: El piloto inteligente se restablecerá automáticamente y se iluminará
en azul la próxima vez que enchufe la plancha, incluso si no ha realizado el
proceso Calc-Clean.
Noechevinagreniotrosagentesdesincrustanteseneldepósitodelagua.
Cómo utilizar la función Calc-Clean
1 Asegúresedequeelaparatoestádesenchufado.
2 Ajusteelcontroldeslizantedevaporenlaposición“sinvapor”.
3 LleneeldepósitodelaguahastaelnivelMAX.
4 Conecteelaparatoaunenchufecontomadetierra.
5 Espereaqueelpilotointeligenteseiluminedeformacontinuay
desenchufelaplancha.
6 Sujetelaplanchasobreelfregadero,mantengapulsadoelbotónCalc-
Cleanysacudasuavementeelaparatohaciadelanteyhaciaatrás.
Nota: De la suela saldrá vapor y agua hirviendo, arrastrando las impurezas y
las partículas de cal (si las hay).
7 SuelteelbotónCalc-Cleancuandosehayaagotadoelaguadel
depósito.
8 Repita los pasos del 1 al 7.
Una vez realizado el proceso Calc-Clean
1 Vuelvaaenchufarlaplanchaalatomadecorrienteydejequese
calienteparaquelasuelaseseque.
2 Cuandoelpilotointeligenteseiluminedeformacontinua,muevala
planchasobreuntrozodetelausadaparaeliminalasmachasdeagua
quepuedanhaberquedadoenlasuela.
3 Desenchufelaplanchaydejequeseenfríeantesdeguardarla.
ESPAÑOL 19

Almacenamiento
1 Desliceelcontroldeslizantedevaporalaposición“sinvapor”.
2 Desenchufelaclavijadelatomadecorriente.
3 Vacíeeldepósitodeaguaydejequelaplanchaseenfríeenunlugar
seguro.
4 Enrolleelcablederedalrededordelrecogecableyfíjeloconel
clipparaelcable.Coloqueelcabledereddebajodelaindicación
CordFixparaasegurarsedequenoestáencontactoconlasuela
durante el almacenamiento.
5 Guardelaplanchasobresubasedeapoyoenunlugarsecoyseguro.
Guía de resolución de problemas
En este capítulo se resumen los problemas más frecuentes que pueden
surgir con el aparato. Si no puede resolver el problema con la siguiente
información, visite www.philips.com/support para consultar una lista
de preguntas más frecuentes o póngase en contacto con el Servicio de
Atención al Cliente en su país.
Problema Posiblecausa Solución
La plancha no
elimina las arrugas
de la prenda.
No se produce vapor durante el
planchado.
Ponga agua en el interior del depósito. Ajuste
el control deslizante de vapor en la posición
MAX.
Salen gotas de
agua de la suela
después de
desenchufarla y
guardarla.
El control deslizante de vapor está
en la posición MAX.
Ajuste el control deslizante de vapor en la
posición “sin vapor”.
Se ha colocado la plancha en
posición horizontal cuando aún
quedaba agua en el depósito.
Vacíe el depósito de agua.
El piloto de la
plancha es ámbar
en lugar de
azul, y continúa
parpadeando.
Se ha activado el piloto de
recordatorio Calc-Clean. Es un
recordatorio regular para que
elimine los depósitos de cal del
aparato.
Utilice la función Calc-Clean (consulte la
sección “Sistema Calc-Clean” del capítulo
“Limpieza y mantenimiento”).
El piloto inteligente
parpadea
lentamente.
El modo de desconexión
automática de seguridad está activo.
Se ha activado el modo de espera
de la plancha (consulte el capítulo
“Desconexión automática de
seguridad”).
Mueva la plancha para volver a activarla.
La plancha empieza a calentarse de nuevo.
Comience a planchar otra vez cuando
el piloto inteligente se ilumine de forma
continua.
Salen agua sucia e
impurezas por la
suela al planchar.
El agua dura con impurezas o
productos químicos ha formado
depósitos de cal dentro de la suela.
Utilice la función Calc-Clean una o más
veces (consulte la sección “Sistema
Calc-Clean” del capítulo “Limpieza y
mantenimiento”).
ESPAÑOL20
La pagina si sta caricando...
La pagina si sta caricando...
La pagina si sta caricando...
La pagina si sta caricando...
La pagina si sta caricando...
La pagina si sta caricando...
La pagina si sta caricando...
La pagina si sta caricando...
La pagina si sta caricando...
La pagina si sta caricando...
La pagina si sta caricando...
La pagina si sta caricando...
La pagina si sta caricando...
La pagina si sta caricando...
La pagina si sta caricando...
La pagina si sta caricando...
La pagina si sta caricando...
La pagina si sta caricando...
-
 1
1
-
 2
2
-
 3
3
-
 4
4
-
 5
5
-
 6
6
-
 7
7
-
 8
8
-
 9
9
-
 10
10
-
 11
11
-
 12
12
-
 13
13
-
 14
14
-
 15
15
-
 16
16
-
 17
17
-
 18
18
-
 19
19
-
 20
20
-
 21
21
-
 22
22
-
 23
23
-
 24
24
-
 25
25
-
 26
26
-
 27
27
-
 28
28
-
 29
29
-
 30
30
-
 31
31
-
 32
32
-
 33
33
-
 34
34
-
 35
35
-
 36
36
-
 37
37
-
 38
38


Philips GC 4914 Manuale del proprietario
- Categoria
- Ferri da stiro
- Tipo
- Manuale del proprietario
in altre lingue
- English: Philips GC 4914 Owner's manual
- français: Philips GC 4914 Le manuel du propriétaire
- español: Philips GC 4914 El manual del propietario
Documenti correlati
-
Philips GC3106 Manuale utente
-
Philips GC2086/30 Manuale utente
-
Philips GC3320/32 Manuale utente
-
Philips GC3811/70 Manuale utente
-
Philips GC4887/30 Manuale utente
-
Philips GC4932/20 Manuale utente
-
Philips GC5036/20 Manuale utente
-
Philips GC2047 Manuale utente
-
-
Philips GC7842/40 Manuale del proprietario