Rowenta Slimline Manuale del proprietario
- Categoria
- Aspirapolvere
- Tipo
- Manuale del proprietario

Réf. 901242 • Rowenta France Siret 301859 880 000 33 • Sous réserve de modifications • Conception & réalisation : JPM & Associés • marketing-design-communication • 33 (0)3 80 56 28 11 • décembre 2005

TR
ES
NL
DE
GB
IT
FR
www.rowenta.com

français
DESCRIPTION . . . . . . . . . . . . . . . . . . . . . . . . . . . . . . . . . . . . . . . . . . . . . . . . . . . . 4
POUR VOTRE SÉCURITÉ
. . . . . . . . . . . . . . . . . . . . . . . . . . . . . . . . . . . . . 4
AVANT UTILISATION
. . . . . . . . . . . . . . . . . . . . . . . . . . . . . . . . . . . . . . . . . . 5
ASPIRATION
. . . . . . . . . . . . . . . . . . . . . . . . . . . . . . . . . . . . . . . . . . . . . . . . . . . . . . 5
RANGEMENT
. . . . . . . . . . . . . . . . . . . . . . . . . . . . . . . . . . . . . . . . . . . . . . . . . . . . . 5
ENTRETIEN ET NETTOYAGE
. . . . . . . . . . . . . . . . . . . . . . . . . . . . . . . 5
CONSEILS ET PRÉCAUTIONS
. . . . . . . . . . . . . . . . . . . . . . . . . . . . . 6
QUE FAIRE SI…
. . . . . . . . . . . . . . . . . . . . . . . . . . . . . . . . . . . . . . . . . . . . . . . . . . 6
italiano
DESCRIZIONE . . . . . . . . . . . . . . . . . . . . . . . . . . . . . . . . . . . . . . . . . . . . . . . . . . . . 7
PER LA VOSTRA SICUREZZA
. . . . . . . . . . . . . . . . . . . . . . . . . . . . . . 7
PRIMA DELL’USO
. . . . . . . . . . . . . . . . . . . . . . . . . . . . . . . . . . . . . . . . . . . . . . . 8
ASPIRARE
. . . . . . . . . . . . . . . . . . . . . . . . . . . . . . . . . . . . . . . . . . . . . . . . . . . . . . . . . . 8
RIPORRE
. . . . . . . . . . . . . . . . . . . . . . . . . . . . . . . . . . . . . . . . . . . . . . . . . . . . . . . . . . . . 8
PULIZIA E MANUTENZIONE
. . . . . . . . . . . . . . . . . . . . . . . . . . . . . . . 8
CONSIGLI E PRECAUZIONI
. . . . . . . . . . . . . . . . . . . . . . . . . . . . . . . . . 9
COSA FARE SE…
. . . . . . . . . . . . . . . . . . . . . . . . . . . . . . . . . . . . . . . . . . . . . . . 9
english
DESCRIPTION . . . . . . . . . . . . . . . . . . . . . . . . . . . . . . . . . . . . . . . . . . . . . . . . . . . 10
FOR YOUR SAFETY
. . . . . . . . . . . . . . . . . . . . . . . . . . . . . . . . . . . . . . . . . . 10
BEFORE USE
. . . . . . . . . . . . . . . . . . . . . . . . . . . . . . . . . . . . . . . . . . . . . . . . . . . . 11
VACUUMING
. . . . . . . . . . . . . . . . . . . . . . . . . . . . . . . . . . . . . . . . . . . . . . . . . . . . 11
STORING
. . . . . . . . . . . . . . . . . . . . . . . . . . . . . . . . . . . . . . . . . . . . . . . . . . . . . . . . . 11
MAINTENANCE AND CLEANING
. . . . . . . . . . . . . . . . . . . . . . . 11
HINTS AND PRECAUTIONS
. . . . . . . . . . . . . . . . . . . . . . . . . . . . . . 12
WHAT TO DO IF …
. . . . . . . . . . . . . . . . . . . . . . . . . . . . . . . . . . . . . . . . . . . 12
deutsch
GERÄTEBESCHREIBUNG . . . . . . . . . . . . . . . . . . . . . . . . . . . . . . . . . . 13
SICHERHEITSHINWEISE
. . . . . . . . . . . . . . . . . . . . . . . . . . . . . . . . . . . . 13
VOR DER BENUTZUNG
. . . . . . . . . . . . . . . . . . . . . . . . . . . . . . . . . . . . . 14
SAUGEN
. . . . . . . . . . . . . . . . . . . . . . . . . . . . . . . . . . . . . . . . . . . . . . . . . . . . . . . . . . 14
AUFBEWAHRUNG
. . . . . . . . . . . . . . . . . . . . . . . . . . . . . . . . . . . . . . . . . . . . 14
REINIGUNG UND PFLEGE
. . . . . . . . . . . . . . . . . . . . . . . . . . . . . . . . . 14
HINWEISE
. . . . . . . . . . . . . . . . . . . . . . . . . . . . . . . . . . . . . . . . . . . . . . . . . . . . . . . . 15
WAS MACHEN, WENN…
. . . . . . . . . . . . . . . . . . . . . . . . . . . . . . . . . . 15
nederlands
BESCHRIJVING . . . . . . . . . . . . . . . . . . . . . . . . . . . . . . . . . . . . . . . . . . . . . . . . 16
VOOR UW VEILIGHEID
. . . . . . . . . . . . . . . . . . . . . . . . . . . . . . . . . . . . . . 16
VÓÓR HET EERSTE GEBRUIK
. . . . . . . . . . . . . . . . . . . . . . . . . . . . 17
OM TE ZUIGEN
. . . . . . . . . . . . . . . . . . . . . . . . . . . . . . . . . . . . . . . . . . . . . . . . 17
OPBERGEN
. . . . . . . . . . . . . . . . . . . . . . . . . . . . . . . . . . . . . . . . . . . . . . . . . . . . . . 17
REINIGEN EN ONDERHOUDEN
. . . . . . . . . . . . . . . . . . . . . . . . . 17
RAADGEVINGEN EN VOORZORGSMAATREGELEN
. . . 18
WAT TE DOEN ALS…
. . . . . . . . . . . . . . . . . . . . . . . . . . . . . . . . . . . . . . . 18
español
DESCRIPCIÓN . . . . . . . . . . . . . . . . . . . . . . . . . . . . . . . . . . . . . . . . . . . . . . . . . . 19
PARA SU SEGURIDAD
. . . . . . . . . . . . . . . . . . . . . . . . . . . . . . . . . . . . . . 19
ANTES DE UTILIZAR
. . . . . . . . . . . . . . . . . . . . . . . . . . . . . . . . . . . . . . . . . 20
ASPIRAR
. . . . . . . . . . . . . . . . . . . . . . . . . . . . . . . . . . . . . . . . . . . . . . . . . . . . . . . . . . 20
ALMACENAMIENTO
. . . . . . . . . . . . . . . . . . . . . . . . . . . . . . . . . . . . . . . . . 20
MANTENIMIENTO Y LIMPIEZA
. . . . . . . . . . . . . . . . . . . . . . . . . . 20
CONSEJOS Y PRECAUCIONES
. . . . . . . . . . . . . . . . . . . . . . . . . . 21
QUÉ HACER SI…
. . . . . . . . . . . . . . . . . . . . . . . . . . . . . . . . . . . . . . . . . . . . . . 21
türçke
TANIMLAMA . . . . . . . . . . . . . . . . . . . . . . . . . . . . . . . . . . . . . . . . . . . . . . . . . . . . . 22
GÜVENL‹K ‹Ç‹N
. . . . . . . . . . . . . . . . . . . . . . . . . . . . . . . . . . . . . . . . . . . . . . . . . 22
KULLANMADAN ÖNCE
. . . . . . . . . . . . . . . . . . . . . . . . . . . . . . . . . . . . . . . 23
SÜPÜRME
. . . . . . . . . . . . . . . . . . . . . . . . . . . . . . . . . . . . . . . . . . . . . . . . . . . . . . . . . . 23
SAKLAMA
. . . . . . . . . . . . . . . . . . . . . . . . . . . . . . . . . . . . . . . . . . . . . . . . . . . . . . . . . . 23
TEM‹ZL‹K VE BAKIM
. . . . . . . . . . . . . . . . . . . . . . . . . . . . . . . . . . . . . . . . . . . . 23
‹PUÇLARI VE ÖNLEMLER
. . . . . . . . . . . . . . . . . . . . . . . . . . . . . . . . . . . . . 24
NE YAPMALIYIZ E⁄ER...
. . . . . . . . . . . . . . . . . . . . . . . . . . . . . . . . . . . . . . . 24

1
10
2
5
4
6
9
8
7
11 12 13 14 15
19
3
20
16 17 18

1
2
fig. 1
fig. 5
fig. 9
2
1
fig. 13
fig. 17
fig. 2
fig. 6
fig. 10
fig. 14
fig. 18
fig. 3
fig. 7
1
2
fig. 11
fig. 15
fig. 19
fig. 4
fig. 8
fig. 12
fig. 16
fig. 20

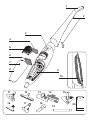
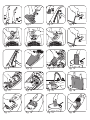
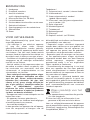
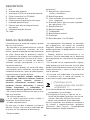
DESCRIPTION
1 Poignée
2 Range cordon rotatif
3 Commande marche/arrêt
et/ou variateur de puissance*
4 Filtre micro-actif (réf. ZR 0022)
5 Grille de sortie d’air
6 Filtre mousse de protection du moteur
7 Témoin de remplissage du sac*
8 Couvercle du compartiment sac
9 Compartiment sac
10 Cordon
Accessoires*
11
Suceur 2 positions* (sols lisses - moquettes)
12 Suceur parquet*
13 Grand suceur 2 positions* (sols lisses -
moquettes)
14 Semelle feutre* pour grand suceur
2 positions (13)*
15 Suceur Delta*
16 Suceur ameublement*
17 Turbo brosse*
18 Suceur plat*
19 Prolunga*
20 Sac papier* (réf. ZR 0022)
POUR VOTRE SÉCURITÉ
Lisez attentivement votre mode d’emploi et
conservez-le soigneusement.
• Votre aspirateur est un appareil électrique : il
doit être utilisé dans des conditions normales
d’utilisation. Utilisez et rangez l’appareil hors
de portée des enfants. Ne laissez jamais
l’appareil fonctionner sans surveillance. Ne
tenez pas le suceur ou l’extrémité du tube à
portée des yeux et des oreilles.
• Vérifiez que la tension d’utilisation (voltage)
de votre aspirateur corresponde bien à celle de
votre installation.
• Débranchez l’appareil en retirant la prise de
courant, sans tirer le cordon : immédiatement
après utilisation, avant chaque changement
d’accessoires, avant chaque nettoyage,
entretien ou changement de filtre.
• N’aspirez pas de surfaces mouillées, de
liquides quelle que soit leur nature, de
substances chaudes, de substances ultrafines
(plâtre, ciment, cendres…), de gros débris
tranchants (verre), de produits nocifs
(solvants, décapants...), agressifs (acides,
nettoyants ...), inflammables et explosifs (à
base d’essence ou d’alcool).
• Ne plongez jamais l’appareil dans l’eau, ne
projetez pas d’eau sur l’appareil et ne
l’entreposez pas à l’extérieur.
• N’utilisez pas l’appareil :
- s’il est tombé et présente des détériorations
visibles ou des anomalies de fonctionnement.
- si le cordon est défectueux.
Dans ce cas, n’ouvrez pas l’appareil mais
envoyez-le au Centre Service Agréé le plus
proche (voir ci-joint la liste des adresses).
• Les réparations ne doivent être effectuées
que par des spécialistes avec des pièces
détachées d’origine. Réparer un appareil soi-
même peut constituer un danger pour
l’utilisateur.
• L'ensemble enrouleur et cordon des
aspirateurs doit être remplacé impérativement
par un Centre Service Agréé car des outils
spéciaux sont nécessaires pour effectuer toute
réparation afin d’éviter un danger.
• Conformément à la réglementation en
vigueur, tout appareil hors d’usage doit être
rendu définitivement inutilisable : débranchez
et coupez le cordon avant de jeter l’appareil.
• Cet appareil est uniquement réservé à un
usage ménager et domestique, en cas
d’utilisation non appropriée ou non conforme
au mode d’emploi, aucune responsabilité ne
peut engager la marque.
Participons à la protection
de l’environnement !
Votre appareil contient de nombreux
matériaux valorisables ou recyclables.
Confiez celui-ci dans un point de collecte
pour que son traitement soit effectué.
Pour votre sécurité, cet appareil est conforme
aux normes et règlementations applicables
(Directives Basse Tension, Compatibilité
Electromagnétique, Environnement,...).
* Selon modèle
4
FR

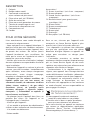
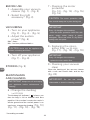
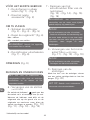
AVANT UTILISATION
1 • Assemblez votre
aspirateur (fig. 1) - (fig. 2)
2 • Sélectionnez le bon
accessoire* (fig. 2)
ASPIRATION
3 • Mettez en marche votre
aspirateur
(fig. 3) - (fig. 4) - (fig. 5)
4 • Réglez la puissance
d’aspiration* (fig. 6)
Max : sols
Min : mobilier, tissus fragiles…
5 • Arrêtez votre aspirateur
(fig. 7) - (fig. 8)
RANGEMENT (fig. 9)
ENTRETIEN ET NETTOYAGE
6 • Changez le sac
(ref ZR 0022)
Le témoin de remplissage du sac* vous
indique que le sac est plein ou saturé par
des poussières fines. Si la puissance
d’aspiration est faible, l’embout soulevé du
sol et la puissance d’aspiration réglée au
maximum, remplacez le sac.
(fig. 10)
(fig. 11) - (fig. 12) - (fig. 13)
7 • Nettoyez le filtre mousse
de protection moteur
(fig. 10) - (fig. 14) - (fig. 15)
(fig. 16)
8 • Remplacez le filtre
micro-actif (ref ZR 0022)
(fig. 17) - (fig. 18) - (fig. 19)
9 • Nettoyez votre aspirateur
Essuyez le corps de l’appareil et les
accessoires avec un chiffon doux et humide,
puis séchez. (fig. 20)
ATTENTION Ne faites jamais fonctionner
votre aspirateur sans sac et sans filtre.
IMPORTANT Arrêtez et débranchez
toujours votre aspirateur avant l’entretien ou
le nettoyage.
IMPORTANT
Tous les 10 changements de sacs :
- nettoyez le filtre mousse de protection du
moteur avec de l’eau savonneuse
(détergent doux) tiède. Rincez et laissez
sécher avant de le remettre en place.
ATTENTION Le filtre mousse de
protection du moteur doit toujours rester en
place lors de l’utilisation.
IMPORTANT N’utilisez pas de produits
agressifs, inflammables ou abrasifs.
* Selon modèle
5
IMPORTANT
Tous les 10 changements de sacs :
- remplacez le filtre micro-actif.
FR

* Selon modèle
6
CONSEILS ET PRÉCAUTIONS
Avant chaque utilisation, le cordon doit être déroulé complètement.
Ne le coincez pas et ne le passez pas sur des arêtes tranchantes.
Ne déplacez pas l’aspirateur en tirant sur le cordon, l’appareil doit être déplacé par sa poignée de
transport.
N’utilisez pas le cordon pour soulever l’appareil.
Si vous utilisez une rallonge, assurez-vous qu’elle est en parfait état et de section adaptée à la
puissance de votre aspirateur.
Ne débranchez jamais l’appareil en tirant sur le cordon.
Arrêtez et débranchez votre aspirateur après chaque utilisation.
N’utilisez que des accessoires, sacs et filtres d’origine Rowenta.
Vérifiez que tous les filtres sont bien en place.
Ne le faites jamais fonctionner sans sac et sans filtre.
En cas de difficultés pour obtenir sacs et filtres pour cet aspirateur, contactez le Service
Consommateurs Rowenta : ou [email protected]
QUE FAIRE SI…
IMPORTANT
Dès que votre aspirateur fonctionne moins bien et avant toute vérification : arrêtez-
le en tournant la commande marche/arrêt et débranchez-le.
Votre aspirateur ne démarre pas ou n'aspire pas.
• L’appareil n’est pas alimenté : vérifiez que l’appareil est correctement branché.
• Un accessoire ou le tube est bouché : débouchez l’accessoire ou le tube.
• Le couvercle est mal fermé : vérifiez la mise en place du sac et refermez le couvercle.
Votre aspirateur aspire moins bien, fait du bruit, siffle.
• Un accessoire ou le tube est partiellement bouché : débouchez l’accessoire ou le tube.
• Le sac est plein ou saturé par des poussières fines : remplacez le sac.
• Le filtre mousse et/ou le filtre micro-actif sont saturés : nettoyez le filtre mousse et remplacez le
filtre micro-actif.
• Le variateur de puissance* est en position min. : augmentez la puissance à l'aide du variateur
de puissance* (sauf si vous aspirez des tissus fragiles).
• Le suceur est difficile à déplacer : diminuez la puissance à l’aide du variateur de puissance.*
Le témoin de remplissage du sac* reste allumé.
• Le sac est saturé : remplacez le sac.
Si un problème persiste, confiez votre aspirateur au Centre Service Agréé Rowenta le plus
proche. Voir la liste des Centres Service Agréés Rowenta
ou contacter le Service Consommateur Rowenta .
FR

DESCRIZIONE
1 Impugnatura
2 Avvolgicavo
3 Comando acceso/spento
e/o variazione della potenza*
4 Filtro antibatterico (rif. ZR 0022)
5 Griglia d’uscita aria
6 Filtro-spugna di protezione motore
7 Indicatore sacco pieno*
8 Leva di apertura dello scomparto sacco
9 Scomparto sacco
10 Cavo
Accessori*
11 Spazzola combinata* (pavimenti/tappeti)
12 Spazzola parquet*
13 Ampia spazzola combinata due posizioni*
(pavimenti/tappeti)
14
Feltro* per
ampia spazzola combinata
due posizioni
(13)*
15 Spazzola Delta*
16 Bocchetta per imbottiti*
17 Turbospazzola*
18 Bocchetta piatta*
19 Prolunga*
20 Sacco carta* (rif. ZR 0022)
PER LA VOSTRA SICUREZZA
Leggete attentamente il presente manuale
d’uso/manutenzione e conservatelo con cura.
• Il vostro aspirapolvere va utilizzato nelle
condizioni normalmente previste per gli
apparecchi elettrici. Pertanto utilizzatelo e
riponetelo lontano dalla portata dei bambini.
Non lasciate mai funzionare l’apparecchio
senza sorveglianza. Non tenete mai le
bocchette o l’estremità del tubo vicino agli
occhi o alle orecchie.
• Verificate che la tensione d’utilizzo (voltaggio)
dell’apparecchio corrisponda bene a quella del
vostro impianto.
• L’apparecchio va staccato dalla corrente
(staccarlo dalla presa): subito dopo l’utilizzo,
prima di ogni sostituzione di accessori, prima
di ogni operazione di pulizia, manutenzione o
sostituzione di filtro.
• Non aspirare su superfici bagnate, liquidi di
qualsiasi natura, sostanze calde, sostanze
ultrafini (gesso, cemento, cenere, ecc.) grossi
detriti affilati (vetro), prodotti nocivi (solventi,
sverniciatori, ecc.), aggressivi (acidi, detersivi,
ecc.), infiammabili ed esplosivi (a base di
benzina o alcol).
• Non immergete mai l’apparecchio nell’acqua
e non lasciatelo all’aperto.
• Non utilizzate l’apparecchio se:
- è caduto e presenta danni visibili o anomalie
di funzionamento
- il cavo è difettoso
In questo caso non aprite l’apparecchio ma
inviatelo al più vicino Centro Assistenza
Tecnica Autorizzato (vedasi l’allegata lista degli
indirizzi).
•
Le riparazioni vanno effettuate esclusivamente
da specialisti e con ricambi originali. Riparare
da soli un apparecchio puo’ costituire un
pericolo per l’utente.
• Pertanto l’insieme avvolgicavo/cavo degli
apparecchi va tassativamente sostituito da un
Centro di Assistenza Tecnica Autorizzato.
• Conformemente alla regolamentazione in
vigore, ogni apparecchio fuori uso va reso
definitivamente inutilizzabile: staccare e
tagliare il filo prima di gettare l’apparecchio.
• La responsabilità del Marchio non sarà
coinvolta in caso d’utilizzo improprio o non
conforme alle istruzioni fornite.
Partecipiamo alla
protezione dell’ambiente !
Il vostro apparecchio è composto da
diversi materiali che possono essere
riciclati.
Lasciatelo in un punto di raccolta o presso
un Centro Assistenza Autorizzato.
Per garantire la vostra sicurezza, l'apparecchio
è conforme alle norme e ai regolamenti vigenti
(direttive sulla bassa tensione, compatibilità
elettromagnetica, ambiente, ecc.).
* Secondo il modello
7
IT

PRIMA DELL’USO
1 • Assemblate il vostro
aspirapolvere
(fig. 1) - (fig. 2)
2 • Scegliete l’accessorio
giusto* (fig. 2)
ASPIRARE
3 • Mettete in funzione il
vostro aspirapolvere
(fig. 3) - (fig. 4) - (fig. 5)
4 • Regolate la potenza
d’aspirazione* (fig. 6)
Max : pavimenti
Min : mobili, tessuti delicati…
5 • Spegnete il vostro
aspirapolvere
(fig. 7) - (fig. 8)
RIPORRE (fig. 9)
PULIZIA E MANUTENZIONE
6 •
Cambiate il sacco (rif ZR 0022)
L’indicatore di sacco pieno* vi indica che
il sacco è pieno o saturo di polvere. Se
l’indicatore rimane acceso, sostituite il sacco
(senza il tubo e con la potenza sul livello
max).
(fig. 10) - (fig. 11) - (fig. 12)
(fig. 13)
7 • Pulite il filtro di
gommapiuma
di protezione motore
(fig. 10) - (fig. 14) - (fig. 15)
(fig. 16)
8 • Sostituite il filtro
microattivo
(ref ZR 0022)
(fig. 17) - (fig. 18) - (fig. 19)
9 • Pulite il vostro
aspirapolvere
Pulite il corpo dell'aspirapolvere con un
panno morbido umido e lasciar asciugare.
(fig. 20)
ATTENZIONE L’apparecchio non deve
mai funzionare senza sacco e senza filtri.
IMPORTANTE L’apparecchio va sempre
spento e staccato dalla corrente prima della
pulizia o della manutenzione.
IMPORTANTE
Ogni 10 sostituzioni dei sacchetti:
- pulite la gommapiuma protettiva con acqua
tiepida e sapone (o detergente delicato).
Sciacquate, asciugate e rimettete a posto.
ATTENZIONE La gommapiuma protettiva
deve sempre rimanere nella sua sede
durante l’utilizzo.
IMPORTANTE Non utilizzate prodotti
aggressivi o abrasivi.
* Secondo il modello
8
IMPORTANTE
Ogni 10 sostituzioni dei sacchetti:
- sostituite il filtro microattivo.
IT

COSA FARE SE …
IMPORTANTE
Se l’aspirapolvere non funziona bene e prima di ogni verifica : spegnerlo
premendo sul comando acceso/spento, scollegarlo.
Il vostro aspirapolvere non si accende o non aspira.
• L’apparecchio non è alimentato: verificate che l’apparecchio sia collegato correttamente.
• Un accessorio o il flessibile è intasato: disintasate l’accessorio o il flessibile.
• Il coperchio non è ben chiuso: verificate che il sacchetto sia posizionato correttamente e
richiudete il coperchio.
Il vostro aspirapolvere aspira meno, fa rumore, emette fischi.
• Un accessorio o il flessibile sono parzialmente intasati: sturate l’accessorio o il flessibile.
• Il sacco è pieno o saturo di polveri fini: sostituite il sacco o svuotate il sacco in tessuto.
• I filtri di gommapiuma e il filtro micro-attivo sono saturi: pulite i filtri di gommapiuma e
cambiate il filtro microattivo.
• Il regolatore di potenza* è in posizione min. : aumentate la potenza tramite il regolatore di
potenza* (salvo che stiate aspirando su tessuti delicati).
• La bocchetta si sposta difficilmente: diminuite la potenza con il cursore del variatore di potenza.*
La spia di riempimento del sacco* rimane rossa.
• Il sacco è saturo : sostituite il sacco.
Se il problema persiste, portate il vostro aspirapolvere presso un Centro Assistenza Tecnica
Autorizzato Rowenta più vicino.
Consultare l'elenco dei centri assistenza autorizzati o contattare il Servizio Consumatori
Tel. 024528181
* Secondo il modello
9
CONSIGLI E PRECAUZIONI
Prima di ogni utilizzo, il cavo va srotolato completamente.
Non bloccatelo e non fatelo passare su profili taglienti.
Non spostate l’aspirapolvere tirandolo per il cavo, l’apparecchio deve essere spostato
impugnando l’apposita maniglia di trasporto.
Non utilizzate il cavo per sollevare l’apparecchio.
Se utilizzate una prolunga, verificate che sia in perfette condizioni e che abbia una sezione adatta
alla potenza del vostro aspirapolvere.
Non esercitate trazioni sul cavo per staccarlo dalla presa di corrente.
Spegnete e scollegate l'aspiratore dopo ogni utilizzo.
Utilizzate soltanto accessori e filtri originali Rowenta.
Verificare se tutti i filtri sono al loro posto.
L’apparecchio non deve mai funzionare senza sacco e senza filtri.
Nel caso vi fosse difficile reperire sacchi carta o filtri per questo apparecchio, contattate il Servizio
Consumatori Rowenta : Tel 02 45 71 24 17
IT

DESCRIPTION
1 Handle
2 Rotating cord tidy
3 On/off switch and/or power control*
4 Micro-active filter (ref. ZR 0022)
5 Air outlet grid
6 Engine foam-filter protection
7 Dustbag full indicator*
8 Dustbag compartment opening
9 Dustbag compartment
10 Cord
Accessories*
11 2 positions floor head* (floors - carpets)
12 Wooden flooring nozzle*
13 Large suction nozzle with 2 positions*
(smooth floors - carpets)
14 Felt base* for large suction nozzle
with 2 positions (13)*
15 Delta nozzle*
16 Furniture nozzle*
17 Turbo-brush*
18 Crevice tool*
19 Prolunga*
20 Paper dustbag* (ref. ZR 0022)
FOR YOUR SAFETY
Read the instructions carefully and keep them
in a safe place.
• Your vacuum cleaner is an electrical
appliance: it must only be used under normal
operating conditions. The appliance should be
used and stored out of the reach of children.
Never leave the appliance unattended when
switched on. Always keep nozzles and tube
ends away from eyes and ears.
• Make sure that the operating voltage of your
vacuum cleaner is the same as your supply
voltage.
• Unplug the appliance by removing the plug
from the power outlet, without pulling the
supply cord: immediately after use, before
changing any accessories, before cleaning,
maintenance or changing the filter.
• Do not vacuum wet surfaces, any kinds of
liquids, hot substances, ultra-fine particles
(plaster, cement, ash, etc.) large, sharp debris
(glass) dangerous products (solvents,
stripping compounds etc.), chemical products
(acid, cleaning fluids, etc), inflammable or
explosive products (petrol- or alcohol-based).
• Do not immerse the appliance in water, and
do not store it outdoors.
• Do not use the appliance, if:
- it has been dropped, and shows visible signs
of damage or functions abnormally,
- the supply cord is defective.
If this is the case, do not open the appliance
but contact an authorised service center (see
overleaf).
• Repairs should only be carried out by
specialists using original replacement parts. It
is dangerous to try to repair an appliance by
yourself and will negate the guarantee.
• Vacuum cleaner supply cords and winding
systems must, in all cases, be replaced by our
Approved Service Centre, as special tools are
needed to avoid accidents during repairs.
• In accordance with current legislation, before
disposing of an appliance no longer in use, the
appliance should be made non-operational by
unplugging it and cutting off the electricity
supply cord.
• This appliance is designed for domestic use
only. In case of any professional or
inappropriate use or failure to comply with the
instructions, the manufacturer accepts no
responsibility and the guarantee will no longer
apply.
Environment protection
first !
Your appliance contains valuable materials
which can be recovered or recycled.
Leave it at a local civic waste collection
point.
For your safety, this appliance conforms to the
applicable standards and regulations (Low
Voltage, Electromagnetic Compatibility,
Environmental, etc. Directives)
* According to model
10
GB

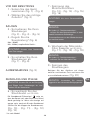
BEFORE USE
1 • Assemble your vacuum
cleaner (fig. 1) - (fig. 2)
2 • Select the right
accessory* (fig. 2)
VACUUMING
3 • Turn on your appliance
(fig. 3) - (fig. 4) - (fig. 5)
4 • Adjust the suction
power* (fig. 6)
Max : floors
Min : furniture, delicate fabrics…
5 • Turn off your appliance
(fig. 7) - (fig. 8)
STORING (fig. 9)
MAINTENANCE
AND CLEANING
6 • Change the dustbag
(ref ZR 0022)
The dustbag full indicator* informs you
that the bag is full or blocked with dust
particles. If the suction is weak, the nozzle is
off the ground and the suction power is on
maximum, change the dustbag.
(fig. 10)
(fig. 11) - (fig. 12) - (fig. 13)
7 • Cleaning the motor
protection
(fig. 10) - (fig. 14) - (fig. 15)
(fig. 16)
8 • Replacing the micro-
active filter (ref ZR 0022)
(fig. 17) - (fig. 18) - (fig. 19)
9 • Cleaning your vacuum
clean
Clean the housing of the vacuum cleaner
with a soft and humid cloth and let dry.
(fig. 20)
CAUTION Never turn the appliance on
without a dustbag and filters.
IMPORTANT Always turn off and unplug
your appliance before maintenance or
cleaning.
IMPORTANT
Every 10 changes of the dustbag:
- clean the motor protection foam filter with
warm, soapy water (using a gentle
detergent). Rinse and leave to dry before
putting back into place.
CAUTION
The motor protection foam
filter should always be in place during use.
IMPORTANT Do not use strong,
inflammable or abrasive cleaning products.
* According to model
11
IMPORTANT
Every 10 changes of the dustbag:
- replace the micro-active filter.
GB

WHAT TO DO IF…
IMPORTANT
As soon as your vacuum cleaner starts to malfunction, and before performing any
checks: stop the appliance by pressing the start/stop switch and unplug it.
Your vacuum cleaner will not start or does not suck.
• The appliance is not connected: check that the appliance is correctly plugged in.
• Either a tool or the tube is blocked: unblock the tool or the tube.
• The lid was not closed properly: check that the bag is properly installed and close the lid again.
Your vacuum cleaner’s suction power is defective, noisy, whistles.
• A tool or the hose is partially blocked: unblock the tool or the tube.
• The dustbag is full or blocked with fine dusts: replace the dustbag.
• A foam filter and/or the micro-active filter are saturated: clean the foam filters and replace the
micro-active filter.
• The power control* is in the min. position: increase power using the power control* (except
when vacuuming delicate fabrics).
• The nozzle is difficult to remove: reduce its power with the cursor of the power control.*
The dustbag full indicator* remains lit.
• The bag is full: replace the bag.
If a problem persists, take the appliance to the nearest Rowenta Authorised Service Centre.
See the list of Rowenta Authorised Service Centres or contact the Rowenta Consumer Service:
0 845 602 1454 - UK / (01) 4751947 - IRELAND
* According to model
12
HINTS AND PRECAUTIONS
Before each use the supply cord should be completely unwound.
Do not allow it to become trapped or be pulled over sharp edges.
Do not move the vacuum cleaner by pulling its cord, the appliance must be moved by its carrying
handle.
Never lift the appliance by its cord.
If you use an extension cord, make sure that it is in perfect condition and appropriate to the
power rating of your appliance.
Never unplug the appliance by pulling on the cord.
Stop and unplug the appliance after each use.
Only use original Rowenta accessories.
Check that all the filters are properly in place.
Never turn the appliance on without a dustbag and filters.
If you encounter any difficulties in obtaining dustbags and filters for this appliance, please
contact Rowenta Helpline:
0845 602 1454 - UK (01) 4751947 - IRELAND
or visit our web site : www.rowenta.uk.co
GB

GERÄTEBESCHREIBUNG
1 Griff
2 Kabelaufwicklung
3 Ein-/Ausschalter und/oder
Saugkraftregulierung*
4 Microaktiv-Filter (ref. ZR 0022)
5 Abluftgitter
6 Motorschutzfilter
7 Staubbeutelfüllanzeige*
8 Öffnungstaste Staubbeutelfach
9 Staubbeutelfach
10 Netzkabel
Zubehör*
11 Umschaltbare Bodensaugdüse*
(glatte Böden - Teppichboden)
12 Parkettdüse*
13 Grosse Bodendüse mit 2 Positionen*
(glatte Böden - Teppichboden)
14 Filzsohle* für grosse Bodendüse mit 2
Positionen (13)*
15 Delta Düse*
16 Polsterdüse*
17 Turbobürste*
18 Fugendüse*
19 Saugrohr*
20 Papierstaubbeutel* (ref. ZR 0022)
SICHERHEITSHINWEISE
Gebrauchsanweisung aufmerksam durchlesen
und sorgfältig aufbewahren.
• Ihr Staubsauger ist ein Elektrogerät:
er muß unter Beachtung der üblichen
Nutzungsbedingungen verwendet werden.
Das Gerät von Kindern fernhalten und nie
ohne Aufsicht betreiben.
Saugen Sie nie Personen oder Tiere ab und
bringen Sie das Saugrohr und den
Saugschlauch nie in Kopfnähe, wenn das
Gerät in Betrieb ist.
• Das Gerät nur an Wechselstrom mit
Spannung (Volt) gemäß dem Typenschild
anschließen.
• Den Netzstecker ziehen ohne die Zuleitung zu
ziehen: unmittelbar nach dem Benutzen, vor
jedem Zubehör- und Filterwechsel, vor jeder
Reinigung und Pflege.
• Zuleitung und Verlängerungskabel muss so
verlegt warden, dass sich keine Stolperfalle
bildet.
• Saugen Sie niemals feuchte oder nasse
Flächen, weder jegliche Flüssigkeiten, heisse
Substanzen, extrem feine Staubpartikel (Gips,
Zement, Asche…), grosse, spitze oder
schneidende Gegenstände (Glas), schädliche
Stoffe (Lösungs- oder Beizmittel…),
aggressive Stoffe (Säure, Reinigunsmittel…),
entflammbare oder explosive Stoffe (benzin-
oder alkoholhaltig).
• Staubbeutel sind Einwegartikel und dürfen
nicht mehrfach verwendet warden.
• Das Gerät nicht in Wasser tauchen oder darin
betreiben. Nicht im Freien aufbewahren.
• Das Gerät ist nur für den Hausgebrauch.
• Das Gerät nicht in Betrieb nehmen, wenn:
- nach einem Sturz, Verdacht auf einen Defekt
oder auf Funktionsstörungen besteht.
- Die Zuleitung sichtbare Schäden aufweist.
Jeder Eingriff außer der im Haushalt üblichen
Reinigung und Pflege muss durch den
ROWENTA Kundendienst erfolgen (siehe
beiliegenden Service-Spiegel).
• Reparaturen dürfen nur von Fachkräften
unter Verwendung von Original-Ersatzteilen
des Herstellers durchgeführt werden. Selbst
ausgeführte Reparaturen sind eine
Gefahrenquelle für den Benutzer und haben
einen Garantieausschluss zur Folge.
• Die komplette Kabelautomatik mit Zuleitung
darf nur in einer Rowenta Service-Stelle
ausgetauscht werden.
• Entsprechend den geltenden Vorschriften, ist
das ausgediente Gerät sofort unbrauchbar zu
machen: Netzstecker ziehen, Zuleitung
abschneiden und einer ordnungsgemäßen
Entsorgung zuzuführen.
• Wird das Gerät zweckentfremdet, falsch
bedient oder nicht fachgerecht repariert, kann
keine Haftung für eventuelle Schäden
übernommen werden.
Denken Sie an den Schutz
der Umwelt !
Ihr Gerät enthält wertvolle Rohstoffe, die
wieder verwertet werden können.
Geben Sie Ihr Gerät deshalb bitte bei einer
Sammelstelle Ihrer Stadt oder Gemeinde ab.
Um Ihre Sicherheit zu gewährleisten,
entspricht dieses Gerät den anwendbaren
Normen und Bestimmungen (Bestimmungen
über Niederspannung, elektromagnetische
Verträglichkeit und Umweltschutz).
* Je nach Modell
13
DE

VOR DER BENUTZUNG
1 •
Setzen Sie das Gerät
zusammen (fig. 1) - (fig. 2)
2 • Wählen Sie das richtige
Zubehör* (fig. 2)
SAUGEN
3 • So bedienen Sie Ihren
Staubsauger
(fig. 3) - (fig. 4) - (fig. 5)
4 • Regeln Sie die
Saugleistung* (fig. 6)
Max : Böden
Min : Möbel, empfindliche Stoffe…
5 • So schalten Sie Ihren
Staubsauger ab
(fig. 7) - (fig. 8)
AUFBEWAHRUNG (fig. 9)
REINIGUNG UND PFLEGE
6 • So wechseln Sie den
Staubbeutel (ref ZR 0022)
Die Staubbeutel-Füllanzeige* zeigt an,
dass der Beutel voll, oder durch sehr feinen
Staub gesättigt ist. Wenn die Anzeige auf
orange steht, wechseln Sie den Staubbeutel
(Öffnen Sie die Klappe der Staubkammer).
(fig. 10) - (fig. 11) - (fig. 12)
(fig. 13)
7 • Reinigung des
Motorschutzfilters
(fig. 10) - (fig. 14) - (fig. 15)
(fig. 16)
8 • Wechseln der Mikroaktiv-
Filter Kassette
(ref ZR 0022)
(fig. 17) - (fig. 18) - (fig. 19)
9 • Reinigen des
Staubsaugers
Reinigen Sie das Gehäuse mit einem
weichen und feuchten Tuch und lassen Sie
es anschließend trocknen. (fig. 20)
ACHTUNG Niemals ohne Staubbeutel
oder Filter saugen.
WICHTIG Schalten Sie vor der Reinigung
und Pflege Ihren Staubsauger ab, und
ziehen Sie den Netzstecker.
WICHTIG
Bei jedem 10. Staubbeutelwechsel :
- reinigen Sie den Motorschutzfilter in einer
sanften lauwarmen Seifenlauge.
Gut ausspülen und vor dem Wiedereinsetzen
gut trocknen lassen.
ACHTUNG Nie ohne Schaumstofffilter
saugen.
WICHTIG Verwenden Sie niemals
aggressive oder scheuernde Reinigungsmittel.
* Je nach Modell
14
WICHTIG
Bei jedem 10. Staubbeutelwechsel :
- wechseln Sie den Mikroaktiv-Filter.
DE

WAS MACHEN, WENN…
WICHTIG Sobald der Staubsauger nicht vorschriftsmässig funktioniert oder einer Überprüfung
unterzogen werden muß : ist der Staubsauger auszuschalten und der Netzstecker zu ziehen.
Ihr Staubsauger schaltet sich nicht ein, saugt nicht.
• Das Gerät ist nicht an das Stromnetz angeschlossen: prüfen Sie, ob das Gerät korrekt
angeschlossen ist.
• Ein Zubehörteil oder der Saugschlauch sind verstopft: entfernen Sie die Verstopfung.
• Der Deckel ist nicht richtig geschlossen: überprüfen Sie die Lage des Staubbeutels und machen
Sie dann den Deckel zu.
Ihr Staubsauger saugt weniger und macht ein aussergewöhnlich pfeifendes Geräusch.
• Ein Zubehörteil oder der Saugschlauch sind teilweise verstopft: entfernen Sie die Verstopfung.
• Der Staubbeutel ist voll oder durch sehr feinen Staub gesättigt: setzen Sie einen neuen
Staubbeutel ein.
• Der Schaumstofffilter und/oder der Mikro-Aktivfilter sind gesättigt: reinigen Sie die
Schaumstofffilter und erneuern Sie den Mikro-Aktivfilter.
• Die Saugkraftregulierung* ist auf minimaler Position: erhöhen Sie die Saugkraft anhand der
Regulierung* (ausser beim Saugen von sehr empfindlichen Stoffen oder Flächen).
• Die Düse hat sich festgesaugt: reduzieren Sie die Leistung an der Saugkraftregulierung des
Geräts.*
Die Staubfüllanzeige* bleibt rot.
• Der Staubbeutel ist voll: setzen Sie einen neuen Staubbeutel.
Falls ein Problem weiterhin besteht, reichen Sie das Gerät an eine Rowenta Service Stelle weiter.
Sehen Sie im Rowenta Service Spiegel nach oder kontaktieren Sie unseren Rowenta
Kundendienst.
* Je nach Modell
15
HINWEISE
Vor jedem Gebrauch, Zuleitung vollständig abrollen.
Zuleitung nicht einklemmen und nicht über heiße Flächen und scharfe Kanten ziehen.
Ziehen Sie nicht am Stromkabel, um den Staubsauger zu bewegen, das Gerät am Tragegriff
hochheben und bewegen.
Verlängerungskabel nur dann verwenden, wenn Sie sich vorher von deren einwandfreiem
Zustand überzeugt haben und diese der Leistung des Gerätes entsprechen.
Nach jedem Gebrauch das Gerät ausschalten und den Netzstecker ziehen.
Den Stecker nie an der Zuleitung aus der Steckdose ziehen.
Benutzen Sie nur Original-Zubehör von Rowenta.
Überprüfen Sie die richtige Positionierung aller Filter.
Niemals ohne Staubbeutel und Filter saugen.
Wenn Sie Probleme haben Staubbeutel oder Ersatzfilter zu erhalten wenden Sie sich bitte an den
ROWENTA Kundendienst.
DE

BESCHRIJVING
1 Handgreep
2 Draaiende snoerkast
3 Aan/Uit-schakelaar
en/of zuigkrachtregeling*
4 Micro-actief filter (ref. ZR 0022)
5 Luchtuitlaatrooster
6
Schuimrubberen beschermfilter van de motor
7 Stofzak-vol-indicator*
8 Openingsgreepje van de stofzakruimte
9 Stofzakruimte
10 Snoer
Toebehoren*
11
Zuigmond met 2 standen* (vloeren-kleden)
12 Vloermondstuk*
13 Groot zuigmondstuk 2 standen*
(gladde vloeren-tapijt)
14 Vilten zool* voor het grote zuigmondstuk
met 2 standen (13)*
15 Delta zuigmond*
16 Meubelzuigmond*
17 Turboborstel*
18 Spleetzuigmond*
19 Prolunga*
20 Papieren stofzak* (ref. ZR 0022)
VOOR UW VEILIGHEID
Deze gebruiksaanwijzing goed lezen en
zorgvuldig bewaren.
• Uw stofzuiger is een elektrisch apparaat:
hij mag dus alleen onder normale
gebruiksomstandigheden worden gebruikt.
Gebruik en berg het apparaat op buiten bereik
van kinderen. Laat hem nooit zonder toezicht
aanstaan. Houd de zuigmond of het uiteinde van
de zuigbuis nooit in de buurt van ogen of oren.
• Controleer of de gebruiksspanning (voltage)
aangegeven op de stofzuiger overeenkomt
met die van uw lichtnet.
• Haal de stekker uit het stopcontact door aan
de stekker te trekken: direct na gebruik, vóór
het verwisselen van accessoires, vóór elke
schoonmaak- of onderhoudsbeurt en het
schoonmaken van het filter.
• Geen vochtige of natte oppervlakken zuigen.
Verder niet opzuigen: vloeistoffen van welke
aard dan ook, warme stoffen/substanties,
bijzonder fijne substanties (bv. gips, kalk,
cement, as e.d.), grove, scherpe scherven (bv.
glas of glas-splinters), schadelijke stoffen (bv.
oplos- of afbijtmiddelen), agressieve
producten (bv. zuren, schoonmaakproducten
e.d.) en ontvlambare of explosieve producten
(op basis van benzine of alcohol).
• Het apparaat nooit in water dompelen en niet
buiten laten staan.
• Dit apparaat niet meer gebruiken als:
- het is gevallen en zichtbare beschadigingen
of werkingsstoornissen vertoont,
- het snoer beschadigd is.
In deze gevallen het apparaat niet zelf openen,
maar het terugsturen of brengen naar de
dichtstbijzijnde servicedienst van Rowenta (zie
garantiebewijs voor adressen).
• Reparaties mogen uitsluitend uitgevoerd
worden door vakmensen en met gebruik van
originele onderdelen. Het zelf repareren van
een apparaat kan gevaar voor de gebruiker
inhouden en zal de garantie doen vervallen.
• Reparaties zoals het vervangen van het snoer
of het opwikkelsysteem mogen uitsluitend
uitgevoerd worden door een door Rowenta
erkend reparateur aangezien speciaal
gereedschap nodig is en om ongelukken
tijdens reparatie te voorkomen.
• Overeenkomstig de wetgeving in uw land,
dient een apparaat dat niet meer gebruikt
wordt niet-operationeel te worden gemaakt
door de stekker uit het stopcontact te halen en
het snoer door te knippen.
• Dit apparaat is uitsluitend bedoeld voor
normaal huishoudelijk gebruik. In geval van
onjuist gebruik of gebruik niet overeenkomstig
de gebruiksaanwijzing accepteert de fabrikant
geen verantwoordelijkheid voor eventuele
schade of reparatie.
Wees vriendelijk voor het
milieu !
Uw apparaat bevat materialen die geschikt
zijn voor hergebruik.
Lever het in bij het milieustation in uw
gemeente of bij onze technische dienst.
Voor uw veiligheid beantwoordt dit apparaat
aan de toepasselijke normen en regelgevingen
(Richtlijnen Laagspanning, Elektromagnetische
Compatibiliteit, Milieu…)
* Afhankelijk van het model
16
NL

VÓÓR HET EERSTE GEBRUIK
1 •
De stofzuiger in elkaar
zetten
(fig. 1) - (fig. 2)
2 • Kies het juiste
accessoire* (fig. 2)
OM TE ZUIGEN
3 • Schakel de stofzuiger
(fig. 3) - (fig. 4) - (fig. 5)
4 •
Regel de zuigkracht* (fig. 6)
Max : vloeren
Min : meubels, tere stoffen…
5 • De stofzuiger uitschakelen
(fig. 7) - (fig. 8)
OPBERGEN (fig. 9)
REINIGEN EN ONDERHOUDEN
6 •
Vervangen van de stofzak
(ref ZR 0022)
De stofzak-vol-indicator* geeft aan dat
de stofzak vol is of verzadigd met fijn stof.
Wanneer de indicator rood blijft als de
zuigmond niet op de grond rust en de
zuigkracht op maximum staat, dient de
stofzak vervangen te worden.
(fig. 10)
(fig. 11) - (fig. 12) - (fig. 13)
7 • Reinigen van het
schuimrubber filter van de
luchtinlaat
(fig. 10) - (fig. 14) - (fig. 15)
(fig. 16)
8 • Vervangen van het micro-
actief filter
(ref ZR 0022)
(fig. 17) - (fig. 18) - (fig. 19)
9 • Reinigen van de
stofzuiger
Maak het huis van de stofzuiger schoon
met een zachte vochtige doek en laat het
drogen. (fig. 20)
BELANGRIJK Gebruik het apparaat
nooit zonder filter en stofzak.
LET OP Voor de onderhouds- of
reinigingsbeurt altijd eerst de stofzuiger
uitschakelen en de stekker uit het
stopcontact trekken.
LET OP
Bij het verwisselen van elke 10e stofzak :
- maak het schuimfilter ter bescherming van
de motor beide schoon in een lauw sopje
van water met een zacht reinigingsmiddel.
Uitspoelen, laten drogen en weer
aanbrengen.
BELANGRIJK Het beschermende
schuimfilter van de motor moet tijdens
gebruik altijd op zijn plaats blijven.
LET OP Gebruik nooit ontvlambare of
schurende schoonmaakmiddelen.
* Afhankelijk van het model
17
LET OP
Bij het verwisselen van elke 10e stofzak :
- vervangen van het micro-actief filter.
NL

WAT TE DOEN ALS…
LET OP Zodra u merkt dat uw stofzuiger minder goed begint te werken en voordat u hem op
voorgaande punten nakijkt: zet hem uit door de aan/uit-knop in te drukken ; trek de stekker uit het
stopcontact.
Uw stofzuiger slaat niet aan. Uw stofzuiger zuigt niet.
• Het apparaat is niet op het stroomnet aangesloten: controleer of de stekker zich goed in het
stopcontact bevindt.
• Een accessoire of de zuigslang is verstopt: ontstop het accessoire of de zuigslang.
• Het deksel is slecht gesloten: controleer of de zak goed op zijn plaats zit en sluit het deksel.
Uw stofzuiger zuigt minder goed, maakt lawaai, fluit.
• Een accessoire of de zuigslang is gedeeltelijk verstopt: ontstop het accessoire of de zuigslang.
• De stofzak zit vol of is verzadigd door fijn stof: de stofzak vervangen.
• Een schuimfilter en/of het micro-actief filter zijn verzadigd: reinig de schuimfilter en vervang het
micro-actief filter.
• De zuigkrachtregeling* staat op de minimum stand: stel de zuigkracht hoger in met behulp van
de regelaar* (behalve bij het zuigen van tere weefsels).
• De zuigmond schuift moeilijk: zet de zuigkracht in een lagere stand.*
De stofzak-vol-indicator* blijft rood.
• De stofzak is vol: vervang de stofzak.
Indien het probleem zich blijft voordoen, stuur uw stofzuiger op of breng hem naar de
dichtstbijzijnde servicedienst van Rowenta. Zie hiervoor de bijgevoegde Rowenta servicelijst of
neem rechtstreeks contact op met de consumentenservice van Rowenta.
Voor Nederland: Groupe SEB Nederland BV, tel. 0318 - 58 24 24.
Voor België: Groupe SEB Belgium SA, tel. 71.82.52.11.
* Afhankelijk van het model
18
RAADGEVINGEN EN VOORZORGSMAATREGELEN
Vóór gebruik moet het snoer altijd helemaal worden afgewikkeld.
Zorg ervoor dat het snoer niet klem komt te zitten en voer hem niet over scherpe randen.
Verplaats de stofzuiger niet door aan het snoer te trekken, het apparaat dient verplaatst te worden
met behulp van de handgreep.
Het apparaat niet bij het snoer optillen.
Maakt u gebruik van een verlengsnoer, controleer dan of deze in perfecte staat verkeert en of de
draaddoorsnede (mm2) geschikt is voor het vermogen van uw stofzuiger.
Trek nooit aan het snoer om de stekker uit het stopcontact te halen.
Zet na gebruik uw apparaat in te drukken en haal de stekker.
Gebruik alleen originele accessoires, filters en stofzakken van Rowenta.
Controleer of het filter goed geplaatst is.
Gebruik het apparaat nooit zonder filters en stofzak.
Neem contact op met de consumentenservice van Rowenta indien het moeilijk is stofzakken of
filters voor uw stofzuiger te bemachtigen.
Zie hiervoor de bijgevoegde servicelijst. Zie hiervoor de bijgevoegde Rowenta servicelijst of
neem rechtstreeks contact op met de consumentenservice van Rowenta.
Voor Nederland: Groupe SEB Nederland BV, tel. 0318 - 58 24 24.
Voor België: Groupe SEB Belgium SA, tel. 71.82.52.11.
NL
La pagina si sta caricando...
La pagina si sta caricando...
La pagina si sta caricando...
La pagina si sta caricando...
La pagina si sta caricando...
La pagina si sta caricando...
La pagina si sta caricando...
-
 1
1
-
 2
2
-
 3
3
-
 4
4
-
 5
5
-
 6
6
-
 7
7
-
 8
8
-
 9
9
-
 10
10
-
 11
11
-
 12
12
-
 13
13
-
 14
14
-
 15
15
-
 16
16
-
 17
17
-
 18
18
-
 19
19
-
 20
20
-
 21
21
-
 22
22
-
 23
23
-
 24
24
-
 25
25
-
 26
26
-
 27
27


Rowenta Slimline Manuale del proprietario
- Categoria
- Aspirapolvere
- Tipo
- Manuale del proprietario
in altre lingue
- français: Rowenta Slimline Le manuel du propriétaire
- español: Rowenta Slimline El manual del propietario
- Deutsch: Rowenta Slimline Bedienungsanleitung
- Nederlands: Rowenta Slimline de handleiding
- Türkçe: Rowenta Slimline El kitabı
Documenti correlati
-
Rowenta RU 635 COLLECTO Manuale del proprietario
-
-
-
-
-
-
-
-
-