
Hardware Review
A
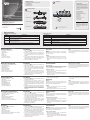
1. Port Selection Switches
2. Port LEDs
3. Sound Opening
4. Reset
5. Power LED
6. Power Jack
7. Console Port Section
8. Computer Port Section
Description de l’appareil
A
1. Commutateurs de sélection de port
2. Voyants des ports
3. Haut-parleur interne
4. Réinitialisation
5. Voyant d’alimentation
6. Prise d’alimentation
7. Section des ports de console
8. Section des ports ordinateur
Hardwareübersicht
A
1. Port-Auswahlschalter
2. Port-LEDs
3. Öffnung für Tonausgabe
4. Zurücksetzen
5. LED-Betriebsanzeige
6. Stromeingangsbuchse
7. Konsolportabschnitt
8. Computer-Portabschnitt
Presentación del hardware
A
1. Conmutadores de selección de puertos
2. Indicadores LED de los puertos
3. Apertura de sonido
4. Resetear
5. Indicador LED de alimentación
6. Entrada de alimentación
7. Sección de puertos de consola
8. Sección de puertos para computadora
Hardware
A
1. Interruttori di selezione della porta
2. LED delle porte
3. Apertura per l’audio
4. Ripristina
5. LED d’alimentazione
6. Presa d’alimentazione
7. Sezione della porta di collegamento alla console
8. Sezione delle porte computer
Installation
B
1. Plug your keyboard, mouse, and monitor into the
unit's Console Ports.
2. Use KVM cable sets (purchased separately), to
connect any available KVM port to the Keyboard,
Video and Mouse ports of the computer you are
installing.
3. If you choose to use external power, plug the power
adapter cable into the KVM switch's Power Jack,
then plug the adapter into an AC power source.
4. Turn on the power to the computers.
Installation
B
1. Connectez le clavier, la souris et le moniteur aux
ports console de l'unité.
2. Utilisez le jeu de câbles KVM (acheté séparément)
pour connecter les ports disponibles du commutateur
KVM aux ports clavier, vidéo et souris de l'ordinateur
que vous installez.
3. Si vous choisissez d’utiliser l’alimentation externe,
branchez le câble de l’adaptateur secteur dans
la prise d’alimentation du commutateur KVM puis
l’adaptateur dans une source d’alimentation CA.
4. Allumez les ordinateurs.
Installation
B
1. Verbinden Sie Tastatur, Maus und Monitor mit den
Konsolports des Gerätes.
2. Verbinden Sie die Tastatur-, Maus- und
Monitoranschlüsse des zu installierenden Computers
mit einem freien KVM-Port am Gerät. Verwenden
Sie dazu ein KVM-Kabelset (muss separat erworben
werden).
3. Wenn Sie eine externe Stromversorgung verwenden
möchten, schließen Sie das Label des Netzteils an
die Stromeingangsbuchse an und verbinden das
Netzteil anschließend mit einer stromführenden
Steckdose.
Instalación
B
1. Conecte el teclado, el mouse y el monitor a los
puertos de consola del equipo.
2. Use un juego de cables KVM (se debe adquirir por
separado) para conectar cualquier puerto KVM libre
a los puertos para teclado, mouse y monitor de la
computadora que vaya a instalar.
3. Si desea utilizar una alimentación externa, conecte
el cable del adaptador de alimentación a la entrada
de alimentación del concentrador KVM y luego el
adaptador a una toma eléctrica.
4. Encienda las computadoras.
Installazione
B
1. Inserire gli spinotti della tastiera, del mouse e del
monitor nelle porte della console del dispositivo.
2. Utilizzare un set di cavi KVM (acquistato
separatamente) per collegare una qualsiasi porta
KVM disponibile alle porte della tastiera, del monitor
e del mouse del computer che si sta installando.
3. Se si decide di utilizzare l’alimentazione di rete,
inserire il cavo dell’alimentatore nella presa
d’alimentazione dello switch KVM, quindi inserire
l’alimentatore in una presa di corrente.
4. Accendere i computer
Operation
Manual
Press the Port Selection Switch on the CS9134/
CS9138's front panel that corresponds to the KVM port
you want to access.
Hotkey
1. Press [Ctrl] [Shift] [Alt] to invoke the hotkey function.
2. Key in the Port ID number (from 1 to 4 for the
CS9134; from 1 to 8 for the CS9138), then press
[Enter].
Fonctionnement
Accès manuel
Sur le panneau avant du CS9134/CS9138, appuyez
sur le commutateur de sélection de port qui correspond
au port KVM auquel vous souhaitez accéder.
Raccourci clavier
1. Appuyez sur [Ctrl] + [Maj] + [Alt] pour activer le
mode raccourcis clavier.
2. Renseignez le numéro d’identi cation du port (de 1
à 4 pour le CS9134 ; de 1 à 8 pour le CS9138), puis
appuyez sur [Entrée].
4. Schalten Sie Ihre Computer ein.
Bedienung
Manuell
Drücken Sie den Port-Auswahlschalter auf der
Vorderseite des CS9134/CS9138, der den KVM-Port
darstellt, auf den Sie zugreifen möchten.
Hotkey
1. Drücken Sie [Strg] [Umsch] [Alt], um die Hotkey-
Funktionalität zu aktivieren.
2. Tippen Sie die Port-ID ein (von 1 bis 4 beim CS9134
Funcionamiento
Manual
Pulse el conmutador de selección del panel anterior
del CS9134/CS9138 que corresponde al puerto KVM
al que desee acceder.
Teclas de acceso directo
1. Pulse [Ctrl] [Mayús] [Alt] para invocar la función de
teclas de acceso directo.
2. Teclee el número del ID de puerto (del 1 al 4 para el
CS9134; del 1 al 8 para el CS9138) y a continuación
pulse [Intro].
Funzionamento
Manuale
Premere l’interruttore di selezione della porta sul
pannello anteriore del CS9134/CS9138 corrispondente
alla porta KVM a cui si desidera accedere.
Tasto di scelta rapida
1. Premere [Ctrl] + [Maiusc] + [Alt] + per richiamare la
funzione del tasto di scelta rapida.
2. Immettere il numero d’identi cazione della porta (da
1 a 4 per il CS9134, da 1 a 8 per il CS9138), quindi
premere [Invio].
OSD
To pop up the OSD Main Menu, tap Ctrl key twice -
[Ctrl] [Ctrl]. The keys must be on the same side (both
left, or both right).
Affi chage à l’écran (OSD)
Pour afficher le menu principal OSD, appuyez deux
fois sur la touche Ctrl - [Ctrl][Ctrl]. Les touches doivent
se trouver du même côté (toutes les deux à gauche ou
toutes les deux à droite).
bzw. von 1 bis 8 beim CS9138), und drücken Sie die
Taste [Enter].
OSD
Um das OSD-Hauptmenü zu öffnen, drücken Sie
zweimal die Steuerungstaste - [Strg][Strg]. Sie müssen
entweder zweimal die linke oder zweimal die rechte
Taste drücken.
Menú OSD
Para acceder a la pantalla principal del OSD, pulse dos
veces la tecla Control - [Ctrl][Ctrl]. Las teclas pulsadas
deben ser las dos de la izquierda o las dos de la
derecha.
OSD
Per accedere alla schermata principale dell’OSD,
premere due volte il tasto Ctrl [Ctrl][Ctrl]. I tasti devono
essere o entrambi sinistra o entrambi destra.
B
Package Contents
1 CS9134 or CS9138 PS/2 KVM Switch
1 Power Adapter
1 Rack Mount Kit
1 User Instructions
CS9134 Front View
CS9138 Front View
CS9134 Rear View
CS9138 Rear View
Installation
© Copyright 2019 ATEN
®
International Co., Ltd.
ATEN and the ATEN logo are trademarks of ATEN International Co., Ltd. All rights reserved.
All other trademarks are the property of their respective owners.
This product is RoHS compliant.
Part No. PAPE-1223-840G
Printing Date: 05/2019
PS/2 KVM Switch
Quick Start Guide
CS9134/CS9138
CS9134/CS9138 PS/2 KVM Switch Quick Start Guide
www.aten.com
CS9134/CS9138 Commutateur KVM PS/2 Guide de démarrage rapide
www.aten.com
CS9134/CS9138 PS/2-KVM-Switch Kurzanleitung
www.aten.com
CS9134/CS9138 Conmutador KVM de tipo PS/2 Guía Rápida
www.aten.com
CS9134/CS9138 Switch KVM PS/2 Guida rapida
www.aten.com
Simply Better Connections
Important Notice
Considering environmental protection,
ATEN does not provide a fully printed user
manual for this product. If the information
contained in the Quick Start Guide is not
enough for you to con gure and operate
your product, please visit our website
www.aten.com, and download the full
user manual.
Online Registration
http://eservice.aten.com
Technical Phone Support
International:
886-2-86926959
North America:
1-888-999-ATEN Ext: 4988
United Kingdom:
44-8-4481-58923
All information, documentation, and
specifications contained in this media
are subject to change without prior
notification by the manufacturer. Please
visit our website to find the most up to
date version.
CS-9134
RESET POWER
K / M RESET AUTO SCAN
2 3 4 5
1
CS-9138
RESET POWER
K / M RESET AUTO SCAN
2
3 4 5
1
6 7 8
6 7 8
Monitor / Keyboard / Mouse
CS9138 (Rear)
2
3
1
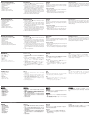
OSD Introduction
OSD Main Screen Headings
Heading Explanation
PN
This column lists the Port ID numbers (Station Number – Port Number), for all
the KVM ports on the installation.
QV
If a port has selected for Quick View scanning, an arrowhead symbol displays in
this column to indicate so.
PC
The computers that are powered on and are On Line have a Plus sign ( + ) in
this column to indicate so.
NAME If a port has been given a name, its name appears in this column.
The Function Keys
Function Key Explanation
F1 GOTO GOTO allows you to switch directly to a port.
F2 SCAN
Pressing [F2] initiates Quick View Scanning, in which the OSD cycles through all the ports that
are currently selected for this with the QV feature.
F3 LIST This function lets you broaden or narrow the scope of which ports the OSD lists.
F4 QV
QV lets you select which ports you want to include for automatic scanning under the Quick
View Scanning function.
F5 EDIT The EDIT function allows you to create, modify, or delete port names.
F6 SET Pressing [F6] brings up the OSD con guration menu.
* [Esc] cancels the current selection, or dismisses the current menu and moves back to the menu one level above. If
you are at the highest menu level, it deactivates OSD.
To prevent damage to your installation from power
surges or static electricity, it is important that all
connected devices are properly grounded.
A
Hardware Review
La pagina si sta caricando...
-
 1
1
-
 2
2


in altre lingue
- English: ATEN CS9134 Quick start guide
- français: ATEN CS9134 Guide de démarrage rapide
- español: ATEN CS9134 Guía de inicio rápido
- Deutsch: ATEN CS9134 Schnellstartanleitung
- русский: ATEN CS9134 Инструкция по началу работы
- português: ATEN CS9134 Guia rápido
- 日本語: ATEN CS9134 クイックスタートガイド