Indesit AQ8F 292 U (EU)/V Guida utente
- Categoria
- Lavatrici
- Tipo
- Guida utente

EN
1
English,1
Contents
Installation, 2-3
Unpacking and levelling
Connecting the electricity and water supplies
Technical data
Description of the machine, 4-5
Control panel
Running a wash cycle, 6
Wash cycles and options, 7
Table of wash cycles
Wash options
Detergents and laundry, 8
Detergent
Preparing the laundry
Washing recommendations
Precautions and advice, 9
General safety
Load balancing system
Disposal
Opening the porthole door manually
Care and maintenance, 10
Cutting off the water and electricity supplies
Cleaning the machine
Cleaning the detergent dispenser drawer
Caring for your appliance drum
Cleaning the pump
Checking the water inlet hose
Trouble shooting, 11
Assistance, 12
EN
WASHING MACHINE
AQUALTIS
AQ8F 292 U
Instructions for
installation and use
PL
Polski,25
IT
italiano,13
BG
Áúëãàðñêè,37

EN
22
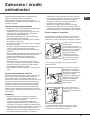
! If the appliance is levelled correctly, it will be more stable
and much less likely to cause vibrations and noise while it
is operating, particularly during the spin cycle.
! If it is placed on carpet or a rug, adjust the feet in such a
way as to allow a sufficient ventilation space underneath
the washing machine.
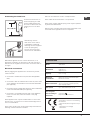
Connecting the electricity and water
supplies
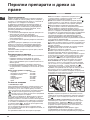
Connecting the water inlet hose
! Before connecting the inlet hose to the water supply, run
the water until it is perfectly clear.
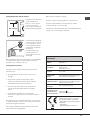
1. Connect the inlet hose
to the machine by screwing
it onto the cold water inlet
of the appliance, which is
situated on the top right-
hand side of the rear part of
the appliance (see figure).
2. Connect the inlet hose
by screwing it to a cold
water tab using a 3/4 gas
threaded connection (see
figure).
3. Make sure that the hose is not folded over or bent.
! The water pressure at the tap must fall within the values
indicated in the Technical data table (see next page).
! If the inlet hose is not long enough, contact a specialised
shop or an authorised technician.
! Never use second-hand or old inlet hoses; use the
products supplied with the machine.
! This instruction manual should be kept in a safe place
for future reference. If the washing machine is sold, given
away or moved, please ensure the manual is kept with
the machine, so that the new owner may benefit from the
advice contained within it.
! Read these instructions carefully: they contain vital
information relating to the safe installation and operation of
the appliance.
! Inside the pack containing this manual, you will also find
the guarantee and all the details necessary for installation.
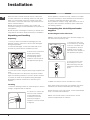
Unpacking and levelling
Unpacking
1. Once you have removed all the packaging from the
washing machine, make sure it has not been damaged
during transportation.
If it has been damaged, contact the retailer and do not
proceed any further with the installation process.
2. Remove the 4 protective
screws (used during
transportation) and the
corresponding spacer,
located on the rear part of
the appliance (see figure).
3. Close off the holes using the plastic plugs supplied in the
pack.
4. Keep all the parts in a safe place; they will be needed
again if the washing machine is moved to another location,
to prevent the inside of the appliance being damaged.
! Packaging materials should not be used as toys for
children.
Levelling
1. Place the washing machine on a flat sturdy floor, without
resting it up against walls or cabinets.
2. If the floor is uneven, the
front feet of the machine
may be adjusted until
it reaches a horizontal
position (the angle of
inclination must not exceed
2 degrees).
Installation

EN
3
Technical data
Model
AQ8F 292 U
Dimensions
width 59.5 cm
height 85 cm
depth 64,5 cm
Capacity
from 1 to 8 kg
Electrical
connections
please refer to the technical data plate
fixed to the machine
Water connections
maximum pressure 1 MPa (10 bar)
minimum pressure 0.05 MPa (0.5 bar)
drum capacity 62 litres
Spin speed
up to 1200 rotations per minute
Test Program-
mes according to
2010/1061
programme
;
temperature 60°C and 40°C.
This appliance conforms to the following
EC Directives:
- 2004/108/EC (Electromagnetic Compa-
tibility)
- 2006/95/EC (Low Voltage)
- 2002/96/EC
65 - 100 cm
Connecting the drain hose
Connect the drain hose to
drain duct piping or a wall
drain located between 65
and 100 cm above the floor,
making sure it is not bent
at all.
Alternatively, rest the
drain hose on the side of
a washbasin or bathtub,
fastening the duct supplied
to the tap (see figure).
The free end of the hose
should not be underwater.
! We advise against the use of hose extensions; if it is
absolutely necessary, the extension must have the same
diameter as the original hose and must not exceed 150 cm
in length.
Electrical connections
Before plugging the appliance into the electricity socket,
make sure that:
• thesocketisearthedandcomplieswithallapplicable
laws;
• thesocketisabletowithstandthemaximumpowerload
of the appliance as indicated in the Technical data table
(see opposite);
• thepowersupplyvoltagefallswithinthevaluesindicated
in the Technical data table (see opposite);
• thesocketiscompatiblewiththeplugoftheappliance.
If this is not the case, have the socket or the plug
replaced.
! The appliace must only be installed indoor in a frost free
and dry room, to prevent it from electronic damage due to
frost or condensation.
! The mains socket must remain within easy reach after the
washing machine has been installed.
! Do not use extension cords or multiple sockets.
! The cable should not be bent or compressed.
! The power supply cable and plug must only be replaced
by authorised technicians.
Warning! The company shall not be held responsible in the
event that these regulations are not respected.

EN
4
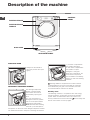
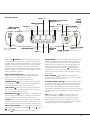
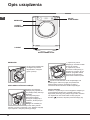
CONTROL
PANEL
PORTHOLE DOOR
PORTHOLE DOOR
HANDLE
KICK STRIP
ADJUSTABLE FEET
Description of the machine
1. pre-wash compartment:
use powder detergent.
2. main wash compartment:
use powder or liquid
detergent. If using the
latter type of detergent, we
recommend it is poured
into the drawer immediately
before you start the washing
machine.
washing additives compartment: for fabric softener
or liquid additives. We recommend that the maximum
level indicated by the grille is not exceeded, and that
concentrated fabric softeners are diluted.
Standby mode
This washing machine, in compliance with new energy
saving regulations, is fitted with an automatic standby
system which is enabled after about 30 minutes if no
activity is detected. Press the ON-OFF
button briefly and
wait for the machine to start up again.
PORTHOLE DOOR
Always use the handle to
open the porthole door (see
figure).
DETERGENT DISPENSER DRAWER
The detergent dispenser
drawer is located inside
the machine and can be
accessed by opening the
door.
For more information on
detergent measures, please
refer to the chapter entitled
“Detergents and laundry”.
Note: stick the label showing
the wash cycle descriptions
and options on the front of the detergent dispenser drawer.
You will find the sticker in the pack containing this manual.
1
2

EN
5
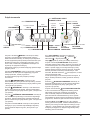
TEMPERATURE button
WASH CYCLE
SELECTOR knob
OPTION buttons with
indicator lights
DOOR LOCKED
indicator light
START/PAUSE
button with indicator
light
WASH
CYCLE
PHASE
icons
SPIN button
CONTROL PANEL
LOCK button with
indicator light
Button with
ON/OFF
indicator light
ECO indicator light
OPTION buttons with
indicator lights
TEMPERATURE
display
SPIN display
DELAYED START/CYCLE
DURATION display
Control panel
Button with ON/OFF indicator light: press this briefly
to switch the machine on or off. The green indicator light
indicates that the machine is switched on. To switch off the
washing machine during the wash cycle, press and hold
the button for approximately 3 seconds; if the button is
pressed briefly or accidentally the machine will not switch
off. If the machine is switched off during a wash cycle, this
wash cycle will be cancelled.
WASH CYCLE SELECTOR knob: may be turned in
either direction. To select the most suitable wash cycle,
please refer to the “Table of wash cycles”.
The knob will not move during the wash cycle.
TEMPERATURE
button: press to modify or exclude
the temperature setting; the value selected will appear on
the display above (see “Running a wash cycle”).
SPIN CYCLE
button: press to modify or exclude the
spin cycle; the value selected will appear on the display
above (see “Running a wash cycle”).
DELAYED START
button: press to set a delayed start
for the selected wash cycle; the set delay time will appear
on the display above (see “Running a wash cycle”).
OPTION buttons with indicator lights: press to select the
available options. The indicator light corresponding to the
selected option will remain lit (see “Running a wash cycle”).
WASH CYCLE PHASE icons: these illuminate to indicate
the progress of the wash cycle (Wash
– Rinse – Spin
– Drain ).
The text
lights up when the cycle is complete.
START/PAUSE button with indicator light: when the green
indicator light flashes slowly, press the button to start a
wash cycle. Once the cycle has begun the indicator light
will remain lit in a fixed manner. To pause the wash cycle,
press the button again; the indicator light will flash in an
orange colour. If the “Door locked”
indicator light is
switched off, the door may be opened. To start the wash
cycle from the point at which it was interrupted, press the
button again.
DOOR LOCKED
indicator light: indicates that the
porthole door is locked. To open the door, pause the wash
cycle (see “Running a wash cycle”).
CONTROL PANEL LOCK
button with indicator light:
to activate or deactivate the control panel lock, press and
hold the button for approximately 2 seconds. when the
indicator light is illuminated, the control panel is locked.
This means it is possible to prevent wash cycles from being
modified accidentally, especially where there are children in
the home.
ECO indicator light: the
icon lights up when, after
altering the washing parameters, an energy saving of
at least 10% is made. Furthermore, before the machine
enters “Standby” mode, the icon will light up for a few
seconds; when the machine is switched off the estimated
energy saving will be around the 80% mark.
DELAYED
START
button
5

EN
6
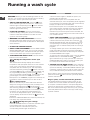
WARNING: before you use the washing machine for the
first time, run a wash cycle with detergent and no laundry,
using the 90° cottons cycle without pre-wash.
1. SWITCH THE MACHINE ON. Press the
button.
All the indicator lights will illuminate for 1 second; the
indicator light corresponding to the
button will then
remain lit in a fixed manner and the START/PAUSE
indicator light will flash slowly.
2. LOAD THE LAUNDRY. Open the porthole door.
Load the laundry, making sure you do not exceed the
maximum load value indicated in the table of wash
cycles on the following page.
3. MEASURE OUT THE DETERGENT. Pull out the
detergent dispenser drawer and pour the detergent into
the relevant compartments as described in “Description
of the machine”.
4. CLOSE THE PORTHOLE DOOR.
5. SELECT THE PROGRAMME. Turn the WASH CYCLE
SELECTOR KNOB right or left, until you have selected
the desired wash cycle. A temperature and spin speed
is set for each wash cycle; these may be adjusted.
6. CUSTOMISE THE WASH CYCLE. Use the relevant
buttons on the control panel:
Modify the temperature and/or spin
speed.
The machine automatically displays the maximum
temperature and spin speed values set for the selected
cycle, or the most recently-used settings if they are
compatible with the selected cycle. The temperature
can be decreased by pressing the
button, until the
cold wash (
) setting is reached. The spin speed may
be progressively reduced by pressing the
button,
until it is completely excluded (
). If these buttons are
pressed again, the maximum values are restored.
! Exception: if the “Cottons” programme is selected, the
temperature can be increased up to a value of 90°C.
Set a delayed start.
Press the button until you have reached the desired
delay time. During the setting process, the delay time is
shown on the display and the
symbol flashes.
After selecting a delayed start time, the fixed
symbol
and the cycle duration will appear on the display. Press
the button once to display the selected delay time.
To remove the delayed start option, press the button
until the display shows the text OFF; the
symbol will
disappear.
! Once the START/PAUSE button has been pressed, the
time delay may only be decreased.
Modify the cycle settings.
Press the OPTION buttons to customise the wash cycle
in accordance with your own requirements.
•Pressthebuttontoactivatetheoption;the
corresponding indicator light will switch on.
•Pressthebuttonagaintodisabletheoption;the
indicator light will switch off.
! If the selected option is not compatible with the
selected wash cycle, this incompatibility will be signalled
by the flashing of the indicator light and a sound alert (3
beeps); the option will not be activated.
! If the selected option is not compatible with another
option that has been selected previously, the indicator
light corresponding to the first option selected will
flash and only the second option will be activated; the
indicator light corresponding to the button will remain lit
in a constant manner.
7. START THE PROGRAMME. Press the START/PAUSE
button. The corresponding indicator light remains lit in
a fixed manner and the porthole door locks (the
DOOR LOCKED indicator light illuminates). The icons
corresponding to the wash cycle phases will light up
during the cycle to indicate which phase is currently in
progress.
To change a wash cycle once it has already started,
pause the washing machine by pressing the START/
PAUSE button; then select the desired cycle and press
the START/PAUSE button again.
To open the door during a wash cycle, press the START/
PAUSE button; if the DOOR LOCKED
indicator
light is switched off you may open the door. Press the
START/PAUSE button again to restart the wash cycle
from the point at which it was interrupted.
8. THE END OF THE WASH CYCLE. This is indicated
by the illuminated text END. The porthole door may be
opened immediately. If the START/PAUSE indicator light
is flashing, press the button to end the cycle. Open the
door, unload the laundry and switch off the machine.
! If you wish to cancel a cycle which has already begun,
press and hold the
button until the cycle stops and the
machine switches off.
Bag for quilts, curtains and delicate garments
The Aqualtis washing machine makes it easier for you
to wash even the most valuable and delicate garments
in complete confidence thanks to the special bag which
protects the laundry (this is supplied with the machine).
We recommend that the bag is used every time you wash
quilts and padded items with an outer layer made using
synthetic material.
Running a wash cycle

EN
7
Wash options
Easy Iron
By selecting this option, the wash and spin cycles will be
modified in order to reduce the formation of creases.
At the end of the cycle the washing machine drum will
rotate slowly; the “Easy Iron” and START/PAUSE indicator
lights will flash. To end the cycle press the START/PAUSE
button or the “Easy Iron” button.
For the Silk
wash cycle, the machine will end the cycle
while the laundry is soaking and the “Easy Iron” indicator
light will flash. To drain the water so that the laundry may
be removed, press the START/PAUSE button or the “Easy
Iron” button.
! It cannot be used in conjunction with
, , , , , .
Steam Hygiene
This option enhances washing performance by generating
steam during the wash cycle that eliminates any bacteria
from fibres while treating them at the same time. Place the
laundry in the drum, choose a compatible programme and
select option “
“.
! The steam generated during washing machine operation
may cause the porthole door to become hazy.
! It cannot be used in conjunction with , (90°C), , ,
, , , , , , , .
Time Saver
If you select this option, the wash cycle duration will be
reduced by 30%-50%, depending on the selected cycle,
thereby guaranteeing simultaneous water and energy
saving. Use this cycle for lightly soiled garments.
! It cannot be used in conjunction with
, , , , ,
, , , , .
Extra rinse
By selecting this option, the efficiency of the rinse is
increased and optimal residual detergent removal is
guaranteed. It is particularly useful for skin which is
sensitive to detergents. We recommend this option is used
with a full load of washing, or when a large amount of
detergent is required.
! It cannot be used in conjunction with
, , , .
(*) Note: 10 minutes after the START, the machine will recalculate the time remaining until the end of the wash cycle on the basis of the load inside it; this
value will then be shown on the display.
Wash cycles and options
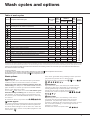
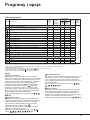
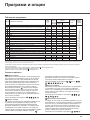
Table of wash cycles
For all Test Institutes:
1) Test wash cycle in compliance with regulation 2010/1061: set wash cycle with a temperature 60°C and 40°C.
2) Long wash cycle for cottons: set wash cycle with a temperature of 40°C.
3) Short wash cycle for cottons: set wash cycle with a temperature of 40°C.
The length of cycle shown on the display or in this booklet is an estimation only and is calculated assuming standard working conditions. The actual duration can vary according
to factors such as water temperature and pressure, the amount of detergent used, the amount and type of load inserted, load balancing and any wash options selected.
Icon Description of the wash cycle
Max. temp.
(°C)
Max.
speed
(rpm)
Detergent and
additives
Max.
load
(kg)
Cycle
duration
Detergent
for wash
Fabric
softener
Cottons wash cycles
Cottons with pre-wash
(Add detergent to the relevant compartment).
90° 1200
8
Cotton (1): heavily soiled whites and resistant colours.
60°
(Max. 90°C)
1200
8
Cotton (1-2): heavily soiled whites and delicate colours. 40° 1200
8
Coloured Cotton (3) 40° 1200
8
Shirts
40° 600
2
Jeans
40° 800
4
Specials wash cycles
Baby: heavily soiled delicate colours. 40° 800
4
Durable Synthetics 60° 800
3,5
** Steam Refresh (see next page). - - - - 1,5
"Bed & Bath" for bedlinen and towels. 60° 1200
8
Duvets: for down-stuffed garments. 30° 1000
3,5
Silk: for garments in silk and viscose, lingerie. 30° 0
2
Wool: for wool, cashmere, etc. 40° 600
2
Mix 30': to refresh lightly soiled garments quickly (not suitable for
wool, silk and clothes which require washing by hand)
30° 800
3,5
Partials wash cycles
Rinse - 1200 -
8
Spin - 1200 - - 8
Drain - 0 - - 8
(*) The duration of the wash cycles can be checked on the display.
7

EN
8
Detergents and laundry
Shirts: use the special “Shirts” wash cycle to wash
shirts in different fabrics and colours to guarantee they
receive the best possible care.
Jeans: use the special “Jeans”
wash cycle for all denim
garments; turn inside out before washing and use a liquid
detergent.
Baby: use the special “Baby”
wash cycle to remove
the remove the soiling typically caused by babies, while
removing all traces of detergent from nappies in order to
prevent the delicate skin of babies from suffering allergic
reactions. The cycle has been designed to reduce the
amount of bacteria by using a greater quantity of water
and optimising the effect of special disinfecting additives
added to the detergent. At the end of the wash cycle, the
machine will slowly rotate the drum; to end the cycle press
the START/PAUSE button.
Silk: use the special “Silk”
wash cycle to wash all silk
garments. We recommend the use of special detergent
which has been designed to wash delicate clothes.
Curtains: use the “Silk”
wash cycle. These should be
folded and placed inside the bag provided.
Wool: Hotpoint is the only washing machine brand to
have been awarded the prestigious Woolmark Platinum
Care endorsement (M.0508) by the Woolmark Company,
which means that all woollen garments may be washed in
the washing machine, even those which state “hand wash
only”
on the label. The “Wool” wash cycle can be used
to wash all woollen garments in the washing machine while
guaranteeing optimum performance.
Duvets: to wash double or single duvets (the weight of
which should not exceed 3,5 kg), cushions or clothes
padded with goose down such as puffa jackets, use the
special “Duvets”
wash cycle. We recommend that
duvets are placed in the drum with their edges folded
inwards (see figure) and that no more than ¾ of the total
volume of the drum is used. To achieve the best results,
we recommend that a liquid detergent is used and placed
inside the detergent dispenser drawer.
Quilts: to wash quilts with a synthetic outer layer, use the
bag provided and set the wash cycle to “Duvets”
.
Bedlinen and towels: use the “Bed & Bath”
cycle to
wash laundry from all over the house; this optimises fabric
softener performance and helps you save time and energy.
We recommend the use of powder detergent.
Stubborn stains: it is wise to treat stubborn stains with
solid soap before washing, and to use the Cottons with
pre-wash cycle.
Detergent
The type and quantity of detergent required depend on
the type of fabric you are washing (cotton, wool, silk, etc.),
as well as its colour, the washing temperature, the level of
soiling and the hardness of the water in the area.
Measuring out the detergent carefully will avoid wastage
and help to protect the environment: although they are
biodegradable, detergents still contain ingredients which
alter the balance of nature.
We recommend the following:
• usepowderdetergentsforwhitecottongarmentsand
pre-washing.
• useliquiddetergentsfordelicatecottongarmentsand
for all low-temperature wash cycles.
• usegentleliquiddetergentsforwoolandsilkgarments.
The detergent should be poured into the relevant compartment
- or the dispenser placed directly inside the drum - before the
wash cycle begins. In the latter case, it will not be possible to
select the Cottons with pre-wash cycle.
! Do not use hand washing detergents because these
create too much foam.
Preparing the laundry
• Shakeoutthegarmentsbeforeloadingthemintothe
machine.
• Dividethelaundryaccordingfabrictype(symbolonthe
washing instruction label) and colour, making sure you
separate the coloured garments from the white ones;
• Emptyallpocketsandcheckthebuttons;
• Donotexceedthevalueslistedinthe“Table of wash cycles”,
which refer to the weight of the laundry when dry.
How much does your laundry weigh?
1 sheet 400-500 g
1 pillowcase 150-200 g
1 tablecloth 400-500 g
1 bathrobe 900-1200 g
1 towel 150-250 g
1 pair of jeans 400-500 g
1 shirt 150-200 g
Washing recommendations
** Steam Refresh
This programme refreshes garments by removing bad
odours and relaxing the fibres (1.5 kg, roughly 3 items).
Insert dry items only (that are not dirty) and select
programme “
“. The garments will be damp once the
cycle is completed, so we recommend hanging them to
dry. The “
“ programme makes ironing easier.
Moreover, with the “Steam Perfume” laundry balls, your
favourite perfume can be added to your laundry. Place a
few drops of perfume on the sponge contained inside the
laundry ball, close it and insert it into the drum together
with the laundry. Then launch the specific programme “
“. At the end of the cycle, garments will be relaxed and
fragrant.
! Not recommended for wool or silk garments.
! Do not add too much perfume to the sponge in order to
avoid it dripping.
! Do not add softeners or detergents.

EN
9
using the normal solid urban waste cycle. Exhausted
appliances should be collected separately in order to
optimise the cost of re-using and recycling the materials
inside the machine, while preventing potential damage
to the atmosphere and to public health. The crossed-out
dustbin is marked on all products to remind the owner
of their obligations regarding separated waste collection.
For more information relating to the correct disposal of
household appliances, owners should contact their local
authorities or appliance dealer.
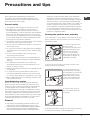
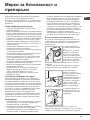
Opening the porthole door manually
In the event that it is not possible to open the porthole door
due to a powercut, and if you wish to remove the laundry,
proceed as follows:
1. remove the plug from the
electrical socket.
2. make sure the water level
inside the machine is lower
than the door opening; if
it is not, remove excess
water using the drain hose,
collecting it in a bucket as
indicated in the figure.
3. remove the cover panel on the lower front part of the
washing machine (see overleaf).
4. pull outwards using the
tab as indicated in the figure,
until the plastic tie-rod is freed
from its stop position; pull
downwards until you hear a
“click”, which indicates that
the door is now unlocked.
5. open the door; if this is
still not possible repeat the
procedure.
6. reposition the panel, making sure the hooks are securely
in place before you push it onto the appliance.
Precautions and tips
! The machine was designed and constructed in
accordance with international safety regulations. The
following information is provided for safety reasons and
must therefore be read carefully.
General safety
• Thisappliancewasdesignedfordomesticuseonly.
• Thisapplianceisnotintendedforusebypersons
(including children) with reduced physical, sensory or
mental capabilities, or lack of experience and knowledge,
unless they have been given supervision or instruction
concerning use of the appliance by a person responsible
for their safety. Children should be supervised to ensure
that they do not play with the appliance.
• themachinemustonlybeusedbyadults,inaccordance
with the instructions given in this manual.
• Donottouchthemachinewhenbarefootorwithwetor
damp hands or feet.
• Donotpullonthepowersupplycablewhenunplugging
the appliance from the electricity socket. Hold the plug
and pull.
• Donottouchthedrainedwaterasitmayreach
extremely high temperatures.
• Neverforcetheportholedoor.Thiscoulddamagethe
safety lock mechanism designed to prevent accidental
opening.
• Iftheappliancebreaksdown,donotunderany
circumstances access the internal mechanisms in an
attempt to repair it yourself.
• Alwayskeepchildrenwellawayfromtheappliancewhile
it is operating.
• Ifitmustbemoved,proceedwiththehelpoftwoor
three people and handle it with the utmost care. Never
try to do this alone, because the appliance is very heavy.
• Beforeloadinglaundryintothewashingmachine,make
sure the drum is empty.
Load balancing system
Before every spin cycle, to avoid excessive vibrations
before every spin and to distribute the load in a uniform
manner, the drum rotates continuously at a speed which
is slightly greater than the washing rotation speed. If,
after several attempts, the load is not balanced correctly,
the machine spins at a reduced spin speed. If the load is
excessively unbalanced, the washing machine performs
the distribution process instead of spinning. To encourage
improved load distribution and balance, we recommend
small and large garments are mixed in the load.
Disposal
• Disposingofthepackagingmaterials:observelocal
regulations so that the packaging may be re-used.
• TheEuropeanDirective2002/96/ECrelatingtoWaste
Electrical and Electronic Equipment (WEEE) states
that household appliances should not be disposed of

EN
10
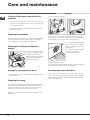
To access the pre-chamber:
1. take off the cover panel on the front of the machine by
first pressing it in the centre and then pushing downwards
on both sides until you can remove it (see figures);
2. position a container so that
it will collect the water which
flows out (approximately 1.5 l)
(see figure);
3. unscrew the lid by rotating
it in an anti-clockwise
direction (see figure);
4. clean the inside thoroughly;
5. screw the lid back on;
6. reposition the panel, making sure the hooks are securely
in place before you push it onto the appliance.
Checking the water inlet hose
Check the inlet hose at least once a year. If there are any
cracks, it should be replaced immediately: during the wash
cycles, water pressure is very strong and a cracked hose
could easily split open.
Cutting off the water and electricity
supplies
• Turnoffthewatertapaftereverywashcycle.Thiswill
limit wear on the hydraulic system in the machine and
help to prevent leaks.
• Unplugtheappliancewhencleaningitandduringall
maintenance work.
Cleaning the machine
The outer parts and rubber components of the appliance
can be cleaned using a soft cloth soaked in lukewarm
soapy water. Do not use solvents or abrasives.
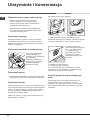
Cleaning the detergent dispenser
drawer
To remove the drawer, press
lever (1) and pull the drawer
outwards (2) (see figure).
Wash it under running water;
this procedure should be
repeated frequently.
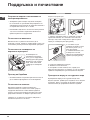
Caring for your appliance drum
• Alwaysleavethedoorajartopreventunpleasantodours
from forming.
Cleaning the pump
The washing machine is fitted with a self-cleaning pump
which does not require any maintenance. Sometimes,
small items (such as coins or buttons) may fall into the
protective pre-chamber at the base of the pump.
Make sure the wash cycle has finished and unplug the
appliance.
1
2
1
2
Care and maintenance

EN
11
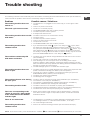
Trouble shooting
Your washing machine could occasionally fail to work. Before contacting the Technical Assistance Centre (see “Assistance”),
make sure that the problem cannot be not solved easily using the following list.
Problem:
The washing machine does not
switch on.
The wash cycle does not start.
The washing machine does not fill
with water.
The washing machine door
remains locked.
The machine continuously fills
with water and drains.
The washing machine does not
drain or spin.
The machine vibrates a lot during
the spin cycle.
The washing machine leaks.
The icons corresponding to the
“Phase in progress” flash rapidly
at the same time as the ON/OFF
indicator light.
There is too much foam.
The washing machine door
remains locked.
Possible causes / Solutions:
• Theapplianceisnotpluggedintothesocketfully,ornotenoughtomake
contact.
• Thereisnopowerinthehouse.
• Thedoorisnotclosedproperly.
• TheSTART/PAUSEbuttonhasnotbeenpressed.
• Thewatertaphasnotbeenopened.
• Adelayedstarthasbeenset.
• Thewaterinlethoseisnotconnectedtothetap.
• Thehoseisbent.
• Thewatertaphasnotbeenopened.
• Thereisnowatersupplyinthehouse.
• Thepressureistoolow.
• TheSTART/PAUSEbuttonhasnotbeenpressed.
• Ifyouhaveselectedthe“Baby
” cycle or the “Easy iron ” option, when
the wash cycle has finished the machine will slowly rotate the drum; to end
the cycle press the START/PAUSE button or the “Easy iron
” button. If you
have selected the “Silk
” wash cycle, the machine will end the cycle while
the laundry is soaking; to drain the water so that the laundry may be removed,
press the START/PAUSE button or the “Easy iron
” button.
• Thedrainhoseisnotfittedataheightbetween65and100cmfromthefloor
(see “Installation”).
• Thefreeendofthehoseisunderwater(see “Installation”).
• Ifthedwellingisononeoftheupperfloorsofabuilding,theremaybe
problems relating to water drainage, causing the washing machine to fill with
water and drain continuously. Special anti-draining valves are available in shops
and help to prevent this inconvenience.
• Thewalldrainagesystemisnotfittedwithabreatherpipe.
• Thewashcycledoesnotincludedraining:Somewashcyclesrequirethedrain
phase to be started manually (see “Wash cycles and options”).
• The“Easyiron”optionisenabled:tocompletethewashcycle,pressthe
START/PAUSE button (“Wash cycles and options”).
• Thedrainhoseisbent(see Installation).
• Thedrainageductisclogged.
• Thedrumwasnotunlockedcorrectlyduringinstallation(see “Installation”).
• Themachineisnotlevel(see “Installation” ).
• Themachineistrappedbetweencabinetsandwalls(see “Installation”).
• Theloadisunbalanced(see “Detergents and laundry”).
• Thewaterinlethoseisnotscrewedonproperly(see“Installation”).
• Thedetergentdispenserisblocked(tocleanit,see “Care and maintenance”).
• Thedrainhoseisnotfixedinplaceproperly(see“Installation”).
• Switchoffthemachineandunplugit,waitforapproximately1minuteand
then switch it back on again. If the problem persists, contact the Technical
Assistance Service.
• Thedetergentisnotsuitableformachinewashing(itshoulddisplaythetext
“for washing machines” or “hand and machine wash”, or the like).
• Toomuchdetergentwasused.
• Performthemanualunlockingprocedure(see “Precautions and tips”).
!
Note: To exit “Demo mode”, press and hold the two “ON/OFF” and “START/PAUSE” buttons simultaneously for 3 seconds.

EN
12
Before calling for Assistance:
• Checkwhetheryoucansolvetheproblembyyourself(see“Trouble shooting”);
• Restartthewashcycletocheckwhethertheproblemhasbeensolved;
• Ifithasnot,contacttheAuthorisedTechnicalAssistanceService.
! If the washing machine has been installed or used incorrectly, you will have to pay for the call-out service.
! Always request the assistance of authorised technicians.
Please have the following information to hand:
• thetypeofproblem;
• theappliancemodel(Mod.);
• theserialnumber(S/N).
The above information can be found on the data plate located on the appliance itself.
Assistance

13
I
Italiano
Sommario
Installazione, 14-15
Disimballo e livellamento
Collegamenti idraulici ed elettrici
Dati tecnici
Descrizione della macchina, 16-17
Pannello comandi
Come effettuare un ciclo di lavaggio, 18
Programmi e opzioni, 19
Tabella Programmi
Le opzioni di lavaggio
Detersivi e biancheria, 20
Detersivo
Preparare la biancheria
Consigli di lavaggio
Precauzioni e consigli, 21
Sicurezza generale
Sistema bilanciamento del carico
Smaltimento
Apertura manuale della porta oblò
Manutenzione e cura, 22
Escludere acqua e corrente elettrica
Pulire la macchina
Pulire il cassetto dei detersivi
Curare il cestello
Pulire la pompa
Controllare il tubo di alimentazione dell’acqua
Anomalie e rimedi, 23
Assistenza, 24
Assistenza Attiva 7 giorni su 7
I
LAVABIANCHERIA
AQUALTIS
AQ8F 292 U
Istruzioni per
l’installazione e l’uso

14
I
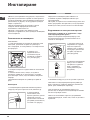
! E’ importante conservare questo libretto per poterlo
consultare in ogni momento. In caso di vendita, di
cessione o di trasloco, assicurarsi che resti insieme alla
lavabiancheria.
! Leggere attentamente le istruzioni: ci sono importanti
informazioni sull’installazione, sull’uso e sulla sicurezza.
! Nella busta contenente questo libretto troverete, oltre alla
garanzia, dei particolari che serviranno per l’installazione.
Disimballo e livellamento
Disimballo
1. Una volta disimballata la lavabiancheria, controllare che
non abbia subito danni durante il trasporto.
Se fosse danneggiata non collegarla e contattare
il rivenditore.
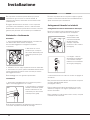
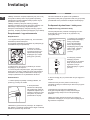
2. Rimuovere le 4 viti di
protezione per il trasporto
ed il relativo distanziale posti
nella parte posteriore (vedi
figura).
3. Chiudere i fori con i tappi di plastica contenuti nella busta.
4. Conservare tutti i pezzi; qualora la lavabiancheria dovesse
essere trasportata, dovranno essere rimontati per evitare
danneggiamenti interni.
! Gli imballaggi non sono giocattoli per bambini.
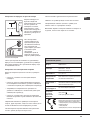
Livellamento
1. Posizionare la lavabiancheria su un pavimento piano e
rigido, senza appoggiarla a muri o mobili.
2. Compensare le irregolarità
svitando o avvitando i piedini
finchè la macchina non sia
orizzontale (non deve essere
inclinata più di 2 gradi).
! Un accurato livellamento dà stabilità ed evita vibrazioni e
rumorosità soprattutto nella fase di centrifuga.
! In caso sia posizionata su moquette o tappeti, regolare
i piedini in modo da conservare sotto la lavabiancheria lo
spazio necessario per la ventilazione.
Collegamenti idraulici ed elettrici
Collegamento del tubo di alimentazione dell’acqua
! Prima di collegare il tubo di alimentazione alla rete
idrica, far scorrere l’acqua finché non sia limpida.
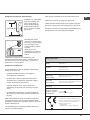
1. Collegare il tubo
di alimentazione alla
macchina avvitandolo
all’apposita presa
d’acqua, nella parte
posteriore in alto a destra
(vedi figura).
2. Collegare il tubo di
alimentazione avvitandolo
a un rubinetto d’acqua
fredda con bocca filettata
da 3/4 gas (vedi figura).
3. Fare attenzione che nel tubo non ci siano né pieghe né
strozzature.
! La pressione idrica del rubinetto deve essere compresa
nei valori della tabella Dati tecnici
(vedi pagina a fianco).
! Se la lunghezza del tubo di alimentazione non fosse
sufficiente, rivolgersi a un negozio specializzato o a un
tecnico autorizzato.
! Non utilizzare mai tubi di carico usati o vecchi, ma quelli
in dotazione alla macchina.
Installazione

15
I
Dati tecnici
Modello AQ8F 292 U
Dimensioni
larghezza cm 59,5
altezza cm 85
profondità cm 64,5
Capacità da 1 a 8 kg
Collegamenti
elettrici
vedi la targhetta caratteristiche tecni-
che applicata sulla macchina
Collegamenti idrici
pressione massima 1 MPa (10 bar)
pressione minima 0,05 MPa (0,5 bar)
capacità del cesto 62 litri
Velocità di
centrifuga
sino a 1200 giri al minuto
Programmi di con-
trollo secondo la
norma 2010/1061
programma ;
temperatura 60°C e 40°C.
Questa apparecchiatura è conforme
alle seguenti Direttive Comunitarie:
- 2004/108/CE (Compatibilità Elettro-
magnetica)
- 2002/96/CE
- 2006/95/CE (Bassa Tensione)
Collegamento del tubo di scarico
Collegare il tubo di scarico
a una conduttura di
scarico o a uno scarico
a muro posti tra 65 e
100 cm da terra evitando
assolutamente di piegarlo.
In alternativa, appoggiare
il tubo di scarico al bordo
di un lavandino o di una
vasca, legando la guida
in dotazione al rubinetto
(vedi figura).
L’estremità libera del
tubo di scarico non
deve rimanere immersa
nell’acqua.
! È sconsigliato usare tubi di prolunga; se indispensabile,
la prolunga deve avere lo stesso diametro del tubo
originale e non superare i 150 cm.
Collegamento elettrico
Prima di inserire la spina nella presa della corrente,
accertarsi che:
• la presa abbia la messa a terra e sia a norma
di legge;
• la presa sia in grado di sopportare il carico
massimo di potenza della macchina, indicato
nella tabella Dati tecnici (vedi a fianco);
• la tensione di alimentazione sia compresa nei
valori indicati nella tabella Dati tecnici (vedi a
fianco);
• la presa sia compatibile con la spina della
macchina. In caso contrario far sostituire la presa o
la spina.
! La macchina non va installata all’aperto, nemmeno se
lo spazio è riparato, perché è molto pericoloso lasciarla
esposta a pioggia e temporali.
! A macchina installata, la presa della corrente deve
essere facilmente raggiungibile.
! Non usare prolunghe e multiple.
! Il cavo non deve subire piegature o compressioni.
! Il cavo di alimentazione e la spina devono essere
sostituiti solo da tecnici autorizzati.
Attenzione! L’azienda declina ogni responsabilità qualora
queste norme non vengano rispettate.
65 - 100 cm

16
I
1. vaschetta per il prela-
vaggio: usare detersivo in
polvere..
2. vaschetta per il lavaggio:
usare detersivo in polvere o
liquido. In quest’ultimo caso
si raccomanda di versarlo
immediatamente prima
dell’avvio della lavabian-
cheria.
vaschetta per additivi: per ammorbidente o additi-
vi liquidi. Si raccomanda di non superare mai il livello
massimo indicato dalla griglia e di diluire ammorbidenti
concentrati.
Modalità di stand by
Questa lavatrice, in conformità alle nuove normative
legate al risparmio energetico, è dotata di un sistema
di autospegnimento (stand by) che entra in funzione
dopo circa 30 minuti nel caso di non utilizzo. Premere
brevemente il tasto ON-OFF
e attendere che la
macchina si riattivi.
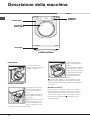
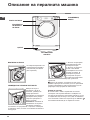
Descrizione della macchina
PORTA OBLO’
Per aprire la porta oblò
utilizzare sempre l’apposita
maniglia
(vedi figura).
CASSETTO DETERSIVI
Il cassetto detersivi si trova
all’interno della macchina
e vi si accede aprendo la
porta.
Per il dosaggio dei detersivi
vedi il capitolo “Detersivi e
biancheria”.
Nota: attaccare sul cassetto
detersivi l’adesivo con le
descrizioni dei programmi e
opzioni. L’adesivo si trova
nella busta contenente questo libretto.
PANNELLO
COMANDI
PORTA OBLÒ
MANIGLIA
PORTA OBLÒ
ZOCCOLO
PIEDINI REGOLABILI
1
2

17
I
Pulsante con spia ON/OFF: premere brevemente il
pulsante per accendere o spegnere la macchina. La spia
verde indica che la macchina è accesa. Per spegnere
la lavabiancheria durante il lavaggio è necessario
tenere premuto il pulsante più a lungo, circa 3 sec.;
una pressione breve o accidentale non permetterà lo
spegnimento della macchina.
Lo spegnimento della macchina durante un lavaggio in
corso annulla il lavaggio stesso.
Manopola PROGRAMMI: può essere ruotata in
entrambe le direzioni. Per impostare il programma più
adatto vedi la “Tabella programmi”.
Durante il lavaggio la manopola resta ferma.
Pulsante
TEMPERATURA: premere per modificare
o escludere la temperatura; il valore scelto viene indicato
dal display soprastante (vedi “Come effettuare un ciclo di
lavaggio”).
Pulsante
CENTRIFUGA: premere per modificare o
escludere la centrifuga; il valore scelto viene indicato dal
display soprastante (vedi “Come effettuare un ciclo di
lavaggio”).
Pulsante
PARTENZA RITARDATA: premere per
impostare una partenza ritardata del programma
prescelto; il valore del ritardo impostato viene indicato
dal display soprastante (vedi “Come effettuare un ciclo di
lavaggio”).
Pulsanti con Spie OPZIONI: premere per selezionare le
opzioni disponibili. La spia relativa all’opzione selezionata
rimarrà accesa (vedi “Come effettuare un ciclo di
lavaggio”).
Icone FASI DI LAVAGGIO: si illuminano ad indicare
l’avanzamento del ciclo (Lavaggio
- Risciacquo -
Centrifuga
- Scarico finale ).
La scritta
si illumina quando il ciclo è terminato.
Pulsante con spia AVVIO/PAUSA: quando la spia verde
lampeggia lentamente, premere il pulsante per avviare un
lavaggio. A ciclo avviato la spia diventa fissa. Per mettere
in pausa il lavaggio, premere nuovamente il pulsante; la
spia lampeggerà con colore arancione. Se la spia “Blocco
porta”
è spenta, si potrà aprire la porta oblò.
Per far ripartire il lavaggio dal punto in cui è stato
interrotto, premere nuovamente il pulsante.
Spia
BLOCCO PORTA: indica che la porta oblò è
bloccata. Per aprire la porta è necessario mettere il ciclo
in pausa (vedi “Come effettuare un ciclo di lavaggio”).
Pulsante con spia
BLOCCO TASTI: per attivare o
disattivare il blocco del pannello comandi, tenere premuto
il pulsante per circa 2 secondi. La spia accesa indica
che il pannello comandi è bloccato. In questo modo
si impediscono modifiche accidentali dei programmi,
soprattutto se in casa ci sono dei bambini.
Spia ECO: l’icona
si accenderà quando, modificando
i parametri di lavaggio, si otterrà un risparmio di energia
di almeno il 10%.
Inoltre prima che la macchina entri nella modalità di
“Stand by” l’icona
si accenderà per pochi secondi;
a macchina spenta il recupero energetico stimato sarà
dell’80% circa.
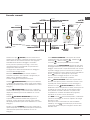
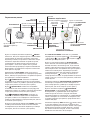
Pannello comandi
Pulsante
TEMPERATURA
Manopola
PROGRAMMI
Pulsanti con Spie
OPZIONI
Spia
BLOCCO
PORTA
Pulsante con spia
AVVIO/
PAUSA
Icone
FASI DI
LAVAGGIO
Pulsante
CENTRIFUGA
Pulsante
PARTENZA
RITARDATA
Pulsante con spia
BLOCCO
TASTI
Pulsante con spia
ON/OFF
Spia
ECO
Pulsanti e Spie
OPZIONI
Display
TEMPERATURA
Display
CENTRIFUGA
Display
PARTENZA RITARDATA/
DURATA CICLO
17

18
I
Come effettuare un ciclo di
lavaggio
NOTA: la prima volta che si utilizza la lavabiancheria,
effettuare un ciclo di lavaggio senza biancheria ma con
detersivo impostando il programma cotone 90° senza
prelavaggio.
1. ACCENDERE LA MACCHINA. Premere il pulsante
. Tutte le spie si accenderanno per 1 secondo dopo
il quale rimarrà accesa fissa la spia del pulsante
, la
spia AVVIO/PAUSA lampeggerà lentamente.
2. CARICARE LA BIANCHERIA. Aprire la porta oblò.
Caricare la biancheria facendo attenzione a non
superare la quantità di carico indicata nella tabella
programmi della pagina successiva.
3. DOSARE IL DETERSIVO. Estrarre il cassetto e
versare il detersivo nelle apposite vaschette come
spiegato in “Descrizione della macchina”.
4. CHIUDERE LA PORTA OBLO’.
5. SCEGLIERE IL PROGRAMMA. Ruotare la
MANOPOLA PROGRAMMI verso destra o verso
sinistra fino a selezionare il programma desiderato;
viene associata una temperatura e una velocità di
centrifuga che possono essere modificati.
6. PERSONALIZZARE IL CICLO DI LAVAGGIO.
Agire sugli appositi pulsanti del pannello comandi:
Modificare la temperatura e/o la
centrifuga.
La macchina visualizza automaticamente la
temperatura e la centrifuga massime previste per
il programma impostato o le ultime selezionate se
compatibili con il programma scelto. Premendo il
pulsante
si riduce progressivamente la temperatura
sino al lavaggio a freddo (
). Premendo il pulsante
si riduce progressivamente la centrifuga sino
alla sua esclusione (
). Un’ulteriore pressione dei
pulsanti riporterà i valori a quelli massimi previsti.
! Eccezione: selezionando il programma Cotone
Bianchi la temperatura può essere portata sino a 90°.
Impostare la partenza ritardata.
Premere il pulsante relativo fino a raggiungere il tempo
del ritardo desiderato. Durante l’impostazione viene
visualizzato il tempo del ritardo insieme al simbolo
che lampeggia; dopo qualche secondo dalla scelta
del ritardo il display visualizzerà il simbolo
fisso e la
durata del ciclo. Premendo il pulsante una volta viene
visualizzato il tempo di ritardo impostato.
Per rimuovere la partenza ritardata premere il pulsante
fino a che sul display compare la scritta OFF; il
simbolo
si spegnerà.
! Una volta premuto il pulsante AVVIO/PAUSA il valore
del ritardo potrà essere modificato solo diminuendolo.
Modificare le caratteristiche del
ciclo.
Premere i pulsanti OPZIONI per personalizzare il
lavaggio secondo le proprie esigenze.
• Premere il pulsante per attivare l’opzione; si
accenderà la spia relativa.
• Premere nuovamente il pulsante per disattivare
l’opzione; la spia si spegnerà.
! Se l’opzione selezionata non è compatibile con il
programma impostato, l’incompatibilità verrà segnalata
con il lampeggio della spia ed un segnale acustico (3
beep) e l’opzione non verrà attivata.
! Se l’opzione selezionata non è compatibile con
un’altra precedentemente impostata, la spia relativa
alla prima opzione selezionata lampeggerà e verrà
attivata solo la seconda, la spia del pulsante si fisserà.
7. AVVIARE IL PROGRAMMA. Premere il tasto AVVIO/
PAUSA. La spia relativa si fisserà e la porta oblò si
bloccherà (spia BLOCCO PORTA
accesa). Le
icone relative alle fasi di lavaggio si illumineranno
durante il ciclo ad indicare la fase in corso.
Per cambiare un programma mentre un ciclo è in
corso, mettere la lavabiancheria in pausa premendo
il pulsante AVVIO/PAUSA; selezionare quindi il ciclo
desiderato e premere nuovamente il pulsante AVVIO/
PAUSA.
Per aprire la porta mentre un ciclo è in corso premere il
pulsante AVVIO/PAUSA; se la spia
BLOCCO PORTA
è spenta sarà possibile aprire
la porta. Premere nuovamente sul pulsante AVVIO/
PAUSA per far ripartire il programma dal punto in cui
era stato interrotto.
8. FINE DEL PROGRAMMA. Viene indicata dalla
scritta END accesa. La porta oblò si potrà aprire
immediatamente. Se la spia AVVIO/PAUSA lampeggia,
premere il pulsante per terminare il ciclo. Aprire la
porta, scaricare la biancheria e spegnere la macchina.
! Se si desidera annullare un ciclo già avviato, tenere
premuto il pulsante
finché il ciclo non verrà interrotto e
la macchina si spegnerà.
Sacchetto per trapunte, tende e capi delicati
Grazie allo speciale sacchetto fornito in dotazione, la
lavabiancheria Aqualtis ti consente di lavare anche i
capi più preziosi e delicati garantendo loro la massima
protezione. Si raccomanda di utilizzare in ogni caso il
sacchetto per il lavaggio di trapunte e piumini con fodera
esterna realizzata in materiale sintetico.

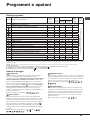
19
I
Icona Descrizione del Programma
Temp.
max.
(°C)
Velocità
max.
(giri al
minuto)
Detersivi e additivi
Carico
max.
(Kg)
Durata
ciclo
Detersivo
Lavaggio
Ammorbi-
dente
Programmi Cotone
(*) E’ possibile controllare la durata dei programmi di
lavaggio sul display.
Cotone bianchi con prelavaggio
(Aggiungere il detersivo nell’apposito scomparto).
90° 1200
8
Cotone bianchi (1): bianchi e colorati resistenti molto sporchi.
60°
(Max. 90°C)
1200
8
Cotone bianchi (1-2): bianchi e colorati delicati molto sporchi. 40° 1200
8
Cotone colorati (3) 40° 1200
8
Camicie
40° 600
2
Jeans
40° 800
4
Programmi speciali
Baby: colori delicati molto sporchi. 40° 800
4
Sintetici resistenti 60° 800
3,5
** Refresh Vapore
(vedi pagina seguente).
- - - - 1,5
Biancheria “7 giorni”: per biancheria da letto e da bagno.” 60° 1200
8
Piumini: per capi imbottiti in piuma d’oca. 30° 1000
3,5
Seta: per capi in seta, viscosa, lingerie. 30° 0
2
Lana: per lana, cachemire, ecc. 40° 600
2
Mix 30’: per rinfrescare rapidamente capi poco sporchi
(non indicato per lana, seta e capi da lavare a mano).
30° 800
3,5
Programmi parziali
Risciacquo - 1200 -
8
Centrifuga - 1200 - - 8
Scarico - 0 - - 8
Programmi e opzioni
Tabella programmi
(*) Nota: dopo circa 10 minuti dallo START, la macchina in base al carico effettuato, ricalcolerà e visualizzera il tempo residuo alla fine del programma.
Per tutti Test Institutes:
1) Programma di controllo secondo la norma 2010/1061: impostare il programma
con una temperaura di 60°C e 40°C.
2) Programma cotone lungo: impostare il programma con una temperatura di 40°C.
3) Programma cotone corto: impostare il programma con una temperatura di 40°C.
Opzioni di lavaggio
Stira Facile
Selezionando questa opzione, il lavaggio e la centrifuga
saranno opportunamente modificati per ridurre la
formazione di pieghe. Al temine del ciclo la lavabiancheria
effettuerà delle lente rotazioni del cestello; le spie “Stira
Facile” e AVVIO/PAUSA lampeggeranno. Per terminare il
ciclo premere il pulsante AVVIO/PAUSA o il pulsante “Stira
Facile”. Nel programma “Seta”
la macchina terminerà il
ciclo con la biancheria in ammollo e la spia “Stira Facile”
lampeggerà. Per scaricare l’acqua e poter rimuovere il
bucato è necessario premere il pulsante AVVIO/PAUSA o il
pulsante “Stira Facile”.
! Non è attivabile sui programmi , , , , , .
Igiene Vapore
Selezionando questa opzione si aumenta l’efficacia del
lavaggio tramite generazione di vapore che durante il ciclo
elimina anche eventuali batteri presenti nelle fibre curandoli
allo stesso momento. Inserire il bucato nel cestello, selezio-
nare il programma compatibile e scegliere l’opzione “
“.
! Durante il funzionamento della lavatrice la porta oblò po-
trebbe risultare meno trasparente a causa della formazione
di vapore.
! Non è attivabile sui programmi , (90°C), , ,
, , , , , , , .
Risparmio Tempo
Selezionando questa opzione si riduce la durata del
programma del 30%-50% in base al ciclo scelto, garantendo
al contempo un risparmio di acqua ed energia. Utilizzare
questo ciclo per capi non eccessivamente sporchi.
! Non è attivabile sui programmi , , , , , ,
, , , .
Extra Risciacquo
Selezionando questa opzione si aumenta l’efficacia del
risciacquo e si assicura la massima rimozione dei residui
del detersivo. E’ utile per pelli particolarmente sensibili ai
detersivi. Si consiglia l’utilizzo di questa opzione con la
lavabiancheria a pieno carico o con l’utilizzo di elevate
dosi di detersivo.
! Non è attivabile sui programmi , , , .
La durata del ciclo indicata sul display o sul libretto è una stima calcolata in base a condizioni standard. Il tempo effettivo può variare in base a numerosi fattori quali la
temperatura e la pressione dell’acqua in ingresso, la temperatura ambiente, la quantità di detersivo, la quantità ed il tipo di carico, il bilanciamento del carico, le opzioni
aggiuntive selezionate.
19

20
I
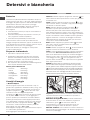
Detersivi e biancheria
Detersivo
La scelta e la quantità del detersivo dipendono dal tipo di
tessuto (cotone, lana, seta...), dal colore, dalla temperatura
di lavaggio, dal grado di sporco e dalla durezza dell’acqua.
Dosare bene il detersivo evita sprechi e protegge
l’ambiente: pur biodegradabili, i detersivi contengono
elementi che alterano l’equilibrio della natura.
Si consiglia di:
• usare detersivi in polvere per capi in cotone bianchi e
per il prelavaggio.
• usare detersivi liquidi per capi delicati in cotone e per
tutti i programmi a bassa temperatura.
• usare detersivi liquidi delicati per lana e seta.
Il detersivo deve essere versato prima dell’inizio del
lavaggio nell’apposita vaschetta, oppure nel dosatore da
porre direttamente nel cestello. In questo caso non si può
selezionare il ciclo Cotone con prelavaggio.
! Non usare detersivi per il lavaggio a mano perché
formano troppa schiuma.
Preparare la biancheria
• Aprire bene i capi prima di caricarli.
• Suddividere la biancheria secondo il tipo di tessuto
(simbolo sull’etichetta del capo) ed il colore facendo
attenzione a separare i capi colorati da quelli bianchi;
• Svuotare le tasche e controllare i bottoni;
• Non superare i valori indicati nella “Tabella Programmi”
riferiti al peso della biancheria asciutta.
Quanto pesa la biancheria?
1 lenzuolo 400-500 gr.
1 federa 150-200 gr.
1 tovaglia 400-500 gr.
1 accappatoio 900-1200 gr.
1 asciugamano 150-250 gr.
1 jeans 400-500 gr.
1 camicia 150-200 gr.
Consigli di lavaggio
** Refresh Vapore
Questo programma permette di rinfrescare i capi to-
gliendo odori sgradevoli e rilassando le fibre (1,5 kg, circa
3 capi). Inserire solamente capi asciutti (non sporchi) e
scegliere il programma “
“. Alla fine del ciclo i capi
risulteranno umidi, si consiglia di appenderli.
Il programma “
“ facilita il processo di stiratura. Inoltre
con le palline “Steam Profumo”, si può aggiungere il
profumo preferito per trasmetterlo sul bucato. Mettere
qualche goccia di profumo sulla spugna presente all’in-
terno della pallina, richiuderla, inserirla nel cesto assieme
ai vestiti e far partire il programma dedicato “
“. Alla
fine del ciclo i vestiti risulteranno rilassati e profumati.
! Sconsigliato per capi in lana o seta.
! Non bagnare la spugna con quantità eccessive di profu-
mo onde evitare gocciolamenti.
! Non aggiungere ammorbidente o detersivo.
Camicie: utilizzare l’apposito programma “Camicie”
per
lavare camicie di diversi tipi di tessuto e colore per garantirne
la massima cura.
Jeans: utilizzare l’apposito programma “Jeans”
per tutti i
capi in tessuto “Denim”; rovesciare i capi prima del lavaggio
ed utilizzare un detersivo liquido.
Baby: utilizzare l’apposito programma “Baby”
per
asportare lo sporco tipico dei bambini e rimuovere il
detersivo dai panni onde evitare reazioni allergiche alla
pelle delicata dei bambini. Questo ciclo è stato studiato per
ridurre la carica batterica utilizzando una maggior quantità di
acqua e ottimizzando l’effetto di additivi specifici igenizzanti
aggiunti al detersivo. Al temine del lavaggio la macchina
effettuerà delle lente rotazioni del cestello; per terminare il
ciclo premere il tasto AVVIO/PAUSA.
Seta: utilizzare l’apposito programma “Seta”
per lavare
tutti i capi in seta. Si consiglia l’utilizzo di un detersivo
specifico per capi delicati.
Tende: utilizzare il programma “Seta”
. Si raccomanda di
piegarle e inserirle nel sacchetto fornito in dotazione.
Lana: è l’unica lavabiancheria ad aver ottenuto il prestigioso
riconoscimento Woolmark Platinum Care (M.0508) da
parte di The Woolmark Company, che certifica il lavaggio in
lavatrice di tutti i capi in lana, anche quelli recanti l’etichetta
“solo lavaggio a mano”
. Con il programma “Lana” si
possono lavare in lavatrice tutti i capi in lana con la garanzia
delle migliori performance.
Piumini: per lavare capi con imbottiture in piuma d’oca quali
piumoni matrimoniali o singoli (non eccedenti i 3,5 kg. di peso),
cuscini, giacche a vento utilizzare l’apposito programma “Piumini”
. Si raccomanda di caricare i piumini nel cestello ripiegandone
i lembi verso l’interno (vedi figure) e di non superare i ¾ di volume
del cestello stesso. Per un lavaggio ottimale si raccomanda di
utilizzare detersivo liquido da dosare nel cassetto detersivo.
Trapunte: per lavare trapunte con fodera sintetica, utilizzare
l’apposito sacchetto fornito in dotazione e impostare il
programma “Piumini”
.
Biancheria da bagno e da letto: per lavare la biancheria
di tutta la casa in un unico ciclo utilizzare il programma
“Biancheria 7 giorni”
che ottimizza l’utilizzo di
ammorbidente e ti consente di risparmiare tempo ed
energia. Si consiglia l’utilizzo di detersivo in polvere.
Macchie ostinate: è bene trattare le macchie ostinate con
sapone solido prima del lavaggio e di utilizzare il programma
Cotone con prelavaggio.
La pagina si sta caricando...
La pagina si sta caricando...
La pagina si sta caricando...
La pagina si sta caricando...
La pagina si sta caricando...
La pagina si sta caricando...
La pagina si sta caricando...
La pagina si sta caricando...
La pagina si sta caricando...
La pagina si sta caricando...
La pagina si sta caricando...
La pagina si sta caricando...
La pagina si sta caricando...
La pagina si sta caricando...
La pagina si sta caricando...
La pagina si sta caricando...
La pagina si sta caricando...
La pagina si sta caricando...
La pagina si sta caricando...
La pagina si sta caricando...
La pagina si sta caricando...
La pagina si sta caricando...
La pagina si sta caricando...
La pagina si sta caricando...
La pagina si sta caricando...
La pagina si sta caricando...
La pagina si sta caricando...
La pagina si sta caricando...
-
 1
1
-
 2
2
-
 3
3
-
 4
4
-
 5
5
-
 6
6
-
 7
7
-
 8
8
-
 9
9
-
 10
10
-
 11
11
-
 12
12
-
 13
13
-
 14
14
-
 15
15
-
 16
16
-
 17
17
-
 18
18
-
 19
19
-
 20
20
-
 21
21
-
 22
22
-
 23
23
-
 24
24
-
 25
25
-
 26
26
-
 27
27
-
 28
28
-
 29
29
-
 30
30
-
 31
31
-
 32
32
-
 33
33
-
 34
34
-
 35
35
-
 36
36
-
 37
37
-
 38
38
-
 39
39
-
 40
40
-
 41
41
-
 42
42
-
 43
43
-
 44
44
-
 45
45
-
 46
46
-
 47
47
-
 48
48


Indesit AQ8F 292 U (EU)/V Guida utente
- Categoria
- Lavatrici
- Tipo
- Guida utente