
English
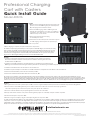
1. With the cabinet unplugged and power switch in the “o”
position, connect the USB charger(s) (not included) to the
AC power plugs in the back of the cabinet.
2. Connect all USB charging cables to USB chargers and
feed the cables through the access holes. For additional
organization, each cable can be secured inside the cable
holder at the top of each divider.
3. Connect the cabinet main power plug
to a wall AC power outlet.
4. From the front of the cabinet, attach each tablet or phone
to a USB charging cable and place into separate bays.
5. Turn power switch (on the side of the cabinet) to the “on” position.
6. When charging is complete, turn power switch to the “o” position.
The cabinet’s AC power plugs should only be used in conjunction with USB chargers (not included). For safety
purposes make sure that all electrical components don’t exceed a 10.8A maximum load. Any other use may
cause an overload which will result in switch breaker tripping. If the power strips in the back of the cabinet
shut down power, unplug all devices and turn main power switch back to the “on” position. Then you can
plug the devices back in again, making sure not to exceed a 10.8A maximum load.
Deutsch
1. Schließen Sie Ihre USB-Ladegeräte (nicht im Lieferumfang) an die Steckdosen im hinteren
Bereich des Schrankes an. Achten Sie darauf, dass der Schrank vom Strom getrennt ist und
der Netzschalter auf „O“ steht.
2. Schließen Sie alle USB-Ladekabel an die USB-Ladegeräte an und führen Sie die Kabel durch die
Önungen. Für zusätzliches Kabelmanagement kann jedes Kabel in der Halterung an der Oberseite jedes Trennfachs xiert werden.
3. Schließen Sie den Netzstecker des Schrankes an eine Steckdose an.
4. Schließen Sie jedes Smartphone oder Tablet an ein USB-Ladekabel an und platzieren Sie die Geräte in den Trennfächern.
5. Stellen Sie den Netzschalter (an der Seite des Schrankes) auf “On”.
6. Stellen Sie bei Nichtbetrieb den Netzschalter des Schrankes auf „O“.
Die Steckdosen des Schrankes sollten mit USB-Ladegeräten (nicht im Lieferumfang) verwendet werden. Achten Sie aus Sicherheitsgründen darauf, dass Sie keine
Ladegeräte mit mehr als 10,8 A Ausgangsleistung verwenden. Eine höhere Ausgangsleistung kann zu Überlastung und damit zum Auslösen der Sicherung führen. Wenn
die Steckdosenleisten im hinteren Bereich des Schranks abschalten, dann trennen Sie alle Geräte und tauschen Sie das Ladegerät mit der zu hohen Ausgangsleistung aus.
Schließen Sie die Geräte wieder an und stellen Sie dann den Netzschalter auf „On“. Achten Sie darauf, dass Sie die 10,8-A-Ausgangsleistung nicht mehr überschreiten.
Professional Charging
Cart with Casters
Quick Install Guide
Model 406116
I NT- 4 0 6116 - Q i G -1115 _ R E V- 5.01
Important: Read before use. • Importante: Leer antes de usar.
Español
1. Con el gabinete desconectado y el interruptor en “O”, conecte el cargador USB (no incluido) de toma de corriente CA a la parte trasera del gabinete.
2. Conecte todos los cables USB al gabinete, pase los cables a través de los oricios de acceso. Para una mejor organización
cada cable se puede jar en el interior del soporte en la parte superior de cada divisor.
3. Conecte el cable de alimentación principal del gabinete a una toma de corriente CA.
4. Coloque cada tableta o teléfono en la parte frontal del gabinete y fíjela a un cable USB, colóquelo en bahías separadas.
5. Encienda el interruptor a la posición “ON”.
6. Cuando la carga esté completa, apague el interruptor del gabinete a la posición “O”.
Los cables de alimentación del gabinete sólo deben utilizarse en combinación con los cargadores USB (no incluido). Por razones de seguridad asegúrese de que todos los
componentes eléctricos no superen una carga máxima 10.8A. Cualquier otro uso puede provocar una sobrecarga lo que derivaría en un daño a los fusibles del Switch.
Si las bandas de poder se apagaran se encuentran en la parte trasera del gabinete, desenchufe todos los dispositivos y encienda el interruptor de alimentación principal
a la posición “ON”. Entonces usted puede conectar los dispositivos nuevamente, asegurándose de no superar una carga máxima 10.8A.
intellinetnetwork.com
All trademarks and trade names are the property of their respective owners. • Alle Marken und Markennamen sind Eigentum Ihrer jeweiligen Inhaber. • Todas las marcas y nombres comerciales son propiedad de sus respectivos dueños.
Toutes les marques et noms commerciaux sont la propriété de leurs propriétaires respectifs. • Wszystkie znaki towarowe i nazwy handlowe należą do ich właścicieli. • Tutti i marchi registrati e le dominazioni commerciali sono di proprietà dei loro rispettivi proprietari.

Français
1. Avec le bâti débranché et le commutateur d’alimentation en position « arrêt », connectez le(s) chargeur(s) USB (non inclus) aux ches d’alimentation CA à l’arrière du bâti.
2. Connectez tous les câbles de charge USB aux chargeurs USB et faites passer les câbles par les trous d’accès. Pour une meilleure organisation, chaque câble peut
être xé à l’intérieur du support pour câble sur le dessus de chaque séparateur.
3. Connectez la che d’alimentation principale du bâti à une prise murale CA.
4. À l’avant du bâti, reliez chaque tablette ou téléphone à un câble de charge USB et placez-les dans des baies séparées.
5. Placez le commutateur d’alimentation (sur le côté du bâti) en position « marche ».
6. Une fois la charge terminée, placez le commutateur d’alimentation en position « arrêt ».
Les ches d’alimentation CA du bâti ne doivent être utilisées qu’avec des chargeurs USB (non inclus). À des ns de sécurité, assurez-vous que tous les composants électriques
ne dépassent pas une charge maximale de 10,8 A. Tout autre usage peut causer une surcharge qui entraînera le déclenchement du coupe-circuit. Si les bandeaux multiprises
à l’arrière du bâti coupent l’alimentation, débranchez tous les appareils et replacez le commutateur d’alimentation principale en position « marche ». Vous pouvez ensuite
rebrancher les appareils, en veillant à ne pas dépasser la charge maximale de 10,8 A.
Italiano
1. Con il cabinet scollegato e il tasto di accensione in posizione “o”, connettere i caricabatterie USB (non inclusi) alle prese di alimentazione AC poste sul retro dell’armadietto.
2. Collegare i cavi di ricarica ai caricabatterie USB e farli passare attraverso i fori di accesso. Per una migliore organizzazione, ogni cavo può essere ssato all’interno
del supporto per cavo posto nella parte superiore di ogni divisore.
3. Collegare la spina elettrica del cabinet ad una presa di corrente AC.
4. Dalla parte frontale dell’armadietto, collegare ogni tablet o smartphone al proprio cavo USB di ricarica e posizionare i dispositivi negli alloggiamenti.
5. Accendere la stazione di ricarica posizionando il tasto di accensione (posto sul lato del cabinet) su “on”.
6. A ricarica ultimata, riportare il tasto di accensione in posizione “o”.
Le prese di alimentatore AC del cabinet devono essere usate solo in combinazione con caricabatterie USB (non inclusi). Per sicurezza, accertarsi che tutti i dispositivi elettrici
collegati non superino un carico massimo di 10.8A. Qualsiasi altro utilizzo potrebbe causare un sovraccarico che provocherebbe lo scatto dell’interruttore. Se le multiprese
nella parte posteriore del cabinet non dovessero funzionare, scollegare tutte le periferiche e accendere l’interruttore principale di alimentazione mettendolo in posizione
“on”. Sarà quindi possibile collegare nuovamente i dispositivi, facendo attenzione a non superare il carico massimo di 10.8A.
Polski
1. Gdy szafka jest odłączona od zasilania, oraz gdy włącznik jest w pozycji „OFF”, podłącz ładowarki USB (brak w zestawie) do gniazdek elektrycznych AC w tylnej części szafki.
2. Podłącz wszystkie kable USB do ładowarek USB i poprowadź je przez specjalne otwory. Dodatkowo, dla lepszej organizacji, każdy przewód może być
przymocowany do górnej części przegródek oddzielających sloty.
3. Podłącz przewód zasilający szafki do gniazda AC sieci elektrycznej.
4. W przedniej części szafki podłącz każdy z tabletów lub telefonów do przewodów USB i umieść je w oddzielnych slotach.
5. Ustaw włącznik zasilania w pozycji „ON” (znajduje się on na bocznej ściance szafki).
6. Po zakończeniu ładowania wyłącz szafkę ustawiając włącznik zasilania w pozycji „OFF”.
Gniazdka elektryczne AC w tylnej części szafki służą tylko i wyłącznie do podłączenia ładowarek USB (brak w zestawie). Dla bezpieczeństwa upewnij się, że suma natężenia
prądu podłączonych komponentów elektrycznych nie przekracza maksymalnego dopuszczalnego obciążenia 10.8 A. Każde inne użycie może spowodować automatyczne
zadziałanie włącznika zasilania. Jeśli w gniazdach AC w tylnej części szafki brak jest napięcie należy odłączyć wszystkie urządzenia i ustawić włącznik zasilania w pozycji
„ON”. Następnie należy kolejno podłączać ładowarki upewniając się, że nie przekraczają one maksymalnego dopuszczalnego obciążenia 10.8 A.
Waste Electrical & Electronic Equipment
Disposal of Electric and Electronic Equipment (applicable in the European Union and other European countries with separate collection systems)
English: This symbol on the product or its packaging indicates that this product shall not be treated as household waste. Instead, it should be taken to an applicable collection point for the recycling of electrical and electronic equipment. By ensuring
this product is disposed of correctly, you will help prevent potential negative consequences to the environment and human health, which could otherwise be caused by inappropriate waste handling of this product. If your equipment contains easily
removable batteries or accumulators, dispose of these separately according to your local requirements. The recycling of materials will help to conserve natural resources. For more detailed information about recycling of this product, contact your local city
oce, your household waste disposal service or the shop where you purchased this product. In countries outside of the EU: If you wish to discard this product, contact your local authorities and ask for the correct manner of disposal.
Deutsch: Dieses auf dem Produkt oder der Verpackung angebrachte Symbol zeigt an, dass dieses Produkt nicht mit dem Hausmüll entsorgt werden darf. In Übereinstimmung mit der Richtlinie 2002/96/EG des Europäischen Parlaments und des Rates
über Elektro- und Elektronik-Altgeräte (WEEE) darf dieses Elektrogerät nicht im normalen Hausmüll oder dem Gelben Sack entsorgt werden. Wenn Sie dieses Produkt entsorgen möchten, bringen Sie es bitte zur Verkaufsstelle zurück oder zum Recycling-
Sammelpunkt Ihrer Gemeinde.
Español: Este símbolo en el producto o su embalaje indica que el producto no debe tratarse como residuo doméstico. De conformidad con la Directiva 2002/96/CE de la UE sobre residuos de aparatos eléctricos y electrónicos (RAEE), este producto eléctrico no puede
desecharse con el resto de residuos no clasicados. Deshágase de este producto devolviéndolo a su punto de venta o a un punto de recolección municipal para su reciclaje.
Français: Ce symbole sur Ie produit ou son emballage signie que ce produit ne doit pas être traité comme un déchet ménager. Conformément à la Directive 2002/96/EC sur les déchets d’équipements électriques et électroniques (DEEE), ce produit électrique ne doit
en aucun cas être mis au rebut sous forme de déchet municipal non trié. Veuillez vous débarrasser de ce produit en Ie renvoyant à son point de vente ou au point de ramassage local dans votre municipalité, à des ns de recyclage.
Italiano: Questo simbolo sui prodotto o sulla relativa confezione indica che il prodotto non va trattato come un riuto domestico. In ottemperanza alla Direttiva UE 2002/96/EC sui riuti di apparecchiature elettriche ed elettroniche (RAEE), questa prodotto elettrico
non deve essere smaltito come riuto municipale misto. Si prega di smaltire il prodotto riportandolo al punto vendita o al punto di raccolta municipale locale per un opportuno riciclaggio.
Polski: Jeśli na produkcie lub jego opakowaniu umieszczono ten symbol, wówczas w czasie utylizacji nie wolno wyrzucać tego produktu wraz z odpadami komunalnymi. Zgodnie z Dyrektywą Nr 2002/96/WE w sprawie zużytego sprzętu elektrycznego i
elektronicznego (WEEE), niniejszego produktu elektrycznego nie wolno usuwać jako nie posortowanego odpadu komunalnego. Prosimy o usuniecie niniejszego produktu poprzez jego zwrot do punktu zakupu lub oddanie do miejscowego komunalnego punktu
zbiórki odpadów przeznaczonych do recyklingu.
Regulatory Statements
FCC Class A
This equipment has been tested and found to comply with the limits for a Class A digital device, pursuant to Part 15 of the Federal Communications Commission (FCC) Rules. These limits are designed to provide reasonable protection against harmful
interference when the equipment is operated in a commercial environment. This equipment generates, uses and can radiate radio frequency energy, and if not installed and used in accordance with the instruction manual may cause harmful interference
to radio communications. Operation of this equipment in a residential area is likely to cause harmful interference, in which case the user will be required to correct the interference at his own expense. Any changes or modications made to this equipment
without the approval of the manuafacturer could result in the product not meeting the Class A limits, in which case the FCC could void the user’s authority to operate the equipment.
CE / R&TTE
English: This device complies with the requirements of R&TTE Directive 1999/5/EC. The Declaration of Conformity for this product is available at: intellinetnetwork.com
Deutsch: Dieses Gerät enspricht der Direktive R&TTE Direktive 1999/5/EC. Die Konformitätserklärung für dieses Produkt nden Sie unter: intellinetnetwork.com
Español: Este dispositivo cumple con los requerimientos de la Directiva R&TTE 1999/5/EC. La declaración de conformidad para este producto esta disponible en: intellinetnetwork.com
Français: Cet appareil satisfait aux exigences de la directive R&TTE 1999/5/CE. La Déclaration de Conformité pour ce produit est disponible à l’adresset: intellinetnetwork.com
Polski: Urządzenie spełnia wymagania dyrektywy R&TTE 1999/5/EC. Deklaracja zgodności dostępna jest na stronie internetowej producenta: intellinetnetwork.com
Italiano: Questo dispositivo è conforme alla Direttiva 1999/5/EC R&TTE. La dichiarazione di conformità per questo prodotto è disponibile al: intellinetnetwork.com
Warranty Information
English: For warranty information, go to intellinetnetwork.com/warranty.
Deutsch: Garantieinformationen nden Sie hier unter intellinetnetwork.com/warranty.
Español: Si desea obtener información sobre la garantía, visite intellinetnetwork.com/warranty.
Français: Pour consulter les informations sur la garantie, rendezvous à l’adresse intellinetnetwork.com/warranty.
Polski: Informacje dotyczące gwarancji znajdują się na stronie intellinetnetwork.com/warranty.
Italiano: Per informazioni sulla garanzia, accedere a intellinetnetwork.com/warranty.
En México: Póliza de Garantia Intellinet — Datos del importador y responsable ante el consumidor IC Intracom México, S.A.P.I. de C.V. • Av. Interceptor Poniente # 73, Col. Parque Industrial La Joya, Cuautitlán Izcalli, Estado de México, C.P. 54730, México. • Tel. (55)1500-4500
La presente garantía cubre este producto por 3 años contra cualquier defecto de fabricación en sus materiales y mano de obra, bajo las siguientes condiciones:
1. Todos los productos a que se reere esta garantía, ampara su cambio físico, sin ningún cargo para el consumidor.
2. El comercializador no tiene talleres de servicio, debido a que los productos que se garantizan no cuentan con reparaciones, ni refacciones, ya que su garantía es de cambio físico.
3. La garantía cubre exclusivamente aquellas partes, equipos o sub-ensambles que hayan sido instaladas de fábrica y no incluye en ningún caso el equipo adicional o cualesquiera que hayan sido adicionados al mismo por el usuario o distribuidor.
Para hacer efectiva esta garantía bastará con presentar el producto al distribuidor en el domicilio donde fue adquirido o en el domicilio de
IC Intracom México, S.A.P.I. de C.V., junto con los accesorios contenidos en su empaque, acompañado de su póliza debidamente llenada y
sellada por la casa vendedora (indispensable el sello y fecha de compra) donde lo adquirió, o bien, la factura o ticket de compra original
donde se mencione claramente el modelo, número de serie (cuando aplique) y fecha de adquisición. Esta garantía no es válida en los
siguientes casos: Si el producto se hubiese utilizado en condiciones distintas a las normales; si el producto no ha sido operado conforme
a los instructivos de uso; o si el producto ha sido alterado o tratado de ser reparado por el consumidor o terceras personas.
North & South America
IC Intracom Americas
550 Commerce Blvd.
Oldsmar, FL 34677 USA
Asia & Africa
IC Intracom Asia
4-F, No. 77, Sec. 1, Xintai 5th Rd.
Xizhi Dist., New Taipei City 221, Taiwan
Europe
IC Intracom Europe
Löhbacher Str. 7, D-58553
Halver, Germany
-
 1
1
-
 2
2


Intellinet 406116 Quick Installation Guide
- Tipo
- Quick Installation Guide
- Questo manuale è adatto anche per
in altre lingue
- English: Intellinet 406116
- français: Intellinet 406116
- español: Intellinet 406116
- polski: Intellinet 406116
Documenti correlati
-
Intellinet 502931 Quick Installation Guide
-
Intellinet 561143 Quick Installation Guide
-
Intellinet 561167 Quick Installation Guide
-
Intellinet 561198 Quick Installation Guide
-
-
-