
1CI90
1CI120
1CIA180
CANALI ATTREZZATI
CHANNELS
Manuale d’installazione e uso
Installation and use manual

2
Prescrizioni importanti per la
sicurezza personale e
dell’apparecchiatura
Important rules for personal safety and the
safety of the appliance
Informazioni generali
General information
Il Costruttore si riserva di apportare ai propri
prodotti e a questo manuale le modifiche che
riterrà opportune senza obbligo di preavviso.
I disegni, gli schemi di installazione e le
tabelle contenuti all’interno del manuale
sono da ritenersi indicativi ed esclusivamente
a titolo d’informazione.
The manufacturer reserves the right to make
any changes deemed suitable to the product
without prior notice. The drawings,
installation diagrams and tables contained in
this manual are approximate and for
informational purposes only.
Complimenti per aver acquistato una
apparecchiatura Barazza!
Questa è un’apparecchiatura di grande qualità in
grado di accompagnarvi nel Vostro lavoro per
lungo tempo in modo affidabile e sicuro
fornendo prestazioni di altissimo livello.
L’installazione e l’uso dell’apparecchiatura è
semplice e immediato.
Vi invitiamo a leggere attentamente questo
manuale: ciò permetterà un’installazione e un
utilizzo corretto che manterrà la Vostra
apparecchiatura sempre perfetta ed efficiente
negli anni.
Per agevolare la lettura del manuale sono
riportati i seguenti simboli:
Congratulations on purchasing a Barazza
appliance!
This safe and reliable high-quality appliance can
assist you in your work with long-lasting top-level
performance.
It also has the added advantage of being quick and
simple to install and easy to use.
Please read this manual carefully, as it provides
important information for the correct installation
and use of the appliance which will ensure its long-
term efficiency.
The following symbols are used to assist you in
reading this manual:

3
INSTALLAZIONE
INSTALLATION
IN
CASSO APPARECCHIATURA
BUILT
-
IN INSTALLATION
Accertarsi del perfetto stato e della
stabilità del mobile nel quale saranno
incassate le apparecchiature
(Normativa DIN 68930).
Make certain that the cabinet in which
you will be installing the appliance is in
perfect condition and completely stable
(Standard DIN 68930).
Nelle realizzazioni fuoriserie, le
dimensioni di ingombro sono
“personalizzate”.
With custom made models, dimensions
are made-to-order.
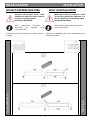
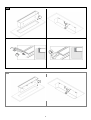
Preparare un foro di incasso con le misure indicate
in figura:
Prepare an embedded hole with measurements as
specified in figures:
Incasso/Built-In
Filo/Flush
90
120

4
CANALI A FILO
Sistemare l’apparecchiatura sopra il foro d’incasso
(fig. 2A part. 1) bloccandola con le viti e le staffe in
dotazione (fig. 2A part. 2). Sigillare la fessura tra
canale e abbassamento con silicone (fig 2A part. 3)
e pulire l’eccesso (fig. 2A part. 4).
FLUSH CHAN
N
ELS
Arrange the appliance above the embedded hole (fig.
2A part.1) secure it using the screws and brackets
provided (fig. 2A part. 2). Seal the gap between the
channel and lowering with silicone (fig. 2A part. 3) and
remove any excess (fig. 2A part. 4)
CANALI AD INCASSO
/APPOGGIO
Sistemare l’apparecchiatura sopra il foro di incasso
spingendola contro il top (fig. 2B part. 1). Bloccare
l’apparecchiatura con le viti e le staffe date in
dotazione (fig. 2B part 2).
BUILT
-
IN CHAN
N
EL
S
Arrange the appliance above the embedded hole
(fig. 2B part. 1).
Secure the appliance using the screws and brackets
Provided (fig. 2B part. 2)
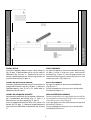
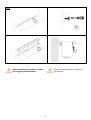
CANALI AD APPOGGIO A PARETE
Posizionare il profilo alla giusta altezza sulla parete
per l’installazione del canale (fig. 2C part 1) e
bloccarlo con viti di fissaggio (fig. 2C part 2)
Inserire l’apparecchiatura nel foro tra il piano e la
parete (fig. 2D part. 1). Bloccare l’apparecchiatura
con le viti e le staffe date in dotazione (fig. 2D part
2).
WALL OVERBENCH
CHAN
N
EL
S
Position the profile at the right height on the wall for
the installation of the channel (Fig. 2C part 1) and lock
it with fixing screws (Fig. 2C part 2)
Insert the appliance in the hole between the top and
the wall (fig. 2D part. 1).
Secure the appliance using the screws and brackets
Provided (fig. 2D part. 2)
Appoggio/Overbench
Parete/Wall
180

5
2A
2B
1
2
2
1
3
4

6
2C
Nelle realizzazioni fuoriserie il sistema
di fissaggio è personalizzato.
With custom made models, assembly is
personalised.
1
2
3
4

7
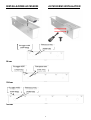
INSTALLAZIONE ACCESSORI
ACCESSORIES INSTALLATION
90 cm
120 cm
180 cm
Fissaggio 1CPP
(1CPP fixing)
Foro passa cavo
(Cable hole
)
Fissaggio 1CPP
(1CPP fixing)
Foro passa cavo
(Cable hole
)
Fissaggio 1CPP
(1CPP fixing)
Foro passa cavo
(Cable hole
)

8
cod.1CI_ rev. 00-07.2018
Barazza srl
31025 Sarano di S.Lucia di Piave (TV) TALIA
Via Risorgimento, 14
www.barazzasrl.it
-
 1
1
-
 2
2
-
 3
3
-
 4
4
-
 5
5
-
 6
6
-
 7
7
-
 8
8


Barazza 1CI120 Istruzioni per l'uso
- Tipo
- Istruzioni per l'uso
in altre lingue
Documenti correlati
-
Barazza 1POF90 Istruzioni per l'uso
-
-
-
Barazza 1PLB5I Istruzioni per l'uso
-
-
-
Barazza B_Free PBF036TK Series Istruzioni per l'uso
-
Barazza 1PMD70 Istruzioni per l'uso
-
Barazza 1PBF104 Istruzioni per l'uso
-