
3Com Wireless Dual Band 11n
USB Adapter
Quick Installation Guide
BOM: 3122A08U
Manual Version: APW100
www.3com.com
3Com Corporation
350 Campus Drive, Marlborough,
MA, USA 01752 3064

Copyright © 2009, 3Com Corporation. All rights reserved. No part of this
documentation may be reproduced in any form or by any means or used to
make any derivative work (such as translation, transformation, or adaptation)
without written permission from 3Com Corporation.
3Com Corporation reserves the right to revise this documentation and to
make changes in content from time to time without obligation on the part of
3Com Corporation to provide notification of such revision or change.
3Com Corporation provides this documentation without warranty, term, or
condition of any kind, either implied or expressed, including, but not limited to,
the implied warranties, terms or conditions of merchantability, satisfactory
quality, and fitness for a particular purpose. 3Com may make improvements
or changes in the product(s) and/or the program(s) described in this
documentation at any time.
If there is any software on removable media described in this documentation,
it is furnished under a license agreement included with the product as a
separate document, in the hard copy documentation, or on the removable
media in a directory file named LICENSE.TXT or !LICENSE.TXT. If you are
unable to locate a copy, please contact 3Com and a copy will be provided to
you.
UNITED STATES GOVERNMENT LEGEND
If you are a United States government agency, then this documentation and
the software described herein are provided to you subject to the following:
All technical data and computer software are commercial in nature and
developed solely at private expense. Software is delivered as “Commercial
Computer Software” as defined in DFARS 252.227-7014 (June 1995) or as a
“commercial item” as defined in FAR 2.101(a) and as such is provided with
only such rights as are provided in 3Com’s standard commercial license for
the Software. Technical data is provided with limited rights only as provided in
DFAR 252.227-7015 (Nov 1995) or FAR 52.227-14 (June 1987), whichever
is applicable. You agree not to remove or deface any portion of any legend
provided on any licensed program or documentation contained in, or
delivered to you in conjunction with, this User Guide.
Unless otherwise indicated, 3Com registered trademarks are registered in
the United States and may or may not be registered in other countries.

3Com and the 3Com logo are registered trademarks of 3Com Corporation.
All other company and product names may be trademarks of the respective
companies with which they are associated.
ENVIRONMENTAL STATEMENT
It is the policy of 3Com Corporation to be environmentally-friendly in all
operations. To uphold our policy, we are committed to:
Establishing environmental performance standards that comply with national
legislation and regulations.
Conserving energy, materials and natural resources in all operations.
Reducing the waste generated by all operations. Ensuring that all waste
conforms to recognized environmental standards. Maximizing the recyclable
and reusable content of all products.
Ensuring that all products can be recycled, reused and disposed of safely.
Ensuring that all products are labelled according to recognized environmental
standards.
Improving our environmental record on a continual basis.
End of Life Statement
3Com processes allow for the recovery, reclamation and safe disposal of all
end-of-life electronic components.
Regulated Materials Statement
3Com products do not contain any hazardous or ozone-depleting material.
Environmental Statement about the Documentation
The documentation for this product is printed on paper that comes from
sustainable, managed forests; it is fully biodegradable and recyclable, and is
completely chlorine-free. The varnish is environmentally-friendly, and the
inks are vegetable-based with a low heavy-metal content.
Obtaining Documentation
You can access the most up-to-date 3Com product documentation on the
World Wide Web at this URL: http://www.3com.com.

1
1 Overview
The 3Com Wireless Dual Band 11n USB Adapter (3CRUSBN275) is a
high-performance USB 2.0 wireless network adapter developed by 3Com,
conforming to 802.11n Draft 2.0. It provides a wireless access rate six times
that of traditional 802.11a/g wireless network cards, and extends the
receiving distance.
2 Installation Preparations
Unpacking and Inspection
Before unpacking the package, make sure that the package is intact,
without any signed of damage. When unpacking the package, avoid
excessive force or collision. Otherwise, the articles inside the package may
get damaged.
Before you start with the installation, verify that your USB Adapter
package includes the following items:
z One 3Com Wireless Dual Band 11n USB Adapter
z One warranty flyer
z This 3Com Wireless 11n USB Adapter Quick Installation Guide
z One 3Com installation CD, which contains the USB Adapter driver
program and 3Com 3CRUSB275 Wireless Utility and user guide.
Note:
z If this package shows any signs of physical damage, stop unpacking
and contact your local dealer..
z If there is any inconsistency with the packing list, contact your local
dealer within three days.

2
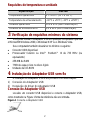
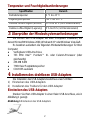
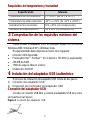
Temperature and Humidity Requirements
Specification Range
Operating temperature 0°C to 45°C (32°F to 113°F)
Storage temperature –40°C to +70°C (–40°F to +158°F)
Operating humidity 10% to 95% (noncondensing)
Storage humidity 5% to 95% (noncondensing)
3 Checking the Minimum System Requirements
You can install the USB Adapter on any computer running Microsoft®
Windows 2000, Windows® XP, or Windows Vista.
Your computer must also have, at least, the following:
z Available USB connector
z 733 MHz Intel™ Pentium™ III or Celeron processor (or equivalent)
z 256 MB of RAM
z 7 MB of free disk space
z CD-ROM drive
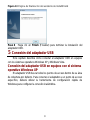
4 Installing the Wireless USB Adapter
Installing the USB Adapter is a two-step process:
1) Plug in the USB Adapter
2) Install the USB Adapter driver
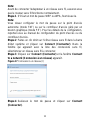
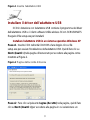
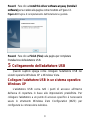
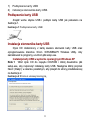
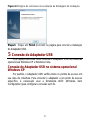
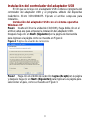
Plug In the USB Adapter
Locate an empty USB connector and plug in your USB Adapter, as
shown in Figure 1.
Figure 1 Plug in the USB Adapter

3
Install the USB Adapter Driver
The CD delivered with the USB Adapter contains the USB Adapter
driver program and the client software 3Com 3CRUSBN275 Wireless Utility.
Run setup.exe to install them.
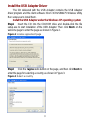
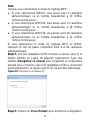
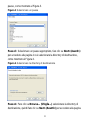
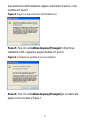
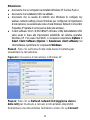
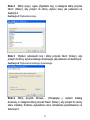
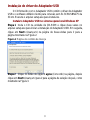
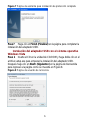
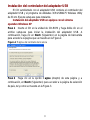
Install the USB Adapter under the Windows XP operating system
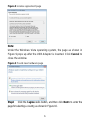
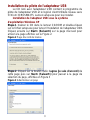
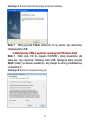
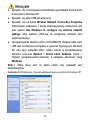
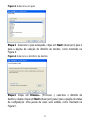
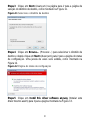
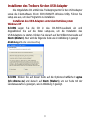
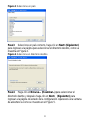
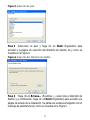
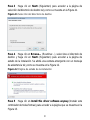
Step1 Insert the CD into the CD-ROM drive and double-click the file
setup.exe to start installation of the USB Adapter. Then click Next> on the
welcome page to enter the page as shown in
Figure 2.
Figure 2 License agreement page
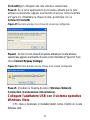
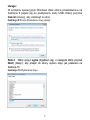
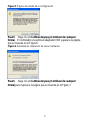
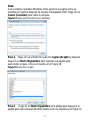
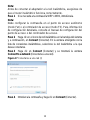
Step2 Click the I agree radio button on the page, and then click Next> to
enter the page for selecting a country, as shown in Figure 3.
Figure 3 Select a country

4
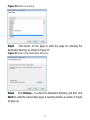
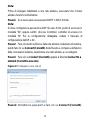
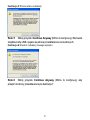
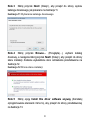
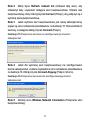
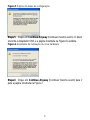
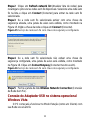
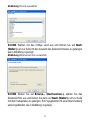
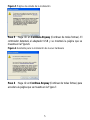
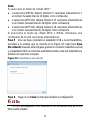
Step3 Select a proper country, click Next> to enter the page for selecting
the destination directory, as shown in
Figure 4.
Figure 4 Select the destination directory
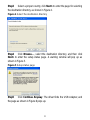
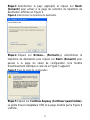
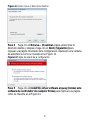
Step4 Click Browse…, select the destination directory, and then click
Next> to enter the setup status page. A warning window will pop up as
shown in
Figure 5.
Figure 5 Setup status page
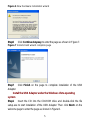
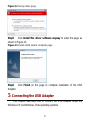
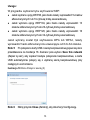
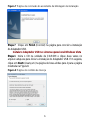
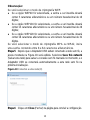
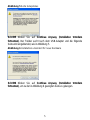
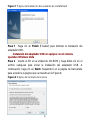
Step5 Click Continue Anyway. The driver finds the USB Adapter, and
the page as shown in
Figure 6 pops up.

5
Figure 6 New hardware installation wizard
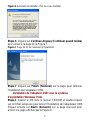
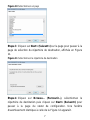
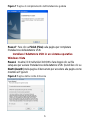
Step6 Click Continue Anyway to enter the page as shown in Figure 7.
Figure 7 Install shield wizard complete page
Step7 Click Finish on the page to complete installation of the USB
Adapter.
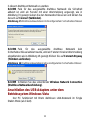
Install the USB Adapter under the Windows Vista operating
system
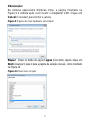
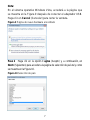
Step1 Insert the CD into the CD-ROM drive and double-click the file
setup.exe to start installation of the USB Adapter. Then click Next> on the
welcome page to enter the page as shown in
Figure 8.

6
Figure 8 License agreement page
Note:
Under the Windows Vista operating system, the page as shown in
Figure 9 pops up after the USB Adapter is inserted. Click Cancel to
close the window.
Figure 9 Found new hardware page
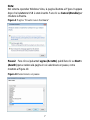
Step2 Click the I agree radio button, and then click Next> to enter the
page for selecting a country, as shown in
Figure 10.

7
Figure 10 Select a country
Step3 Click Next> on the page to enter the page for selecting the
destination directory, as shown in
Figure 11.
Figure 11 Select the destination directory
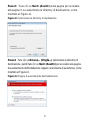
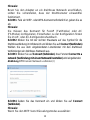
Step4 Click Browse… to select the destination directory, and then click
Next> to enter the setup status page. A warning window as shown in Figure
12 pops up.

8
Figure 12 Setup status page
Step5 Click Install this driver software anyway to enter the page as
shown in
Figure 13.
Figure 13 Install shield wizard complete page
Step6 Click Finish on the page to complete installation of the USB
Adapter.
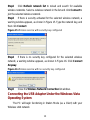
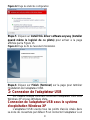
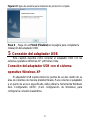
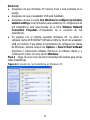
5 Connecting the USB Adapter
This chapter describes how to connect the USB Adapter under the
Windows XP and Windows Vista operating systems.

9
Connecting the USB Adapter Under the Windows XP
Operating System
The USB Adapter scans all the access points within its coverage area
by default. To connect the adapter to a specified access point, you need to
use the Windows Zero Configuration (WZC) tool to configure wireless
connection.
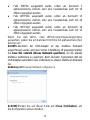
Caution:
z Ensure that you have Windows XP Service Pack 2 installed on your
computer.
z Ensure that the USB Adapter is enabled.
z Ensure that the Use Windows to configure my wireless network
settings check box is selected in the Wireless Network Connection
Properties tab.
z The client software 3Com 3CRUSBN275 Wireless Utility of the USB
Adapter is used under the Windows XP operating system by default.
To use the WZC tool, you need to select Options > Select Client
Software on the client software, and then click the Windows radio
button.
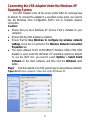
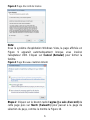
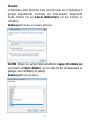
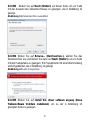
Step1 Click the network icon in the system tray to view wireless networks.
Figure 14 Wireless network connection under Windows XP

10
Step2 Click Refresh network list to reload and search for available
wireless networks. Select a wireless network in the list and click Connect to
join the selected wireless network.
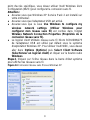
Step3 If there is security activated for the selected wireless network, a
warning window appears, as shown in
Figure 15. Type the network key, and
then click Connect.
Figure 15 Wireless service with security key configured
Step4 If there is no security key configured for the selected wireless
network, a warning window appears, as shown in Figure 16. Click Connect
Anyway.
Figure 16 Wireless service with no security key configured
Step5 Close the Wireless Network Connection list window.
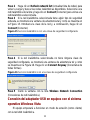
Connecting the USB Adapter Under the Windows Vista
Operating System
The PC will begin functioning in Station Mode (as a Client) with your
Wireless LAN network.

11
Note:
Before connecting the adapter to a wireless network, ensure that
the wireless router works normally.
Step1 If a WEP or WPA password is needed, provide it.
Note:
You need to configure the password on the WLAN access devices.
For the detailed configuration, refer to the configuration manual of
the WLAN access devices.
Step2 Right-click the wireless network icon in the system tray, and click
Connect. In the popup wireless connection list window, select a wireless
network to be connected.
Step3 Click Connect, and the Connect to a network window appears.
Figure 17 Connect to a network (I)
Step4 Type the password, and click Connect.

12
Note:
When you select the WEP encryption mode:
z If WEP40 is selected, 5 alphanumeric characters or a 10-digit
hexadecimal number should be entered as the password;
z If WEP104 is selected, 13 alphanumeric characters or a 26-digit
hexadecimal number should be entered as the password;
z If WEP128 is selected, 16 alphanumeric characters or a 32-digit
hexadecimal number should be entered as the password.
When you select the WPA or WPA2 encryption mode, enter a
password of 8 to 64 alphanumeric characters.
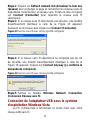
Step5 After the USB Adapter is connected to the wireless network, the
window as shown in
Figure 18 appears. Select Save this network to save
the current wireless connection and the USB Adapter will automatically
connect to this wireless network at the next startup.
Figure 18 Connect to a network (II)
Step6 Click Close on the page to complete your configuration.

13
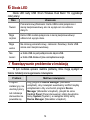
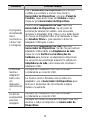
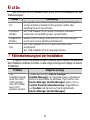
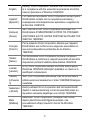
6 LEDs
The LED of the 3Com Wireless Dual Band 11n USB Adapter has four
statuses:
State Meaning
On
Orange/Blue: The USB Adapter has been connected to a
wireless network, but it is not transmitting or receiving data.
Fast
blinking
The USB Adapter is connected to a wireless network and is
receiving or transmitting data.
Slow
blinking
Alternating orange, blue, and purple: The USB Adapter is
searching for a wireless network.
Off
z The USB Adapter is not inserted into the USB connector.
z The USB Adapter works in the power saving mode.
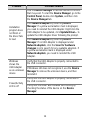
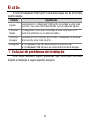
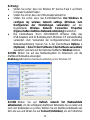
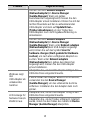
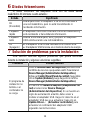
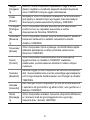
7 Troubleshooting Installation
This section describes some problems that you may encounter during
installation and some suggested solutions.

14
Problem Possible solution
Use the Device Manager to resolve resource conflicts
that may exist. To start the Device Manager, go to the
Control Panel, double-click System, and then click
the Device Manager
tab.
Find Network adapters by selecting Device
Manager. If a yellow exclamation mark is displayed,
you need to reinstall the USB Adapter. Right click the
USB Adapter to be updated, click Update Driver… to
update the USB Adapter driver following the prompt.
Installation
program does
not finish or
the driver fails
to load
Find Network adapters by selecting Device
Manager. If no USB Adapter is displayed under
Network adapters, click the Scan for hardware
changes icon to search for any available adapters. If
a yellow exclamation mark is displayed under
Network adapters, you need to reinstall the USB
Adapter.
Verify that the USB Adapter is properly connected to
the USB connector.
Windows
shows the
USB Adapter
as an unknown
device
If Windows still does not recognize it, use the Device
Manager to remove the unknown device, and then
reinstall it.
Verify that the USB Adapter is properly connected to
the USB connector.
Power/Activity
LED is off
Verify that the driver was installed successfully by
checking the status of the device on the Device
Manager.

1
1 Vue d'ensemble
L'adaptateur USB sans fil 11n à double bande 3Com (3CRUSBN275)
est un adaptateur réseau sans fil USB 2.0 haute performance conçu par
3Com, conforme à la norme 802.11n draft 2.0. Il offre un accès sans fil six
fois plus rapide que les cartes réseau sans fil traditionnelles 802.11 a/g et
élargit la zone de réception.
2 Préparation à l'installation
Déballage et inspection
Avant de procéder au déballage, veuillez vous assurer que
l'emballage est intact, qu'il n'a pas subi d'importants dommages et
ne présente aucun signe d'humidité. Lors du déballage, évitez de
recourir à la force et veillez à ce que l'appareil ne heurte aucun
autre élément, sous peine d'endommager les articles contenus
dans l'emballage.
Avant de commencer l'installation, vérifiez que l'emballage de
votre adaptateur USB comporte les éléments suivants:
z Un adaptateur USB sans fil 11n à double bande 3Com
z Une garantie
z Le présent 3Com Wireless 11n USB Adapter Quick Installation
Guide (Guide d'installation rapide de l'adaptateur USB 11n
sans fil 3Com)
z Un CD d'installation 3Com contenant le programme du pilote
de l'adaptateur USB, l'utilitaire réseau sans fil 3CRUSB275
ainsi que le manuel d'utilisation.
Note:
z Si l'emballage est rouillé ou mouillé, interrompez le déballage et
contactez votre revendeur local.
z S'il manque des éléments par rapport à la liste d'emballage,
contactez votre revendeur local dans un délai de trois jours.

2
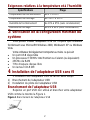
Exigences relatives à la température et à l'humidité
Spécifications Plage
Température de fonctionnement de 0°C à 45°C
Température de stockage de –40°C à +70°C
Humidité de fonctionnement de 10% à 95% (sans condensation)
Humidité de stockage de 5% à 95% (sans condensation)
3 Vérification de la configuration minimale du
système
Vous pouvez installer l'adaptateur USB sur n'importe quel ordinateur
fonctionnant sous Microsoft® Windows 2000, Windows® XP ou Windows
Vista.
Votre ordinateur doit également comporter au moins ce qui suit:
z Un port USB disponible
z Un processeur 733 MHz Intel Pentium ou Celeron (ou équivalent)
z 256 Mo de RAM
z 7 Mo d'espace disque libre
z Un lecteur CD-ROM
4 Installation de l'adaptateur USB sans fil
L'installation de l'adaptateur USB se fait en deux temps:
1) Branchement de l'adaptateur USB
2) Installation du pilote de l'adaptateur USB
Branchement de l'adaptateur USB
Repérez un port USB non utilisé et branchez votre adaptateur
USB comme le montre la
Figure 1.
Figure 1 Branchement de l'adaptateur USB

3
Installation du pilote de l'adaptateur USB
Le CD livré avec l'adaptateur USB contient le programme du
pilote de l'adaptateur USB et le logiciel client Utilitaire réseau sans
fil 3Com 3CRUSBN275. Lancez setup.exe pour les installer.
Installation de l'adapteur USB sous le système
d'exploitation Windows XP
Etape 1 Insérez le CD dans le lecteur CD-ROM et double-cliquez
sur le fichier setup.exe pour lancer l'installation de l'adaptateur USB.
Cliquez ensuite sur Next> (Suivant>) sur la page d'accueil pour
arriver à la page affichée sur la
Figure 2.
Figure 2 Page d'accord de licence
Etape 2 Cliquez sur le bouton radio I agree (je suis d'accord) de
cette page puis sur Next> (Suivant>) pour passer à la page de
sélection du pays, affichée en
Figure 3
Figure 3 Sélectionnez un pays
La pagina sta caricando ...
La pagina sta caricando ...
La pagina sta caricando ...
La pagina sta caricando ...
La pagina sta caricando ...
La pagina sta caricando ...
La pagina sta caricando ...
La pagina sta caricando ...
La pagina sta caricando ...
La pagina sta caricando ...
La pagina sta caricando ...
La pagina sta caricando ...
La pagina sta caricando ...
La pagina sta caricando ...
La pagina sta caricando ...
La pagina sta caricando ...
La pagina sta caricando ...
La pagina sta caricando ...
La pagina sta caricando ...
La pagina sta caricando ...
La pagina sta caricando ...
La pagina sta caricando ...
La pagina sta caricando ...
La pagina sta caricando ...
La pagina sta caricando ...
La pagina sta caricando ...
La pagina sta caricando ...
La pagina sta caricando ...
La pagina sta caricando ...
La pagina sta caricando ...
La pagina sta caricando ...
La pagina sta caricando ...
La pagina sta caricando ...
La pagina sta caricando ...
La pagina sta caricando ...
La pagina sta caricando ...
La pagina sta caricando ...
La pagina sta caricando ...
La pagina sta caricando ...
La pagina sta caricando ...
La pagina sta caricando ...
La pagina sta caricando ...
La pagina sta caricando ...
La pagina sta caricando ...
La pagina sta caricando ...
La pagina sta caricando ...
La pagina sta caricando ...
La pagina sta caricando ...
La pagina sta caricando ...
La pagina sta caricando ...
La pagina sta caricando ...
La pagina sta caricando ...
La pagina sta caricando ...
La pagina sta caricando ...
La pagina sta caricando ...
La pagina sta caricando ...
La pagina sta caricando ...
La pagina sta caricando ...
La pagina sta caricando ...
La pagina sta caricando ...
La pagina sta caricando ...
La pagina sta caricando ...
La pagina sta caricando ...
La pagina sta caricando ...
La pagina sta caricando ...
La pagina sta caricando ...
La pagina sta caricando ...
La pagina sta caricando ...
La pagina sta caricando ...
La pagina sta caricando ...
La pagina sta caricando ...
La pagina sta caricando ...
La pagina sta caricando ...
La pagina sta caricando ...
La pagina sta caricando ...
La pagina sta caricando ...
La pagina sta caricando ...
La pagina sta caricando ...
La pagina sta caricando ...
La pagina sta caricando ...
La pagina sta caricando ...
La pagina sta caricando ...
La pagina sta caricando ...
La pagina sta caricando ...
La pagina sta caricando ...
La pagina sta caricando ...
La pagina sta caricando ...
La pagina sta caricando ...
La pagina sta caricando ...
La pagina sta caricando ...
La pagina sta caricando ...
La pagina sta caricando ...
La pagina sta caricando ...
La pagina sta caricando ...
La pagina sta caricando ...
La pagina sta caricando ...
La pagina sta caricando ...
La pagina sta caricando ...
La pagina sta caricando ...
La pagina sta caricando ...
La pagina sta caricando ...
La pagina sta caricando ...
La pagina sta caricando ...
La pagina sta caricando ...
La pagina sta caricando ...
La pagina sta caricando ...
La pagina sta caricando ...
La pagina sta caricando ...
La pagina sta caricando ...
La pagina sta caricando ...
La pagina sta caricando ...
La pagina sta caricando ...
La pagina sta caricando ...
-
 1
1
-
 2
2
-
 3
3
-
 4
4
-
 5
5
-
 6
6
-
 7
7
-
 8
8
-
 9
9
-
 10
10
-
 11
11
-
 12
12
-
 13
13
-
 14
14
-
 15
15
-
 16
16
-
 17
17
-
 18
18
-
 19
19
-
 20
20
-
 21
21
-
 22
22
-
 23
23
-
 24
24
-
 25
25
-
 26
26
-
 27
27
-
 28
28
-
 29
29
-
 30
30
-
 31
31
-
 32
32
-
 33
33
-
 34
34
-
 35
35
-
 36
36
-
 37
37
-
 38
38
-
 39
39
-
 40
40
-
 41
41
-
 42
42
-
 43
43
-
 44
44
-
 45
45
-
 46
46
-
 47
47
-
 48
48
-
 49
49
-
 50
50
-
 51
51
-
 52
52
-
 53
53
-
 54
54
-
 55
55
-
 56
56
-
 57
57
-
 58
58
-
 59
59
-
 60
60
-
 61
61
-
 62
62
-
 63
63
-
 64
64
-
 65
65
-
 66
66
-
 67
67
-
 68
68
-
 69
69
-
 70
70
-
 71
71
-
 72
72
-
 73
73
-
 74
74
-
 75
75
-
 76
76
-
 77
77
-
 78
78
-
 79
79
-
 80
80
-
 81
81
-
 82
82
-
 83
83
-
 84
84
-
 85
85
-
 86
86
-
 87
87
-
 88
88
-
 89
89
-
 90
90
-
 91
91
-
 92
92
-
 93
93
-
 94
94
-
 95
95
-
 96
96
-
 97
97
-
 98
98
-
 99
99
-
 100
100
-
 101
101
-
 102
102
-
 103
103
-
 104
104
-
 105
105
-
 106
106
-
 107
107
-
 108
108
-
 109
109
-
 110
110
-
 111
111
-
 112
112
-
 113
113
-
 114
114
-
 115
115
-
 116
116
-
 117
117
-
 118
118
-
 119
119
-
 120
120
-
 121
121
-
 122
122
-
 123
123
-
 124
124
-
 125
125
-
 126
126
-
 127
127
-
 128
128
-
 129
129
-
 130
130
-
 131
131
-
 132
132
-
 133
133


3com 3CRUSBN275 Manuale utente
- Tipo
- Manuale utente
- Questo manuale è adatto anche per
in altre lingue
- English: 3com 3CRUSBN275 User manual
- français: 3com 3CRUSBN275 Manuel utilisateur
- español: 3com 3CRUSBN275 Manual de usuario
- Deutsch: 3com 3CRUSBN275 Benutzerhandbuch
- português: 3com 3CRUSBN275 Manual do usuário
- polski: 3com 3CRUSBN275 Instrukcja obsługi