
CAME S.p.A.
Via Martiri Della Libertà, 15
31030 - Dosson di Casier
Treviso - Italy
AGATA CF
L1 L2 L3
VA/01
Le
La Lb
Lc Ld
Lithos
ThangramThangramThangram
VAS/101
La Lb
Lc Ld
Ø60
5
503
43
1
6
7 8
VCM/1D VCM/2D UTP/CAT 5 2x2,5mm2
La, Lb, Lc, Ld ≤250 m – ≤250 m –
L1, L2, L3 – ≤100 m – –
L1+L2+ L3 – ≤300 m – –
La(Lb, Lc, Ld)+L1(L2, L3) ≤250 m
La+Lb+Lc+Ld+L1+L2+L3 ≤600 m
VCM/1D VCM/2D UTP/CAT 5 2x2,5mm2
La, Lb, Lc, Ld ≤250 m – ≤250 m –
Le ≤25 m – – ≤60 m
La(Lb, Lc, Ld)+Le ≤250 m
L1 L2 L3
VA/01
Le
La Lb
Lc Ld
Lithos
ThangramThangramThangram
VAS/101
La Lb
Lc Ld
190
102
39
– + B
M1
❶
❷
❸
9
B
... beep!
A x5
E
... beep!
A x5
H
... beep!
A x5
C
F
D
G
... beep!
A x5
... beep!
A x5
... beep!
A x5
A
... beep!
A x5
I
... beep!
A x5
... beep!
A x5
FB00847M4A - ver. 1 - 08/2017
FB00847M4A
IT
Italiano
EN
English
FR
Français
RU
Pусский
ITALIANO
Avvertenze generali
•Leggere attentamente le istruzioni, prima di iniziare
l’installazione ed eseguire gli interventi come specifi-
cato dal costruttore.
•L’installazione, la programmazione, la messa in
servizio e la manutenzione del prodotto deve essere
eettuata solo da personale tecnico qualificato ed
opportunamente addestrato nel rispetto delle norma-
tive vigenti ivi comprese le osservanze sulla preven-
zione infortuni.
•Prima di eettuare ogni operazione di pulizia o di
manutenzione, togliere l’alimentazione.
•L’apparecchio dovrà essere destinato solo all’uso
per il quale è stato studiato.
•Il costruttore non può comunque essere considera-
to responsabile per eventuali danni derivanti da usi
impropri, erronei ed irragionevoli.
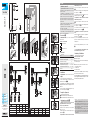
Descrizione 1
Derivato interno citofonico con selettore del volume
della suoneria.
Funzione dei morsetti M1
BIngresso linea BUS
+
Chiamata pianerottolo
–
Dati tecnici
Tipo Agata CF
Alimentazione da BUS (V DC) 15 ÷ 20
Assorbimento in stand-by (mA) < 0,5
Assorbimento max (mA) 30
Assorbimento singolo LED (mA) 1
Temperatura di stoccaggio (°C) -25 ÷ +70
Temperatura di funzionamento (°C) +5 ÷ +40
Grado IP IP 30
Installazione
•Aprire l’apparecchio, premendo sulla leva posta sul
fondo 3.
•Separare il guscio dal fondo dell’apparecchio.
•Fissare il fondo dell’apparecchio alla scatola a muro
utilizzando le viti fornite 4 5.
La scatola deve essere installata ad una altezza
adeguata all’utente. Evitare il serraggio eccessivo
delle viti.
•Una volta eettuati i collegamenti, riagganciare il gu-
scio al fondo dell’apparecchio 6.
Esempi di collegamento
7 Limiti installativi in impianti alimentati da VA/01.
8 Limiti installativi in impianti alimentati da VAS/101.
Configurazione melodie 9
☞Bisogna eseguire, in successione, tutte le fasi
di programmazione descritte di seguito:
1-Ingresso in programmazione
Sollevare la cornetta e premere per 5 volte il pulsante
A entro 5 secondi.
Un breve segnale acustico conferma l’ingresso in pro-
grammazione A.
2-Programmazione della melodia associata alla
chiamata dal posto esterno
Per ascoltare in sequenza le melodie premere il tasto
B.
Per selezionare la melodia ed uscire dalla programma-
zione riporre la cornetta C.
Per selezionare la melodia e proseguire con la pro-
grammazione premere il tasto D.
3-Programmazione della melodia associata alla
chiamata dal pianerottolo
Per ascoltare in sequenza le melodie premere il tasto
E.
Per selezionare la melodia ed uscire dalla programma-
zione riporre la cornetta F.
Per selezionare la melodia e proseguire con la pro-
grammazione premere il tasto G.
4-Programmazione del numero di squilli di chia-
mata
Premere il tasto tante volte quanti sono gli squilli de-
siderati (da 1 a 6 squilli) H.
Dopo 3 secondi dall’ultima pressione del tasto, viene
riprodotta la chiamata selezionata per il numero di
squilli prescelto.
Per uscire dalla programmazione riporre la cornetta
I.
☞Per la programmazione della chiamata, vedere
la documentazione dei posti esterni.
Istruzioni per l'utilizzatore
Funzione di pulsanti e selettore
❶Pulsante apriporta.
❷Pulsante per l'attivazione di servizi ausiliari (Aux2) o
per chiamata portiere.
❸Selettore per la regolazione del volume suoneria.
0 = disabilitata (LED rosso)
I = Volume medio
II = Volume massimo
Quando la suoneria è disabilitata, il LED rosso lampeg-
giante indica una chiamata entrante.
Per la pulizia utilizzare solo panni morbidi ed asciutti
oppure leggermente inumiditi con acqua; non utiliz-
zare alcun tipo di prodotto chimico.
Il prodotto è conforme alle direttive di riferimento vigenti.
Dismissione e smaltimento. Non disperdere nell’am-
biente l’imballaggio e il dispositivo alla fine del ciclo di
vita, ma smaltirli seguendo le norme vigenti nel paese
di utilizzo del prodotto. I componenti riciclabili riportano
simbolo e sigla del materiale.
I DATI E LE INFORMAZIONI INDICATE IN QUESTO MANUALE SONO DA RI-
TENERSI SUSCETTIBILI DI MODIFICA IN QUALSIASI MOMENTO E SENZA
OBBLIGO DI PREAVVISO. LE MISURE, SE NON DIVERSAMENTE INDICATO,
SONO IN MILLIMETRI.

FB00847M4A - ver. 1 - 08/2017
ENGLISH
General precautions
• Read the instructions carefully before beginning the
installation and carry out the actions as specified by
the manufacturer.
• The installation, programming, commissioning and
maintenance of the product must be carried out only
by qualified technical personnel, correctly trained
with regard to respecting the regulations in force,
including the implementation of accident prevention
measures.
• Before carrying out any cleaning or maintenance,
disconnect the power supply.
• The equipment must only be used for the purpose
for which it was designed.
• The manufacturer declines all liability for any dam-
age as a result of improper, incorrect or unreasonable
use.
Description 1
Internal audio receiver with ringtone volume dial.
Function of M1 terminals
BBUS line input
+
Doorbell
–
Technical data
Type Agata CF
Power supply from BUS (V DC) 15 to 20
Consumption in stand-by mode (mA) < 0.5
Max. consumption (mA) 30
Single LED consumption (mA) 1
Storage temperature (°C) -25 to +70
Operating temperature (°C) +5 to +40
IP Rating IP 30
Installation
• Open the device by pressing on the tab at the bottom
3.
• Separate the shell from the bottom of the device.
• Secure the bottom of the device to the wall-mount
box using the screws provided 4 5.
The box must be installed at an appropriate height
for the user. Avoid overtightening the screws.
• Once all connections have been made, reattach the
shell to the bottom of the device 6.
Connection examples
7 Installation limits for systems powered by VA/01.
8 Installation limits for systems powered by VAS/101.
Melody configuration 9
☞ All the programming stages described below
must be carried out in sequence:
1-Entering programming mode
Lift up the handset and press button A 5 times in 5
seconds.
A short beep confirms that you have entered program-
ming mode A.
2- Programming the melody associated with a call
from the entry panel
To listen to the melodies in sequence, press the but-
ton B.
To select the melody and exit programming, hang up
the handset C.
To select the melody and continue with programming,
press the button D.
3- Programming the melody associated with a call
from the floor
To listen to the melodies in sequence, press button
E.
To select the melody and exit programming, hang up
the handset F.
To select the melody and continue with programming,
press button G.
4- Programming the number of rings
Press button as many times as you want the call to
ring (from 1 to 6 rings) H.
Three seconds after the button is last pressed, the se-
lected call is played back with the chosen number of
rings.
To exit programming, hang up the handset I.
☞ See the entry panel documentation for call pro-
gramming.
Instructions for the user
Button and dial functions
❶ Door-lock release button.
❷ Button to activate the auxiliary services (Aux2) or
to call the porter.
❸ Dial for adjusting the ringtone volume.
0 = disabled (red LED)
I = Average volume
II = Maximum volume
When the ringtone is disabled, a flashing red LED indi-
cates that there is an incoming call.
Only use a soft, dry or slightly damp cloth to clean
the terminal. Do not use any chemical products.
This product complies with the relevant directives in
force.
Decommissioning and disposal. Dispose of the pack-
aging and the device at the end of its life cycle respon-
sibly, in compliance with the laws in force in the country
where the product is used. The recyclable components
are marked with a symbol and the material's ID marker.
THE DATA AND INFORMATION SHOWN IN THIS MANUAL ARE TO BE
CONSIDERED AS SUBJECT TO CHANGE AT ANY TIME AND WITHOUT
THE NEED FOR ANY ADVANCE WARNING. MEASUREMENTS, UNLESS
OTHERWISE INDICATED, ARE IN MILLIMETRES.
FRANÇAIS
Instructions générales
• Lire attentivement les instructions avant toute
opération d'installation et eectuer les interventions
comme indiqué par le fabricant.
• L’installation, la programmation, la mise en service
et l'entretien du produit ne doivent être eectués que
par des techniciens qualifiés et dans le strict respect
des normes en vigueur, y compris des règles sur la
prévention des accidents.
• Avant toute opération de nettoyage ou d'entretien,
mettre hors tension.
• L'appareil ne devra être destiné qu'à l'utilisation
pour laquelle il a été conçu.
• Le fabricant décline toute responsabilité en cas
d'éventuels dommages provoqués par des utilisa-
tions impropres, incorrectes et déraisonnables.
Description 1
Poste vidéophonique interne avec sélecteur du volume
de la sonnerie.
Fonction des bornes M1
BEntrée ligne BUS
+
Appel palier
–
Données techniques
Type Agata CF
Alimentation par BUS (VDC) 15 - 20
Absorption en mode veille (mA) < 0,5
Absorption max. (mA) 30
Absorption LED simple (mA) 1
Température de stockage (°C) -25 à +70
Température de fonctionnement (°C) +5 à +40
Degré IP IP 30
Installation
• Ouvrir l’appareil en appuyant sur le levier prévu au
fond 3.
• Séparer la coque du fond de l’appareil.
• Fixer le fond de l’appareil au boîtier mural à l’aide des
vis fournies 4 5.
Le boîtier doit être installé à une hauteur convenant
à l’utilisateur. Éviter de trop serrer les vis.
• Après avoir eectué les branchements, fixer à nouve-
au la coque au fond de l’appareil 6.
Exemples de branchement
7 Limites d’installation sur des systèmes alimentés
par VA/01.
8 Limites d’installation sur des systèmes alimentés
par VAS/101.
Configuration des mélodies 9
☞ Eectuer, l’une après l’autre, toutes les phases
de programmation décrites ci-après :
1-Entrée en mode programmation
Décrocher le combiné et appuyer 5 fois sur le bouton
A dans les 5 secondes qui suivent.
Un signal sonore bref confirme l’entrée en mode pro-
grammation A.
2-Programmation de la mélodie associée à l’appel
provenant du poste externe
Pour écouter les mélodies l’une après l’autre, appuyer
sur la touche B.
Pour sélectionner la mélodie et sortir de la programma-
tion, raccrocher le combiné C.
Pour sélectionner la mélodie et poursuivre la program-
mation, appuyer sur la touche D.
3-Programmation de la mélodie associée à l’appel
provenant du palier
Pour écouter les mélodies l’une après l’autre, appuyer
sur la touche E.
Pour sélectionner la mélodie et sortir de la programma-
tion, raccrocher le combiné F.
Pour sélectionner la mélodie et poursuivre la program-
mation, appuyer sur la touche G.
4-Programmation du nombre de sonneries de
l’appel
Appuyer sur la touche autant de fois que le nombre
de sonneries souhaité (de 1 à 6 sonneries) H.
Au bout de 3 secondes à compter du dernier enfonce-
ment de la touche, l’appel sélectionné sera reproduit
selon le nombre de sonneries choisi.
Pour sortir du menu de programmation, raccrocher le
combiné I.
☞ Pour la programmation de l’appel, voir la docu-
mentation des postes externes.
Instructions pour l’utilisateur
Fonction des boutons et du sélecteur
❶ Bouton ouvre-porte.
❷ Bouton pour l’activation de services auxiliaires
(Aux2) ou pour appel concierge.
❸ Sélecteur pour le réglage du volume de la sonnerie.
0 = désactivée (LED rouge)
I = Volume moyen
II = Volume maximum
Quand la sonnerie est désactivée, le clignotement de
la LED rouge indique un appel entrant.
Pour le nettoyage, n'utiliser que des chions doux et
secs ou légèrement imbibés d'eau ; n'utiliser aucun
produit chimique.
Ce produit est conforme aux directives de référence en
vigueur.
Mise au rebut et élimination. Ne pas jeter l'emballage
et le dispositif dans la nature au terme du cycle de vie
de ce dernier, mais les éliminer selon les normes en
vigueur dans le pays où le produit est utilisé. Le sym-
bole et le sigle du matériau figurent sur les composants
recyclables.
LES DONNÉES ET LES INFORMATIONS CONTENUES DANS CE MANUEL
SONT SUSCEPTIBLES DE SUBIR DES MODIFICATIONS À TOUT MOMENT
ET SANS AUCUN PRÉAVIS. LES DIMENSIONS SONT EXPRIMÉES EN MIL-
LIMÈTRES, SAUF INDICATION CONTRAIRE.
РУССКИЙ
Общие правила безопасности
• Внимательно прочитайте инструкции, прежде
чем приступить к установке и выполнению работ,
согласно указаниям фирмы-изготовителя.
• Монтаж, программирование, включение и те-
хобслуживание изделия должны выполняться
только квалифицированным и обученным персо-
налом в полном соответствии с действующими
нормативами, включая соблюдение правил техни-
ки безопасности
• Обесточьте все устройства перед выполнением
работ по чистке и техобслуживанию.
• Это изделие должно использоваться исключи-
тельно по назначению.
• Фирма-изготовитель снимает с себя всякую от-
ветственность за ущерб, нанесенный неправиль-
ным, ошибочным или небрежным использовани-
ем изделия.
Описание 1
Абонентское устройство домофонной системы с
регулировкой громкости вызова.
Функция контактов М1
BВход линии шины
+
Дверной звонок
–
Технические характеристики
Модель Agata CF
Напряжение электропитания от шины
(=В) 15 — 20
Потребляемый ток в режиме ожида-
ния (мА) < 0,5
Макс. потребляемый ток (мA) 30
Потребление тока одним светодиодом (А) 1
Диапазон температур хранения (°C) -25 —
+70
Диапазон рабочих температур (°C) +5 — +40
Класс защиты (IP) IP 30
Монтаж
• Откройте устройство, нажав на рычаг, располо-
женный на задней стенке 3.
• Снимите корпус с задней стенки устройства.
• Прикрепите заднюю стенку устройства к монтаж-
ной коробке с помощью поставляемых винтов 4
5.
Встраиваемую коробку следует устанавливать
на удобной для пользователя высоте. Избегайте
чрезмерного затягивания винтов.
• После подключения установите корпус на
заднюю стенку устройства 6.
Варианты подключения
7 Ограничения по применению в системах с элек-
тропитанием от VA/01.
8 Ограничения по применению в системах с элек-
тропитанием от VAS/101.
Настройка мелодий 9
☞ Необходимо последовательно выполнить все
этапы программирования, описанные ниже:
1. Вход в режим программирования.
Поднимите трубку и нажмите 5 раз кнопку A в те-
чение 5 секунд.
Короткий звуковой сигнал подтвердит вход в ре-
жим программирования A.
2. Программирование мелодии вызова с вы-
зывной панели.
Для последовательного прослушивания мелодий
нажмите кнопку B.
Для выбора мелодии и выхода из режима про-
граммирования положите трубку на абонентское
устройство C.
Для выбора мелодии и продолжения программиро-
вания нажмите кнопку D.
3. Программирование мелодии дверного звонка.
Для последовательного прослушивания мелодий
нажмите кнопку E.
Для выбора мелодии и выхода из режима про-
граммирования положите трубку на абонентское
устройство F.
Для выбора мелодии и продолжения программиро-
вания нажмите кнопку G.
4. Программирование количества звонков во
время вызова.
Нажмите кнопку столько раз, сколько звонков
требуется для вызова (от 1 до 6) H.
Спустя 3 секунды после последнего нажатия кноп-
ки мелодия вызова будет воспроизведена заданное
количество раз.
Для выхода из режима программирования положи-
те трубку на абонентское устройство I.
☞ Информация о программировании вызовов
приведена в документации к вызывной панели.
Руководство пользователя
Функции кнопок и переключателя
❶ Кнопка открывания двери.
❷ Кнопка активации дополнительных выходов
(Aux2) или вызова консьержа.
❸ Переключатель регулировки громкости вызова.
0 = звук отключен (красный LED-индикатор)
I = средняя громкость
II = максимальная громкость
При отключенном звуке мигание красного светоди-
одного индикатора указывает на входящий вызов.
Запрещается чистить терминал с помощью хи-
мических чистящих средств. Для этого можно
использовать только сухую или слегка увлаж-
ненную водой мягкую ветошь.
Изделие соответствует требованиям действующих
нормативов.
Утилизация. Не выбрасывайте упаковку и устрой-
ство в окружающую среду. Утилизируйте их в со-
ответствии с требованиями законодательства,
действующего в стране установки. Компоненты,
пригодные для повторного использования, отмече-
ны специальным символом с обозначением мате-
риала.
КОМПАНИЯ CAME S.P.A. СОХРАНЯЕТ ЗА СОБОЙ ПРАВО НА ИЗМЕ-
НЕНИЕ СОДЕРЖАЩЕЙСЯ В ЭТОЙ ИНСТРУКЦИИ ИНФОРМАЦИИ В
ЛЮБОЕ ВРЕМЯ И БЕЗ ПРЕДВАРИТЕЛЬНОГО УВЕДОМЛЕНИЯ. ВСЕ
РАЗМЕРЫ ПРИВЕДЕНЫ В ММ, ЕСЛИ НЕ УКАЗАНО ИНОЕ.
-
 1
1
-
 2
2


in altre lingue
- English: CAME AGATA Installation guide
- français: CAME AGATA Guide d'installation
Documenti correlati
-
CAME AGATA Guida d'installazione
-
-
-
-
-
-
-
-
-
CAME PEC IP Manuale utente
