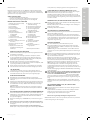
AEG LX9-3-CR Manuale del proprietario
- Categoria
- Aspirapolvere
- Tipo
- Manuale del proprietario
Questo manuale è adatto anche per

LX9 | XPRECISION
Bagless canister vacuum cleaner
Instruction Book
GB INSTRUCTION BOOK .................................6
DE GEBRAUCHSANWEISUNG ......................9
AR ..........................................12
ES LIBRO DE INSTRUCCIONES...................15
FA .............................18
FR MODE D’EMPLOI .......................................... 21
GR ΕΓΧΕΙΡΙΔΙΟ ΟΔΗΓΙΏΝ ........................... 24
IT ISTRUZIONI ..................................................... 27
NL INSTRUCTIE BOEK ......................................30
PT LIVRO DE INSTRUÇÕES ..........................33

www.aeg.com
2
R *S *
U
*
K
V*
W* X* Y* Z*
AA*
T *
*
P
*
L
Q
*
E
F
C
D
B
A
M
*
N
*
H
I
J
G
O
E
G
1
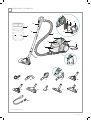
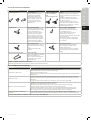
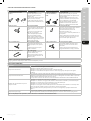
OVERVIEW OF THE PRODUCT
* CERTAIN MODELS ONLY

3
www.aeg.com
2
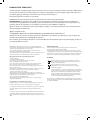
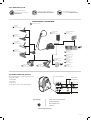
INSTALLATION
Click!
Click!
Click!
Click!
1
2
3 4 5
Ref: AA
*
CR1632
Ref: LITHIUM CR1632
*
*
6 7
3
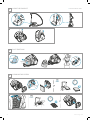
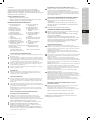
USING THE PRODUCT
MAX
MIN
MIN
MAX
*
10
*
8 9
* CERTAIN MODELS ONLY
*
11

www.aeg.com
4
24h
12 months
16
24h
6 months
15
1
2
12
13
5
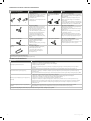
CLEANING THE FILTERS
3
4
USING THE PRODUCT
DUST EMPTYING
MAX
14
* CERTAIN MODELS ONLY

5
www.aeg.com
24h
17
A
B
C
5!
19
6
7
MAINTENENCE
SYSTEM CHECK
* *
18
* CERTAIN MODELS ONLY
5
CLEANING THE FILTERS

www.aeg.com
6
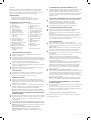
SAFETY PRECAUTIONS
This appliance can be used by children aged from 8 years and above and persons with reduced physical,
sensory or mental capabilities or lack of experience and knowledge if they have been given supervision or
instruction concerning use of the appliance in a safe way and understand the hazards involved.
Children shall not play with the appliance.
Cleaning and maintenance shall not be done by children without supervision.
WARNING: Turbo nozzles* have a rotating brush where parts can get entrapped. Please use them with caution
and only on intended surfaces. Please turn the vacuum cleaner o before removing entrapped parts or
cleaning the brush.
Batteries must be removed from the remote control in the handle* / LED lighted nozzle* before scrapping the
product**.
*Certain models only.
**Information on how to remove the battery is in section 6 and 7.
Always disconnect the plug from the mains before cleaning or maintaining the appliance or when removing
the battery. The battery is to be disposed of safely.
If the cord is damaged, it must be replaced only by an authorized AEG service centre in order to avoid a
hazard.
LX9 should only be used for normal vacuuming indoors and in a domestic environment. Make sure the vacuum cleaner is stored in a dry place.
All service or repairs must be carried out by an authorized AEG service centre.
Packaging material, e.g. plastic bags should not be accessible to children to avoid suocation.
Never use the vacuum cleaner:
In wet areas.
Close to ammable gases, etc.
When the product shows visible signs of damage.
On sharp objects or uids.
When the oor nozzle shows visible signs of a damages.
On hot or cold cinders, lighted cigarette butts, etc.
On ne dust, for instance from plaster, concrete, our, hot or cold ashes.
Do not leave the vacuum cleaner in direct sunlight.
Avoid exposing the vacuum cleaner to strong heat or freezing tempera-
tures.
Never use the vacuum cleaner without its lters.
Do not try to touch the brush roll while the cleaner is switched on and the
brush roll is turning.
When the wheels are blocked.
Do not use your vacuum cleaner if the lters are injured or broken.
Power cord precautions
Check the plug and cord regularly. Never use the vacuum cleaner if the
plug or cord is damaged.
Damage to the vacuum cleaner’s cord is not covered by the warranty.
Never pull or lift the vacuum cleaner by the cord.
Using the vacuum cleaner in the above circumstances may cause serious
personal injury or damage to the product. Such injury or damage is not
covered by the warranty or by AEG.
SERVICING AND WARRANTY
All service or repairs must be carried out by an authorized AEG service
centre.
Damage to the vacuum cleaner’s cord is not covered by the warranty.
Damage to the motor caused by; vacuuming liquid, immersing appliance
in liquid or using appliance with a damaged hose and nozzle is not
covered by the warranty.
DISPOSAL
This symbol on the product indicates that this product contains
a battery which shall not be disposed with normal household
waste.
This symbol on the product or on its packaging indicates that
the product may not be treated as household waste.
To recycle your product, please take it to an ocial collection
point or to an AEG service center that can remove and recycle
the battery and electric parts in a safe and professional way.
Follow your country’s rules for the separate collection of
electrical products and rechargeable batteries.
Hereby, AEG Home Care and SDA, declares that the Vacuum Cleaner with
radio equipment type HER2 and HER3 is in compliance with Directive
2014/53/EU.

7
www.aeg.com
ENGLISH
Thank you for choosing AEG LX9 vacuum cleaner. Always use original
accessories and spare parts to get the best results. This product is designed
with the environment in mind. All plastic parts are marked for recycling
purposes.
BEFORE STARTING
• Read this manual carefully.
• Check that all parts described are included.
• Pay special attention to the safety precautions!
DESCRIPTION OF LX9 VACUUM CLEANER
A. Display (see versions later)
B. Filters lid
C. Fine dust lter
D. Pre-motor lter
E. Parking slots
F. Power cord
G. Carry handle
H. Cyclone compartment and
nose cone lter
I. Air channel
J. Dust compartment
K. AeroPro 3in1 tool
L. AeroPro hose
M. AeroPro handle (see versions
later)
N. AeroPro telescopic tube
O. Parking clip
P. Display for models with rotary
knob manual control*
Q. Display for models with
remote control*
R. AeroPro Classic handle*
S. AeroPro Ergo handle*
T. AeroPro Remote Control
handle*
U. FlowMotion nozzle*
V. FlowMotion LED nozzle*
(with front lights)*
W. AeroPro Turbo nozzle*
X. AeroPro Mini Turbo nozzle*
Y. ParkettoPro nozzle*
Z. AeroPro FlexProPlus nozzle*
AA. AeroPro Long crevice
nozzle*
* Certain models only
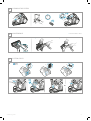
HOW TO USE THE VACUUM CLEANER
1 Check that all lters are properly placed before using the vacuum
cleaner.
2 Insert the hose into the cleaner (to remove it, press the lock buttons
and pull). Insert the hose into the hose handle until the lock button
clicks (to release it, press the lock button
and pull).
3 Attach the telescopic tube to the nozzle. Attach the telescopic tube to
the hose handle (to remove it, press the lock button and pull).
4 Adjust the telescopic tube by holding the lock with one hand and
pulling the handle with the other hand.
3IN1 ACCESSORY TOOL
5 You can fasten the clip-on holder and 3in1 tool under the handle to
have it easily accessible. The tool has 3functions, see pictures on next
page.
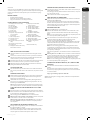
CHANGING THE BATTERIES*
6 Nozzle with front lights*: Before rst use, remove the protective lm
(on top of the batteries). Change batteries when front lights start
blinking fast. Use 2 AA batteries.
7 Handle with remote control*: Change battery when light indicator
turns red or is not responding when pressing any button.
Use only
batteries type LITHIUM CR1632.
NB: Remove the batteries from the product before scrapping. Follow
your country’s rules for collection of batteries and electrical products.
START/STOP THE VACUUM CLEANER AND ADJUST SUCTION
POWER
8 Pull out the power cord and plug it into the mains. Press the ON/OFF
button to turn the cleaner on/o. Models with remote control can also
be operated by the ON/OFF button on the handle.*
9 After cleaning, push the REWIND button to rewind the cable.
10 Adjust suction power (manual control models): Turn the rotary knob
on the cleaner or use the air valve on the handle.*
Adjust suction power (remote control models): Press +/- button on
the handle. MIN/MAX and symbols indicators on display will show
level of power.*
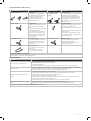
VACUUMING WITH THE UNIVERSAL NOZZLE V*, W*
11 Change nozzle setting with the pedal. Icon illustrates recommended
oor type (hard oor or carpet).
FlowMotion LED nozzle*: Move the nozzle forward. The front light
turns on automatically after a few seconds. When the nozzle is not
used, the light turns o automatically after a few seconds.
PARKING POSITIONS, MOVING THE VACUUM CLEANER
12 Use parking position (1), at the back of the vacuum cleaner, when you
pause while vacuuming.
Use parking position (2), underneath the vacuum cleaner, to carry and
store the vacuum cleaner.
13 The vacuum cleaner has two carrying handles.
EMPTYING THE DUST COMPARTMENT
14 Empty the dust compartment when the level of dust has reached the
maximum limit ("MAX"-mark).
P
ress the release button and pull to remove the dust compartment.
Hold the dust compartment over a dust bin. Press the unlock button
underneath the lid, open the lid by swinging it outwards. Empty dust
into the dustbin. Ret in reverse order.
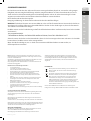
REPLACING THE FILTERS
15 Pull the FILTER button to open the lter lid.
Clean the ne dust lter after six months of use. Pull the tab on the
frame to remove the ne dust lter. Rinse the lter under running
water.
NB: Do not use cleaning agents. Let the lter dry completely (min. 24 h
in room temperature) before putting back !
16 Press and slide the lock mechanism to the right to release the pre-
motor lter. Remove the lter by pulling the lter frame tab.
Clean the pre-motor lter after twelve months of use.
Only use original s-lter PureAdvantage, ref: EFSXXX. Rinse the inside
(dirty side) in lukewarm tap water. Tap the lter frame to remove the
water. Repeat the process four times.
NB: Do not use cleaning agents. Avoid touching the lter surface.
Let the lter dry completely (min. 24 h in room temperature) before
putting back ! Change the washable lter at least once a year or when
it is very dirty or damaged.
After replacing the lters, close the lter lid until it is clicked back into
place.
17 Cleaning the nose cone lter:
the nose cone lter is located inside the
cyclone compartment. Clean the nose cone lter if dust has entered.
Pull the nose cone lter to remove. Remove dust with your hand.
Clean under running water if heavily soiled. Ret in reverse order.
NB: Do not use cleaning agents. Let the lter dry completely (min. 24 h
in room temperature) before putting back!
CLEANING THE UNIVERSAL NOZZLE V*, W** AND THE TURBO
NOZZLE X*
18 Disconnect the universal nozzle from the tube. Clean with the hose
handle.
Disconnect the turbo nozzle from the tube and remove entangled
threads etc by snipping them away with scissors. Use the hose handle
to clean the nozzle. *
Enjoy a great cleaning experience with LX9!
AEG reserves the right to change products, information and specications
without notice.
FR
GR
IT
NL
DE
PT
FA
AR
GB
ES
GB

8
www.aeg.com
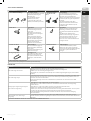
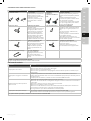
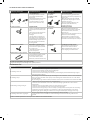
TIPS ON HOW TO GET THE BEST RESULTS
NOZZLE/ACCESSORY USE FOR: NOZZLE/ACCESSORY USE FOR:
K. 3in1 accessory tool*
3 tools in 1:
1. Dusting tool for hard surfaces
(bookshelves, skirting boards etc).
2. Upholstery tool for textiles
(curtains, upholstery etc).
3. Crevice tool for narrow spaces
(behind radiators etc).
U. FlowMotion nozzle*
V. FlowMotion LED
nozzle*
Universal nozzle:
- For all oor types, secures best dust pick
up on both carpets and hard oors.
- Change nozzle setting with the pedal.
Icon will show recommended oor type.
- Front light helps to detect dust and
dirt in dark spaces (under furniture etc).
PureVision only
1 2 3
W. Turbo nozzle* Carpet nozzle:
- Brushes and vacuums at the same
time (best pick up of hair, bres
etc).
- Brush roller is driven by the airow
of the vacuum cleaner.
- Not suitable for carpets with very
deep piles and long fringes, anti-
slip carpets like door mats or water
resistant carpets. Use universal
nozzle instead.
X. Mini Turbo nozzle* Upholstery nozzle:
- Brushes and vacuums at the same time
(best pick up of hair, bres etc).
- For textile furniture, car seats, mattresses
etc.
- Brush roller is driven by the airow of the
vacuum cleaner.
- Not suitable for carpets with very deep
pile and long fringes as it can get stuck in
the rotating brush roll.
Y. ParkettoPro nozzle* Hard oor nozzle:
- For gentle cleaning of hard oor
(parquet, wooden oor, tiles etc).
- Best dust pick up on hard oor
with crevice.
Z. FlexProPlus nozzle* Hardoor nozzle:
- For reach under/between furniture,
corners and other obstacles.
- Can easily turn 180 degrees for direct
access to narrow spaces.
AA. Long crevice nozzle* Extra long tool:
- For areas hard to reach (top of
shelves etc).
- For narrow spaces (behind
radiators, under car seats etc).
Models with manual power regulation
– follow graphics on cleaner for optimal performance.
TROUBLESHOOTING
PROBLEM SOLUTION
The vacuum cleaner does not start
• Check that the cable is connected to the mains.
• Check that the plug and cable are not damaged.
• Check for a blown fuse.
• Check if the battery indicator lamp in the remote control handle responds (certain models only).
The cleaner stops
The cleaner might be overheated: disconnect it from the mains; check if the nozzle, tube, hose or lters
are blocked. Let the cleaner cool down for 120 minutes before plugging it in again.
If the cleaner still does not work, contact an authorized AEG service centre.
Reduction of suction capacity versus
normal
• Check if the dust compartment is full or blocked.
• Check if the air channel and inlet or outlet connection is blocked and needs to be cleared.
• Check if the pre-motor lter is clogged and needs changing.
• Check if nozzle is blocked and needs to be cleared.
• Check if hose is blocked by squeezing it gently. However, be careful in case the obstruction has been
caused by glass or needles caught inside the hose.
Note: The warranty does not cover any damage to the hose caused by cleaning it.
Water has been sucked into the vacuum
cleaner
It will be necessary to replace the motor at an authorized AEG service centre.
Damage to the motor caused by the penetration of water is not covered by the warranty.
For any further problems, contact an authorized AEG service centre.

9
www.aeg.com
SICHERHEITSHINWEISE
Das Gerät kann von Kindern ab 8 Jahren und Personen mit eingeschränkten physischen, sensorischen oder geistigen
Fähigkeiten oder mit mangelnder Erfahrung und/oder mangelndem Wissen nur dann verwendet werden, wenn sie
durch eine für ihre Sicherheit zuständige Person beaufsichtigt werden oder in die sichere Verwendung des Geräts
eingewiesen wurden und die mit dem Gerät verbundenen Gefahren verstanden haben.
Kinder dürfen nicht mit dem Gerät spielen.
Reinigung und Wartung des Geräts dürfen nicht von Kindern ohne Aufsicht erfolgen.
WARNUNG: Turbodüsen* besitzen eine rotierende Bürste, in der sich Teile festsetzen können. Verwenden Sie die Düsen
vorsichtig und nur auf den dafür vorgesehenen Oberächen. Schalten Sie den Staubsauger aus, bevor Sie festsitzende
Teile entfernen oder die Bürsten reinigen.
Die Akkus müssen aus der Fernbedienung im Gri*/der LED beleuchteten Düse* entfernt werden, bevor Sie das Produkt
verschrotten**.
*Nur ausgewählte Modelle.
**Informationen darüber, wie Sie den Akku entfernen können, lesen Sie in Abschnitt 6 und 7.
Ziehen Sie immer den Stecker aus der Netzsteckdose, bevor Sie das Gerät reinigen oder warten oder wenn Sie den Akku
herausnehmen. Die Akkus müssen sicher entsorgt werden.
Wenn das Kabel beschädigt ist, muss es durch einen autorisierten AEG-Kundendienst ersetzt werden, um
Gefahrenquellen zu vermeiden.
LX9 darf nur für normales Staubsaugen im Innenbereich und in einer
Haushaltsumgebung verwendet werden. Staubsauger immer an einem
trockenen Ort aufbewahren.
Alle Wartungs- und Reparaturarbeiten dürfen ausschließlich von einem
autorisierten AEG-Kundendienst durchgeführt werden.
Verpackungsmaterial wie Plastikbeutel u. ä. von Kindern fernhalten. Es
besteht Erstickungsgefahr.
Benutzen Sie den Staubsauger niemals ...
• in nassen Bereichen.
• in der Nähe von brennbaren Gasen etc.
• wenn das Gerät sichtbare Schäden aufweist.
• für Flüssigkeiten oder scharfkantige und spitze Gegenstände.
• wenn die Bodendüse sichtbare Schäden aufweist.
• für heiße oder kalte Asche, brennende Zigarettenkippen etc.
• für feinen Staub (z. B. von Gips, Beton, Mehl, heißer oder kalter
Asche).
• Den Staubsauger niemals in direktem Sonnenlicht stehen lassen.
• Staubsauger vor starker Hitze oder Temperaturen unter dem
Gefrierpunkt schützen.
• Staubsauger niemals ohne Filter benutzen.
• Berühren Sie die Bürstenrolle nicht, solange der Staubsauger
eingeschaltet ist und sich die Rolle dreht.
• wenn die Räder blockiert sind.
• Verwenden Sie Ihren Staubsauger nicht, wenn die Filter beschädigt
sind.
Vorsichtsmaßnahmen für Netzkabel
Überprüfen Sie den Stecker und das Netzkabel regelmäßig. Verwenden
Sie den Staubsauger niemals, wenn der Stecker oder das Netzkabel
beschädigt ist.
Beschädigungen am Netzkabel des Staubsaugers sind nicht durch die
Garantie abgedeckt.
Unterlassen Sie es, den Staubsauger am Kabel zu ziehen oder anzuheben.
Der Einsatz des Staubsaugers unter den genannten Bedingungen kann zu
Verletzungen führen und das Produkt ernsthaft beschädigen. Ein solcher
Schaden ist nicht durch die Garantie von AEG abgedeckt.
WARTUNG UND GARANTIE
Alle Wartungs- und Reparaturarbeiten dürfen ausschließlich von einem
autorisierten AEG-Kundendienst durchgeführt werden.
Beschädigungen am Netzkabel des Staubsaugers sind nicht durch
die Garantie abgedeckt. Schäden am Motor, die durch Einsaugen
von Flüssigkeiten, Eintauchen des Geräts in eine Flüssigkeit oder die
Verwendung des Geräts mit einem beschädigten Schlauch und einer
defekten Düse verursacht wurden, sind nicht durch die Garantie
abgedeckt.
ENTSORGUNG
Dieses Symbol auf dem Produkt zeigt an, dass das Gerät eine
Batterie enthält, die nicht im normaler Hausmüll entsorgt
werden darf.
Das Symbol auf dem Produkt oder der Verpackung weist das
Gerät als ein Produkt aus, das nicht in den Hausmüll gehört.
Bitte entsorgen Sie dieses Gerät an einer entsprechenden
Sammelstelle oder bringen Sie es zum Kundendienst von
AEG, bei dem Batterie als auch elektrische Bauteile sicher und
professionell entsorgt werden. Beachten Sie die jeweiligen
lokalen Vorschriften für die Entsorgung von Elektrogeräten und
wiederauadbaren Batterien.
Hiermit erklärt AEG Home Care & SDA, dass der Staubsauger mit
Funkgeräten vom Typ HER2 und HER3 die Richtlinie 2014/53/EU erfüllt.
FR
GR
IT
NL
PT
FA
AR
GB
ES
DE

10
www.aeg.com
DEUTSCH
Vielen Dank, dass Sie sich für den AEG-Staubsauger LX9 entschieden
haben. Verwenden Sie immer Originalzubehör und Originalersatzteile, um
bestmögliche Ergebnisse zu erzielen. Dieses Produkt wurde mit Rücksicht
auf die Umwelt hergestellt. Alle Plastikteile sind für Recyclingzwecke
markiert.
VOR DER INBETRIEBNAHME
• Lesen Sie dieses Handbuch sorgfältig durch.
• Überprüfen Sie, ob alle beschriebenen Teile enthalten sind.
• Beachten Sie insbesondere die Sicherheitshinweise
BESCHREIBUNG DES STAUBSAUGERS VOM TYP LX9
A. Display (Versionen siehe weiter
unten)
B. Filterdeckel
C. Feinstaublter
D.
Vormotorlter
E. Parkaufnahmen
F. Netzkabel
G. Tragegri
H. Zyklonbehälter und konischer
Filter
I. Luftkanal
J. Staubbehälter
K. AeroPro 3-in-1-Tool
L. AeroPro-Schlauch
M. AeroPro-Handgri (Versionen
siehe weiter unten)
N. AeroPro-Teleskoprohr
O. Parkfunktion
P. Display für Modelle mit
manueller Bedienung des
Drehschalters*
Q. Display für Modelle mit
Fernbedienung*
R. AeroPro Classic-Handgri*
S. AeroPro Ergo-Handgri*
T. Ferngesteuerter AeroPro-
Gri*
U. FlowMotion-Düse*
V. FlowMotion LED-Düse (mit
Vorderleuchten)*
W. AeroPro-Turbodüse*
X. AeroPro Mini-Turbodüse*
Y. ParkettoPro-Düse*
Z. AeroPro FlexProPlus-Düse*
AA. Lange AeroPro-
Fugendüse*
* Nur ausgewählte Modelle
WIE MAN DEN STAUBSAUGER BENUTZT
1 Überprüfen Sie zuerst, ob alle Filter korrekt eingesetzt sind, bevor Sie
den Staubsauger verwenden.
2 chieben Sie den Schlauch in den Staubsauger (zum Entnehmen
des Schlauchs drücken Sie die Entriegelungstasten und ziehen
ihn ab). Schieben Sie den Schlauch in den Schlauchgri, bis die
Verriegelungstaste klickt (um ihn freizugeben, drücken Sie die
Verriegelungstaste und ziehen ihn heraus).
3 Befestigen Sie das Teleskoprohr an der Düse. Befestigen Sie das
Teleskoprohr am Schlauchgri (um es zu entfernen, drücken Sie die
Verriegelungstaste und ziehen es heraus).
4 Justieren Sie das Teleskoprohr, indem Sie die Verriegelung mit einer
Hand halten und den Gri mit der anderen Hand ziehen.
3IN1ZUBEHÖRWERKZEUG
5 Sie können den Clip-On-Halter und das 3in1-Werkzeug unter dem
Gri befestigen, damit diese leicht zugänglich sind.
Das Tool hat 3
Funktionen, die auf den Bildern auf der nächsten Seite veranschaulicht
werden.
AUSWECHSELN DER BATTERIEN*
6 Düse mit Vorderleuchten*: Entfernen Sie vor dem ersten Gebrauch die
Schutzfolie (auf den Batterien). Wechseln Sie die Batterien aus, wenn
die Vorderleuchten schnell zu blinken beginnen. Verwenden Sie zwei
AA-Batterien.
7 Handgri mit Fernbedienung*: Wechseln Sie die Batterie, wenn die
Kontrollleuchte rot aueuchtet oder beim Drücken der Tasten nicht
mehr reagiert. Verwenden Sie nur Lithium-Batterien vom Typ CR1632.
Hinweis: Entfernen Sie die Batterien aus dem Produkt, bevor Sie
es verschrotten. Befolgen Sie die Vorschriften Ihres Landes für die
Erfassung von Batterien und elektrischen Produkten.
STARTEN/STOPPEN SIE DEN STAUBSAUGER UND STELLEN SIE
DIE SAUGLEISTUNG EIN
8 Ziehen Sie das Netzkabel heraus und stecken Sie es in die
Netzsteckdose. Drücken Sie die EIN/AUS-Taste, um den Staubsauger
ein-/auszuschalten. Modelle mit Fernbedienung können auch über die
EIN/AUS-Taste am Gri bedient werden.*
9 Nach der Reinigung drücken Sie die AUFROLLTASTE, um das Kabel
einzurollen.
10 Anpassen der Saugleistung (Modelle mit manueller Bedienung):
Drehen Sie den Drehschalter am Staubsauger oder verwenden Sie das
Luftventil am Handgri.*
Anpassen der Saugleistung (Modelle mit Fernbedienung): Drücken
Sie die +/– Taste am Handgri. Die MIN/MAX-Anzeige und die Symbole
auf dem Display geben die Leistungsstufe an.*
STAUBSAUGEN MIT DER UNIVERSALDÜSE V*, W*
11 Ändern Sie die Düseneinstellung mit dem Pedal. Das Symbol zeigt den
empfohlenen Bodentyp (
Hartböden
oder
Teppiche
).
FlowMotion LED-Düse*: Schieben Sie die Düse nach vorn. Die vordere
Leuchte schaltet sich nach einigen Sekunden automatisch ein. Wenn
die Düse nicht verwendet wird, schaltet sich das Licht nach einigen
Sekunden automatisch aus.
PARKPOSITIONEN, STAUBSAUGER BEWEGEN
12 Verwenden Sie die Parkposition (1) auf der Rückseite des
Staubsaugers, wenn Sie während des Staubsaugens anhalteng.
Verwenden Sie die Parkposition (2) unter dem Staubsauger, um den
Staubsauger zu tragen oder zu lagern.
13 Der Staubsauger besitzt zwei Tragegrie.
STAUBBEHÄLTER LEEREN
14 Entleeren Sie den Staubbehälter, wenn der Staub die maximale Grenze
(„MAX“-Markierung) erreicht hat.
Drücken Sie die Entriegelungstaste und ziehen am Staubbehälter, um
ihn abzunehmen
.
Halten Sie den Staubbehälter über einen Abfallbehälter. Drücken Sie
den Entriegelungsknopf unter dem Deckel, und önen ihn, indem
Sie ihn nach außen schwenken. Entleeren Sie den Inhalt in einen
Abfallbehälter. Der Einbau erfolgt in umgekehrter Reihenfolge.
ERSETZEN DER FILTER
15 Ziehen Sie die FILTER-Taste, um die Filterabdeckung zu önen.
Reinigen Sie den Feinstaublter nach sechs Monaten Gebrauch.
Ziehen Sie an der Lasche, um den Feinstaublter zu entfernen.
Reinigen Sie die Filter unter ießendem Wasser.
NB: Verwenden Sie keine Reinigungsmittel. Lassen Sie den Filter
vollständig trocken (min. 24h bei Raumtemperatur), bevor Sie ihn
wieder einsetzen!
16 Drücken und schieben Sie den Verriegelungsmechanismus nach
rechts, um den Vormotorlter zu lösen. Entfernen Sie den Filter, indem
Sie an der Lasche des Filterrahmens ziehen.
Reinigen Sie den Vormotorlter nach zwölf Monaten Gebrauch.
Verwenden Sie nur den originalen S-Filter PureAdvantage, Ref.:
EFSXXX. Spülen Sie die Innenseite (die verschmutzte Seite) mit
lauwarmem Leitungswasser aus. Tippen Sie auf den Filterrahmen, um
das Wasser zu entfernen. Wiederholen Sie den Vorgang viermal.
Hinweis: Verwenden Sie keine Reinigungsmittel. Berühren Sie nicht
die Filteroberäche. Lassen Sie den Filter vollständig trocken (min. 24
h bei Raumtemperatur), bevor Sie ihn wieder einsetzen! Wechseln Sie
den waschbaren Filter mindestens einmal pro Jahr oder wenn er sehr
schmutzig oder beschädigt ist.
Nachdem Sie die Filter ausgetauscht haben, schließen Sie die
Filterabdeckung, bis sie einrastet.
17 Reinigung des konischen Filters: Der konische Filter bendet sich
im Inneren des Zyklonbehälters. Reinigen Sie den konischen Filter,
sobald Staub eingedrungen ist. Ziehen Sie den konischen Filter
heraus. Entfernen Sie Staub mit der Hand. Bei starker Verschmutzung
unter ießendem Wasser reinigen. Der Einbau erfolgt in umgekehrter
Reihenfolge.
NB: Verwenden Sie keine Reinigungsmittel. Lassen Sie den Filter
vollständig trocken (min. 24h bei Raumtemperatur), bevor Sie ihn
wieder einsetzen!
REINIGEN DER UNIVERSALDÜSE V*, W**
UND DER TURBODÜSE X*
18 Trennen Sie die Universaldüse vom Rohr. Reinigen Sie mit dem
Schlauchgri.
Trennen Sie die Turbodüse vom Rohr und entfernen Sie verhedderte
Fäden usw., indem Sie sie mit einer Schere wegschneiden. Reinigen
Sie die Düse mit dem Schlauchgri. *
Erleben Sie eine großartige Reinigung mit LX9!
AEG behält sich das Recht vor, Produkte, Informationen und
Spezikationen ohne Vorankündigung zu ändern.

11
www.aeg.com
TIPPS FÜR BESTE ERGEBNISSE
DÜSE/ZUBEHÖR VERWENDUNG FÜR: DÜSE/ZUBEHÖR VERWENDUNG FÜR:
K. 3-in-1-Zubehörwerkzeug*
Drei Tools in einem:
1. Tool zum Staubsaugen auf harten
Oberächen (Bücherregalen,
Fußleisten usw.).
2. Polsterdüse für Textilien
(Gardinen, Polster usw.).
3. Fugendüse für Spalten und
Nischen (hinter Heizkörpern usw.).
U. FlowMotion-Düse*
V. FlowMotion LED-
Düse*
Universaldüse:
- Für alle Bodentypen, sorgt für eine
optimale Staubentfernung sowohl auf
Teppichen als auch auf Hartböden.
- Ändern Sie die Düseneinstellung mit dem
Pedal. Das Symbol zeigt den empfohlenen
Bodentyp.
- Die Vorderleuchten helfen dabei,
Staub und Schmutz an dunklen Stellen
zu erkennen (unter Möbeln usw.). Nur
FlowMotion LED
1 2 3
W. Turbodüse* Teppichdüse:
- Bürstet und saugt gleichzeitig
(beste Entfernung von Haaren,
Fasern usw.).
- Die Bürstenrolle wird durch
den Luftstrom des Staubsaugers
angetrieben.
- Nicht geeignet für Teppiche
mit sehr hohem Flor und langen
Fransen, rutschfeste Teppiche
wie Türmatten oder wasserfeste
Teppiche. Verwenden Sie
stattdessen die Universaldüse.
X. Miniturbodüse* Polsterdüse:
- Bürstet und saugt gleichzeitig (beste
Entfernung von Haaren, Fasern usw.).
- Für Polstermöbel, PKW-Sitze, Matratzen
usw.
- Die Bürstenrolle wird durch den
Luftstrom des Staubsaugers angetrieben.
- Nicht geeignet für Teppiche mit sehr
hohem Flor und langen Fransen, da
diese sich in der rotierenden Bürstenrolle
verfangen können.
Y. ParkettoPro-Düse* Hartbodendüse::
- Zur schonende Reinigung von
Hartböden (Parkett, Holzböden,
Fliesen usw.).
- Optimale Staubentfernung auf
Hartböden mit Fugen.
Z. FlexProPlus-Düse* Hartbodendüse:
- Um unter/zwischen Möbel, andere
Hindernisse und in Ecken zu gelangen.
- Kann leicht um 180 Grad gedreht werden,
um direkt in Spalten und Nischen zu
gelangen
AA. Lange Fugendüse* Extralanges Tool:
- Für schwer erreichbare Stellen
(Oberseite von Regalen usw.).
- Für Spalten und Nischen (hinter
Heizkörpern, unter Autositzen
usw.).
Modelle mit manueller Leistungsregelung
- Für eine optimale Leistung befolgen Sie die Abbildung auf dem Staubsauger.
FEHLERSUCHE
STÖRUNG ABHILFE
Der Staubsauger startet nicht
• Stellen Sie sicher, dass das Kabel an das Stromnetz angeschlossen ist.
• Vergewissern Sie sich, dass der Stecker und das Kabel nicht beschädigt sind.
• Prüfen Sie, ob eine Sicherung durchgebrannt ist.
• Überprüfen Sie, ob die Batterie-Kontrolllampe am Fernbedienungshandgri reagiert (nur bestimmte
Modelle).
Der Staubsauger stoppt
Der Staubsauger könnte überhitzt sein: Trennen Sie ihn vom Netzstrom, und prüfen Sie, ob Düse, Rohr,
Schlauch oder Filter verstopft sind. Lassen Sie den Staubsauger 120 Minuten lang abkühlen, bevor Sie
ihn wieder am Stromnetz anschließen.
Wenn der Staubsauger immer noch nicht funktioniert, kontaktieren Sie einen autorisierten AEG-
Kundendienst.
Rückgang der Saugleistung im Vergleich
zur normalen Saugleistung
• Überprüfen Sie, ob der Staubbehälter voll oder verstopft ist.
• Überprüfen Sie, ob der Luftkanal und der Ein- oder Auslassanschluss blockiert sind und gereinigt
werden müssen.
• Überprüfen Sie, ob der Vormotorlter verstopft ist und ausgetauscht werden muss.
• Prüfen Sie, ob die Düse verstopft ist und gereinigt werden muss.
• Prüfen Sie, ob der Schlauch verstopft ist, indem Sie ihn vorsichtig zusammendrücken. Seien Sie jedoch
vorsichtig, falls die Verstopfung im Schlauch durch Glas oder Nadeln verursacht wurde.
Hinweis: Die Gewährleistung deckt keine Schäden am Schlauch ab, die durch dessen Reinigung
verursacht wurden.
Wasser wurde in den Staubsauger
eingesaugt
Es ist erforderlich, den Motor von einem autorisierten AEG-Kundendienst auswechseln zu lassen.
Schäden am Motor, die durch eingedrungenes Wasser verursacht wurden, sind nicht durch die Garantie
abgedeckt.
Bei weiteren Problemen wenden Sie sich an den autorisierten AEG-Kundendienst.
FR
GR
IT
NL
PT
FA
AR
GB
ES
GB
DE

12
www.aeg.com
8
LED
AEG
LX9
AEG
AEG
AEG
AEG
AEG Home Care and SDA
HER3

13
www.aeg.com
•
•
•
AeroPro
.B
.C
.D
.E
.F
G
H
I
J
2
3
4
3
.
.AA
.
FlowMotion LED
!LX9
AEG
12
13
14
15
16
17
18
6
5
7
9
10
11
8
1
FR
GR
IT
NL
DE
PT
FA
GB
ES
AR

14
www.aeg.com
*

15
www.aeg.com
PRECAUCIONES DE SEGURIDAD
ste aparato puede ser utilizado por niños de 8 años en adelante y personas cuyas capacidades físicas,
sensoriales o mentales estén disminuidas o que carezcan de la experiencia y conocimientos sucientes para
manejarlo siempre que estén supervisados o hayan recibido instrucciones sobre el uso del electrodoméstico de
forma segura y comprendan los riesgos.
Los niños no deben jugar con el aparato.
Las operaciones de limpieza y mantenimiento no deberán ser realizadas por niños sin supervisión.
ADVERTENCIA: Las boquillas Turbo* tienen un cepillo giratorio que puede atrapar objetos. Úselas con cuidado
y solo en supercies adecuadas. Apague la aspiradora antes de retirar objetos atrapados o de limpiar el cepillo.
Antes de desechar el producto se deben retirar las pilas del mando a distancia de asa* / boquilla* con luz LED**.
*Solo algunos modelos.
**La información sobre cómo retirar las pilas está en la sección 6 y 7.
Desconecte siempre el enchufe de la red eléctrica antes de limpiar o realizar el mantenimiento del aparato, así
como al retirar las pilas. Asegúrese de desechar las pilas de forma segura.
Si se daña el cable y para evitar riesgos, su sustitución debe realizarla únicamente un servicio técnico autorizado
de AEG.
LX9 solo debe ser utilizada por adultos y exclusivamente para aspirar
en el interior de un entorno doméstico normal. Asegúrese de guardar la
aspiradora en un lugar seco.
Todas las operaciones de servicio o reparación debe realizarlas un servicio
técnico autorizado de AEG.
El material de embalaje, como las bolsas de plástico, no deben ser
accesibles para los niños para evitar posibles asxias.
No utilice nunca la aspiradora:
En zonas húmedas.
Cerca de gases inamables, etc.
Cuando el producto muestre señales visibles de daño.
Con objetos punzantes o líquidos.
Cuando la boquilla de suelos muestre señales visibles de daño.
Con ceniza caliente o fría, cigarrillos encendidos, etc.
Con polvo no, como yeso, cemento, harina o ceniza.
No deje la aspiradora expuesta a la luz directa del sol.
Evite someter la aspiradora a calor intenso o temperaturas muy frías.
No use nunca la aspiradora sin sus ltros.
No toque el cepillo giratorio mientras la aspiradora está encendida y gira
el rodillo.
Cuando las ruedas estén bloqueadas.
No utilice su aspiradora si los ltros están dañados o rotos.
Precauciones con el cable de alimentación
Revise con frecuencia el enchufe y el cable. Nunca use la aspiradora si el
enchufe o el cable están dañados.
La garantía no cubre daños al cable de la aspiradora.
Nunca tire de la aspiradora ni la levante por el cable.
El uso de la aspiradora en las circunstancias anteriores puede provocar
lesiones graves o dañar el producto. Ni la garanbtía ni AEG cubren dichas
lesiones o daños.
SERVICIO TÉCNICO Y GARANTÍA
Todas las operaciones de servicio o reparación debe realizarlas un servicio
técnico autorizado de AEG.
La garantía no cubre daños en el cable de la aspiradora.
La garantía no cubre daños en el motor provocados por líquidos aspirados,
por sumergir el aparato en líquido o por utilizarlo con una manguera o
boquilla dañada.
VERTIDO
Este símbolo que aparece en el producto indica que contiene
pilas que no deben eliminarse con los residuos domésticos
normales.
Este símbolo que aparece en el producto o en el embalaje indica
que el producto no debe tratarse como residuo doméstico.
Para reciclar su producto, llévelo a un punto de recogida ocial
o a un servicio técnico de AEG, donde retirarán y reciclarán las
pilas y los componentes eléctricos de forma segura y profesional.
Siga las normas de su país sobre recogida selectiva de productos
eléctricos y pilas recargables.
Por la presente, AEG Home Care y SDA declaran que la Aspiradora con
equipo de radio tipo HER2 y HER3 cumple la Directiva 2014/53/EU.
FR
GR
IT
NL
DE
PT
FA
AR
GB
ES

16
www.aeg.com
ESPAÑOL
Gracias por elegir la aspiradora AEG LX9. Use siempre accesorios y piezas
de repuesto originales para lograr los mejores resultados. Este producto
ha sido diseñado teniendo en cuenta el medio ambiente. Las piezas de
plástico están marcadas para su reciclaje.
ANTES DE COMENZAR
• Lea detenidamente este manual.
• Compruebe que están incluidas todas las piezas descritas.
• ¡Preste especial atención a las precauciones de seguridad!
DESCRIPCIÓN DE LA ASPIRADORA LX9
A. Pantalla (ver otras versiones)
B. Tapa del ltros
C. Filtro de polvo no
D.
Filtro pre-motor
E. Ranuras de almacenamiento
F. Cable de alimentación
G. Asa de transporte
H. Compartimento ciclónico y
ltro de cono
I. Canal de aire
J. Compartimento para el polvo
K. Herramienta AeroPro 3 en 1
L. Manguera AeroPro
M. Asa AeroPro (ver otras
versiones)
N. Tubo telescópico AeroPro
O. Clip de estacionamiento
P. Pantalla para modelos con
mando de control manual
giratorio*
Q. Pantalla para modelos con
mando a distancia*
R. Asa AeroPro Classic*
S. Asa ergonómica AeroPro
Ergo*
T. Asa de mando a distancia
AeroPro*
U. Boquilla FlowMotion*
V. Boquilla FlowMotion LED
(con luces frontales)*
W. Boquilla AeroPro Turbo*
X. Boquilla AeroPro Mini
Turbo*
Y. Boquilla ParkettoPro*
Z. Boquilla AeroPro
FlexProPlus*
AA. Boquilla larga para suras
AeroPro Long*
* Solo algunos modelos
CÓMO USAR LA ASPIRADORA
1 Compruebe que todos los ltros están colocados correctamente antes
de usar la aspiradora.
2 Inserte la manguera en la aspiradora (para retirarla, pulse los botones
de bloqueo y tire). Inserte la manguera en el asa de manguera hasta
que el botón de bloqueo haga clic (para liberarla, pulse el botón de
bloqueo y tire).
3 Una el tubo telescópico a la boquilla. Instale el tubo telescópico en el
asa de la manguera (para retirarlo, pulse el botón de bloqueo y tire).
4 Ajuste el tubo telescópico sosteniendo el bloqueo con una mano y
tirando del asa con la otra.
HERRAMIENTA DE ACCESORIOS 3 EN 1
5 Puede jar el soporte para colgar la herramienta 3en1 debajo del
mango para tenerla fácilmente accesible. La herramienta tiene 3
funciones; vea las fotos de la página siguiente.
CAMBIO DE LAS PILAS*
6 Boquilla con luces frontales*: Antes del primer uso, retire la película
protectora (encima de las baterías). Cambie las pilas cuando las luces
frontales comiencen a parpadear rápido. Use 2 pilas tipo AA.
7 Asa con mando a distancia*: cambie las pilas cuando el indicador
luminoso se encienda en rojo o cuando no responda al pulsar un
botón. Utilice solo pilas tipo LITHIUM CR1632.
NB: Retire las pilas del producto antes de desecharlo. Siga las normas
de su país en materia de recogida de pilas, baterías y productos
eléctricos.
PONGA EN MARCHA/PARE LA ASPIRADORA Y AJUSTE LA
POTENCIA DE ASPIRACIÓN
8 Tire del cable de alimentación y enchúfelo a la red eléctrica. Pulse el
botón ON/OFF para encender o apagar el aparato. Los modelos con
mando a distancia también pueden manejarse con el botón ON/OFF
del asa.*
9 Tras la limpieza, pulse el botón REWIND para recoger el cable
10 Ajuste la potencia de aspiración (modelos de control manual): gire
el mando giratorio del aparato o use la válvula de aire del asa.*
Ajuste la potencia de aspiración (modelos con mando a distancia):
Pulse el botón +/- en el asa. Los indicadores MIN/MAX y los símbolos
de la pantalla muestran el nivel de potencia.*
ASPIRACIÓN CON LA BOQUILLA UNIVERSAL V*, W*
11 Cambie el ajuste de la boquilla con el pedal. El icono ilustra un tipo de
suelo recomendado (
suelo duro
o
alfombra
).
Boquilla FlowMotion LED*: mueva la boquilla hacia adelante. La luz
frontal se enciente automáticamente tras unos segundos. Cuando
la boquilla no se usa, la luz se apaga automáticamente tras unos
segundos.
POSICIONES DE ESTACIONAMIENTO, MOVER LA ASPIRADORA
12 Utilice la posición de estacionamiento (1), en la parte posterior de la
aspiradora, cuando haga una pausa mientras aspira.
Utilice la posición de estacionamiento (2), debajo de la aspiradora,
para transportar y guardar la aspiradora.
13 La aspiradora tiene dos asas de transporte.
VACIAR EL COMPARTIMENTO PARA EL POLVO
14 POLVO Vacíe el compartimento de polvo cuando el nivel de polvo
haya alcanzado el límite máximo (marca "MAX").
Presione el botón de liberación y tire para retirar el compartimento
para el polvo
.
Sostenga el compartimiento para el polvo sobre una papelera.
Presione el botón de desbloqueo situado debajo de la tapa y abra
la tapa girándola hacia fuera. Vacíe el polvo en la papelera. Vuelva a
montar en orden inverso.
SUSTITUCIÓN DE LOS FILTROS
15 Tire del botón FILTER para abrir la tapa del ltro.
Limpie el ltro de polvo no después de seis meses de uso. Tire de la
lengüeta del marco para quitar el ltro de polvo no. Enjuague el ltro
con agua corriente.
Nota: No utilice productos de limpieza. Deje que el ltro se seque
completamente (min. 24 horas a temperatura ambiente) antes de
colocarlo de nuevo.
16 Presione y deslice el mecanismo de bloqueo hacia la derecha para
soltar el ltro pre-motor. Retire el ltro tirando de la lengüeta del
marco del ltro.
Limpie el ltro pre-motor tras doce meses de uso.
Utilice únicamente el s-lter PureAdvantage original, ref: EFSXXX.
Enjuague el interior (lado sucio) con agua tibia del grifo. Golpee
ligeramente el chasis del ltro para eliminar el agua. Repita el proceso
cuatro veces.
NB: No use productos de limpieza. No toque la supercie del
ltro. Deje que el ltro se seque completamente (mín. 24 horas a
temperatura ambiente) antes de colocarlo de nuevo. Cambie el ltro
lavable al menos una vez al año o cuando esté muy sucio o dañado.
Tras cambiar el ltros, cierre la tapa hasta que se oiga un clic.
17 Limpieza del ltro de cono: el ltro de cono se encuentra dentro del
compartimiento del ciclón. Limpie el ltro si ha entrado polvo. Tire del
ltro para quitarlo. Quite el polvo con la mano. Limpie bajo agua si
está muy sucio. Vuelva a montar en orden inverso.
Nota: No utilice productos de limpieza. Deje que el ltro se seque
completamente (min. 24 horas a temperatura ambiente) antes de
colocarlo de nuevo!
LIMPIEZA DE LA BOQUILLA UNIVERSAL V*, W** Y DE LA
BOQUILLA TURBO X*
18 Desconecte la boquilla universal del tubo. Limpie con el asa de la
manguera.
Desconecte la boquilla turbo del tubo y recorte los hilos, etc.
enredados con unas tijeras. Use el asa de la manguera para limpiar la
boquilla. *
Disfrute de una gran experiencia de limpieza con LX9!
AEG se reserva el derecho de modicar los productos, la información y las
especicaciones sin previo aviso.

17
www.aeg.com
CONSEJOS PARA OBTENER EL MEJOR RESULTADO
BOQUILLA/ACCESORIO USO PARA: BOQUILLA/ACCESORIO USO PARA:
K. Herramienta de accesorios
3 en 1*
3 herramientas en 1:
1. Accesorio de limpieza para
supercies duras (estanterías,
rodapiés, etc.)
2. Accesorio de tapicerías para
textiles (cortinas, tapizados, etc.)
3. Boquilla estrecha para espacios
estrechos (detrás de radiadores,
etc.)
U. Boquilla FlowMotion*
V. Boquilla FlowMotion
LED *
Boquilla Universal:
- Para todo tipo de suelos, limpia el polvo
de alfombras y de suelos duros.
- Cambie el ajuste de la boquilla con el
pedal. El icono mostrará el tipo de suelo
recomendado
- La luz frontal ayuda a detectar el polvo y
la suciedad en espacios oscuros (debajo de
mobiliario, etc.). Solo FlowMotion LED
1 2 3
W. Boquilla Turbo* Boquilla de alfombras:
- Cepilla y aspira al mismo tiempo
(recoge pelos, bras, etc).
- El rodillo del cepillo es accionado
por el ujo de aire de la aspiradora.
-No es apropiada para alfombras
de pelo o ecos largos, alfombras
resistentes al agua ni alfombras
antideslizantes, como los felpudos.
Use para ello una boquilla universal.
X. Boquilla Mini Turbo* Boquilla para tapicería:
- Cepilla y aspira al mismo tiempo (recoge
pelos, bras, etc).
- Para tapicerías de muebles, asientos de
coche, colchones, etc.
- El rodillo del cepillo es accionado por el
ujo de aire de la aspiradora.
- No es apropiada para alfombras de pelo
o ecos largos, pues estos se pueden
enredar en el rodillo giratorio del cepillo.
Y. Boquilla ParkettoPro* Boquilla para suelos duros:
- Para limpiar suelos duros (parquet,
suelo de madera, baldosas, etc.)
- Óptima limpieza de suelo duro
con suras.
Z. Boquilla FlexProPlus* Boquilla para suelos duros:
- Para limpiar debajo y entre muebles,
esquinas y otros obstáculos.
- Puede girar fácilmente 180 grados
para acceder directamente a espacios
estrechos.
AA. Boquilla larga para suras* Herramienta extra larga:
- Para zonas de difícil acceso (parte
superior de estanterías, etc).
- Para espacios estrechos (detrás de
radiadores, bajo asientos de coche,
etc.)
Modelos con regulación de potencia manual
- siga los grácos del aparato para conseguir un rendimiento óptimo.
SOLUCIÓN DE PROBLEMAS
PROBLEMA SOLUCIÓN
La aspiradora no se pone en marcha
• Compruebe que el cable está conectado a la red eléctrica.
• Compruebe que el enchufe y el cable no están dañados.
• Compruebe si hay algún fusible fundido.
• Compruebe si el indicador de batería en el asa de mando a distancia responde (solo en ciertos
modelos).
El aparato se detiene
El aparato podría estar sobrecalentado: desconéctelo de la red eléctrica; compruebe si la boquilla, la
manguera o los ltros están obstruidos. Deje que el aparato se enfríe durante 120 minutos antes de
enchufarlo de nuevo.
Si el aparato sigue sin funcionar, póngase en contacto con un servicio técnico autorizado AEG.
Reducción de la capacidad de aspiración
• Compruebe si el compartimento de polvo está lleno o bloqueado.
• Compruebe si el canal de aire y la conexión de entrada o salida están bloqueados y es necesario
despejarlos.
• Compruebe si el ltro pre-motor está obstruido y necesita sustitución.
• Compruebe si la boquilla está obstruida.
• Compruebe si la manguera está obstruida apretándola suavemente. Tenga cuidado si la obstrucción
ha sido provocada por cristales o agujas atrapadas dentro de la manguera.
Nota: la garantía no cubre posibles daños provocados a la manguera al desobstruirla.
Ha entrado agua en la aspiradora
Será necesario cambiar el motor en un servicio técnico autorizado AEG.
La garantía no cubre posibles daños en el motor por la entrada de agua.
Para otras consultas, póngase en contacto con un servicio técnico autorizado AEG.
FR
GR
IT
NL
DE
PT
FA
AR
GB
ES

18
www.aeg.com
8
LED
AEG
LX9
AEG
AEG
AEG
AEG
SDAAEG Home Care
HER3

19
www.aeg.com
•
•
•
.
.
.
.
.
.e3
.s
.sAA
.
.
.
.
FlowMotion LED
.
.
.MAX
..
.
EFSXXX
.
LX9
1
2
3
4
5
6
7
8
9
10
11
12
13
14
15
16
17
18
FR
GR
IT
NL
DE
PT
AR
GB
ES
FA

20
www.aeg.com
PrecisionFlow
.
La pagina sta caricando ...
La pagina sta caricando ...
La pagina sta caricando ...
La pagina sta caricando ...
La pagina sta caricando ...
La pagina sta caricando ...
La pagina sta caricando ...
La pagina sta caricando ...
La pagina sta caricando ...
La pagina sta caricando ...
La pagina sta caricando ...
La pagina sta caricando ...
La pagina sta caricando ...
La pagina sta caricando ...
La pagina sta caricando ...
La pagina sta caricando ...
-
 1
1
-
 2
2
-
 3
3
-
 4
4
-
 5
5
-
 6
6
-
 7
7
-
 8
8
-
 9
9
-
 10
10
-
 11
11
-
 12
12
-
 13
13
-
 14
14
-
 15
15
-
 16
16
-
 17
17
-
 18
18
-
 19
19
-
 20
20
-
 21
21
-
 22
22
-
 23
23
-
 24
24
-
 25
25
-
 26
26
-
 27
27
-
 28
28
-
 29
29
-
 30
30
-
 31
31
-
 32
32
-
 33
33
-
 34
34
-
 35
35
-
 36
36


AEG LX9-3-CR Manuale del proprietario
- Categoria
- Aspirapolvere
- Tipo
- Manuale del proprietario
- Questo manuale è adatto anche per
in altre lingue
- français: AEG LX9-3-CR Le manuel du propriétaire
- español: AEG LX9-3-CR El manual del propietario
- português: AEG LX9-3-CR Manual do proprietário