
USER MANUAL
BI SD 177

LANGUAGES
English 1
Deutsche 19
Español 39
Français 59
Italiano 79
Nederlands 98
Polskie 117
Português 136
Čeština 155
Ελληνικά 174

1
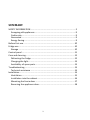
SUMMARY
SAFETY INFORMATION ............................................................................ 2
Scrapping old appliances ..................................................................... 9
Conformity ........................................................................................... 9
Guarantee ............................................................................................ 9
Energy Saving....................................................................................... 9
Before first use ...................................................................................... 10
Fridge use .............................................................................................. 10
Storage .............................................................................................. 10
Control panel ......................................................................................... 11
Care and cleaning .................................................................................. 12
Defrosting the fridge ......................................................................... 12
Changing the light .............................................................................. 13
Availability of spare parts .................................................................. 13
Troubleshooting .................................................................................... 13
Technical assistance .......................................................................... 14
Installation ............................................................................................. 14
Ventilation ......................................................................................... 15
Installation into the cabinet .............................................................. 16
Mounting the fascia door .................................................................. 17
Reversing the appliance door ............................................................ 18

2
Thank you for purchasing this product.
Before using your refrigerator, please carefully read this instruction manual in order to maximize
its performance. Store all documentation for subsequent use or for other owners. This product is
intended solely for household use or similar applications such as:
- the kitchen area for personnel in shops, offices and other working environments
- on farms, by clientele of hotels, motels and other environments of a residential type
- at bed and breakfasts (B & B)
- for catering services and similar applications not for retail sale.
This appliance must be used only for purposes of storage of food, any other use is considered
dangerous and the manufacturer will not be responsible for any omissions. Also, it is recommended
that you take note of the warranty conditions.
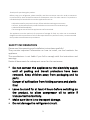
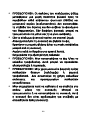
SAFETY INFORMATION
Please read the operating and installation instructions carefully!
They contain important information on how to install, use and maintain the
appliance.
The manufacturer is not liable if you fail to comply with the instructions and
warnings.
Retain all documents for subsequent use or for the next owner.
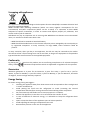
Do not connect the appliance to the electricity supply
until all packing and transit protectors have been
removed. Keep children away from packaging and its
parts.
Danger of suffocation from folding cartons and plastic
film!
Leave to stand for at least 4 hours before switching on
the product, to allow compressor oil to settle if
transported horizontally.
Make sure there is no transport damage.
Do not damage the refrigerant circuit.

3
Maintain the ventilation openings in the appliance
enclosure or in the built-in structure, free of
obstruction.
Never use water to wash the compressor position,
wipe it with a dry cloth thoroughly after cleaning to
prevent rust.
Handle the appliance always with at least two persons
because it is heavy.
Install and level the appliance in an area suitable for its
size and use.
Make sure that the electrical information on the rating
plate agrees with the power supply. If it does not,
contact an electrician.
The appliance is operated by a 220-240 VAC/50 Hz
power supply. Abnormal voltage fluctuation may cause
the appliance to fail to start, or damage to the
temperature control or compressor, or there may be
an abnormal noise when operating. In such case, an
automatic regulator shall be mounted.
Only for UK: The appliance’s power cable is fitted with
3-cord (grounding) plug that fits a standard 3-cord
(grounded) socket. Never cut off or dismount the third
pin (grounding). After the appliance is installed, the
plug should be accessible.
Make sure that mains cable is not caught under the
appliance during and after carrying/moving the
appliance, to avoid the mains cable becoming cut or

4
damaged. If the supply cord is damaged, it must be
replaced by the manufacturer, its service agent or
similarly qualified person in order to avoid a hazard.
Do not install the appliance in humid, oily or dusty
places, nor expose it to direct sunlight and to water.
Do not install the appliance near heaters or
inflammable materials.
FOR appliances with a freezer compartment: if there is
a power failure do not open the lid. Frozen food
should not be affected if the failure lasts for less than
the hours indicated on the rating label (Temperature
rise time). If the failure is longer, then the food should
be checked and eaten immediately or cooked and then
refrozen.
If you find that the lid of the appliance is difficult to
open just after you have closed it, don’t worry. This is
due to the pressure difference which will equalize and
allow the lid to be opened normally after a few
minutes.
Do not store medicines, bacteria or chemical agents in
the appliance. This appliance is a household appliance,
it is not recommended to store materials that require
strict temperatures.
Do not excessively pull or fold the power cord or touch
the plug with wet hands.
Do not store products which contain flammable
propellant (e.g. spray cans) or explosive substances in

5
the appliance. Risk of explosion!
Do not place unstable articles (heavy objects,
containers filled with water) on top of the refrigerator,
to ovoid personal injury caused by falling or electric
shock caused by contact with water.
Do not use electrical appliances inside the food
storage compartments, unless they are of the type
recommended by the manufacturer.
Do not touch internal cooling elements, especially with
wet hands, to avoid cracks or injuries.
At risk here are children, people who have limited
physical, mental or sensory abilities, as well as people
who have inadequate knowledge concerning safe
operation of the appliance.
Check that children and vulnerable people have
understood the hazards. A person responsible for
safety must supervise or instruct children and
vulnerable people who are using the appliance. Only
children aged 8 years and above may use the
appliance.
Children should not play with the appliance.
Children aged from 3 to 8 years are allowed to load
and unload this appliance.
FOR appliances with a freezer compartment: do not
store bottled or canned liquids (especially carbonated
drinks) in the freezer compartment. Bottles and cans
may burst!

6
FOR appliances with a freezer compartment: never put
frozen food straight from the freezer compartment in
your mouth. Risk of low-temperature burns!
Keep plastic parts and the door seal free of oil and
grease. Otherwise, plastic parts and the door seal will
become porous.
Before performing any operation, unplug the power
cord from the power socket.
Do not use mechanical devices or other means to
accelerate the defrosting process, other than those
recommended by the manufacturer.
Do not use pointed or sharp-edged objects such as
knives or forks to remove the frost.
Never use hairdryers, electrical heaters or other such
electrical appliances for defrosting.
It is recommended to keep the plug clean, any
excessive dust residues on the plug can be the cause
fire.
Do not try to repair, disassemble or modify the
appliance by yourself. In case of repair please contact
always our customer service.
Supervise children while the appliance is being cleaned
or maintained.
Do not clean the cold glass shelves with hot water.
Sudden temperature change may cause the glass to
break.
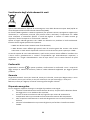
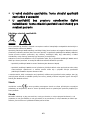
WARNING: The tubes of the refrigeration circuit

7
convey a small quantity of an environmentally friendly
but flammable refrigerant (R600a) and insulating gas
(cyclopentane). It does not damage the ozone layer
and does not increase the greenhouse effect. If
refrigerant escapes, it may injure your eyes or ignite.
If the refrigerant circuit should be damaged:
- Switch off the appliance and pull out the mains plug,
- Keep naked flames and/or ignition sources away from
the appliance,
- Thoroughly ventilate the room for several minutes,
- Inform customer service.
WARNING: Do not damage the plug and/or the power
cord; this could cause electrical shocks or fires.
WARNING: Do not use multiple portable socket-outlets
or portable power supplies. We do not recommend
the use of extension leads and multi-way adapters.
Do not attempt to sit or stand on the top of the
appliance. You could injure yourself or damage it. This
appliance is not designed for stacking with any other
ones.
The product is designed and built for domestic
household use only.
Only original parts supplied by the manufacturer may
be used. The manufacturer guarantees that only these
parts satisfy the safety requirements.
Opening the door for long periods can cause a
significant increase of the temperature in the

8
compartments of the appliance.
- Clean regularly surfaces that can come in contact with
food and accessible drainage systems.
- Clean water tanks if they have not been used for 48h;
flush the water system connected to a water supply if
water has not been drawn for 5 days.
- Store raw meat and fish in suitable containers in the
refrigerator, so that it is not in contact with or drip
onto other food.
- Two-star frozen-food compartments(if they are
presented in the appliance) are suitable for storing
pre-frozen food, storing or making ice-cream and
making ice cubes.
- One-, two- and three -star compartments, if present in
the appliance, are not suitable for the freezing of fresh
food.
- If the appliance is left empty for long periods, switch
off, defrost, clean, dry and leave the door open to
prevent mould developing within the appliance.
FOR Wine Coolers: this appliance is intended to be
used exclusively for the storage of wine
FOR a free standing appliance: this refrigerating
appliance is not intended to be used as a built-in
appliance
FOR appliances without a 4-star compartment: this
refrigerating appliance is not suitable for freezing
foodstuffs

9
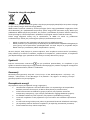
Scrapping old appliances
This appliance is marked according to the European directive 2012/19/EU on Waste Electrical and
Electronic Equipment (WEEE).
WEEE contains both polluting substances (which can cause negative consequences for the
environment) and basic components (which can be re-used). It is important to have WEEE
subjected to specific treatments, in order to remove and dispose properly all pollutants, and
recover and recycle all materials.
Individuals can play an important role in ensuring that WEEE does not become an environmental
issue; it is essential to follow some basic rules:
- WEEE should not be treated as household waste;
- WEEE should be handed over to the relevant collection points managed by the municipality or
by registered companies. In many countries, for large WEEE, home collection could be
present.
In many countries, when you buy a new appliance, the old one may be returned to the retailer
who has to collect it free of charge on a one-to-one basis, as long as the equipment is of equivalent
type and has the same functions as the supplied equipment.
Conformity
By placing the mark on this product, we are confirming compliance to all relevant European
safety, health and environmental requirements which are applicable in legislation for this product.
Guarantee
Minimum guarantee is: 2 years for EU Countries, 3 years for Turkey, 1 year for UK, 1 year for
Russia, 3 years for Sweden, 2 years for Serbia, 5 years for Norway, 1 year for Morocco, 6 months
for Algeria, Tunisia no legal warranty required.
Energy Saving
For better energy saving we suggest :
Installing the appliance away from heat sources and not exposed to direct sunlight and
in a well ventilated roo.
Avoid putting hot food into the refrigerator to avoid increasing the internal
temperature and therefore causing continuos functionaliting of the compressor.
Do not excessively stuff foods so as to ensure proper air circulation.
Defrost the appliance in case there is ice to facilitate the transfer of cold.
In case of absence of electrical energy, it is advisable to keep the refrigerator door
closed.
Open or keep the doors of the appliance open as little as possible
Avoid adjusting the setting to temperatures too cold.
Remove dust present on the rear of the appliance

10
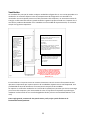
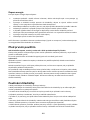
For further information about the product, please consult https://eprel.ec.europa.eu/ or scan the
QR on the energy label supplied with the appliance
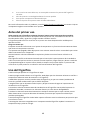
Before first use
You must allow the fridge to settle for at least four hours prior to switching the power on.
It is recommended that you clean the interior of the appliance prior to first use, using a solution of
bicarbonate of soda and warm water and then thoroughly drying the interior.
The fridge may have an odor to it at first use. This will disappear as the appliance cools.
Please note:
The appliance will start on temperature setting 3 and work continuously until it comes down to the
correct temperature.
If the appliance is switched off, you should allow five minutes before switching it on again to
prevent unnecessary damage to the compressor.
Never store inflammable or explosive items and strong corrosive acids or alkalis in the appliance.
This fridge cools your food by making the inside back of the cavity cold. It is normal for frost to
build up on this surface; it then dissipates and drains through a small drain at the bottom, where it
evaporates harmlessly. The presence of frosting at the back is not a malfunction of the fridge.
Fridge use
•Never put liquids in the refrigerator uncovered.
•Never put hot foods in the refrigerator. Warm food should be allowed to cool to room
temperature before being put into the refrigerator.
•Nothing should rest against the rear wall of the refrigerator, as this will cause frost and possible
condensation problems which will be difficult to remove.
•Make sure food is clean and any extra water is wiped away before putting into the fridge.
•Wrap or cover food before putting into the fridge. This will help prevent the loss of moisture,
keep food fresh and avoid unpleasant odors.
•Sort foods prior to storing. Any foods to be used soon should be stored at the front of the shelf to
prevent deterioration caused by the door being open for prolonged periods.
•Do not overfill the fridge. There should be sufficient space between the foods to allow the cool air
to circulate.
•Thawing frozen foods in the fridge compartment will help to keep the temperature low and save
energy.
•Never store raw meats on shelves above cooked meats or other produce. This will help to prevent
juices from raw meat contaminating other foodstuffs.
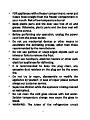
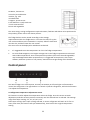
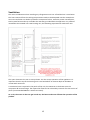
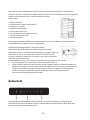
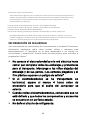
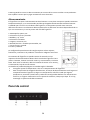
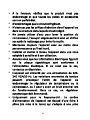
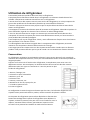
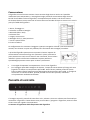
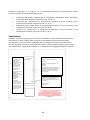
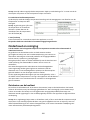
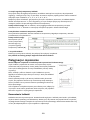
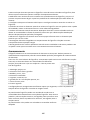
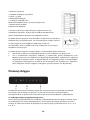
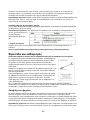
Storage
The fridge is for short term food storage. Although low temperatures can be maintained, extended
periods of food storage is not recommended.
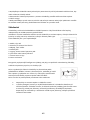
As the cold air circulates within the fridge, the temperature can vary between the different
sections. As such, foods should be stored in different sections according to type. Sections 6 and 7
are the coldest parts of the fridge.

11
01.Butter, cheeses etc.
2.Food in jars and bottles
3.Drinks, e.g. milk
4.Cooked food
5.Yogurts, preserves etc.
6.75cl bottles or ready meals etc.
7.Fresh meat and fish
8.Fruit and vegetables
The most energy-saving configuration requires drawers, food box and shelves to be positioned in
the product, please refer to the above pictures
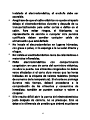
The fridge shelves can be moved according to the storage
requirements within the fridge section. To move the shelf, lift up the
rear section and then pull it outwards. To replace, slide the shelf back
into the slot, and then lower the rear section.
The wine racks can be deployed or withdrawn as desired.
It’s suggested to set the temperature at 4°C in the fridge compartment.
For most food categories, the longest storage time in the fridge compartment is achieved
with colder temperatures. Since some particular products (as fresh fruits and vegetables)
may be damaged with colder temperatures, it is suggested to keep them in the crisper
drawers, whenever present. If not present, maintain an average setting of the thermostat
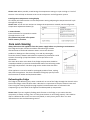
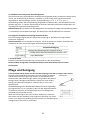
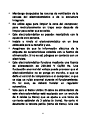
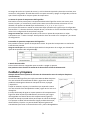
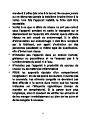
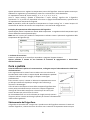
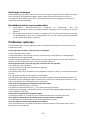
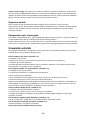
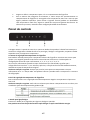
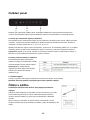
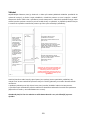
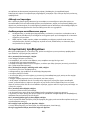
Control panel
The above image is the control panel, and only the buttons on left and right are functional to
control the refrigerator. The right button is to switch on/off the refrigerator, while the left button
is to adjust the temperature.
A. Refrigerator temperature adjustment sensor
This button is used to adjust the temperature within the fridge. Press this sensor to make
adjustment, and then as many times as necessary until the desired level is selected. The settings
range from super cooling, 2°C, 3°C, 4°C, 6°C, 8°C.
Start super cooling: when super cooling selected, it means refrigerator will work at 2°C for 24
hours, after that, the function will quit automatically, then back to the original temperature
setting.

12
Please note: Where possible, avoid having the temperature setting on super cooling or 2°C all of
the time. This will help to alleviate strain on the compressor and refrigeration system.
B. Refrigerator temperature setting display
This display will illuminate the current temperature setting. Adjusting the temperature will cycle
through this display.
Please note: You do not use numbers to change the temperature. Instead, use the refrigerator
temperature adjustment button (A).
C. Power button
Press the button for 3 seconds to switch
the appliance on or off.
This product has power-off or power
failure memory function.
Care and cleaning
Always disconnect the appliance from the power supply before any cleaning or maintenance.
The fridge and crisper sections should be cleaned using a solution
of bicarbonate of soda and lukewarm water. Do not use abrasive
products or detergents. After washing, rinse and dry thoroughly.
Clean the shelves, drawers and balconies separately by hand with a mild
solution of washing up liquid and water. Do not put them in the
dishwasher.
The water drain hole at the back of the fridge compartment should be
cleaned periodically to prevent the defrosted water from collecting inside
the fridge compartment. The drain plug can be used to clean the drain
hole.
If the appliance is not to be used for prolonged periods of time, unplug
and clean the appliance. The doors should be left slightly ajar to prevent
the formation of mildew and unpleasant odors.
Defrosting the fridge
The fridge is self-defrosting. Any water created will run out of the fridge through the channel at the
back of the fridge, unless the drain hole is blocked. It is important to keep the channel clear at all
times using the cleaning tool/drain plug supplied. The defrosted water is collected in the
evaporating tray at the back of the appliance and dissipated by evaporation.
Please note: If you are regularly finding pools of water in the fridge, or you notice that the
compressor is always running, then it is likely that the door is not sealing properly. This could be
due to a defective door seal or an incorrectly fitted, or overly heavy, decor door. For more
information see the troubleshooting section.

13
Changing the light
If the LED lighting fails in any way, it should only be replaced by authorized service agents. In the
event of light failure within your fridge please contact Customer Care to arrange a service visit.
Contact details are on the rear cover of this manual.
Availability of spare parts
Thermostats, temperature sensors, printed circuit boards and light sources are available for a
minimum period of seven years after placing the last unit of the model on the market.
Door handles, door hinges, trays and baskets for a minimum period of seven years and door
gaskets for a minimum period of 10 year, after placing the last unit of the model on the
market.
Troubleshooting
If you have any problems with your appliance, you should check the troubleshooting prior to
calling Customer Care.
If the appliance is not working, check:
•That there is power to the appliance.
•The house fuses are intact and the fuse in the plug has not blown.
•The fridge has not been turned off.
•The plug socket is functioning fine. To check this, plug another electrical appliance in to see if the
socket is faulty.
If the appliance is working, but not very well, check:
•The appliance is not overloaded.
•The thermostat is set to an appropriate temperature.
•The doors are closing properly.
•The cooling system at the rear of the appliance is clean and free of dust, and not touching the
rear wall.
•There is enough ventilation at the side and rear walls.
•This can be due to the decor door(s) not being properly fitted, causing the fridge door to not close
properly thus letting warm air in. If you are at all unsure, ask your fitter to check the decor doors.
If the appliance is noisy, check:
•The appliance is level and stable.
•The side and rear walls are clear, and there is nothing resting on the appliance.
•Note: The cooling gas in the refrigerator may make a slight bubbling or gurgling noise, even when
the compressor is not running.
If the appliance is beeping, check:
•That the door is closed. An alarm will sound after 60 seconds of a door being open.
If there’s water in the base of the refrigerator compartment, check:
•The drain hole at the back of the compartment is clear.
If ice has formed on the back wall of the fridge:
•It is normal for some ice droplets to form on the back wall of the fridge. This does not constitute a
fault with the appliance.
•Ensure that no items inside the fridge are in contact with the back wall.

14
•Check that there is some resistance when opening the door of the appliance. If it opens at the
slightest touch it may mean that the door seal needs to be replaced.
•Check the door seal for any kinks, debris or damage. If you notice any, and are unable to resolve
the issue yourself, contact Customer Care so that the seal can be replaced.
•This can be due to the decor door(s) not being properly fitted. If you are at all unsure, ask your
fitter to check the decor doors.
If the LED unit within the appliance is not working:
•Contact Customer Care to arrange a service visit.
Technical assistance
To contact the technical assistance, visit our website: https://corporate.haier-europe.com/en/
Under the section “website”, choose the brand of your product and your country. You will be
redirected to the specific website where you can find the telephone number and form to contact
the technical assistance
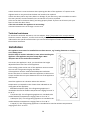
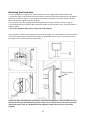
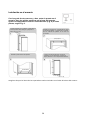
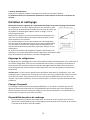
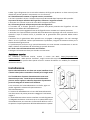
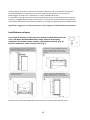
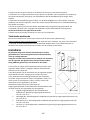
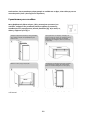
Installation
This appliance must never be installed close to heat sources, e.g. heating elements or cookers,
nor in damp places.
Seek the help of another individual, or two, when installing this
appliance. This appliance may have sharp edges. Wear
adequate PPE for the task and environment.
•To ensure the appliance is level, you should use the height
adjustable feet at the front of the appliance.
•The cooling system at the rear of the appliance must not touch
the rear wall. The greater the gap, the better.
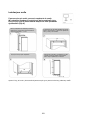
•The appliance must be installed with adequate ventilation.
Ensure that there is clearance above the appliance to allow air to
escape and that there is space between the rear of the appliance
and the wall.
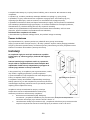
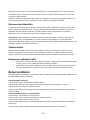
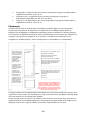
Install the appliance at a location where the ambient
temperature corresponds to the climate class indicated on the
rating plate of the appliance:
- Extended temperate (SN): ‘this refrigerating appliance is
intended to be used at ambient temperatures ranging from 10 °C
to 32 °C’
- Temperate (N): ‘this refrigerating appliance is intended to be
used at ambient temperatures ranging from 16 °C to 32 °C’
- Subtropical (ST): ‘this refrigerating appliance is intended to be
used at ambient temperatures ranging from 16 °C to 38 °C’
- Tropical (T): ‘this refrigerating appliance is intended to be used at ambient temperatures
ranging from 16 °C to 43 °C’

15
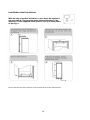
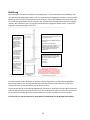
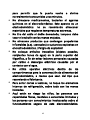
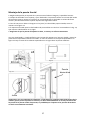
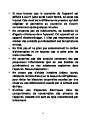
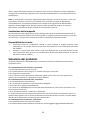
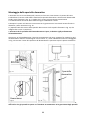
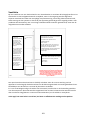
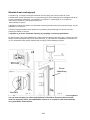
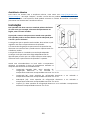
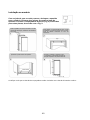
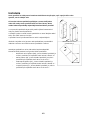
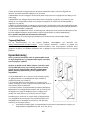
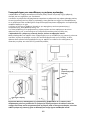
Ventilation
The main consideration when installing any refrigeration unit into a fitted kitchen is ventilation.
The heat removed from the cooling compartment needs to be dissipated into the atmosphere.
Incorrect ventilation can lead to premature compressor failure, excessive power consumption,
total system failure and may invalidate the warranty provided with the appliance. For products
intended to be instaIIed into a taII housing unit, the foIIowing requirements need to be met:
The open channeI at the rear is cIearIy shown. For the correct operation of the appIiance it is
important that the top of the housing unit is not bIocked off. A channeI depth of 40-50mm is
normaI with most units.
A ventiIation hoIe is required in the pIinth of the unit; this aIIows air to be drawn over the
compressor & heat exchange. The required air flow can be achieved by removal of a thin section of
plinth (recommended 600mm x 10mm minimum).
As a rule, the more air that can get in and out, the better and more efficient the operation of the
product.

16
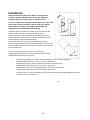
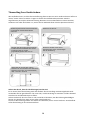
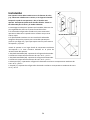
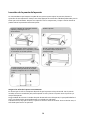
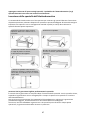
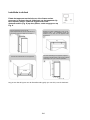
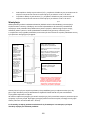
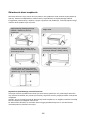
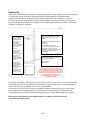
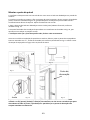
Installation into the cabinet
With the help of another individual, or two, move the appliance
into the cabinet. There are two metal plates at the base of the
appliance. Fit the supplied white spacers (Fig. 8) to these plates,
as per Fig. 9.
Ensure that the lips of the spacers are level with the lip of the cabinet base.

17
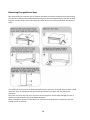
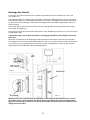
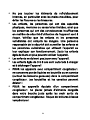
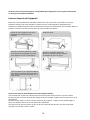
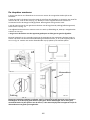
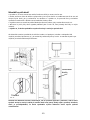
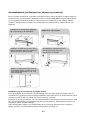
Mounting the fascia door
• Ensure that there is a gap of 3 to 4mm between the non- hinged side and the cabinet wall.
• Locate the slider in the bracket and fix the slider to the fascia door 20 to 22mm from the edge of
the fascia as shown in figure 11, ensuring that the slider is positioned centrally and horizontally
within the bracket. Tighten securely by hand.
• Fill the gap on the non-hinged side with the gasket/seal strip provided, as shown in Fig. 12.
• The finished look for the door sliders should be similar to those shown in Fig. 14, which shows 2
sliders in place.
• Ensure the appliance door opens, closes and seals properly.
Once complete, and if you are happy with the fit of the appliance in the cabinet, bend and snap the
parts of the white spacers marked ‘S’ as shown by the dotted outline in fig. 13. Leave the rest of
the spacer cover in place over the metal plates.
Important: After completing the installation, check that the appliance is secured within the unit
and that the door(s) close and open properly. If there is no resistance from the door seals when
opening the doors, then it is probable that the appliance and/or decor doors are not fitted
properly.

18
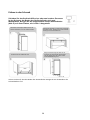
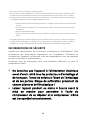
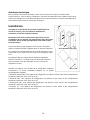
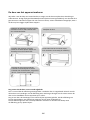
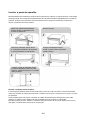
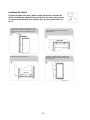
Reversing the appliance door
We recommend you seek the help of another individual to support the doors whilst performing
this operation. Always wear adequate PPE (Personal Protective Equipment) for the task at hand.
Prepare a surface with a soft, clean towel or similar where you can place the door during these
steps
Ensuring the door seals correctly:
It is normal for the seal to be compressed after the door has been reversed. With the door closed,
use a hair dryer to expand the seal and fill the gap between the door and the body of the
appliance.
Take care not to use the hair dryer too close to the appliance, which could damage the seal. A
distance of approximately 10cm should be adequate.
When completed, allow the seal and door to cool before touching them. Once done, the seal
should remain in position.
La pagina sta caricando ...
La pagina sta caricando ...
La pagina sta caricando ...
La pagina sta caricando ...
La pagina sta caricando ...
La pagina sta caricando ...
La pagina sta caricando ...
La pagina sta caricando ...
La pagina sta caricando ...
La pagina sta caricando ...
La pagina sta caricando ...
La pagina sta caricando ...
La pagina sta caricando ...
La pagina sta caricando ...
La pagina sta caricando ...
La pagina sta caricando ...
La pagina sta caricando ...
La pagina sta caricando ...
La pagina sta caricando ...
La pagina sta caricando ...
La pagina sta caricando ...
La pagina sta caricando ...
La pagina sta caricando ...
La pagina sta caricando ...
La pagina sta caricando ...
La pagina sta caricando ...
La pagina sta caricando ...
La pagina sta caricando ...
La pagina sta caricando ...
La pagina sta caricando ...
La pagina sta caricando ...
La pagina sta caricando ...
La pagina sta caricando ...
La pagina sta caricando ...
La pagina sta caricando ...
La pagina sta caricando ...
La pagina sta caricando ...
La pagina sta caricando ...
La pagina sta caricando ...
La pagina sta caricando ...
La pagina sta caricando ...
La pagina sta caricando ...
La pagina sta caricando ...
La pagina sta caricando ...
La pagina sta caricando ...
La pagina sta caricando ...
La pagina sta caricando ...
La pagina sta caricando ...
La pagina sta caricando ...
La pagina sta caricando ...
La pagina sta caricando ...
La pagina sta caricando ...
La pagina sta caricando ...
La pagina sta caricando ...
La pagina sta caricando ...
La pagina sta caricando ...
La pagina sta caricando ...
La pagina sta caricando ...
La pagina sta caricando ...
La pagina sta caricando ...
La pagina sta caricando ...
La pagina sta caricando ...
La pagina sta caricando ...
La pagina sta caricando ...
La pagina sta caricando ...
La pagina sta caricando ...
La pagina sta caricando ...
La pagina sta caricando ...
La pagina sta caricando ...
La pagina sta caricando ...
La pagina sta caricando ...
La pagina sta caricando ...
La pagina sta caricando ...
La pagina sta caricando ...
La pagina sta caricando ...
La pagina sta caricando ...
La pagina sta caricando ...
La pagina sta caricando ...
La pagina sta caricando ...
La pagina sta caricando ...
La pagina sta caricando ...
La pagina sta caricando ...
La pagina sta caricando ...
La pagina sta caricando ...
La pagina sta caricando ...
La pagina sta caricando ...
La pagina sta caricando ...
La pagina sta caricando ...
La pagina sta caricando ...
La pagina sta caricando ...
La pagina sta caricando ...
La pagina sta caricando ...
La pagina sta caricando ...
La pagina sta caricando ...
La pagina sta caricando ...
La pagina sta caricando ...
La pagina sta caricando ...
La pagina sta caricando ...
La pagina sta caricando ...
La pagina sta caricando ...
La pagina sta caricando ...
La pagina sta caricando ...
La pagina sta caricando ...
La pagina sta caricando ...
La pagina sta caricando ...
La pagina sta caricando ...
La pagina sta caricando ...
La pagina sta caricando ...
La pagina sta caricando ...
La pagina sta caricando ...
La pagina sta caricando ...
La pagina sta caricando ...
La pagina sta caricando ...
La pagina sta caricando ...
La pagina sta caricando ...
La pagina sta caricando ...
La pagina sta caricando ...
La pagina sta caricando ...
La pagina sta caricando ...
La pagina sta caricando ...
La pagina sta caricando ...
La pagina sta caricando ...
La pagina sta caricando ...
La pagina sta caricando ...
La pagina sta caricando ...
La pagina sta caricando ...
La pagina sta caricando ...
La pagina sta caricando ...
La pagina sta caricando ...
La pagina sta caricando ...
La pagina sta caricando ...
La pagina sta caricando ...
La pagina sta caricando ...
La pagina sta caricando ...
La pagina sta caricando ...
La pagina sta caricando ...
La pagina sta caricando ...
La pagina sta caricando ...
La pagina sta caricando ...
La pagina sta caricando ...
La pagina sta caricando ...
La pagina sta caricando ...
La pagina sta caricando ...
La pagina sta caricando ...
La pagina sta caricando ...
La pagina sta caricando ...
La pagina sta caricando ...
La pagina sta caricando ...
La pagina sta caricando ...
La pagina sta caricando ...
La pagina sta caricando ...
La pagina sta caricando ...
La pagina sta caricando ...
La pagina sta caricando ...
La pagina sta caricando ...
La pagina sta caricando ...
La pagina sta caricando ...
La pagina sta caricando ...
La pagina sta caricando ...
La pagina sta caricando ...
La pagina sta caricando ...
La pagina sta caricando ...
La pagina sta caricando ...
La pagina sta caricando ...
La pagina sta caricando ...
La pagina sta caricando ...
La pagina sta caricando ...
La pagina sta caricando ...
La pagina sta caricando ...
La pagina sta caricando ...
La pagina sta caricando ...
La pagina sta caricando ...
La pagina sta caricando ...
La pagina sta caricando ...
La pagina sta caricando ...
-
 1
1
-
 2
2
-
 3
3
-
 4
4
-
 5
5
-
 6
6
-
 7
7
-
 8
8
-
 9
9
-
 10
10
-
 11
11
-
 12
12
-
 13
13
-
 14
14
-
 15
15
-
 16
16
-
 17
17
-
 18
18
-
 19
19
-
 20
20
-
 21
21
-
 22
22
-
 23
23
-
 24
24
-
 25
25
-
 26
26
-
 27
27
-
 28
28
-
 29
29
-
 30
30
-
 31
31
-
 32
32
-
 33
33
-
 34
34
-
 35
35
-
 36
36
-
 37
37
-
 38
38
-
 39
39
-
 40
40
-
 41
41
-
 42
42
-
 43
43
-
 44
44
-
 45
45
-
 46
46
-
 47
47
-
 48
48
-
 49
49
-
 50
50
-
 51
51
-
 52
52
-
 53
53
-
 54
54
-
 55
55
-
 56
56
-
 57
57
-
 58
58
-
 59
59
-
 60
60
-
 61
61
-
 62
62
-
 63
63
-
 64
64
-
 65
65
-
 66
66
-
 67
67
-
 68
68
-
 69
69
-
 70
70
-
 71
71
-
 72
72
-
 73
73
-
 74
74
-
 75
75
-
 76
76
-
 77
77
-
 78
78
-
 79
79
-
 80
80
-
 81
81
-
 82
82
-
 83
83
-
 84
84
-
 85
85
-
 86
86
-
 87
87
-
 88
88
-
 89
89
-
 90
90
-
 91
91
-
 92
92
-
 93
93
-
 94
94
-
 95
95
-
 96
96
-
 97
97
-
 98
98
-
 99
99
-
 100
100
-
 101
101
-
 102
102
-
 103
103
-
 104
104
-
 105
105
-
 106
106
-
 107
107
-
 108
108
-
 109
109
-
 110
110
-
 111
111
-
 112
112
-
 113
113
-
 114
114
-
 115
115
-
 116
116
-
 117
117
-
 118
118
-
 119
119
-
 120
120
-
 121
121
-
 122
122
-
 123
123
-
 124
124
-
 125
125
-
 126
126
-
 127
127
-
 128
128
-
 129
129
-
 130
130
-
 131
131
-
 132
132
-
 133
133
-
 134
134
-
 135
135
-
 136
136
-
 137
137
-
 138
138
-
 139
139
-
 140
140
-
 141
141
-
 142
142
-
 143
143
-
 144
144
-
 145
145
-
 146
146
-
 147
147
-
 148
148
-
 149
149
-
 150
150
-
 151
151
-
 152
152
-
 153
153
-
 154
154
-
 155
155
-
 156
156
-
 157
157
-
 158
158
-
 159
159
-
 160
160
-
 161
161
-
 162
162
-
 163
163
-
 164
164
-
 165
165
-
 166
166
-
 167
167
-
 168
168
-
 169
169
-
 170
170
-
 171
171
-
 172
172
-
 173
173
-
 174
174
-
 175
175
-
 176
176
-
 177
177
-
 178
178
-
 179
179
-
 180
180
-
 181
181
-
 182
182
-
 183
183
-
 184
184
-
 185
185
-
 186
186
-
 187
187
-
 188
188
-
 189
189
-
 190
190
-
 191
191
-
 192
192
-
 193
193
-
 194
194
-
 195
195


Hoover CFLO172F Manuale utente
- Tipo
- Manuale utente
- Questo manuale è adatto anche per
in altre lingue
- English: Hoover CFLO172F User manual
- français: Hoover CFLO172F Manuel utilisateur
- español: Hoover CFLO172F Manual de usuario
- Deutsch: Hoover CFLO172F Benutzerhandbuch
- Nederlands: Hoover CFLO172F Handleiding
- português: Hoover CFLO172F Manual do usuário
- čeština: Hoover CFLO172F Uživatelský manuál
- polski: Hoover CFLO172F Instrukcja obsługi
Documenti correlati
Altri documenti
-
Haier HBB 177 TNF DE Manuale utente
-
ROSIERES RMNV 6182XMCN Manuale utente
-
Bosch KAN93VL30N/01 User manual and assembly instructions
-
-
Haier HLE 172 Manuale utente
-
-
-
Zerowatt EZVNM 6184SN Manuale utente
-
Candy CHSBSV 5172X Manuale utente
-
Electrolux ERC39392W Manuale utente