Hoover ABHDC75TEXSY Manuale utente
- Categoria
- Asciugatrici
- Tipo
- Manuale utente

HDC 75 TEX
English 2-16
Deutsch 17-28
Français 29-40
Italiano 41-52
Polski 53-64
Dansk 65-76
Svenska 77-88
Norsk 89-100
Suomi 101-112
®
®
40000556-cover -Pics-Blanks.qxd 02/10/2003 11:55 Page 2

2
40000556-cover -Pics-Blanks.qxd 02/10/2003 11:55 Page 3

3
40000556-cover -Pics-Blanks.qxd 02/10/2003 11:55 Page 4

#
ENGLISH
4
1
3
5
4
7
2
6
SUPPLY CORD
AIR INLET
VENTS
AIR OUTLETS
IN BASE
40000556-cover -Pics-Blanks.qxd 02/10/2003 11:55 Page 5

5
9
10
11
12
8
1
2
3
4
5
6
7
8
9
10 11
40000556-cover -Pics-Blanks.qxd 02/10/2003 11:55 Page 6

ENGLISH
6
Safety reminders
WARNING Check that the product has no
visible signs of damage before use. If damaged
do not use and please contact GIAS Service.
WARNING Do not use the product if the fluff
filter is not in position or is damaged; fluff
could be ignited.
WARNING Foam rubber materials can, under
certain circumstances, when heated become
ignited by spontaneous combustion. Foam
plastic, foam rubber and rubber-like material
are not suitable for tumble drying. Articles
made from these materials MUST NOT be
placed in the dryer.
Always refer to the laundry care labels for
directions on suitability for drying.
WARNING Misuse of a tumble dryer may
create a fire hazard.
WARNING Where the hot surface symbol
is located the temperature rise during operation
of the tumble dryer may be in excess of 60° C
User’s manual. This machine should only be
used for its intended purpose as described in
this manual. Ensure that it is fully understood
before operating.
Installation. This machine should not be
installed in a bathroom or shower room.
Never install the dryer against curtains and be
sure to prevent items from falling or collecting
behind the dryer.
Ventilation. Adequate ventilation must be
provided in the room where the tumble dryer is
located to prevent gases from appliances
burning other fuels, including open fires, being
drawn into the room during operation of the
tumble dryer.
Exhaust air must not be discharged into a flue
which is used for exhausting fumes from
appliances burning gas or other fuels.
Check regularly that the air flowing through
the dryer is not restricted.
Check the fluff filter after use, and clean, if
necessary.
The venting hose or duct should be checked
periodically and any accumulation of fluff
removed.
The inlet and outlets should be kept free from
obstructions.
If the dryer is used frequently the period
between checks should be reduced accordingly.
Dryness. Clothes should be spin dried or
thoroughly wrung before they are put into the
tumble dryer. Clothes that are dripping wet
should NOT be put into the dryer.
Lighters and matches must not be left in
pockets and NEVER use flammable liquids
near the machine.
Glass fibre curtains should never be put in
this machine. Skin irritation may occur if
other garments are contaminated with the
glass fibres.
Garments treated or contaminated with
flammable cleaning sprays or liquids such as
petrol, cooking oil or aerosol sprays must not
be put in this machine.
Lint or fluff. must not be allowed to collect
on the floor around the outside of the machine.
Cool down period. The drum inside may be
very hot. Always allow the dryer to complete
the cool down period before removing the
laundry.
Faults. Do not continue to use this machine if
it appears to be faulty.
After use. Remove the plug from the
electricity supply. Always remove the plug
before cleaning the appliance.
Supply cord. If the supply cord on this
appliance is damaged, it must be replaced by
a special cord which is only available from
GIAS Service or an authorised dealer.
GIAS Service. To ensure the continued safe
and efficient operation of this appliance we
recommend that any servicing or repairs are
only carried out by an authorised service
engineer.
40000556-English.qxd 01/10/2003 15:12 Page 1

Safety reminders 6
Electrical requirements 7
Installation requirements 8
Preparing the load 8
Clothes preparation 8
Maximum drying weight 8
Sorting the load 8-9
Do not tumble dry 9
Energy saving 9
Opening the door 9
Filter 9
Water container 10
Condenser 10
Drying guide 11
Controls & indicators 12
Operation 13-14
Cleaning the dryer 15
Technical specification 15
Trouble shooting 16
Before using the tumble dryer for the
first time:
● please read this instruction book
thoroughly.
● remove all items packed inside drum.
● wipe the inside of the drum and door
with a damp cloth to remove any dust
which may have settled in transit.
IMPORTANT: This dryer must only be
used for drying household textiles and
garments where a water solution has
been used for the cleaning process.
DO NOT tumble dry fabrics treated
with dry cleaning fluids.
Electrical requirements
This appliance is fitted with a moulded-on
non-rewireable plug.
The plug should be accessible for
disconnection after the appliance has been
installed.
IMPORTANT: The wires in the mains
lead are coloured in accordance with the
following code:
Blue - NEUTRAL
Brown - LIVE
Green-and-yellow - EARTH
If the supply cord on this appliance is
damaged, it must be replaced by a
special cord which is only available
from GIAS Service or an authorised
Hoover Dealer.
7
ENGLISH
PLEASE READ THESE INSTRUCTIONS THOROUGHLY
This appliance must be operated in accordance with the instructions given in this manual.
It is for domestic use only in drying household textiles and garments where a water
solution has been used in the cleaning process. It MUST NOT be used with dry cleaning
fluids. For your safety, this dryer must be correctly installed.
If there is any doubt about installation, call the national GIAS Service number for advice.
WARNING!
ELECTRICITY CAN BE
EXTREMELY DANGEROUS.
THIS APPLIANCE MUST BE
EARTHED.
40000556-English.qxd 01/10/2003 15:12 Page 2

ENGLISH
Installation
requirements
IMPORTANT: This dryer must be
installed such that the air inlets and
outlets are not restricted (fig. 1).
1 – Supply cord
2 – Air inlets
3 – Air outlets
There should be a gap of at least 12 mm
(0.5 inches) between the sides rear and
base of the machine and the surrounding
walls, cabinets and floor.
To ensure adequate ventilation the space
between the bottom of the machine and the
floor must not be obstructed.
NEVER install the dryer up against
curtains.
Prevent items from falling or collecting
behind and beneath the dryer as these may
obstruct the air inlets and outlets.
Preparing the load
Before using the dryer for the first time
wipe the inside of the drum and door with
a damp cloth.
Make sure that the laundry you are going
to dry is suitable for drying in a tumble
dryer, as shown by the care symbols on
each item.
Clothes preparation
Check that all fastenings are closed and
that pockets are empty. Turn the articles
inside out. Place clothes loosely in the
drum to make sure that they don’t get
tangled.
Warning:
Do not overload the drum, large items
when wet can exceed the maximum
admissible clothes load (for example:
sleeping bags, duvets).
Maximum drying
weight
● Cottons Max. 7 kg
● Synthetics Max. 3 kg
Sort the load as
follows:
A) By care symbols
On the collar or inside seam:
Suitable for tumble drying.
Tumble drying at high temperature.
Tumble drying at low temperature only.
Do not tumble dry.
B) By amount and thickness
Whenever the load is bigger than the
dryer capacity, separate clothes
according to thickness (e.g. towels
from thin underwear).
8
40000556-English.qxd 01/10/2003 15:12 Page 3

C) By type of fabric
Cottons/linen: Towels, cotton jersey,
bed and table linen.
Synthetics: Blouses, shirts, overalls,
etc. made of polyester or polyamid, as
well as for cotton/synthetic mixes.
D) By drying level
● Sort into: iron dry, cupboard dry, etc.
● For delicate articles press the
‘DELICATES’ ( ) button to select
low drying temperature.
● For airing or drying very delicate
articles select the airing option on the
dial ( ).
Do not tumble dry:
Woollens, silk, delicate fabrics, nylon
stockings, delicate embroidery, fabrics
with metallic decorations, garments with
PVC or leather trimmings, training shoes,
bulky items such as sleeping bags, etc.
IMPORTANT: Do not dry articles
which have been treated with a dry
cleaning fluid or rubber clothes (danger
of fire or explosion).
Energy saving
Only put into the tumble dryer laundry
which has been thoroughly wrung or spin-
dried. The drier the laundry the shorter the
drying time thus saving electricity.
ALWAYS try to dry the maximum weight
of laundry, this will save time and
electricity.
NEVER exceed the maximum weight, this
will waste time and electricity.
ALWAYS check that the filter is clean
before every drying cycle as this aids
efficiency.
NEVER put dripping wet items into the
tumble dryer, this may damage the
appliance and waste time and efficiency.
Opening the door
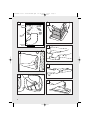
Pull on handle to open the door (fig. 2).
Restart the dryer by closing the door and
pressing the ‘START’ button ( ).
Filter
IMPORTANT: To maintain the
efficiency of the dryer check that the
fluff filter is clean before each drying
cycle.
1. Pull the filter upwards (fig. 3).
2. Open filter as shown (fig. 4).
3. Gently remove lint using a soft brush
or your fingertips.
4. Snap the filter together and push back
into place.
Filter Care Indicator ( )
Lights when the filter needs cleaning.
If the laundry is not drying check that the
filter is not clogged.
9
ENGLISH
WARNING!
WHEN THE TUMBLE DRYER IS
IN USE THE DRUM AND DOOR
MAY BE VERY HOT.
40000556-English.qxd 01/10/2003 15:12 Page 4

ENGLISH
Water Container
The water removed from the laundry
during the drying cycle is collected in a
container positioned behind the control
panel on the left-hand side of the machine.
When the container is full the ‘EMPTY
WATER’ ( ) indicator on the control
panel will light and the container MUST
be emptied.
We recommend that the container be
emptied after each drying cycle.
To empty the water container:
1. ENSURE THE MACHINE IS
SWITCHED OFF. The ON/OFF
button ( ) must be released to switch
the machine off.
2. Pull firmly on the drawer front
handgrip and slide the water container
out of the dryer (fig. 5). Support the
container with both hands. When full,
the water container will weigh about
4 kg (fig. 6).
3. Open the lid located on the top of the
container and empty the water (fig. 7).
4. Refit the lid and slide the water
container back into position.
PUSH FIRMLY IN PLACE.
Condenser
IMPORTANT: Always switch off and
remove the plug from the electricity
supply before cleaning the condenser.
To maintain the efficiency of the dryer
regularly check that the condenser is
clean.
To remove the condenser:
1. Remove the kickplate (fig. 8).
2. Turn the two locking levers anti-
clockwise (fig. 9).
3. Pull out the condenser unit (fig. 10).
4. Gently remove any dust or fluff with a
cloth, then wash the unit by holding it
under a running tap (fig. 11) turning it
so that water flows between the plates,
to remove any dust or fluff.
5. Refit the condenser ensuring it is
pushed firmly into place. Lock the two
levers by turning them clockwise.
6. Refit the kickplate.
10
40000556-English.qxd 01/10/2003 15:12 Page 5

11
ENGLISH
REMEMBER: During the last 10 minutes the load is always tumbled in cool air.
Drying guide
For delicate fabrics select the “DELICATES” ( ) button for all Drying
Programmes. This reduces the drying temperature to protect your garments.
PRE-IRON PROGRAMME: RELAXES CREASES - EASIER TO IRON
Programme Drying Guide
1 Bone Dry
2 Extra Dry
3 Cupboard Dry
4 Iron Dry
5 Medium Dry
6 Damp Dry
40000556-English.qxd 01/10/2003 15:12 Page 6

ENGLISH
Control panel and indicator lights (fig. 12)
1. ‘ON/OFF’ button and indicator – press to switch on, the indicator will light ( ).
2. ‘DELICATES’ button – press to reduce the heat level for delicate items, press again to
select high temperature ( ).
3. ‘ALARM OFF’ button – press to switch off buzzer ( ).
4. DIGITAL DISPLAY – shows the number of hours remaining when ‘START-DELAY’
is selected.
5. PROGRAM dial – selects drying time program.
6. ‘FILTER CARE’ indicator – lights when filter needs cleaning ( ).
7. ‘EMPTY WATER’ indicator – lights when water container is full ( ).
8. COOLING INDICATOR – lights when the drying cycle is in the cooldown period ( ).
9. HEATING indicator – lights when the drying cycle is in the heating period ( ).
10. ‘START’ button – press to start the drying cycle ( ).
11. ‘START DELAY’ button – press to delay the start of the drying cycle by up to 9 hours
( ).
12
HIGH Heat setting
LOW Heat setting
40000556-English.qxd 01/10/2003 15:12 Page 7

ENGLISH
Operation
1. Open the door and load the drum with
laundry. Ensure that garments do not
hinder closure of the door.
2. Gently close the door pushing it slowly
until you hear the door ‘click’ shut.
3. Press the ‘ON/OFF’ ( ) button to
switch on the dryer. The indicator will
light.
4. Turn the PROGRAM dial to select the
required drying program:
e.g. if you are drying cotton laundry
and would like it suitable for ironing
please select the iron dry option.
The PRE-IRONING setting shown by
the symbol on the PROGRAM
dial provides a conditioning and anti-
crease function. The dryer will heat the
load for 9 minutes followed by a 3
minute cool down period and is
especially good for garments which
may have been left for some time prior
to ironing, in a linen basket for
example. Garments may also become
stiffened when dried outside on a
washing line or inside on radiators. The
PRE-IRONING process relaxes the
creases in the fabric making ironing
quicker and easier.
5. If drying delicate items on the ‘timed’
programs press the ‘DELICATES’ ( )
button to reduce the heat level. Press
again on completion, to select high
temperature.
If airing or drying very delicate items
select the airing option on the ‘drying
time’ dial ( ).
6. Press the ‘START’ ( ) button. The
dryer will start automatically and the
‘HEATING’ ( ) indicator will light.
Drying sensor
A sensor will detect when the load is
dry. The drying cycle will then go into
the cooldown period and the
‘COOLING’ ( ) indicator will light.
After 10 minutes of cooldown the
drum will stop rotating automatically.
Note:
(i) The sensor may not detect a small
load of small articles. For small loads
and separate items or pre-dried fabrics
with low moisture content, utilise the
timed programmes. Set the programme
between 30 and 75 minutes depending
upon the load size and dryness required
and select high or low heat depending
upon the fabric type. If this is not
carried out the dryer will only operate
for 10 minutes before going into
cooldown.
(ii) If the sensor does not operate, for
example when a load is too large or too
wet to tumble dry, the dryer will
automatically go into cooldown after
180 minutes.
The dryer can be set to start up to 9 hours
after the program has been set.
To set the time delay option press and
release the ‘START-DELAY’ ( ) button
until the required delay (shown in hours)
appears on the display and then press the
‘START’ button. The display will flash.
13
HIGH Heat setting
LOW Heat setting
40000556-English.qxd 01/10/2003 15:12 Page 8

As each hour passes the figure shown on
the display will count down. When it gets
to 0 the dryer will start.
The delay can be changed at any time
simply by pressing the button until the
new figure appears on the display.
If there is an interruption to the electricity
supply the time delay will be lost and so
will have to be re-set when the power is
restored.
7. To switch off the buzzer, which sounds
at the end of each cycle, press the
‘ALARM OFF’ ( ) button.
8. The load is dried by tumbling in
thermostatically controlled warm air.
Cool air is used for the last 10 minutes
to reduce creasing and cool the load
ready for handling. During this time
the ‘COOLING’ indicator is lit.
9. When the program is fully completed
the drum will stop rotating. The dial
remains at the position of the selected
program. The ‘COOLING’ indicator
will flash and the buzzer will sound.
10. Open the door and remove the load.
If the load is not removed from the
dryer at the end of the drying cycle, a
‘creaseguard’ function is activated.
Every 15 minutes the dryer will tumble
the load for 5 seconds and the buzzer
will sound.
This process will be repeated until the
‘creaseguard’ function is cancelled by
opening the door.
11. Clean the filter and empty the water
container after every drying cycle to
ensure maximum dryer efficiency.
(See ‘Filter’ and ‘Water Container’
sections.)
12. Clean the condenser after
approximately every 10 drying cycles
to ensure maximum dryer efficiency.
(See ‘Condenser’ section.)
14
ENGLISH
WARNING!
THE DRUM, DOOR AND LOAD
MAY BE VERY HOT.
40000556-English.qxd 01/10/2003 15:12 Page 9

ENGLISH
Cleaning the dryer
IMPORTANT: Always switch off and
remove the plug from the electricity
supply before cleaning this appliance.
Clean the filter and empty the water
container after every drying cycle.
Regularly clean the condenser.
After each period of use, wipe the inside
of the drum and leave the door open for a
while to allow circulation of air to dry it.
Wipe the outside of the machine and the
door with a soft cloth.
DO NOT use abrasive pads or cleaning
agents.
To prevent the door sticking, periodically
clean the door gasket with a ‘non-scratch
cream cleaner.’
Over a period of time deposits from the
water may form over the sensor plate
(found inside the drum below the door
opening). This sensor plate can be cleaned
with a soft cloth and a dilute vinegar
solution. Ensure that any excess is
removed or the vinegar solution may stain
clothing.
Technical
specifications
Drum capacity 115 litres
Maximum load 7 kg
Height 85 cm
Width 60 cm
Depth 60 cm
Energy Label Band C
Note: For electrical data refer to the rating
label on the front of the dryer cabinet
(with the door open).
15
40000556-English.qxd 01/10/2003 15:12 Page 10

Trouble shooting
Should your dryer operate incorrectly,
check the following points before calling
for a service engineer.
Drying time is too long/clothes are not
dry enough:
● Have you selected the correct drying
time/programme? Go to page 11.
● Were the clothes too wet? Were the
clothes thoroughly wrung or spin-dried?
● Does the filter need cleaning? Go to
page 9.
● Does the condenser need cleaning? Go
to page 10.
● Is the dryer overloaded? Go to page 8.
● Are the inlets, outlets and base of the
dryer free from obstructions?
● Is the load too small?
Go to page 13.
● Has the ‘DELICATES’ button been
selected from a previous cycle? Go to
page 12.
● Is the sensor system clean? Deposits
from the water may form over the
sensor plate. Go to page 15 ‘Cleaning
the dryer’.
The dryer does not operate:
● Is there a working electricity supply to
the dryer? Check using another
appliance such as a table lamp.
● Is the plug properly connected to the
mains supply?
● Is there a power failure?
● Has the fuse blown?
● Is the door fully closed? Go to pages
13/14.
● Is the dryer switched on, both at the
mains supply and at the machine? Go
to page 12.
● Has the drying time or the programme
been selected? Go to page 12.
● Has the ‘START’ button been pressed
after opening the door? Go to page 9.
● Have you pressed the ‘START’ button
to begin the program? Go to page 13.
● Has the ‘START DELAY’ option been
set and is there still time remaining?
Go to page 13.
● Has the dryer stopped operating
because the water tray is full and needs
emptying? Go to page 10.
Filter Care Indicator on
● Does the filter need cleaning? Go to
page 9.
Empty Water Indicator on
● Does the water container need
emptying? Go to page 10.
If the supply cord on this appliance is
damaged, it must be replaced by a special
cord which is only available from GIAS
Service or an authorised GIAS Dealer.
Should there still be a problem with your
dryer after completing all the
recommended checks, please call Hoover
Service for advice. They may be able to
assist you over the telephone or arrange
for a suitable appointment for an engineer
to call under the terms of your guarantee.
However, a charge may be made if any of
the following applies to your machine:
● Is found to be in working order.
● Has not been installed in accordance
with the installation instructions.
● Has been used incorrectly.
16
ENGLISH
40000556-English.qxd 01/10/2003 15:12 Page 11

DEUTSCH
17
Sicherheitshinweise
WARNUNG Überprüfen Sie vor dem
Gebrauch, ob das Produkt sichtbare Schäden
aufweist. Verwenden Sie es nicht, wenn es
beschädigt ist, und wenden Sie sich an den
GIAS Service.
WARNUNG Verwenden Sie das Produkt nicht,
wenn das Flusensieb nicht richtig eingebaut oder
beschädigt ist; Flusen könnten Feuer fangen.
WARNUNG Wenn Schaumgummimaterialien
heiß werden, können sie sich unter bestimmten
Bedingungen plötzlich entzünden. Textilien,
die Schaumplastik, Schaumgummi und
gummiähnliche Materialien enthalten, eignen
sich nicht für das Trocknen im Wäschetrockner.
Füllen Sie AUF KEINEN FALL Textilien aus
diesen Materialien in den Trockner ein.
Sehen Sie immer auf den Pflegeetiketten nach,
ob das Material für das Trocknen geeignet ist.
WARNUNG Zweckentfremdung des
Trockners kann zu Brandgefahr führen.
WARNUNG An der Stelle, an der sich das
Symbol für heiße Flächen befindet , kann
die Temperatur während des
Trocknerbetriebs auf über 60 °C steigen.
Gebrauchsanleitung. Verwenden Sie dieses
Gerät nur für die vorgesehenen Zwecke gemäß
der Anleitung. Lesen Sie die
Gebrauchsanleitung sorgfältig durch, bevor Sie
den Trockner in Betrieb nehmen.
Aufstellung. Installieren Sie das Gerät nicht in
einem Badezimmer oder Duschraum.
Stellen Sie den Trockner nie in der Nähe von
Vorhängen auf. Achten Sie darauf, dass keine
Gegenstände hinter den Trockner fallen oder
sich dort ansammeln können.
Entlüftung. In dem Raum, in dem sich der
Trockner befindet, muss eine ausreichende
Entlüftung vorhanden sein, um zu verhindern,
dass Gase aus der Verbrennung anderer
Brennstoffe, zum Beispiel offene Feuer,
während des Trocknerbetriebs in den Raum
gesogen werden.
Die Abluft darf nicht in einen Kaminschacht
geleitet werden, der für das Ableiten von
Rauch aus der Verbrennung von Gas oder
anderen Brennstoffen verwendet wird.
Prüfen Sie regelmäßig die reibungslose
Luftzirkulation im Trockner.
Überprüfen Sie nach Gebrauch das Flusensieb
und reinigen Sie es, wenn es erforderlich ist!
Der Abluftschlauch oder -kanal sollte
regelmäßig nachgesehen und angesammelte
Flusen entfernt werden.
Die Ansaug- und Abluftanschlüsse dürfen nicht
zugestellt werden.
Bei regelmäßiger Benutzung des Trockners
sind die Kontrollabstände entsprechend kürzer
zu halten.
Restfeuchte. Textilien vor dem Einfüllen in
den Trockner erst schleudern oder gründlich
auswringen. Füllen Sie KEINE tropfnassen
Textilien in den Trockner.
Feuerzeuge und Streichhölzer unbedingt aus
den Taschen entfernen und AUF KEINEN
FALL mit feuergefährlichen Flüssigkeiten in
der Nähe der Maschine hantieren.
Keine Vorhänge aus Glasfasermaterial in die
Maschine füllen. Kommen andere Textilien mit
Glasfasern in Berührung, so kann dies zu
Hautreizungen führen.
Kleidungsstücke, die mit feuergefährlichen
Reinigungssprays oder Flüssigkeiten wie
Benzin, Speiseöl oder Aerosolsprays behandelt
oder verunreinigt sind, dürfen nicht in dieser
Maschine getrocknet werden.
Fusseln oder Flusen dürfen sich nicht auf dem
Fußboden im Bereich um die Maschine
ansammeln.
Abkühlphase. Die Trommel in dem Gerät kann
sehr heiß werden. Lassen Sie den Trockner stets
vollständig bis zum Ende der Abkühlphase
laufen, bevor Sie die Wäsche herausnehmen.
Störungen. Die Maschine bei vermuteten
Störungen nicht weiterbenutzen.
Nach Gebrauch. Ziehen Sie den Stecker aus
der Steckdose! Ziehen Sie vor dem Reinigen
des Geräts immer den Stecker heraus!
Netzleitung. Ist das Kabel des Geräts
beschädigt, muss es durch ein spezielles Kabel
ersetzt werden, das nur beim GIAS-Service
oder einem zugelassenen Händler erhältlich ist.
GIAS-Service. Um einen sicheren und
einwandfreien Betrieb dieses Geräts zu
gewährleisten, empfehlen wir, alle Wartungs-
und Reparaturarbeiten nur von einem
zugelassenen Kundendiensttechniker
durchführen zu lassen.
40000556-German.qxd 01/10/2003 15:11 Page 17

Sicherheitshinweise 17
Elektro-Anschluss 18
Installation 19
Vorbereitung der Füllung 19
Vorbereitung der Textilien 19
Maximales Fassungsvermögen
(Trockengewicht) 19
Sortierung der Füllung 19-20
Nicht für den Trockner geeignet 20
Energiesparen 20
Öffnen der Tür 20
Sieb 20
Kondenswasser-Behälter 21
Kondensator 21
Trocknungswerte 22
Schalter & Anzeigen 23
Betrieb 24-25
Reinigung des Trockners 26
Technische Daten 26
Bei Betriebsstörungen 27
Garantie 28
Bevor Sie den Trockner das erste Mal
benutzen:
● lesen Sie die Gebrauchsanleitung bitte
sorgfältig durch!
● entfernen Sie alle in der Trommel
befindlichen Gegenstände!
● wischen Sie die Innenseiten der Trommel und
Tür mit einem feuchten Tuch aus, um den
beim Transport eventuell dort angesammelten
Staub zu entfernen.
WICHTIG: Dieser Trockner darf nur für die
Trocknung von Haushaltstextilien und
Kleidungsstücken benutzt werden, die vorher
in Wasser gewaschen worden sind.
AUF KEINEN FALL Stoffe in der Maschine
trocknen, die mit chemischen
Reinigungsmitteln behandelt wurden.
Elektro-Anschluss
Das Gerät ist mit einem geschweißten Stecker
ausgestattet.
Der Stecker ist so anzubringen, dass er nach der
Installation des Geräts leicht aus der Steckdose zu
ziehen ist.
WICHTIG: Die Drähte im Netzanschlusskabel
sind farblich gemäß folgendem Code
unterschieden:
Blau - NEUTRAL
Braun - STROMFÜHREND
Grün-Gelb - ERDE
Ist das Kabel des Gerätes beschädigt, muss es
durch ein spezielles Kabel ersetzt werden, das
nur beim GIAS-Service oder einem
zugelassenen Händler erhältlich ist.
18
DEUTSCH
GEBRAUCHSANLEITUNG BITTE SORGFÄLTIG DURCHLESEN
Dieses Gerät muss gemäß der Anweisungen dieser Gebrauchsanleitung benutzt werden. Es ist nur für die
Trocknung von Haushaltstextilien und Kleidungsstücken geeignet, die mit Wasser gewaschen wurden.
Der Trockner DARF AUF KEINEN FALL mit chemischen Reinigungsflüssigkeiten in Berührung
kommen. Zu Ihrer eigenen Sicherheit muss der Trockner richtig installiert werden.
Sollten Sie bezüglich der Installation Fragen haben, rufen Sie die für Ihr Land angegebene Nummer für
den GIAS-Service an.
WARNUNG!
STROM KANN
LEBENSGEFÄHRLICH SEIN.
DIESES GERÄT MUSS AN EINE
SCHUTZKONTAKTSTECKDOSE
ANGESCHLOSSEN WERDEN
40000556-German.qxd 01/10/2003 15:11 Page 18

DEUTSCH
Installation
WICHTIG: Der Trockner ist so zu installieren,
dass die Ansaug- und Abluftanschlüsse nicht
blockiert werden (Abb. 1).
1 – Netzleitung
2 – Ansauganschlüsse
3 – Abluftanschlüsse
Zwischen den Seitenteilen sowie zwischen dem
Sockel der Maschine und den sie umgebenden
Wänden, Schränken bzw. dem Fußboden ist ein
Abstand von mindestens 12 mm einzuhalten.
Um eine richtige Abluft zu gewährleisten, muss
die Fläche zwischen dem Boden der Maschine
und dem Fußboden frei bleiben.
Der Trockner darf AUF KEINEN FALL in der
unmittelbaren Nähe von Vorhängen aufgestellt
werden.
Achten Sie darauf, dass keine Gegenstände hinter
und unter den Trockner fallen oder sich dort
ansammeln, da hierdurch die Ansaug- und
Abluftanschlüsse blockiert werden können.
Vorbereitung der Füllung
Vor der ersten Benutzung des Trockners sind die
Innenseiten der Trommel und Tür mit einem
feuchten Tuch abzuwischen.
Vergewissern Sie sich anhand der
Pflegeanleitungssymbole in jedem Wäschestück,
dass die Wäsche, die Sie trocknen wollen, für eine
Trocknung im Trockner geeignet ist.
Vorbereitung der Textilien
Überprüfen Sie, ob alle Verschlüsse zu und die
Taschen entleert sind. Wenden Sie die Innenseiten
der Textilien nach außen. Füllen Sie die
Kleidungsstücke locker in die Trommel, so dass
diese sich nicht verheddern.
Warnung: Überladen Sie die Trommel nicht,
große Teile können, wenn sie nass sind, die
maximal zulässige Wäscheladung überschreiten
(zum Beispiel Schlafsäcke, Bettdecken).
Maximales
Fassungsvermögen
(Trockengewicht)
● Baumwolle max. 7 kg
● Synthetische Stoffe max. 3 kg
Sortieren Sie die Füllung
folgendermaßen:
A) Anhand der Pflegeanleitungssymbole
am Kragen oder an der Sauminnenseite:
Für Trockner geeignet.
Im Trockner bei hoher Temperatur.
Im Trockner nur bei geringer Temperatur.
Nicht für Trockner geeignet.
B) Nach Menge und Volumen
Ist die Füllmenge größer als das
Fassungsvermögen des Trockners, sortieren
Sie die Wäsche nach Stoffdicke (trennen Sie
z.B. Handtücher von dünner Unterwäsche).
19
40000556-German.qxd 01/10/2003 15:11 Page 19

C) Nach Stoffart
Baumwolle/Leinen: Handtücher,
Baumwolljersey, Bett- und Tischwäsche.
Textilien aus Kunstfaser: Blusen, Hemden,
Overalls usw. aus Polyester oder Polyamid
sowie Baumwoll/Synthetikgemische.
D) Nach Trocknungsgrad
● Sortieren Sie nach: Bügelfeucht,
Schranktrocken, usw.
● Für empfindliche Textilien drücken Sie zur
Wahl einer niedrigeren Trocknungstemperatur
den Knopf ‘TEMPERATURSTUFE’ ( ).
● Wählen Sie zur Lüftung oder Trocknung sehr
empfindlicher Textilien die Option LÜFTUNG
auf dem Programmwählschalter ( ) .
Nicht für den Trockner
geeignet:
Wollsachen, Seide, empfindliche Stoffe,
Nylonstrümpfe, gewirkte Textilien, Stoffe mit
Metall-Dekor, Kleidungsstücke mit PVC- oder
Lederbesatz, Trainingsschuhe, voluminöse Sachen
wie Schlafsäcke usw.
WICHTIG: Kleidungsstücke, die mit einem
chemischen Reinigungsmittel behandelt worden
sind, oder Gummibekleidung dürfen nicht im
Wäschetrockner getrocknet werden (Brand-
oder Explosionsgefahr).
Energiesparen
Nur gründlich ausgewrungene oder geschleuderte
Wäsche in den Trockner füllen. Je trockener die
Wäsche, desto kürzer ist die Trocknungszeit, was
sich energiesparend auswirkt.
Es ist wirtschaftlicher, IMMER die maximale
Füllmenge zu trocknen.
Überschreiten Sie NIE die maximale Füllmenge,
denn dies ist zeitaufwendig und
Energieverschwendung.
Achten Sie IMMER darauf, dass der Filter vor
jedem Trocknungsvorgang sauber ist, um eine
optimale Leistung zu erzielen.
Füllen Sie AUF KEINEN FALL tropfnasse
Wäschestücke in den Wäschetrockner, dies kann
zu Schäden am Gerät führen, ist zeitaufwendig
und kann die Leistung beeinträchtigen.
Öffnen der Tür
Ziehen Sie am Griff, um die Tür zu öffnen
(Abb. 2).
Um den Trockner wieder zu starten, schließen Sie
die Tür und drücken Sie die ‘START’-Taste ( ).
Sieb
WICHTIG: Damit der Wäschetrockner immer
optimale Leistung erbringen kann, überprüfen
Sie vor jedem Trocknungsvorgang, ob das
Flusensieb sauber ist.
1. Das Sieb nach oben ziehen (Abb. 3).
2. Sieb wie auf der Abbildung öffnen (Abb. 4).
3. Entfernen Sie die Flusen sanft mit einer
weichen Bürste oder den Fingerspitzen.
4. Klappen Sie das Sieb zusammen und setzen
Sie es wieder an seinen Platz ein.
Flusensieb-Anzeige ( )
Die Anzeige leuchtet auf, wenn das Sieb gesäubert
werden muss.
Wenn die Wäsche nicht trocknet, kontrollieren
Sie, ob das Sieb verstopft ist.
20
DEUTSCH
WARNUNG!
WÄHREND DES
TROCKNUNGSVORGANGS
KÖNNEN DIE TROMMEL UND DIE
TÜR SEHR HEISS WERDEN.
40000556-German.qxd 01/10/2003 15:11 Page 20
La pagina si sta caricando...
La pagina si sta caricando...
La pagina si sta caricando...
La pagina si sta caricando...
La pagina si sta caricando...
La pagina si sta caricando...
La pagina si sta caricando...
La pagina si sta caricando...
La pagina si sta caricando...
La pagina si sta caricando...
La pagina si sta caricando...
La pagina si sta caricando...
La pagina si sta caricando...
La pagina si sta caricando...
La pagina si sta caricando...
La pagina si sta caricando...
La pagina si sta caricando...
La pagina si sta caricando...
La pagina si sta caricando...
La pagina si sta caricando...
La pagina si sta caricando...
La pagina si sta caricando...
La pagina si sta caricando...
La pagina si sta caricando...
La pagina si sta caricando...
La pagina si sta caricando...
La pagina si sta caricando...
La pagina si sta caricando...
La pagina si sta caricando...
La pagina si sta caricando...
La pagina si sta caricando...
La pagina si sta caricando...
La pagina si sta caricando...
La pagina si sta caricando...
La pagina si sta caricando...
La pagina si sta caricando...
La pagina si sta caricando...
La pagina si sta caricando...
La pagina si sta caricando...
La pagina si sta caricando...
La pagina si sta caricando...
La pagina si sta caricando...
La pagina si sta caricando...
La pagina si sta caricando...
La pagina si sta caricando...
La pagina si sta caricando...
La pagina si sta caricando...
La pagina si sta caricando...
La pagina si sta caricando...
La pagina si sta caricando...
La pagina si sta caricando...
La pagina si sta caricando...
La pagina si sta caricando...
La pagina si sta caricando...
La pagina si sta caricando...
La pagina si sta caricando...
La pagina si sta caricando...
La pagina si sta caricando...
La pagina si sta caricando...
La pagina si sta caricando...
La pagina si sta caricando...
La pagina si sta caricando...
La pagina si sta caricando...
La pagina si sta caricando...
La pagina si sta caricando...
La pagina si sta caricando...
La pagina si sta caricando...
La pagina si sta caricando...
La pagina si sta caricando...
La pagina si sta caricando...
La pagina si sta caricando...
La pagina si sta caricando...
La pagina si sta caricando...
La pagina si sta caricando...
La pagina si sta caricando...
La pagina si sta caricando...
La pagina si sta caricando...
La pagina si sta caricando...
La pagina si sta caricando...
La pagina si sta caricando...
La pagina si sta caricando...
La pagina si sta caricando...
La pagina si sta caricando...
La pagina si sta caricando...
La pagina si sta caricando...
La pagina si sta caricando...
La pagina si sta caricando...
La pagina si sta caricando...
La pagina si sta caricando...
La pagina si sta caricando...
La pagina si sta caricando...
La pagina si sta caricando...
La pagina si sta caricando...
La pagina si sta caricando...
La pagina si sta caricando...
La pagina si sta caricando...
-
 1
1
-
 2
2
-
 3
3
-
 4
4
-
 5
5
-
 6
6
-
 7
7
-
 8
8
-
 9
9
-
 10
10
-
 11
11
-
 12
12
-
 13
13
-
 14
14
-
 15
15
-
 16
16
-
 17
17
-
 18
18
-
 19
19
-
 20
20
-
 21
21
-
 22
22
-
 23
23
-
 24
24
-
 25
25
-
 26
26
-
 27
27
-
 28
28
-
 29
29
-
 30
30
-
 31
31
-
 32
32
-
 33
33
-
 34
34
-
 35
35
-
 36
36
-
 37
37
-
 38
38
-
 39
39
-
 40
40
-
 41
41
-
 42
42
-
 43
43
-
 44
44
-
 45
45
-
 46
46
-
 47
47
-
 48
48
-
 49
49
-
 50
50
-
 51
51
-
 52
52
-
 53
53
-
 54
54
-
 55
55
-
 56
56
-
 57
57
-
 58
58
-
 59
59
-
 60
60
-
 61
61
-
 62
62
-
 63
63
-
 64
64
-
 65
65
-
 66
66
-
 67
67
-
 68
68
-
 69
69
-
 70
70
-
 71
71
-
 72
72
-
 73
73
-
 74
74
-
 75
75
-
 76
76
-
 77
77
-
 78
78
-
 79
79
-
 80
80
-
 81
81
-
 82
82
-
 83
83
-
 84
84
-
 85
85
-
 86
86
-
 87
87
-
 88
88
-
 89
89
-
 90
90
-
 91
91
-
 92
92
-
 93
93
-
 94
94
-
 95
95
-
 96
96
-
 97
97
-
 98
98
-
 99
99
-
 100
100
-
 101
101
-
 102
102
-
 103
103
-
 104
104
-
 105
105
-
 106
106
-
 107
107
-
 108
108
-
 109
109
-
 110
110
-
 111
111
-
 112
112
-
 113
113
-
 114
114
-
 115
115
-
 116
116


Hoover ABHDC75TEXSY Manuale utente
- Categoria
- Asciugatrici
- Tipo
- Manuale utente
Documenti correlati
Altri documenti
-
Candy EVOC 580B-S Manuale utente
-
Candy AB CDC268TEX Manuale utente
-
Iberna AB ITD 55 CX Manuale utente
-
-
-
-
-
-
Candy GO DC 78-01S Manuale utente
-