Garant GridLine side cladding Istruzioni per l'uso
- Tipo
- Istruzioni per l'uso

GARANT GridLine Seitenverkleidung
mit Lochwand
927165
Montageanleitung
Installation instructions |
Instrucciones de montaje |
Instructions de montage |
Istruzioni di montaggio |
Instrukcja montażu
UM0001018 Copyright © Hoffmann Group
Manufacturer
Hoffmann GmbH Qualitätswerkzeuge
Haberlandstr. 55, 81241 Munich, Germany
www.hoffmann-group.com
de
en
es
fr
it
pl
927165 550 / 650
1✕ 4✕
1
2
3a
2✕
2✕
A
3b
2 - 3 mm
de GridLine Seitenverkleidung mit
Lochwand
1. Allgemeine Hinweise
Bedienungsanleitung lesen, beachten, für späteres
Nachschlagen aufbewahren und jederzeit verfüg-
bar halten.
2. Sicherheit
2.1 BESTIMMUNGSGEMÄSSE VERWENDUNG
Lochwand zur Montage an Fußteil der GridLine vario
und Ready-to-go Werkbank.
Zur Aufnahme von Easyfix-Haken, -Haltern und Loch-
wand-Zubehör.
Nur an entsprechenden Bohrungen montieren.
2.2 PERSÖNLICHE SCHUTZAUSRÜSTUNG
Nationale und regionale Vorschriften zur Sicherheit und
Unfallverhütung beachten. Schutzkleidung wie Fußschutz
und Schutzhandschuhe müssen entsprechend der bei der
jeweiligen Tätigkeit zu erwartenden Risiken gewählt und
bereitgestellt werden.
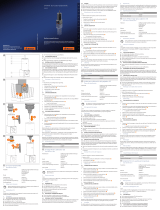
3. Seitenverkleidung montieren
A
i
Seitenverkleidung seitlich an Fußteil montieren.
Zwischen Schraubenkopf und Fuß muss ein Abstand
von 2 mm bis 3 mm eingehalten werden.
Lochwand mit zwei Linsen-Blechschrauben von oben
mit Querverstrebung verschrauben.
3a
Falls Querverstrebung von oben nicht zugänglich ist,
Lochwand mit Linsen-Blechschrauben von unten mit
Querverstrebung verschrauben.
3b
4. Technische Daten
Größe 550 650
Höhe 550 mm 650 mm
Breite 500 mm 500 mm
Passend für Fuß-
teilhöhe
650mm, 800mm 750mm, 900mm
Passend für Werk-
bankhöhe
850mm 950mm
en GridLine side cladding with
perforated panel
1. General instructions
Read the instructions for use, follow them and keep
them available for later reference.
2. Safety
2.1 INTENDED USE
Perforated panel for installation on the support leg of
the GridLine vario and Ready-to-go workbench.
To accept Easyfix hooks, holders and perforated panel
accessories.
Mount only on suitable holes.
2.2 PERSONAL PROTECTIVE EQUIPMENT
Comply with the national and regional regulations for sa-
fety and accident prevention. Protective work wear such as
safety shoes and safety gloves appropriate for the risks as-
sociated with the intended activities must be selected and
provided.
3. Fitting the side panels
A
i
Install the side cladding on the side of the support leg.
A space of 2mm to 3mm must be maintained between
the screw head an the leg.
Use two raised-head self-tapping screws to secure the
perforated panel from above to the cross brace.
3a
If the cross brace is not accessible from above, use two
raised-head self-tapping screws to secure the perfora-
ted panel to the cross brace from below.
3b
4. Technical data
Size 550 650
Height 550mm 650mm
Width 500mm 500mm
Suitable for sup-
port leg height
650mm, 800mm 750mm, 900mm
Suitable for work-
bench height
850mm 950mm
es Panel lateral con pared perforada
GridLine
1. Indicaciones generales
Lea, observe y conserve el manual de instrucciones
de uso para consultas posteriores, y téngalo siemp-
re a mano.
2. Seguridad
2.1 USO CONFORME A LO PREVISTO
Pared perforada para montar en pie soporte del banco
de trabajo GridLine vario y Ready-to-go.
Para el asiento de ganchos Easyfix, soportes Easyfix y
accesorios de pared perforada.
Montar solo en las perforaciones correspondientes.
2.2 EQUIPO DE PROTECCIÓN INDIVIDUAL
Tener en cuenta las normas nacionales y regionales en
cuanto a seguridad y prevención de accidentes. La ropa de
protección como protección para los pies y guantes pro-
tectores se han de seleccionar y disponer de acuerdo con
los riesgos propios de la actividad correspondiente.
3. Montaje del panel lateral
A
i
Montar el panel lateral por el lado en el pie soporte.
Entre la cabeza del tornillo y el pie ha de dejarse una di-
stancia de 2mm a 3mm.
Atornillar la pared perforada por arriba al arriostra-
miento transversal con dos tornillos alomados para
chapa.
3a
En caso de que el arriostramiento transversal no sea ac-
cesible por arriba atornillar la pared perforada por aba-
jo al arriostramiento transversal con tornillos alomados
para chapa.
3b
4. Especificaciones técnicas
Tamaño 550 650
Altura 550mm 650mm
Anchura 500mm 500mm
Adecuado para al-
tura de pie sopor-
te
650mm, 800mm 750mm, 900mm
Adecuado para al-
tura de banco de
trabajo
850mm 950mm
fr Paroi latérale avec panneau perforé
GridLine
1. Remarques générales
Lisez, respectez et conservez le mode d'emploi à
des fins de consultation ultérieure, et gardez-le
toujours à disposition.
2. Sécurité
2.1 UTILISATION NORMALE
Panneau perforé pour montage sur un piètement des
établis GridLine vario et Ready-to-go.
Pour accueillir des crochets et supports Easyfix ainsi
que des accessoires pour panneaux perforés.
Monter uniquement sur les trous correspondants.
2.2 EQUIPEMENT DE PROTECTION INDIVIDUELLE
Respecter les réglementations nationales et régionales en
matière de sécurité et de prévention des accidents. Les
vêtements de protection, tels que les chaussures et les
gants, doivent être choisis et mis à disposition en fonction
des risques prévus pendant l'activité concernée.
3. Montage de la paroi latérale
A
i
Monter la paroi latérale sur le côté du piètement.
Respecter une distance de 2 à 3mm entre la tête de vis
et le pied.
Visser le panneau perforé au renfort transversal par le
haut à l'aide de deux vis à tôle à tête bombée.
3a
Si le renfort transversal n'est pas accessible par le haut,
visser le panneau perforé au renfort transversal par le
bas à l'aide de vis à tôle à tête bombée.
3b
4. Caractéristiques techniques
Réf. 550 650
Hauteur 550mm 650mm
Largeur 500mm 500mm
Pour hauteur de
piètement
650mm, 800mm 750mm, 900mm
Pour hauteur
d'établi
850mm 950mm
it Rivestimento laterale in pannello
forato GridLine
1. Note generali
Leggere il manuale d’uso, rispettarlo, conservarlo
per riferimento futuro e tenerlo sempre a portata di
mano.
2. Sicurezza
2.1 USO PREVISTO
Pannello forato da montare alle strutture portanti del
banco da lavoro GridLine vario e Ready-to-go.
Per l’alloggiamento di ganci e supporti Easyfix, nonché
degli accessori per pannello forato.
Montare solo nei fori corrispondenti.
2.2 DISPOSITIVI DI PROTEZIONE
ANTINFORTUNISTICI
Osservare le norme nazionali e regionali in materia di sicu-
rezza e prevenzione degli infortuni. L’abbigliamento di
protezione, come scarpe di sicurezza e guanti protettivi,
deve essere selezionato e messo a disposizione conforme-
mente ai rischi legati alla rispettiva attività.
3. Montaggio del rivestimento laterale
A
i
Montare il rivestimento laterale sulle parti laterali delle
strutture portanti.
Mantenere una distanza di 2-3 mm tra la testa della vite
e la struttura portante.
Avvitare il pannello forato alla controventatura trasver-
sale inserendo dall’alto due viti autofilettanti a testa
bombata.
3a
Nel caso in cui la controventatura trasversale non fosse
accessibile dall’alto, avvitare il pannello forato alla con-
troventatura trasversale dal basso usando le viti autofi-
lettanti a testa bombata.
3b
4. Dati tecnici
Dim. 550 650
Altezza 550 mm 650 mm
Larghezza 500 mm 500 mm
Per altezza struttu-
ra portante
650mm, 800mm 750mm, 900mm
Per altezza banco
da lavoro
850mm 950mm
pl Obudowa boczna GridLine z
perforacją
1. Informacje ogólne
Należy zapoznać się z instrukcją obsługi i przestrze-
gać jej oraz zachować ją na przyszłość, przechowu-
jąc w dostępnym miejscu.
2. Bezpieczeństwo
2.1 UŻYTKOWANIE ZGODNIE ZPRZEZNACZENIEM
Ścianka perforowana do montażu na segmencie nóg
stołu warsztatowego GridLine vario i Ready-to-go.
Do mocowania haków i uchwytów Easyfix oraz wypo-
sażenia ścianek perforowanych.
Montować wyłącznie we właściwych otworach.
2.2 ŚRODKI OCHRONY INDYWIDUALNEJ
Przestrzegać krajowych iregionalnych przepisów dotyczą-
cych bezpieczeństwa izapobiegania nieszczęśliwym wy-
padkom. Należy dobrać iudostępnić odzież ochronną,
taką jak ochrona stóp irękawice ochronne, odpowiednio
do rodzajów ryzyka oczekiwanego podczas wykonywania
danej czynności.
3. Montaż obudowy bocznej
A
i
Obudowę boczną zamontować z boku na segmencie nóg.
Pomiędzy łbem śruby a nogą zachować odstęp od 2
mm do 3 mm.
Korzystając z dwóch śrub z łbem soczewkowym przy-
kręcić ściankę perforowaną od góry do usztywnienia
poprzecznego.
3a
Gdy usztywnienie poprzeczne jest niedostępne od
góry, ściankę perforowaną należy przykręcić do usztyw-
nienia od dołu za pomocą śrub z łbem soczewkowym.
3b
4. Dane techniczne
Rozmiar 550 650
Wysokość 550 mm 650 mm
Szerokość 500 mm 500 mm
Odpowiednie do
wysokości seg-
mentu nóg
650mm, 800mm 750mm, 900mm
Odpowiednie do
wysokości stołu ro-
boczego
850mm 950mm
-
 1
1
Garant GridLine side cladding Istruzioni per l'uso
- Tipo
- Istruzioni per l'uso
in altre lingue
Documenti correlati
Altri documenti
-
 Hoffmann Group 358975 Istruzioni per l'uso
-
Key Gates Wind Guida utente
-
CHAUVIN ARNOUX TGN 100 Manuale del proprietario
-
Chamberlain LiftMaster 1703E Manuale del proprietario
-
Maxi-Cosi CabrioFix Manuale utente
-
Maxi-Cosi Baby Carrier Baby Crrier Manuale utente
-
 Unical BISER Guida d'installazione
-
schmersal SLG440COM-ER-0800-03 Istruzioni per l'uso


