
Hardware Review
A
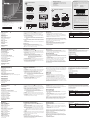
VE602T Front View
1. DVI-D In Port
2. Audio In Port
VE602R
Front View
1. DVI-D Out Port
2. Audio Out Port
VE602T/VE602R Rear View
1. Main/Sub (Unit to Unit) Port
2. Power Jack
VE602T Top View
1. Power LED
VE602R Top View
1. Link LED
2. Power LED
VE602R Side View
1. Grounding terminal
2. EQ Switch
Description de l’appareil
A
Vue avant du VE602T
1. Port d’entrée DVI-D
2. Port d'entrée audio
Vue avant du VE602R
1. Port de sortie DVI-D
2. Port de sortie audio
Vue arrière de VE602T/VE602R
1. Port Principal/Secondaire (unité vers unité)
2. Prise d’alimentation
Vue de dessus du VE602T
1. Voyant d’alimentation
Vue de dessus du VE602R
1. Voyant de liaison (Link)
2. Voyant d’alimentation
Vue latérale du VE602R
1. Prise de terre
2. Bouton EQ
Hardwareübersicht
A
VE602T Vorderseitige Ansicht
1. DVI-D-Eingang
2. Audio-Eingang
VE602R Vorderseitige Ansicht
1. DVI-D-Ausgang
2. Audio-Ausgang
VE602T/VE602R Rückseitige Ansicht
1. Port Main/Sub zur Verbindung von Sende- und Empfangseinheit
2. Stromeingangsbuchse
VE602T Draufsicht
1. LED-Betriebsanzeige
VE602R Draufsicht
1. Verbindungsanzeige
2. LED-Betriebsanzeige
VE602R Seitliche Ansicht
1. Erdungsanschluss
2. EQ-Schalter
Presentación del hardware
A
Vista frontal del VE602T
1. Entrada DVI-D
2. Entrada de audio
Vista frontal del VE602R
1. Salida DVI-D
2. Salida de audio
Vista posterior del VE602T/VE602R
1. Puerto Main/Sub (conexión del transmisor al receptor)
2. Entrada de alimentación
Vista superior del VE602T
1. Indicador de alimentación
Vista superior del VE602R
1. Indicador de enlace (Link)
2. Indicador de alimentación
Vista lateral del VE602R
1. Toma de tierra
2. Conmutador EQ
Hardware
A
VE602T - Vista anteriore
1. Porta d’ingresso DVI-D
2. Porta d’ingresso audio
VE602R - Vista anteriore
1. Porta d’uscita DVI-D
2. Porta d’uscita audio
VE602T/VE602R – Vista posteriore
1. Porta Main/Sub (da unità a unità)
2. Presa d’alimentazione
VE602T – Lato superiore
1. LED d’alimentazione
VE602R – Lato superiore
1. LED di collegamento
2. LED d’alimentazione
VE602R – Vista laterale
1. Terminale di messa a terra
2. Interruttore EQ
Hardware Installation
B
1. Connect your DVI source device to the DVI In port on the VE602T.
2. Connect your stereo audio source to the Audio In port on the
VE602T.
3. Use a Cat 5e cable to connect the Main port on the VE602T to the
Main port on the VE602R.
4. Use a second Cat 5e cable to connect the Sub port on the VE602T
to the Sub port on the VE602R.
Note: The length of the second Cat 5e cable must be the same as
the rst Cat 5e cable.This cable (sub) is needed for Dual –Link
signals.
5. Connect your DVI display device to the DVI Out port on the VE602R.
6. Connect your speakers or audio device to the Audio Out port on the
VE602R.
7. Use the provided power adapter(s) to connect the VE602T/VE602R
to power outlets.
Wall Mounting
To mount the VE602 against the wall do the following:
• Using the screws provided in this package, attach the mounting
bracket to the bottom of the unit, then screw* the bracket against the
wall.
* The screws are not provided with the package.
Installation du matériel
B
1. Connectez votre périphérique source DVI au port d'entrée DVI (DVI
In) du VE602T.
2. Connectez votre source audio stéréo au port d'entrée audio (Audio
In) du VE602T.
3. Utilisez un câble de catégorie 5e pour connecter le port Principal du
VE602T au port Principal du VE602R.
4. Utilisez un deuxième câble de catégorie 5e pour connecter le port
Secondaire du VE602T au port Secondaire du VE602R.
Remarque : Le deuxième câble de catégorie 5e doit être de
longueur identique au premier câble Cat 5e de
catégorie 5e. Ce câble (Secondaire) est nécessaire
pour les signaux Dual Link.
5. Connectez votre périphérique d’af chage DVI au port de sortie DVI
(DVI Out) du VE602R.
6. Connectez vos enceintes ou votre périphérique audio au port de
sortie audio (Audio Out) du VE602R.
7. Branchez les modules VE602T/VE602R sur des prises de courant à
l’aide des adaptateurs secteur fournis.
Hardware installieren
B
1. Verbinden Sie Ihre DVI-Signalquelle mit dem Anschluss DVI In am
VE602T.
2. Verbinden Sie Ihre Stereo-Tonsignalquelle mit dem Anschluss Audio
In am VE602T.
3. Verbinden Sie den Port Main des VE602T mit dem Port Main des
VE602R. Verwenden Sie dazu ein Kat. 5e-Kabel.
4. Verbinden Sie den Port Sub des VE602T mit dem Port Sub des
VE602R. Verwenden Sie dazu ein zweites Kat. 5e-Kabel.
Hinweis: Die Länge des zweiten Kat. 5e-Kabels muss mit der des
ersten übereinstimmen. Dieses Kabel (Sub) wird für Dual
Link-Signale benötigt.
5. Verbinden Sie Ihr DVI-Anzeigegerät mit dem Anschluss DVI Out am
VE602R.
6. Verbinden Sie Ihre Lautsprecher oder ein Audiogerät mit dem
Anschluss Audio Out des VE602R.
7. Verbinden Sie den VE602T/VE602R über das bzw. die
mitgelieferte(n) Netzteile mit dem Stromnetz.
Instalar el hardware
B
1. Conecte su dispositivo fuente de señal DVI al puerto DVI In del
VE602T.
2. Conecte su fuente de audio estéreo al puerto Audio In del VE602T.
3. Utilice un cable de Cat. 5e para conectar el puerto Main de la unidad
VE602T al puerto Main de la unidad VE602R.
4. Utilice un segundo cable de Cat. 5e para conectar el puerto Sub de
la unidad VE602T al puerto Sub de la unidad VE602R.
Nota: La longitud del segundo cable de Cat. 5e debe ser la misma
que la del primero. Este cable (Sub) se requiere para
transmitir señales Dual Link.
5. Conecte su dispositivo de visualización DVI al puerto DVI Out del
VE602R.
6. Conecte sus altavoces o su dispositivo de audio al puerto Audio Out
del VE602R.
7. Enchufe el VE602T/VE602R a la red eléctrica. Para ello, emplee el/
los adaptador(es) de alimentación incluido(s).
Installazione dell’hardware
B
1. Collegare il dispositivo sorgente DVI alla porta DVI In sul VE602T.
2. Collegare il dispositivo sorgente audio alla porta Audio In sul
VE602T.
3. Utilizzare un cavo Cat 5e per connettere la porta Main del VE602T
alla porta Main del VE602R.
4. Utilizzare un cavo Cat 5e per connettere la porta Sub del VE602T
alla porta Sub del VE602R.
Nota: la lunghezza del secondo cavo Cat 5e deve essere la stessa
del primo. Questo cavo (sub) è necessario per i segnali Dual
Link.
5. Collegare il dispositivo di visualizzazione DVI alla porta DVI Out sul
VE602R.
6. Collegare gli altoparlanti o il dispositivo audio alla porta Audio Out sul
VE602R.
7. Utilizzare gli alimentatori forniti in dotazione per collegare il VE602T/
VE602R alle prese di alimentazione in uscita.
Montaggio a parete
Per montare il VE602 a parete procedere come segue:
• Utilizzando le viti fornite con questa confezione, avvitare le staffe di
montaggio sul fondo del dispositivo e poi ssarle* alla parete.
* Le viti non sono incluse nella confezione.
Operation
EDID Operation
Do the following steps to run the EDID Learning function:
1. Using a DVI cable, connect the VE602T to the monitor/display you
want to use.
2. Use the power adapter to plug the VE602T to an appropriate power
source.
3. Unplug the power adapter after 2~3 seconds.
The monitor’s EDID is now saved in the VE602T. Connect the VE602T
and the VE602R using Cat 5e cables. The source device proceeds to
read the EDID information previously learned by the VE602T, then uses
the information for the monitor/display accordingly.
Equalization Adjustment
The 8-segment Equalization (EQ) switch located on the VE602R unit
is used to adjust the video quality. Use the EQ switch to adjust the
equalization strength and improve a fl ickering or blinking image.
7: Strongest equalization
0: Weakest equalization
Montage au mur
Pour monter le VE602 au mur, procédez comme suit :
• Vissez le support de montage sur la partie inférieure de l'appareil à
l'aide des vis fournies, puis xez le support au mur au moyen de vis*.
* Ces vis ne sont pas fournies dans la livraison.
Fonctionnement
Fonctionnement du mode EDID
Pour exécuter la fonction d’apprentissage EDID, procédez comme suit :
1. Utilisez un câble DVI pour connecter le VE602T au moniteur/à l’écran
de votre choix.
2. Branchez le VE602T sur une source d’alimentation adéquate à l’aide
de l’adaptateur secteur.
3. Débranchez l’adaptateur secteur au bout de 2 à 3 secondes.
La fonction EDID du moniteur est enregistrée dans le VE602T.
Connectez le VE602T et le VE602R à l’aide de câbles de catégorie
5e. Le périphérique source commence à lire les informations EDID
précédemment apprises par le VE602T, puis applique ces informations
au moniteur/à l’écran.
Wandmontage
Um den VE602 an der Wand zu montieren, gehen Sie folgendermaßen
vor:
• Verwenden Sie die mitgelieferten Schrauben, um den Montagerahmen
auf die Unterseite des Gerätes zu schrauben. Anschließend bringen
Sie den Rahmen an der Wand an*.
* Die Schrauben sind nicht im Lieferumfang enthalten.
Bedienung
EDID-Funktion
Gehen Sie folgendermaßen vor, um die EDID-Lernfunktion
auszuführen:
1. Verbinden Sie den VE602T mit dem gewünschten Monitor bzw.
Display über ein DVI-Kabel.
2. Verbinden Sie den VE602T über das Netzteil mit dem Stromnetz.
3. Trennen Sie das Netzteil nach 2-3 Sekunden vom Stromnetz.
Dadurch speichert der VE602T die EDID des Monitors. Verbinden Sie
den VE602T mit dem VE602R über Kat. 5e-Kabel. Daraufhin liest die
Signalquelle die zuvor erlernten EDID-Daten vom VE602T ein und stellt
die Bildparameter entsprechend ein.
Montaje en la pared
Para montar el VE602 en la pared, proceda como se indica a
continuación:
• Atornille el marco de montaje en la parte inferior de la unidad (con los
tornillos incluidos) y luego je el marco a la pared*.
* Estos tornillos no están incluidos con la unidad.
Funcionamiento
Funcionamiento EDID
Para ejecutar la función de aprendizaje de EDID:
1. Con un cable DVI, conecte el VE602T al monitor o a la pantalla que
desee utilizar.
2. Enchufe el VE602T a la red eléctrica. Para ello, emplee el adaptador
de alimentación incluido.
3. Desconecte el adaptador de alimentación después de unos 2 o 3
segundos.
El EDID del monitor ha sido guardado por el VE602T. Interconecte el
VE602T y el VE602R con cables de Cat 5e. El dispositivo fuente de
señal leerá los datos de EDID previamente aprendidos por el VE602T y
ajusta los parámetros de la imagen de forma correspondiente.
Funzionamento
Funzionamento EDID
Per eseguire la funzione di apprendimento EDID, procedere come
segue:
1. Utilizzare un cavo DVI per collegare il VE602T al monitor/schermo
desiderato.
2. Utilizzare l’alimentatore per collegare il VE602T a un’apposita fonte
d’alimentazione.
3. Scollegare l’alimentatore dopo 2~3 secondi.
L’EDID del monitor è ora salvato nel VE602T. Collegare il VE602T e il
VE602R con dei cavi Cat 5e. Il dispositivo sorgente passa a leggere
le informazioni EDID precedentemente apprese dal VE602T, quindi le
utilizza per il monitor/schermo.
Regolazione dell’equalizzazione
Il selettore dell’equalizzazione (EQ) a 8 segmenti posto sull’unità
VE602R serve a regolare la qualità video. Utilizzare il selettore EQ per
regolare la potenza di equalizzazione per migliorare un'immagine che
sfarfalla o lampeggia.
7: equalizzazione più potente
0: equalizzazione più debole
LED Display
LED Indication
Link (Green)
Lights steadily to indicate that the connection to the
Remote unit is ok.
Power (Green)
Lights steadily to indicate that the Local / Remote
unit is receiving power.
Réglage de l’égalisation
Le commutateur d’égalisation (EQ) à 8 segments situé sur l’unité
VE602R est utilisé pour régler la qualité vidéo. Utilisez le commutateur
EQ pour régler le niveau d'égalisation a n de corriger une image
tremblante ou vacillante.
7: égalisation la plus forte
0: égalisation la plus faible
Affi chage des voyants
Voyant Indication
Voyant de liaison
(vert) (Link)
S’allume en continu pour indiquer que la
connexion à l’unité distante est correcte.
Voyant d’alimentation
(vert) (Power)
S'allume en continu pour indiquer que l'unité
locale/distante est sous tension.
Equalizer einstellen
Der 8-stu ge Equalizer-Schalter (EQ) am VE602R dient zur Einstellung
der Bildqualität. Mit dem EQ-Schalter können Sie die Verstärkung
bzw. Dämpfung justieren und ein fl immerndes oder fl ackerndes Bild zu
kompensieren.
7: größte Laufzeitfehlerkorrektur
0: kleinste Laufzeitfehlerkorrektur
LED-Anzeige
LED-Anzeigen Anzeige
Verbindung (grün)
Leuchtet stetig, wenn die Verbindung zum Gerät
der Gegenstelle hergestellt wurde.
Stromversorgung
(grün)
Leuchtet dauerhaft, wenn die Sende- bzw.
Empfangseinheit mit Strom gespeist wird.
Ajustar la ecualización
El conmutador de ajuste de señal (EQ) de 8 segmentos del VE602R
sirve para optimizar la calidad de imagen. Utilice el conmutador EQ
para ajustar el nivel de ecualización y mejorar la calidad de una imagen
centelleante o intermitente.
7: mayor compensación
0: menor compensación
Indicador LED
Indicador LED Indicación
Enlace (verde)
Se ilumina cuando la conexión con la unidad
remota se ha establecido.
Alimentación
(verde)
Se ilumina cuando la unidad local/remota está
recibiendo corriente eléctrica.
Indicatore LED
LED Indicazione
Collegamento
(verde)
Rimane acceso sso per indicare che il
collegamento con l’unità remota funziona.
Alimentazione
(verde)
Rimane acceso sso a indicare che l’unità
locale/remota è alimentata.
B
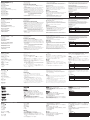
Package Contents
1 VE602T DVI Dual Link Extender with Audio
1 VE602R DVI Dual Link Extender with Audio
2 Power Adapters
1 Mounting Kit
1 User Instructions
VE602T Front View
VE602T/VE602R Rear View
VE602R Front View
VE602T Top View
VE602R Top View
VE602R Side View
Hardware Installation
VE602 DVI Dual Link Extender with Audio Quick Start Guide
www.aten.com
Système d’extension Dual Link DVI VE602 avec Guide de démarrage rapide audio
www.aten.com
VE602 DVI Dual Link-Verlängerung mit Tonübertragung Kurzanleitung
www.aten.com
VE602 Alargador DVI Dual Link con transmisión del sonido Guía rápida
www.aten.com
Estensore DVI Dual Link con audio VE602 – Guida rapida
www.aten.com
VE602T (Front)
VE602R (Front)
VE602T (Rear) VE602R (Rear)
Cat 5e Cables
DVI-D Cable
DVI-D Cable
Audio Cable
Audio Cable
1
3
5
2
3
6
7
4
4
7
1 2 1 2
1 2
1
21
1 2
Important Notice
Considering environmental protection, ATEN does not provide a fully
printed user manual for this product. If the information contained in the
Quick Start Guide is not enough for you to confi gure and operate your
product, please visit our website www.aten.com, and download
the full user manual.
Online Registration
http://eservice.aten.com
Technical Phone Support
International:
886-2-86926959
All information, documentation, firmware, software utilities, and
specifi cations contained in this package are subject to change without
prior notification by the manufacturer. Please visit our website http://
www.aten.com/download/?cid=dds for the most up-to-date versions.
이 기기는 업무용(A급) 전자파 적합기기로서 판매자 또는 사용자는 이
점을 주의하시기 바라며, 가정외의 지역에서 사용하는 것을 목적으로
합니다.
EMC Information
FEDERAL COMMUNICATIONS COMMISSION INTERFERENCE STATEMENT:
This equipment has been tested and found to comply with the limits for a Class A
digital device, pursuant to Part 15 of the FCC Rules. These limits are designed to provide
reasonable protection against harmful interference when the equipment is operated
in a commercial environment. This equipment generates, uses, and can radiate radio
frequency energy and, if not installed and used in accordance with the instruction
manual, may cause harmful interference to radio communications. Operation of this
equipment in a residential area is likely to cause harmful interference in which case the
user will be required to correct the interference at his own expense.
FCC Caution: Any changes or modifi cations not expressly approved by the party
responsible for compliance could void the user's authority to operate this equipment.
CE Warning: This is a class A product. In a domestic environment this product may cause
radio interference in which case the user may be required to take adequate measures.
Suggestion: Shielded twisted pair (STP) cables must be used with the unit to ensure
compliance with FCC & CE standards.
This device complies with Part 15 of the FCC Rules. Operation is subject to the following
two conditions:(1) this device mat not cause harmful interference, and(2) this device
must accept any interference received, including interference that may cause undesired
operation.
The following contains information that relates to China:
© Copyright 2016 ATEN
®
International Co., Ltd.
ATEN and the ATEN logo are trademarks of ATEN International Co., Ltd. All rights reserved. All
other trademarks are the property of their respective owners.
This product is RoHS compliant.
Part No. PAPE-1223-A41G Printing Date: 04/2016
DVI Dual Link Extender with Audio
Quick Start Guide
VE602
ATEN VanCryst
™
North America:
1-888-999-ATEN Ext: 4988
United Kingdom:
44-8-4481-58923
A
Hardware Review
La pagina si sta caricando...
-
 1
1
-
 2
2


ATEN VE602 Guida Rapida
- Tipo
- Guida Rapida
- Questo manuale è adatto anche per
in altre lingue
- English: ATEN VE602 Quick start guide
- français: ATEN VE602 Guide de démarrage rapide
- español: ATEN VE602 Guía de inicio rápido
- Deutsch: ATEN VE602 Schnellstartanleitung
- русский: ATEN VE602 Инструкция по началу работы
- português: ATEN VE602 Guia rápido
- 日本語: ATEN VE602 クイックスタートガイド