AJA HDP3 Manuale utente
- Categoria
- Apparecchiature musicali supplementari
- Tipo
- Manuale utente

HDP3 Mini-Converter
3G/HD/SD-SDI to DVI-D
Version 1.0r2
Published December 4, 2019
Installation and Operation Guide

HDP3 Mini-Converter v1.0r2 2 www.aja.com
Notices
Trademarks
AJA® and Because it matters.® are registered trademarks of AJA Video Systems, Inc.
for use with most AJA products. AJA™ is a trademark of AJA Video Systems, Inc. for
use with recorder, router, software and camera products. Because it matters.™ is a
trademark of AJA Video Systems, Inc. for use with camera products.
CION®, Corvid Ultra®, lo®, Ki Pro®, KONA®, KUMO®, ROI® and T-Tap® are registered
trademarks of AJA Video Systems, Inc.
AJA Control Room™, KiStor™, Science of the Beautiful™, TruScale™, TruZoom™,
V2Analog™ and V2Digital™ are trademarks of AJA Video Systems, Inc.
All other trademarks are the property of their respective owners.
Copyright
Copyright © 2019 AJA Video Systems, Inc. All rights reserved. All information in
this manual is subject to change without notice. No part of the document may be
reproduced or transmitted in any form, or by any means, electronic or mechanical,
including photocopying or recording, without the express written permission of AJA
Video Systems, Inc.
Contacting AJA Support
When calling for support, have all information at hand prior to calling. To contact AJA
for sales or support, use any of the following methods:
Telephone +1.530.271.3190
FAX +1.530.271.3140
Web
https://www.aja.com
Support Email
suppor[email protected]
Sales Email

HDP3 Mini-Converter v1.0r2 3 www.aja.com
Contents
Notices . . . . . . . . . . . . . . . . . . . . . . . . . . . . . . . . . . . . . .2
Trademarks . . . . . . . . . . . . . . . . . . . . . . . . . . . . . . . . . . . . . . . . . . . 2
Copyright . . . . . . . . . . . . . . . . . . . . . . . . . . . . . . . . . . . . . . . . . . . . 2
Contacting AJA Support . . . . . . . . . . . . . . . . . . . . . . . . . . . . . . . . . . . 2
Chapter 1 – Introduction . . . . . . . . . . . . . . . . . . . . . . . . . . .4
Overview. . . . . . . . . . . . . . . . . . . . . . . . . . . . . . . . . . . . . . . . . . . . .4
Features. . . . . . . . . . . . . . . . . . . . . . . . . . . . . . . . . . . . . . . . . . . .4
Monitor Compatibility . . . . . . . . . . . . . . . . . . . . . . . . . . . . . . . . . . . . 5
Frame Locking. . . . . . . . . . . . . . . . . . . . . . . . . . . . . . . . . . . . . . . .5
Recommended Monitors . . . . . . . . . . . . . . . . . . . . . . . . . . . . . . . . .5
Optimal Performance with HP LP2480zx DreamColor . . . . . . . . . . . . . . 5
Automatic 720p or 1080p Support . . . . . . . . . . . . . . . . . . . . . . . . . . .6
Manual 720p or 1080p Support . . . . . . . . . . . . . . . . . . . . . . . . . . . . .6
VESA and CEA Timing . . . . . . . . . . . . . . . . . . . . . . . . . . . . . . . . . . . 6
Motion Adaptive De-interlacing . . . . . . . . . . . . . . . . . . . . . . . . . . . . 6
10-Bit and Deep Color Support . . . . . . . . . . . . . . . . . . . . . . . . . . . . . 6
Video Scaling . . . . . . . . . . . . . . . . . . . . . . . . . . . . . . . . . . . . . . . . . . 6
Vertical Locking . . . . . . . . . . . . . . . . . . . . . . . . . . . . . . . . . . . . . . . . 7
Frame Add/Drop . . . . . . . . . . . . . . . . . . . . . . . . . . . . . . . . . . . . . . 7
Motion Tearing . . . . . . . . . . . . . . . . . . . . . . . . . . . . . . . . . . . . . . . 7
Frame Rates . . . . . . . . . . . . . . . . . . . . . . . . . . . . . . . . . . . . . . . . . . . 8
Block Diagram . . . . . . . . . . . . . . . . . . . . . . . . . . . . . . . . . . . . . . . . . 8
I/O Connections . . . . . . . . . . . . . . . . . . . . . . . . . . . . . . . . . . . . . . . . 8
User Controls . . . . . . . . . . . . . . . . . . . . . . . . . . . . . . . . . . . . . . . . . . 9
Mini-Cong Control . . . . . . . . . . . . . . . . . . . . . . . . . . . . . . . . . . . . 9
Installation. . . . . . . . . . . . . . . . . . . . . . . . . . . . . . . . . . . . . . . . . . . .9
Chapter 2 – Operation . . . . . . . . . . . . . . . . . . . . . . . . . . . .10
USB Control and Setup—Using AJA Mini-Cong . . . . . . . . . . . . . . . . . . 10
Acquiring Mini-Cong. . . . . . . . . . . . . . . . . . . . . . . . . . . . . . . . . . 10
Installing Mini-Cong . . . . . . . . . . . . . . . . . . . . . . . . . . . . . . . . . . 10
Running Mini-Cong. . . . . . . . . . . . . . . . . . . . . . . . . . . . . . . . . . . 12
Operating Mini-Cong . . . . . . . . . . . . . . . . . . . . . . . . . . . . . . . . . 13
Tabbed Screens . . . . . . . . . . . . . . . . . . . . . . . . . . . . . . . . . . . . . . 14
Video Tab Screen. . . . . . . . . . . . . . . . . . . . . . . . . . . . . . . . . . . . . . . 15
Audio Tab Screen . . . . . . . . . . . . . . . . . . . . . . . . . . . . . . . . . . . . . . 17
Update Tab Screen. . . . . . . . . . . . . . . . . . . . . . . . . . . . . . . . . . . . . . 18
Info Tab Screen . . . . . . . . . . . . . . . . . . . . . . . . . . . . . . . . . . . . . . . . 19
Appendix A – Specications . . . . . . . . . . . . . . . . . . . . . . . . 20
HDP3 Tech Specs. . . . . . . . . . . . . . . . . . . . . . . . . . . . . . . . . . . . . . . 20
Appendix B – Safety and Compliance . . . . . . . . . . . . . . . . . . 22
Warranty and Liability Information . . . . . . . . . . . . . . . . . . . .30
Limited Warranty on Hardware. . . . . . . . . . . . . . . . . . . . . . . . . . . . . . 30
Limitation of Liability . . . . . . . . . . . . . . . . . . . . . . . . . . . . . . . . . . . . 30
Governing Law and Language; Your Rights. . . . . . . . . . . . . . . . . . . . . . 30
Index. . . . . . . . . . . . . . . . . . . . . . . . . . . . . . . . . . . . . . .32

HDP3 Mini-Converter v1.0r2 4 www.aja.com
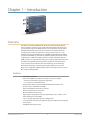
Chapter 1 – Introduction
Overview
The HDP3 is a miniature 3G/HD/SD-SDI to DVI-D converter for digital display
devices (graphics and video), such as LED, LCD, DLP and Plasma monitors (and
projectors) with support for 1080p60. Using a very high quality scaling engine,
the HDP3 will automatically size 4:3 or 16:9 inputs to many DVI-D monitors.
For appropriate monitor configurations, scaling is automatically 1 to 1—for
example, displaying 1920x1080 video on a WUXGA (1920x1200) monitor. Where
appropriate, the HDP3 can automatically adapt the input frame rate for monitor
compatibility. In addition, the HDP3 provides 8 channel embedded audio over
HDMI, 2 channel analog audio monitoring, and a looping output of the SDI input.
The HDP3 is designed for general monitoring, perfect for use in applications
such as: General post-production reference monitoring, Client monitoring,
Presentation, Projection, Corporate displays, Kiosk applications, and more.
Deep color is supported in RGB and YCbCr. USB connectivity allows for easy PC/
Mac setup and field upgrades.
Features
• 3G/HD/SD-SDI to DVI-D
• DVI v1.0 and HDMI v1.3a support (via DVI-D connector), including:
• Deep Color 30-bit video (24-bit also supported)
• 2 or 8 channels of embedded audio
• Automatically adapts to popular LED/LCD/DLP/Plasma monitors (and
projectors) up to 1920x1200 and 1080p
• Responds to EDID from monitor or projector
• Video to VESA frame rate conversion
• Motion Adaptive De-interlacing
• High quality scaling engine for proper display of 4:3 or 16:9 content—even
better quality than original HDP
• 1 to 1 scaling for appropriate monitor congurations
• 2 channel audio monitoring using RCA analog audio outputs (user-assignable
channel pairs)
• 3G/HD/SD-SDI looping output

HDP3 Mini-Converter v1.0r2 5 www.aja.com
• Setup via DIP switch or PC/Mac using USB port and supplied USB cable (Mini-
Cong conguration software application available via download from AJA
website)
• 5 year warranty
Monitor Compatibility
The HDP3 is designed to work with most DVI-D monitors. HDMI monitors are
also supported with a standard, inexpensive DVI-to-HDMI cable or adapter (user
supplied). The HDP3 uses the industry standard EDID communication protocol
(within the DVI or HDMI link) to communicate with the monitor, and then adjust
the HDP3’s internal scaling engine to scale the input video to the native resolution
of the monitor. However, due to the hundreds of variations of DVI formats
currently in use, proper operation with all monitors cannot be guaranteed.
To ensure the greatest compatibility with today's available digital display devices,
the HDP3 will, by default, provide VESA or CEA standard timing.
Frame Locking
Auto
Use this mode to ensure greatest compatibility with other monitors. The HDP3
will use standardized output timing for most monitors. If the attached monitor
(such as an HP DreamColor) is recognized as having enhanced capabilities, then
special, frame-locked timing will be used.
Manual
Selecting an output frame rate that matches the input frame rate will provide a
vertically locked signal to the monitor, and may yield the best results. Note that
not all monitors will be able to accept these signals.
Recommended Monitors
The monitors listed below have been verified to work with one or more of the
manual frame rate selections.
• HP 24" LP2480zx DreamColor
• Apple 23" HD Cinema, model M9178LL/A (aluminum bezel)
• Sony 23", model SDM-P234
• Viewsonic VP231wb
• Dell 2405FPW
• Barco LC-42
• Barco LC-47
• Westinghouse LVM-37wl
• Sony Bravia Series
• Sharp Aquos Series
Optimal Performance with HP LP2480zx DreamColor
When using the HDP3 with an HP LP2480zx, the best results are obtained by
using the default HDP3 “Auto” selections (no action required—unless you’ve
changed the factory defaults using the Mini-Config software supplied).

HDP3 Mini-Converter v1.0r2 6 www.aja.com
Automatic 720p or 1080p Support
Monitors that report 1280x720 or 1920x1080 in their “Preferred Timing Mode”
section of EDID readback will receive a 1280x720 or 1920x1080p signal,
respectively, from the HDP3.
Manual 720p or 1080p Support
The HDP3 can be configured manually for 720p or 1080p. This is discussed under
“USB Control and Setup” later in this manual.
NOTE: For best results when using video display devices, it is recommended that a
monitor capable of displaying the “Full 1080p” image be used.
VESA and CEA Timing
By default, the HDP3 will automatically output standardized VESA rate graphics
where appropriate when a computer resolution is detected, and standardized
CEA rate video when a video device, such as an HDTV is detected. Not all VESA
rates are synchronous to SMPTE standard video input rates. However, the HDP3
can be configured manually by selecting an output frame rate that matches the
incoming frame rate. By doing so, enhanced timing signals will be generated that
will be locked to the incoming video.
NOTE: Some monitors may not be able to handle some of these enhanced timing
modes. For best results, refer to the list of recommended monitors that have been
tested to lock at one or more of the user-selectable frame rates.
Motion Adaptive De-interlacing
Video displayed on DVI progressive display devices requires de-interlacing
technology to properly display the video from its native interlace format. HDP3
uses advanced motion adaptive de-interlacing to predict motion in the video
stream and output a quality picture using spatial and temporal comparisons on
individual pixels.
10-Bit and Deep Color Support
HDP3 supports the HDMI v1.3a specification for Deep Color bit depths. In
operation, HDP3 can support Deep Color bit depths up to 30 bits/pixel (1.073
billion colors).
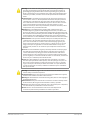
Video Scaling
The HDP3 will scale the input video to the best fit for a given monitor and video
input. In cases where the input video and the monitor are already the same or
similar, the HDP3 automatically turns off scaling. For example, a 1920 x1080 video
and a 1920 x1200 monitor will not be scaled.

HDP3 Mini-Converter v1.0r2 7 www.aja.com
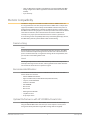
Figure 1. Video Scaling Examples
16 x 9 Monitor
16 x 9 Video
4 x 3 Video
16 x 9 Monitor
4 x 3 Monitor
4 x 3 Monitor
16:9 Monitor
Full Screen
Full Screen
“Widezoom/Crop”
“Letterbox”
4:3 Monitor
“Widezoom/Crop”
“Pillarbox”
NOTE: The HDP3 also properly supports 16:10 and 5:4 monitors.
If the HDP3 scaling is set to 1:1 via the control panel, the input raster will be
displayed unscaled. This means that input rasters smaller than the monitor appear
as a “floating” image surrounded by black. For example, a 1280 x 720 image on a
1920 x 1200 monitor only fills about 40% of the screen. Standard definition inputs
unscaled on a 1920 x 1200 monitor only fill about 20% of the screen. This mode
will only work when the input raster is smaller than the monitor resolution.
If the HDP3 scaling is set to “Auto”, the HDP3 will scale the image to best fit
the screen while preserving the aspect ratio. In some cases, a letterboxed or
pillarboxed image can be expected.
Vertical Locking
Depending on the input frame rate and the capabilities of the monitor in use,
the HDP3 will provide a vertically locked signal to the monitor. Because most DVI
monitors have their own internal scaling, the internal scaler of the monitor may
or may not lock vertically to the HDP3 output. The recommended monitor list
shown earlier lists only monitors which have been tested for proper vertical lock.
The HDP3 works with many LED/LCD/DLP/Plasma monitors not shown on the
recommended monitor list—however, these monitors may have one of two types
of issues associated with not being vertically locked:
Frame Add/Drop
The monitor occasionally adds or drops a frame of video which appears as
discontinuous motion. For example, a moving object may appear to briefly pause
or jump ahead.
Motion Tearing
The monitor displays video from two different fields or frames on screen. This
appears as a horizontal discontinuity in the video during motion. For example, a
moving object may appear to be split horizontally with the upper part ahead or
behind the lower part.

HDP3 Mini-Converter v1.0r2 8 www.aja.com
Frame Rates
When the HDP3 is manually configured for a particular output frame rate, the
output will run in lock-step with the video input. For best results, (without
any added or dropped frames), select an output frame rate that matches the
incoming video frame rate.
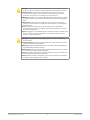
Block Diagram
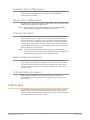
Figure 2. HDP3 Converter, Simplified Block Diagram
DVI-D Output
3G/SD/HD-SDI
Input
3G/SD/HD-SDI
Output
2-Channel
Analog Audio
Output
USB Port
(connec
t to PC or Mac)
For conguring and
updating
SDI Receiver
SDI Transmitter
Processor
Video Scaler
and
Framebuer
Audio
Disembedder
Audio
D/A
DVI
Transmitter
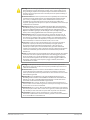
I/O Connections
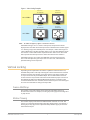
Figure 3. HDP3 Mini-Converter
DC Power
Input
DVI
Output
Connector
3G-SDI
Output BNC
Unbalanced
Analog Audio
Outputs
(2 RCA Jacks)
USB Port
Lock LED
3G-SDI
Input BNC
NOTE: The LOCK LED indicates valid input video by color. Off is no signal, green is SD
video, red is HD video, amber is 3G video.

HDP3 Mini-Converter v1.0r2 9 www.aja.com
User Controls
Mini-Config Control
Automatic input format detection configures the unit automatically to match
input and output video parameters. In most cases, manual configuration is not
necessary. Advanced Mini-Config control supports color space and bit depth
adjustments, and audio channel selection.
Configuration set via Mini-Config is stored in the HDP3 unit through subsequent
power cycles.
Installation
Typically, HDP3 installation consists of the following steps:
1. Ensure the converter is disconnected from power.
2. Connect video equipment to the converter BNC and DVI connectors.
3. Connect audio equipment to RCA connectors (optional).
4. Apply power to the converter (AJA power supply included).
5. The converter will now run using the default factory settings. If you wish to
alter the factory settings, you’ll need to:
• Install the AJA Mini-Cong software on your computer.
• Attach the converter via USB.
• Make your changes using Mini-Cong setup screens. This process is detailed
in "Chapter 2 Operation" on page 10.

HDP3 Mini-Converter v1.0r2 10 www.aja.com
Chapter 2 – Operation
USB Control and Setup—Using AJA Mini-Config
Your AJA Mini-Converter can be used right out of the box for some applications
since it is designed to recognize inputs and perform standard actions
automatically by default. However, to use its full capability, you must use AJA’s
Mini-Config software application for PCs and Macs. This same application can be
used to update to new Mini-Converter software released by AJA.
Acquiring Mini-Config
AJA’s Mini-Config application is available for download from the AJA website.
To download the latest Mini-Config package, which includes the Mini-Config
application, Mini-Converter firmware, and documentation, go to:
https://www.aja.com/products/mini-config-software
Select either the Windows or Mac icon to download the desired version.
Mini-Converter Documentation
Included with the Mini-Config package is a complete set of documentation for
all Mini-Converters supported by Mini-Config. A .PDF of the Installation and
Operation Guide for the currently connected Mini-Converter can be accessed from
the Mini-Config UI via the Help/Manual drop-down menu.
Documentation for all AJA Mini-Converters that use Mini-Config can also be
accessed directly in the Mini-Config download package Documentation folder,
and via the Documentation icon available on the Mac installer.
Documentation (and firmware) included with the Mini-Config application are the
versions available at the time of distribution. However, Mini-Converter software,
firmware and documentation are updated regularly, so newer versions may exist.
To download the latest documentation for an individual Mini-Converter, go to:
https://www.aja.com/family/mini-converters
and navigate to the Support web page of that Mini-Converter.
Installing Mini-Config
PC Installation
To install Mini-Config on a Windows PC:
1. Download the application from the AJA website (select the Windows icon
on the Mini-Cong Support web page).
2. Open the AJA_MiniCong.zip le
3. Double-click on the MiniInstaller.msi le.
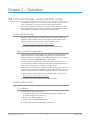
4. A Setup Wizard will guide you through the installation.

HDP3 Mini-Converter v1.0r2 11 www.aja.com
Figure 4. Mini-Config PC Setup Wizard
5. Click Next to begin. Answer the questions in the subsequent dialogs. When
nished, an AJA Mini-Cong shortcut will be installed on the desktop, and
you will be able to locate the Mini-Cong application in the AJA folder in
the Programs listing.
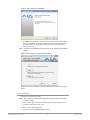
NOTE: If the Mini-Config application already exists on the PC, a different Setup Wizard
appears.
Figure 5. Mini-Config Setup Wizard, Reinstallation
With this screen you can Repair (reinstall) or Remove (uninstall) Mini-Config on
the PC.
Mac Installation
To install the application on a Mac:
NOTE: Mac computers must be Intel-based (G5, G4 and earlier models will not work
with Mini-Config).
1. Download the application from the AJA website (select the Apple icon on
the Mini-Cong Support web page).
2. Open the AJA_MiniCong folder.
3. Double-click on the AJAMiniCong.dmg le.

HDP3 Mini-Converter v1.0r2 12 www.aja.com
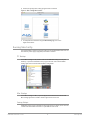
4. Answer the prompt and a utility program will be launched.
Figure 6. Mini-Config Mac Installer
5. To complete the installation drag the MiniCong.app icon to the
Applications folder.
Running Mini-Config
Connect the Mini-Converter to the PC or Mac via the supplied USB cable. Connect
the external power supply (supplied) to the Mini-Converter.
PC Startup
To run Mini-Config on a PC, double-click on the AJA Mini-Config icon on your
desktop, or open the AJA folder in the program list and click on the AJA Mini-
Config application located inside the Mini-Config folder.
Mac Startup
To run Mini-Config on a Mac, open the Applications folder and locate the AJA
Mini-Config application. Double-click the application to launch it.
Saving Setups
A File drop down menu on the Mini-Config application bar allows you to save the
current state of the Mini-Converter to a preset file for later recall.

HDP3 Mini-Converter v1.0r2 13 www.aja.com
Using this feature you can set up the converter for different applications, storing
each configuration (Save Preset As...) with a unique name for easy recall (Open
Preset...).
A Revert to Factory Settings menu item similarly allows you to change the
settings back to AJA’s factory defaults.
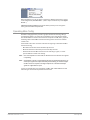
Operating Mini-Config
The Mini-Config application provides a graphic interface for viewing settings
and updating software. It consists of an information area at the top that shows
the available Mini-Converters attached to the computer via USB, with a graphical
rendering of the selected Mini-Converter showing all the connectors and their
current state.
Colored text next to the connectors indicates the signal type and what the Mini-
Converter is doing:
• Blue text indicates the values automatically selected
• Black text indicates values that you have manually selected
• Red text indicates the Mini-Converter is not detecting a signal, or cannot
operate with the current user settings.
NOTE: Even if no output device is detected, the SDI connector text still shows the signal it
is outputting.
NOTE: Configuration settings in red will change based on the attached output device as
well as input signals. For improved accuracy and reliability, you should configure
the Mini-Converter only when the target output device is attached and input
signals are supplied at the inputs.
Screens are virtually the same on both PC and Mac, with subtle differences that
reflect the general look of the platform environment.

HDP3 Mini-Converter v1.0r2 14 www.aja.com
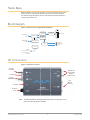
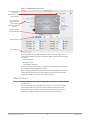
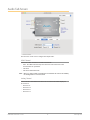
Figure 7. Example Mini-Config Screen
Select a USB port and
an attached
Mini-Converter (name
in parentheses).
Each connector is
labeled with the
signals currently
detected or manually
selected.
Firmware Version
and Serial Number
Status Message
Tabbed Screens
Selecting a Mini-Converter with the pulldown menu causes this application to
connect to the selected converter. The graphic of Mini-Converter and text below
it provides:
• Type of converter
• Firmware version
• Serial number of the unit.
A status field at the bottom of the screen shows if your application is connected
and communicating with the Mini-Converter.
When configuring the Mini-Converter, select it from the top pulldown, view the
current settings and change any values. Making a change communicates that
new value to the Mini-Converter’s non-volatile memory.
Tabbed Screens
The Tabs delineate control screens with groups of controls for each type of task to
be performed.
The controls for the actual configuration parameters are specific to each Mini-
Converter type. When you Click on any of the tab buttons, the pane below
the tabs will change to match your tab selection. Any changes you make are
immediately applied and will be saved, overwriting previous settings.

HDP3 Mini-Converter v1.0r2 15 www.aja.com
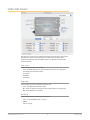
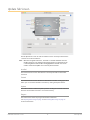
Video Tab Screen
The selections on this screen configure the output video. Selecting “Auto” allows
the HDP3 to conform the output to best serve the attached monitor. This is
handled automatically when the HDP3 reads the capabilities indicated by the
attached monitor.
Color Space
Selects the Video Format. Choose from
• Auto - the HDP3 automatically select the format based on the capabilities
indicated by the attached monitor.
• 4:2:2 YCbCr
• 4:4:4 RGB
• 4:4:4 YCbCr.
Deep Color
Selects how Deep Color is supported. Choose from:
• Auto - The HDP3 decide based on input.
• On - Turns on support for Deep Color 30-bit video (24-bit also supported)
• O - Turns o Deep Color support.
RGB Range
Selects the Input Video Color Range. Choose from:
• Auto - to let the HDP3 decide, or choose
• SMPTE
• Full color range.

HDP3 Mini-Converter v1.0r2 16 www.aja.com
Scaling
Choose from:
• Auto - The HDP3 chooses based on the attached output device’s capabilities.
• 1:1 (no scaling) - 1:1 only works properly when it is possible to display the
entire unscaled raster. For example, it is not possible to display a 1920 x 1080
input on a 1600 x 1200 monitor. For optimal performance with 1:1 scaling, use
a 1920 x 1200 (WUXGA) monitor.
• Scale - The HDP3 scales for the attached monitor.
SD Format
Controls how an SD picture appears on an HD monitor. Choose from:
• Normal (standard picture aspect ratio)
• Anamorphic
Standard
Raster choices available are:
Auto (let the HDP3 decide based on input), Native, WUXGA, UXGA, WSXGA+,
SXGA, XGA, 1080p, 1080i, 720p, 576p, or 480p.
Frame Rate
Choices are:
Auto (let HDP3 decide) VESA, 24/23.98, 25, 30/29.97, 48/47.95, 50, or 60/59.94.
HDMI/DVI
Selects HDMI or DVI output. Choose from:
• Auto - The HDP3 automatically select the audio channels based on the
attached device's capabilities.
• HDMI
• DVI

HDP3 Mini-Converter v1.0r2 17 www.aja.com
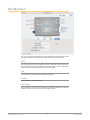
Audio Tab Screen
The selections on this screen configure the output audio.
HDMI Channel
Selects the audio channels to be used. Choose from:
• Auto - The HDP3 automatically select the audio channels based on the
attached device's capabilities.
• 2 Channel
• 8 Channel embedded audio.
NOTE: When in 2-channel mode, the audio pair selected will be the same as described by
the “Analog Channel” selection, below.
Analog Channel
Selects which 2 embedded audio channels are routed to the RCA output pair.
Choose from:
• Channel 1+2
• Channel 3+4
• Channel 5+6
• Channel 7+8.

HDP3 Mini-Converter v1.0r2 18 www.aja.com
Update Tab Screen
Use this Update tab screen to view the software version currently installed on the
converter or install new software.
NOTE: When discussing Mini-Converters, “Firmware” is software that will be stored in
the Mini-Converter’s non-volatile memory and used when it is powered up. This
is something different than the Mini-Config application software. The version
numbers shown in the Update screen refer only to the firmware.
Installed
This field shows the version of the firmware currently installed inside the Mini-
Converter.
Desired
This field shows the version of firmware embedded in the Mini-Config application
which you can install into the Mini-Converter by clicking the Update button.
Update
This button initiates a software update operation loading the “Desired” version of
firmware into the Mini-Converter’s non-volatile memory.
Progress
This indicator bar shows the progress of firmware installation.
See "Acquiring Mini-Config" on page 10 and "Installing Mini-Config" on page 10
for more information.

HDP3 Mini-Converter v1.0r2 19 www.aja.com
Info Tab Screen
This screen provides basic information about the Mini-Converter. This information
is mostly useful when calling AJA Support for service or technical support.
Name
This field allows you to give your Mini-Converter a name. This can be useful if you
have several Mini-Converters attached to a Mac/PC via USB so you can distinguish
between them easily (especially if they’re the same model).
Type
This is the factory set model name of the Mini-Converter.
Assembly
This is the factory assembly number.
Serial Number
This is the factory set unique serial number of your Mini-Converter. If you ever call
AJA Support for service, you may be asked for this number.

HDP3 Mini-Converter v1.0r2 20 www.aja.com
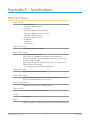
Appendix A – Specifications
HDP3 Tech Specs
Video Formats
• 1x 3 Gb SDI (Level A)
• (HD) 1920 x 1080p 50, 59.94, 60
• 1x 1.5 Gb SDI
• (HD) 1920 x 1080p 23.98, 24, 25, 29.97, 30
• (HD) 1920 x 1080PsF 23.98, 24, 25, 29.97, 30
• (HD) 1920 x 1080i 50, 59.94, 60
• (HD) 1280 x 720p 50, 59.94, 60
• 1x 270 Mb SDI
• (SD) 625i 50
• (SD) 525i 59.94
Video Input Digital
• 1x 3G-SDI BNC, SMPTE-259/292/424
Video Output Digital
• 1x DVI Type D female connector
• Supports DVI v1.0 and HDMI v1.3a, 24/30 bits per pixel, RGB or YUV
• Automatically adapts to popular LCD/DLP/Plasma monitors (and projectors)
up to 1920 x 1200 and 1080p
• High quality scaling engine for proper display of 4:3 or 16:9 content-even
better quality than original HDP
• 1 to 1 scaling for appropriate monitor congurations
Audio Input Digital
• SDI embedded audio, 24-bit, 8-Channel
Audio Output Digital
• DVI embedded audio, 24-bit, 2 or 8-Channel (HDMI adapter only)
• SDI (looped) embedded audio, 24-bit, 8-Channel
Audio Output Analog
• 1x RCA Stereo analog outputs at -10dBV (nominal)
Size (w x d x h)
• 5.8” x 3.1" x 1.0" (147.32 x 78.74 x 25.4 mm)
Weight
• 0.7 lb (0.5 kg)
Power
• 5-20VDC regulated, 6.5 watts, power supply required (included with purchase)
La pagina si sta caricando...
La pagina si sta caricando...
La pagina si sta caricando...
La pagina si sta caricando...
La pagina si sta caricando...
La pagina si sta caricando...
La pagina si sta caricando...
La pagina si sta caricando...
La pagina si sta caricando...
La pagina si sta caricando...
La pagina si sta caricando...
La pagina si sta caricando...
-
 1
1
-
 2
2
-
 3
3
-
 4
4
-
 5
5
-
 6
6
-
 7
7
-
 8
8
-
 9
9
-
 10
10
-
 11
11
-
 12
12
-
 13
13
-
 14
14
-
 15
15
-
 16
16
-
 17
17
-
 18
18
-
 19
19
-
 20
20
-
 21
21
-
 22
22
-
 23
23
-
 24
24
-
 25
25
-
 26
26
-
 27
27
-
 28
28
-
 29
29
-
 30
30
-
 31
31
-
 32
32


AJA HDP3 Manuale utente
- Categoria
- Apparecchiature musicali supplementari
- Tipo
- Manuale utente
in altre lingue
- English: AJA HDP3 User manual
- français: AJA HDP3 Manuel utilisateur
- Deutsch: AJA HDP3 Benutzerhandbuch
- português: AJA HDP3 Manual do usuário
Documenti correlati
-
AJA ROI-DP Istruzioni per l'uso
-
AJA Hi5-Fiber Manuale utente
-
AJA 12GDA Manuale utente
-
-
-
-
AJA T-TAP® Manuale utente
-
AJA Hi5 Manuale utente
-
-
AJA HD10MD4 Manuale utente