Panasonic NVVZ1E Istruzioni per l'uso
- Categoria
- Lettori di cassette
- Tipo
- Istruzioni per l'uso
Questo manuale è adatto anche per

52
ITALIANO ENGLISH
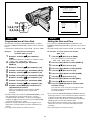
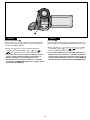
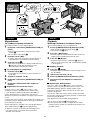
Pila del telecomando (inserimento)
Prima di regolare ora e data, inserite la pila a pastiglia
1 Aprite il coperchio [BACKUP BATTERY].
2 Inserite la pila di modo che il lato
contrassegnato con (+) sia visibile.
3 Chiudete il coperchio [BACKUP BATTERY].
≥Prima di inserire o togliere la pila a pastiglia, controllate che
l’interruttore [CAMERA/OFF/VCR] sia sulla posizione [OFF].
≥Quando la pila a pastiglia si scarica, lampeggia l’indicazione
[0]. In questo caso sostituite la pila con una nuova pila
modello CR2025.
(La vita utile della batteria è di circa 3 anni.)
≥Per aiutarvi nella sostituzione della pila, potete utilizzare un
oggetto a punta.
≥Nel togliere la pila, fate attenzione a non farla cadere.
¡Tenete la pila a pastiglia lontano dalla portata dei
bambini.
¡Controllate di aver inserito la pila rispettando le polarità.
≥L’orologio interno rimane in funzione anche quando la movie
è spenta. Per fare questo, consuma l’energia della pila.
Inserting the Button-type Battery
Before setting the date and time, insert the button-type battery
(supplied).
1 Open the [BACKUP BATTERY] Cover.
2 Insert the button-type battery so that its (
__
__
_)
side is visible.
3 Close the [BACKUP BATTERY] Cover.
≥Before inserting or removing the button-type battery, be sure
to set the [CAMERA/OFF/VCR] Switch to [OFF].
≥When the button-type battery is exhausted, the [0]
Indication flashes. In this case, replace it with a new CR2025
battery.
(The life of the battery is about 3 years.)
≥To make it easier to remove the button-type battery, use a
pointed object.
≥When you remove the button-type battery, be careful not to
drop it.
≥Keep the button-type battery out of the reach of children.
≥Make sure you insert the battery with its poles correctly
aligned.
≥The internal clock works even when the Movie Camera is
turned off, and it consumes power from the button-type
battery.
2
3
1
_
CAUTION
Danger of explosion if battery is incorrectly replaced.
Replace only with the same or equivalent type
recommended by the equipment manufacturer. Discard
used batteries according to manufacturer’s instructions.
ATTENZIONE
Una sostituzione non corretta della pila espone al
rischio di esplosione. Sostituite la pila esclusivamente
con una di tipo identico o equivalente a quello
raccomandato dal produttore. Per lo smaltimento delle
pile esaurite, osservate le norme vigenti.

54
ITALIANO ENGLISH
Setting the Date and Time
If you select the [DATE/TIME SETUP] Sub-Menu of the
[CAMERA FUNCTIONS] Main-Menu, the menu shown above
appears.
The initial setting of date and time is 0:00, 1st January, 2000.
For example: To set the clock to 15th October
2000, 14:30.
1 Turn the [
3434
3434
34] Dial to set to [2000].
The years change in the following order:
...1990...1991... 2000...2089 ...1990 ...
2 Press the [SET] Button to select [MONTH].
3 Turn the [
3434
3434
34] Dial to set to [10].
4 Press the [SET] Button to select [DATE].
5 Turn the [
3434
3434
34] Dial to set to [15].
6 Press the [SET] Button to select [HOUR].
7 Turn the [
3434
3434
34] Dial to set to [14].
8 Press the [SET] Button to select [MIN.].
9 Turn the [
3434
3434
34] Dial to set to [30].
10 Press the [MENU] Button to finish the date
and time setting.
The operation of the clock starts from [00] seconds.
Pressing the button one more time makes
the menu disappear.
≥If you select the [DATE/TIME SETUP] Sub-Menu when the
button-type battery is not inserted into the Movie Camera or
is exhausted, the Main-Menu disappears and the [0]
Indication flashes instead. Insert a new button-type battery
(l 52) and then set the date and time again.
≥As the Movie Camera’s built-in clock is subject to slight
imprecision, be sure to check the indicated time before
recording.
≥The clock employs the 24-hour system.
Programmazione di Ora e Data
Selezionando il sottomenu [DATE/TIME SETUP], sul Menu
principale [CAMERA FUNCTIONS], apparirà il menu mostrato
sopra.
L’impostazione iniziale di Ora e Data è 0:00, 1 Gennaio, 2000.
Esempio: per programmare l’orologio su
15 Ottobre 2000, ore 14:30.
1 Ruotate il selettore [
3434
3434
34] per impostare
[2000].
L’indicazione dell’anno si modifica nel seguente ordine:
...1990 ...1991... 2000...2089...1990...
2 Premete il tasto [SET] per selezionare
[MONTH].
3 Ruotate il selettore [
3434
3434
34] per impostare [10].
4 Premete il tasto [SET] per selezionare [DATE].
5 Ruotate il selettore [
3434
3434
34] per impostare [15].
6 Premete il tasto [SET] per selezionare [HOUR].
7 Ruotate il selettore [
3434
3434
34] per impostare [14].
8 Premete il tasto [SET] per selezionare [MIN].
9 Ruotate il selettore [
3434
3434
34] per impostare [30].
10 Premete il tasto [MENU] per confermare la
regolazione di ora e data.
Inizierà il conteggio dei secondi a partire da [00].
Premendo nuovamente il tasto, il menu verrà
cancellato.
≥Quando selezionate il sottomenu [DATE/TIME SETUP], se la
pila a pastiglia non è inserita nella movie o è scarica,
scomparirà il Menu principale e al suo posto lampeggerà
l’indicazione [0]. Inserite una nuova pila a pastiglia (l 52)
e regolate nuovamente ora e data.
≥Dato che l’orologio interno della movie è soggetto a lievi
imprecisioni, controllate bene l’ora prima di effettuare una
ripresa.
≥L’orologio interno utilizza un sistema a 24 ore.
DATE/TIME SETUP
PRESS MENU TO RETURN
YEAR 2000
MONTH 10
DATE 15
HOUR 14
MIN. 30
MENU
FOCUS / SET
MF/
TRACKING
2,4,6,8
1,3,5,7,9
10
CAMERA FUNCTIONS
PRESS MENU TO EXIT
1.
CAMERA SETUP
2.
DIGITAL EFFECT
3.
TITLE SETUP
4.
DATE/TIME SETUP
5.
OTHER FUNCTIONS
6.
LCD/EVF SETUP

56
ITALIANO ENGLISH
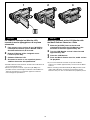
Ripresa con la sovrimpressione di Ora e/o Data
Dopo aver visualizzato il sottomenu [TITLE SETUP]...
(l 30)
1 Ruotate il selettore [
3434
3434
34] per selezionare
[DATE/TITLE].
2 Premete il tasto [SET] per selezionare
l’indicazione desiderata.
≥Le indicazioni si modificano nell’ordine da 1 a 6.
1 Ora e Data _> 2 Data _>
3 Ora e Data, Titolo _>4 Data e Titolo _>
5 Titolo _>6 Ora (con i secondi) e Data _>
≥Se la pila a pastiglia che fornisce energia all’orologio
interno non è stata inserita nella movie o è scarica,
verrà visualizzato solo il titolo. (l 52)
3 Premete il tasto [MENU] per uscire dal menu.
≥Apparira l’indicazione di Ora/Data/Titolo che è stata
selezionata.
4 Premete il tasto di Avvio/Arresto per iniziare la
ripresa.
∫ Cancellazione dell’indicazione di Ora/Data/Titolo
5 Durante la ripresa, o mentre la movie si trova in
Pausa di Ripresa, premete il tasto [DATE/TITLE]
fino a che l’indicazione di Ora/Data/Titolo non
scompare.
≥Se la movie viene spenta e accesa nuovamente,
l’Indicazione di Ora/Data/Titolo non sarà più visibile. Per farla
apparire di nuovo, premete una volta il tasto [DATE/TITLE].
≥Ricordatevi di spegnere la movie prima di togliere la batteria
o di staccare l’alimentatore CA. Scollegare l’alimentazione,
mentre la movie è accesa, provoca la cancellazione
dell’indicazione di Ora/Data/Titolo (l 126) conservata in
memoria.
Recording with the Time and/or Date
Superimposed in the Picture
After displaying the [TITLE SETUP] Sub-Menu...
(l 30)
1 Turn the [
3434
3434
34] Dial to select [DATE/TITLE].
2 Press the [SET] Button to select the desired
indication.
≥The indications change in the order 1 to 6.
1 Date and Time _>2 Date _>
3 Date, Time and Title _>4 Date and Title _>
5 Title _>6 Date and Time with seconds _>
≥If the button-type battery for the built-in clock is not
inserted into the Movie Camera or is exhausted, only
the title is displayed. (l 52)
3 Press the [MENU] Button to exit the menu.
≥The selected Date/Time/Title Indication appears.
4 Press the Recording Start/Stop Button to start
recording.
∫ Deleting the Date/Time/Title Indication
5 During recording or when the Movie Camera is
in the Recording Pause Mode, press the
[DATE/TITLE] Button to make the Date/Time/
Title Indication disappear.
≥After turning the Movie Camera off and then on again, the
previously selected Date/Time/Title Indication is no longer
displayed. To make it appear again, press the [DATE/TITLE]
Button once.
≥Be sure to turn the Movie Camera off before removing the
Battery or disconnecting the AC Adaptor. Disconnecting the
power supply while the Movie Camera is on erases the Date/
Time/Title Indication (l 126) stored in memory.
15.10.2000
12:30
HOLIDAY
15.10.2000
12:30
15.10.2000
1
2
3
4
5
15.10.2000
HOLIDAY
HOLIDAY
15.10.2000
12:30:15
6
5
TITLE SETUP
PRESS MENU TO EXIT
DATE/TITLE
SIZE
WHITECOLOUR
DATE TIME
LANGUAGE
TITLE
FOR TITLE
NORMAL
HOLIDAY
RETURN ----
ENGLISH
DATE/
TITLE
MENU
FOCUS / SET
MF/
TRACKING
4
2
1
3

58
ITALIANO ENGLISH
PAUSE
6
AUTO
3
RECORD
REC
5
PROG. AE STORE COLOUR
OFF/ON
A
INFO-
WINDOW
CAMERA
V C R
42
2
1
3,4
5
CAMERA
OFF
VCR
1
CAMERA
OFF
VCR
CAMERA
OFF
VCR
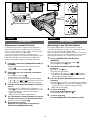
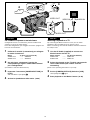
Basic Operations
Recording in the Full Auto Mode
The Full Auto Mode adjusts the white balance and focus
automatically. However, if you want, you can also adjust either
one or both of them manually (m 106, 110).
When recording in a dimly lit location, the picture may become
noisy and less sharp, so we recommend that you use the IR/
Video DC Light (optional), etc. to brighten up the scene.
1 Set the [CAMERA/OFF/VCR] Switch to
[CAMERA].
¡Turn the switch while pressing the button 1.
¡The [CAMERA] Lamp 2 lights.
2 Confirm that the [AUTO] Indication 3 is
displayed.
≥The [ƒ] Lamp 4 lights.
¡The initial setting is [AUTO].
¡If the [MNL], [5], [7], [4], [ ] or [ ] Indication
is displayed, press the [PROG.AE] Button repeatedly
until the [AUTO] Indication appears.
3 Press the Recording Start/Stop Button to start
recording.
¡Recording starts and the [◊◊] Indication and the [REC]
Indication 5 appear. The Tally Lamp (m 60) on the front
of the Movie Camera remains lit during recording.
([REC] means Recording.)
4 To pause recording:
Press the Start/Stop Button again.
The [PAUSE] Indication appears. 6
5 To finish recording:
Set the [CAMERA/OFF/VCR] Switch to [OFF].
Operazioni Base
Ripresa con il modo Full Auto
Il modo Full Auto provvede a regolare automaticamente il
Bilanciamento del bianco e la Messa a fuoco. Queste due
funzioni, volendo, possono essere regolate in modo manuale,
insieme o separatamente. (m 106, 110)
Se le riprese vengono effettuate in un ambiente poco
illuminato,l’immagine può presentare disturbi ed essere poco
nitida. Per evitare questi inconvenienti vi consigliamo di
utilizzare ad esempio l’Illuminatore video/IR (opzionale).
1 Impostate l’interruttore [CAMERA/OFF/VCR] su
[CAMERA].
≥Per far ruotare l’interruttore tenete premuto il tasto
centrale 1.
¡Si accenderà la spia [CAMERA] 2.
2 Controllate che sia visualizzata l’indicazione
[AUTO]
3.
≥Si accenderà la spia [ƒ] 4.
¡L’impostazione iniziale è [AUTO].
¡Se è visualizzata una delle altre impostazioni [MNL],
[5], [7], [4], [ ] o [ ] premete più volte il tasto
[PROG. AE] fino a visualizzare l’indicazione [AUTO].
3 Premete il tasto di Avvio/Arresto per iniziare la
ripresa.
¡Inizierà la ripresa e appariranno le indicazioni [◊◊] e
[REC] 5. Per tutto il tempo della registrazione, sul lato
anteriore della movie, rimarrà accesa la spia di
registrazione (m 60).
([REC] sta per Recording = Registrazione.)
4 Per interrompere momentaneamente la ripresa:
Premete nuovamente il tasto di Avvio/Arresto.
Apparirà l’indicazione [PAUSE]. 6
5 Per terminare la ripresa:
Spegnete la movie tramite l’interruttore di
Accensione [CAMERA/OFF/VCR].

60
ITALIANO ENGLISH
Spia di registrazione 1
Se non volete che la spia di registrazione si accenda durante
la ripresa, impostate su [OFF] la funzione [TALLY LAMP] del
sottomenu [CAMERA SETUP].
¡Durante la registrazione, non è possibile modificare la
modalità di registrazione ([MNL], [5], [7], [4], [ ],
[ ]), anche premendo il tasto [PROG. AE]. (m 112)
¡Se la movie viene lasciata in Pausa di ripresa per oltre 6
minuti si spegne automaticamente, per proteggere il
nastro e risparmiare l’energia della batteria. Per
riprendere la ripresa da questa condizione, impostate
l’interruttore [CAMERA/OFF/VCR] prima su [OFF], quindi
nuovamente su [CAMERA].
Tally Lamp 1
If you don’t want the Tally Lamp to light during recording, set
[TALLY LAMP] on the [CAMERA SETUP] Sub-Menu to [OFF].
¡During recording, it is not possible to change the recording
mode ([MNL], [5], [7], [4], [ ], [ ]), even if you
press the [PROG.AE] Button. (m 112)
¡If you leave the Movie Camera in the Recording Pause
Mode for more than 6 minutes, it automatically switches
off to protect the tape and to conserve battery power. To
resume recording from this condition, set the [CAMERA/
OFF/VCR] Switch to [OFF] and then to [CAMERA] again.
1

62
ITALIANO ENGLISH
Come controllare la fine della scena
precedente
(Funzione di controllo della ripresa)
Questa funzione riproduce automaticamente gli ultimi
2 secondi della scena che avete appena ripreso, per
controllare se la registrazione vi sembra soddisfacente.
Quando iniziate una nuova ripresa, la scena sarà collegata
alla precedente, senza disturbi o distorsioni di immagine. Vi
consigliamo di utilizzare di tanto in tanto questa funzione
quando filmate eventi che rivestono una particolare
importanza.
1 Mentre vi trovate in Pausa di ripresa, premete
brevemente il tasto [S].
≥Apparirà l’indicazione [CHK] 1 e potrete rivedere gli
ultimi 2 secondi circa della registrazione precedente.
Quindi la movie tornerà in Pausa di Ripresa e sarà
pronta per registrare nuovamente. ([CHK] sta per Check
= controllo.)
Come cercare a metà nastro una scena
registrata (Ricerca nella Telecamera)
Questa funzione semplifica la ricerca sul nastro di un punto
preciso da cui continuare le riprese. In più garantisce una
transizione senza disturbi dalla vecchia ripresa alla nuova.
2 In Pausa di ripresa, tenete premuto il tasto
[sSEARCH] o il tasto [SEARCHr].
2: Ricerca all’indietro
3: Ricerca in avanti
CHK
1
3
2
s SEARCH
6
S
SEARCH r
5
2
1, 2
Checking the End of a Recorded Scene
(Recording Check Function)
By automatically playing back the final
2 seconds (approximate) of the last recorded scene, this
function lets you check if a just finished scene has been
recorded correctly. When you then start recording the next
scene, it is automatically joined with a smooth transition free
from picture distor tion. For especially important scenes, use
this function from time to time for confirmation.
1 Press the [S] Button briefly in the Recording
Pause Mode.
¡The [CHK] Indication 1 appears and the final
approximately 2 seconds of the last recorded scene are
played back.
After that, the Movie Camera returns to the Recording
Pause Mode and is ready for recording the next scene.
([CHK] means Check.)
Searching for a Tape Position Before the End of
the Last Recording
(Camera Search Function)
This function makes it easy to search for a point in a
previously recorded scene or cassette from which you want to
start recording a new scene. In addition, it ensures smooth
scene-to-scene transitions free from picture distortion.
2 Keep the [
HH
HH
HSEARCH] Button (or the
[SEARCH
GG
GG
G] Button) pressed in the Recording
Pause Mode.
2: Reverse Search
3: Forward Search

64
ITALIANO ENGLISH
Uso dello zoom
∫ Zoomata in avvicinamento 1
La zoomata in avvicinamento permette di riprendere in primo
piano soggetti distanti.
1 Premete la leva Zoom [W/T] verso la posizione
[T].
≥Apparirà l’indicazione del numero di ingrandimenti dello
zoom 2.
∫ Zoomata in allontanamento 3
La zoomata in allontanamento permette di riprendere la scena
con un angolo visuale più ampio.
2 Premete la leva Zoom [W/T] verso la posizione
[W].
≥Apparirà l’indicazione del numero di ingrandimenti dello
zoom 4.
≥E’ possibile zoomare dalla posizione di grandangolo
(Ingrandimento [1t]) a quella di telefoto (Ingrandimento
[20t]).
≥Quanto più spostate la leva verso le posizioni [W] o [T], tanto
più veloce è l’effetto di zoom.
≥Al massimo della telefoto, cioè al massimo
dell’ingrandimento, è possibile mettere a fuoco solo soggetti
che siano a più di 1,8 m dall’obiettivo.
Un uso eccessivo dello zoom durante le registrazioni dà alle
scene un aspetto poco professionale.
Zooming In/Out
∫ Zooming in 1
Zooming in lets you record close-ups of distant subjects.
1 Push the [W/T] Zoom Lever toward [T].
≥The Zoom Magnification Indication 2 appears.
∫ Zooming out 3
Zooming out lets you record wider views.
2 Push the [W/T] Zoom Lever toward [W].
≥The Zoom Magnification Indication 4 appears.
≥Zooming is possible between wide-angle (Zoom
Magnification Indication [1t]) and telephoto (Zoom
Magnification Indication [20t]).
≥The farther you push the [W/T] Zoom Lever toward [W] or [T],
the faster the zooming speed becomes.
≥In the maximum telephoto setting (when you have zoomed
in), precise focusing is only possible for subjects that are
more than 1.8 m from the lens.
Avoid too much zooming during recording as it gives videos an
unprofessional look.
[W]
[T]
1
20
1
3
2
4
21
s
VOL
r
WT

66
ITALIANO ENGLISH
Uso della funzione di MACRO
(primissimo piano)
E’ una funzione che permette di riprendere soggetti molto
piccoli, come ad esempio insetti.
1 Tenete premuta la leva Zoom [W/T] verso la
posizione [W], per allargare l’inquadratura fino
al massimo del grandangolo (Ingrandimento
[1t]).
2 Avvicinatevi al soggetto fino a che, all’interno
dell’inquadratura, non ha le dimensioni
richieste.
≥Al massimo del grandangolo, la movie è in grado di mettere a
fuoco automaticamente soggetti che si trovino a una
distanza dall’obiettivo compresa tra
5 mm e infinito.
≥Nelle riprese macro è facile che vi siano oscillazioni nelle
immagini. Vi consigliamo pertanto l’uso di un treppiede
(opzionale).
≥Se state utilizzando la funzione di Macro (primissimo piano)
e siete estremamente vicini al soggetto, nelle riprese 0 lux
(Visione notturna) il raggio a infrarossi emesso dalla movie
potrebbe non raggiungere il soggetto.
Using the Macro Close-up Function
This function lets you record very small subjects such as
insects.
1 Keep the [W/T] Zoom Lever pushed toward [W]
to zoom to the maximum wide-angle setting
(Zoom Magnification Indication [1t]).
2 Approach the subject with the Movie Camera
until it reaches the desired size in the picture.
≥With the lens in the maximum wide-angle setting, the Movie
Camera can automatically focus on subjects from infinity to a
minimum distance of only 5 mm between lens and subject.
≥To prevent unstable pictures, use a tripod (optional) for
macro close-up recording.
≥If you use the Macro close-up Function and approach
extremely close to the subject when recording in the
0 Lux Night View Function, the infra-red beam from the
Movie Camera’s built-in Infra-red Beam Emitters may not
reach the subject.
2
1
s
VOL
r
WT

68
ITALIANO ENGLISH
3
VOLUME
5
7
s SEARCH SEARCH r
BLC
;W.B
∫1
65
S
4 3
2
1
6
4
5
2
A
INFO-
WINDOW
CAMERA
V C R
CAMERA
OFF
VCR
CAMERA
OFF
VCR
1
Playback
Watching Playback on the Movie Camera
You can watch playback of the recorded scenes.
1 Set the [CAMERA/OFF/VCR] Switch to [VCR].
¡Turn the switch while pressig the button 1.
¡The [VCR] Lamp 2 lights.
2 Press the [C] Button.
¡The tape starts to rewind. When the tape reaches the
beginning, the rewinding automatically stops.
3 Press the [
11
11
1] Button.
¡Playback starts and the [◊] Indication 3 appears.
When the tape reaches the end, it automatically rewinds
to the beginning.
»»
»»
» Stopping Playback
4 Press the [
∫∫
∫∫
∫] Button.
¡Playback stops and the Movie Camera changes over to
the Stop Mode.
5 Take out the cassette. (m 42)
6 Set the [CAMERA/OFF/VCR] Switch to [OFF].
7 Disconnect the AC Adaptor or remove the
Battery.
»»
»»
» Adjusting the Sound Volume
Push the [HVOLG] Lever 4 toward [G] to increase the
volume or push it toward [H] to decrease the volume. The
[VOLUME] Indication appears and the number of bars
increases or decreases. When you release the Lever, this
indication disappears.
You can also adjust the volume with the Remote Controller.
Increase the volume by pressing the [T] Button, or decrease it
by pressing the [W] Button.
This adjustment is only possible during playback.
¡Do not cover the Speaker 5 during playback.
¡Because the speaker contains a magnet, do not bring a
cassette near the speaker. It could adversely influence the
recorded content.
Riproduzione
Per rivedere le riprese nella movie
E’ possibile rivedere le scene appena riprese.
1 Impostate l’interruttore [CAMERA/OFF/VCR] su
[VCR].
¡Per far ruotare l’interruttore tenete premuto il tasto
centrale 1.
¡Si accenderà la spia [VCR] 2.
2 Premete il tasto [C].
¡Il nastro comincerà a riavvolgersi. Giunto all’inizio, il
riavvolgimento si interromperà automaticamente.
3 Premete il tasto [
11
11
1].
¡Avrà inizio la riproduzione e apparirà l’indicazione [◊]
3. Quando il nastro giungerà alla fine, verrà
automaticamente riavvolto fino all’inizio.
»»
»»
» Per interrompere la riproduzione
4 Premete il tasto [
∫∫
∫∫
∫].
¡La riproduzione si arresterà e la movie passerà nel
modo Stop.
5 Togliete la cassetta. (m 42)
6 Impostate l’interruttore [CAMERA/OFF/VCR] su
[OFF].
7 Scollegate l’alimentatore CA o togliete la
batteria.
»»
»»
» Regolazione del volume del suono
Premete la leva [HVOLG] 4 verso il segno [G] per
aumentare il volume, oppure premetela verso il segno
[H] per diminuirlo. Apparirà l’indicazione [VOLUME] e il
numero delle barre che la costituiscono aumenterà o
diminuirà. L’indicazione scompare non appena viene lasciata
la leva.
Il volume può essere regolato anche tramite telecomando. Per
aumentare il volume potete premere il tasto [T], per diminuirlo
potete premere il tasto [W].
Questa regolazione è possibile solo in fase di riproduzione.
¡Non coprite il diffusore 5 durante la riproduzione.
¡Il diffusore contiene un magnete. Non mettetegli vicino
una videocassetta: il contenuto della registrazione
potrebbe venire alterato.

70
ITALIANO ENGLISH
3
OPEN
123
Watching Playback on the LCD Monitor with
the Movie Camera Placed on a Table
1 Slide the [LOPEN] Lever to the left and
simultaneously open the LCD Monitor in the
direction of the arrow approximately 90
uu
uu
u.
2 Turn the LCD Monitor so that it faces forward
approximately 180
uu
uu
u.
3 Close the LCD Monitor.
4 Place the Movie Camera on a flat, stable surface
for playback.
¡If you use the Remote Controller to operate the Movie
Camera, use it within approximately 1 metre from the Movie
Camera.
¡When recording in the Mirror Mode (l
124), the Date, Time
and/or Title Indications cannot be inserted in the picture.
Therefore, they are also not included in the playback picture.
Per vedere le immagini sul Monitor LCD,
tenendo la movie appoggiata su di un piano
orizzontale
1 Fate scorrere verso sinistra la leva [LOPEN] e
contemporaneamente aprite il Monitor LCD, in
direzione della freccia, di circa 90°.
2 Ruotate il Monitor LCD e rivolgetelo verso
l’esterno (circa 180
uu
uu
u).
3 Chiudete il Monitor LCD.
4 Sistemate la movie su una superficie piana e
stabile e date avvio alla riproduzione.
¡Quando utilizzate il telecomando, tenetelo ad una distanza di
circa 1 metro dalla movie.
¡Durante le riprese nel modo “a specchio” (l
124) non è
possibile inserire nell’immagine l’indicazione di Ora/Data e/o
Titoli. Di conseguenza, non potranno apparire nemmeno
nelle immagini in riproduzione.

72
ITALIANO ENGLISH
Watching Playback on a TV
By connecting the Movie Camera to a TV, you can watch
playback of the recorded scenes on the TV screen.
Before connecting, turn off both the Movie Camera and the TV
for safety’s sake.
1 Use the AV Cable (supplied) to connect the
Movie Camera with the TV.
Movie Camera TV (AV Input Sockets)
VIDEO OUT _> VIDEO IN
AUDIO OUT _> AUDIO IN
2 Select the channel on the TV which corresponds
to the video/audio input sockets used for
connecting.
(Refer to the operating instructions of your TV).
3 Set the [CAMERA/OFF/VCR] Switch to [VCR].
≥The [VCR] Lamp 1 lights.
4 Start playback on the Movie Camera. (l 68)
AUDIO OUT
VIDEO OUT
3
V
A
BLC
1
4
1
A
INFO-
WINDOW
CAMERA
V C R
2
VIDEO IN AUDIO IN
1
CAMERA
OFF
VCR
Per rivedere le riprese su un televisore
Collegando la movie a un televisore, potrete rivedere sullo
schermo le scene che avete ripreso.
Prima del collegamento, per maggiore sicurezza, spegnete sia
la movie che il televisore.
1 Utilizzate il cavo AV (in dotazione) per collegare
la movie al televisore.
Movie TV (Presa di ingresso AV)
VIDEO OUT _> VIDEO IN
AUDIO OUT _> AUDIO IN
2 Sul televisore, selezionate il canale che
corrisponde agli ingressi audio/video utilizzati
per il collegamento.
(Consultate le istruzioni del televisore.)
3 Impostate l’interruttore [CAMERA/OFF/VCR] su
[VCR].
≥Si accenderà la spia [VCR] 1.
4 Avviate la riproduzione dalla movie. (l 68)
-
 1
1
-
 2
2
-
 3
3
-
 4
4
-
 5
5
-
 6
6
-
 7
7
-
 8
8
-
 9
9
-
 10
10
-
 11
11


Panasonic NVVZ1E Istruzioni per l'uso
- Categoria
- Lettori di cassette
- Tipo
- Istruzioni per l'uso
- Questo manuale è adatto anche per
in altre lingue
Documenti correlati
-
Panasonic NV RZ1 E Manuale utente
-
-
-
-
-
-
-
-
-