Canon LEGRIA HF G30 Manuale utente
- Categoria
- Videocamere
- Tipo
- Manuale utente

PAL
PUB. DIE-0439-000C
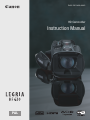
HD Camcorder
Instruction Manual

2
Introduction
Important Usage Instructions
REGIONS OF USE
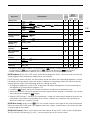
LEGRIA HF G30 is in compliance (as of April 2013) with the radio signal regulations of the regions listed below. For details on other
regions where they can be used, make inquiries with the contacts listed on the back side of this instruction manual.
Statement on EC directive
COPYRIGHT WARNING:
Unauthorized recording of copyrighted materials may infringe on the rights of copyright owners and be contrary to copyright
laws.
CAUTION:
TO REDUCE THE RISK OF ELECTRIC SHOCK AND TO REDUCE ANNOYING INTERFERENCE, USE THE RECOMMENDED ACCESSORIES
ONLY.
CAUTION:
DISCONNECT THE MAINS PLUG FROM THE SUPPLY SOCKET WHEN NOT IN USE.
To reduce the risk of electric shock, do not expose this product to dripping or splashing.
The Mains plug is used as the disconnect device. The Mains plug shall remain readily operable to disconnect the plug in case of
an accident.
CA-570 identification plate is located on the bottom.
Only for European Union and EEA (Norway, Iceland and Liechtenstein)
These symbols indicate that this product is not to be disposed of with your household waste, according to the
WEEE Directive (2012/19/EU), the Battery Directive (2006/66/EC) and/or national legislation implementing those
Directives.
If a chemical symbol is printed beneath the symbol shown above, in accordance with the Battery Directive, this
indicates that a heavy metal (Hg = Mercury, Cd = Cadmium, Pb = Lead) is present in this battery or accumulator
at a concentration above an applicable threshold specified in the Battery Directive.
This product should be handed over to a designated collection point, e.g., on an authorized one-for-one basis when you buy a new
similar product or to an authorized collection site for recycling waste electrical and electronic equipment (EEE) and batteries and
accumulators. Improper handling of this type of waste could have a possible impact on the environment and human health due to
potentially hazardous substances that are generally associated with EEE. Your cooperation in the correct disposal of this product will
contribute to the effective usage of natural resources.
For more information about the recycling of this product, please contact your local city office, waste authority, approved scheme or
your household waste disposal service or visit www.canon-europe.com/weee
, or www.canon-europe.com/battery.
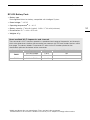
Complies with
IDA Standards
DB00671
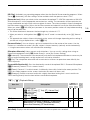
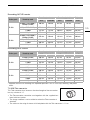
REGIONS Prohibited radio channels in outdoor use
Australia, Austria, Belgium, Bulgaria, Cyprus, Czech Republic, Denmark, Estonia,
Finland, France, Germany, Greece, Hong Kong S.A.R., Hungary, Iceland, Ireland,
Italy, Latvia, Liechtenstein, Lithuania, Luxembourg, Malta, Netherlands,
New Zealand, Norway, Poland, Portugal, Romania, Slovakia, Slovenia, Spain,
Sweden, Switzerland, United Kingdom
36 - 64ch
Russia, Singapore Not prohibited
Hereby, Canon Inc. declares that the ID0026 is in compliance with the essential requirements and other relevant provisions of
Directive 1999/5/EC.
Please contact the following address for the original Declaration of Conformity:
CANON EUROPA N.V.
Bovenkerkerweg 59, 1158 XB Amstelveen, The Netherlands
CANON INC.
30-2, Shimomaruko 3-chome, Ohta-ku, Tokyo 146-8501, Japan
Model
ID0026: LEGRIA HF G30

3
Trademark Acknowledgements
• SD, SDHC and SDXC Logos are trademarks of SD-3C, LLC.
• Microsoft and Windows are trademarks or registered trademarks of Microsoft Corporation in the United States and/or other countries.
• App Store, iPad, iPhone, iPod, iTunes and Mac OS are trademarks of Apple Inc., registered in the U.S. and other countries.
• HDMI, the HDMI logo and High-Definition Multimedia Interface are trademarks or registered trademarks of HDMI Licensing LLC in the
United States and other countries.
• “AVCHD”, “AVCHD Progressive” and the “AVCHD Progressive” logo are trademarks of Panasonic
Corporation and Sony Corporation.
• Manufactured under license from Dolby Laboratories.
“Dolby” and the double-D symbol are trademarks of Dolby Laboratories.
• Google, Android, Google Play, YouTube are trademarks of Google Inc.
• Facebook is a registered trademark of Facebook, Inc.
• IOS is a trademark or registered trademark of Cisco in the U.S. and other countries and is used under license.
• The Twitter name and marks are trademarks of Twitter, Inc.
• Wi-Fi is a registered trademark of the Wi-Fi Alliance.
• Wi-Fi Certified, WPA, WPA2, and the Wi-Fi Certified logo are trademarks of the Wi-Fi Alliance.
• WPS as used on the camcorder’s settings, onscreen displays and in this manual signifies Wi-Fi Protected Setup.
• The Wi-Fi Protected Setup Identifier Mark is a mark of the Wi-Fi Alliance.
• JavaScript is a trademark or registered trademark of Oracle Corporation, its affiliates or subsidiaries in the United States and other
countries.
• Other names and products not mentioned above may be trademarks or registered trademarks of their respective companies.
• This device incorporates exFAT technology licensed from Microsoft.
• “Full HD 1080” refers to Canon camcorders compliant with high-definition video composed of 1,080 vertical pixels
(scanning lines).
• This product is licensed under AT&T patents for the MPEG-4 standard and may be used for encoding MPEG-4
compliant video and/or decoding MPEG-4 compliant video that was encoded only (1) for a personal and non-
commercial purpose or (2) by a video provider licensed under the AT&T patents to provide MPEG-4 compliant video. No license is
granted or implied for any other use for MPEG-4 standard.

4
Highlights of the LEGRIA HF G30
The Canon LEGRIA HF G30 HD Camcorder is a high-performance camcorder whose compact size
makes it ideal in a variety of situations. The following are just some of the many functions featured in
the camcorder.
HD Recording
HD CMOS PRO sensor and DIGIC DV 4
processor
The camcorder is equipped with a
1/2.84-type CMOS sensor that captures video
at an effective pixel count of approximately
2.91 megapixels (2136x1362). The video is
then processed by the state-of-the-art DIGIC
DV 4 image processor. This allows the
camcorder to excel in low-light situations and
achieve improved image stabilization.
Wide zoom lens
With a focal length at full wide angle of
26.8 mm* (35 mm equivalent), the camcorder
has superb wide-angle shooting capability. The
newly developed lens is also capable of 20x
optical zoom.
* 28.8 mm when using Dynamic IS.
Shoot cinematic video
Using CINEMA mode and the cinema-look
filters (A 49), you can make recordings that
truly look and feel cinematic.
Operability
Emphasis on versatility
This camcorder has features to make it usable
as a main camera but is also small enough to
be very portable. The advanced image
stabilization (A 60) will let you shoot in a
variety of situations in the field.
Manual controls at your fingertips
The focus/zoom ring helps you achieve the
focus you are looking for. You can also easily
change the ring's functionality so that you can
operate the zoom. Furthermore, you can
assign certain frequently used functions to a
customizable button and adjust those
functions with the accompanying dial (A 91).
If those were not enough, the camcorder also
features 5 assignable buttons to which you
can assign a variety of functions so that you
can access them with ease (A 92).
Face detection
When a subject's face is detected, the
camcorder can track and focus on it (A 54).
Furthermore, you can have the camcorder in
manual focus but switch to autofocus only
when a face is detected, ensuring that
important subjects are in focus.
AVCHD/MP4 recording and dual
recording
When you record, you can choose between
AVCHD and MP4 formats (A 36). You can
also use dual recording (A 46) to record the
same scene to both memory cards and even
record on both memory cards using different
formats. Dual recording is convenient, for
example, to create a backup of your recording.

5
Other Features
Audio scene select
With the audio scene select function (A 79),
you can optimize the audio settings of the
built-in microphone by selecting the audio
scene that matches your surroundings. Your
audience will feel even more immersed in the
scene during playback.
Smart AUTO
Smart AUTO (A 39) automatically selects the
best scene mode for the scene you want to
shoot. You get spectacular recordings every
time without worrying about settings.
Wi-Fi functions
Because the camcorder is compatible with
Wi-Fi, you have access to a variety of
convenient functions such as using a
smartphone or tablet as a remote control
(A 120), using the Web browser on a
smartphone or tablet to view the camcorder's
recordings (A 126), and using an iOS device
to share your videos on the Internet (A 128).
OLED screen and LCD viewfinder
The OLED screen and LCD viewfinder both
have 100% frame coverage, which will ensure
that you can accurately check that your shots
are framed how you want them. The OLED
screen has incredible clarity, which is
indispensible in checking the details of those
important shots. The viewfinder can be tilted
45 degrees upward, which gives you additional
range and versatility while you shoot.
Touch AE
By simply touching the screen, you can make
dark areas in the picture appear brighter
(A 65). This operation is simple yet allows
you to shoot with the desired exposure.
Added and improved functionality
Other functions include relay recording (A 46)
and conversion to MP4 (A 114).

6
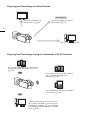
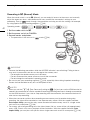
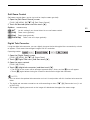
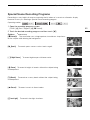
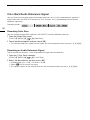
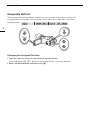
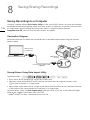
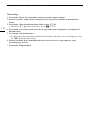
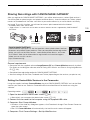
Enjoying your Recordings on Other Devices
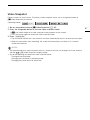
Enjoying Your Recordings Using the Camcorder's Wi-Fi Functions
Connect the camcorder to an
external monitor (A 102).
Copy your recordings to an external
video recorder (A 115).
Save your recordings (A 108).
Use your iOS or Android device to remotely control
the camcorder and view the image on its screen
(A 120).
Use the Web browser on your iOS or Android
device to view the recordings on the
camcorder (A 126).
Connect the camcorder to an access point on a
Wi-Fi network. After doing so, you can save your
recordings on a computer (
A 131) or play back
your recordings using the camcorder as a media
server (
A 130).
Use an iOS device to upload your recordings
to the Internet (A 128).

7
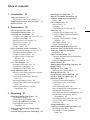
1 Introduction 10
About this Manual 10
Conventions Used in this Manual 10
Supplied Accessories and CD-ROMs 12
Names of Parts 14
2 Preparations 20
Attaching the Ferrite Core 20
Charging the Battery Pack 20
Preparing the Camcorder 23
Using the Lens Hood and Lens Cap 23
Using the Viewfinder 23
Adjusting the OLED Screen 24
Grip Belt and Straps 25
Wireless Controller 25
Using a Tripod 26
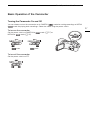
Basic Operation of the Camcorder 27
Turning the Camcorder On and Off 27
Setting the Shooting Mode 28
Using the Touch Screen 28
Using the FUNC. Button and
Joystick 29
Using the Menus 30
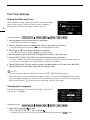
First Time Settings 32
Setting the Date and Time 32
Changing the Language 32
Changing the Time Zone 33
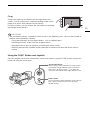
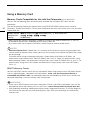
Using a Memory Card 34
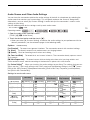
Memory Cards Compatible for Use with
the Camcorder 34
Inserting and Removing a Memory
Card 35
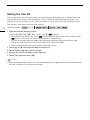
Initializing a Memory Card 35
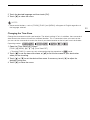
Selecting the Movie Format (AVCHD/
MP4) 36
Selecting the Memory Card for
Recordings 36
3 Recording 37
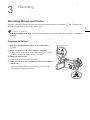
Recording Movies and Photos 37
Preparing to Record 37
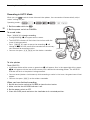
Recording in AUTO Mode 38
Recording in n (Manual) Mode 42
Reviewing the Latest Scene
Recorded 43
Selecting the Recording Mode (Video
Quality) 44
Dual Recording and Relay Recording 46
Selecting the Frame Rate 47
Slow & Fast Motion Recording 48
CINEMA Mode and Cinema-Look
Filters 49
Focus Adjustment 51
Manual Focus 51
Autofocus 52
Face Detection & Tracking 54
Zooming 56
Using the Focus/Zoom Ring 56
Using the Zoom Rocker or Wireless
Controller 56
Using the Touch Screen’s Zoom
Controls 58
Soft Zoom Control 59
Digital Tele-Converter 59
Advanced Image Stabilization 60
Automatic Gain Control (AGC) Limit 61
Automatic Exposure Recording
Programs 62
Exposure Adjustment 64
Using the Manual Exposure Recording
Program 64
Exposure Compensation 65
White Balance 67
Special Scene Recording Programs 69
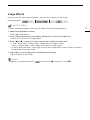
Image Effects 71
Setting the Time Code 72
Selecting the Running Mode 72
Setting the User Bit 74
Using the Mini Advanced Shoe 75
Using an External Video Light 76
Recording Audio 77
Using an External Microphone 77
Audio Scenes and Other Audio
Settings 79
Audio Recording Level 80
Wind Screen (Built-in Microphone) 81
Microphone Attenuator 81
Audio Equalizer (Built-in Microphone) 82
Microphone Directionality (Built-in
Microphone) 82
Switching the Input (MIC Terminal) 83
Low Cut Filter (MIC Terminal) 83
Audio Mix 84
Using Headphones 85
Color Bars/Audio Reference Signal 86
Recording Color Bars 86
Recording an Audio Reference
Signal 86
Table of contents

8
Video Snapshot 87
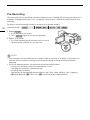
Pre-Recording 88
Onscreen Displays and Data Code 89
Using the GP-E2 GPS Receiver 90
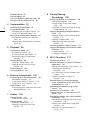
4 Customization 91
CUSTOM Dial and Button 91
Assignable Buttons 92
Changing the Assigned Function 92
Using an Assignable Button 93
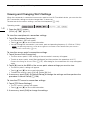
Saving and Loading Menu Settings 94
Saving Menu Settings to a Memory
Card 94
Loading Menu Settings from a Memory
Card 94
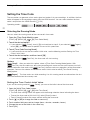
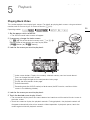
5 Playback 95
Playing Back Video 95
Adjusting the volume 96
Displaying scene information 97
Capturing Photos During Movie
Playback 97
Deleting Scenes 98
Deleting a Single Scene 98
Deleting Scenes from the Index
Screen 98
Dividing Scenes 100
Trimming Scenes 101
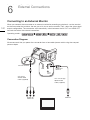
6 External Connections 102
Connecting to an External Monitor 102
Connection Diagram 102
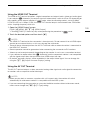
Using the HDMI OUT Terminal 103
Using the AV OUT Terminal 103
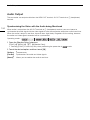
Audio Output 104
Synchronizing the Video with the Audio
being Monitored 104
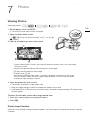
7 Photos 105
Viewing Photos 105
Photo Jump Function 105
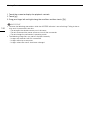
Deleting Photos 107
Deleting a Single Photo 107
Deleting Photos from the Index
Screen 107
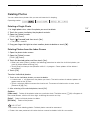
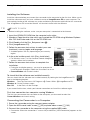
8 Saving/Sharing
Recordings 108
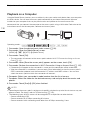
Saving Recordings to a Computer 108
Connection Diagram 108
Saving Movies Using Data Import
Utility 108
Saving MP4 Movies and Photos Using
ImageBrowser EX 109
Copying Recordings Between Memory
Cards 112
Copying Scenes from the Movie Index
Screen 112
Copying a Single Photo 112
Copying Photos from the Index
Screen 113
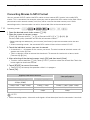
Converting Movies to MP4 Format 114
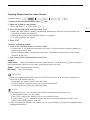
Copying Recordings to an External Video
Recorder 115
In High Definition 115
In Standard Definition 115
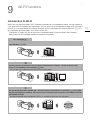
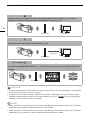
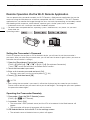
9 Wi-Fi Functions 117
Introduction to Wi-Fi 117
Remote Operation Via the Wi-Fi Remote
Application 120
Setting the Camcorder's Password 120
Operating the Camcorder
Remotely 120
Wi-Fi Remote Onscreen Controls and
Displays 121
Remote Operation Using Wi-Fi
Remote 123
Remote Browse: Viewing Recordings
Using a Web Browser on Your iOS or
Android Device 126
Uploading Recordings Using an iOS
Device 128
Playback on a Computer 130
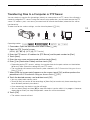
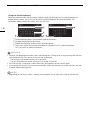
Transferring Files to a Computer or FTP
Server 131
Sharing Recordings with CANON iMAGE
GATEWAY 133
Setting the Desired Web Services in the
Camcorder 133
Sharing Your Recordings Using Web
Services 135
Sending Links to Recordings by
E-mail 136

9
Wi-Fi Connection Using an Access
Point 137
Wi-Fi Protected Setup (WPS) 137
Searching for Access Points 138
Manual Setup 138
Viewing and Changing Wi-Fi
Settings 140
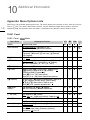
10 Additional Information 142
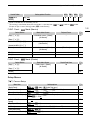
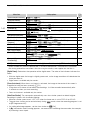
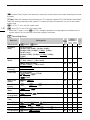
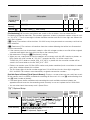
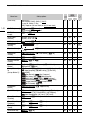
Appendix: Menu Options Lists 142
FUNC. Panel 142
Setup Menus 143
Appendix: Onscreen Icons and
Displays 152
Troubleshooting 156
List of Messages 161
List of Messages for Wi-Fi
Functions 164
List of Messages for Web Services 166
Handling Precautions 167
Camcorder 167
Battery Pack 168
Memory Card 169
Built-in Rechargeable Lithium
Battery 169
Lithium Button Battery 170
Disposal 170
Maintenance/Others 171
Cleaning 171
Condensation 171
Using the Camcorder Abroad 172
Optional Accessories 173
Specifications 178
Index 182

About this Manual
10
Introduction
About this Manual
Thank you for purchasing the Canon LEGRIA HF G30. Please read this manual carefully before you
use the camcorder and retain it for future reference. Should your camcorder fail to operate correctly,
refer to Troubleshooting (A 156).
Conventions Used in this Manual
• IMPORTANT: Precautions related to the camcorder’s operation.
• NOTES: Additional topics that complement the basic operating procedures.
• POINTS TO CHECK: Restrictions or requirements regarding the function described.
• A: Reference page number within this manual.
• : Used as an abbreviation for models whose Wi-Fi functions operate only in the 2.4 GHz
band (A 119).
• The following terms are used in this manual:
“Memory card” refers to an SD, SDHC or SDXC memory card.
“Screen” refers to the OLED screen and the viewfinder screen.
“Scene” refers to one movie unit from the point you press the Y button to start recording
until you press again to pause the recording.
“iOS device” is used in this text to refer to Wi-Fi-enabled iPhones, iPods and iPads while “Android
device” refers to Wi-Fi-enabled Android smartphones and tablets.
• The photos included in this manual are simulated pictures taken with a still camera.
• Some screenshots in this manual have been simplified to show only relevant icons.
1
Introduction

About this Manual
11
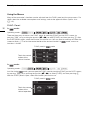
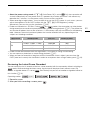
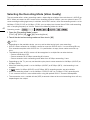
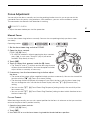
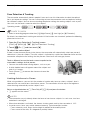
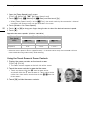
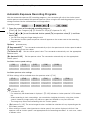
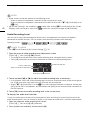
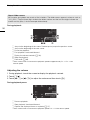
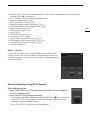
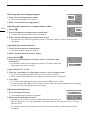
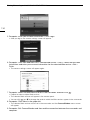
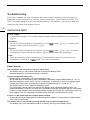
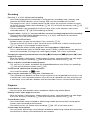
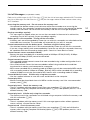
Focus Adjustment
Autofocus
When autofocus is activated, the camcorder continuously adjusts the focus on the subject in the
center of the screen. The focusing range is 1 cm (at full wide-angle, measured from the front of the
lens barrel) to
G and 60 cm (throughout the zoom range, measured from the front of the lens barrel)
to
G. Perform the following procedure to set the autofocus speed.
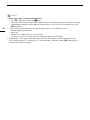
1 and modes only: Press B.
2 Open the [AF Mode] screen.
[FUNC.]
> [MENU] > p > [AF Mode]
3 Touch the desired option and then touch [
X].
• The icon of the selected option appears on the screen.
Options
( Default value)
Operating modes:
[ Instant AF]
Sets the autofocus to Instant AF. The focus is adjusted at the highest speed. This
mode is useful even when recording in very bright or low-light surroundings. This mode uses both the
TTL system and external sensor for focusing.
[
!
Mdi AF]
S h f M di AF Th d f hl h
The names of physical
buttons and switches
on the camcorder are
indicated within a
“button” frame.
For example B.
The three sets of icons indicate the operating
mode and whether a function is available in
that mode.
: Indicates whether the
camcorder is in shooting (CAMERA) or
playback (MEDIA) mode. In this example, the
function is available only in mode. For
details, refer to Turning the Camcorder On
and Off (A 27).
: Indicates the movie format. For
details, refer to Selecting the Movie Format
(AVCHD/MP4) (A 36).
: Indicates the shooting
mode. For details, refer to Setting the
Shooting Mode (A 28).
Brackets [ ] are used to
refer to control buttons
and menu options you
will select and to other
onscreen messages
and displays.
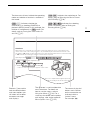
The > arrow is used to abbreviate
menu selections. For details on
how to use the menus, refer to
Using the Menus (A 30). For a
summary of available menu options
and settings, refer to the appendix
Menu Options Lists (A 142).

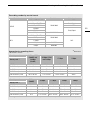
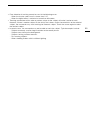
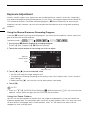
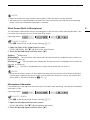
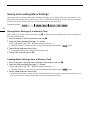
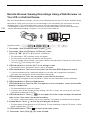
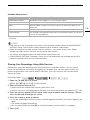
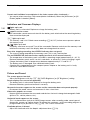
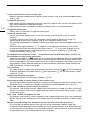
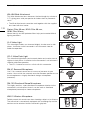
Supplied Accessories and CD-ROMs
12
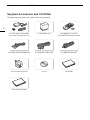
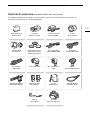
Supplied Accessories and CD-ROMs
The following accessories are supplied with the camcorder:
CA-570 Compact Power Adapter
(incl. power cord and ferrite core)
BP-820 Battery Pack WL-D89 Wireless Controller
(incl. CR2025 lithium button battery)
HTC-100/S High Speed HDMI Cable STV-250N Stereo Video Cable IFC-300PCU/S USB Cable
Lens hood with lens barrier Lens cap Quick Guide
Wi-Fi Basic Setup Guide

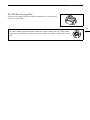
Supplied Accessories and CD-ROMs
13
The following CD-ROMs and software are supplied with the camcorder:
• Data Import Utility CD-ROM
-Use Data Import Utility to transfer your scenes to a computer. Refer to Saving Recordings to a
Computer (A
108). The CD-ROM includes the instruction manual of the software (on PDF file).
• Canon LEGRIA CD-ROM. Contains the following components.
- Instruction Manual - The full-version instruction manual of the camcorder (this PDF file).
- ImageBrowser EX - Software for saving, managing and editing your photos. The supplied
LEGRIA CD-ROM contains an automatic installer for ImageBrowser EX. An Internet connection
is required to fully install the software.

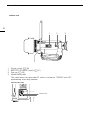
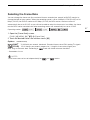
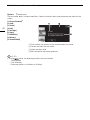
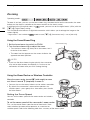
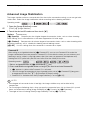
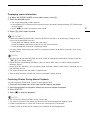
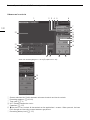
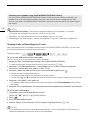
Names of Parts
14
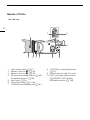
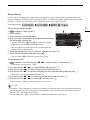
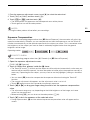
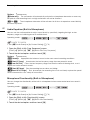
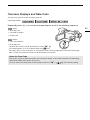
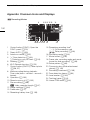
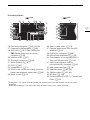
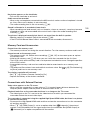
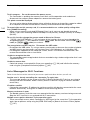
Names of Parts
1 Lens barrier switch (A 37)
2 Memory card slot 2 (A 35)
3 Memory card slot 3 (A 35)
4 u (review recording) button (A 43)/
Assignable button 5 (A 92)
5Lens hood (A 23)
6 Focus/Zoom ring (A 51, 56)
7 CUSTOM (customizable) dial (A 91)
8 CUSTOM (customizable) button
(A 91)
9 Double memory card slot cover
10 DISP. (onscreen display) button
(A 89)/BATT. INFO (battery
information) button (A 155)
4
108765
1
32
9
L
e
f
t s
id
e v
i
ew

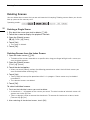
Names of Parts
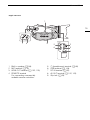
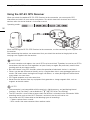
15
1 Built-in speaker (A 96)
2MIC terminal (A 78)
3HDMI OUT terminal (A 102, 103)
4 REMOTE terminal
For connecting commercially
available remote controllers.
5 × (headphones) terminal (A 85)
6USB terminal (A 108)
7DC IN terminal (A 20)
8AV OUT terminal (A 102, 103)
9 Grip belt (A 25)
25
6
3
4
987
1
Ri
g
h
t s
id
e v
i
ew

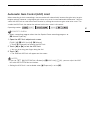
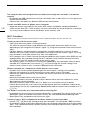
Names of Parts
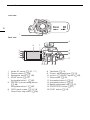
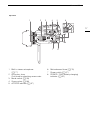
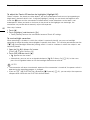
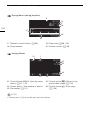
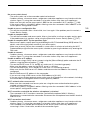
16
1 Instant AF sensor (A 52, 171)
2 Remote sensor (A 26)
3 Illumination sensor (A 149)
4AF/MF button (A 51)/
Assignable button 1 (A 92)
5 PRE REC (pre-recording) button
(A 88)/
Assignable button 2 (A 92)
6 OLED touch screen (A 24, 28)
7 Focus/Zoom ring switch (A 56)
8 Viewfinder (A 23)
9 Dioptric adjustment lever (A 23)
10 Joystick (A 29)/SET button (A 29)
11 Strap mount (A 25)
12 Assignable button 3 (A 92)
13 Assignable button 4 (A 92)
14 Battery attachment unit (A 20)
15 START/STOP button (A 37)
16 FUNC. button (A 29)
1
67
8
9
10
11
1615141312
5
4
3
2
F
ront v
i
ew
Back view


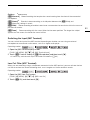
Names of Parts
19
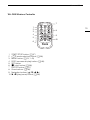
WL-D89 Wireless Controller
1START/STOP button (A 37)
2 G (mode selection) button (A 95)
3 MENU button (A 31, 143)
4 DISP. (onscreen display) button (A 89)
5SET button
6
Ñ (stop) button (A 95)
7 PHOTO button (A 37)
8 Zoom buttons (A 56)
9 Navigation buttons (Í/Î/Ï/Ð)
10 Ò (play/pause) button (A 95)
1
7
8
9
10
2
3
4
5
6

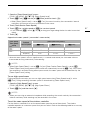
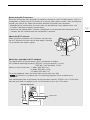
Attaching the Ferrite Core
20
Prep aration s
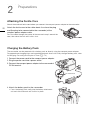
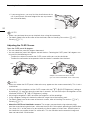
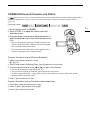
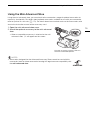
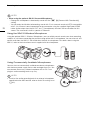
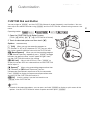
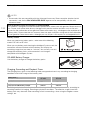
Attaching the Ferrite Core
Attach the enclosed ferrite core before you connect the compact power adapter to the camcorder.
Attach the ferrite core to the cable about 6 cm from the plug
end (the plug to be connected to the camcorder) of the
compact power adapter cable.
Pass the cable through the center of the core and wrap it around the
core, then close the unit until it clicks shut.
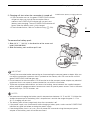
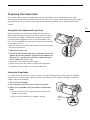
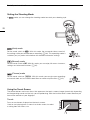
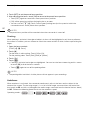
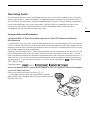
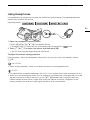
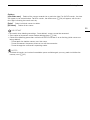
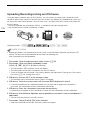
Charging the Battery Pack
The camcorder can be powered with a battery pack or directly using the compact power adapter.
For approximate charging times and recording/playback times with a fully charged battery pack, refer
to Charging, Recording and Playback Times (A 174).
1 Connect the power cord to the compact power adapter.
2 Plug the power cord into a power outlet.
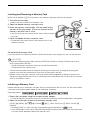
3 Connect the compact power adapter to the camcorder’s
DC IN terminal.
4 Attach the battery pack to the camcorder.
• Press the battery pack softly into the battery attachment
unit and slide it forward until it clicks in place.
DC IN terminal
2
Preparations
La pagina sta caricando ...
La pagina sta caricando ...
La pagina sta caricando ...
La pagina sta caricando ...
La pagina sta caricando ...
La pagina sta caricando ...
La pagina sta caricando ...
La pagina sta caricando ...
La pagina sta caricando ...
La pagina sta caricando ...
La pagina sta caricando ...
La pagina sta caricando ...
La pagina sta caricando ...
La pagina sta caricando ...
La pagina sta caricando ...
La pagina sta caricando ...
La pagina sta caricando ...
La pagina sta caricando ...
La pagina sta caricando ...
La pagina sta caricando ...
La pagina sta caricando ...
La pagina sta caricando ...
La pagina sta caricando ...
La pagina sta caricando ...
La pagina sta caricando ...
La pagina sta caricando ...
La pagina sta caricando ...
La pagina sta caricando ...
La pagina sta caricando ...
La pagina sta caricando ...
La pagina sta caricando ...
La pagina sta caricando ...
La pagina sta caricando ...
La pagina sta caricando ...
La pagina sta caricando ...
La pagina sta caricando ...
La pagina sta caricando ...
La pagina sta caricando ...
La pagina sta caricando ...
La pagina sta caricando ...
La pagina sta caricando ...
La pagina sta caricando ...
La pagina sta caricando ...
La pagina sta caricando ...
La pagina sta caricando ...
La pagina sta caricando ...
La pagina sta caricando ...
La pagina sta caricando ...
La pagina sta caricando ...
La pagina sta caricando ...
La pagina sta caricando ...
La pagina sta caricando ...
La pagina sta caricando ...
La pagina sta caricando ...
La pagina sta caricando ...
La pagina sta caricando ...
La pagina sta caricando ...
La pagina sta caricando ...
La pagina sta caricando ...
La pagina sta caricando ...
La pagina sta caricando ...
La pagina sta caricando ...
La pagina sta caricando ...
La pagina sta caricando ...
La pagina sta caricando ...
La pagina sta caricando ...
La pagina sta caricando ...
La pagina sta caricando ...
La pagina sta caricando ...
La pagina sta caricando ...
La pagina sta caricando ...
La pagina sta caricando ...
La pagina sta caricando ...
La pagina sta caricando ...
La pagina sta caricando ...
La pagina sta caricando ...
La pagina sta caricando ...
La pagina sta caricando ...
La pagina sta caricando ...
La pagina sta caricando ...
La pagina sta caricando ...
La pagina sta caricando ...
La pagina sta caricando ...
La pagina sta caricando ...
La pagina sta caricando ...
La pagina sta caricando ...
La pagina sta caricando ...
La pagina sta caricando ...
La pagina sta caricando ...
La pagina sta caricando ...
La pagina sta caricando ...
La pagina sta caricando ...
La pagina sta caricando ...
La pagina sta caricando ...
La pagina sta caricando ...
La pagina sta caricando ...
La pagina sta caricando ...
La pagina sta caricando ...
La pagina sta caricando ...
La pagina sta caricando ...
La pagina sta caricando ...
La pagina sta caricando ...
La pagina sta caricando ...
La pagina sta caricando ...
La pagina sta caricando ...
La pagina sta caricando ...
La pagina sta caricando ...
La pagina sta caricando ...
La pagina sta caricando ...
La pagina sta caricando ...
La pagina sta caricando ...
La pagina sta caricando ...
La pagina sta caricando ...
La pagina sta caricando ...
La pagina sta caricando ...
La pagina sta caricando ...
La pagina sta caricando ...
La pagina sta caricando ...
La pagina sta caricando ...
La pagina sta caricando ...
La pagina sta caricando ...
La pagina sta caricando ...
La pagina sta caricando ...
La pagina sta caricando ...
La pagina sta caricando ...
La pagina sta caricando ...
La pagina sta caricando ...
La pagina sta caricando ...
La pagina sta caricando ...
La pagina sta caricando ...
La pagina sta caricando ...
La pagina sta caricando ...
La pagina sta caricando ...
La pagina sta caricando ...
La pagina sta caricando ...
La pagina sta caricando ...
La pagina sta caricando ...
La pagina sta caricando ...
La pagina sta caricando ...
La pagina sta caricando ...
La pagina sta caricando ...
La pagina sta caricando ...
La pagina sta caricando ...
La pagina sta caricando ...
La pagina sta caricando ...
La pagina sta caricando ...
La pagina sta caricando ...
La pagina sta caricando ...
La pagina sta caricando ...
La pagina sta caricando ...
La pagina sta caricando ...
La pagina sta caricando ...
La pagina sta caricando ...
La pagina sta caricando ...
La pagina sta caricando ...
La pagina sta caricando ...
La pagina sta caricando ...
La pagina sta caricando ...
La pagina sta caricando ...
La pagina sta caricando ...
La pagina sta caricando ...
La pagina sta caricando ...
La pagina sta caricando ...
La pagina sta caricando ...
-
 1
1
-
 2
2
-
 3
3
-
 4
4
-
 5
5
-
 6
6
-
 7
7
-
 8
8
-
 9
9
-
 10
10
-
 11
11
-
 12
12
-
 13
13
-
 14
14
-
 15
15
-
 16
16
-
 17
17
-
 18
18
-
 19
19
-
 20
20
-
 21
21
-
 22
22
-
 23
23
-
 24
24
-
 25
25
-
 26
26
-
 27
27
-
 28
28
-
 29
29
-
 30
30
-
 31
31
-
 32
32
-
 33
33
-
 34
34
-
 35
35
-
 36
36
-
 37
37
-
 38
38
-
 39
39
-
 40
40
-
 41
41
-
 42
42
-
 43
43
-
 44
44
-
 45
45
-
 46
46
-
 47
47
-
 48
48
-
 49
49
-
 50
50
-
 51
51
-
 52
52
-
 53
53
-
 54
54
-
 55
55
-
 56
56
-
 57
57
-
 58
58
-
 59
59
-
 60
60
-
 61
61
-
 62
62
-
 63
63
-
 64
64
-
 65
65
-
 66
66
-
 67
67
-
 68
68
-
 69
69
-
 70
70
-
 71
71
-
 72
72
-
 73
73
-
 74
74
-
 75
75
-
 76
76
-
 77
77
-
 78
78
-
 79
79
-
 80
80
-
 81
81
-
 82
82
-
 83
83
-
 84
84
-
 85
85
-
 86
86
-
 87
87
-
 88
88
-
 89
89
-
 90
90
-
 91
91
-
 92
92
-
 93
93
-
 94
94
-
 95
95
-
 96
96
-
 97
97
-
 98
98
-
 99
99
-
 100
100
-
 101
101
-
 102
102
-
 103
103
-
 104
104
-
 105
105
-
 106
106
-
 107
107
-
 108
108
-
 109
109
-
 110
110
-
 111
111
-
 112
112
-
 113
113
-
 114
114
-
 115
115
-
 116
116
-
 117
117
-
 118
118
-
 119
119
-
 120
120
-
 121
121
-
 122
122
-
 123
123
-
 124
124
-
 125
125
-
 126
126
-
 127
127
-
 128
128
-
 129
129
-
 130
130
-
 131
131
-
 132
132
-
 133
133
-
 134
134
-
 135
135
-
 136
136
-
 137
137
-
 138
138
-
 139
139
-
 140
140
-
 141
141
-
 142
142
-
 143
143
-
 144
144
-
 145
145
-
 146
146
-
 147
147
-
 148
148
-
 149
149
-
 150
150
-
 151
151
-
 152
152
-
 153
153
-
 154
154
-
 155
155
-
 156
156
-
 157
157
-
 158
158
-
 159
159
-
 160
160
-
 161
161
-
 162
162
-
 163
163
-
 164
164
-
 165
165
-
 166
166
-
 167
167
-
 168
168
-
 169
169
-
 170
170
-
 171
171
-
 172
172
-
 173
173
-
 174
174
-
 175
175
-
 176
176
-
 177
177
-
 178
178
-
 179
179
-
 180
180
-
 181
181
-
 182
182
-
 183
183
-
 184
184


Canon LEGRIA HF G30 Manuale utente
- Categoria
- Videocamere
- Tipo
- Manuale utente
in altre lingue
- English: Canon LEGRIA HF G30 User manual
Documenti correlati
-
Canon LEGRIA HF-G40 Manuale del proprietario
-
-
Canon Vixia HF-G40 Istruzioni per l'uso
-
Canon LEGRIA mini X Manuale utente
-
-
Canon LEGRIA HF G60 Manuale utente
-
Canon XA 25 Manuale utente
-
Canon VIXIA HF G21 Manuale utente
-
Canon LEGRIA HF G26 Manuale utente
-
Canon XA15 Manuale utente