
1 2 3 4 5 6
Display panel / ButtonsProgramme selector / Off
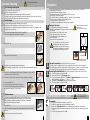
Empty the condensate container
Empty the container after each drying cycle.
1. Remove the container, holding it level.
2. Pour out the condensate.
3. Push the container back in until it clicks
into place.
If È (Condensate container) flashes in the
display panel aWhat to do if..., page 11.
Clean fluff filter
Do not operate the dryer without a fluff filter or with
a defective fluff filter. A clean fluff filter minimises
energy consumption.
Clean the fluff filter after each drying cycle.
1. Open the door. Remove any fluff from
the door/around the door and pull out
the fluff filter.
2. Remove the fluff from the shaft of the
fluff filter.
3. Open the fluff filter and remove the fluff
(sweep your hand over the fluff filter). If
the fluff filter is very dirty or blocked,
rinse with warm water and dry
thoroughly.
4. Close and reinsert the fluff filter.
7
6
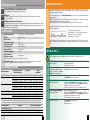
Programmes / Fabrics
Detailed overview of the programmes and fabrics
aProgramme overview, page 7.
Observe the care instructions on the care label.
ÊCottons Hard-wearing fabrics.
ÏEasy-Care Fabrics made from synthetic
or blended fabrics.
Dryness levels to select with the ÊCottons and ÏEasy-Care
programmes:
cCupboard Dry
Extra
Thick and multi-layered fabrics.
| Cupboard Dry Single-layered laundry.
ÔIron Dry Laundry suitable for ironing after drying.
üOutdoor Functional clothing made
of microfibre.
ª Sensitive Cotton fabrics for drying in higher
temperatures.
Í÷Mix A mixed load of fabrics made
of cotton and synthetic fabrics.
Warm
All types of fabric except
for wool and silk.
Cold
gcShirts 15’ Cotton or linen fabrics that are still damp
and easy-care fabrics.
x Super 40’ Synthetics, cotton or blended fabrics.
ÉüWoollen finish Woollen fabrics that are suitable
for use in washers.
üLingerie Lingerie made of synthetic fibres, cotton
or blended fabric.
Your new dryer
Congratulations - You have chosen a modern, high-quality Siemens
domestic appliance.
The condensation dryer is distinguished by its economical energy
consumption.
Every dryer which leaves our factory is carefully checked to ensure
that it functions correctly and is in perfect condition.
Should you have any questions, our after-sales service
will be pleased to help.
Disposal in an environmentally-responsible manner
Dispose of packaging in an environmentally-responsible manner.
This appliance is labelled in accordance with the European
guideline
2002/96/EC on waste electrical and electronic
equipment - WEEE.
The guideline provides an EU-wide framework for the return
and recycling of old appliances.
For further information about our products, accessories,
spare parts and services, please visit: www.siemens-home.com
Intended use
Preparation
Set and adjust the
programme individually
1
2
Drying
ʋ exclusively for domestic use,
ʋ only for drying fabrics which have been washed using
water.
Do not leave children unsupervised near the dryer.
Keep pets away from the dryer.
The dryer may be operated by children from
8 years of age, by persons who have limited
physical, sensory or mental abilities and by
persons who have inadequate experience
or knowledge, provided they are supervised
or have been instructed by a responsible person.
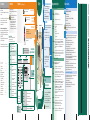
Drying
Display panel and settings
ʑ
Display panel (status indicators)
¡
(Fluff filter/
Heat exchanger)
Clean the fluff filter a page 4/11
or clean the heat exchanger apage 8.
È÷
(Condensate
container)
Empty the condensate container a page 4/11.
ÕüÔ]+
-Æ->
(Programme
sequence)
These indicators show the programme progress in the next steps
of the drying cycle:
Õ Drying;
Ô] Iron Dry;
+Cupboard Dry;
- Æ- Programme pause aif required;
>Programme end.
s
(Childproof lock)
You can lock the dryer to prevent the functions you have set from being
changed inadvertently. To activate/deactivate s(Childproof lock) start
the programme or set the (Finished in) option and then press and hold
the Start/Pause button for 5 seconds until a long acoustic signal is heard.
The option activated/deactivated as(Childproof lock) indicator
light on/off.
[h:min]
(Remaining time)
When a programme is selected, the anticipated drying time (remaining time)
for the recommended load is displayed. While drying, the moisture sensors
detect the actual load and correct the programme length. This is shown by
jumps in the remaining time in the display panel.
ʑ
Settings (indicators lights and buttons)
(Drying time)
Drying time, available only for timed programmes, can be selected
from min. 0:20 h to max. 3:00 h, in 10-minute steps.
(Fine adjust)
The dryness levels (e.g. Cupboard Dry) can be increased in three levels.
The laundry is made drier. Default = 0. Selectable values: 0, 1, 2, 3. After setting
the level of the fine adjustment for a programme, it is also retained for other
programmes, until (Fine adjust) is changed again.
³¤- ¤
(Finished in)
The time when the programme has to end can be set by selecting
the (Finished in) time. The (Finished in) time can be selected in one-hour
steps, up to a maximum of 24 hours. Select the (Finished in) button
repeatedly until the required number of hours is displayed. Then press
the Start/Pause button to activate the (Finished in) option.
The programme ends after the selected number of hours.
Several minutes after activating (Finished in) option the display switches off
to save energy. To switch it on select any button, close/open the door or turn
the programme selector.
(Gentle Dry)
Reduced temperature for delicate fabrics, e.g. polyacrylic, polyamide
or elastane, with a longer drying time.
Î
(Wrinkle Guard+)
After the programme finishes, the drum moves at regular intervals
to prevent creases. Laundry remains loose and fluffy.
The standard setting for each programme is 60 min. Automatic
anti-crease function can be extended by up to 60 min.
ü(Buzzer)
For switching the buzzer on and off. ü(Buzzer) indicates program end if it is
activated. Other sounds are not influenced by this option.
Close the door
3
Contents Page
ʋ Preparation . . . . . . . . . . . . . . . . . . . . . . 2
ʋ Control panel . . . . . . . . . . . . . . . . . . . . . 2
ʋ Drying . . . . . . . . . . . . . . . . . . . . . . . . .3/4
ʋ Display panel and settings . . . . . . . . . . . 5
ʋ Notes on laundry . . . . . . . . . . . . . . . . . . 6
ʋ Overview of programmes . . . . . . . . . . . . 7
ʋ Care and cleaning . . . . . . . . . . . . . . . . . 8
ʋ Installation . . . . . . . . . . . . . . . . . . . . . . . 9
ʋ Frost protection / Transport . . . . . . . . . . 9
ʋ Optional accessories . . . . . . . . . . . . . . 10
ʋ Technical data . . . . . . . . . . . . . . . . . . . 10
ʋ Consumption rates . . . . . . . . . . . . . . . . 10
ʋ After-sales service . . . . . . . . . . . . . . . 11
ʋ What to do if ... . . . . . . . . . . . . . . . . 11/12
ʋ Safety instructions. . . . . . . . . . . . . . . . . 13
Never start the dryer if it is damaged!
Inform your after-sales service!
Inspect the dryer
Sort the laundry
Remove all items from pockets,
especially cigarette lighters.
The drum must be empty prior to loading.
See also separate instructions for “Woollens basket”
(depending on model).
Make sure your hands are dry.
Only grasp the plug by the plug
body.
Connect the
mains plug
End of the programme...
Interrupt the programme
1. Open the door or press the Start/Pauseübutton;
the drying cycle is interrupted.
2. Add or remove laundry and close the door.
3. If required, select a new programme and additional
functions. Select the
Start/Pause button.
The remaining time is updated after a few minutes.
The drum and door may be hot!
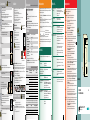
Notes on laundry ...
Labelling of fabrics
Follow the manufacturer's care instructions.
hcSuitable for tumble drying.
(cDry at normal temperature.
'cDry at low temperature a in addition, select (Gentle Dry).
)cDo not tumble dry.
Do not tumble dry the following fabrics:
– Non-breathable fabrics (e.g. rubber-coated).
– Delicate materials (silk, curtains made from synthetic material) a these may crease.
– Oil-stained laundry.
Drying tips
– To ensure a consistent drying result, sort the laundry by fabric type and drying programme.
– Always dry very small fabrics (e.g. baby socks) together with large items of laundry
(e.g. towels).
– Close zips, hooks and eyelets, and button up covers.
Tie cloth belts, apron strings, etc. together or use a laundry bag.
– Do not over-dry easy-care laundry a risk of creasing.
Allow laundry to finish drying in the air.
– Do not dry woollens in the dryer. They may, however, be refreshed in the dryer
a page 7, ÉüWoollen finish programme (depending on model).
– Do not iron laundry immediately after drying; fold items up and leave for a while
a residual moisture will then be distributed evenly.
– Knitted fabrics (e.g. T-shirts, jerseys) often shrink slightly the first time they are tumble-dried.
a Do not use the cCupboard Dry Extra programme.
– Starched laundry is not always suitable for dryers a starch leaves behind a coating that
reduces the drying effect.
– When washing laundry that is to be tumble dried afterwards, use the correct amount of
fabric softener as specified in the manufacturer's instructions.
– For pre-dried, multi-layered fabrics or small, individual items of laundry, use the timed
programme. Also suitable for subsequent drying.
Environmental protection / Energy-saving tips
– Before drying, spin the laundry in the washing machine a higher spin speeds minimise
the drying time and reduce energy consumption.
– Use the maximum recommended capacity, but do not exceed it
a Programme overview, page 7.
– Make sure the room is well ventilated during drying.
– Clean the fluff filter after every drying cycle a Clean the fluff filter, page 4/11.
– Do not cover or seal the air inlet on the dryer.
Remove the laundry and switch off
the dryer
5
4
Control panel
Fluff filter
Select
Start/Pause
Door
Installation a page 9.
Selected option activated/deactivated aindicator light on/off.
See the separate Energy-saving mode instructions.
Condensate
container
Air inlet
Programme sequence ÕüÔ]+ (Drying Time) Setting the drying time available only for timed programmes.
- Æ->
(Fine adjust) Fine adjustment of dryness level.
Childproof lock
s
³¤- ¤
(Finished in) Setting the programme end.
Condensate container
È
(Gentle Dry) Low-heat drying reduced temperature.
Fluff filter/Heat exchanger ¡ Î (Wrinkle Guard+) Extends the anti-crease function.
(Buzzer) Buzzer on/off.
Start/Pause Starts, pauses and continues the programme;
activates or deactivates s(Childproof lock).
Programme selector for setting
the programme and switching the appliance
on/off. Can be turned in both directions.
Maintenance flap
Further information
can be found
on page 5
`
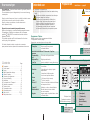
7
Programme overview see also page 6.
Sort the laundry according to type of textile and fabric. Fabrics must be suitable for tumble drying.
After drying, laundry is to be ...
cironed lightly ironed @cnot ironed cmangled
PROGRAMMES TEXTILE TYPE AND INFORMATION
*ÊCottons
max. 8 kg
Hard-wearing fabrics, boil-proof fabrics made of cotton or linen.
*ÏEasy-Care
max. 3.5 kg
Non-iron laundry made of synthetic fibres and mixed fabric, easy-care cotton.
Ô Iron Dry c÷@c
The condition of the laundry means it is suitable for ironing (iron clothes in order to avoid creases).
|÷Cupboard Dry @
Single-layered laundry.
÷Cupboard Dry Extra @
Laundry with thick, multi-layered parts.
üOutdoor
max. 1.5 kg
Fabrics with membrane coating, water-repellent fabrics, functional clothing, fleece fabrics (dry jackets/trousers with
removable internal lining separately).
ªü Sensitive
max. 6 kg
Cotton fabrics for drying in higher temperatures to keep them more hygienic .
Í÷Mix
max. 3 kg
Mixed items of laundry made of cotton and synthetics (Mix).
Warm
max. 3 kg
Pre-dried, multi-layered, sensitive fabrics made of acrylic fibres, or separate small items of laundry.
Also for subsequent drying.
Cold
max. 3 kg
All types of fabrics. For freshening up or airing of items of laundry that have been worn for a short period of time.
gcShirts 15’
max. 1 kg
For optimal drying result dry a maximum of 5 business shirts together. After drying, iron clothes or hang them out and leave
for a while. The remaining moisture will be distributed evenly.
x Super 40’
max. 2 kg
Laundry made of synthetic fibres, cotton or blended fabrics (for example) that needs to be dried quickly. The values may
differ from the those specified depending on the type of fabric, mixture of laundry to be dried, residual moisture in the fabric
and loading capacity.
ÉüWoollen finish
max. 3 kg
Woollen fabrics suitable for washing machines. Fabrics become fluffier but not dry.
Remove fabrics once the programme has ended and allow to dry.
üLingerie
max. 1 kg
Lingerie made of synthetic fibres, cotton or blended fabric.
*Dryness levels can be selected individually a ÷Cupboard Dry Extra, |÷Cupboard Dry and ÔüIron Dry (depending on the model).
Degree of dryness can be finely adjusted; multi-layered textiles require a longer drying time than single-layered items of clothing.
Recommendation: Dry separately.
9308 / 9000879489
*879489*
Siemens Electrogeräte GmbH
Carl-Wery-Str. 34
81739 München/Deutschland
WT44B5E0DN

8
Care and cleaning
Dryer housing, control panel
– Wipe clean with a soft, damp cloth.
– Do not clean with a water jet.
– Remove detergent and cleaning agent residue immediately.
– During drying, water may occasionally accumulate between the window and the seal.
This does not affect the proper operation of your dryer.
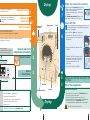
Heat exchanger
The heat exchanger requires cleaning once a month,
however this varies depending on how frequently the dryer is used.
Allow the dryer to cool down and place an absorbent cloth under the maintenance flap.
Residual water may escape.
1. Unlock the maintenance flap and open completely.
2. Turn both locking levers towards each another.
3. Pull out the cap.
4. Remove the heat exchanger.
Take care not to damage the heat exchanger.
When cleaning, use water only. Do not use hard or sharp-edged objects.
5. Rinse the heat exchanger and the cap on all sides with a jet of water to
completely remove all of the fluff.
6. Remove any fluff from the seals on the dryer and heat exchanger.
7. Allow to drip dry fully.
8. First insert the heat exchanger, then the cap.
9.
Turn back both locking levers and close the
maintenance flap until it locks closed.
Moisture sensors
The dryer is equipped with stainless steel moisture sensors.
Moisture sensors measure the moisture level of the laundry.
After sustained, repeated operation, a fine layer of limescale
may form on the moisture sensors.
1. Open the door.
2. Clean the moisture sensors with a damp sponge which has a rough
surface.
Do not use steel wool or abrasive agents!
Only when switched off!
9
Installation
– Scope of delivery: dryer, operating and installation instructions, basket for woollens
(depending on the model).
– Check the dryer for transport damage.
– The dryer is very heavy. Do not attempt to lift it on your own.
– Be careful to avoid sharp edges.
– Do not lift the dryer by protruding parts (e.g. the door) - risk of breakage.
– Do not set up in a room that is susceptible to frost.
Freezing water may cause damage.
– If in doubt, have the appliance connected by a specialist.
Setting up the dryer
– The mains plug must always be accessible.
– Ensure that the appliance is placed on a clean, level and
firm surface.
– Do not obstruct the air inlet on the dryer.
– Keep the area around the dryer clean.
– Level the dryer using the threaded feet
and a spirit level.
Never remove the threaded feet!
For mains connection, see Safety instructions a page 13.
– Connect to an AC earthed socket. If in doubt have the socket checked by a specialist.
– The mains voltage and the voltage shown on the rating plate (a page 10) must be the same.
– The connected load and necessary fuse protection are specified on the rating plate.
Converting the installed load Note the fuse protection of the socket (10/16 Amps.).
1. Turn the programme selector to Off.
2. Press and hold the (Fine adjust) button.
3. Turn the programme selector to ÊüCotton ÷Cupboard Dry Extra; wait until the recent
setting appears in the display:
¥¯=10A or ³=16A.
4. Press the (Fine adjust) button to change the settings.
5. Turn the programme selector to Off.
Frost protection / Transport
Preparation
1. Empty the condensate container a page 4/11.
2. Select any programme using the programme selector.
3. Press the Start/Pause button a condensation is pumped into the container.
4. Wait several minutes or until the dryer stops, and then empty the condensate container
again.
5. Turn the programme selector to Off.
1.
Take all accessory parts out
of the drum.
The drum must be empty.
Make sure that the air inlet
remains unobstructed
Clean and level
Do not install the dryer behind a door
or sliding door which could prevent or
obstruct the dryer door from opening.
This will prevent children from locking
themselves in and risking their lives.
2.
3.
Do not operate the dryer if
there is a risk of frost.
10
Optional accessories (order from the after-sales service using the order number, depending on the model)
Connection fittings for condensation outlet
The condensation is conveyed directly via a hose.
Platform
For easier loading and unloading. The basket contained in the drawer can be used
to carry the laundry.
Washer-dryer stack connection set
The dryer can be placed on top of a suitable washing machine with the same width and depth
to save space. The dryer must be fastened to the washing machine using this connection set.
WZ 20400: with pull-out worktop.
Technical data
Dimensions (DxWxH) 60 x 60 x 85 cm (height adjustable)
Weight approx. 45 kg
Max. capacity 8 kg
Condensate container 4.2 l
Connection voltage 220 - 240V
Connected load 2100 - 2800 W
Fuse protection 10 A / 16 A
Ambient temperature 5-35°C
Product number
Production number
Inside of door
The rating plate can be found on the back of the dryer.
ʠ
Drum interior light (depending on model): The drum lights up after the door is opened
and after the programme starts, and switches off automatically.
WZ
20160
WZ
20500
WZ
11410
Consumption rates (The value on the label is achieved at the maximum heat setting.)
Fabrics/programmes
Residual moisture in the
fabrics after spinning
Drying time**
Energy
consumption**
ÊüCottons 8 kg 10 A 16 A 10 A 16 A
|÷Cupboard Dry*
1400 U/min (50%) 140 min 108 min 3.84 kWh 3.84 kWh
1000 U/min (60%) 158 min 126 min 4.61 kWh 4.61 kWh
800 U/min (70%) 176 min 144 min 5.31 kWh 5.31 kWh
ÔüIron Dry*
1400 U/min (50%) 116 min 86 min 2.30 kWh 2.30 kWh
1000 U/min (60%) 135 min 103 min 3.53 kWh 3.53 kWh
800 U/min (70%) 153 min 121 min 3.96 kWh 3.96 kWh
ÏüEasy-Care 3.5 kg
|÷Cupboard Dry*
800 U/min (40%) 52 min 46 min 1.42 kWh 1.42 kWh
600 U/min (50%) 65 min 56 min 1.74 kWh 1.74 kWh
* Programme setting for testing in accordance with applicable standard EN61121.
** The values may differ from those specified, depending on the type of fabric, composition of
laundry to be dried, residual moisture in the fabric and the amount of laundry being loaded.
Fabrics/programmes Drying time Annual energy consumption
ÊüCottons 8 kg / 4ükg*
|÷Cupboard Dry*** 97 min / cycle 561ükWh / year
***Programme setting for testing and energy labelling in accordance with Directive 2010/30/EU.
11
What to do if ...
Turn the programme selector to Off and remove the mains plug from the socket.
ʠ
The Start/Pause indicator light
does not light up.
Mains plug plugged in?
Programme selected?
Check the socket fuse.
ʠ
The display panel light and
indicator lights (depending on
model) go out and the Start/
Pause indicator light flashes.
Energy-saving mode is activated a see the separate
Energy-saving mode instructions.
ʠ
The display panel switches off. The appliance goes into the sleep mode after activating
(Finished in) option apage 5.
ʠ
The È (Condensate container)
indicator light flashes.
Empty the condensate container apage 4.
Press the Start/Pause button to reset the displayed
indication and then press the Start/Pause button again
to restart the appliance if necessary.
If featured, check the hose for condensation outlet.
ʠ
¡(Fluff filter/Heat exchanger)
indicator light flashes.
Clean the fluff filter a page 4.
Press the Start/Pause button to reset the displayed
indication and then press the Start/Pause button again
to restart the appliance if necessary.
Clean the heat exchanger a page 8.
ʠ
Dryer does not start. Start/Pause button selected?
Door closed?
Programme set?
After-sales service
If you cannot rectify the fault yourself (e.g. switching off/on) a What to do if..., page 11/12,
please contact our after-sales service. We will always find an appropriate solution and avoid
unnecessary visits by engineers.
The contact details of your local after-sales service can be found in the enclosed after-sales
service directory.
– GB 0844 8928999 (Calls from a BT landline will be charged at up to 3 pence per minute.
A call set-up fee of up to 6 pence may apply.)
– IE 01450 2655 (0.03 € per minute at peak. Off peak 0.0088 € per minute.)
Please provide the after-sales service the product number (E no.) and the production number
(FD) of the appliance.
Product number Production number
You can find this information:
inside the door* / in the opened service flap*
and on the rear of the appliance.
*depending on the model
Trust the expertise of the manufacturer. Contact us for assistance. In this way, you can rest
assured that the repair will be carried out by trained service technicians using original spare
parts.
12
What to do if ...
ʠ
Programme terminates shortly
after starting.
Ambient temperature greater than 5°C?
Is the appliance loaded with the laundry?
Load too small for selected programme?/Use timed
programme apage 6/7.
Loaded laundry dry?
ʠ
Water is leaking out. Make sure the dryer is level.
Clean the heat exchanger seal.
ʠ
The door opens by itself. Push the door closed until you hear it engage.
ʠ
Creasing. Laundry load exceeded?
Remove articles of clothing immediately after the end
of the programme, hang up and pull into shape.
Unsuitable programme selected a page 7.
ʠ
Drying result is not satisfactory
(laundry feels too damp).
Warm laundry feels damper than it really is.
The selected programme does not suit the load. Use
another drying programme or, in addition, select the
timed programme a page 7.
Use (Fine adjust) for the dryness levels a page 5.
Fine layer of limescale on the humidity sensors
a Clean the moisture sensors apage 8.
Programme termination, e.g. tank full, mains power
supply failure, door open or maximum drying time
reached?
ʠ
Drying time too long. Clean the fluff filter under running water a page 4/11.
Insufficient supply of air a Ensure that air can circulate.
Air inlet possibly blocked a Clear inlet a page 9.
Ambient temperature higher than 35°C a Ventilate the
room.
ʠ
One or more indicator lights are
flashing.
Clean the fluff filter and heat exchanger a page 4,8/11.
Check the installation conditions a page 9.
Switch off, allow to cool, switch back on and restart the
programme.
ʠ
Power failure. Remove the laundry from the dryer immediately and
spread out. This allows the heat to dissipate. Be careful
as the door, the drum and the laundry may be hot.
13
Safety instructions
Emergency
– Pull the appliance plug out of the socket immediately or disconnect the fuse.
ONLY use the
dryer...
– in rooms inside the house.
– to dry fabrics.
The dryer must
NEVER...
– be used for purposes other than those described above.
– be modified in terms of its technology or properties.
Hazards
– The dryer must not be used by children or persons who have not been
instructed in its use.
– Do not leave children unsupervised near the dryer.
– Keep pets away from the dryer.
– Remove all objects from pockets, and lighters in particular
a Risk of explosion.
– Do not lean or sit on the door a Risk of tipping.
Installation
– Secure loose cables a Risk of tripping.
– Do not operate a dryer if there is a risk of frost.
Mains
connection
– Connect the dryer to an AC earthed socket according to specifications,
otherwise it cannot be guaranteed that the appliance is completely safe.
– The cable cross-section must be sufficient.
– Only use earth-leakage circuit breakers with the following symbol:
– The appliance plug and socket must be compatible.
– Do not use multiple plugs/connectors and/or extension cables.
– Do not touch or hold the appliance plug with wet hands
a Risk of electric shock.
– Never pull the appliance plug out of the socket by its cable.
– Do not damage the mains lead a Risk of electric shock.
Operation
– Only load the drum with laundry.
Check the contents before you switch the dryer on.
– Do not use the dryer if the laundry has been in contact with solvents, oil, wax,
grease or paint (e.g. hair styling products, nail varnish remover, stain remover,
cleaning solvent, etc.) a Risk of fire/explosion.
– Dust (e.g. coal dust, flour) poses a danger: Do not use the dryer
aRisk of explosion.
– Do not put laundry containing foamed material/rubber in the dryer a elastic
material may be destroyed and the dryer be damaged due to possible
deformation of the foamed material.
– When cleaning the fluff filter, make sure that no foreign material (down or
filling material) gets into the air duct opening. If necessary, clean the drum
beforehand with a vacuum cleaner. If foreign material should still get into the
air duct a call the after-sales service a Risk of fire/explosion.
– Light things, such as long hair, may be sucked into the air inlet of the dryer
aRisk of injury.
– Switch off the dryer once the programme has ended.
– The water from condensation is not drinking water and may be contaminated
with fluff.
Defect
– Do not use the dryer if it is defective or if you suspect that it is.
Repairs must only be carried out by the after-sales service.
– Do not use the dryer if the mains cable is defective. To avoid danger, only
have the defective mains cable replaced by the after-sales service.
Spare parts
– For safety reasons, you must only use genuine spare parts and accessories.
Disposal
– Pull out the appliance plug, then cut off the mains cable from the appliance.
Dispose of the appliance at a municipal waste disposal site.
– Packaging: Keep all packaging out of reach of babies and children
a Risk of suffocation.
– All materials are environmentally sound and can be reused.
Dispose of them in an environmentally-responsible manner.
Instructions
for installation and use
en
Tumble dryer
Observe the safety
instructions on page 13.
Read these instructions and the separate
Energy-saving mode instructions before
operating the dryer.

1 2
Display panel / ButtonsProgramme selector / Off
È
a
Programmes / Fabrics
Detailed overview of the programmes and fabrics
aProgramme overview, page 7.
Observe the care instructions on the care label.
ÊCottons Hard-wearing fabrics.
ÏEasy-Care Fabrics made from synthetic
or blended fabrics.
Dryness levels to select with the ÊCottons and ÏEasy-Care
programmes:
cCupboard Dry
Extra
Thick and multi-layered fabrics.
| Cupboard Dry Single-layered laundry.
ÔIron Dry Laundry suitable for ironing after drying.
üOutdoor Functional clothing made
of microfibre.
ª Sensitive Cotton fabrics for drying in higher
temperatures.
Í÷Mix A mixed load of fabrics made
of cotton and synthetic fabrics.
Warm
All types of fabric except
for wool and silk.
Cold
gcShirts 15’ Cotton or linen fabrics that are still damp
and easy-care fabrics.
x Super 40’ Synthetics, cotton or blended fabrics.
ÉüWoollen finish Woollen fabrics that are suitable
for use in washers.
üLingerie Lingerie made of synthetic fibres, cotton
or blended fabric.
Your new dryer
Congratulations - You have chosen a modern, high-quality Siemens
domestic appliance.
The condensation dryer is distinguished by its economical energy
consumption.
Every dryer which leaves our factory is carefully checked to ensure
that it functions correctly and is in perfect condition.
Should you have any questions, our after-sales service
will be pleased to help.
Disposal in an environmentally-responsible manner
Dispose of packaging in an environmentally-responsible manner.
This appliance is labelled in accordance with the European
guideline
2002/96/EC on waste electrical and electronic
equipment - WEEE.
The guideline provides an EU-wide framework for the return
and recycling of old appliances.
For further information about our products, accessories,
spare parts and services, please visit: www.siemens-home.com
Intended use
Preparation
ʋ exclusively for domestic use,
ʋ only for drying fabrics which have been washed using
water.
Do not leave children unsupervised near the dryer.
Keep pets away from the dryer.
The dryer may be operated by children from
8 years of age, by persons who have limited
physical, sensory or mental abilities and by
persons who have inadequate experience
or knowledge, provided they are supervised
or have been instructed by a responsible person.
ʑ
¡
a
a
È÷
a
ÕüÔ]+ Æ >
Õ
Ô]
+
Æ a
>
s
s
as
ʑ
³¤ ¤
Î
ü
ü
Contents Page
ʋ Preparation . . . . . . . . . . . . . . . . . . . . . . 2
ʋ Control panel . . . . . . . . . . . . . . . . . . . . . 2
ʋ Drying . . . . . . . . . . . . . . . . . . . . . . . . .3/4
ʋ Display panel and settings . . . . . . . . . . . 5
ʋ Notes on laundry . . . . . . . . . . . . . . . . . . 6
ʋ Overview of programmes . . . . . . . . . . . . 7
ʋ Care and cleaning . . . . . . . . . . . . . . . . . 8
ʋ Installation . . . . . . . . . . . . . . . . . . . . . . . 9
ʋ Frost protection / Transport . . . . . . . . . . 9
ʋ Optional accessories . . . . . . . . . . . . . . 10
ʋ Technical data . . . . . . . . . . . . . . . . . . . 10
ʋ Consumption rates . . . . . . . . . . . . . . . . 10
ʋ After-sales service . . . . . . . . . . . . . . . 11
ʋ What to do if ... . . . . . . . . . . . . . . . . 11/12
ʋ Safety instructions. . . . . . . . . . . . . . . . . 13
Never start the dryer if it is damaged!
Inform your after-sales service!
ü
hc
(c
'c a
)c
a
a
a Éü
a
a c
a
a
a
a
Installation a page 9.
a
Programme sequence ÕüÔ]+ (Drying Time)
- Æ->
(Fine adjust)
Childproof lock
s
³¤- ¤
(Finished in)
Condensate container
È
(Gentle Dry)
Fluff filter/Heat exchanger ¡ Î (Wrinkle Guard+)
(Buzzer)
Start/Pause
s
Programme selector for setting
the programme and switching the appliance
on/off. Can be turned in both directions.
Further information
can be found
on page 5
`
c @c c
Ê
Ï
Ô c÷@c
|÷ @
÷ @
ü
ªü
Í÷
gc
x
Éü
ü
a ÷ |÷ Ôü

3 4
Display panel / Buttons
Empty the condensate container
Empty the container after each drying cycle.
1. Remove the container, holding it level.
2. Pour out the condensate.
3. Push the container back in until it clicks
into place.
If È (Condensate container) flashes in the
display panel aWhat to do if..., page 11.
Clean fluff filter
Do not operate the dryer without a fluff filter or with
a defective fluff filter. A clean fluff filter minimises
energy consumption.
Clean the fluff filter after each drying cycle.
1. Open the door. Remove any fluff from
the door/around the door and pull out
the fluff filter.
2. Remove the fluff from the shaft of the
fluff filter.
3. Open the fluff filter and remove the fluff
(sweep your hand over the fluff filter). If
the fluff filter is very dirty or blocked,
rinse with warm water and dry
thoroughly.
4. Close and reinsert the fluff filter.
7
6
a
Ê
Ï
Ê Ï
c
|
Ô
ü
ª
Í÷
gc
x
Éü
ü
Set and adjust the
programme individually
1
2
Drying
ʋ
ʋ
Drying
ʑ
¡
a
a
È÷
a
ÕüÔ]+ Æ >
Õ
Ô]
+
Æ a
>
s
s
as
ʑ
³¤ ¤
Î
ü
ü
Close the door
3
ʋ
ʋ
ʋ
ʋ
ʋ
ʋ
ʋ
ʋ
ʋ
ʋ
ʋ
ʋ
ʋ
ʋ
ʋ
Never start the dryer if it is damaged!
Inform your after-sales service!
Inspect the dryer
Sort the laundry
Remove all items from pockets,
especially cigarette lighters.
The drum must be empty prior to loading.
See also separate instructions for “Woollens basket”
(depending on model).
Make sure your hands are dry.
Only grasp the plug by the plug
body.
Connect the
mains plug
End of the programme...
Interrupt the programme
1. Open the door or press the Start/Pauseübutton;
the drying cycle is interrupted.
2. Add or remove laundry and close the door.
3. If required, select a new programme and additional
functions. Select the
Start/Pause button.
The remaining time is updated after a few minutes.
The drum and door may be hot!
hc
(c
'c a
)c
a
a
a Éü
a
a c
a
a
a
a
Remove the laundry and switch off
the dryer
5
4
Control panel
Fluff filter
Select
Start/Pause
Door
a
a
Condensate
container
Air inlet
ÕüÔ]+
Setting the drying time available only for timed programmes.
Æ >
Fine adjustment of dryness level.
s
³¤ ¤
Setting the programme end.
È
Low-heat drying reduced temperature.
¡ Î
Extends the anti-crease function.
Buzzer on/off.
Starts, pauses and continues the programme;
activates or deactivates s(Childproof lock).
Programme selector for setting
the programme and switching the appliance
on/off. Can be turned in both directions.
Maintenance flap
`
c @c c
Ê
Ï
Ô c÷@c
|÷ @
÷ @
ü
ªü
Í÷
gc
x
Éü
ü
a ÷ |÷ Ôü

5 6
È
a
th
a
Ê
Ï
Ê Ï
c
|
Ô
ü
ª
Í÷
gc
x
Éü
ü
ʋ
ʋ
Display panel and settings
ʑ
Display panel (status indicators)
¡
(Fluff filter/
Heat exchanger)
Clean the fluff filter a page 4/11
or clean the heat exchanger apage 8.
È÷
(Condensate
container)
Empty the condensate container a page 4/11.
ÕüÔ]+-Æ->
(Programme
sequence)
These indicators show the programme progress in the next steps
of the drying cycle:
Õ Drying;
Ô] Iron Dry;
+Cupboard Dry;
- Æ- Programme pause aif required;
>Programme end.
s
(Childproof lock)
You can lock the dryer to prevent the functions you have set from being
changed inadvertently. To activate/deactivate s(Childproof lock) start
the programme or set the (Finished in) option and then press and hold
the Start/Pause button for 5 seconds until a long acoustic signal is heard.
The option activated/deactivated as(Childproof lock) indicator
light on/off.
[h:min]
(Remaining time)
When a programme is selected, the anticipated drying time (remaining time)
for the recommended load is displayed. While drying, the moisture sensors
detect the actual load and correct the programme length. This is shown by
jumps in the remaining time in the display panel.
ʑ
Settings (indicators lights and buttons)
(Drying time)
Drying time, available only for timed programmes, can be selected
from min. 0:20 h to max. 3:00 h, in 10-minute steps.
(Fine adjust)
The dryness levels (e.g. Cupboard Dry) can be increased in three levels.
The laundry is made drier. Default = 0. Selectable values: 0, 1, 2, 3. After setting
the level of the fine adjustment for a programme, it is also retained for other
programmes, until (Fine adjust) is changed again.
³¤- ¤
(Finished in)
The time when the programme has to end can be set by selecting
the (Finished in) time. The (Finished in) time can be selected in one-hour
steps, up to a maximum of 24 hours. Select the (Finished in) button
repeatedly until the required number of hours is displayed. Then press
the Start/Pause button to activate the (Finished in) option.
The programme ends after the selected number of hours.
Several minutes after activating (Finished in) option the display switches off
to save energy. To switch it on select any button, close/open the door or turn
the programme selector.
(Gentle Dry)
Reduced temperature for delicate fabrics, e.g. polyacrylic, polyamide
or elastane, with a longer drying time.
Î
(Wrinkle Guard+)
After the programme finishes, the drum moves at regular intervals
to prevent creases. Laundry remains loose and fluffy.
The standard setting for each programme is 60 min. Automatic
anti-crease function can be extended by up to 60 min.
ü(Buzzer)
For switching the buzzer on and off. ü(Buzzer) indicates program end if it is
activated. Other sounds are not influenced by this option.
ʋ
ʋ
ʋ
ʋ
ʋ
ʋ
ʋ
ʋ
ʋ
ʋ
ʋ
ʋ
ʋ
ʋ
ʋ
ü
Notes on laundry ...
Labelling of fabrics
Follow the manufacturer's care instructions.
hcSuitable for tumble drying.
(cDry at normal temperature.
'cDry at low temperature a in addition, select (Gentle Dry).
)cDo not tumble dry.
Do not tumble dry the following fabrics:
– Non-breathable fabrics (e.g. rubber-coated).
– Delicate materials (silk, curtains made from synthetic material) a these may crease.
– Oil-stained laundry.
Drying tips
– To ensure a consistent drying result, sort the laundry by fabric type and drying programme.
– Always dry very small fabrics (e.g. baby socks) together with large items of laundry
(e.g. towels).
– Close zips, hooks and eyelets, and button up covers.
Tie cloth belts, apron strings, etc. together or use a laundry bag.
– Do not over-dry easy-care laundry a risk of creasing.
Allow laundry to finish drying in the air.
– Do not dry woollens in the dryer. They may, however, be refreshed in the dryer
a page 7, ÉüWoollen finish programme (depending on model).
– Do not iron laundry immediately after drying; fold items up and leave for a while
a residual moisture will then be distributed evenly.
– Knitted fabrics (e.g. T-shirts, jerseys) often shrink slightly the first time they are tumble-dried.
a Do not use the cCupboard Dry Extra programme.
– Starched laundry is not always suitable for dryers a starch leaves behind a coating that
reduces the drying effect.
– When washing laundry that is to be tumble dried afterwards, use the correct amount of
fabric softener as specified in the manufacturer's instructions.
– For pre-dried, multi-layered fabrics or small, individual items of laundry, use the timed
programme. Also suitable for subsequent drying.
Environmental protection / Energy-saving tips
– Before drying, spin the laundry in the washing machine a higher spin speeds minimise
the drying time and reduce energy consumption.
– Use the maximum recommended capacity, but do not exceed it
a Programme overview, page 7.
– Make sure the room is well ventilated during drying.
– Clean the fluff filter after every drying cycle a Clean the fluff filter, page 4/11.
– Do not cover or seal the air inlet on the dryer.
Remove the laundry and switch off
a
Selected option activated/deactivated aindicator light on/off.
See the separate Energy-saving mode instructions.
ÕüÔ]+
Æ >
s
³¤ ¤
È
¡ Î
s
`
c @c c
Ê
Ï
Ô c÷@c
|÷ @
÷ @
ü
ªü
Í÷
gc
x
Éü
ü
a ÷ |÷ Ôü

È
a
a
Ê
Ï
Ê Ï
c
|
Ô
ü
ª
Í÷
gc
x
Éü
ü
ʋ
ʋ
ʑ
¡
a
a
È÷
a
ÕüÔ]+ Æ >
Õ
Ô]
+
Æ a
>
s
s
as
ʑ
³¤ ¤
Î
ü
ü
ʋ
ʋ
ʋ
ʋ
ʋ
ʋ
ʋ
ʋ
ʋ
ʋ
ʋ
ʋ
ʋ
ʋ
ʋ
ü
hc
(c
'c a
)c
a
a
a Éü
a
a c
a
a
a
a
a
a
ÕüÔ]+
Æ >
s
³¤ ¤
È
¡ Î
s
`
7
Programme overview see also page 6.
Sort the laundry according to type of textile and fabric. Fabrics must be suitable for tumble drying.
After drying, laundry is to be ...
cironed lightly ironed @cnot ironed cmangled
PROGRAMMES TEXTILE TYPE AND INFORMATION
*ÊCottons
max. 8 kg
Hard-wearing fabrics, boil-proof fabrics made of cotton or linen.
*ÏEasy-Care
max. 3.5 kg
Non-iron laundry made of synthetic fibres and mixed fabric, easy-care cotton.
Ô Iron Dry c÷@c
The condition of the laundry means it is suitable for ironing (iron clothes in order to avoid creases).
|÷Cupboard Dry @
Single-layered laundry.
÷Cupboard Dry Extra @
Laundry with thick, multi-layered parts.
üOutdoor
max. 1.5 kg
Fabrics with membrane coating, water-repellent fabrics, functional clothing, fleece fabrics (dry jackets/trousers with
removable internal lining separately).
ªü Sensitive
max. 6 kg
Cotton fabrics for drying in higher temperatures to keep them more hygienic .
Í÷Mix
max. 3 kg
Mixed items of laundry made of cotton and synthetics (Mix).
Warm
max. 3 kg
Pre-dried, multi-layered, sensitive fabrics made of acrylic fibres, or separate small items of laundry.
Also for subsequent drying.
Cold
max. 3 kg
All types of fabrics. For freshening up or airing of items of laundry that have been worn for a short period of time.
gcShirts 15’
max. 1 kg
For optimal drying result dry a maximum of 5 business shirts together. After drying, iron clothes or hang them out and leave
for a while. The remaining moisture will be distributed evenly.
x Super 40’
max. 2 kg
Laundry made of synthetic fibres, cotton or blended fabrics (for example) that needs to be dried quickly. The values may
differ from the those specified depending on the type of fabric, mixture of laundry to be dried, residual moisture in the fabric
and loading capacity.
ÉüWoollen finish
max. 3 kg
Woollen fabrics suitable for washing machines. Fabrics become fluffier but not dry.
Remove fabrics once the programme has ended and allow to dry.
üLingerie
max. 1 kg
Lingerie made of synthetic fibres, cotton or blended fabric.
*Dryness levels can be selected individually a ÷Cupboard Dry Extra, |÷Cupboard Dry and ÔüIron Dry (depending on the model).
Degree of dryness can be finely adjusted; multi-layered textiles require a longer drying time than single-layered items of clothing.
Recommendation: Dry separately.
9308 / 9000879489
*879489*
Siemens Electrogeräte GmbH
Carl-Wery-Str. 34
81739 München/Deutschland
WT44B5E0DN

8
Care and cleaning
Dryer housing, control panel
– Wipe clean with a soft, damp cloth.
– Do not clean with a water jet.
– Remove detergent and cleaning agent residue immediately.
– During drying, water may occasionally accumulate between the window and the seal.
This does not affect the proper operation of your dryer.
Heat exchanger
The heat exchanger requires cleaning once a month,
however this varies depending on how frequently the dryer is used.
Allow the dryer to cool down and place an absorbent cloth under the maintenance flap.
Residual water may escape.
1. Unlock the maintenance flap and open completely.
2. Turn both locking levers towards each another.
3. Pull out the cap.
4. Remove the heat exchanger.
Take care not to damage the heat exchanger.
When cleaning, use water only. Do not use hard or sharp-edged objects.
5. Rinse the heat exchanger and the cap on all sides with a jet of water to
completely remove all of the fluff.
6. Remove any fluff from the seals on the dryer and heat exchanger.
7. Allow to drip dry fully.
8. First insert the heat exchanger, then the cap.
9.
Turn back both locking levers and close the
maintenance flap until it locks closed.
Moisture sensors
The dryer is equipped with stainless steel moisture sensors.
Moisture sensors measure the moisture level of the laundry.
After sustained, repeated operation, a fine layer of limescale
may form on the moisture sensors.
1. Open the door.
2. Clean the moisture sensors with a damp sponge which has a rough
surface.
Do not use steel wool or abrasive agents!
Only when switched off!
9
Installation
– Scope of delivery: dryer, operating and installation instructions, basket for woollens
(depending on the model).
– Check the dryer for transport damage.
– The dryer is very heavy. Do not attempt to lift it on your own.
– Be careful to avoid sharp edges.
– Do not lift the dryer by protruding parts (e.g. the door) - risk of breakage.
– Do not set up in a room that is susceptible to frost.
Freezing water may cause damage.
– If in doubt, have the appliance connected by a specialist.
Setting up the dryer
– The mains plug must always be accessible.
– Ensure that the appliance is placed on a clean, level and
firm surface.
– Do not obstruct the air inlet on the dryer.
– Keep the area around the dryer clean.
– Level the dryer using the threaded feet
and a spirit level.
Never remove the threaded feet!
For mains connection, see Safety instructions a page 13.
– Connect to an AC earthed socket. If in doubt have the socket checked by a specialist.
– The mains voltage and the voltage shown on the rating plate (a page 10) must be the same.
– The connected load and necessary fuse protection are specified on the rating plate.
Converting the installed load Note the fuse protection of the socket (10/16 Amps.).
1. Turn the programme selector to Off.
2. Press and hold the (Fine adjust) button.
3. Turn the programme selector to ÊüCotton ÷Cupboard Dry Extra; wait until the recent
setting appears in the display:
¥¯=10A or ³=16A.
4. Press the (Fine adjust) button to change the settings.
5. Turn the programme selector to Off.
Frost protection / Transport
Preparation
1. Empty the condensate container a page 4/11.
2. Select any programme using the programme selector.
3. Press the
Start/Pause button a condensation is pumped into the container.
4. Wait several minutes or until the dryer stops, and then empty the condensate container
again.
5. Turn the programme selector to Off.
1.
Take all accessory parts out
of the drum.
The drum must be empty.
Make sure that the air inlet
remains unobstructed
Clean and level
Do not install the dryer behind a door
or sliding door which could prevent or
obstruct the dryer door from opening.
This will prevent children from locking
themselves in and risking their lives.
2.
3.
Do not operate the dryer if
there is a risk of frost.
ʠ
Êü
|÷
Ôü
Ïü
|÷
Êü ü
|÷ ü
ʠ
ʠ
a
ʠ
a
ʠ
È
a
ʠ
¡ a
a
ʠ
a
ʠ
a
ʠ
ʠ
ʠ
a
ʠ
a
a
a a
ʠ
a
a
a a
a
ʠ
a
a
ʠ
a
a
a
a
a
a
a
a
a a
a
a

a
a
Êü ÷
¥¯ ³
a
a
10
Optional accessories (order from the after-sales service using the order number, depending on the model)
Connection fittings for condensation outlet
The condensation is conveyed directly via a hose.
Platform
For easier loading and unloading. The basket contained in the drawer can be used
to carry the laundry.
Washer-dryer stack connection set
The dryer can be placed on top of a suitable washing machine with the same width and depth
to save space. The dryer must be fastened to the washing machine using this connection set.
WZ 20400: with pull-out worktop.
Technical data
Dimensions (DxWxH) 60 x 60 x 85 cm (height adjustable)
Weight approx. 45 kg
Max. capacity 8 kg
Condensate container 4.2 l
Connection voltage 220 - 240V
Connected load 2100 - 2800 W
Fuse protection 10 A / 16 A
Ambient temperature 5-35°C
Product number
Production number
Inside of door
The rating plate can be found on the back of the dryer.
ʠ
Drum interior light (depending on model): The drum lights up after the door is opened
and after the programme starts, and switches off automatically.
WZ
20160
WZ
20500
WZ
11410
Consumption rates (The value on the label is achieved at the maximum heat setting.)
Fabrics/programmes
Residual moisture in the
fabrics after spinning
Drying time**
Energy
consumption**
ÊüCottons 8 kg 10 A 16 A 10 A 16 A
|÷Cupboard Dry*
1400 U/min (50%) 140 min 108 min 3.84 kWh 3.84 kWh
1000 U/min (60%) 158 min 126 min 4.61 kWh 4.61 kWh
800 U/min (70%) 176 min 144 min 5.31 kWh 5.31 kWh
ÔüIron Dry*
1400 U/min (50%) 116 min 86 min 2.30 kWh 2.30 kWh
1000 U/min (60%) 135 min 103 min 3.53 kWh 3.53 kWh
800 U/min (70%) 153 min 121 min 3.96 kWh 3.96 kWh
ÏüEasy-Care 3.5 kg
|÷Cupboard Dry*
800 U/min (40%) 52 min 46 min 1.42 kWh 1.42 kWh
600 U/min (50%) 65 min 56 min 1.74 kWh 1.74 kWh
* Programme setting for testing in accordance with applicable standard EN61121.
** The values may differ from those specified, depending on the type of fabric, composition of
laundry to be dried, residual moisture in the fabric and the amount of laundry being loaded.
Fabrics/programmes Drying time Annual energy consumption
ÊüCottons 8 kg / 4ükg*
|÷Cupboard Dry*** 97 min / cycle 561ükWh / year
***Programme setting for testing and energy labelling in accordance with Directive 2010/30/EU.
11
What to do if ...
Turn the programme selector to Off and remove the mains plug from the socket.
ʠ
The Start/Pause indicator light
does not light up.
Mains plug plugged in?
Programme selected?
Check the socket fuse.
ʠ
The display panel light and
indicator lights (depending on
model) go out and the Start/
Pause indicator light flashes.
Energy-saving mode is activated a see the separate
Energy-saving mode instructions.
ʠ
The display panel switches off. The appliance goes into the sleep mode after activating
(Finished in) option apage 5.
ʠ
The È (Condensate container)
indicator light flashes.
Empty the condensate container apage 4.
Press the
Start/Pause button to reset the displayed
indication and then press the Start/Pause button again
to restart the appliance if necessary.
If featured, check the hose for condensation outlet.
ʠ
¡(Fluff filter/Heat exchanger)
indicator light flashes.
Clean the fluff filter a page 4.
Press the Start/Pause button to reset the displayed
indication and then press the Start/Pause button again
to restart the appliance if necessary.
Clean the heat exchanger a page 8.
ʠ
Dryer does not start. Start/Pause button selected?
Door closed?
Programme set?
After-sales service
If you cannot rectify the fault yourself (e.g. switching off/on) a What to do if..., page 11/12,
please contact our after-sales service. We will always find an appropriate solution and avoid
unnecessary visits by engineers.
The contact details of your local after-sales service can be found in the enclosed after-sales
service directory.
– GB 0844 8928999 (Calls from a BT landline will be charged at up to 3 pence per minute.
A call set-up fee of up to 6 pence may apply.)
– IE 01450 2655 (0.03 € per minute at peak. Off peak 0.0088 € per minute.)
Please provide the after-sales service the product number (E no.) and the production number
(FD) of the appliance.
Product number Production number
You can find this information:
inside the door* / in the opened service flap*
and on the rear of the appliance.
*depending on the model
Trust the expertise of the manufacturer. Contact us for assistance. In this way, you can rest
assured that the repair will be carried out by trained service technicians using original spare
parts.
ʠ
a
ʠ
ʠ
ʠ
a
ʠ
a
a
a a
ʠ
a
a
a a
a
ʠ
a
a
ʠ
a
a
a
a
a
a
a
a
a a
a
a

a
a
Êü ÷
¥¯ ³
a
a
ʠ
Êü
|÷
Ôü
Ïü
|÷
Êü ü
|÷ ü
ʠ
ʠ
a
ʠ
a
ʠ
È
a
ʠ
¡ a
a
ʠ
a
12
What to do if ...
ʠ
Programme terminates shortly
after starting.
Ambient temperature greater than 5°C?
Is the appliance loaded with the laundry?
Load too small for selected programme?/Use timed
programme apage 6/7.
Loaded laundry dry?
ʠ
Water is leaking out. Make sure the dryer is level.
Clean the heat exchanger seal.
ʠ
The door opens by itself. Push the door closed until you hear it engage.
ʠ
Creasing. Laundry load exceeded?
Remove articles of clothing immediately after the end
of the programme, hang up and pull into shape.
Unsuitable programme selected a page 7.
ʠ
Drying result is not satisfactory
(laundry feels too damp).
Warm laundry feels damper than it really is.
The selected programme does not suit the load. Use
another drying programme or, in addition, select the
timed programme a page 7.
Use (Fine adjust) for the dryness levels a page 5.
Fine layer of limescale on the humidity sensors
a Clean the moisture sensors apage 8.
Programme termination, e.g. tank full, mains power
supply failure, door open or maximum drying time
reached?
ʠ
Drying time too long. Clean the fluff filter under running water a page 4/11.
Insufficient supply of air a Ensure that air can circulate.
Air inlet possibly blocked a Clear inlet a page 9.
Ambient temperature higher than 35°C a Ventilate the
room.
ʠ
One or more indicator lights are
flashing.
Clean the fluff filter and heat exchanger a page 4,8/11.
Check the installation conditions a page 9.
Switch off, allow to cool, switch back on and restart the
programme.
ʠ
Power failure. Remove the laundry from the dryer immediately and
spread out. This allows the heat to dissipate. Be careful
as the door, the drum and the laundry may be hot.
13
Safety instructions
Emergency
– Pull the appliance plug out of the socket immediately or disconnect the fuse.
ONLY use the
dryer...
– in rooms inside the house.
– to dry fabrics.
The dryer must
NEVER...
– be used for purposes other than those described above.
– be modified in terms of its technology or properties.
Hazards
– The dryer must not be used by children or persons who have not been
instructed in its use.
– Do not leave children unsupervised near the dryer.
– Keep pets away from the dryer.
– Remove all objects from pockets, and lighters in particular
a Risk of explosion.
– Do not lean or sit on the door a Risk of tipping.
Installation
– Secure loose cables a Risk of tripping.
– Do not operate a dryer if there is a risk of frost.
Mains
connection
– Connect the dryer to an AC earthed socket according to specifications,
otherwise it cannot be guaranteed that the appliance is completely safe.
– The cable cross-section must be sufficient.
– Only use earth-leakage circuit breakers with the following symbol:
– The appliance plug and socket must be compatible.
– Do not use multiple plugs/connectors and/or extension cables.
– Do not touch or hold the appliance plug with wet hands
a Risk of electric shock.
– Never pull the appliance plug out of the socket by its cable.
– Do not damage the mains lead a Risk of electric shock.
Operation
– Only load the drum with laundry.
Check the contents before you switch the dryer on.
– Do not use the dryer if the laundry has been in contact with solvents, oil, wax,
grease or paint (e.g. hair styling products, nail varnish remover, stain remover,
cleaning solvent, etc.) a Risk of fire/explosion.
– Dust (e.g. coal dust, flour) poses a danger: Do not use the dryer
aRisk of explosion.
– Do not put laundry containing foamed material/rubber in the dryer a elastic
material may be destroyed and the dryer be damaged due to possible
deformation of the foamed material.
– When cleaning the fluff filter, make sure that no foreign material (down or
filling material) gets into the air duct opening. If necessary, clean the drum
beforehand with a vacuum cleaner. If foreign material should still get into the
air duct a call the after-sales service a Risk of fire/explosion.
– Light things, such as long hair, may be sucked into the air inlet of the dryer
aRisk of injury.
– Switch off the dryer once the programme has ended.
– The water from condensation is not drinking water and may be contaminated
with fluff.
Defect
– Do not use the dryer if it is defective or if you suspect that it is.
Repairs must only be carried out by the after-sales service.
– Do not use the dryer if the mains cable is defective. To avoid danger, only
have the defective mains cable replaced by the after-sales service.
Spare parts
– For safety reasons, you must only use genuine spare parts and accessories.
Disposal
– Pull out the appliance plug, then cut off the mains cable from the appliance.
Dispose of the appliance at a municipal waste disposal site.
– Packaging: Keep all packaging out of reach of babies and children
a Risk of suffocation.
– All materials are environmentally sound and can be reused.
Dispose of them in an environmentally-responsible manner.

a
a
Êü ÷
¥¯ ³
a
a
ʠ
Êü
|÷
Ôü
Ïü
|÷
Êü ü
|÷ ü
ʠ
ʠ
a
ʠ
a
ʠ
È
a
ʠ
¡ a
a
ʠ
a
ʠ
a
ʠ
ʠ
ʠ
a
ʠ
a
a
a a
ʠ
a
a
a a
a
ʠ
a
a
ʠ
a
a
a
a
a
a
a
a
a a
a
a
Instructions
for installation and use
en
Tumble dryer
Observe the safety
instructions on page 13.
Read these instructions and the separate
Energy-saving mode instructions before
operating the dryer.
-
 1
1
-
 2
2
-
 3
3
-
 4
4
-
 5
5
-
 6
6
-
 7
7
-
 8
8
-
 9
9
-
 10
10


Siemens WT44B5E0DN/01 Manuale utente
- Tipo
- Manuale utente
- Questo manuale è adatto anche per
in altre lingue
- English: Siemens WT44B5E0DN/01 User manual