
369111 - 369121
Video Kit
Manuale installatore • Installation manual
U1071E01PC11W38
La pagina si sta caricando...

Video Kit
3
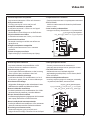
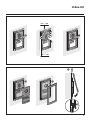
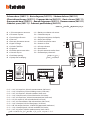
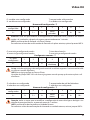
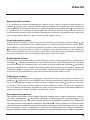
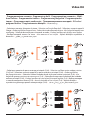
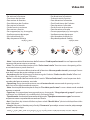
• Vecchio impianto a campanello
Impianato esistente con 3 fili e sola chiamata.
• Old system with bell
Existing system with 3 wires and just call.
• Ancienne installation a sonnette
Installation existante à 3 fils et un seul appel.
• Alte klingelanlage
Vorhandene 3-Leiter Anlage nur mit Ruffunktion.
• Vieja instalación con timbre
Instalación existente con 3 hilos y una llamada.
• Oude deurbelinstallatie
Bestaande 3-aderige installatie met alleen een
oproepfunctie.
• Antiga instalação em campaínha
Instalação existente com 3 fios e somente
chamada.
• Παλαιό σύστηα ε κουδούνι
Παρόν σύστηα ε 3 καλώδια και ια κλήση
• Старая система со звонком
3 .
• Esk zl sstem
3 kablo ve sadece arama le donatılmış halhazırda
mevcut sstem.
• Stara instalacja z dzwonkiem
Istniejąca instalacja dzwonkowa na 3 przewodach.
}
346000
0322 06
IP30
PRI 230V~ 50 - 60Hz 260mA
BUS
2-1
27V 1,2A
PRI
230 Vac
PS
BUS TK
BUS PI
346830
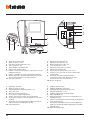
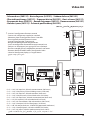
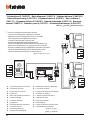
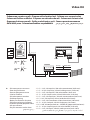
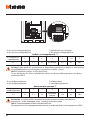
• Nuovo impianto citofonico
Impianto realizzato senza modifiche ai 2 fili
esistenti: chiamata, citofono e serratura.
• New door entry system
System made without modifications to the 2 existing
wires; call, door entry and electric door lock.
• Nouvelle installation phonique
Installation réalisée sans modifications sur les 2
fils existants: appel, phone, et serrure électrique.
• Neue haustelefonanlage
Anlage ohne Änderungen an den vorhandenen 2 Leiter:
Ruffunktion, haustelefon und elektrischer Schloss.
• Nueva instalación interfónica
Instalación realizada sin las modificaciones a los 2 hilos
existentes: llamada, interfono y cerradura eléctrica.
• Nieuwe deurtelefooninstallatie
Installatie aangelegd zonder wijzigingen aan de 2 bestaande
aders: oproep, deurtelefoon en elektrisch deurslot.
• Nova instalação do intercomunicador
Instalação realizada sem modificar os 2 fios existentes:
chamada, intercomunicador e fechadura eléctrica.
• Νέο σύστηα ενδοεπικοινωνία
Κατασκευή συστήατο χωρί ετατροπέ στα 2
υπάρχοντα καλώδια: κλήση, ενδοεπικοινωνία και κλειδαριά.
•
Новая домофонная система
, 2
: , .
• Yeni dahili ünite sistemi
Halihazırda mevcut 2 kabloda değişiklik
yapılmadan gerçekleştirilmiş sistem: Arama, dahili
ünite ve kilitleme.
• Nowa instalacja domofonowa
Instalacja wykorzystująca 2 istniejące przewody
– wywołanie, domofon, otwarcie drzwi.
•
•
230 Vac 12 V
La pagina si sta caricando...
La pagina si sta caricando...

6
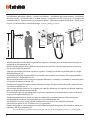
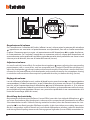
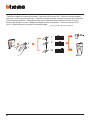
• La telecamera non deve essere installata di fronte a grandi sorgenti luminose, oppure in luoghi
dove il soggetto ripreso rimanga molto in controluce. Per risolvere i problemi precedentemente
descritti si consiglia di variare l’altezza di installazione della telecamera, solitamente 160 – 165
cm, ad un’altezza di 180 cm e di orientare l’obiettivo verso il basso in modo da migliorare la qua-
lità delle riprese.
Nota: Le telecamere con sensore CCD a colori presentano, in condizioni di scarsa luminosità, una
sensibilità inferiore rispetto alle telecamere in bianco/nero. Si consiglia pertanto, in ambienti
poco illuminati di prevedere una fonte di illuminazione aggiuntiva.
• The camera must not be installed in front of large light sources, or in places where the subject viewed
remains in deep shadow. To solve the problems described above change the height at which the cam-
era is installed, normally 160 to 165 cm, to a height of 180 cm, and face the lens downwards to improve
the quality of the views.
Note: in poor lighting conditions cameras with colour CCD detector are less sensitive than black/white
cameras. An extra lighting source should be added in poorly lit rooms.
• La télécaméra ne doit pas être installée en face de fortes sources lumineuses, ou bien dans des
endroits où le sujet pris reste très à contre-jour. Pour résoudre les problèmes précédemment dé-
crits, il est conseillé de porter la hauteur d’installation de la télécaméra, normalement 160 – 165
cm, à une hauteur de 180 cm et d’orienter l’objectif vers le bas de façon à améliorer la qualité des
prises de vue.
Nota: les télécaméras avec capteur CCD couleurs présentent, dans des conditions de faible lumi-
nosité, une sensibilité inférieure aux télécaméras noir/blanc. Il est donc conseillé, dans des mi-
lieux peu éclairés, de prévoir une source de lumière supplémentaire.
• Die Kamera darf nicht vor starken Lichtquellen oder an Orten installiert werden, wo das Subjekt sich
im Gegenlicht befindet. Um die zuvor erwähnten Probleme zu lösen, empfehlen wir die Installations-
höhe der Kamera zu ändern, d.h. sie anstatt auf 160 – 165 cm Höhe, auf 180 cm Höhe zu installieren
und das Objektiv nach unten zu orientieren, um die Aufnahmequalität zu verbessern.
Bemerkung: Farbkameras mit CCD-Aufnahmeelement besitzen bei schlechter Beleuchtung eine gerin-
gere Empfindlichkeit als Schwarz/Weiß Kameras. Wir empfehlen daher eine zusätzliche Beleuchtungs-
quelle vorzusehen.
• La telecámara no debe ser instalada delante de fuentes luminosas grande en lugares en donde el
individuo filmado se encuentre demasiado en contraluz. Para solucionar los problemas descritos
antes, es aconsejable modificar la altura de instalación de la telecamera, de 160 – 165 cm a 180
cm y enfocar el objetivo hacia abajo para optimizar la calidad de la filmación.
Nota: las telecámaras con sensor CCD en colores presentan, en condiciones de escasa luminosi-
dad, una sensibilidad inferior respecto a las telecámaras en blanco/negro. Por lo tanto es aconse-
jable en ambientes escasamente iluminados prever una fuente de iluminación extra.
• Installeer de camera niet tegenover grote lichtbronnen of op plaatsen waar de opname van het onder-
werp door sterk tegenlicht wordt gestoord. Voorgaande problemen zijn op te lossen door de camera op
een hoogte van 180 cm te installeren (in plaats van 160 – 165 cm) en het objectief omlaag te richten zodat
de kwaliteit van de opnames beter zal zijn.
Opmerking: camera’s met kleuren-CCD-sensor zijn bij een zwakke verlichting minder gevoelig dan zwart-
wit camera’s. Daarom is het raadzaam om zwak verlichte omgevingen van extra verlichting te voorzien.
La pagina si sta caricando...

8
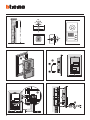
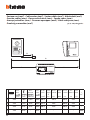
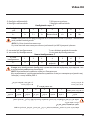
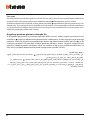
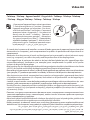
• Installazione del posto interno • Handset installation • Installation du poste interne • Installation
der Hausstation • Instalación de la unidad interior • Installatie van het intern punt • Instalação da
unidade interna • Εγκατάσταση τη εσωτερική θέση • • Dahl ünte
kurma • Instalacja miejsca wewnętrznego • •
3
2
1
O
Ø 5 mm
160 – 165 cm
40°
30°
10°
210
215
56
185
3
2
1
O
• Altezza consigliata salvo diversa normativa vigente. L’immagine visualizzata è ottimale per un
angolo di osservazione di 40°.
• Recommended height, unless different regulations are specified. The displayed picture is optimum
for an observation angle of 40°.
• Hauteur conseillée sauf autre norme en vigueur. L’image visualisée est parfaite pour un angle
d’observation de 40°.
• Empfohlene Höhe falls die gesetzlichen Vorschriften nichts anderes vorschreiben. Das angezeigte Bild ist
optimal für einen Sichtwinkel von 40°.
• Altura recomendada salvo normativa vigente diferente. La imagen visualizada es excelente para
un ángulo de observación de 40°.
• Aanbevolen hoogte behoudens andere normen in voege. Het gevisualiseerde beeld is optimaal voor
een observatiehoek van 40°.
• Altura aconselhada a não ser se a norma em vigor for diferente. A imagem visualizada é óptima
para um ângulo de observação de 40°.
• Συνιστούενο ύψο πλην διαφορετική ισχύουσα νοοθεσία.Η προβαλλόενη εικόνα είναι άρτια
ε ια γωνία παρακολούθηση 40°.
• , - .
40°.
• Yürürlüktek kanunlarca farklı şeklde belrlenenler harç olarak, tavsye edlen yükseklk.
Görüntülenen görüntü, 40°’lk zleme açısı çn optmaldr.
• Zalecana wysokość z zastrzeżeniem innych obowiązujących przepisów. Wyświetlany obraz jest
najlepszy dla kąta widzenia 40°.

Video Kit
9
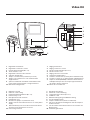
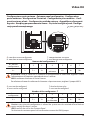
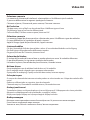
1. Brightness control
2. Contrast / color setting
3. Programmable pushbuttons (O-1-2-3)
4. Door lock key + Led
5. Bell adjustment and exclusion
6. Configurator seat
7. Master/slave jumper 1 (remove for slave)
8. Jumper 2 to be removed when there is an extra power
supply
9. Move to ON only in the last video internal unit of the
stretch of each apartment or each riser
10. Connecting terminals
1. Regolazione luminosità
2. Regolazione contrasto / colore
3. Pulsanti programmabili (O-1-2-3)
4. Tasto serratura + Led
5. Regolazione suoneria ed esclusione
6. Sede dei configuratori
7. Jumper 1: master/slave (rimuovere per slave)
8. Jumper 2: da rimuovere in caso di alimentatore
supplementare
9. Spostare su ON solo nell’ultimo videocitofono della
tratta di ogni appartamento e di ogni montante
10. Morsetti di collegamento
1. Réglage luminosité
2. Réglage contraste / coleur
3. Touches programmables (O-1-2-3)
4. Touche serrure + Led
5. Réglage sonnerie et exclusion
6. Logement configurateurs
7. Cavalier 1 master/slave (le retirer pour la modalité slave)
8. Cavalier 2 à retirer en cas d’alimentation supplémentaire
9. Déplacer sur ON (MARCHE) seulement dans le dernier
vidéophone du parcours de chaque appartement ou
de chaque colonne montante
10. Bornes de raccordement
1. Helligkeitseinstellung
2. Kontraste / Farbe instellung
3. Programmierbare Tasten (O-1-2-3)
4. Türöffner + LED
5. Ruflautstärkeregrlung und Rufabschaltung
6. Sitz der Konfiguratoren
7. Jumper 1 Master/Slave (für Slave entfernen)
8. Falls eines zusätzlischen Netzgeräts muß der Jumper 2
entfernt werden
9. Bei der letzten V ideo-Hausstation ist der Schalter auf
ON zu stellen
10. Verbindungsklemmen
3
2
1
O
5
1
2
3
4
5
BUS
1
ET
2 1
N P MOD
JMP 2
OFF
ON
JMP 1
N P
MOD
1
2
3
4
5
La pagina si sta caricando...
La pagina si sta caricando...
La pagina si sta caricando...
La pagina si sta caricando...
La pagina si sta caricando...
La pagina si sta caricando...

16
* • Inserire il configuratore fornito a corredo
• Connect the configurator supplied as standard
•
Mettre en place le configurateur fourni à cet effet
• Den mitgelieferten Konfigurator einsetzen
• Inserte el configurador suministrado
• Breng de standaard geleverde configurator aan
• Inserir o configurador fornecido no equipamento base
• Εισάγετε τον διαορφωτή που χορηγείται στον εξοπλισό
• ,
• Donanım dahlnde tedark edlmş konfgüratörü takın
• Umieścić konfigurator będący na wyposażeniu
P
= –
= –
N
= –
= –
T = –
S = –
5
BUS
1
ET
2 1
B
ON
OFF
3
2
1
O
PS
BUS TK
BUS PI
346830
BUS
PL S+
S-
A
BUS 2 1
230 Vac
5
BUS
1
ET
2 1
IP30
PRI
PRI 230 V~ 50 - 60 Hz 260 mA
346000
}
BUS
2 - 1
27V 1,2A
CEBEC
N
N
F
B
ON
OFF
3
2
1
O
N
= –
= *1
P
= –
= –
MOD = –
N
= –
= –
P
= –
= –
MOD = –
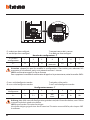
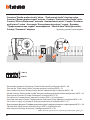
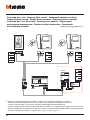
• A = Pulsante apertura serratura
B = Chiamata al piano
• A = Door lock pushbutton
B = Floor call
• A = Poussoir d’ouverture serrure
B = Appel à l’étage
• A = Schalter Türöffner
B = Etagenruf
• A = Pulsador apertura cerradura
B = Llamada al piso
• A = Drukknop opening
B = Oproep aan verdieping
•
• A = Botão para abertura do trinco
B = Chamada ao piso
• A = Πλήκτρο ανοίγατο κλειδαριά
B = Κλήση στον όροφο
• A =
B =
• A = kilit açma butonu
B = Katta arama
• A = Przycisk otwarcia zamka drzwi
B = Dzwonek przy drzwiach
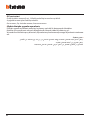
• Schema base 2 (369121) • Basic diagram 2 (369121) • Schéma de base 2 (369121)
• Übersichtszeichnung 2 (369121) • Esquema básico 2 (369121) • Basis schema 2
(369121) • Esquema de base 2 (369121) • Βασικό διάγραα 2 (369121) •
2 (369121) • Standart şema 2 (369121) • Schemat podstawowy 2 (369121)
La pagina si sta caricando...
La pagina si sta caricando...

Video Kit
19
•
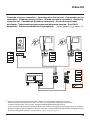
Configurazione posto esterno
•
Entrance panel configuration
•
Configuration
poste extérieur
•
Konfiguration Türstation
•
Configuración placa exterior
•
Confi-
guratie externe plaats
•
Configuração unidade externa
•
ιαρρύθιση εξωτερικού
σηείου
•
•
Dış ünte konfgürasyonu
•
Konfigu-
racja panelu zewnętrznego
•
T: temporizzatore serratura
S: non deve essere configurato
• P: non deve essere configurato
N: non deve essere configurato
Numero del configuratore - T
0 = nessun
configuratore
1 2 3 4 5 6 7
4 s 1 s 2 s 3 s
come
pulsante
6 s 8 s 10 s
Attenzione: tutte le volte che si modifica la configurazione è necessario togliere e ridare
l’alimentazione all’impianto, attendendo circa 1 minuto.
JMP4: conferma chiamata su Posto Esterno.
Per eliminare il tono di conferma di chiamata sul posto esterno, togliere il jumper JMP 4.
Number of the configurator - T
0 = no
configurator
1 2 3 4 5 6 7
4 s 1 s 2 s 3 s
as
pushbutton
6 s 8 s 10 s
T: door lock timer relay
S: must not be configured
• P: must not be configured
N: must not be configured
Caution: every time the configuration is altered the system must be switched off and back on
again, waiting for about 1 minute.
JMP4: confirm the call on the Entrance Panel.
To eliminate the entrance panel call confirmation remove the JPM 4 jumper.
BUS
PL
S+ S−
PJ3 J1
J4 J2
T S
N
BUS
PL
S+ S−
PJ3 J1
J4 J2
T S
N
La pagina si sta caricando...
La pagina si sta caricando...
La pagina si sta caricando...
La pagina si sta caricando...

24
• Regolazione del volume
Se si manifestasse il disturbo del fischio, (effetto Larsen), ridurre prima la potenza del microfono
, agendo con un cacciavite sul potenziometro corrispondente, fino ad un livello accettabile.
Qualora il fenomeno persista, agire sul potenziometro dell’altoparlante
in modo da elimina-
re l’inconveniente. Se il volume è troppo basso, aumentare prima il volume dell’altoparlante ed
eventualmente anche quello del microfono, tenendo presente che è preferibile una trasmissione
chiara e priva di disturbi, che una al limite dell’innesco (Larsen).
• Adjustment volume:
In case of a whistle (Larsen effect), first reduce the microphones power, adjusting the corresponding
potentiometers with a screw driver, until an acceptable level is reached. Should the whistle persist,
adjust the loudspeakers
volume in order to eliminate the trouble. If the volume is too low level then,
increase first the potentiometer of the loudspeaker and secondly the one for the microphone, bearing
in mind that a clear and noise free reception is preferable than one just before whistling (Larsen).
•
Réglage du volume:
Lors de sifflement (effet de Larsen), reduire d’abord la puissance du micro , sur le potentiomètre
correspondant, à l’aide d’un tournevis, jusqu’à l’obtention d’un niveau satisfaisant. Si le sifflement
persiste, régler le potentiomètre du hautparleur
jusqu’à l’élimination de celui-ci. Si le volume
est trop bas, augmenter d’abord la puissance du haut-parleur et éventuellement celle du micro,
en considérant qu’une réception claire et sans parasite est préférable à une communication à la
limite de l’accrochage (effet de Larsen).
•
Einstellung der Lautstärke:
Beim etwaigen Auftreten eines Pfeiftones (Larsen-Effekt), zuerst die Lautstärke des Mikrophones bis
auf einen annehmbaren Wert herabsetzen, indem man das entsprechende Potentiometer mit einem
Schraubendreher einstellt. Sollte die Störung weiterhin bestehen, dann das Potentiometer des Laut-
sprechers
bis zur Beseitigung des Pfeiftones einstellen. Ist die Lautstärke nun zu niedrig, dann zuerst
die des Lautsprechers und erst danach evtl. auch die des Mikrophones erhohen, wobei ein deutlicher
und störungsfreier Empfang einem an der Störungsgrenze liegendem (Larsen-Effekt) vorzuziehen ist.
BUS
PL
S+ S−
PJ3 J1
J4 J2
T S
N
BUS
PL
S+ S−
PJ3 J1
J4 J2
T S
N
La pagina si sta caricando...
La pagina si sta caricando...

Video Kit
27
• Selezione suoneria
La suoneria di chiamata del citofono è selezionabile tra 16 differenti tipi di melodie.
Si possono differenziare le seguenti tipologie di chiamata:
Chiamata al piano; Chiamata da posto esterno; Chiamata intercom.
• Bell selection
The door entry unit call bells can be selected from 16 different types of tune.
The following types of call can be differentiated:
Call to the floor; Call from entrance panel; Intercom Call.
• Sélection sonnerie
La sonnerie d’appel du phone peut être sélectionnée parmi 16 différents types de mélodies.
On peut différencier les typologies d’appel suivantes:
Appel à l’étage; Appel de poste extérieur; Appel intercom.
• Läutwerk wählen
Für das Läutwerk der Rufe des haustelefons stehen 16 verschiedene Melodien zur Verfügung.
Die Rufe können folgendermaßen differenziert werden:
Etagenruf; Ruf von der Türstation; Intercom Anruf.
• Selección del timbre
El timbre del llamada del interno fono se puede seleccionar entre 16 melodías diferentes.
Es posible diferenciar las siguientes tipologías de llamadas:
Llamada a la planta; llamada desde puesta exterior; Llamada interna.
• Beltoon kiezen
De oproepbeltoon van de telefoon biedt de keus uit 16 melodiën.
Het is mogelijk om de volgende types oproepen te kenmerken:
Oproep aan de verdieping; Oproep vanuit het deurstation; Intercom oproep.
• Selecção toques
Os toques de chamada do intercomunicador podem ser seleccionados em 16 tipos de melodias dife-
rentes.
Podem ser diferenciados os seguintes tipos de chamada:
Chamada ao piso; Chamada da unidade externa; Chamada Intercom.
• Επιλογή κουδουνιού
Το κουδούνι κλήση του θυροτηλεφώνου είναι επιλέξιο εταξύ 16 διαφορετικών τύπων ελωδιών.
Μπορούν να διαφοροποιούνται οι ακόλουθε τυπολογίε κλήση:
Κλήση στον όροφο. Κλήση από εξωτερικό σηείο. Κλήση intercom.
•
16 .
:
; ; .
La pagina si sta caricando...

Video Kit
29
• Selezione suoneria chiamata al piano • Selection call to the floor bell • Sélection sonnerie appel à
l’étage • Änderung Rufton Etagentaster • Selección timbre llamada al piso • Kies belgeluid oproep aan
verdieping • Selecção do toque para chamada ao anda • Επιλογή κουδουνιού κλήση στον όροφο
• . • Kat araması zl ses seçm • Wybór dźwięku wywołania z
dzwonka •
• Selezione suoneria da posto esterno principale (S=0) • Selection call from main outdoor station
(S=0) bell • Sélection sonnerie appel d’un poste extérieur principal (S=0) • Änderung Rufton
der Haupttürstation • Selección timbre llamada desde el puesto exterior principal (S=0) • Kies
belgeluid oproep vanuit eerste externe post (S=0) • Selecção do toque para chamada da unidade
externa principal (S=0) • Επιλογή κουδουνιού από κύριο εξωτερικό σηείο (S=0) •
(S=0) • Ana dış ünteden zl ses seçm (S=0) • Wybór dźwięku
wywołania z głównego panelu zewnętrznego (S=0) •
• Programmazione suonerie • Programming bells • Programmation sonneries • Wähl-
bare Ruftöne • Programación timbres • Programmering belgeluid • Programação dos
toques • Προγραατισό κουδουνιών • Программирование мелодий • Zl sesler
programlanması • Programowanie dźwięku •
1
1
1
1
16
2
3
2
1
4
OK
3
2
1
RESET
1
O
1
1
1
1
16
2
3
2
1
4
OK
3
2
1
RESET
1

30
• Selezione suoneria chiamata intercom • Selection call intercom bell • Sélection sonnerie appel
intercom • Änderung interner Rufton • Selección timbre llamada intercomunicante • Kies belgeluid
intercom oproep gebouw • Selecção do toque para chamada intercomomunicador • Επιλογή
κουδουνιού κλήση intercom • • İntercom araması zl ses
seçm • Wybór dźwięku wywołania interkomowego •
1
1
1
1
16
2
3
2
1
4
OK
3
2
1
RESET
2
1
La pagina si sta caricando...

32
10s
BIP
Led OFF Led OFF
10s
BIP
Led OFF
3
2
3
2
1
O
3
2
1
O
1
3501/2
2
0
3501/0
MO DP
N
2 0
• Funzione “Studio professionale” attiva • “Professional studio” function active •
Fonction “Bureau professionnel” activée • Funktion “Professionelles Studio” aktiv •
Función “Oficina Profesional” activada • Kantoorfunctie actief • Função “Escritório
profissional” activa • Λειτουργία “Επαγγελατικό στούντιο” ενεργή •
“ ” • “Mesleki büro” fonksiyonu etkin •
Funkcja “Pracownia” aktywna •
• Per rendere operativa la funzione “Studio Professionale” configurare MOD = 20
• To make the “Professional Studio” function operative, configure MOD = 20
• Pour rendre la fonction “Bureau Professionnel” opérationnelle, configurer MOD = 20
• Um die Funktion “Professionelles Studio” benutzen zu können, folgendermaßen konfigurieren: MOD = 20
• Para activar la función “Estudio Profesional” configure MOD = 20
• Om de functie “kantoorfunctie” operatief te maken MOD = 20 configureren
• Para fazer com que a função “Departamento Profissional” fique operativa configurar MOD = 20
• Για να κάνετε ενεργή τη λειτουργία “Επαγγελατικό Στούντιο” ρυθίστε MOD = 20
• “ ” MOD = 20
• “Mesleki Büro” fonksiyonunu etkin kılmak için MOD = 20 konfigüre edin
• Aby uaktywnić funkcję „Pracownia”, skonfigurować MOD = 20
•

Video Kit
33
10s
BIP
Led OFF Led OFF
10s
BIP
Led OFF
3
2
3
2
1
O
3
2
1
O
1
• Per attivare la funzione
• To activate the function
• Pour activer la fonction
• Zum Aktivieren der Funktion
• Para activar la función
• Om de functie te activeren
• Para activar a função
• Για ενεργοποίηση τη λειτουργία
•
• İşlev etkn kılmak çn
• Aby aktywować funkcję
•
10s
BIP
Led OFF Led OFF
10s
BIP
Led OFF
3
2
3
2
1
O
3
2
1
O
1
• Per disattivare la funzione
• To deactivate the function
• Pour désactiver la fonction
• Zum Deaktivieren der Funktion
• Para desactivar la función
• Om de functie te deactiveren
• Para desactivar a função
• Για απενεργοποίηση τη λειτουργία
•
• İşlev devreden çıkarmak çn
• Aby dezaktywować funkcję
•
• Nota: L’attivazione/disattivazione della funzione “Studio professionale” causa l’apertura della
serratura del posto esterno associato.
• Note: The activation/deactivation of the “Professional studio” function causes the opening of the
associated entrance panel door lock.
• Remarque: L’activation/désactivation de la fonction «Bureau professionnel» provoque l’ouver-
ture de la serrure du poste extérieur associé
• Anmerkung: Bei der Aktivierung/Deaktivierung der Funktion “Professionelles Studio” öffnet sich
das Schloss an der jeweiligen Türstation.
• Nota: La activación/desactivación de la función "Oficina Profesional" causa la apertura de la
cerradura del puesto exterior asociado.
• Opmerking: Het activeren/deactiveren van de kantoorfunctie veroorzaakt de opening van het
deurslot van het bijbehorende deurstation.
• Nota: A activação/desactivação da função "Escritório profissional" causa a abertura da unidade
externa associada.
• Σηείωση: Η ενεργοποίηση/απενεργοποίηση τη λειτουργία “Επαγγελατικό γραφείο” προκαλεί
το άνοιγα τη κλειδαριά τη συνδεδεένη εξωτερική θέση.
• Примечание: / “Профессиональная студия”
.
• Not: Eşleştrlmş dış üntenn kldnn açılması sebeb “Meslek büro” şlevnn etknleştrlmes/dev-
reden çıkarılması.
• Uwaga: Aktywacja /dezaktywacja funkcji “Pracownia” powoduje otwarcie zamka połączonego
panelu zewnętrznego.
La pagina si sta caricando...
La pagina si sta caricando...

BTicino SpA
Via Messina, 38
20154 Milano - Italy
www.bticino.com
Servizio clienti
BTicino SpA si riserva il diritto di variare in qualsiasi momento i contenuti illustrati nel presente stampato e di
comunicare, in qualsiasi forma e modalità, i cambiamenti apportati.
BTicino SpA reserves at any time the right to modify the contents of this booklet and
to comunicate in any form and modality, the charges brought to the same.
Timbro installatore
Installer stamp
-
 1
1
-
 2
2
-
 3
3
-
 4
4
-
 5
5
-
 6
6
-
 7
7
-
 8
8
-
 9
9
-
 10
10
-
 11
11
-
 12
12
-
 13
13
-
 14
14
-
 15
15
-
 16
16
-
 17
17
-
 18
18
-
 19
19
-
 20
20
-
 21
21
-
 22
22
-
 23
23
-
 24
24
-
 25
25
-
 26
26
-
 27
27
-
 28
28
-
 29
29
-
 30
30
-
 31
31
-
 32
32
-
 33
33
-
 34
34
-
 35
35
-
 36
36


Bticino 369121 Istruzioni per l'uso
- Tipo
- Istruzioni per l'uso
- Questo manuale è adatto anche per
in altre lingue
- English: Bticino 369121 Operating instructions
- français: Bticino 369121 Mode d'emploi
- español: Bticino 369121 Instrucciones de operación
- Deutsch: Bticino 369121 Bedienungsanleitung
- Nederlands: Bticino 369121 Handleiding
- português: Bticino 369121 Instruções de operação
- polski: Bticino 369121 Instrukcja obsługi
- Türkçe: Bticino 369121 Kullanma talimatları
- română: Bticino 369121 Instrucțiuni de utilizare
Documenti correlati
-
Bticino 365711 Guida d'installazione
-
-
-
-
-
-
-
-
-