
C9704-90903
*C9704-90903*
*C9704-90903*
copyright © 2002
Hewlett-Packard Company
www.hp.com
c9704a
instalasi
lea esto primero
install
installation
installation
installazione
installación
installation
installatiegids
asennus
installasjon
instalação
instalation
nstalacii
telepítés
instalacja
”‛“ ‗‘—
kurulum

EnglishFrançaisDeutschItalianoEspañolDanskNederlands
1
1 2 3
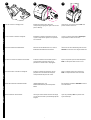
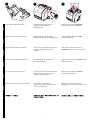
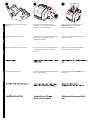
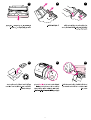
This kit contains an imaging drum. Replace the imaging drum when the
corresponding imaging drum light on the control
panel is blinking.
Open the top cover of the printer. Note: The
printer should be turned on.
Ce kit contient un tambour d'imagerie. Remplacez le tambour d'imagerie lorsque le
voyant correspondant clignote sur le panneau
de commande.
Ouvrez le capot de l'imprimante. Remarque :
L’imprimante doit être sous tension.
Questo kit contiene un tamburo fotosensibile. Sostituire il tamburo fotosensibile quando il
corrispondente indicatore luminoso sul
pannello di controllo inizia a lampeggiare.
Aprire il coperchio superiore della stampante.
Nota: La stampante deve essere accesa.
Este kit contiene un tambor de imágenes. Sustituya el tambor de imágenes cuando
parpadee la luz del tambor de imágenes
correspondiente del panel de control.
Abra la cubierta superior de la impresora.
Nota: La impresora debe estar encendida.
Dette sæt indeholder et billedtromlesæt. Udskift billedtromlen, når
billedtromleindikatoren på kontrolpanelet
blinker.
Åbn printerens topdæksel. Bemærk! Printeren
skal være tændt.
Deze kit bevat de drumcassette. Vervang de drumcassette wanneer het lampje
voor de drumcassette op het bedieningspaneel
knippert.
Open de printerkap. N.B.: De printer moet
ingeschakeld zijn.
Dieses Kit enthält eine Bildtrommel. Wechseln Sie die Bildtrommel aus, wenn im
Bedienfeld die Bildtrommel-LED blinkt.
Öffnen Sie die obere Abdeckung des Druckers.
Hinweis: Der Drucker muss eingeschaltet sein.

2
4 5 6
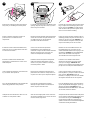
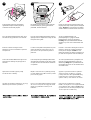
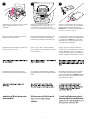
Remove the used imaging drum by pushing it
away from you and lifting it out of the printer.
Locate the clear plastic strip in the bottom of the
opening. Wipe the strip with a soft, dry cloth to
remove any dust or debris.
Remove the new imaging drum from the plastic
bag, and place the used imaging drum in the
bag for recycling. Caution: The new imaging
drum should not be exposed to light for more
than 15 seconds before installing.
Retirez le tambour d'imagerie usagé en le
poussant et en le soulevant hors de
l'imprimante.
Repérez la bande plastique transparente située
en bas de l'ouverture. Essuyez la bande avec
un chiffon doux et sec afin de retirer la
poussière et les débris éventuels.
Retirez le nouveau tambour d'imagerie de son
emballage plastique et placez l'ancien dans ce
même sac afin de le recycler. Attention : Le
nouveau tambour d'imagerie ne doit pas être
exposé à la lumière plus de 15 secondes.
Rimuovere il tamburo fotosensibile usato
spingendolo e sollevandolo fino a farlo uscire
dalla stampante.
Individuare la striscia di plastica trasparente
nella parte inferiore dell'apertura. Pulire la
striscia con un panno morbido e asciutto per
rimuovere polvere e detriti.
Estrarre il nuovo tamburo fotosensibile
dall'involucro di plastica ed inserirvi quello
usato per il riciclaggio. Attenzione: Non
esporre il nuovo tamburo fotosensibile alla luce
per più di 15 secondi prima dell'installazione.
Quite el tambor de imágenes usado tirando de
él y sacándolo de la impresora.
Busque la tira de plástico trasparente de la
parte inferior de la abertura. Limpie la tira con
un paño seco suave que no desprenda pelusa
Saque el nuevo tambor de imágenes de la
bolsa de plástico y coloque el usado en la bolsa
para reciclarlo. Precaución: Antes de
instalarlo, no exponga a la luz el nuevo tambor
de imágenes durante más de 15 segundos.
Fjern den brugte billedtromle ved at skubbe den
væk fra dig og løfte den ud af printeren.
Find den klare plasticstrimmel nederst i
åbningen. Rengør strimlen med en blød, tør
klud for at fjerne støv eller snavs.
Den nye billedtromle tages ud af plasticposen,
og den brugte billedtromle lægges i posen og
afleveres til genbrug. Forsigtig! Den nye
billedtromle må ikke udsættes for lys i mere end
15 sekunder, inden den sættes i.
Verwijder de drumcassette door deze van u af
te duwen en uit de printer te tillen.
Zoek de doorzichtige plastic strook onder aan
de opening. Verwijder stof en vuil van de strook
met een zachte, droge doek.
Verwijder de nieuwe drumcassette uit de plastic
zak en plaats de gebruikte drumcassette in de
zak om deze te recyclen. Voorzichtig: De
nieuwe drumcassette mag niet langer dan
vijftien seconden aan licht worden blootgesteld
voordat deze wordt geïnstalleerd.
Entnehmen Sie die verbrauchte Bildtrommel,
indem Sie sie von sich weg drücken und dann
aus dem Drucker heben.
Suchen Sie nach dem transparenten
Plastikstreifen auf der Unterseite des
Gehäuses. Reinigen Sie den Streifen mit einem
weichen, trockenen Tuch, um Staub- und
andere Schmutzpartikel zu beseitigen.
Nehmen Sie die neue Bildtrommel aus der
Kunststoffverpackung, und legen Sie die
verbrauchte Bildtrommel zum Recycling in die
Verpackung. Achtung: Die neue Bildtrommel
darf vor dem Einsetzen nicht länger als
15 Sekunden dem Licht ausgesetzt sein.

EnglishFrançaisDeutschItalianoEspañolDanskNederlands
3
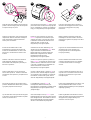
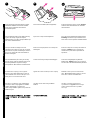
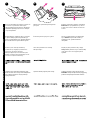
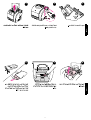
Place the imaging drum on a firm surface and
pull the orange rings to remove the shipping
pins. Remove the orange shipping lock on each
end of the imaging drum.
Remove the two orange shipping spacers. Remove the orange cover from the imaging
drum. Caution: Touching the surface of the
white roller can affect print quality.
7 8
9
Placez le tambour d'imagerie sur une surface
plane et tirez les anneaux orange afin de retirer
les broches d'expédition. Retirez le dispositif de
sécurité orange à chaque extrémité du tambour
d'imagerie.
Retirez les deux cales d'expédition orange. Enlevez l'emballage orange du tambour
d'imagerie. Attention : Ne touchez pas la
surface du rouleau blanc, sinon la qualité
d'impression risque d'être amoindrie.
Collocare il tamburo fotosensibile su una
superficie stabile e tirare gli anelli arancioni per
rimuovere i piedini di spedizione. Rimuovere i
sigilli di spedizione arancione su tutti i lati del
tamburo fotosensibile.
Rimuovere i due distanziatori di spedizione
arancioni.
Rimuovere il coperchio arancione dal tamburo
fotosensibile. Attenzione: Non toccare la
superficie del rullo bianco poiché si potrebbe
influire sulla qualità di stampa.
Coloque el tambor de formación de imágenes
en una superficie firme y tire de los anillos
naranjas para retirar el envoltorio. Quite los
bloqueos de transporte naranjas de los
extremos del tambor de formación de
imágenes.
Retire los dos espaciadores de embalaje
naranjas.
Saque la cubierta naranja del tambor de
imágenes. Precaución: Tocar la superficie del
rodillo blanco puede afectar a la calidad de
impresión.
Placer billedtromlen på et fast underlag, og
fjern transporttappene ved at trække i de
orange ringe. Fjern den orange transportlås i
hver ende af billedtromlen.
Fjern de to orange afstandsstykker fra
forsendelsen.
Tag det orange dæksel af billedtromlen.
Forsigtig! Hvis den hvide rulles overflade
berøres, kan udskriftskvaliteten påvirkes.
Zet de drumcassette op een vlakke ondergrond
en trek aan de oranje ringen om de
verzendpinnen te verwijderen. Verwijder de
oranje verzendvergrendeling aan de uiteinden
van de drumcassette.
Verwijder het oranje verzendmateriaal (2). Verwijder de oranje bedekking van de
drumcassette. Voorzichtig: Wanneer u het
oppervlak van de witte rollen aanraakt, kan de
afdrukkwaliteit afnemen.
Legen Sie die Bildtrommel auf eine feste
Oberfläche, und ziehen Sie an den
orangefarbenen Ringen, um die Transportstifte
zu entfernen. Entfernen Sie die orangefarbenen
Versandsperren an jedem Ende der
Bildtrommel.
Entfernen Sie die zwei für den Transport
angebrachten orangefarbenen Abstandshalter.
Entfernen Sie die orangefarbene Hülle von der
Bildtrommel. Achtung: Durch das Berühren der
Oberfläche der weißen Walze kann die
Druckqualität beeinträchtigt werden.

4
10 11 12
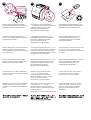
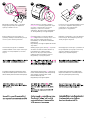
Align the white roller with the arrows inside the
printer. Lower the imaging drum into the printer
and press it firmly into place.
Close the top cover and press G
O
on the control
panel. After a few seconds, the Ready light will
turn on. Installation is complete. For additional
help, go to http://www.hp.com/support/clj2500.
Place the used imaging drum in the box in
which the new imaging drum arrived. See the
enclosed recycling guide for recycling
instructions.
Alignez le rouleau blanc avec les flèches dans
l'imprimante. Abaissez le tambour d'imagerie
dans l'imprimante et appuyez fermement
dessus pour l'enclencher.
Fermez le capot et appuyez sur la touche
R
EPRISE
du panneau de commande. Après
quelques secondes, le voyant Prêt s'allume.
L'installation est maintenant terminée. Pour
obtenir de l'aide, accédez au site
http://www.hp.com/support/clj2500.
Mettez le tambour d'imagerie usagé dans
l'emballage du nouveau tambour. Suivez les
instructions du guide de recyclage inclus dans
l'emballage.
Allineare il rullo bianco alle frecce all'interno
della stampante. Abbassare il tamburo
fotosensibile nella stampante e premerlo per
bloccarlo in posizione.
Chiudere il coperchio superiore e premere il
tasto C
ONTINUA
sul pannello di controllo. Dopo
qualche secondo, l'indicatore luminoso Pronta
si accende. L'installazione è completata. Per
ulteriori informazioni, visitare il sito
http://www.hp.com/support/clj2500.
Inserire il tamburo fotosensibile usato nella
confezione di spedizione del nuovo tamburo.
Consultare le informazioni sul riciclaggio
accluse.
Alinee el rodillo blanco con las flechas del
interior de la impresora. Introduzca el tambor
de imágenes en la impresora y encájelo bien en
su sitio.
Cierre la cubierta superior y presione I
R
en el
panel de control. Pasados algunos segundos,
se encenderá la luz Preparada. La instalación
ha finalizado. Si desea más ayuda, visite la
dirección http://www.hp.com/support/clj2500.
Coloque el tambor de imágenes usado en la
caja del nuevo. Consulte las instrucciones de
reciclaje que encontrará en la guía sobre
reciclaje adjunta.
Den hvide rulle placeres ud for pilene inden i
printeren. Billedtromlen sænkes ned i printeren
og trykkes på plads med et fast tryk.
Luk topdækslet og tryk på S
TART
på
kontrolpanelet. Efter få sekunder lyser
Klar-indikatoren. Installationen er fuldført. Gå til
http://www.hp.com/support/clj2500 for at få
yderligere hjælp.
Placer den brugte billedtromle i den kasse, som
den nye billedtromle blev leveret i. Se den
vedlagte genbrugsvejledning for at få yderligere
vejledning i genbrug.
Lijn de witte rollen uit ten opzichte van de pijlen
in de printer. Laat de drumcassette in de printer
zakken en druk deze vast.
Sluit de bovenkap en druk op S
TART
op het
bedieningspaneel. Na enige seconden gaat het
Klaar-lampje branden. De installatie is voltooid.
Bezoek http://www.hp.com/support/clj2500
wanneer u aanvullende hulp nodig hebt.
Plaats de gebruikte drumcassette in de doos
waarin de nieuwe drumcassette is geleverd. Zie
de bijgaande recyclinghandleiding voor
instructies voor het recyclen.
Richten Sie die weiße Walze an den
Pfeilsymbolen im Inneren des Drucker aus.
Setzen Sie die Bildtrommel von oben in den
Drucker ein, und drücken Sie sie fest in ihre
Position.
Schließen Sie die obere Abdeckung, und
drücken Sie auf dem Bedienfeld S
TART
. Nach
einigen Sekunden leuchtet wieder die
Bereitschafts-LED auf. Das Einsetzen der
Bildtrommel ist abgeschlossen. Weitere
Informationen finden Sie unter
http://www.hp.com/support/clj2500.
Legen Sie die verbrauchte Bildtrommel in die
Verpackung der neuen. Hinweise zum
Recycling finden Sie in der beiliegenden
Recycling-Anleitung.
La pagina si sta caricando...
La pagina si sta caricando...
La pagina si sta caricando...
La pagina si sta caricando...

PolskiBahasa Indonesia
Türkçe
9
1
2
3
.
,
.
.
:
.
Bu kit içinde bir resim dramı vardır. Resim dramını, kontrol paneli üzerinde bulunan
ilgili resim dramı ışığı yanıp sönmeye
başladığında değiştirin.
Yazıcının üst kapağını açın. Not: Yazıcının
açık olması gerekir.
Perangkat ini berisi drum tinta. Ganti drum tinta apabila lampu drum tinta pada
panel kontrol berkedip.
Buka penutup atas printer. Catatan: Printer
harus aktif.
Niniejszy zestaw zawiera bęben obrazowy. Konieczność wymiany bębna wskazywana jest
przez miganie kontrolki bębna na panelu
sterowania.
Otwórz górną pokrywę drukarki. Uwaga:
Drukarka powinna być włączona.

10
4 5 6
, ,
.
.
,
- .
.
!
15 .
Biten resim dramını yazıcıdan çıkarırken ileri
doğru itip yukarı doğru kaldırın.
Açıklığın alt tarafındaki saydam plastik şeridi
bulun. Şeridi üzerindeki toz ve pisliklerden
temizlemek için yumuşak, kuru bir bezle silin.
Yeni resim dramını plastik torbasından çıkarın
ve kullanılmış resim dramını geri dönüştürmek
için torbaya koyun. Dikkat: Yeni resim dramı
takılmadan önce 15 saniyeden daha uzun bir
süre ışığa maruz kalmamalıdır.
Keluarkan drum tinta bekas dengan cara
mendorongnya lalu angkat keluar dari printer.
Cari strip plastik di bagian bawah. Bersihkan
dengan kain halus dan kering supaya debunya
hilang.
Keluarkan drum tinta baru dari tas plastiknya
lalu masukkan drum tinta bekas ke dalam
kantong untuk daur ulang. Perhatian: Sebelum
dipasang, drum tinta baru tidak boleh terkena
cahaya lebih dari 15 detik.
Wyjmij zużyty bęben z drukarki popychając go w
kierunku od siebie i unosząc.
W dolnej części otworu odszukaj plastikową
taśmę. Używając suchej szmatki usuń z niej kurz
i zanieczyszczenia.
Wyjmij nowy bęben obrazowy z plastikowej
torebki i umieść w niej zużyty bęben w celu jego
utylizacji. Uwaga: Po wyjęciu z opakowania
nowy bęben obrazowy może być wystawiany na
działanie światła przez maksymalnie 15 sekund.

PolskiBahasa Indonesia
Türkçe
11
7
8
9
. 3)
.
.
.
!
.
.
Görüntü dramını sağlam bir yüzeye yerleştirin
ve paket sabitleyici pimlerini çıkarmak için
turuncu renkli halkaları çekin. Görüntü dramının
iki ucundaki turuncu taşıma kilitlerini çıkarın.
İki turuncu paket ara parçasını çıkarın. Turuncu renkteki kapağı resim dramından
ayırın. Dikkat: Beyaz renkli merdaneye
dokunmayın. Bu, yazdırma kalitesini
etkileyebilir.
Letakkan drum tinta pada permukaan yang
keras lalu tarik cincin oranye untuk melepaskan
pin. Lepaskan pengunci oranye pada tiap
unjung drum tinta.
Lepaskan kedua pengatur jarak oranye. Lepaskan penutup oranye dari drum tinta.
Perhatian: Menyentuh permukaan penggulung
putih bisa mempengaruhi kualitas cetakan.
Umieść bęben obrazowy na stabilnej
powierzchni i pociągnij za pomarańczowe
pierścienie, aby usunąć trzpienie
zabezpieczające bęben na czas transportu.
Zdejmij pomarańczowe blokady transportowe
z obu końców bębna obrazowego.
Usuń dwa pomarańczowe elementy
zabezpieczające.
Zdejmij z bębna pomarańczową pokrywę.
Uwaga: Należy uważać, aby nie dotknąć białej
rolki, gdyż może to mieć wpływ na jakość
wydruku.

12
10 11 12
.
.
.
.
.
. http://www.hp.com/support/clj2500.
- .
.
.
Beyaz merdaneyi yazıcının içindeki, ok
işaretleriyle hizalayın. Resim dramını yazıcıya
sokun ve yerine oturması için bastırın.
Üst kapağı kapatın ve kontrol panelindeki
D
EVAM
düğmesine basın. Bir kaç saniye sonra
Hazır ışığı yanar. Takma işlemi böylece
tamamlanmış olur. Yardım konusunda daha
fazla bilgi için
http://www.hp.com/support/clj2500 adresindeki
siteye bakın.
Kullanılmış resim dramını, yeni resim dramının
kutusuna koyun. Geri dönüşüm işlemleri için
ekteki yönergelere başvurun.
Sesuaikan penggulung putih dengan tanda
anak panah di dalam printer. Turunkan drum
tinta ke dalam printer lalu tekan ke tempatnya.
Tutup penutup atas lalu tekan G
O
pada panel
kontrol. Setelah beberapa detik, lampu Ready
akan menyala. Instalasi selesai. Untuk
bantuan lebih lanjut, lihat
http://www.hp.com/support/clj2500.
Letakkan drum tinta bekas ke dalam kotak
tempat drum tinta baru. Lihat buku panduan
daur ulang untuk petunjuk daur ulang.
Umieść białą rolkę zgodnie ze strzałkami
wewnątrz drukarki. Umieść bęben obrazowy w
drukarce i dociśnij aż znajdzie się na swoim
miejscu.
Zamknij pokrywę górną i naciśnij
G
O
na panelu
sterowania. Po kilku sekundach zaświeci się
kontrolka Gotowe. Instalacja została
zakończona. Więcej informacji na temat
instalacji bębna można znaleźć na stronie
http:
//
www.hp.com
/
support
/
clj2500.
Włóż zużyty bęben obrazowy do opakowania, w
którym znajdował się nowy bęben. Informacje
dotyczące utylizacji można znaleźć w
załączonym podręczniku utylizacji.

13
9
8 7
12
11
10

14
3
2
1
6
5
4

-
 1
1
-
 2
2
-
 3
3
-
 4
4
-
 5
5
-
 6
6
-
 7
7
-
 8
8
-
 9
9
-
 10
10
-
 11
11
-
 12
12
-
 13
13
-
 14
14
-
 15
15
-
 16
16


HP Color LaserJet 2500 Printer series Manuale del proprietario
- Tipo
- Manuale del proprietario
- Questo manuale è adatto anche per
in altre lingue
- English: HP Color LaserJet 2500 Printer series Owner's manual
- français: HP Color LaserJet 2500 Printer series Le manuel du propriétaire
- español: HP Color LaserJet 2500 Printer series El manual del propietario
- Deutsch: HP Color LaserJet 2500 Printer series Bedienungsanleitung
- Nederlands: HP Color LaserJet 2500 Printer series de handleiding
- português: HP Color LaserJet 2500 Printer series Manual do proprietário
- dansk: HP Color LaserJet 2500 Printer series Brugervejledning
- čeština: HP Color LaserJet 2500 Printer series Návod k obsluze
- polski: HP Color LaserJet 2500 Printer series Instrukcja obsługi
- svenska: HP Color LaserJet 2500 Printer series Bruksanvisning
- Türkçe: HP Color LaserJet 2500 Printer series El kitabı
- suomi: HP Color LaserJet 2500 Printer series Omistajan opas
Documenti correlati
-
HP Color LaserJet 4550 Printer series Guida d'installazione
-
HP LaserJet Ultra M206 series Manuale del proprietario
-
HP Color LaserJet 2500 Printer series Manuale del proprietario
-
HP Color LaserJet 9500 Printer series Guida Rapida
-
-
HP Color LaserJet 9500 Multifunction Printer series Guida Rapida
-
HP Neverstop Laser 1000w Guida Rapida
-
HP Neverstop Laser MFP 1200a Guida Rapida
-
-