
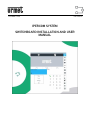
IPERCOM
SYSTEM
SWITCHBOARD INSTALLATION AND USER
MANUAL
DS1060-121A LBT20379

CONTENTS
Version 1.1.0
1
Introduction................................................................................................................................. 4
1.1 Hardware and software requirements ....................................................................................................... 4
2
Installation .................................................................................................................................. 5
2.1 Windows Firewall Configuration ................................................................................................................ 9
2.2 Network Configuration ............................................................................................................................. 10
2.3 Doorphone 1060/41 Installation (only for PC with speaker output and microphone input)................... 12
2.4 Audio Devices Configuration .................................................................................................................... 12
2.4.1
Speaker (Audio Devices) .................................................................................................................................................. 13
2.4.2
Microphone (Recording Devices) .................................................................................................................................... 14
3
Login phase ................................................................................................................................ 16
4
Operating modes ....................................................................................................................... 19
4.1 Switchboard in stand by mode ................................................................................................................. 20
4.2 Switchboard in night mode ...................................................................................................................... 20
4.3 Switchboard in day mode ......................................................................................................................... 20
5
Switchboard use ........................................................................................................................ 21
5.1 call received from a door unit .................................................................................................................. 21
5.2 Call received from a user .......................................................................................................................... 23
5.3 Call to a user with code ............................................................................................................................ 24
5.4 Call to a user with the address book ........................................................................................................ 26
5.4.1
User search by name ....................................................................................................................................................... 27
5.4.2
User search by apartment ............................................................................................................................................... 27
5.4.3
User search by topological code ...................................................................................................................................... 28
5.4.4
Call to a user by address book ......................................................................................................................................... 30
5.4.5
Sending chat message ..................................................................................................................................................... 30
5.4.6
Switchboard search ......................................................................................................................................................... 31
5.4.7
Contact searching ............................................................................................................................................................ 32
5.4.8
Chat list ............................................................................................................................................................................ 33
5.5 Receiving a call from a door unit and forwarding to a user (concierge service) ...................................... 35
5.6 Receiving a call from a user and forwarding to another user (concierge service) ................................... 36
5.7 Door lock release commands ................................................................................................................... 38

3 DS1060-121A
5.7.1
Door opening ................................................................................................................................................................... 38
6
Drop-down menus ..................................................................................................................... 39
6.1 View menu ................................................................................................................................................ 40
6.1.1
Address book ................................................................................................................................................................... 40
6.1.2
Alarms ............................................................................................................................................................................. 41
6.1.3
Calls memory ................................................................................................................................................................... 43
6.1.4
Camera test ..................................................................................................................................................................... 43
6.1.5
Opened doors .................................................................................................................................................................. 44
6.1.6
Hide keypad / Show keypad ............................................................................................................................................ 44
6.2 Tools menu ............................................................................................................................................... 45
6.2.1
Concierge service configuration ...................................................................................................................................... 45
6.2.2
Output List ....................................................................................................................................................................... 46
6.2.3
Door opener .................................................................................................................................................................... 47
6.2.4
Cctv .................................................................................................................................................................................. 48
6.2.5
Textmessage .................................................................................................................................................................... 49
6.2.6
External application configuration .................................................................................................................................. 50
6.2.7
Access control .................................................................................................................................................................. 51
6.2.8
Configuration distribution status..................................................................................................................................... 52
6.3 Menu Settings ........................................................................................................................................... 53
6.3.1
Switchboard application configuration ........................................................................................................................... 53
6.3.2
Melody configuration ...................................................................................................................................................... 54
6.3.3
Tool bar configuration ..................................................................................................................................................... 55
6.3.4
Other features of Switchboard application ..................................................................................................................... 56
6.4 Info menu ................................................................................................................................................. 58
6.4.1
Information about switchboard ...................................................................................................................................... 58
7
Problem solving ......................................................................................................................... 59
7.1 Right close of Switchboard application .................................................................................................... 59
7.2 Right uninstall of Switchboard application ............................................................................................... 59
7.3 Switchboard application network setting change .................................................................................... 59
7.3.1
Case 1: Manual network settings (previous setting: automatic) ..................................................................................... 60
7.3.2
Case 2: Manual network settings (previous setting: manual) ......................................................................................... 62
7.3.3
Case 3: automatic network settings (previous setting: manual) ..................................................................................... 62
7.3.4
Case 4: automatic network settings (previous setting: automatic) ................................................................................. 63
7.4 Use of Switchboard application with door phone Ref. 1060/41 .............................................................. 64

4 DS1060-121A
1
I
NTRODUCTION
The user-friendly Switchboard application has been designed and implemented to allow a concierge
attendant of a building performing and managing all switchboard calls and applications.
The application can be downloaded from Urmet Internet site (www.urmet.com) (it is necessary to log in
on website).
1.1
H
ARDWARE AND SOFTWARE REQUIREMENTS
PC hardware and software minimum requirements are the following:
• Processor: 2GHz 32 bit (x86) or 64 bit (x64) (Windows 7 Home Premium, Professional or
Ultimate);
• RAM: 2GB (32 bit or 64 bit);
• Disk space: 16 GB (32 bit) or 20 GB (64 bit) available;
• Audio card: compatible with 32 or 64 bit Microsoft Windows 7 (Home Premium, Professional
or Ultimate);
• Video card: compatible with 32 or 64 bit Microsoft Windows 7 (Home Premium, Professional
or Ultimate), 1024 x 768 pixel min. resolution;
• Webcam
1
: compatible with 32 or 64 bit Microsoft Windows 7 (Home Premium, Professional or
Ultimate);
• USB port: 1 for the connection of the external doorphone Ref. 1060/41 (optional);
• Ethernet interface: 10 / 100 Mbit/s.
1
Switchboard application does not need any webcam, which is requested if a video communication must be established from
the Switchboard application to the other devices able to display images.

5 DS1060-121A
2
I
NSTALLATION
The installation procedure starts launching the related set up file, which can be downloaded from Urmet
Internet site.
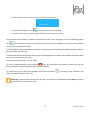
During the installation phases, follow the indications displayed from time to time in the different windows.
Warning: to perform correctly the installation procedure of Switchboard application, the user must
access the PC with system administrator rights; otherwise, the installation will not be properly
performed.
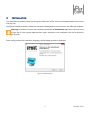
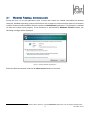
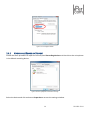
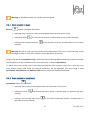
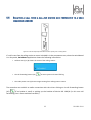
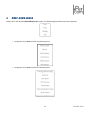
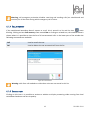
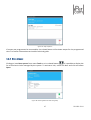
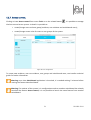
After having chosen the installation language, the following window is displayed:
Figure 1: installation phase

6 DS1060-121A
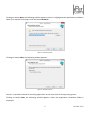
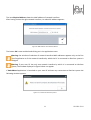
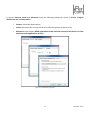
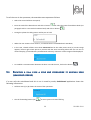
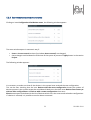
Clicking on button Next, the following window appears where it is highlighted the application installation
folder (it is possible to change it with the button Browse):
Figure 2: installation phase
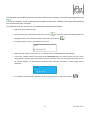
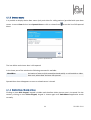
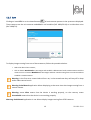
Clicking on button Next, the following window appears:
Figure 3: installation phase
where it is possible to decide if launching application at the same time of the operating system.
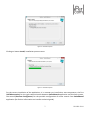
Clicking on button Next, the following window appears, where the application installation folder is
displayed:

7 DS1060-121A
Figure 4: installation phase
Clicking on button Install, installation process starts:
Figure 5: installation phase
For the correct installation of the application, it is necessary to install other two components, the first
(UPTKConnection) for the right communication between Switchboard application and IPerCom system,
the second (IPerCom Configurator) for the possible configuration of access control from Switchboard
application (for further information see installer technical guide).

8 DS1060-121A
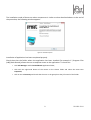
The installation mode of these two other components is similar to what described above. At the end of
the procedure, the following window appears:
Figure 6: installation phase
Installation of application has been completed properly.
Check then that the folder where the application has been installed (for example C:\ Program Files
(x86)\Switchboard), allows the user a complete access to the application. To check this:
• Start File Manager and find Switchboard application folder,
• Click with the right-hand button of the mouse on the chosen folder and select the menu item
Properties,
• Click on the tab Security and check that the user or the group have the full control of the folder.

9 DS1060-121A
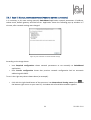
2.1
W
INDOWS
F
IREWALL
C
ONFIGURATION
During the first run of the application (click 2 times with mouse on related executable file desktop
shortcut), Windows operating system could ask the user to open the communication ports on IP network
used for communication between IPerCom system and Switchboard application. This operation is needed
to make the system work properly. If the protection is performed by Windows Firewall module, the
following message will be displayed:
Figure 7: opening Windows firewall ports
Select the desired network
2
and click on Allow access button to continue.
2
For further information about the network where the PC is used as Switchboard application, ask the System Administrator.

10 DS1060-121A
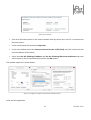
2.2
N
ETWORK
C
ONFIGURATION
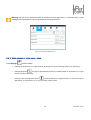
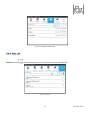
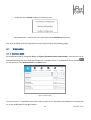
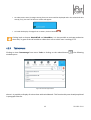
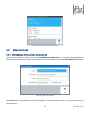
At the first run of Switchboard application, the following window appears:
Figure 8: network interface selection
It is necessary to choose the MAC address of the network interface by which the PC is connected to the
IPerCom system.
In order to make this, click on item Network and Sharing Center: this item appears clicking with the right-
hand button of the mouse on icon (which it is placed at the bottom right corner of PC monitor). A
window with all available networks appears. After having clicked on the network connected to IPerCom
system, the window on the left of the image below appears, then clicking on the button Details, the
window on the right appears:
Figure 9: neywork interface MAC address

11 DS1060-121A
The item Physical Address shows the MAC address of network interface.
After having chosen the right network interface, its related IP address appears:
Figure 10: MAC address and related IP address
The button OK is now enabled and clicking on it the application starts.
Warning: the window of selection of network interface MAC addresses appears only at the first
run of application or if the network interface by which the PC is connected to IPerCom system is
changed.
Warning: if your own PC has only one network interface by which it is connected to IPerCom
system, the window displayed in figure 8 does not appear.
If Switchboard application is launched on your own PC without any connection to IPerCom system the
following window appears:
Figure 11: no network connection present

12 DS1060-121A
2.3
D
OORPHONE
1060/41
I
NSTALLATION
(
ONLY FOR
PC
WITH SPEAKER OUTPUT
AND MICROPHONE INPUT
)
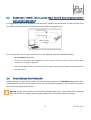
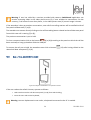
It is suggested to connect an additional door phone Ref. 1060/41 to the computer in order to make more
immediate and easier all the communications with visitors and system users.
Figure 12: switchboard – Ref. 1060/41 doorphone connection
To use properly for the first time the door phone Ref. 1060/41, follow the procedure below:
• Run Switchboard application;
• Connect the door phone Ref. 1060/41 to a free USB port of the PC. Perform also the other audio
connections, as shown in Figure 12;
• Wait until the display shows a window with the message A USB Door Phone 1060-41 has been detected;
•
Click OK to finish.
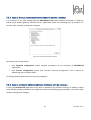
2.4
A
UDIO
D
EVICES
C
ONFIGURATION
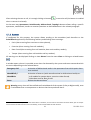
Default settings of audio devices usually ensure the proper operation of Switchboard application. If PC
loudspeakers do not work or the visitor cannot hear the attendant speaking in the microphone, perform
some checks on system audio devices.
Warning: images shown below are referred to a Realtek audio card; if your audio card is different
from the shown one, images could be slightly different or without some specific settings.

13 DS1060-121A
2.4.1
S
PEAKER
(A
UDIO
D
EVICES
)
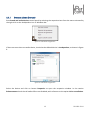
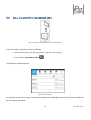
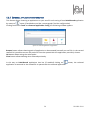
Start Sound and audio devices control panel by selecting the respective item from the menu activated by
the right click on the loudspeaker icon in Windows bar.
Figure 13: audio device configuration
If there are more than one audio device, check that the default device is Loudspeakers, as shown in Figure
6.
Figure 14: audio device configuration
Select the device and click on button Properties to open the respective window. In the section
Enhancements check that all audio effects are disabled, with reference to the option Voice cancellation.

14 DS1060-121A
Figure 15: sound effect disable
2.4.2
M
ICROPHONE
(R
ECORDING
D
EVICES
)
Follow the same procedure to open the control panel Recording devices and check that the microphone
is the default recording device.
Figure 16: check of default record device settings
Select the device and click on button Properties to access the settings window.

15 DS1060-121A
In sections Custom, Levels and Advanced check the following settings (as shown in Errore. L'origine
riferimento non è stata trovata.):
• Custom: select Mic Boost option;
• Levels: check that the microphone level is sufficient (greater or equal to 50);
• Advanced: select options Allow application to take exclusive control of this device and Give
exclusive mode applications priority.
Figure 17: record device properties

16 DS1060-121A
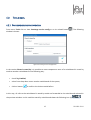
3
L
OGIN PHASE
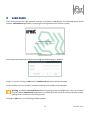
After having chosen the right network interface and clicked on OK button, the following splash screen
appears: Switchboard application is receiving the configuration from IPerCom system.
Figure 18: splash screen
Username and password are requested through the following log in window:
Figure 19: log in window
If log in is correct, clicking on OK button, Switchboard application will be launched.
For the creation of users and their related passwords, see installer technical guide.
Warning: the button Show advanced allows removing previous configuration. This can be useful
if the PC (where Switchboard application is installed) must be moved on another IPerCom system,
making easier to receive a new configuration.
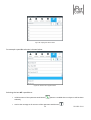
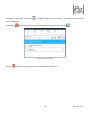
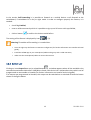
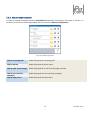
Clicking on OK button, the following window appears:

17 DS1060-121A
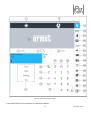
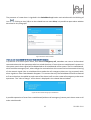
Figure 20: application graphic interface
A short description of every button or area follows below:

18 DS1060-121A
1.
Switchboard status display
2. Call divert status display on smartphone
3. Video picture area
4. Panel 1 end call button
5. Call divert button
6. Panel 2 end call button
7. Panel 1 call data area
8. Panel 2 call data area
9. Drop-down menu
10. Call forwarding button
11. Delete button
12. Hold/Resume call button
13. Repeat last number called by switchboard
button
14. Open pedestrian door button
15. Open garage gate button
16. Mute microphone button
17. Open/close switchboard panel button
18.
Alarm button
(
auditory warning and
blinking in case
of alarms in progress)
19. Door open button (auditory warning and blinking if
doors are left open)
20. Missed call list button (blinking in case of missed
calls)
21. Chat button (auditory warning and blinking in case
of incoming message which has not been read)
22. CCTV button
23. Phonebook button
24. Open door button
25. Control output button
26. Switchboard state configuration button
27. Access control button
28. Switchboard service configuration button
29. Hide/show keyboard button
30. Close application button
31. Keypad
Warning: button lay out on vertical bar can be changed, except for buttons 17, 18, 19, 20 e 21
whose position is fixed. For further information see paragraph Tool bar configuration. Button lay
out shown in figure 20 is the lay out that appears at the first run of application: what written below
refers to a button bar which has not been changed.

19 DS1060-121A
4
O
PERATING MODES
More than one switchboard can be present in the same IPerCom system, operating on different
competence areas or on the same area. The competence area of a switchboard with its related users is
defined during IPerCom programming phase (for further information see installer technical guide).
Switchboard operating mode depends on its configuration state.
To change switchboard configuration state, click on related icon Change concierge status
(Day/Night/Stand by) (26) and choose the wished status: Day, Night or Stand by. The related status icon
(1) shows the selected status.
Below switchboard operating modes are described regarding the incoming or outgoing calls.

20 DS1060-121A
4.1
S
WITCHBOARD IN STAND BY MODE
This state is shown with icon in switchboard status display area (1): it does not perform any
operation. In detail:
• Calls coming from calling stations to apartment stations are directly addressed to users (they are
not intercepted by switchboard);
• Calls from calling stations or apartment station to switchboard are not forwarded;
• Calls from switchboard to apartment stations are not forwarded.
Warning: alarm, door open, missed call and chat message highlightings are disabled in this state.
They are notified when switchboard comes back to day or night status.
4.2
S
WITCHBOARD IN NIGHT MODE
This state is shown with icon in switchboard status display area (1): concierge service is disabled and
calls forwarded from calling stations are directly addressed to users. In detail:
• Calls coming from calling stations to apartment stations are directly addressed to users (they are
not intercepted by switchboard);
• Calls from calling stations or apartment station to switchboard are forwarded;
• Calls from switchboard to apartment stations are forwarded.
4.3
S
WITCHBOARD IN DAY MODE
This state is shown with icon in switchboard status display area (1). Switchboard application works
as concierge service intercepting calls sent from calling stations to users of competence area. In detail:
• Calls coming from calling stations to apartment stations are intercepted by switchboard;
• Calls from calling stations or apartment station to switchboard are forwarded;
• Calls from switchboard to apartment stations are forwarded.
La pagina si sta caricando...
La pagina si sta caricando...
La pagina si sta caricando...
La pagina si sta caricando...
La pagina si sta caricando...
La pagina si sta caricando...
La pagina si sta caricando...
La pagina si sta caricando...
La pagina si sta caricando...
La pagina si sta caricando...
La pagina si sta caricando...
La pagina si sta caricando...
La pagina si sta caricando...
La pagina si sta caricando...
La pagina si sta caricando...
La pagina si sta caricando...
La pagina si sta caricando...
La pagina si sta caricando...
La pagina si sta caricando...
La pagina si sta caricando...
La pagina si sta caricando...
La pagina si sta caricando...
La pagina si sta caricando...
La pagina si sta caricando...
La pagina si sta caricando...
La pagina si sta caricando...
La pagina si sta caricando...
La pagina si sta caricando...
La pagina si sta caricando...
La pagina si sta caricando...
La pagina si sta caricando...
La pagina si sta caricando...
La pagina si sta caricando...
La pagina si sta caricando...
La pagina si sta caricando...
La pagina si sta caricando...
La pagina si sta caricando...
La pagina si sta caricando...
La pagina si sta caricando...
La pagina si sta caricando...
La pagina si sta caricando...
La pagina si sta caricando...
La pagina si sta caricando...
La pagina si sta caricando...
La pagina si sta caricando...
-
 1
1
-
 2
2
-
 3
3
-
 4
4
-
 5
5
-
 6
6
-
 7
7
-
 8
8
-
 9
9
-
 10
10
-
 11
11
-
 12
12
-
 13
13
-
 14
14
-
 15
15
-
 16
16
-
 17
17
-
 18
18
-
 19
19
-
 20
20
-
 21
21
-
 22
22
-
 23
23
-
 24
24
-
 25
25
-
 26
26
-
 27
27
-
 28
28
-
 29
29
-
 30
30
-
 31
31
-
 32
32
-
 33
33
-
 34
34
-
 35
35
-
 36
36
-
 37
37
-
 38
38
-
 39
39
-
 40
40
-
 41
41
-
 42
42
-
 43
43
-
 44
44
-
 45
45
-
 46
46
-
 47
47
-
 48
48
-
 49
49
-
 50
50
-
 51
51
-
 52
52
-
 53
53
-
 54
54
-
 55
55
-
 56
56
-
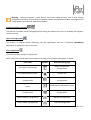 57
57
-
 58
58
-
 59
59
-
 60
60
-
 61
61
-
 62
62
-
 63
63
-
 64
64
-
 65
65


in altre lingue
- English: urmet domus LBT20379
Documenti correlati

Altri documenti
-
Marmitek 14" COLOR OBSERVATION SYSTEM Manuale utente
-
Panasonic VLSWD501UEX Manuale del proprietario
-
Bticino 344642 Technical Manual
-
-
Marmitek DoorPhone 124 Manuale utente
-
Bticino 067219 Manuale utente
-
Comelit 1952 Istruzioni per l'uso
-
urmet DS1083-167 Device Shift Citofono Smartphone Phone Calls Manuale utente
-
Bticino 344602 Istruzioni per l'uso
-