
MCE 600
Bedienungsanleitung
und Ersatzteilliste
Operating instruction and
Spare parts list
Istruzioni di funzionamento e
Parti di ricambio
Instructions d'emploi et
Accessoires et pièces
détachées
Руководство по эксплуатации
и перечень запчастей

Wichtige Sicherheitshinweise
Warnung: Zum Schutz vor Verletzungen sollten grundlegende Vorsichtsmaßnahmen und folgende
Sicherheitshinweise beachtet werden.
1) Sicherheitshinweise Lesen und befolgen
2) Gefahr: Zur Vermeidung eines elektrischen Schlages sollten alle Aquarium Geräte mit Vorsicht
gehandhabt werden. In keinem der unten aufgeführten Fälle sollte die Reparatur vom Kunden versucht
werden. Das Gerät muss zu einen autorisierten Kundendienst gebracht werden.
a) Wenn am Gerät ein abnormaler Wasseraustritt beobachtet wird, muss es sofort ausgesteckt werden.
b) Nach der Installation sollte das Gerät sorgfältig überprüft werden. Es darf nicht eingesteckt werden,
wenn sich auf Teilen, die trocken bleiben müssen, Wasser befindet.
c) Ein Gerät mit beschädigtem Kabel oder Stecker darf nicht in Betrieb genommen werden. Das gleiche
gilt, wenn das Gerät nicht richtig funktioniert, fallen gelassen oder anderweitig beschädigt wurde.
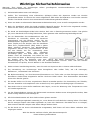
d) Um ein Nasswerden des Gerätesteckers oder der
Steckdose zu vermeiden, sollten der Aquarium
Unterschrank und das Becken seitlich von der
Wandsteckdose aufgestellt werden. Somit können
keine Tropfen auf den Stecker oder die Steckdose
fallen. Eine „Tropfenschleife“ (Bild) sollte in jedem
Kabel zwischen Aquarium und Wandsteckdose
vorgesehen werden. Die „Tropfenschleife“ ist der
Teil des Kabels, der bei Verwendung eines
Verlängerungskabels unter der Steckdose
durchhängt (Bild). Auf diese Weise tropft das
Wasser unter der Steckdose vom Kabel ab und
kann nicht mit dieser in Berührung kommen. Wenn
der Stecker oder die Steckdose nass wird, NICHT das Kabel herausziehen, sondern die
Stromversorgung an der Sicherung bzw. am Leistungsschalter trennen. Dann erst den Stecker
herausziehen und prüfen, ob sich Wasser in der Steckdose befindet.
3) Kinder müssen beaufsichtigt werden, wenn Sie sich am Aquarium oder in dessen nähe Aufhalten.
4) Zur Vermeidung von Verletzungen keine beweglichen oder heißen Teile, wie z.B. Heizungen,
Reflektoren , Leuchtmittel usw. berühren.
5) Bei Nichtverwendung, vor dem Montieren/Demontieren von Teilen oder vor dem Reinigen müssen die
betroffenen Geräte stets ausgesteckt werden. Nicht am Kabel ziehen. Zum Herausziehen des Kabels
immer den Stecker greifen.
6) Die Geräte dürfen nur für den vorgesehenen Zweck verwendet werden. Die Verwendung von Zubehör,
das vom Hersteller nicht empfohlen oder verkauft wird, kann gefährliche Bedingungen verursachen.
7) Das Gerät nicht an einer Stelle installieren oder lagern, wo es der Witterung oder Temperaturen unter
null Grad ausgesetzt ist.
8) Vor der Inbetriebnahme eines an der Beckenwand montierten Gerätes muss sichergestellt werden, dass
dieses richtig installiert und befestigt ist.
9) Alle Sicherheitshinweise auf dem Gerät müssen gelesen werden.
10) Wenn ein Verlängerungskabel notwendig ist, muss dieses die erforderliche Leistung haben. Ein Kabel,
das für weniger Ampere oder Watt zugelassen ist, kann sich überhitzen. Das Kabel ist so zu verlegen,
dass niemand darüber stolpern oder daran hängen bleiben kann.
11) Ist das Gerät ist mit einem Schukostecker ausgestattet, darf Dieser auf keine Weise verändert oder
umgangen werden.
Wird der Stecker entfernt erlischt jeder Garantieanspruch!
Diese Anleitung aufbewahren

Außenabschäumer MCE 600
Der MCE 600 ist ein kompakter Außenabschäumer mit unerreicht hoher Leistung,
welche unter anderem durch das Nadelradsystem erzielt wird. Er ist ideal für
Seewasseraquarien bis zu 600 Liter bei normalem Besatz.
Wichtig
Zur Vermeidung von Wasserschäden ist der Abschäumer genauestens auf
Transportschäden zu prüfen. Dazu sollte man das Gehäuse vor dem Einbau mit
Leitungswasser befüllen und auf eventuelle Leckstellen kontrollieren.
Einbau
- Den MCE 600 mit der Auflageschiene auf den Aquarium Rand setzen.
- Den MCE 600 mit der Halterung sichern (festschrauben).
- Ablaufschütte bis zum Anschlag in das Ablaufrohr schieben.
- Schaumtopf herausnehmen.
- Den MCE 600 bis zum Ablauf mit Aquarium Wasser befüllen.
- Erst jetzt das Ansaugrohr aufstecken.
- Regulierungsventil schließen.
- Den Schaumtopf ca. 50 mm in den Abschäumer schieben.
- Pumpe einschalten, nach kurzer Zeit sind Pumpe und Zuleitung entlüftet.
- Regulierungsventil auf die “2 Uhr“ Position stellen, der MCE 600 ist nun
betriebsbereit.
Einstellung
Die richtige Einstellung kann erst nach dem Einlaufen (24 Stunden) erfolgen. Bis
dahin den Schaumtopf nicht weiter als ca. 50 mm in den MCE 600 einschieben.
Um ein korrektes Schaumbild zu erreichen, kann der Schaumtopf in der Höhe
eingestellt werden
- tiefer = nasser Schaum
- höher = trockener Schaum.
Die richtige Einstellung ist abhängig von der Wasserbelastung.
Je nach Bedarf kann der Schaumtopf um 180° gedreht werden, so dass die
transparente Seite sichtbar ist.
Standard Filterkammer
Unterhalb des Ablaufes befindet sich die Filterkammer für Deltec Phosphatadsorber,
Deltec Special Carbon oder andere Filtermaterialien. Die Filtermaterialien sollten nur
in einem Filtersack einsetzten. Damit der Ablauf nicht durch den Filtersack blockiert
wird, muss der Abstandshalter mit der waagerechten Platte nach unten über den
Filtersack eingeschoben werden. Außerdem muss der Deckel die Filterkammer
verschließen.
Optionale Media Box
Zur wirkungsvolleren Ausnutzung der Filtermaterialien ist eine Media Box erhältlich,
die nach dem Fließbettsystem durchflutet wird. Hierdurch wir eine 100%ige Nutzung
der Filtermaterialien gewährleistet.Bei sehr feinen Filtermaterialien kann das
Auswaschen durch einen oberen und unteren Schwamm vermieden werden.

Hinweise
Sollten durch den Betrieb des MCE 600 feine Luftblasen mit ins Aquarium kommen,
kann dieses verschiedene Ursachen haben:
a. Frisches Meerwasser. Durch bestimmte Zusäte in vielen Meersalzen erzeugt der
MCE 600 extrem feine Luftblasen, die nicht zurückgehalten werden können,
gleichzeitig wird sehr wässeriger Schaum erzeugt. Wir empfehlen das
Regulierungsventil zu entfernen und durch häufiges Entleeren des Schaumtopfes,
die besagten Inhaltsstoffe im Aquarium Wasser zu reduzieren.
b. Regulierungsventil zu stark geschlossen, Luftschlauch im Abschäumer abgeknickt,
Luftansaugstutzen (10) durch Salzkristalle, Kalk und Staub verstopft. Durch die
reduzierte Luftmenge fördert die Pumpe proportional mehr Wasser, die
Fließgeschwindigkeit im Abschäumer erhöht sich und reißt anders als im
Normalbetrieb Luftblasen in den Rücklauf.
Wartung
Bei korrektem Einbau und Einstellung benötigen Deltec Abschäumer denkbar wenig
Wartung. Durch Kalkwassemischer und Kalkreaktoren kann es jedoch zu
Kalkablagerungen in der Pumpe kommen,
die zu Funktionsstörungen führen können.
Es wird deshalb empfohlen bei Störungen oder alle 3-6 Monate den Rotor sowie die
Strömungsklappe auf Leichtgängigkeit und die Lufteinzugsdüse auf freien Durchgang
hin zu prüfen. Durch eintauchen der Teile in einen handelsüblichen Entkalker lösen
sich die Kalkablagerungen. Ein frühzeitiges Verstopfen der Lufteinzugsdüse durch
Luftstaub und Salzkristalle kann durch ca. 15-30 minütiges Abstellen der Pumpe 1
mal pro Woche vermieden werden.
Fehlersuche
Symptom Ursache Maßnahme
Luftzuleitung zur Pumpe
verstopft reinigen
Ozongerät verschmutzt reinigen
Luftschlauch abgeknickt Schlauchführung ändern
Pumpe läuft, jedoch keine
oder zu geringe Luftmenge
Strömungsklappe (8a) in
Pumpe fest reinigen
Kommt bei bestimmten
Seesalzen und bei Zugabe
von Wasser-
aufbereitungsmitteln vor
Andere Salze verwenden
Bei sehr starker Wasser-
Belastung nach
Neueinrichtung mit
lebenden Steinen
Luftmenge stark drosseln
Starke Luftperlung im
Ansaugwasser
Luftabsperrhahn zu stark
gedrosselt Lufthahn öffnen
Technische
Daten Maße (l/b/h) ca. Stromaufnahme Luftleistung ca.
Höhe für Außenfilter
Einbau ca. Aquarium Größe
MCE 600 260x85x500mm 10 Watt 400 Ltr./Std. 570mm 200 - 600 Liter

IMPORTANT SAFETY INSTRUCTIONS
WARNING To guard against injury, basic safety precautions should be observed, including the following.
1) READ AND FOLLOW ALL SAFETY INSTRUCTIONS.
2) DANGER – To avoid possible electric shock, special care should be taken since water is employed in the
use of aquarium equipment. For each of the following situations, do not attempt repairs by yourself;
return the appliance to an authorized service facility for service or discard the appliance.
a) If the appliance shows any sign of abnormal water leakage, immediately unplug it from the power
source. (Immersible equipment only)
b) Carefully examine the appliance after installation. It should not be plugged in if there is water on
parts not interned to be wet.
c) Do not operate any appliance if it has a damaged cord or plug, or if it is malfunctioning or has been
dropped or damaged in any manner.
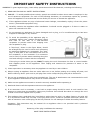
d) To avoid the possibility of the appliance plug or
receptacle getting wet, position aquarium stand
and tank to one side of a wall-mounted
receptacle to prevent water from dripping onto
the receptacle or plug.
A “drip-loop”, shown in the figure below, should
be arranged by the user for each cord connecting
an aquarium appliance to a receptacle. The “drip-
loop” is that part of the cord below the level of
the receptacle, or the connector if an extension
cord is used, to prevent water travelling along the
cord and coming in contact with the receptacle.
If the plug or socket does get wet, DON´T unplug the cord. Disconnect the fuse or circuit breaker
that supplies power to the appliance. Then unplug and examine for presence of water in the
receptacle.
3) Close supervision is necessary when any appliance is used by or near children.
4) Always unplug an appliance from an outlet when not in use, before putting an or taking off parts, and
before cleaning. Never yank cord to pull plug from outlet. Grasp the plug and pull to disconnect.
5) Do not use an appliance for other than intended use. The use of attachments not recommended or sold
by the appliance manufacturer may cause an unsafe condition.
6) Make sure an appliance mounted on a tank is securely installed before operating it.
7) Read and observe all the important notices on the appliance.
8) If an extension cord is necessary, a cord with a proper rating should be used. A cord rated for less
amperes or watts than the appliance rating may overheat. Care should bee taken to arrange the cord
so that it will not be tripped over or pulled.
9) This appliance has a polarized plug (one blade is wider than the other). As safety feature, this plug will
fit in a polarized outlet only one way. If the plug does not fit, contact a qualified electrician. Never use
with an extension cord unless plug can be fully inserted. Do not attempt to defeat this safety feature.
Exception: This instruction may be omitted for an appliance that is not provided with a polarized
attachment plug.
Removing of the plug invalidates the warranty!
SAVE THESE INSTRUCTIONS

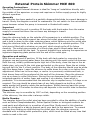
External Protein Skimmer MCE 600
Operating Instructions
The Multi Compact External skimmer is ideal for ‘hang on’ installation directly onto
the outside of the aquarium or sump and requires no further supply pump for highly
efficient operation.
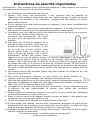
Assembly
The skimmer has been packed in a partially disassembled state to prevent damage in
transit. Study the diagram overleaf to reassemble. Do not switch on the recirculation
pump however unless the pump is immersed or flooded with water.
Important
Before you install the unit in position fill the body with fresh water from the mains
supply to ensure that there has not been any damage in transit.
Installation
Hang the skimmer body on the outside of the aquarium in a suitable position. The
skimmer sits on the black support bar where the outlet pipes come out of the body
and is held in place by the clear retaining clamp, which tightens onto the outlet pipe
Hang the skimmer body on the outside of the aquarium in a suitable position. The
inlet pipe is fitted with a strainer on one end, which simply pulls off for future
cleaning. The outlet pipe consists of a 40mm clear pipe to direct water back over
any stress bars and into the tank. To prevent bubbles from entering the aquarium an
ingenious degassing plate pushes into the end of the outlet pipe.
Operation and setting
With the unit secured in position, fill the body with tank water by removing the
skimmer cup and pouring water down the opening until the water exits the skimmer.
Refit the cup, initially positioned quite high out of the body, close the tap on the air
intake pipe, only now fit the inlet pipe and switch on the pump. Open the air intake
tap and set it to the 2 o’clock position. The body of the skimmer should now be white
with fine dense foam. Leave the skimmer to settle down for a day or so before fine
adjustment. After two to three days, or earlier in a previously unskimmed tank, a
thick drown foam will be produced at the neck of the skimmer. Move the skimmer
cup up or down to collect this foam. Moving the cup downwards will result in an
increased quantity of wetter foam and moving it up a darker, foam which is
preferable. It is recommended that the skimmer cup is emptied every 2-4 days or as
required. The cup should be wiped clean of any fatty deposits as build up of this
waste product will greatly reduce the performance. Whilst cleaning leave the pump
switched off, for 15 minutes to allow any salt deposits in the venturi tube to dissolve.
Please Note
The skimmer cup is reversible by 180° so that, depending on the mounting position
of the skimmer, the clear side is always visible.
Media Chamber
The chamber below the outlet pipe has been provided to allow the addition of media
such as Deltec Phosphatadsorber, Deltec Special Carbon or biological media to be
used easily and effectively in a position of good flow. Media used in this chamber
must be contained in a bag to prevent carry over back to the aquarium. To prevent
the bag from floating up and blocking the outlet pipe, the skimmer comes as
standard with a sliding outlet protection plate, which must be fitted at any time that
media is used in the unit.

This plate is fitted above the media bag with the horizontal section at its lowest
point.
Optional Media Box with sliding lid
This item is available as an optional extra to allow use of the multi compact with a
greater volume of media. Larger media can be added directly to the box, which has a
perforated base and a perforated sliding lid. Finer media can be used by the addition
of sponge top and bottom to prevent the media from washing out or by use of a
mesh bag.
Use with ozone
Deltec skimmers are suitable for use with ozone and will automatically suck the gas
through the venturi hose. A maximum volume of 25 mg/h should be used on tank
volumes that are suitable for this skimmer. Do not use excessive ozone, as it is
dangerous and can cause severe headaches.
Maintenance
The Deltec skimmer range should require very little adjustment and maintenance
due to the high levels of calcium in marine aquariums and large volumes of air drawn
in, it is common for deposits to accumulate. Regular introduction of a small amount
of RO water into the inlet tap whilst running may help to prevent any build up of salt
and debris in the venturi.
The MCE 600 is fitted with an Deltec pump, Deltec pumps are fitted with a little flap
inside the outlet of the pump, which flips from one side to the other depending on
the direction of rotation thus ensuring that the pump always operates at full duty.
This is illustrated on the attached drawing. It is recommended every 3 months to
strip down the pump to check and clean the impellor of debris. Ensure that the
direction flap moves easily and if necessary soak the neck of the pump housing in
white vinegar or kettle scale remover.
Fault finding
Malfunction cause remedy
tap, airline or venturi
blocked clean
airline kinked remove kink
ozonizer blocked clean
Pump produces
insufficient air
Pump flap No. 8a blocked clean
caused by additives in
certain sea salts and water
conditions
use different salt or feed heavily for
a period, empty skimmer cup
frequently, open air tap fully. This
condition may last for several
weeks.
excessive air bubbles
in aquarium water
air tap closed to far open air tap
Technical data
Dimensions (l/w/h)
app.
Power
consumption Air flow app. min. height for sump
installation Aquarium size
MCE 600 260x85x500mm 10 Watt 400 l/h 575mm 200 - 600 litre

NORME DI SICUREZZA
AVVERTENZA: Per evitare incidenti si raccomanda di osservare le norme generali di sicurezza, tra cui le
seguenti:
1) LEGGERE E SEGUIRE SCRUPOLOSAMENTE TUTTE LE NORME DI SICUREZZA.
2) PERICOLO – Considerato che l’uso di attrezzature per acquario avviene in presenza di acqua, agire
sempre con particolare cautela per evitare scosse elettriche. Per ognuna delle seguenti situazioni
possibili, si raccomanda di non tentare di eseguire da sé eventuali riparazioni, ma di portare
l’apparecchio presso un centro assistenza autorizzato o provvedere alla sua rottamazione.
a. (Solo per apparecchi ad immersione). Se l’apparecchio mostra perdite d’acqua anormali, scollegarlo
immediatamente dall’alimentazione.
b. Dopo avere installato l’apparecchio, eseguire un controllo accurato. Non collegare l’apparecchio
all’alimentazione nel caso si osservi la presenza di acqua in parti non destinate ad essere bagnate.
c. Non mettere in funzione l’apparecchio se il cavo d’alimentazione o la spina appaiono danneggiati, se
l’apparecchio è malfunzionante, se è caduto o ha subito un qualsiasi danno.
d. Per evitare il gocciolamento dell’acqua sulla
presa o sulla spina, posizionare l’acquario e il
mobile di fianco alla presa montata a parete in
modo che questa resti visibile.
Si raccomanda di fare eseguire al cavo una
curva “anti-gocciolamento” come mostrato nella
figura sottostante. Eseguire l’operazione per
tutti i componenti elettrici dell’acquario. In
questo modo una parte di cavo si trova sotto il
livello della presa, o della spina di collegamento
nel caso si usi una prolunga, impedendo così che l’acqua gocciolando lungo il cavo venga a contatto
con la presa.
Se la presa o la spina si bagna, NON disinserire il cavo, ma scollegare l’interruttore generale che
porta corrente all’apparecchio. Quindi scollegare la spina e verificare la presenza di acqua all’interno
della presa.
3) Se l’apparecchio viene utilizzato da o in presenza di bambini, è necessaria un’attenta supervisione da
parte degli adulti.
4) Scollegare sempre il cavo d’alimentazione quando l’apparecchio è inutilizzato, prima di aggiungere o
prelevare delle parti e prima di effettuare la pulizia. Per scollegare il cavo d’alimentazione, afferrare
bene la spina ed estrarla dalla presa senza tirare mai direttamente il cavo.
5) Non utilizzare l’apparecchio per usi diversi da quelli a cui è destinato. L’uso di accessori non
raccomandati o non venduti dal produttore dell’apparecchio possono essere causa di condizioni di
funzionamento non sicure.
6) Assicurarsi che gli apparecchi montati sull’acquario siano correttamente installati prima di avviarli.
7) Leggere ed osservare tutte le informazioni importanti sull’apparecchio.
8) Se è necessario l’uso di una prolunga, assicurarsi che il cavo sia adatto al voltaggio utilizzato. Se il cavo
è messo a punto per meno ampere or watt rispetto all’apparecchio, potrebbe surriscaldarsi. Fare
attenzione che il cavo non sia troppo teso o schiacciato.
9) (Solo per UK) Questo apparecchio è dotato di spina polarizzata (uno spinotto è più largo dell’altro).
Come misura di sicurezza, tale spina potrà essere inserita in un solo modo in una presa polarizzata. Se
la spina non è adatta, rivolgersi ad un elettricista qualificato. Non utilizzare una prolunga se la spina
non si inserisce completamente. Non tentare di eludere questa condizione di sicurezza.
Eccezione: Questa avvertenza può essere omessa se l’apparecchio non è dotato di spina polarizzata.
In caso di manomissione della spina decade ogni garanzia!
“CONSERVATE LE PRESENTI ISTRUZIONI”

Schiumatoio esterno MCE 600
MCE 600 è uno schiumatoio esterno compatto con le più alte prestazioni finora
raggiunte grazie anche al sistema con girante a spazzola brevettato. MCE 600 è
ideale per acquari marini con capacità fino a 600 l e normale densità di popolazione.
Importante
Onde evitare spiacevoli inconvenienti è bene ispezionare lo schiumatoio per verificare
eventuali danni subiti durante il trasporto. A tale scopo prima dell’installazione
riempire lo schiumatoio con acqua del rubinetto e controllare eventuali perdite.
Installazione
Procedura:
- Posizionare MCE 600 con guida d’appoggio sul bordo dell’acquario
- Fissare (avvitando bene) MCE 600 al supporto
- Spingere la piastra di degassamento nel tubo di scarico fino all’arresto
- Estrarre il recipiente di raccolta
- Riempire MCE 600 con acqua dell’acquario fino alla tracimazione
- Solo ora inserire il tubo d’aspirazione
- Chiudere la valvola di regolazione
- Inserire il recipiente di raccolta nello schiumatoio per ca. 50 mm
- Accendere la pompa, dopo poco tempo la pompa e i tubi sono privi d’aria
- Porre la valvola di regolazione ad “ore 2”, il MCE 600 è ora pronto per il
funzionamento
Regolazione
La regolazione definitiva può essere eseguita solo dopo il “rodaggio” (24 ore). Fino a
quel momento non inserire il recipiente di raccolta per oltre ca. 50 mm nel MCE 600.
L’altezza del recipiente di raccolta può essere regolata al fine di ottenere il giusto tipo
di schiuma: più immerso = schiuma bagnata, più alto = schiuma asciutta.
La giusta regolazione dipende dall’inquinamento dell’acqua.
Se necessario, il bicchiere può essere ruotato di 180° per rendere visibile il lato
trasparente.
Camera standard per materiali filtranti
La camera, posta sotto il tubo d’uscita, permette l’immissione di prodotti quali Deltec
Phosphatadsorber, Deltec Special Carbon o altri materiali filtranti, che devono essere
contenuti in un apposito sacchetto. Affinché tale sacchetto del filtro non ostruisca il
deflusso, il distanziatore con la piastra orizzontale deve essere spinto verso il basso
sopra il sacchetto. La camera deve poi essere chiusa col coperchio.
Scatola opzionale per prodotti filtranti
Questo accessorio, disponibile su richiesta, permette un utilizzo più efficace dei
materiali filtranti. I prodotti inseriti nella scatola vengono investiti dal flusso secondo
il sistema a letto fluido. Questo garantisce lo sfruttamento al 100% del prodotto
utilizzato. Materiali filtranti più fini devono essere sistemati tra due strati di spugna
per evitarne il dilavamento.
Avvertenze
Se durante il funzionamento dello schiumatoio MCE 600 bolle d’aria fini finiscono
nell’acquario, le cause possono essere diverse:
Acqua marina nuova. A causa di determinati integratori presenti in molti sali marini
MCE 600 produce bolle d’aria estremamente fini, che non possono essere trattenute,
e nello stesso tempo una schiuma molto acquosa. Consigliamo di togliere la valvola

di regolazione e di ridurre le citate sostanze nell’acqua dell’acquario mediante il
frequente svuotamento del bicchiere.
Valvola di regolazione troppo chiusa, deviazione del tubo dell’aria nello schiumatoio,
bocchettone della presa d’aria ostruito da cristalli di sale, calcare e polvere. A causa
del ridotto apporto di aria la pompa immette in proporzione una maggiore quantità di
acqua che aumenta la velocità di flusso nello schiumatoio e genera bolle d’aria nel
ritorno, cosa che normalmente non succede.
Manutenzione
Una volta installati e tarati correttamente gli schiumatoi Deltec necessitano di poca
manutenzione. Tuttavia, l’uso di miscelatori di kalkwasser e di reattori di calcio può
portare alla formazione di depositi calcarei che possono causare inconvenienti nel
funzionamento. Si raccomanda quindi di verificare all’occorrenza o comunque ogni 3-
6 mesi che il rotore, ruotino senza impedimenti e che la valvola di flusso e l’ugello
dell’aria non siano ostruiti. Eventuali depositi calcarei possono essere rimossi
immergendo le parti in una soluzione con un comune anticalcare.
Si consiglia di fermare la pompa per circa 15-30 minuti una volta alla settimana per
evitare il deposito di cristalli di polvere e sale nel raccordo d’entrata dell’aria.
Ricerca errori
Problema Causa Rimedio
Il tubo che immette l’aria
nella pompa è ostruito Eseguire pulizia
Ozonizzatore sporco Eseguire pulizia
tubo dell’aria deviato modificare il percorso del
tubo
La pompa funziona, ma la
quantità d’aria è nulla o molto
ridotta
La valvola di flusso nella
pompa è ostruita Eseguire pulizia
Si nota in concomitanza
con l’uso di determinati
sali marini o
condizionatori
Utilizzare prodotti con
caratteristiche diverse
Forte inquinamento
dell’acqua dopo nuovo
allestimento con rocce
vive
ridurre la quantità d’aria
Forte presenza di bolle d’aria
nell’acqua in entrata
Rubinetto di presa d’aria
troppo chiuso Aprire il rubinetto dell’aria
Dati tecnici Dimensioni (l/b/h)
ca. Consumo Resa ca.
Altezza per
installazione in filtro
esterno
Acquari popolati
MCE 600 260x85x500mm 10 Watt 400 l/h 575mm 200 - 600 litre

Instructions de sécurité importantes
Avertissement : Pour protéger contre quelconques blessures, il faut respecter les mesures
de prudence et les instructions de sécurité suivantes :
1) Lire et respecter les instructions de sécurité.
2) Danger : Pour éviter une électrocution, il faut manipuler tous les appareils de
l'aquarium avec prudence. Dans aucun des cas indiqué plus bas, le client ne devrait
pas essayer de procéder à une réparation. L’appareil doit être délivré au service
après-vente autorisé.
a) Si vous observez une fuite d'eau anormale sur l'appareil, il faut retirer immédiatement
la prise de l’appareil.
b) Après l'installation, il faut vérifier soigneusement l'appareil. Il ne faut pas enficher sa
prise quand de l'eau se trouve sur des pièces qui doivent rester sèches.
c) Un appareil muni d’un câble ou d’une fiche détériorés ne doit pas être mis en service.
Ceci est aussi valable quand l’appareil ne
fonctionne pas correctement, est tombé
par terre ou a été détérioré d’une autre
manière.
d) Pour éviter que la fiche de l'appareil ou la
prise de courant se mouille, il faut placer le
meuble de l’aquarium et le bassin à côté
de la prise de courant murale. Ainsi
aucune goutte d'eau ne tombera sur la
fiche ou la prise de courant. Une « boucle
d’égouttage » devrait être prévue entre
l'aquarium et la prise de courant murale. La « boucle d’égouttage » est la partie du
câble qui fléchit sous la prise de courant en cas d’emploi d’une rallonge. De cette
manière, l'eau s'égouttera sous la prise de courant du câble et ne pourra pas entrer
en contact avec celui-ci. Si la fiche ou la prise de courant se mouille, NE PAS retirer le
câble mais couper l’alimentation en courant au fusible ou au sectionneur de puissance.
Ne retirer la fiche qu’après avoir ceci et vérifier si de l'eau se trouve dans la prise de
courant.
3) Les enfants doivent être surveillés quand vous vous occupez de l'aquarium ou vous
vous trouvez à proximité.
4) Pour éviter quelconques blessures, ne pas toucher les pièces mobiles ou
chaudes, telles que les chauffages, les réflecteurs, les ampoules etc.
5) Les fiche des appareils qui ne sont pas utilisés, avant le montage/démontage de
pièces de ces appareils ou avant leur nettoyage, doivent être retirées. Ne pas tirer au
câble. Pour sortir le câble, toujours saisir la fiche.
6) Les appareils ne doivent être utilisés qu'aux fins prévues. L’emploi d’accessoires que
le fabricant n'a pas recommandés ou vendus, peut causer des conditions
dangereuses.
7) Ne pas installer ou entreposer l’appareil à un endroit où il est exposé aux intempéries
ou à des températures en dessous de zéro.
8) Avant la mise en service d’un appareil monté à la paroi du bassin, il faut garantir que
cet appareil est correctement installé et fixé.
9) Toutes les indications de sécurité sur l'appareil doivent être lues.
10) S'il faut utiliser une rallonge, elle doit avoir la puissance nécessaire. Un câble qui est
homologué pour peu d’ampères ou de watts, peut se surchauffer. Le câble doit être
posé de sorte que personne ne trébuche dessus ou y reste accroché.
11) L’appareil est équipé d’une fiche à contact de protection. Cette fiche ne doit en aucun
cas être modifiée ou contournée.
Si la fiche est retirée, tout droit à garantie sera annulé !
Conserver ces instructions

Écumeur de protéines externe MCE 600
Mode d’emploi
Cet écumeur externe polyvalent et compact a été dessiné pour être installé à la face
externe de l'aquarium ou de la décantation. . Il n'y a pas besoin d’installer de pompe
supplémentaire pour être parfaitement efficace.
Montage
Il est possible que l’écumeur soit expédié partiellement démonté pour limiter les
risques du transport. Assemblez-le en suivant le schéma au verso. Attendez que les
pompes de circulation soient complètement immergées dans avant de les mettre en
fonction.
Important
Remplissez le corps de l'écumeur avec de l'eau de conduite fraîche avant de
l'installer pour vérifier que celui-ci n'a pas été abîmé lors du transport.
Installation
Accrochez le corps de l'écumeur de façon convenable à la face externe de
l'aquarium. L'écumeur est fixé à un support noir là où les tubes de refoulement
sortent de l'écumeur. L'écumeur est tenu en place par une patte transparente serrée
autour du tube de refoulement. Le tube d'entrée est pourvu d'un filtre. Ce filtre est
démontable pour permettre de le nettoyer. Le tube de refoulement en plexi
transparent d’une longueur de 40 mm qui renvoie l’eau dans l'aquarium. Une
plaquette de dégazage ingénieuse placée au bout du tube de refoulement ce qui
prévient la formation de bulles d'air dans l'aquarium.
Opération de mise au point
Après avoir positionné l'écumeur, remplissez-le avec de l'eau du bac. Tout d’abord
enlevez le gobelet de l'écumeur et versez de l’eau jusqu'à débordement du gobelet.
Repositionnez le gobelet de sorte qu'il soit plus haut que l'écumeur, fermez la vanne
sur le tube d'admission d'air et raccordez ensuite le tube d'entrée et le connecteur à
la pompe. Rouvrez la vanne du tube d'admission d'air et mettez-la en position 14
heures. À ce point la partie centrale de l'écumeur sera remplie d’une écume dense de
couleur blanche.
Ne touchez pas l’écumeur pendant une journée environ avant d’effectuer les
dernières mises au point. Après deux ou trois jours (ou plus tôt si l’eau de l’aquarium
est écumée pour la première fois) le goulot de l'écumeur sera rempli d'une écume
dense et blanche. Montez ou descendez le gobelet pour rassembler l’écume de façon
optimale. En descendant le gobelet vous aurez plus d’écume humide, en montant le
gobelet vous aurez de l'écume plus dense, ce qui est préférable. Il est
recommandable de vider le gobelet de l’écumeur tous les 2 à 4 jours pour éliminer
d’éventuels dépôts graisseux à l’intérieur du gobelet car l'accumulation de
substances résiduaires réduira l’efficacité de l'écumeur. Coupez la pompe lors de
cette procédure pendant quelque 10 minutes de sorte que d’éventuels dépôts de sel
dans le tube Venturi puissent se dissoudre.
Chambre de granulat
La chambre située au-dessous du tube de refoulement a été dessinée pour recueillir
des granulats tels que Deltec Phospatadsorber, du Deltec Special Carbonou des
granulats biologiques. L'utilisation est des plus simple et très efficace. Il faut que le
granulat soit emballé dans un sachet pour éviter qu'il se disperse dans l'aquarium.
Pour éviter que le sachet monte et colmate le tube de refoulement, l'écumeur est

livré avec une plaquette coulissante qui protège le tube de refoulement. Il faut
toujours utiliser la plaquette quand on utilise du granulat. Elle est attachée au-
dessus du sachet avec le granulat. La section horizontale se trouve à la position la
plus basse.
Boîte de granulat optionnelle avec fermeture coulissante
Cette pièce est disponible pour pouvoir utiliser l’écumeur polyvalent en combinaison
avec des granulats plus gros. On peut mettre les granulats plus gros tels dans la
boîte. Le fond ainsi que la fermeture coulissante sont perforés. Employez le fond et
la fermeture spongieux si vous utilisez des granulats plus fins tels que Deltec
Phosphatadsorber pour éviter que le granulat se disperse dans l’eau. Vous pouvez
également utiliser un sachet filtrant.
Opération avec l’ozone
Il est possible d'utiliser les écumeurs Deltec avec de l'ozone. L’écumeur aspire le gaz
automatiquement à travers le tube Venturi. La quantité maximum d’ozone applicable
pour les volumes d'aquarium indiqués pour cet écumeur, est de 25 mg/h par pompe.
N'utilisez pas trop d'ozone puisque c'est une substance nocive qui peut provoquer de
graves troubles.
Maintenance
Les écumeurs Deltec ne requièrent qu’un minimum de réglage et de maintenance.
Pourtant, les forts taux de calcium dans les aquariums marins et l’aspiration de
grandes quantités d’air provoquent la formation de tartre. On peut éviter le dépôt de
sel et d'autres substances résiduelles en administrant de petites quantités d'eau
traitée par osmose inverse de temps en temps. Le MCE 600 est livré avec une
pompe Deltec. La sortie de pompe est pourvue d'un petit volet qui tourne d'un côté à
l'autre en fonction du sens de rotation pour garantir que la pompe tourne toujours à
plein régime. Il est recommandé de détacher les pompes de l'écumeur une fois tous
les trois mois pour contrôler et nettoyer le rotor. Assurez-vous que le volet de la
pompe bouge librement et immergez le goulot de la pompe si nécessaire dans le
vinaigre blanc ou dans un produit anticalcaire.
fiche technique
dimensions (lxlxh)
env.
consommation
d’énergie débit d’air env.
hauteur min.
d'installation de la
décantation
volume de
l’aquarium à
plantation normale
MCE 600 260x85x500mm 10 Watt 400 l/h 575mm 200 - 600 litre

Правила техники безопасности
Внимание! Во избежание травм следует соблюдать основные меры предосторожности и
следующие правила техники безопасности.
1) Внимательно прочитайте и соблюдайте правила техники безопасности.
2) Опасно! Во избежание поражения электрическим током следует проявлять
осторожность при обращении со всеми устройствами аквариума. В ниже
приведенных случаях самостоятельное проведение ремонта запрещено.
Устройство следует доставить в авторизованный сервисный центр.
a) При обнаружении выхода большого количества воды из устройства необходимо
сразу немедленно выключить его из розетки.
b) После установки устройство подлежит тщательной проверке. Запрещается
подключать его к электросети, если на деталях, которые должны всегда быть
сухими, обнаружена влага.
c) Запрещается включать устройство с поврежденным кабелем или штекером, а
также при его неисправности, при наличии каких-либо повреждений и после
падения.
Чтобы не допустить попадания влаги на розетку или
штекер, аквариум следует разместить подальше от
розетки. Таким образом, капли воды не попадут на
штекер или розетку. Для той части кабеля, которая
находится между аквариумом и розеткой, должен
быть предусмотрен водозащитный изгиб.
Водозащитный изгиб — это та часть кабеля, которая
при использовании удлинителя провисает под
розеткой (см. рисунок). В этом случае вода стекает
с кабеля и не попадает в розетку. При наличии
влаги на розетке или штекере ЗАПРЕЩАЕТСЯ отключать кабель, следует отключить
подачу тока с помощью предохранителя или силового выключателя. Только после этого
можно вынуть штекер и проверить розетку на наличие влаги.
3) Запрещается оставлять без присмотра детей, находящихся рядом с аквариумом.
4) Во избежание травм запрещается касаться подвижных или горячих деталей,
таких как элементы нагрева, отражатели, лампы и т.п.
5) При простое, перед монтажом или демонтажем деталей, а также перед очисткой
следует отключить соответствующие приборы от электросети. При этом следует
браться за штекер и запрещается тянуть за кабель.
6) Устройство следует использовать только по назначению. Использование
запасных частей и аксессуаров, которые не рекомендованы или не поставляются
производителем, может быть опасным, и несет за собой утерю заводской
гарантии.
7) Запрещается устанавливать или хранить устройство в местах, подверженных
воздействию атмосферных явлений или температуры ниже нуля.
8) Перед вводом в эксплуатацию убедитесь, что все детали правильно собраны и
закреплены.
9) Следует ознакомиться со всеми указаниями по технике безопасности,
расположенными на самом устройстве.
10) При необходимости следует использовать удлинитель соответствующей
мощности. Кабель меньшей мощности или силы тока может перегреться.
Укладывать кабель следует так, чтобы никто не споткнулся и не зацепился.
11) Прибор оснащен штекером под евророзетку. Запрещается вносить в него
изменения или использовать вместо него иной штекер.
Если по каким либо причинам,штекер будет удалён или повреждён,то пумпа Лишается
всякой гарантии.
Сохраните настоящее Руководство по эксплуатации

Внешний пеноотделитель MCE 600
Deltec MCE 600 является компактным внешним пеноотделителем очень высокой
производительности за счет применения запатентованной системы игольчатой
крыльчатки. Deltec MCE 600 идеально подходит для использования в аквариумах
с морской водой объемом до 400 литров с обычной плотностью загрузки.
Важно
Во избежание порчи воды пеноотделитель следует внимательно проверить на
отсутствие повреждений, возникших при транспортировке. Для этого перед
установкой необходимо заполнить корпус водой и проверить его на
герметичность.
Монтаж
Последовательность:
- установить MCE 600 опорной шиной на край аквариума;
- зафиксировать MCE 600 с помощью зажима (завинтить);
- сточный жёлоб вставить до упора в дренажную трубку;
- вынуть коробку для пены;
- заполнить MCE 600 до стока аквариумной водой;
- только после этого насадить всасывающую трубку;
- закрыть регулировочный клапан;
- коробку для пены вставить в пеноотделитель примерно на 50 мм;
- включить насос, через некоторое время из насоса и подводящей трубке будет
удален воздух;
- регулировочный клапан установить в положение на „2 часа“, MCE 600 готов к
работе.
астройка
Окончательная настройка может быть выполнена только после „приработки“ (24
часа). До этого времени не вставлять коробку для пены более чем на 50 мм в
Deltec MCE 600 . Для получения требуемого вида пены можно регулировать
высоту расположения коробки для пены
- глубже = мокрая пена
- выше = сухая пена.
Правильная настройка зависит от степени загрязнения воды.
При необходимости коробку для пены можно повернуть на 180°, чтобы была
видна ее прозрачная сторона.
Стандартная камера для наполнителя
Ниже стока находится камера для наполнителей Deltec Phospatadsorber,
фильтрующего Deltec Special Carbon и других фильтрующих материалов.
Фильтрующие материалы должны использоваться только в мешочке фильтра.
Чтобы избежать забивание стока мешочком фильтра, необходимо над мешочком
фильтра вставить промежуточный элемент горизонтальной пластиной вниз.
Кроме того, камера фильтра должна быть закрыта крышкой.
Опциональный контейнер для фильтрующих материалов
Для более эффективного использования фильтрующих материалов в продаже
имеется специальный контейнер для фильтрующих материалов. Заполнение
контейнера для фильтрующих материалов производится по способу
псевдоcжижения. Тем самым обеспечивается 100%-ное использование
фильтрующих материалов. В случае с мелкозернистыми
материалами, как Deltec Phosphatadsorber, вымывание материала
предотвращается благодаря губкам, установленным сверху и снизу.

Примечания
Если при работе Deltec MCE 600 в аквариум поступают мелкие воздушные
пузырьки, причинами этого может быть:
c. Свежая морская вода. По причине наличия во многих морских солях
определенных добавок Deltec MCE 600 выделяет очень мелкие воздушные
пузырьки, выход которых невозможно предотвратить, одновременно с этим
вырабатывается очень мокрая пена. Мы рекомендуем удалить
регулировочный клапан и посредством частой очистки коробки для пены
добиться сокращения таких добавок в аквариумной воде.
d. Регулировочный клапан почти закрыт, перегнут воздушный шланг в
пеноотделителе, воздухозаборник забит кристаллами соли, известью или
пылью. В результате уменьшения объема воздуха, насос подает
соответственно больший объем воды, скорость потока в пеноотделителе
возрастает и в отличие от обычного режима работы в слив попадают
воздушные пузырьки.
Техническое обслуживание
При соответствующем монтаже и настройках пеноотделители Deltec требуют
минимального обслуживания. Смесители известковой воды и кальциевый
реактор могут, тем не менее, привести к появлению известкового осадка в
насосе, вызывающего неисправности.
Поэтому при возникновении неисправностей и каждые 3-6 месяцев
рекомендуется проверять ротор с керамической осью, регулировочный клапан
на лёгкость хода и воздухозаборной насадки на свободную проходимость. При
погружении деталей в соответствующее средство для удаления извести
известковые отложения легко удаляются. Быстрого засорения воздухозаборной
насадки воздушной пылью и кристаллами соли можно избежать, если раз в
неделю отключать насос на 15-30 минут.
Выявление неисправностей
Признак Причина Меры
трубопровод подачи воздуха к
насосу забит прочистить
озонатор загрязнён прочистить
воздушный шланг перегнут устранить перегиб
Насос работает, но воздух в малом
количестве или отсутствует
регулировочный клапан (8a)
плотно закрыт прочистить
может быть вызвано
определёнными морскими
солями и особым средствами,
влияющими на состав воды
использовать другие соли
при очень сильной нагрузке
воды после укладки живых
камней
ограничить количество
воздуха
Бурное образование пузырьков в
сточной воде
сильно затянут запорный
воздушный кран открыть воздушный кран
Технические
характеристики
Размер
(д/ш/в) ок.
Потребление
энергии
Производительность
по воздуху ок.
Высота для
внешнего
фильтра
встроено ок.
Размер
аквариума
обычная
нагрузка
Размер аквариума
облегчённая
нагрузка
MCE 600 260x85x500
мм 17 Вт 400 л/ч 575 мм 200 л 600 л

MCE 600
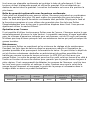
Ersatzteilliste / Spare parts list / Parti di ricambio /Accessoires et pieces datachees
/ Перечень запасных частей

Nr. Art. Nr. Bezeichnung Description
A 28005000
Pumpe DCS 600
Komplett
Skimmer pump DCS 600
cpl.
1 31117100 Gehäuse Skimmer body only
2 93010010 Mini Regulierungsventil Tap
3 61751048 Silikonschlauch 5/8 Silicon hose 5/8mm
4 31116300 Schaumtopf Deckel Lid
5 31117200 Schaumtopf mit Überlauf Skimmer cup
6 31132000 Media Box optional Media Box optionally
7 27083000 Laufeinheit DCS 600 Needlewheel DCS 600
7a
8 26083000 Stator DCS 600 Stator DCS 600
9 69303500 Adapter Adapter
10 31131000 Luftansaugstutzen-07 Air inlet adapter-07
11 31117950 Trennplatte Divide plate
12 31117910 Deckel Filterkammer Lid
13 31117920 Distanzplatte Plate
14 31119730 Halter Holder
15 31117940 Deckel klein Lid
16 31117960
Abstandhalter
Filterkammer
Sliding spacer
18 31117810 Ansaugrohr mit Winkel Suction pipe
19 10100460 Ansaugkorb Strainer
20 31117970 Ablaufschütte Degassing plate
21 12350000 Kunststoffschraube M4 Screw M4
22 12350000
Kunststoffschraube M6 Screw M6
23 69340000 Dämpfungssatz Pumpe Dampening set
Nr. Art. Nr. Descrizione Description Наименование
A 28005000
Pompa DCS 600 cpl.
Pompe d’écumeur DCS
600 cpl.
Насос DCS 600 с
воздухозаборной насадкой
1 31117100
Apparecchio base senza
Pos. 2
-
20
Corps d’écumeur seul Базовая модель без поз. 2-20
2 93010010
Mini valvola di
regolazione
Robinet d’air Мини регулировочный кран
3 61751048
Tubo di silicone 5/8
Tuyau de silicone 5/8
mm
Силиконовый шланг 5/8
4 31116300
Coperchio del recipiente
di raccolta
Couvercle Крышка коробки для пены
5 31117200
Recipiente di raccolta
Gobelet (sans
couvercle)
Корпус с переливом
6 31132000
Media Box
facoltativamente
Media box sur option
7 27083000
Girante a spazzola per
DCS 600
Rotor modifié breveté
DCS 600
Media Box факультативно
7a Stator DCS 600 Игольчатая крыльчатка DCS 600
8 26083000
Statore per DCS 600
Entrée de pompe (prise
d’air)
Корпус DCS 600
9 69303500
Adattatore
Vanne pour entrée
d’air
-
07
Адаптер
10 31131000
Bocchettone presa d’aria
-
07
Plaquett
e déversoir
réglable
Воздухозаборник-07
11 31117950
Piastra di sezionamento Séparation Разделительная пластина
12 31117910
Coperchio della camera
filtrante
Plaquette Крышка фильтровальной камеры
13 31117920
Distanziatore Support Дистанционная пластина
14 31119730
Supporto Séparation petite Держатель
15 31117940
Coperchio piccolo
Plaquette hauteur
réglable
Малая крышка
16 31117960
Distanziale camera
filtrante
Coude PVC 90 diamètre
20mm
Промежуточный элемент
18 31117810
Tubo d’aspirazione Впускная труба
19 10100460
Griglia di aspirazione Corbeille Сетчатый фильтр
20 31117970
Piastra di degassamento Plaquette de dégazage Сточный желоб
21 12350000
Vite di plastica M4 Vis M4 Пластиковый болт M4
22 12350000
Vite di plastica M6 Vis M6 Пластиковый болт M6
23 69340000
Schiumatolo
assorbimento
Écumeur absorption Демпфирующий комплект


Deltec GmbH 2019
Steller Straße 75
D-27755 Delmenhorst
Deutschland / Germany
www.deltec-aquaristic.com
-
 1
1
-
 2
2
-
 3
3
-
 4
4
-
 5
5
-
 6
6
-
 7
7
-
 8
8
-
 9
9
-
 10
10
-
 11
11
-
 12
12
-
 13
13
-
 14
14
-
 15
15
-
 16
16
-
 17
17
-
 18
18
-
 19
19
-
 20
20


in altre lingue
- English: Deltec MCE 600 Operating instructions
- français: Deltec MCE 600 Mode d'emploi
- Deutsch: Deltec MCE 600 Bedienungsanleitung