
WatchGuard® Technologies, Inc.
WatchGuard® XCS Platform
Appliance Models: 280 and 580
Quick Start Guide
Guide de démarrage rapide
Kurzanleitung
Guida introduttiva
Guía Rápida

English
WatchGuard® XCS Quick Start Guide
1
2
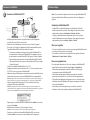
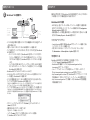
Register with LiveSecurity® Service
• Find the serial number on your device and record it.
• Go to http://www.watchguard.com/activate
• Log in.
NOTE: If you are new to WatchGuard®, follow the instructions provided at the URL above to create a prole.
• Follow the instructions on the screen to enter your serial number and receive a feature
key.
NOTE: If you will not have an Internet connection during the setup procedure, we recommend that you copy
your feature key to a text le during the activation process.
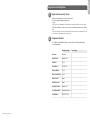
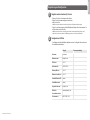
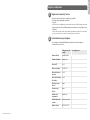
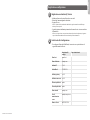
Conguration Checklist
• To congure your WatchGuard device, you must collect the following information
about your network:
Example Settings Your Settings
Hostname hostname
Domain Name example.com
IP Address 10.0.0.1
Subnet Mask 255.255.255.0
Gateway Address 10.0.0.2
Name Server Address 10.0.0.2
Default User ID admin
Default Password admin
Organization Name example.com
Server Admin Email [email protected]
Serial Number B0E112345-1234
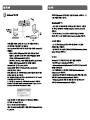
Registration and Conguration

• Install the device in a secure location, preferably in a locked equipment rack or secure
server room.
• Connect the power cord to the power socket on the back panel of the device.
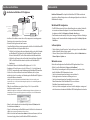
• To access the Web UI Setup Wizard, connect to the WatchGuard XCS using one of these
methods:
o
Connect your computer to the same network as the WatchGuard XCS through a
network switch. Connect the WatchGuard XCS to the network switch using the
rst onboard Ethernet connector (NIC 1) at the left side of the back panel.
o
Connect your computer directly to the WatchGuard XCS using a cross-over
Ethernet cable connected to the rst onboard Ethernet connector (NIC 1) at the
left side of the back panel.
• The default IP address on the WatchGuard XCS is 10.0.0.1/24.
• Congure your computer to use the IP address 10.0.0.2 with a netmask of
255.255.255.0 to connect to the WatchGuard XCS.
• Power on your device. Wait at least ve minutes for the system to initialize before you
try to connect to the WatchGuard XCS with a web browser.
NOTE: Ping is enabled on the congured network interface. You can ping the default address 10.0.0.1 to
check connectivity before you connect with a web browser.
• Open a web browser and type https://10.0.0.1 to start the Web UI Setup Wizard.
NOTE: Because the XCS device uses a self-signed certicate, you may see a certicate warning in your
browser. It is safe to ignore the warning (Internet Explorer) or to add a certicate exception (Mozilla Firefox).
• On the Login page, type the default user ID (admin) and the default password (admin).
• Follow the instructions on the screen and complete the Wizard.
NOTE: Make sure you enter your feature key during the Wizard.
• Log in to the WatchGuard XCS Web UI with the user name admin and the new
password you set in the Wizard.
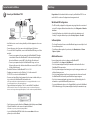
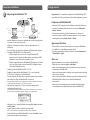
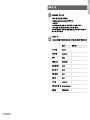
Connect your WatchGuard® XCS
3
NIC 1
Ethernet cable
Switch
Ethernet
cable
Connection and Installation Next Steps
Congratulations! You have nished the basic setup of your WatchGuard® XCS. You can
use the Web UI to continue all conguration and management tasks.
WatchGuard XCS Conguration
• The XCS is initially congured for a deployment using a single interface on an internal
network. To congure additional network interfaces, select Conguration > Network >
Interfaces.
• A weekly full email report is scheduled to be emailed to the administrator each
Saturday. To congure additional reports, select Activity > Reports > Schedule.
Software Updates
• The Security Connection feature contacts WatchGuard’s support servers daily to check
for new software updates.
• To install new software updates for your device, select Administration > Software
Updates > Updates.
Additional Resources
For more information about how to congure your WatchGuard XCS:
• From the Web UI, select Support > Online Manual.
• Go to http://www.watchguard.com/help/documentation and download the latest
WatchGuard XCS documentation.
• Go to http://www.watchguard.com/training/courses.asp for training presentations and
additional training resources.
• Go to http://www.watchguard.com/forum to view an interactive online user forum for
the WatchGuard XCS moderated by senior WatchGuard support engineers.
• Go to http://customers.watchguard.com to view and search the knowledge base for
information on specic WatchGuard XCS product issues.
• For copyright information, please see the Copyright Guide located on the WatchGuard
XCS documentation page at http://www.watchguard.com/help/documentation/xcs.asp

Deutsch
WatchGuard® XCS-Kurzanleitung
1
2
Registrieren beim LiveSecurity®-Service
• Notieren Sie sich die Seriennummer Ihres Geräts.
• Gehen Sie zu http://www.watchguard.com/activate
• Melden Sie sich an.
HINWEIS: Wenn Sie Neukunde sind, erstellen Sie zunächst ein Prol gemäß den Anweisungen.
• Folgen Sie den Anweisungen auf dem Bildschirm zur Eingabe Ihrer Seriennummer. Sie
erhalten dann einen Feature-Key.
HINWEIS: Wenn Sie während des Setup-Vorgangs nicht über eine Internetverbindung verfügen, wird
empfohlen, den Feature-Key während des Aktivierungsprozesses in eine Textdatei zu kopieren.
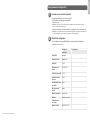
Kongurations-Prüiste
• Zur Konguration Ihrer WatchGuard-Appliance müssen Sie folgende Informationen zu
Ihrem Netzwerk bereithalten:
Beispiel Benutzereinstellung
Hostname hostname
Domänenname beispiel.com
IP-Adresse 10.0.0.1
Subnetzmaske 255.255.255.0
Gateway-Adresse 10.0.0.2
Namensserveradresse 10.0.0.2
Standard-Benutzer-ID admin
Standardkennwort admin
Organisationsname beispiel.com
E-Mail des
Serveradministrators
Seriennummer B0E112345-1234
Registrierung und Konguration

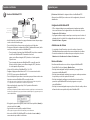
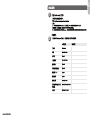
Anschließen der WatchGuard® XCS-Appliance
3
• Installieren Sie das Gerät an einem sicheren Ort, vorzugsweise in einem abgesperrten
Geräteträger oder in einem sicheren Serverraum.
• Verbinden Sie die Appliance mit dem Stromnetz.
• Um auf den Web-Installationsassistenten zuzugreifen, schließen Sie die WatchGuard XCS-
Appliance mithilfe einer der folgenden Methoden an:
o
Schließen Sie den Computer über einen Netzwerkschalter an das gleiche Netzwerk
wie WatchGuard XCS an. Verbinden Sie die WatchGuard XCS-Appliance über die
Ethernet-Schnittstelle (NIC 1) auf der Rückseite links mit dem Netzwerkschalter.
o
Schließen Sie den Computer über ein Crosskabel, das mit der Ethernet-Schnittstelle
(NIC 1) auf der Rückseite links verbunden ist, direkt an die WatchGuard XCS-
Appliance an.
• Die Standard-IP-Adresse der WatchGuard XCS-Appliance ist 10.0.0.1/24.
• Kongurieren Sie Ihren Computer so, dass die IP-Adresse 10.0.0.2 mit der Netzmaske
255.255.255.0 verwendet wird, um eine Verbindung mit der WatchGuard XCS herzustellen.
• Schalten Sie das Gerät ein. Warten Sie mindestens fünf Minuten, bis das System
initialisiert ist, bevor Sie versuchen, eine Verbindung zu der WatchGuard XCS-Appliance
mit einem Webbrowser herzustellen.
HINWEIS: Ping ist für die kongurierte Netzwerkschnittstelle aktiviert. Sie können einen Ping an die
Standardadresse 10.0.0.1 senden, um die Verbindung zu überprüfen, bevor Sie eine Verbindung mit einem
Webbrowser herstellen.
• Önen Sie einen Webbrowser, und geben Sie https://10.0.0.1 ein, um den Web-
Installationsassistenten zu starten.
HINWEIS: Da Ihre Appliance ein selbstsigniertes Zertikat benutzt, zeigt der Browser möglicherweise eine
Warnmeldung an. Sie können diese Warnung ignorieren (Internet Explorer) oder eine Zertikatausnahme
hinzufügen (Mozilla Firefox).
• Geben Sie auf der Anmeldeseite die standardmäßige Benutzer-ID (admin) und das
Standardkennwort (admin) ein.
• Folgen Sie den Anweisungen auf dem Bildschirm, und schließen Sie den Assistenten ab.
HINWEIS: Geben Sie im Assistenten unbedingt den Feature-Key ein.
• Melden Sie sich mit dem Benutzernamen admin und dem neuen Kennwort, das Sie im
Assistenten festgelegt haben, bei der WatchGuard XCS-Webschnittstelle an.
Ethernet-Kabel
[Optionaler Monitor
und optionale
Tastatur für
Konsolenzugri]
Switch
Ethernet-
Kabel
NIC 1
Anschluss und Installation Weitere Schritte
Herzlichen Glückwunsch! Das Setup für Ihre WatchGuard® XCS-Plattform ist hiermit
abgeschlossen. Weitere Kongurations- und Verwaltungsaufgaben können Sie über die
Webschnittstelle erledigen.
WatchGuard XCS-Konguration
• Die XCS-Plattform ist zunächst für eine Bereitstellung über eine einzelne Schnittstelle
in einem internen Netzwerk konguriert. Um weitere Netzwerkschnittstellen zu
kongurieren, wählen Sie Conguration > Network > Interfaces aus.
• Dem Administrator wird einmal pro Woche jeden Samstag per E-Mail ein vollständiger
Bericht gesendet. Um weitere Berichte zu kongurieren, wählen Sie Activity > Reports >
Schedule aus.
Software-Updates
• Über die Funktion „Security Connection“ werden die Support-Server von WatchGuard
täglich auf aktuelle Software-Updates geprüft.
• Um neue Software-Updates für Ihr Gerät zu installieren, wählen Sie Administration >
Software Updates > Updates aus.
Weitere Ressourcen
Weitere Infos zur Konguration Ihrer WatchGuard XCS-Appliance nden Sie hier:
• Wählen Sie auf der Webschnittstelle Support > Online Manual.
• Rufen Sie http://www.watchguard.com/help/documentation auf, und laden Sie die
aktuelle WatchGuard XCS-Dokumentation herunter.
• Unter http://www.watchguard.com/training/courses.asp nden Sie
Schulungspräsentationen und weitere Schulungsressourcen.
• Unter http://www.watchguard.com/forum nden Sie ein interaktive
Online-Benutzerforum für die WatchGuard XCS, das von erfahrenen
WatchGuard-Supportmitarbeitern moderiert wird.
• Unter http://customers.watchguard.com können Sie die Knowledgebase anzeigen und
nach Informationen zu bestimmten WatchGuard XCS-Produktproblemen durchsuchen.

Español
Guía rápida de WatchGuard® XCS
1
2
Regístrese en LiveSecurity® Service
• Encuentre el número de serie de su dispositivo y guárdelo.
• Visite http://www.watchguard.com/activate
• Loguéese.
NOTA: si usted es nuevo en WatchGuard®, siga las instrucciones provistas en el URL de arriba para crear un perl.
• Siga las instrucciones de la pantalla para ingresar su número de serie y recibir una tecla
de función.
NOTA: si usted no tiene una conexión a Internet durante el procedimiento de conguración, recomendamos
que copie su tecla de función en un archivo de texto durante el proceso de activación.
Lista de Vericación para Congurar
• Para congurar su dispositivo WatchGuard, usted debe recolectar la siguiente
información acerca de su red:
Conguraciones de
ejemplo
Sus conguraciones
Nombre del host Nombre del host
Nombre de dominio example.com
Dirección IP 10.0.0.1
Máscara de subred 255.255.255.0
Dirección de puerta
de enlace
10.0.0.2
Dirección del nombre
del servidor
10.0.0.2
ID del usuario por
defecto
admin
Contraseña por
defecto
admin
Nombre de la
Organización
example.com
Email del admin del
servidor
Número de serie B0E112345-1234
Registro y conguración

Conecte su WatchGuard® XCS
3
• Instale el dispositivo en una ubicación segura, preferentemente en un rack para equipos
cerrado o una sala del servidor segura.
• Conecte el cable eléctrico al tomacorriente en el panel trasero del dispositivo.
• Para ingresar al Asistente de conguración de la Web UI (interfaz web de usuario), utilice
uno de estos métodos para conectarse a WatchGuard XCS:
o
Conecte su equipo a la misma red que WatchGuard XCS a través de un conmutador
de red. Conecte WatchGuard XCS al conmutador de red con el
primer conector Ethernet integrado (NIC 1), ubicado en el costado izquierdo
del panel trasero.
o
Conecte su equipo directamente a WatchGuard XCS con un cable cruzado de
Ethernet conectado al primer conector Ethernet integrado (NIC 1), ubicado en
el costado izquierdo del panel trasero.
• La dirección IP por defecto en WatchGuard XCS es 10.0.0.1/24.
• Congure el equipo para utilizar la dirección IP 10.0.0.2 con una máscara de red de
255.255.255.0 para conectarse a WatchGuard XCS.
• Conecte el dispositivo. Espere al menos cinco minutos para que el sistema se inicie antes
de intentar conectarse a WatchGuard XCS con un explorador web.
NOTA: el ping está activado en la interfaz de red congurada. Puede hacer ping a la dirección por defecto
10.0.0.1 para vericar la conectividad antes de conectarse a un explorador web.
• Abra un explorador web e ingrese https://10.0.0.1 para iniciar el Asistente de
conguración de Web UI.
NOTA: dado que el dispositivo XCS utiliza un certicado auto rmado, es posible que vea una advertencia sobre
el certicado en su explorador. Es seguro ignorar la advertencia (Internet Explorer) o agregar una excepción de
certicado (Mozilla Firefox).
• En la página de generación de registros, escriba el ID de usuario por defecto (admin) y la
contraseña por defecto (admin).
• Siga las instrucciones en la pantalla y complete el Asistente.
NOTA: a segúrese de ingresar su tecla de función durante la ejecución del Asistente.
• Inicie sesión en la Web UI de WatchGuard XCS con el nombre de usuario admin y la
nueva contraseña que estableció en el Asistente.
Cable de Ethernet
[Monitor y teclado
opcionales para
acceder a la consola]
Conmutador
Cable de
Ethernet
NIC 1
Conexión e instalación Siguientes pasos
¡Felicitaciones! Ha nalizado la conguración básica de su WatchGuard® XCS.
Ahora puede usar la Web UI para continuar con toda la conguración y las tareas de
administración.
Conguración de WatchGuard XCS
• XCS se congura inicialmente para una implementación mediante una interfaz
única en una red interna. Para congurar interfaces de red adicionales, seleccione
Conguración > Red > Interfaces.
• Se programa un informe completo semanal que se enviará por correo electrónico al
administrador todos los sábados. Para congurar informes adicionales, seleccione
Actividad > Informes > Programar.
Actualizaciones de software
• La característica Security Connection contacta los servidores de soporte de
WatchGuard diariamente para vericar si hay nuevas actualizaciones de software.
• Para instalar actualizaciones de software nuevas para su dispositivo, seleccione
Administración > Actualizaciones de software > Actualizaciones.
Recursos adicionales
Para obtener más información acerca de cómo congurar su WatchGuard XCS:
• Desde la Web UI, seleccione Soporte > Manual en línea.
• Visite http://www.watchguard.com/help/documentation y descargue la última
documentación de WatchGuard XCS.
• Visite http://www.watchguard.com/training/courses.asp para consultar presentaciones
de capacitación y recursos de capacitación adicionales.
• Visite http://watchguard.com/forum para consultar un foro interactivo en línea
para usuarios para WatchGuard XCS moderado por ingenieros en soporte
senior de WatchGuard.
• Visite http://customers.watchguard.com para ver y buscar la base de consulta y obtener
información sobre temas especícos del producto WatchGuard XCS.

Français
Guide de démarrage rapide de WatchGuard® XCS
1
2
Inscrivez-vous au Service LiveSecurity®
• Enregistrez le numéro de série de votre appareil.
• Allez sur http://www.watchguard.com/activate
• Connectez-vous.
REMARQUE: vous n'êtes pas encore inscrit auprès de WatchGuard®, suivez les instructions fournies à
l'adresse ci-dessus pour créer votre prol.
• Suivez les instructions à l’écran pour entrer votre numéro de série et recevoir une clé.
REMARQUE: si vous ne disposez pas d'une connexion Internet pendant la procédure de conguration, nous
vous recommandons de copier votre clé dans un chier texte pendant l'activation.
Check-list de conguration
• Pour congurer votre appareil WatchGuard, vous devez réunir les informations
suivantes sur votre réseau:
Exemples de
paramètres
Vos paramètres
Nom d’hôte hostname
Nom de domaine exemple.com
Adresse IP 10.0.0.1
Masque de sous-
réseau
255.255.255.0
Adresse de passerelle 10.0.0.2
Adresse du serveur
de noms
10.0.0.2
Identiant utilisateur
par défaut
admin
Mot de passe par
défaut
admin
Nom de l'entreprise exemple.com
Email de
l'administrateur
du serveur
admin@exemple.com
Numéro de série B0E112345-1234
Enregistrement et conguration

Connectez votre WatchGuard® XCS
3
• Installez l'appareil dans un endroit sûr, de préférence dans un bâti d'équipement
verrouillé ou dans une salle de serveur sécurisée.
• Branchez le cordon d’alimentation à la prise qui se trouve à l’arrière de l’appareil.
• Pour avoir accès à l'assistant de conguration de l'interface utilisateur Web, branchez
l'appareil WatchGuard XCS à l'aide d'une des méthodes suivantes:
o
Connectez votre ordinateur sur le même réseau que celui de WatchGuard XCS via
un commutateur réseau. Connectez le WatchGuard XCS au commutateur réseau au
moyen du premier connecteur Ethernet (NIC1) situé à gauche à l'arrière de l'appareil.
o
Connectez directement votre ordinateur à l'appareil WatchGuard XCS à l'aide d'un
câble inverseur Ethernet relié au premier connecteur Ethernet (NIC1) situé à gauche
à l'arrière de l'appareil.
• L'adresseIP par défaut de WatchGuard XCS est 10.0.0.1/24.
• Congurez votre ordinateur pour utiliser l'adresseIP 10.0.0.2 avec un masque réseau de
255.255.255.0 pour vous connecter au WatchGuard XCS.
• Allumez votre appareil. Veuillez patienter cinq minutes environ pendant l'initialisation du
système avant d'essayer de vous connecter au WatchGuard XCS avec un navigateur Web.
REMARQUE: Ping est activé sur votre interface de réseau congurée. Vous pouvez envoyer une requête ping à
l'adresse par défaut 10.0.0.1 pour vérier la connectivité avant de vous connecter avec le navigateur Web.
• Ouvrez le navigateur Web et entrez https://10.0.0.1 pour démarrer l'assistant de
conguration de l'interface utilisateur Web.
REMARQUE: comme l'appareil XCS utilise un certicat auto-signé, il se peut qu'un avertissement sur ce
certicat s'ache dans votre navigateur. Vous pouvez ignorer l'avertissement (Internet Explorer) ou ajouter une
exception de certicat (Mozilla Firefox) sans nuire à la sécurité de votre ordinateur.
• Depuis la page de connexion, entrez votre identiant utilisateur (admin) et votre mot de
passe par défaut (admin).
• Veuillez suivre les instructions sur l'écran et terminer l'assistant.
REMARQUE: assurez-vous d'avoir entré la clé de fonctionnalité pendant la conguration.
• Connectez-vous à l'interface utilisateur Web de WatchGuard XCS avec votre nom
d'utilisateur admin et le nouveau mot de passe déni pendant la conguration.
Câble Ethernet
[Écran et clavier en
option pour l'accès à
la console]
Commutateur
Câble
Ethernet
NIC 1
Connexion et installation Prochaines étapes
Bravo! Vous avez terminé la conguration de base de votre appareil WatchGuard® XCS.
Vous pouvez utiliser l'interface Web pour poursuivre les tâches de conguration et
de gestion.
Conguration de WatchGuard XCS
• L'appareil XCS est conguré initialement pour un déploiement à l'aide d'une
interface unique sur un réseau interne. Pour congurer des interfaces de réseau
supplémentaires, sélectionnez Conguration > Network > Interfaces.
• Un rapport complet hebdomadaire est programmé pour être envoyé chaque
samedi à l'administrateur par courrier électronique. Pour congurer des rapports
supplémentaires, sélectionnez Activity > Reports > Schedule.
Mises à jour logicielles
• La fonction Security Connection contacte les serveurs du support WatchGuard tous les
jours an de rechercher les mises à jour logicielles.
• Pour installer les nouvelles mises à jour logicielles de votre appareil, sélectionnez
Administration > Software Updates > Updates.
Ressources supplémentaires
Pour de plus amples informations sur la façon de congurer votre WatchGuard XCS:
• Depuis l'interface utilisateur Web, sélectionnez Support > Online Manual.
• Allez sur http://www.watchguard.com/help/documentation et téléchargez la
documentation actualisée de WatchGuard XCS.
• Allez sur http://www.watchguard.com/training/courses.asp pour consulter les
présentations sur la formation et les ressources de formation supplémentaires.
• Allez sur http://www.watchguard.com/forum pour avoir accès à un forum en ligne
d'utilisateurs interactif du WatchGuard XCS animé par des ingénieurs d'assistance
chevronnés de WatchGuard.
• Allez sur http://customers.watchguard.com pour consulter et rechercher les
informations de base sur des problèmes spéciques du WatchGuard XCS.

Italiano
WatchGuard® XCS - Guida introduttiva
1
2
Registrazione con LiveSecurity® Service
• Individuare il numero di serie sul dispositivo e annotarlo.
• Visitare http://www.watchguard.com/activate
• Eseguire l'accesso.
NOTA: se è la prima volta che si utilizza il sito WatchGuard®, seguire le istruzioni fornite nell'URL sopra
indicato per creare un prolo.
• Seguire le istruzioni visualizzate per immettere il numero di serie e ricevere una chiave
di funzionalità.
NOTA: se non si dispone di una connessione Internet durante la procedura di congurazione, è opportuno
copiare la chiave di funzionalità in un le di testo durante la procedura di attivazione.
Lista di controllo di congurazione
• Per congurare il dispositivo WatchGuard, è necessario avere a portata di mano le
seguenti informazioni sulla rete:
Impostazioni di
esempio
Impostazioni utente
Nome host nome host
Nome di dominio esempio.com
Indirizzo IP 10.0.0.1
Subnet Mask 255.255.255.0
Indirizzo gateway 10.0.0.2
Indirizzo name server 10.0.0.2
ID utente predenito admin
Password predenita admin
Nome azienda esempio.com
E-mail
amministrazione
server
Numero di serie B0E112345-1234
Registrazione e congurazione

Collegare l'appliance WatchGuard® XCS
3
• Installare il dispositivo in un luogo sicuro, preferibilmente in un rack per apparecchiature
con serratura o in una sala per server protetti.
• Collegare il cavo di alimentazione alla presa di corrente sul pannello posteriore
del dispositivo.
• Per accedere alla procedura guidata di congurazione dell'interfaccia web, collegare in
rete l'appliance WatchGuard XCS con uno di questi metodi:
o Collegare il computer alla stessa rete a cui è collegata la WatchGuard XCS
attraverso uno switch, collegando quest'ultimo al primo connettore Ethernet (NIC 1)
dell'appliance, situato sul lato sinistro del pannello posteriore.
o Collegare il computer direttamente alla WatchGuard XCS mediante un cavo Ethernet
di crossover collegato al primo connettore Ethernet (NIC 1) dell'appliance, situato
sul lato sinistro del pannello posteriore.
• L'indirizzo IP predenito della WatchGuard XCS è 10.0.0.1/24.
• Congurare il computer anché utilizzi l'indirizzo IP 10.0.0.2 con una netmask di
255.255.255.0 per il collegamento con la WatchGuard XCS.
• Accendere il dispositivo. Attendere almeno cinque minuti, mentre il sistema si inizializza,
prima di tentare di collegarsi alla WatchGuard XCS con un browser.
NOTA: ping è abilitato sull'interfaccia di rete congurata. Prima di collegarsi con un browser, si può inviare un
comando ping all'indirizzo predenito 10.0.0.1 per vericare la connettività.
• Aprire un browser e digitare https://10.0.0.1 per avviare la procedura guidata di
congurazione dell'interfaccia web.
NOTA: poiché il dispositivo utilizza un certicato self-signed, il browser visualizzerà un avviso di certicato. Si
può ignorare l'avviso (Internet Explorer) o aggiungere un'apposita eccezione (Mozilla Firefox).
• Sulla pagina di accesso, digitare l'identicativo utente predenito (admin) e la password
predenita (admin).
• Seguire le istruzioni a schermo e completare la procedura guidata.
NOTA: accertarsi che durante la procedura guidata venga immessa la chiave di funzionalità.
• Accedere all'interfaccia web della WatchGuard XCS con il nome utente admin e la nuova
password impostata durante la procedura guidata.
Cavo Ethernet
[Monitor e tastiera
opzionali per
l'accesso alla
console]
Switch
Cavo
Ethernet
NIC 1
Connessione e installazione Passaggi successivi
Congratulazioni! Si è così completata la congurazione base della WatchGuard® XCS. È
ora possibile usare l'interfaccia web per tutte le altre attività di congurazione e gestione.
Congurazione della WatchGuard XCS
• Inizialmente la XCS è congurata in modo da utilizzare una singola interfaccia su una
rete interna. Per congurare ulteriori interfacce di rete, selezionare Conguration >
Network > Interfaces.
• Per impostazione predenita, ogni sabato l'amministratore riceverà un'e-mail
contenente un rapporto completo sulla settimana appena trascorsa. Per congurare
ulteriori rapporti, selezionare Activity > Reports > Schedule.
Aggiornamenti del software
• La funzionalità di connessione protetta contatta i server di supporto di WatchGuard
per controllare se sono disponibili aggiornamenti software.
• Per installare aggiornamenti software per il dispositivo, selezionare Administration >
Software Updates > Updates.
Altre risorse
Per ulteriori informazioni su come congurare la WatchGuard XCS:
• Dall'interfaccia web, selezionare Support > Online Manual.
• Andare a http://www.watchguard.com/help/documentation e scaricare la più recente
documentazione su WatchGuard XCS.
• Andare a http://www.watchguard.com/training/courses.asp per presentazioni di training
e ulteriori risorse sul training.
• Andare a http://www.watchguard.com/forum per seguire un forum interattivo di utenti
della WatchGuard XCS moderato da tecnici di assistenza WatchGuard di
lunga esperienza.
• Andare a http://customers.watchguard.com per visualizzare il Knowledge Base per
cercare informazioni su specici problemi relativi al prodotto WatchGuard XCS.

英語
WatchGuard® XCSクイックスタート
1
2
LiveSecurity® Service に登録する
• デバイスについているシリアル番号を見つけて記録しておきます。
• http://www.watchguard.com/activate を開きます。
• ロ グ イ ン し ま す。
ご注意:WatchGuard® 製品を新たに使用されるお客様は、上記の URL の指示に従ってプロファイルを作成
して下さい。
• 画面の指示に従ってシリアル番号を入力し、機能キーを受け取ります。
ご注意:セットアップ手順実行時にインターネット接続が使用できない場合は、アクティベーション処理の
間に機能キーをテキストファイルにコピーしておくことをお勧めします。
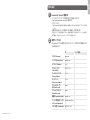
設 定チェックリスト
• WatchGuard デバイスを設定するためには、ネットワークに関する次の情報を入手す
る必要があります。
例 ユーザー設定
ホ ス ト 名( Hostname)
hostname
ドメイン名(Domain Name)
example.com
IP ア ド レ ス( IP Address)
10.0.0.1
サ ブ ネ ット・マ スク
(Subnet Mask)
255.255.255.0
ゲ ー ト ウェ イ・アド レ ス
(Gateway Address)
10.0.0.2
ネームサーバー
(Name Server Address)
10.0.0.2
デフォルトのユーザー
ID(Default User ID)
admin
デフォルトのパスワード
(Default Password)
admin
組織名(Organization Name)
example.com
サーバー管理者のメールアド
レ ス( Server Admin Email)
シ リ ア ル 番 号( Serial Number)
B0E112345-1234
登録と設定

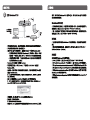
WatchGuard® XCSを接続する
3
• デバイスを安全な場所に設置します。ロックできる機器用ラックまたは安全なサーバ
ー室をお勧めします。
• 電源コードをデバイスのバックパネルにある電源ソケットに接続します。
• ウェブ UI設定ウィザードにアクセスするには、次のうちいずれかの方法で WatchGuard
XCSに接続します。
o
ネットワークスイッチを介して、WatchGuard XCSと同じネットワークにお使いの
コンピュータを接続します。バックパネルの左側にあるオンボード・イーサネット
コネクタ1(NIC 1)を使用して、WatchGuard XCSをネットワークのスイッチに接続
します。
o
バックパネルの左側にあるオンボード・イーサネットコネクタ1(NIC 1)に 接 続 さ
れているクロスオーバー・イーサネットケーブルを使用して、コンピュータを直接
WatchGuard XCS に接 続します。
• WatchGuard XCS の デフォルトIPアドレスは、10.0.0.1/24です。
• 255.255.255.0 のネットマスクでマスクした IP アドレ ス 10.0.0.2 を使用するようコンピ
ュータを設定し、WatchGuard XCS に接続します。
• デバイスの電源を投入します。システムが初期化するまで少なくとも5分待ってから、
ウェブブラウザを使用して WatchGuard XCS に接続します。
ご注意:ピングは構成済みネットワークインターフェース上で利用できます。ウェブブラウザに接続する前
に、デフォルトアドレス 10.0.0.1 にピング送信して接続の状態を確認してください。
•
ウェブブラウザを開き、https://10.0.0.1
と入力して、ウェブUI設定ウィザードを起動します。
ご注意:XCSデバイスは自己署名証明書を使用するため、証明書に関する警告がブラウザに表示されるこ
とがあります。この警告は無視(Internet Explorer)したり、証明書の例外を追加(Mozilla Firefox)し て も 問 題
ありま せん 。
• ログイン・ページでデフォルトのユーザーID(admin)と、デフォルトのパスワード
(admin) を入力します。
• 画面の指示に従ってウィザードを終了します。
ご注意:ウィザードでは機能キーを入力します。
• ユーザー名 admin と今ウィザードで設定した新しいパスワードを使用し
て、WatchGuard XCSウェブ UIにログインします。
イーサーネット・
ケーブル
[オプ ション の
コンソール
アクセス 用
モニターと
キーボード]
スイッチ
イーサー
ネ ット・
ケーブル
NIC 1
接 続 とインストール 次のステップ
おめでとうございます。これでWatchGuard® XCS の基本設定を完了しました。このままウェ
ブUIを使用して、すべての構成・管理タスクを続行できます。
WatchGuard XCSの 構成
• XCSはもともと、社内インターネットの単一インターフェースを使用した実装用に構
成されています。別のネットワークインターフェースも構成するには、Conguration >
Network > Interfaces を選択します。
• 詳細な週報レポートが、毎週土曜日に電子メールで配信されます。別のレポートも構
成するには、Activity > Reports > Schedule を選択します。
ソ フ ト ウ ェ ア・ア ッ プ デ ー ト
• Security Connection 機能は、毎日 WatchGuard のサポート・サーバーに接続して、新し
いソフトウェア・アップデードを確認します。
• お使いのデバイスに新しいソフトウェア・アップデートをインストールするに
は、Administration > Software Updates > Updates を選択します。
そ の 他 のリソース
WatchGuard XCSを設定する方法の詳細は、下記を参照して下さい。
• ウェブ UIで、Support > Online Manual を選 択します。
• WatchGuard XCS の最新マニュアルは、http://www.watchguard.com/help/
documentation でダウンロードできます。
• トレーニング・プレゼンテーションやその他のトレーニング用リソースについて
は、http://www.watchguard.com/training/courses.asp を参照してください。
• http://www.watchguard.com/forum では、WatchGuard のシニアサポートエンジニアが
司会を務めるインタラクティブなオンライン・ユーザー・フォーラムを閲覧できます。
• http://customers.watchguard.com では、知識ベースから WatchGuard XCS 製品問題別
の情報を検索できます。

1
2

3
NIC 1

1
2

3
e
NIC 1

WatchGuard® XCS Quick Start Guide WatchGuard® XCS Quick Start Guide

ADDRESS: 505 Fifth Avenue South, Suite 500, Seattle, WA 98104
WEB: www.watchguard.com • U.S. SALES: 1.800.734.9905 • INTERNATIONAL SALES: +1.206.613.0895
© 2012 WatchGuard Technologies, Inc. All rights reserved. WatchGuard, the WatchGuard Logo, Firebox, Fireware,
Core, Peak, and LiveSecurity are either trademarks or registered trademarks of WatchGuard Technologies, Inc.
in the United States and/or other countries. All other trademarks and tradenames are the property of their
respective owners. P.N. 352-4475-001 Rev A 0902612
1.877.232.3531 +1.206.613.0456 www.watchguard.com/support
(U.S. and Canada) (all other countries)
WATCHGUARD TECHNICAL SUPPORT
-
 1
1
-
 2
2
-
 3
3
-
 4
4
-
 5
5
-
 6
6
-
 7
7
-
 8
8
-
 9
9
-
 10
10
-
 11
11
-
 12
12
-
 13
13
-
 14
14
-
 15
15
-
 16
16
-
 17
17
-
 18
18
-
 19
19


in altre lingue
Documenti correlati
-
Watchguard QMS 1200 Guida Rapida
-
-
-
-
-
-
-
-
Watchguard XTM 2050 Guida Rapida