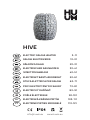
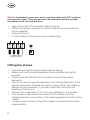
HUUM HIVE Electric Sauna Heater Manuale utente
- Tipo
- Manuale utente

HIVE
ELECTRIC SAUNA HEATER 3–11
SAUNA ELEKTRIKERIS 13–21
SÄHKÖKIUKAAN 23–31
ELEKTRISCHER SAUNAOFEN 33–41
ЭЛЕКТРОКAМЕНКИ 43–51
ELEKTRISKT BASTUAGGREGAT 53–61
STUFA ELETTRICA PER SAUNA 63–71
PIEC ELEKTRYCZNY DO SAUNY 73–81
ELEKTRICKÝ OHŘÍVAČ 83–91
POÊLE ÉLECTRIQUE 93-101
ELEKTRISKĀ KRĀSNS PIRTĪM 103-111
ELEKTRINĖ PIRTIES KROSNELĖ 113-121
[email protected] www.huum.eu
LV
LT


3
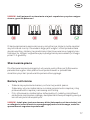
HIVE
ELECTRIC SAUNA HEATER
Installation and operation manual
NB! The following instructions for electrical works must be carried out
by a certied electrician.
The product must be installed as a complete set. The HUUM HIVE
electric sauna heater delivery set contains:
• electric heater;
• installation and operation manual for the electric heater.
NB! The electric heater requires a control panel and stones.

4
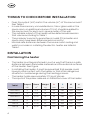
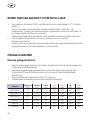
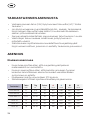
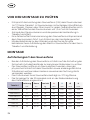
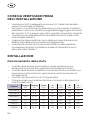
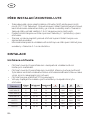
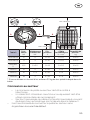
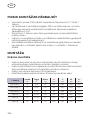
THINGS TO CHECK BEFORE INSTALLATION
• Does the output (kW) match the volume (m3) of the sauna room?
See Table 1.
• In case there are any uninsulated brick, tile or glass walls in the
sauna room, an additional volume of 1.5 m³ should be added to
the sauna room for each such square meter of the wall.
• The suitable output of the heater will be determined based on
that volume according to Table 1.
• The producer’s warranty guarantee is invalid if the heater and
sauna room have been dimensioned incorrectly!
• Minimal safe distances between the sauna room’s ceiling and
walls to consider in installing the electric heater are listed in
Table 1.
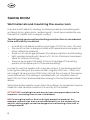
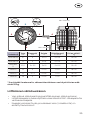
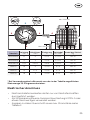
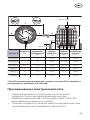
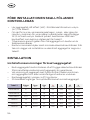
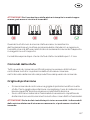
INSTALLATION
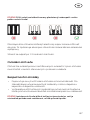
Positioning the heater
• The heater must be positioned in such a way that there is a safe
of the heater. See Figure.
• In installing the heater, it must be prevented that people could
have physical contact with the heater or that other dangerous
situations could emerge during the heating process.
•
• T
heater.
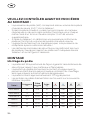
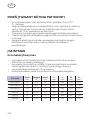
Table 1 Output
kW
Room
m3
Weight
kg
A
mm
B
mm
Ø
mm
H
mm
HIVE Mini 6 6 14
HIVE Mini 9 9 16
HIVE Mini 11 16
HIVE 15 15

5
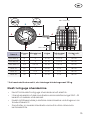
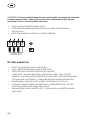
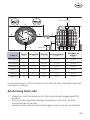
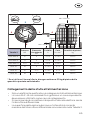
Connecting the heater to the power supply
•
power supply.
•
used as the connection cable.
• It is recommended to connect the unit to the mains without an
earth-leakage circuit breaker.
•
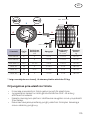
Min. 1200 mm
50 mm
Max. 400 mm
A A
H
A
A
B
X3
6 X 90
Y
Table 2 Output
kW Elements
kW Circuit Breaker
APower cable
N × mm
Quantity of
stones*
kg
HIVE Mini 6 6
HIVE Mini 9 9 3 3 × 16
HIVE Mini
11
5 × 4
HIVE 15 15 5 × 4
3 5 × 6
* If you use an air tunnel, subtract 30 kg from the amount of stones
provided in the table.

6
NB! It is forbidden to use a non-heat-resistant cable with PVC isolation
as the power cable. The joint box must be waterproof and it must be
located up to 50 cm from the oor.
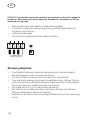
•
•
circuit diagram.
• Close the cover.
•
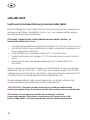
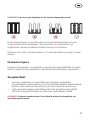
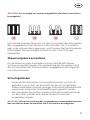
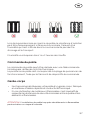
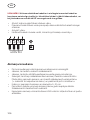
Fiing the stones
• The stones must be washed clean before laying.
• Make sure that the heating elements are not bent during the
process.
•
elements.
• Stack the stones sparsely between the heating elements. If the
stones have been stacked too close to each other, the heating
elements may overheat (= shorter useful life) and slow the
heating of the sauna.
•
•
stacked close to one another. The heating elements must not be
visible.
• Using ceramic stones in the HIVE heater is allowed at the user’s
responsibility.
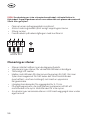
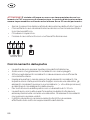
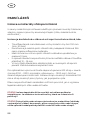
L1 L2
400V 3N
L3 N

7
ATTENTION! A too sparsely lled stone container causes re hazard!
to be lower than the standard. The reason for that is the moisture
seeped into the insulating layer during storage in the warehouse and
transportation.
Controlling the heater
The output of the heater must remain in the interval determined by
the control panel’s producer.
Guard rails
• It is recommended to construct a guard rail around the heater.
We recommend using materials with low heat capacity and bad
thermal conductivity for the guard rail.
•
NB! Installing the heater closer to ammable constructions than at the
distance of the minimal required protection belt may cause re hazard.

8
SAUNA ROOM
Wall materials and insulating the sauna room
In a sauna with electric heating, all massive heat accumulating wall
surfaces (brick, glass brick, rendering etc.) must be insulated to use
the electric heater with a regular output.
The following sauna wall and ceiling construction is considered
to be suiciently insulated:
•
• the construction is damp proofed with taped aluminium paper or
• t
boarding;
•
• there is an air gap of at least 5 mm on the edge of the ceiling
panels at the upper part of the wall panelling.
In order to use the heater with a regular output, it would be practical
room diminishes. The ceiling is insulated with an insulation laer at
above.
made for heat resistant walls in the vicinity of the heater.
ATTENTION! Insulating the heat barrier has to be approved by the re
inspector. Insulating ues in use is forbidden!
NB! Covering the walls or oor with light protective material, for
example, mineral tiles that are installed directly on the surface of the
walls or ceiling might cause the dangerous overheating of the wall or
ceiling material.

9
Floor of the sauna room
The heater stones in use crumble due to temperature changes.
The pieces and pebbles breaking away from the heater stones are
Heater stone particles and sprays from the steam-making water (e.g.,
order to avoid aesthetic damage (caused by the reasons mentioned
around the heater.
Ventilation of the sauna
•
advisable to direct the fresh air into the sauna room from above
the heater stones.
• As an alternative, the fresh air may be directed in from under the
heater.
• The air inlet must be equipped with an adjustable valve.
•
• It is advised to install a ventilation valve at the upper part of the

10
WARNING!
•
room and heater.
•
with stones.
•
• Do not touch a working heater, it causes burns.
• Ventilating the sauna room incorrectly may dry the wood too
• Only tap water may be used for making steam.
• Never make steam by using a water hose.
•
under the boarding.
• Sauna doors must always open outward.
• Do not use the sauna for any other purpose than it is meant to be
used.
• Do not install more than one heater in the sauna room.
• Undiluted sauna essences etc. may ignite when poured directly
on the stones.
•
• Sudden cooling after staying in the steam room is not
recommended for people with poor health. Consult a doctor.
• Enjoy the sauna as long as it is comfortable for you.
• Keep this information in a secure place.
•
elements.

11
WARRANTY
requirements presented. Damage to the product caused by not
following instructions and requirements will void warranty.
If any defects are found on the product, where manufacturer can be
product. Demands must be made not later than 5 years after buying
the product. Purchase receipt needs to be presented when warranty
demands are made.
Warranty Terms
• Warranty applies only to electric heaters that have been used
according to the manual
•
considered as consumable parts.
• Warranty does not cover wear that occurs from natural usage.
• Warranty does not cover defects or wear caused by planned use.
• Warranty does not imply when:
• damage or defects are caused by transportation or other
actions not controlled by manufacturer;
• product has been damaged by carelessness or overload;
• product has not been installed correctly;
•
• warranty period is over;
• product is not complete.
Find the latest updates on our website www.huum.eu


13
HIVE
SAUNA ELEKTRIKERIS
Paigaldus- ja kasutusjuhend
NB! Käesolevas juhendis kirjeldatud elektritöid tohib teostada vaid
sertitseeritud elektrik.
Toode peab olema paigaldatud komplektselt. HUUM HIVE elektri-
kerise tarnekomplekti kuulub:
• elektrikeris;
• elektrikerise paigaldus– ja kasutusjuhend.
NB! Elektrikeris vajab juhtpulti ja kive.

14
ENNE PAIGALDAMIST KONTROLLIDA
• Kas kerise võimsus (kW) vastab leiliruumi ruumalale (m3)? Vaata
tabel 1.
•
klaasseinu, tuleb iga taolise seina ruutmeetri kohta arvestada 1,5
m3 täiendavat leiliruumi ruumala.
• Selle järgi määratakse tabeli 1 abil kindlaks kerise sobilik võimsus.
• Tootja garantii ei kehti, kui keris ja leiliruum on valesti
dimensioonitud!
• Leiliruumi lae ja seinte minimaalsed ohutuskaugused elektrikerise
paigutamisel on toodud tabelis 1 ja joonisel.
PAIGALDAMINE
Kerise paigutamine
• Keris tuleb paigutada nii, et oleks tagatud ohutud vahekaugused
• Kerise paigaldusega peab olema välistatud inimese ja kerise
füüsiline kontakt kütmise ajal või muude ohtlike olukordade
tekkimine.
•
• Toitekaabli sisendid asuvad kerise põhjakaanel.
Tabel 1 Võimsus
kW Ruum
m3Kaal
kg A
mm B
mm Ø
mm H
mm
HIVE Mini 6 6 14
HIVE Mini 9 9 16
HIVE Mini 11 16
HIVE 15 15

15
Elektrivõrguga ühendamine
• Kerist tohib elektrivõrguga ühendada ainult elektrik.
•
kaablit või sellele võrdväärset.
• Kaabli ristlõikepindala ja kaitsme maksimaalne voolutugevus on
• Soovitatav on seade ühendada vooluvõrku ilma rikkevoolu
kaitsmelülitita.
Min. 1200 mm
50 mm
Max. 400 mm
A A
H
A
A
B
X3
6 X 90
Y
Tabel 2 Võimsus
kW Küekehad
kW Kaitse
AToitekaabel
N × mmKivide hulk*
kg
HIVE Mini 6 6
HIVE Mini 9 9 3 3 × 16
HIVE Mini 11
5 × 4
HIVE 15 15 5 × 4
3 5 × 6
* Kui kasutate õhutunnelit, siis lahutage kivide kogusest 30 kg.

16
TÄHELEPANU! Kerise toitekaablina on keelatud kasutada kuumust
mietaluvat isolatsiooniga kaablit. Harutoos peab olema veekindel ning
paiknema põrandast kuni 50 cm kõrgusel.
• Avage kerise elektrikarbi kaas.
• Ühendage toitekaabel vastavalt elektriskeemile klemmliistule.
• Sulgege kaas.
• Fikseerige kaabel väljaviigule kaablivitsaga.
Kivide paigaldamine
• Enne kivide ladumist soovitame kivid puhtaks pesta.
•
• Oleks tagatud piisavad õhkvahed õhuringluse tarvis.
•
aeglustavad sauna kuumenemist.
•
•
tohi näha olla.
• Keraamiliste kivide kasutamine HIVE kerises on lubatud omal
vastutusel.
L1 L2
400V 3N
L3 N

17
TÄHELEPANU! Liiga hõredalt täidetud kiviruum tekitab tuleohtu!
Enne kerise sisse lülitamist võib isolatsioonitakistus osutuda normist
väiksemaks. Selle põhjuseks on ladustamise ja transportimise ajal
isolatsioonikihi sisse imbunud niiskus.
Kerise juhtimine
juhtpulti. Kerise võimsus peab jääma juhtimisseadme tootja poolt
määratud töövõimsuse vahemikku.
Kaitsepiirded
• Soovituslik on rajada kerise ümber kaitsepiire. Kaitsepiirde
materjalina soovitame kasutada väikese soojusmahutavuse ja
halva soojusjuhtivusega materjale.
•
konstruktsioonide vahel.
TÄHELEPANU! Kerise paigaldamine süivatele konstruktsioonidele
lähemale, kui näevad ee minimaalsed ohutuskujad, võib põhjustada
tuleohtu.

18
LEILIRUUM
Leiliruumi isoleerimine ja seinamaterjalid
seinapinnad (tellis, klaastellis, krohv jne.) normaalse võimsusega
kerise kasutamiseks isoleerida.
Piisavalt isoleerituks võib pidada sauna sellist seina- ja
laekonstruktsiooni, kus:
•
• konstruktsiooni niiskustõkkeks on teibitud alumiiniumpaber või
muu peegeldav materjal;
•
• -
laud;
• seinavoodri ülaosas laepaneelide piiril on vähemalt 5 mm
õhkvahe.
Kerise võimsuse optimeerimiseks on otstarbekas tuua sauna lage
mm paksuselt ja vooderdatakse ülal kirjeldatud viisil.
kuumuskindlad seinad kerise vahetus läheduses.
TÄHELEPANU! Soojamüüride isoleerimine tuleb kooskõlastada
tuletõrjeinspektoriga. Kasutatavate lõõride isoleerimine on keelatud!
NB! Seinte või lae katmine tulekindla materjali, näiteks
mineraalplaadiga, õhkvaheta, otse seina või lae pinnale, võib
põhjustada seina- või laematerjalide ohtliku ülekuumenemise.

19
Leiliruumi põrand
Temperatuurimuudatustest tingituna kasutatavad kerisekivid
murenevad. Kividest eralduvad tükid ja peened kivid uhutakse koos
leiliveega sauna põrandale. Kuumad kiviosad võivad kerise all ja
Kerisekivide ja leilivee pritsmed (näiteks rauasisaldus) võivad
imenduda plaatpõranda heledasse vuuki. Eelmainitust tingituna
tuleks esteetiliste kahjustuste ärahoidmiseks kerise all ja ümbruses
kasutada keraamilisi plaate ja tumedat vuugitäidet.
Sauna ventilatsioon
• Küllaldase hapnikuvarustuse ja värske õhu tagamiseks peab
sauna ventilatsioon olema võimalikult tõhus. Värske õhk on
soovitatav juhtida leiliruumi kerisekivide kohale. Alternatiivina võib
värske õhu juhtida kerise alla.
• Sissetõmbeava tuleb varustada reguleeritava klapiga.
• Väljalaskeklapp paigaldada sisselaskeklapist vastasseina
• Soovituslik on varustada leiliruumi ülaosasse tuulutusklapp
lõpptuulutuse tarvis.

20
HOIATUS!
• Enne elektrikerise sisselülitamist kontrollige alati leiliruumi ja
kerist.
• Kerist võib kasutada vaid korrektselt kividega täidetuna.
• Ärge katke kerist - see tekitab tuleohtu.
• Ärge puudutage köetud kerist, see põhjustab põletust.
• Leiliruumi vale ventileerimine võib põhjustada puidu liigset
kuivamist ja luua saunas tuleohtu.
•
• Ärge kunagi kasutage leili tekitamiseks veevooliku abi.
• Alati peab peale laudist olema vähemalt 5 cm tulekindlat
soojusisolatsiooni.
• Sauna uksed peavad alati avanema väljapoole.
• Ärge kasutage sauna muuks otstarbeks kui saunatamine.
• Ärge paigaldage üle ühe kerise sauna leiliruumi.
• Lahjendamata sauna lõhnaained jm võivad otse kividele valades
• Ärge jätke väikelapsi järelvalveta sauna.
• Nõrga tervise korral ei ole soovituslik järsk jahutamine peale leili.
Konsulteerige arstiga.
• Nautige saunas käiku nii kaua kuni see on teile mugav.
• Hoidke seda teavet kindlas kohas.
•
La pagina si sta caricando...
La pagina si sta caricando...
La pagina si sta caricando...
La pagina si sta caricando...
La pagina si sta caricando...
La pagina si sta caricando...
La pagina si sta caricando...
La pagina si sta caricando...
La pagina si sta caricando...
La pagina si sta caricando...
La pagina si sta caricando...
La pagina si sta caricando...
La pagina si sta caricando...
La pagina si sta caricando...
La pagina si sta caricando...
La pagina si sta caricando...
La pagina si sta caricando...
La pagina si sta caricando...
La pagina si sta caricando...
La pagina si sta caricando...
La pagina si sta caricando...
La pagina si sta caricando...
La pagina si sta caricando...
La pagina si sta caricando...
La pagina si sta caricando...
La pagina si sta caricando...
La pagina si sta caricando...
La pagina si sta caricando...
La pagina si sta caricando...
La pagina si sta caricando...
La pagina si sta caricando...
La pagina si sta caricando...
La pagina si sta caricando...
La pagina si sta caricando...
La pagina si sta caricando...
La pagina si sta caricando...
La pagina si sta caricando...
La pagina si sta caricando...
La pagina si sta caricando...
La pagina si sta caricando...
La pagina si sta caricando...
La pagina si sta caricando...
La pagina si sta caricando...
La pagina si sta caricando...
La pagina si sta caricando...
La pagina si sta caricando...
La pagina si sta caricando...
La pagina si sta caricando...
La pagina si sta caricando...
La pagina si sta caricando...
La pagina si sta caricando...
La pagina si sta caricando...
La pagina si sta caricando...
La pagina si sta caricando...
La pagina si sta caricando...
La pagina si sta caricando...
La pagina si sta caricando...
La pagina si sta caricando...
La pagina si sta caricando...
La pagina si sta caricando...
La pagina si sta caricando...
La pagina si sta caricando...
La pagina si sta caricando...
La pagina si sta caricando...
La pagina si sta caricando...
La pagina si sta caricando...
La pagina si sta caricando...
La pagina si sta caricando...
La pagina si sta caricando...
La pagina si sta caricando...
La pagina si sta caricando...
La pagina si sta caricando...
La pagina si sta caricando...
La pagina si sta caricando...
La pagina si sta caricando...
La pagina si sta caricando...
La pagina si sta caricando...
La pagina si sta caricando...
La pagina si sta caricando...
La pagina si sta caricando...
La pagina si sta caricando...
La pagina si sta caricando...
La pagina si sta caricando...
La pagina si sta caricando...
La pagina si sta caricando...
La pagina si sta caricando...
La pagina si sta caricando...
La pagina si sta caricando...
La pagina si sta caricando...
La pagina si sta caricando...
La pagina si sta caricando...
La pagina si sta caricando...
La pagina si sta caricando...
La pagina si sta caricando...
La pagina si sta caricando...
La pagina si sta caricando...
La pagina si sta caricando...
La pagina si sta caricando...
La pagina si sta caricando...
La pagina si sta caricando...
La pagina si sta caricando...
La pagina si sta caricando...
La pagina si sta caricando...
La pagina si sta caricando...
-
 1
1
-
 2
2
-
 3
3
-
 4
4
-
 5
5
-
 6
6
-
 7
7
-
 8
8
-
 9
9
-
 10
10
-
 11
11
-
 12
12
-
 13
13
-
 14
14
-
 15
15
-
 16
16
-
 17
17
-
 18
18
-
 19
19
-
 20
20
-
 21
21
-
 22
22
-
 23
23
-
 24
24
-
 25
25
-
 26
26
-
 27
27
-
 28
28
-
 29
29
-
 30
30
-
 31
31
-
 32
32
-
 33
33
-
 34
34
-
 35
35
-
 36
36
-
 37
37
-
 38
38
-
 39
39
-
 40
40
-
 41
41
-
 42
42
-
 43
43
-
 44
44
-
 45
45
-
 46
46
-
 47
47
-
 48
48
-
 49
49
-
 50
50
-
 51
51
-
 52
52
-
 53
53
-
 54
54
-
 55
55
-
 56
56
-
 57
57
-
 58
58
-
 59
59
-
 60
60
-
 61
61
-
 62
62
-
 63
63
-
 64
64
-
 65
65
-
 66
66
-
 67
67
-
 68
68
-
 69
69
-
 70
70
-
 71
71
-
 72
72
-
 73
73
-
 74
74
-
 75
75
-
 76
76
-
 77
77
-
 78
78
-
 79
79
-
 80
80
-
 81
81
-
 82
82
-
 83
83
-
 84
84
-
 85
85
-
 86
86
-
 87
87
-
 88
88
-
 89
89
-
 90
90
-
 91
91
-
 92
92
-
 93
93
-
 94
94
-
 95
95
-
 96
96
-
 97
97
-
 98
98
-
 99
99
-
 100
100
-
 101
101
-
 102
102
-
 103
103
-
 104
104
-
 105
105
-
 106
106
-
 107
107
-
 108
108
-
 109
109
-
 110
110
-
 111
111
-
 112
112
-
 113
113
-
 114
114
-
 115
115
-
 116
116
-
 117
117
-
 118
118
-
 119
119
-
 120
120
-
 121
121
-
 122
122
-
 123
123
-
 124
124


HUUM HIVE Electric Sauna Heater Manuale utente
- Tipo
- Manuale utente
in altre lingue
Documenti correlati
-
HUUM HIVE Manuale utente
-
-
 HUUM 4744103010233 Manuale utente
-
 HUUM Cliff Electric Sauna Heater Manuale utente
-
 HUUM CORE ELECTRIC SAUNA HEATER Manuale utente
-
 HUUM 4744103010332 Guida d'installazione
-
 HUUM 4744103010332 Guida d'installazione
-
 HUUM UKU GSM- Wi-Fi- Local Heater Control Console Manuale utente
-
HUUM 4744103013029 Manuale utente
-
HUUM UKU Manuale utente


Altri documenti
-
Tylö Flex Sauna Harmony Glass Corner#hs_cos_wrapper_module_170083095099526 .icon-style--link .g-module-macros-icon { padding-left:8px; } #hs_cos_wrapper_module_170083095099526 .icon-style--link .g-module-macros-icon svg { fill:#C65622; } Manuale del proprietario
-
-
Sentiotec Safety device Manuale utente
-
HARVIA XAFIR CS110 Manuale utente
-
HARVIA SC1212 Manuale del proprietario
-
-
-
-
-