
1????
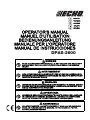
OPERATOR'S MANUAL
MANUEL D'UTILISATION
BEDIENUNGSANLEITUNG
MANUALE PER L'OPERATORE
MANUAL DE INSTRUCCIONES
ENGLISH
FRANÇAIS
DEUTSCH
ITALIANO
ESPAÑOL
DPAS-2600
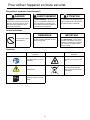
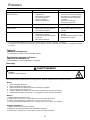
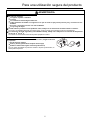
WARNING
READ THE INSTRUCTIONS CAREFULLY AND FOLLOW THE RULES FOR
SAFE OPERATION. FAILURE TO DO SO COULD RESULT IN SERIOUS
INJURY.
AVERTISSEMENT
LIRE ATTENTIVEMENT LES INSTRUCTIONS ET SUIVRE LESRÈGLES DE
SECURITÉ.LE NON-RESPECT DES RÈGLES DE SÉCURITÉ ENTRAÎNE UN
ISQUE DE BLESSURE GRAVE.
WARNUNG
LESEN SIE DIE BEDIENUNGSANLEITUNG SORGFÄLTIG DURCH, UND BE
FOLGEN SIE DIE SICHERHEITSREGELN. ANDERNFALLS BESTEHT DAS
RISIKO SCHWERER VERLETZUNGEN.
AVVERTENZA
LEGGERE E SEGUIRE ATTENTAMENTE LE ISTRUZIONI PER LAVORARE
IN CONDIZIONI DI MASSIMA SICUREZZA. LA MANCATA OSSERVANZA
DELLE ISTRUZIONI POTREBBE PROVOCARE LESIONI GRAVI.
ADVERTENCIA
LEA ATENTAMENTE LAS INSTRUCCIONES Y SIGA LAS INDICACIONES
PARA UN FUNCIONAMIENTO SEGURO. DE NO HACERLO, PODRÍA
SUFRIR LESIONES GRAVES.


1Cover
ENGLISH
(Original instructions)
OPERATOR'S MANUAL
PRO ATTACHMENT SERIES
DPAS-2600
WARNING
READ THE INSTRUCTIONS CAREFULLY AND FOLLOW THE
RULES FOR SAFE OPERATION.
FAILURE TO DO SO COULD RESULT IN SERIOUS INJURY.

2
Contents
For safe use of your product............................................................................................... 3
Description.......................................................................................................................... 7
Before you start .................................................................................................................. 8
Packing list ....................................................................................................................8
Charging the battery ...................................................................................................... 8
Assembly ....................................................................................................................... 9
Battery Installation ....................................................................................................... 10
Adjusting the shoulder harness ................................................................................... 11
Operation .......................................................................................................................... 12
Starting the unit ........................................................................................................... 12
Stopping the unit.......................................................................................................... 13
Maintenance and care ...................................................................................................... 14
Servicing guidelines..................................................................................................... 14
Maintenance and care ................................................................................................. 14
Storage ........................................................................................................................ 15
Disposal....................................................................................................................... 16
Specifications.................................................................................................................... 17
Declaration of conformity .................................................................................................. 19
UK Declaration of conformity ............................................................................................ 20

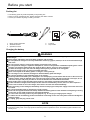
3
For safe use of your product
For safe use of yo ur product
Important information
WARNING
Please ensure that you read the operator's manual before using your product.
About your operator's manual
This manual contains necessary information about the assembly, operation, and maintenance of your product.
Please read it carefully and absorb its contents.
Always keep your manual in a place where it is readily accessible.
If you have lost your manual or it is damaged and no longer readable, please purchase a new one from your dealer.
The units used in this manual are SI units (International System of Units). Figures in parentheses are reference val-
ues, and there may be a slight conversion error in some cases.
Failure to do so could lead to an accident or serious injury.
Intended use of this product
This product is lightweight, high-performance unit designed for using attachment.
Do not use this unit for any purpose other than aforementioned.
The content of this manual may be changed without notice for the purpose of upgrades to the product. Some of the
illustrations used may differ from the product itself in order to make the explanations clearer.
Please consult your dealer if anything is unclear or of concern.
Failure to do so could lead to an accident or serious injury.
Do not modify the product
You must not modify the product.
To do so could lead to an accident or serious injury. Any malfunction resulting from a modification to the product will not be
covered by the manufacturer's warranty.
Do not use the product unless it has been checked and maintained
You must not use the product unless it has been checked and maintained. Always ensure that the product is checked
and maintained on a regular basis.
Failure to do so could lead to an accident or serious injury.
Loaning or assigning your product
When loaning your product to another party, ensure that the person borrowing the product receives the operator's
manual along with it.
If you assign your product to another party, please enclose the operator's manual with the product when handing it
over.
Failure to do so could lead to an accident or serious injury.
Users of the product
The product should not be used by:
people who are tired
people who have taken alcohol
people who are on medication
people who are pregnant
people who are in poor physical condition
people who have not read the operator's manual
children
Keep in mind that the operator or user is responsible for accidents or hazards occurring to other people or their prop-
erty.
Failure to observe these instructions could lead to an accident.
The components of this machine generate an electromagnetic field during operation, which may interfere with some
pacemakers. To reduce health risks, we recommend that pacemaker users consult their physician and the pacemak-
er manufacturer before operating this product.

4
For safe use of your product
Vibration and cold
It is believed that a condition called Raynaud's Phenomenon which affects the fingers of certain individuals may be
brought about by exposure to vibration and cold. Exposure to vibration and cold may cause tingling and burning,
followed by loss of colour and numbness in the fingers. The following precautions are strongly recommended be-
cause the minimum exposure which might trigger the ailment is unknown.
Keep your body warm, especially the head and neck, feet and ankles, and hands and wrists.
Maintain good blood circulation by performing vigorous arm exercises during frequent work breaks, and also by
not smoking.
Limit the number of hours of operation. Try to fill each day with jobs where operating the trimmer or other hand-
held power equipment is not required.
If you experience discomfort redness and swelling of the fingers, followed by whitening and loss of feeling, con-
sult your physician before exposing yourself further to cold and vibration.
Failure to observe these instructions could result in damage to your health.
Repetitive stress injuries
It is believed that over-using the muscles and tendons of the fingers, hands, arms and shoulders may cause sore-
ness, swelling, numbness, weakness and extreme pain to the areas just mentioned. Certain repetitive hand activities
may put you at a high risk for developing a repetitive stress injury (RSI). To reduce the risk of RSI, do the following:
Avoid using your wrist in a bent, extended or twisted position.
Take periodic breaks to minimize repetition and rest your hands. Reduce the speed and force in which you do the
repetitive movement.
Do exercises to strengthen hand and arm muscles.
See a doctor if you feel tingling, numbness or pain in your fingers, hands, wrists or arms. The sooner RSI is diag-
nosed, the more likely permanent nerve and muscle damage can be prevented.
Failure to observe these instructions could result in damage to your health.
Proper training
Do not permit operation without proper training and protective equipment.
Be thoroughly familiar with the controls and proper use of unit.
Know how to stop the unit and switch off the motor.
Know how to unhook a harnessed unit quickly.
Never allow anyone to use the unit without proper instruction.
Failure to observe these instructions could result in damage to your health.
Wear proper clothing.
Secure hair so it is above shoulder length.
Do not wear ties, jewellery, or loose, dangling clothing which could be caught in the
unit.
Do not wear open toed footwear, or go bare-foot or barelegged.
Failure to observe these precautions could result in damage to your sight or hearing, or lead
to a serious injury.
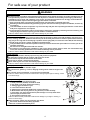
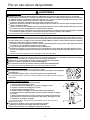
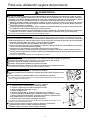
Wear protective gear
Always wear the following protective gear.
1. Head protection (helmet): Protects the head
2. Ear muffs or ear plugs: Protect the hearing
3. Safety goggles: Protect the eyes
4. Face shield: Protects the face
5. Safety gloves: Protect the hands from cold and vibration
6. Work clothes that fit (long sleeves, long trousers): Protect the body
7. Heavy duty, non-slip protective boots (with toecaps) or non-slip work shoes
(with toecaps): Protect the feet
8. Shin guards: Protect the legs
Failure to observe these precautions could result in damage to your sight or hearing, or
lead to a serious injury.
When necessary, please use the protective gear below.
Dust mask: Protects the breathing apparatus
Bee net: To deal with attacks by bees
WARNING

5
For safe use of your product
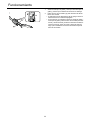
Environment of use and operation
Do not use the product:
in damp or wet locations.
in the rain.
under poor weather conditions.
on steep slopes or in places which give no secure foothold and are thus slippery.
at night or in dark places with poor visibility.
when there is a risk of lightning.
When using the product on a gentle slope, work in a level, contour-like motion.
A serious injury could result if you fall or slip, or fail to operate the product correctly.
For your own health and your safe and comfortable work, operate the machine within the air temperature range of
−5oC to 40oC.
Failure to observe these instructions could result in damage to your health.
Being prepared in case of an injury
In the unlikely event of an accident or injury, please ensure that you are
prepared.
First aid kit
Towels and wipes (to stop any bleeding)
Whistle or mobile phone (for calling outside help)
If you are unable to perform first aid or call for outside help, the injury could
worsen.
WARNING

6
For safe use of your product
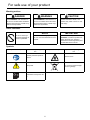
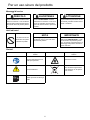
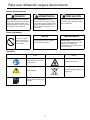
Warning notices
Other indicators
Symbols
DANGER WARNING CAUTION
This symbol accompanied by the
word "DANGER" calls attentions to
an act or a condition which will lead to
serious personal injury or death of op-
erators and bystanders.
This symbol accompanied by the
word "WARNING" calls attentions to
an act or a condition which can lead to
serious personal injury or death of op-
erators and bystanders.
"CAUTION" indicates a potentially
hazardous situation which, if not
avoided, may result in minor or mod-
erate injury.
Circle and slash sym-
bol means whatever is
shown is prohibited.
NOTE IMPORTANT
This enclosed message provides tips
for use, care and maintenance of the
product.
Framed text featuring the word "IM-
PORTANT" contains important infor-
mation about the use, checking,
maintenance and storage of the prod-
uct described in this manual.
Symbol form/shape Symbol description/applica-
tion
Symbol form/shape Symbol description/applica-
tion
Carefully read the operator's
manual Beware of fire
Safety/Alert Do not throw electrical appli-
ances in garbage
Guaranteed sound power lev-
el

7
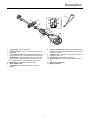
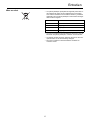
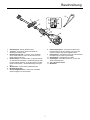
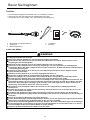
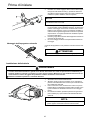
Description
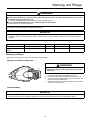
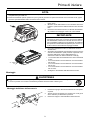
Description
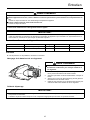
1. Loop-handle - Grip for Left Hand.
2. Suspension point - Device on which the harness can
be hooked.
3. Power indicator LED - Remains illuminated when pow-
er to unit is turned on. Turns off when power to unit is off.
4. Power button - Press once to turn on power to the unit,
power indicator LED illuminates. Press once more to
turn power off to unit, power indicator LED turns off.
5. Mode button - Change the operation mode.
6. Mode indicator LED
7. Speed button - Change the three step maximum
speed.
8. Trigger switch lockout - Locks trigger switch in the off
position until you have a proper grip with your right hand
around the handle.
9. Trigger switch - Activated by the operator's finger for
turning the motor on.
10. Power head – Houses Motor and Battery.
11. Shoulder harness - An adjustable strap to suspend
unit.
12. Type and serial number
13. Gripping surface

8
Before you start
Before you start
Packing list
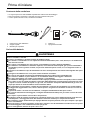
Charging the battery
The following parts are packed separately in the packing box.
When you have unpacked the box, please check the parts that it contains.
Contact your dealer if anything is missing or broken.
1. Motor unit and shaft tube
2. Shoulder harness
3. Operator's manual
4. L-wrench
5. Loop handle
WARNING
Always use battery pack LBP-560-100/LBP-560-200/LBP-50-150/LBP-50-250 and charge only with LCJQ-560 or LCJU-
560 charger.
Keep charger and battery away from damp conditions and all liquids.
Do not operate the charger on an easily combustible surface (e.g. paper, textiles) or in an environment with a high
risk of fire.
Do not cover the charger. Covering the charger will prevent it from cooling.
Do not operate the charger in explosive atmospheres, such as in the presence of flammable liquids, gases or dust.
Chargers can produce sparks which may ignite the dust or fumes - there is a risk of explosion.
Connect the charger only to the mains of voltage and frequency specified on the rating plate.
Connect the charger only to an easily accessible wall outlet.
Never insert objects in the battery pack's or charger's cooling slots (A).
Do not charge or use a defective, damaged or deformed battery pack and charger.
Do not open, damage or drop the battery pack or the charger.
Fluid may leak from the battery if it is damaged or not used properly; avoid contact with the skin. In the event of ac-
cidental contact, wash the affected areas of the skin with plenty of water and soap. If fluid gets in the eyes, do not
rub. Rinse the eyes with plenty of water for at least 15 minutes. Also seek medical assistance.
Never bridge (short circuit) the battery pack contacts or the charger's terminals with metallic objects.
Protect from direct sunlight, heat and open flames and never throw battery into fire; there is a risk of explosion.
In the event of smoke or fire in the charger, disconnect it from the wall outlet immediately.
If the connecting cord is damaged, immediately disconnect the plug from the power supply to avoid the risk of elec-
tric shock.
Do not expose battery pack to microwaves or high pressure.
Secure the unit against unintentional startup. Remove the battery pack from the unit before transporting or storing
the unit. Do not use metal containers for transporting batteries.
Do not use the connecting cord for any other purpose, e.g. for carrying or hanging up the charger.
To reduce the risk of stumbling, position and mark the connecting cord in such a way that it cannot be damaged or
endanger others.
To unplug, grasp the plug, not the cord.
NOTE
The battery comes partially charged from the factory and needs to be fully charged before first use.
Charge the battery when it no longer produces sufficient power to operate the unit or when battery lights indicate that the
battery is low.

9
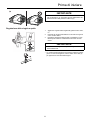
Before you start
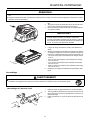
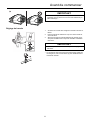
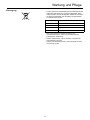
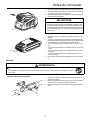
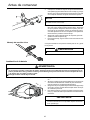
1. Plug charger AC cord in the wall outlet.
2. Align ridges on battery with grooves on charger, and slide
battery into charger.
3. During normal charging, the charger LED (B) will blink con-
tinuously GREEN.
4. When charging is complete, LED will remain GREEN.
5. Verify battery is fully charged by removing battery from
charger, then pressing battery charge status button (C), and
checking LED display (D).
One green light indicates that the battery has 0-25%
charge.
Two green lights indicate that the battery has 25-50%
charge.
Three green lights indicate that the battery has 50-75%
charge.
Four green lights indicate that the battery has 75-100%
charge.
6. Disconnect battery charger from power supply.
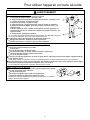
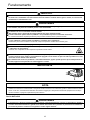
Assembly
Attachment shaft assembly
1. Set power head/shaft assembly on a level surface.
2. Pull locator pin (A) out, and turn anticlockwise 1/4 turn to
lockout position.
3. Remove vinyl cap from attachment drive shaft.
A
B
IMPORTANT
If charger detects a problem, LED blinks RED. Remove bat-
tery from charger, clear obstructions from contacts and rein-
stall battery into charger. If battery is outside acceptable
temperature range (0°C to 60°C) LED remains RED.
C
D
WARNING
Read the operator's manual carefully to ensure that you assemble the product correctly.
Using a product that has been incorrectly assembled could lead to an accident or serious injury.

10
Before you start
4. Carefully fit attachment drive shaft assembly into coupler (B)
to decal assembly line (C), making sure that the inner lower
drive shaft engages into the square upper drive shaft socket.
5. Rotate locator pin (A) 1/4 turn clockwise to engage lower
shaft hole. Insure locator pin is fully engaged by twisting low-
er drive shaft. Locator pin should snap flush in coupler. Full
engagement will prevent further shaft rotation.
6. Secure lower shaft assembly to coupler by tightening clamp-
ing knob (D).
7. To disassemble, reverse assembly instructions.
Loop handle assembly
Position handle in comfortable operating position and tighten
Bolts.
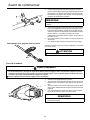
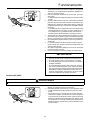
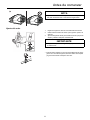
Battery Installation
1. Make sure power to unit is turned off.
2. Align ridges (A) on battery pack with grooves in power head.
Slide battery pack into power head.
3. Assure the battery pack latch (B) snaps into place and bat-
tery pack is secure before beginning operation.
4. To remove battery, depress battery pack latch release (C)
slide battery pack out of power head.
NOTE
Lower bearing housing and head assembly must be in line with
the motor unit.
CAUTION
Install the handle between the marks (A).
WARNING
The attachment will operate when the battery is installed, the power indicator LED is lit, and the trigger and trigger
lockout are engaged. Make sure the unit is properly positioned to prevent loss of control and possible serious injury.
Keep movable parts of the attachment off the ground and away from objects that could become entangled or thrown.
Remove the battery when leave the unit.
ABC
NOTE
Battery pack latch is in the complete position when battery
pack latch is correctly engaged.
IMPORTANT
Before using the unit, make sure that battery is set correctly
with battery pack latch in the complete position (D).

11
Before you start
Adjusting the shoulder harness
1. Hook the strap hook to the hanger on the outer tube.
2. Wear the shoulder strap so that the hook stays at your right
hand side.
3. Adjust the length of the shoulder strap so that you can hold
and operate the machine comfortably.
The shoulder harness is fitted with an emergency release
function. In case of emergency, pull up on the collar (A) to dis-
connect the machine from the strap.
IMPORTANT
Make sure all hooks and adjustment devices are secure.

12
Operation
Operation
Starting the unit
DANGER
All over head electrical conductors and communications wires can have electricity flow with high voltages. This unit
is not insulated against electrical current. Never touch wires directly or indirectly, otherwise serious injury or death
may result.
WARNING
Do not operate the unit in explosive atmospheres, such as in presence of flammable liquids, gases or dust. The unit
creates sparks which may ignite the dust or fumes.
Be particularly careful to observe the following precautions when starting the unit:
Check that none of the nuts and bolts are loose.
A wrench or locking tool did not leave attached to a rotating part of the unit.
Leave plenty of space around the product and do not allow people or animals near it.
Failure to observe the precautions could cause an accident or injury, or even lead to a fatality.
Check that there are no abnormal vibrations or sounds once the unit starts. Do not use the product if there are ab-
normal vibrations or sounds. Contact your dealer to have it repaired.
Accidents involving parts that fall or shatter off can cause wounds or serious injury.
Always switch off the unit and remove the battery when transporting the unit.
Do not touch angle transmission and other high temperature components while the product is running
or for some time after it stops.
You could burn yourself if you touch a high temperature component.
Never operate overreach the unit and to keep the balance at all times, to always be sure of the footing on slopes and
to walk, never run.
Never to operate the unit with defective guards or shields, or without safety devices, or if the cord is damaged or
worn.
IMPORTANT
Always ventilation slots (A) keep clean.
NOTE
When you first use this product under low temperature after purchase, it may not operate smoothly in rare instances. This
phenomenon does not indicate a product failure. In this case, condition the unit to room temperature (normal temperature),
and turn on and off power to the unit repeatedly before use.
WARNING
The attachment will operate when the battery is installed, the power indicator LED is lit, and the trigger switch and
trigger switch lockout are engaged. Make sure the product is properly positioned to prevent loss of control and pos-
sible serious injury.

13
Operation
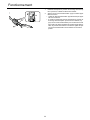
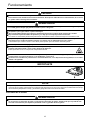
1. Check to ensure that the attachment does not come into
contact with the surface of the ground or any other impedi-
ment using a beam or other such implement.
2. Push power button (A) once to turn on power to unit.
Power indicator LED (B) illuminates when power to unit is
turned on.
3. When you use the trimmer attachment, push mode button
(C), illuminates mode indicator LED (D) (trimmer mode).
When you use the other attachment, push mode button (C),
turn off mode indicator LED (D).
When in trimmer mode, you can work comfortably at the op-
timum RPM speed for the trimmer attachment. When not in
trimmer mode, you can work comfortably at the wide range
of RPM speed with the other attachments.
4. Hold down trigger switch lockout (E) and depress trigger
switch (F) to increase RPM to operating speed.
5. To change maximum speed, push speed button (G).
6. The maximum speed changes in the order of low speed, me-
dium speed, high speed, and then returns to low speed after
high speed.
7. If you press mode button for one second then keep the
speed at that time.
8. Not to keep the speed, push mode button.
Stopping the unit
1. Release trigger switch and trigger switch lockout, and allow
the attachment head to stop.
2. Push power button (A) to turn off power to unit.
Power indicator LED (B) turns off when power to unit is
turned off.
If the attachment does not stop when the trigger and trigger
lockout are released, push power button to turn off and re-
move the battery to stop the power supply to product. Have
your authorized servicing dealer repair power button before
using product again.
IMPORTANT
When power to the unit is turned on:
After 90 seconds of inactivity, unit will power itself off.
If the LED remains lit, operation is normal.
If the LED flashes once per second, the battery needs to
be charged.
If the LED flashes four times per second, there is a fault
within the product. Turn power off to unit. Remove bat-
tery. Clear debris from around line head. Install battery.
Turn power on to unit. If flashing continues, have your au-
thorized servicing dealer repair the product.
WARNING
The attachment continues to run for a short period after the unit is switched off.

14
Maintenance and care
Maintenance and care
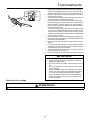
Servicing guidelines
Maintenance and care
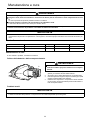
Cleaning battery and battery compartment
1. Release trigger switch and trigger switch lockout and allow
the attachment head to stop.
2. Make sure power indicator LED is not illuminated.
3. Depress battery pack latch release (A) slide battery pack out
of power head.
4. Use compressed air or a soft bristle brush to remove debris
from battery and battery compartment.
Troubleshooting table
WARNING
Observe the following precautions when checking and maintaining your product after use:
Turn power to unit off, remove battery, and make sure all moving parts have come to a complete stop.
An accident could occur if the product starts unexpectedly.
Allow unit to cool before performing service.
You could burn yourself.
Never service damaged battery packs. Service of battery packs should only be performed by the manufacturer or
authorized service providers.
IMPORTANT
Checking and maintenance requires specialist knowledge. If you are unable to check and maintain the product or deal with a
fault yourself, consult your dealer. Do not attempt to dismantle the product.
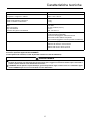
Area Maintenance Page Before use Monthly
Battery Inspect/Clean/Charge 8 •
Screws, bolts and nuts Inspect, Tighten/Replace - •
If you have any questions or problems, please contact your dealer.
A
WARNING
Risk of electric shock or fire. Do not use conducting ma-
terials to clean battery or battery compartment.
IMPORTANT
For spare parts and consumables, please use only genuine parts and designated products and components.
Using parts from other manufacturers or non-designated components may result in a malfunction.

15
Maintenance and care
Storage
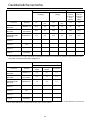
Trouble Cause Remedy
Red Charger light flashes or does not
light up
1. Plug not connected to power outlet
2. Battery pack not installed properly
3. Obstructed connection
4. Fault in the charger
5. Fault in the battery pack
1. Plug in the charger
2. Check the battery pack installation
3. Reinstall battery pack again after re-
moving obstructions from connec-
tion.
4. Consult your dealer
5. Consult your dealer
Unit will not turn on 1. Battery pack not installed properly 1. Check the battery pack installation
Unit does not run when turned on 1. Battery pack discharged
2. Battery pack outside acceptable
temperature range
1. Charge the battery pack
2. Remove the battery pack and allow
to cool
Running time is too short 1. Battery pack outside acceptable
temperature range
2. Unit electronics too hot
3. Battery pack discharged
1. Remove the battery pack and allow
to cool
2. Turn unit off and allow to cool
3. Charge the battery pack
Consult your dealer in the event of a problem that is not covered in the table above, or other such concerns.
Please contact your dealer in order to dispose of the product or its parts in compliance with national laws.
Manufacturer:
YAMABIKO CORPORATION
1-7-2 Suehirocho, Ohme, Tokyo 198-8760 JAPAN
Authorized Representative in Europe:
CERTIFICATION EXPERTS B.V.
Amerlandseweg 7, 3621 ZC Breukelen, The Netherlands
WARNING
Do not store in an enclosure where combustible fumes may accumulate.
You could cause a fire.
When storing the product for long periods of time, ensure that the following preparations for storage are carried out.
Motor unit
1. Turn power to unit off.
2. Remove battery from power head.
3. Remove accumulation of dirt and debris from exterior of unit.
4. Tighten all the screws and nuts.
5. Cover the battery compartment of power head, the battery, and the battery charger.
6. Store unit in a dry, dust-free place, out of the reach of children.
Battery
1. Remove battery from power head.
2. Store in a dry, dust-free place, out of the reach of children.
3. Store in temperatures between -20°C and 60°C (140°F).
4. If the battery is stored for longer than one year, charge it to approximately 40 - 60% capacity.
Battery charger
1. Remove battery from battery charger.
2. Disconnect battery charger from power supply.
3. Store in a dry, dust-free place, out of the reach of children.

16
Maintenance and care
Disposal
Major plastic parts making up the product have codes showing
their materials. The codes refer to the following materials; dis-
pose of those plastic parts in accordance with local regula-
tions.
Please contact your dealer in case you do not know how you
should dispose of waste plastic parts.
Battery contains lithium. Dispose of only at a designated col-
lection point.
Lithium-ion batteries must be recycled or disposed of properly.
Mark Material
>PA6-GF< Nylon 6 - Glass fiber
>PP-GF< Polypropylene - Glass fiber
>PE-HD< Polyethylene
>PP< Polypropylene

17
Specifications
Specifications
These specifications are subject to change without notice.
YAMABIKO approved optional attachments
(Sound pressure level, sound power level and vibration levels)
DPAS-2600
External dimensions:
Length × Width × Height 1082 × 229 × 186 mm
Mass:
Unit without battery and harness
Unit with battery and harness
2.4 kg
4.3 kg
Battery:
Type
Pack voltage
Charger type
Charger input voltage
Li-ion
56 Volts (rated 50.4 V)
CCCV
220 - 240 Volts AC
Battery Charger Lights: Red LED – Battery is outside charging temperature range
Red LED Blinking – Fault
Green LED – Battery finished charging
Green LED Blinking – Battery is charging normally
Charge Time: (with LCJQ-560)
LBP-560-100 battery: Approximately 33 minutes.
LBP-560-200 battery: Approximately 64 minutes.
LBP-50-150 battery: Approximately 47 minutes.
LBP-50-250 battery: Approximately 89 minutes.
WARNING
Use only YAMABIKO approved attachments for Pro Attachment Series models. Serious injury may result from the
use of non approved attachment combinations. Read and comply with all safety instructions listed in this manual
and attachment manual.
YAMABIKO will not be responsible for the failure of cutting devices, attachments or accessories which have not been
tested and approved by YAMABIKO for use with this Pro Attachment Series unit.

18
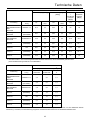
Specifications
The vibration and noise emissions during actual use of the unit can differ from the declared values depending on the ways in which
the tool is used especially what kind of workpiece is processed.
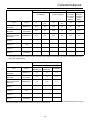
2006/42/EC 2000/14/EC
Sound pressure level
[dB(A)]
Sound power level [dB(A)] Measured
sound pow-
er level
[dB(A)]
Guaran-
teed sound
power level
[dB(A)]
Attachment Standard LpA Uncertainty
KpA LWA Uncertainty
KWA LWA LWA
HEDGE TRIMMER
MTA-DAH EN62841-4-2 85.5 3.0 93.4 3.0 93 96
POLE PRUNER
MTA-DPP
ISO 11680-1
(ISO 22868) 94.4 3.0 105.2 3.0 105*1 108*1
GRASS-TRIMMER/
BRUSHCUTTER
MTA-DTB
EN50636-2-91 79.6 3.0 92.0 3.0 91*2 96*2
Sweeper
MTA-PS (ISO22868) 77.3 3.0 90.1 3.0 90 *1 93 *1
Blower
MTA-PB
EN50636-2-
100 90.0 3.0 100.3 3.0 100 103
Tiller Cultivator
MTA-TC (ISO22868) 75.2 3.0 91.5 3.0 92 *1 95 *1
Edger
MTA-LE
ISO 11789
(ISO22868) 79.3 3.0 93.5 3.0 94 97
*1: These values are not within the scope of directive 2000/14/EC.
*2: These values are within the scope of directive 2000/14/EC amended by 2005/88/EC (conformity assessment procedure fol-
lowed ANNEX VI.
2006/42/EC
Vibration Declared values [m/s2]
Attachment Standard Front/Left
handle
Rear/Right
handle Uncertainty K
HEDGE TRIMMER
MTA-DAH EN62841-4-2 4.2 2.4 1.5
POLE PRUNER
MTA-DPP
ISO 11680-1
(ISO 22867) 4.4 2.1 1.5
GRASS-TRIMMER/
BRUSHCUTTER
MTA-DTB
EN50636-2-91 3.8 2.9 1.5
Sweeper
MTA-PS (ISO22867) 2.5 1.3 1.5
Blower
MTA-PB
EN50363-2-
100 3.3 1.3 1.5
Tiller Cultivator
MTA-TC (ISO22867) 2.7 1.3 1.5
Edger
MTA-LE
ISO 11789
(ISO22867) 3.5 1.8 1.5
La pagina sta caricando ...
La pagina sta caricando ...
La pagina sta caricando ...
La pagina sta caricando ...
La pagina sta caricando ...
La pagina sta caricando ...
La pagina sta caricando ...
La pagina sta caricando ...
La pagina sta caricando ...
La pagina sta caricando ...
La pagina sta caricando ...
La pagina sta caricando ...
La pagina sta caricando ...
La pagina sta caricando ...
La pagina sta caricando ...
La pagina sta caricando ...
La pagina sta caricando ...
La pagina sta caricando ...
La pagina sta caricando ...
La pagina sta caricando ...
La pagina sta caricando ...
La pagina sta caricando ...
La pagina sta caricando ...
La pagina sta caricando ...
La pagina sta caricando ...
La pagina sta caricando ...
La pagina sta caricando ...
La pagina sta caricando ...
La pagina sta caricando ...
La pagina sta caricando ...
La pagina sta caricando ...
La pagina sta caricando ...
La pagina sta caricando ...
La pagina sta caricando ...
La pagina sta caricando ...
La pagina sta caricando ...
La pagina sta caricando ...
La pagina sta caricando ...
La pagina sta caricando ...
La pagina sta caricando ...
La pagina sta caricando ...
La pagina sta caricando ...
La pagina sta caricando ...
La pagina sta caricando ...
La pagina sta caricando ...
La pagina sta caricando ...
La pagina sta caricando ...
La pagina sta caricando ...
La pagina sta caricando ...
La pagina sta caricando ...
La pagina sta caricando ...
La pagina sta caricando ...
La pagina sta caricando ...
La pagina sta caricando ...
La pagina sta caricando ...
La pagina sta caricando ...
La pagina sta caricando ...
La pagina sta caricando ...
La pagina sta caricando ...
La pagina sta caricando ...
La pagina sta caricando ...
La pagina sta caricando ...
La pagina sta caricando ...
La pagina sta caricando ...
La pagina sta caricando ...
La pagina sta caricando ...
La pagina sta caricando ...
La pagina sta caricando ...
La pagina sta caricando ...
La pagina sta caricando ...
La pagina sta caricando ...
La pagina sta caricando ...
La pagina sta caricando ...
La pagina sta caricando ...
La pagina sta caricando ...
La pagina sta caricando ...
La pagina sta caricando ...
La pagina sta caricando ...
La pagina sta caricando ...
La pagina sta caricando ...
La pagina sta caricando ...
La pagina sta caricando ...
La pagina sta caricando ...
La pagina sta caricando ...
La pagina sta caricando ...
La pagina sta caricando ...
La pagina sta caricando ...
La pagina sta caricando ...
La pagina sta caricando ...
La pagina sta caricando ...
La pagina sta caricando ...
La pagina sta caricando ...
-
 1
1
-
 2
2
-
 3
3
-
 4
4
-
 5
5
-
 6
6
-
 7
7
-
 8
8
-
 9
9
-
 10
10
-
 11
11
-
 12
12
-
 13
13
-
 14
14
-
 15
15
-
 16
16
-
 17
17
-
 18
18
-
 19
19
-
 20
20
-
 21
21
-
 22
22
-
 23
23
-
 24
24
-
 25
25
-
 26
26
-
 27
27
-
 28
28
-
 29
29
-
 30
30
-
 31
31
-
 32
32
-
 33
33
-
 34
34
-
 35
35
-
 36
36
-
 37
37
-
 38
38
-
 39
39
-
 40
40
-
 41
41
-
 42
42
-
 43
43
-
 44
44
-
 45
45
-
 46
46
-
 47
47
-
 48
48
-
 49
49
-
 50
50
-
 51
51
-
 52
52
-
 53
53
-
 54
54
-
 55
55
-
 56
56
-
 57
57
-
 58
58
-
 59
59
-
 60
60
-
 61
61
-
 62
62
-
 63
63
-
 64
64
-
 65
65
-
 66
66
-
 67
67
-
 68
68
-
 69
69
-
 70
70
-
 71
71
-
 72
72
-
 73
73
-
 74
74
-
 75
75
-
 76
76
-
 77
77
-
 78
78
-
 79
79
-
 80
80
-
 81
81
-
 82
82
-
 83
83
-
 84
84
-
 85
85
-
 86
86
-
 87
87
-
 88
88
-
 89
89
-
 90
90
-
 91
91
-
 92
92
-
 93
93
-
 94
94
-
 95
95
-
 96
96
-
 97
97
-
 98
98
-
 99
99
-
 100
100
-
 101
101
-
 102
102
-
 103
103
-
 104
104
-
 105
105
-
 106
106
-
 107
107
-
 108
108
-
 109
109
-
 110
110
-
 111
111
-
 112
112


in altre lingue
- français: Echo DPAS-2600 Manuel utilisateur
- español: Echo DPAS-2600 Manual de usuario
- Deutsch: Echo DPAS-2600 Benutzerhandbuch