Hotpoint AQM8D 29 U (EU) /B Guida utente
- Categoria
- Lavatrici
- Tipo
- Guida utente

EN
1
English,1
Contents
Installation, 2-3
Unpacking and levelling
Connecting the electricity and water supplies
Technical data
Description of the machine, 4-5
Touch control panel
How to run a wash cycle or a drying
cycle, 6
Wash cycles and options, 7
Table of wash cycles
Wash options
Detergents and laundry, 8
Detergent
Preparing the laundry
Washing recommendations
Load balancing system
Precautions and advice, 9
General safety
Disposal
Opening the porthole door manually
Care and maintenance, 10
Cutting off the water and electricity supplies
Cleaning the machine
Cleaning the detergent dispenser drawer
Caring for your appliance drum
Cleaning the pump
Checking the water inlet hose
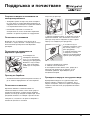
Trouble shooting, 11
Assistance, 12
EN
WASHER-DRYER
AQUALTIS
AQM8D 29 U
Instructions for
installation and use
BG
Áúëãàðñêè,13

EN
2
Installation
This instruction manual should be kept in a safe place
for future reference. If the washing machine is sold,
given away or moved, please ensure the manual is kept
with the machine, so that the new owner may benefit
from the advice contained within it.
Read these instructions carefully: they contain vital
information relating to the safe installation and operation
of the appliance.
Inside the pack containing this manual, you will also
find the guarantee and all the details necessary for
installation.
Unpacking and levelling
Unpacking
1. Once you have removed all the packaging from the
washing machine, make sure it has not been damaged
during transportation.
If it has been damaged, contact the retailer and do not
proceed any further with the installation process.
2. Remove the 4
protective screws (used
during transportation) and
the corresponding spacer,
located on the rear part of
the appliance (see figure).
3. Close off the holes using the plastic plugs supplied in
the pack.
4. Keep all the parts in a safe place; they will be needed
again if the washing machine is moved to another
location, to prevent the inside of the appliance being
damaged.
Packaging materials should not be used as toys for
children.
Levelling
1. Place the washing machine on a flat sturdy floor,
without resting it up against walls or cabinets.
2. If the floor is uneven,
the front feet of the
machine may be adjusted
until it reaches a horizontal
position (the angle of
inclination must not
exceed 2 degrees).
If the appliance is levelled correctly, it will be more
stable and much less likely to cause vibrations and noise
while it is operating, particularly during the spin cycle.
If it is placed on carpet or a rug, adjust the feet in such
a way as to allow a sufficient ventilation space
underneath the washing machine.
Connecting the electricity and water
supplies
Connecting the water inlet hose
Before connecting the inlet hose to the water supply,
run the water until it is perfectly clear.
1. Connect the inlet hose
to the machine by
screwing it onto the cold
water inlet of the
appliance, which is
situated on the top right-
hand side of the rear part
of the appliance (see
figure).
2. Connect the inlet hose
by screwing it to a cold
water tab using a 3/4 gas
threaded connection (see
figure).
3. Make sure that the hose is not folded over or bent.
The water pressure at the tap must fall within the
values indicated in the Technical data table (see next
page).
If the inlet hose is not long enough, contact a
specialised shop or an authorised technician.
Never use second-hand or old inlet hoses; use the
products supplied with the machine.

EN
3
Technical data
Model
AQM8D 29 U
Dimensions
width 59,5 cm
height 85 cm
depth 64,5 cm
Capacity
from 1to 8 kg for wash programme
from 1 to 6 kg for the drying programme
Electrical
connections
please refer to the technical data
plate fixed to the machine
Water connections
maximum pressure 1 MPa (10 bar)
minimum pressure 0.05 MPa (0.5 bar)
drum capacity 62 litres
Spin speed
up to 1200 rotations per minute
Energy rated
programmes
according to
regulation
EN 50229
Wash: programme ; temperature
60°C; using a load of 8 kg.
Drying: first drying cycle performed
with a 2 kg load, by selecting the
drying level "IRON";
Second drying cycle performed with a
6 kg load, selecting the maximum
drying level "EXTRA".
This appliance conforms to the
following EC Directives:
- 89/336/EEC dated 03/05/89
(Electromagnetic Compatibility) and
subsequent modifications
- 2006/95/EC (Low Voltage)
- 2002/96/EC
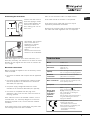
65 - 100 cm
Connecting the drain hose
Connect the drain hose to
drain duct piping or a wall
drain located between 65
and 100 cm above the
floor, making sure it is not
bent at all.
Alternatively, rest the drain
hose on the side of a
washbasin or bathtub,
fastening the duct
supplied to the tap (see
figure).
The free end of the hose
should not be underwater.
We advise against the use of hose extensions; if it is
absolutely necessary, the extension must have the same
diameter as the original hose and must not exceed 150
cm in length.
Electrical connections
Before plugging the appliance into the electricity socket,
make sure that:
the socket is earthed and complies with all applicable
laws;
the socket is able to withstand the maximum power
load of the appliance as indicated in the Technical
data table (see opposite);
the power supply voltage falls within the values
indicated in the Technical data table (see opposite);
the socket is compatible with the plug of the
appliance. If this is not the case, have the socket or
the plug replaced.
The machine must not be installed outdoors, even in
covered areas. It is extremely dangerous to leave the
appliance exposed to rain, storms and other weather
conditions.
The mains socket must remain within easy reach after
the washing machine has been installed.
Do not use extension cords or multiple sockets.
The cable should not be bent or compressed.
The power supply cable and plug must only be
replaced by authorised technicians.
Warning! The company shall not be held responsible in
the event that these regulations are not respected.

EN
4
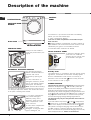
CONTROL
PANEL
3
1
2
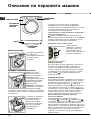
Description of the machine
PORTHOLE DOOR
Always use the handle to
open the porthole door (see
figure).
DETERGENT DISPENSER DRAWER
The detergent dispenser
drawer is located inside the
machine and can be
accessed by opening the
door.
For more information on
detergent measures, please
refer to the chapter entitled
Detergents and laundry.
Note: stick the label showing
the wash cycle descriptions and options on the front of
the detergent dispenser drawer. You will find the sticker
in the pack containing this manual.
1. pre-wash compartment:
use powder detergent.
Before pouring in the
detergent, make sure that
extra compartment 3 has
been removed.
2. main wash compartment:
use powder or liquid
detergent. If using the latter
type of detergent, we
recommend it is poured into the drawer immediately
before you start the washer-dryer.
3. extra compartment: Bleach
The use of extra compartment 3 excludes the pre-
wash function.
washing additives compartment: for fabric softener or
liquid additives. We recommend that the maximum level
indicated by the grille is not exceeded, and that
concentrated fabric softeners are diluted.
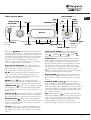
TOUCH CONTROL PANEL
To adjust the settings, gently
press the icon inside the
sensitive (touch control) area
as illustrated in the figure.
Standby mode
This washer-dryer, in compliance with new energy saving
regulations, is fitted with an automatic standby system
which is enabled after a few minutes if no activity is
detected. Press the ON-OFF
button briefly and wait
for the machine to start up again.
CHANGE LANGUAGE
The first time the machine is switched on, the first language
will flash on the display. The "
", "OK" and "V" symbols will
appear on the display, in line with the 3 buttons on the right-
hand side. The languages change automatically every 3";
alternatively, they can be changed by pressing the buttons next
to the " " and "V" symbols. Use the "OK" button to confirm the
language, which will be set after 2". If no buttons are pressed,
the automatic language change will begin again after 30".
The language may only be changed while the machine is
switched off.
Press and hold the temperature
+spin +delayed start
buttons for 5''; a short beep sounds and the set language
flashes on the display. Press the buttons next to the " " and
"V" symbols to change the language. Use the button next to
the "OK" symbol to confirm the language, which will be set
after 2". If no buttons are pressed, the language set previously
will be displayed after 30". Switch on the machine.
PORTHOLE DOOR
PORTHOLE DOOR
HANDLE
ADJUSTABLE FEET
KICK STRIP

EN
5
WASH CYCLE
SELECTOR knob
Button withON/OFF
indicator light
Touch control panel
Button with ON/OFF indicator light: press this briefly
to switch the machine on or off. The green indicator light
indicates that the machine is switched on. To switch off
the washer-dryer during the wash cycle, press and hold
the button for approximately 3 seconds; if the button is
pressed briefly or accidentally the machine will not
switch off. If the machine is switched off during a wash
cycle, this wash cycle will be cancelled.
WASH CYCLE SELECTOR knob: may be turned in
either direction. To select the most suitable wash cycle,
please refer to the Table of wash cycles.
The knob will not move during the wash cycle.
M1-M2 buttons: press and hold one of the buttons to
store a cycle with your own set preferences in the
memory of the machine. To recall a previously-stored
cycle, press the corresponding button.
DRYING button
: press to decrease or exclude
drying; the selected drying level or time will appear on the
display (see "How to run a wash cycle or a drying cycle").
TEMPERATURE
button: press to modify or exclude
the temperature setting; the value selected will appear
on the display above (see How to run a wash cycle or a
drying cycle).
SPIN CYCLE
button: press to modify or exclude the
spin cycle; the value selected will appear on the display
above (see How to run a wash cycle or a drying cycle).
DELAYED START
button: press to set a delayed
start for the selected wash cycle; the set delay time will
appear on the display above (see How to run a wash
cycle or a drying cycle).
OPTION buttons: press to select the available options.
The indicator light corresponding to the selected option
will remain lit (see How to run a wash cycle or a drying
cycle).
WASH CYCLE PHASE icons: these illuminate to
indicate the progress of the wash cycle (Wash
Rinse
Spin/Drain Drying ). The text
lights up when the cycle is complete.
START/PAUSE button with indicator light: when the
green indicator light flashes slowly, press the button to
start a wash cycle. Once the cycle has begun the
indicator light will remain lit in a fixed manner. To pause
the wash cycle, press the button again; the indicator
light will flash in an orange colour. If the Door locked
indicator light is switched off, the door may be
opened. To start the wash cycle from the point at which
it was interrupted, press the button again.
DOOR LOCKED
indicator light: indicates that the
porthole door is locked. To open the door, pause the
wash cycle (see How to run a wash cycle or a drying
cycle).
CONTROL PANEL LOCK
button with indicator
light: to activate or deactivate the control panel lock,
press and hold the button for approximately 2 seconds.
when the indicator light is illuminated, the control panel is
locked. This means it is possible to prevent wash cycles
from being modified accidentally, especially where there
are children in the home.
ECO indicator light: the
icon lights up when, after
altering the washing parameters, an energy saving of at
least 10% is made. Furthermore, before the machine
enters Standby mode, the icon will light up for a few
seconds; when the machine is switched off the
estimated energy saving will be around the 80% mark.
TEMPERATURE
button
OPTION
buttons
SPIN
button
DISPLAY
M1
DRYING
ECO
indicator light
DELAYED START
button
START/PAUSEbutton
with indicator light
DOOR LOCKED indicator light
WASH
CYCLE
PHASE
icons
CONTROL PANEL
LOCK button with
indicator light
M2

EN
6
WARNING: before you use the washer-dryer for the first
time, run a wash cycle with detergent and no laundry, using
the 90° cottons cycle without pre-wash.
1. SWITCH THE MACHINE ON. Press the
button. All the
indicator lights will illuminate for 1 second and the text
AQUALTIS will appear on the display; the indicator light
corresponding to the
button will then remain lit in a constant
manner and the START/PAUSE indicator light will flash.
2. SELECT THE PROGRAMME. Turn the PROGRAMME
KNOB left or right, until the required programme has been
selected; the name of the programme will appear on the
display. A temperature and spin speed is set for each
programme; these may be adjusted. The cycle duration will
also appear on the display.
3. LOAD THE LAUNDRY. Open the porthole door. Load the
laundry, making sure you do not exceed the maximum load value
indicated in the table of wash cycles on the following page.
4. MEASURE OUT THE DETERGENT. Pull out the detergent
dispenser drawer and pour the detergent into the relevant
compartments as described in Description of the machine.
5. CLOSE THE PORTHOLE DOOR.
6. CUSTOMISE THE WASH CYCLE. Use the relevant
buttons on the control panel:
Modify the temperature and/or spin speed.
The machine automatically displays the maximum
temperature and spin speed values set for the selected
cycle, or the most recently-used settings if they are
compatible with the selected cycle. The temperature can be
decreased by pressing the
button, until the cold wash
OFF setting is reached. The spin speed may be
progressively reduced by pressing the
button, until it is
completely excluded OFF. If these buttons are pressed
again, the maximum values are restored.
Exception: if the Cottons programme is selected, the
temperature can be increased up to a value of 90°C.
Setting the drying cycle
The first time the button
is pressed, the machine will
automatically select the maximum drying cycle which is
compatible with the selected wash cycle. Subsequent
presses will decrease the drying level and then the drying time,
until the cycle is excluded completely ("OFF"). If these buttons
are pressed again, the maximum values are restored.
Drying may be set as follows:
A - Based on a set time period: between 20 and 180 minutes.
B- Based on the desired laundry dryness level:
Iron: suitable for clothes which will need ironing afterwards.
the remaining dampness softens creases, making them
easier to remove.
Hanger: ideal for clothes which do not need to be dried fully.
Cupboard: suitable for laundry which can be put back in a
cupboard without being ironed.
Extra: suitable for garments which need to be dried
completely, such as sponges and bathrobes.
If your laundry load to be washed and dried is much
greater than the maximum stated load (see adjacent table),
perform the wash cycle, and when the cycle is complete,
divide the garments into groups and put some of them
back in the drum. At this point, follow the instructions
provided for a "Drying only" cycle. Repeat this procedure
for the remainder of the load.
A cooling-down period is always added to the end of each
drying cycle.
Drying only
Use the cycle selector knob to select a drying cycle (
- -
) in accordance with the type of fabric. The desired drying
level or time may also be set using the DRYING button
.
Setting a delayed start.
To set a delayed start for the selected cycle, press the
corresponding button repeatedly until the required delay period
has been reached. During the setting procedure, the delay
period and the text "Starts in: will be displayed, along with the
flashing
symbol. After the delayed start has been set, the
symbol will remain fixed on the display, which will also
indicate the duration of the selected cycle with the text "Ends
in: and the cycle duration. Press the DELAYED START button
just once to display the delay time set previously. After the
countdown has begun, the display will show the text "Starts
in: and the delay period. Once the set delay time has elapsed,
the machine will begin its cycle and the display will show "Ends
in: and the time remaining until the end of the cycle. To remove
the delayed start option, press the button until the display
shows the text OFF; the
symbol will disappear.
Modify the cycle settings.
Press the button to activate the option; the name
of the option will then appear on the display and
the corresponding indicator light will illuminate.
Press the button again to deactivate the option; the
name of the option will then appear on the display
followed by the text OFF, and the corresponding
indicator light will switch off.
If the selected option is not compatible with the selected
wash cycle, this incompatibility will be signalled by the
flashing of the indicator light and a sound alert (3 beeps);
the option will not be activated.
If the selected option is not compatible with another option
that has been selected previously, the indicator light
corresponding to the first option selected will flash and only the
second option will be activated; the indicator light
corresponding to the button will remain lit in a constant manner.
The options may affect the recommended load value and/
or the duration of the cycle.
7. START THE PROGRAMME. Press the START/PAUSE
button. The corresponding indicator light remains lit in a fixed
manner and the porthole door locks (the
DOOR LOCKED
indicator light illuminates). The icons corresponding to the wash
cycle phases will light up during the cycle to indicate which
phase is currently in progress. To change a wash cycle once it
has already started, pause the washer-dryer by pressing the
START/PAUSE button; then select the desired cycle and press
the START/PAUSE button again. To open the door during a
wash cycle, press the START/PAUSE button; if the DOOR
LOCKED
indicator light is switched off you may open the
door. Press the START/PAUSE button again to restart the
wash cycle from the point at which it was interrupted.
8. THE END OF THE WASH CYCLE. This is indicated by
the illuminated text END. The porthole door may be
opened immediately. If the START/PAUSE indicator light is
flashing, press the button to end the cycle. Open the door,
unload the laundry and switch off the machine.
If you wish to cancel a cycle which has already begun, press and hold
the
button until the cycle stops and the machine switches off.
How to run a wash cycle or a
drying cycle

EN
7
Wash options
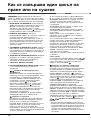
Super Wash
This option offers a high-performance wash due to the
greater quantity of water used in the initial phase of the
cycle, and due to the increased wash cycle duration, is
particularly useful for the
removal of stubborn stains.
It can be used with or
without bleach. If you desire
bleaching, insert the extra
tray compartment (3) into
compartment 1. When
pouring in the bleach, be
careful not to exceed the
max level marked on the
central pivot (see figure).
To bleach laundry without
carrying out a full wash cycle, pour the bleach into the
extra compartment 3, select the "Rinse" cycle
and
activate the "Super Wash" option
.
It cannot be used in conjunction with
, , , , ,
, , , , , .
Easy Iron
By selecting this option, the wash and spin cycles will be
modified in order to reduce the formation of creases.
At the end of the cycle the washer-dryer drum
will rotate slowly; the Easy Iron and START/PAUSE
indicator lights will flash. To end the cycle press the
START/PAUSE button or the Easy Iron button.
For the Silk
wash cycle, the machine will end the
cycle while the laundry is soaking and the Easy
Iron indicator light will flash. To drain the water so that
the laundry may be removed, press the START/PAUSE
button or the Easy Iron button.
It cannot be used in conjunction with
, , , , ,
, , , .
Note: If you also want to run the drying cycle, this option is
enabled only if combined with level Iron.
Time Saver
If you select this option, the wash cycle duration will be
reduced by 30%-50%, depending on the selected cycle,
thereby guaranteeing simultaneous water and energy
saving. Use this cycle for lightly soiled garments.
It cannot be used in conjunction with
, , , , ,
, , , , , .
Extra rinse
By selecting this option, the efficiency of the rinse is
increased and optimal residual detergent removal is
guaranteed. It is particularly useful for skin which is
sensitive to detergents. We recommend this option is
used with a full load of washing, or when a large amount
of detergent is required.
It cannot be used in conjunction with
, , , , ,
, .
3
1
2
(*) The duration of the wash cycles can be checked
on the display.
(*) Note: 10 minutes after the START, the machine will recalculate the time remaining until the end of the wash cycle on the basis of the load inside it; this
value will then be shown on the display.
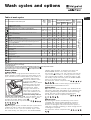
Wash cycles and options
Table of wash cycles
For all Test Institutes:
1) Test wash cycle in compliance with regulation EN 50229: set wash cycle
with a temperature of 60°C.
2) Long wash cycle for cottons: set wash cycle
with a temperature of 40°C.
3) Short wash cycle for cottons: set wash cycle
with a temperature of 40°C.
Icon Description of the wash cycle
Max.
temp.
(°C)
Max.
speed
(rpm)
Drying
Detergent and additives
Max.
load
(kg)
Cycle
duration
Wash
Fabric
softener
Bleach
Cottons wash cycles
Cottons
with pre-wash
(Add detergent to the relevant compartment).
90° 1200
ll l
- 8
Cottons (1):
heavily soiled whites and resistant colours.
60°
(Max. 90°)
1200
ll l l
8
Cottons (2):
heavily soiled whites and delicate colours.
40° 1200
ll l l
8
Coloured
Cottons (3)
40° 1200
ll l l
8
Jeans
40° 800
ll l
- 4
Special programmes
Baby:
heavily soiled delicate colours
40° 800
ll l l
4
Mix 30':
to refresh lightly soiled garments quickly (not suitable
for wool, silk and clothes which require washing by hand)
30° 800
ll l
- 3,5
Durable
Synthetics
60° 800
ll l l
4
Silk:
for garments in silk and viscose, lingerie.
30° 0 -
ll
- 2
Wool:
for wool, cashmere, etc.
40° 800
ll l
- 2
Drying cycles
Wash&Dry 30° 1200
ll l
- 1
Drying Cotton - -
l
- - - 6
Drying Synthetic - -
l
- - - 4
Drying Wool - -
l
- - - 1,5
Partials wash cycles
Rinse - 1200
l
-
ll
8
Spin - 1200
l
- - - 8
Drain - 0 - - - - 8

EN
8
Detergents and laundry
Detergent
The type and quantity of detergent required depend on
the type of fabric you are washing (cotton, wool, silk,
etc.), as well as its colour, the washing temperature, the
level of soiling and the hardness of the water in the area.
Measuring out the detergent carefully will avoid wastage
and help to protect the environment: although they are
biodegradable, detergents still contain ingredients which
alter the balance of nature.
We recommend the following:
use powder detergents for white cotton garments and
pre-washing.
use liquid detergents for delicate cotton garments and
for all low-temperature wash cycles.
use gentle liquid detergents for wool and silk
garments.
The detergent should be poured into the relevant
compartment - or the dispenser placed directly inside
the drum - before the wash cycle begins. In the latter
case, it will not be possible to select the Cottons with
pre-wash cycle.
Do not use hand washing detergents because these
create too much foam.
Preparing the laundry
Shake out the garments before loading them into the
machine.
Divide the laundry according fabric type (symbol on the
washing instruction label) and colour, making sure you
separate the coloured garments from the white ones;
Empty all pockets and check the buttons;
Do not exceed the values listed in the Table of wash
cycles, which refer to the weight of the laundry when dry.
How much does your laundry weigh?
1 sheet 400-500 g
1 pillowcase 150-200 g
1 tablecloth 400-500 g
1 bathrobe 900-1200 g
1 towel 150-250 g
1 pair of jeans 400-500 g
1 shirt 150-200 g
Washing recommendations
Jeans: use the special Jeans wash cycle for all
denim garments; turn inside out before washing and use
a liquid detergent.
Baby: use the special Baby
wash cycle to remove
the remove the soiling typically caused by babies, while
removing all traces of detergent from nappies in order to
prevent the delicate skin of babies from suffering allergic
reactions. The cycle has been designed to reduce the
amount of bacteria by using a greater quantity of water
and optimising the effect of special disinfecting additives
added to the detergent. At the end of the wash cycle,
the machine will slowly rotate the drum; to end the cycle
press the START/PAUSE button.
Silk: use the special Silk
wash cycle to wash all silk
garments. We recommend the use of special detergent
which has been designed to wash delicate clothes.
Curtains: use the Silk
wash cycle. Fold curtains
and place them in a pillow case or mesh bag.
Wool: Hotpoint/Ariston is the only washer-dryer brand to
have been awarded the prestigious Woolmark Platinum
Care endorsement (M.0508) by the Woolmark Company,
which means that all woollen garments may be washed
in the washer-dryer, even those which state hand wash
only
on the label. The Wool wash cycle can be
used to wash all woollen garments in the washer-dryer
while guaranteeing optimum performance.
Bedlinen and towels: use the Bed & Bath
cycle
to wash laundry from all over the house; this optimises
fabric softener performance and helps you save time and
energy. We recommend the use of powder detergent.
Stubborn stains: it is wise to treat stubborn stains with
solid soap before washing, and to use the Cottons with
pre-wash cycle.
Wash & Dry
was designed to wash and dry lightly
soiled garments quickly. This cycle may be used to wash
and dry a laundry load of up to 1 kg in just 60 minutes.
To achieve optimum results, use liquid detergent and pre-
treat cuffs, collars and stains.
Load balancing system
Before every spin cycle, to avoid excessive vibrations
before every spin and to distribute the load in a uniform
manner, the drum rotates continuously at a speed which
is slightly greater than the washing rotation speed. If,
after several attempts, the load is not balanced
correctly, the machine spins at a reduced spin speed. If
the load is excessively unbalanced, the washer-dryer
performs the distribution process instead of spinning. To
encourage improved load distribution and balance, we
recommend small and large garments are mixed in the
load.

EN
9
Precautions and tips
The machine was designed and constructed in
accordance with international safety regulations. The
following information is provided for safety reasons and
must therefore be read carefully.
General safety
This appliance was designed for domestic use only.
the machine must only be used by adults, in
accordance with the instructions given in this manual.
Do not touch the machine when barefoot or with wet
or damp hands or feet.
Do not pull on the power supply cable when
unplugging the appliance from the electricity socket.
Hold the plug and pull.
Do not touch the drained water as it may reach
extremely high temperatures.
Never force the porthole door. This could damage the
safety lock mechanism designed to prevent
accidental opening.
If the appliance breaks down, do not under any
circumstances access the internal mechanisms in an
attempt to repair it yourself.
Always keep children well away from the appliance
while it is operating.
If it must be moved, proceed with the help of two or
three people and handle it with the utmost care.
Never try to do this alone, because the appliance is
very heavy.
Before loading laundry into the washer dryer, make
sure the drum is empty.
During the drying phase, the door tends to get
quite hot.
Do not use the appliance to dry clothes that have
been washed with flammable solvents (e.g.
trichlorethylene).
Do not use the appliance to dry foam rubber or
similar elastomers.
Make sure that the water tap is turned on during
the drying cycles.
Disposal
Disposing of the packaging materials: observe local
regulations so that the packaging may be re-used.
The European Directive 2002/96/EC relating to Waste
Electrical and Electronic Equipment (WEEE) states
that household appliances should not be disposed of
using the normal solid urban waste cycle. Exhausted
appliances should be collected separately in order to
optimise the cost of re-using and recycling the
materials inside the machine, while preventing
potential damage to the atmosphere and to public
health. The crossed-out dustbin is marked on all
products to remind the owner of their obligations
regarding separated waste collection.
For more information relating to the correct disposal of
household appliances, owners should contact their
local authorities or appliance dealer.
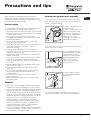
Opening the porthole door manually
In the event that it is not possible to open the porthole
door due to a powercut, and if you wish to remove the
laundry, proceed as follows:
1. remove the plug from the
electrical socket.
2. make sure the water level
inside the machine is lower
than the door opening; if it is
not, remove excess water
using the drain hose,
collecting it in a bucket as
indicated in the figure.
3. remove the cover panel on the lower front part of the
washer dryer (see overleaf).
4. pull outwards using the
tab as indicated in the figure,
until the plastic tie-rod is
freed from its stop position;
pull downwards until you
hear a click, which
indicates that the door is
now unlocked.
5. open the door; if this is
still not possible repeat the
procedure.
6. reposition the panel, making sure the hooks are
securely in place before you push it onto the appliance.

EN
10
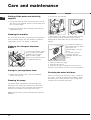
Care and maintenance
1
2
Cutting off the water and electricity
supplies
Turn off the water tap after every wash cycle. This will
limit wear on the hydraulic system in the machine and
help to prevent leaks.
Unplug the appliance when cleaning it and during all
maintenance work.
Cleaning the machine
The outer parts and rubber components of the appliance
can be cleaned using a soft cloth soaked in lukewarm
soapy water. Do not use solvents or abrasives.
Cleaning the detergent dispenser
drawer
To remove the drawer, press
lever (1) and pull the drawer
outwards (2) (see figure).
Wash it under running
water; this procedure should
be repeated frequently.
Caring for your appliance drum
Always leave the door ajar to prevent unpleasant
odours from forming.
Cleaning the pump
The washer dryer is fitted with a self-cleaning pump
which does not require any maintenance. Sometimes,
small items (such as coins or buttons) may fall into the
protective pre-chamber at the base of the pump.
Make sure the wash cycle has finished and unplug the
appliance.
To access the pre-chamber:
1. take off the cover panel on the front of the machine
by first pressing it in the centre and then pushing
downwards on both sides until you can remove it (see
figures);
2. position a container so
that it will collect the water
which flows out
(approximately 1.5 l) (see
figure);
3. unscrew the lid by
rotating it in an anti-
clockwise direction (see
figure);
4. clean the inside thoroughly;
5. screw the lid back on;
6. reposition the panel, making sure the hooks are
securely in place before you push it onto the appliance.
Checking the water inlet hose
Check the inlet hose at least once a year. If there are
any cracks, it should be replaced immediately: during
the wash cycles, water pressure is very strong and a
cracked hose could easily split open.
1
2

EN
11
Trouble shooting
Your washer-dryer could occasionally fail to work. Before contacting the Technical Assistance Centre
(see Assistance), make sure that the problem cannot be not solved easily using the following list.
Problem:
The washer-dryer does not switch on.
The wash cycle does not start.
The washer-dryer does not fill
with water.
The washer-dryer door remains
locked.
The machine continuously fills
with water and drains.
The washer-dryer does not drain
or spin.
The machine vibrates a lot during
the spin cycle.
The washer-dryer leaks.
The icons corresponding to the
Phase in progress flash rapidly
at the same time as the ON/OFF
indicator light.
There is too much foam.
The washer-dryer door remains locked.
The washer-dryer does not dry.
Possible causes / Solutions:
The appliance is not plugged into the socket fully, or not enough to make contact.
There is no power in the house.
The door is not closed properly.
The START/PAUSE button has not been pressed.
The water tap has not been opened.
A delayed start has been set.
The water inlet hose is not connected to the tap.
The hose is bent.
The water tap has not been opened.
There is no water supply in the house.
The pressure is too low.
The START/PAUSE button has not been pressed.
If you have selected the Baby
cycle or the Easy iron option, when
the wash cycle has finished the machine will slowly rotate the drum; to end
the cycle press the START/PAUSE button or the Easy iron
button. If
you have selected the Silk
wash cycle, the machine will end the cycle
while the laundry is soaking; to drain the water so that the laundry may be
removed, press the START/PAUSE button or the Easy iron
button.
The drain hose is not fitted at a height between 65 and 100 cm from the
floor (see Installation).
The free end of the hose is under water (see Installation).
If the dwelling is on one of the upper floors of a building, there may be
problems relating to water drainage, causing the washer-dryer to fill with
water and drain continuously. Special anti-draining valves are available in
shops and help to prevent this inconvenience.
The wall drainage system is not fitted with a breather pipe.
The wash cycle does not include draining: Some wash cycles require the
drain phase to be started manually (see Wash cycles and options).
The Easy iron option is enabled: to complete the wash cycle, press the
START/PAUSE button (Wash cycles and options).
The drain hose is bent (see Installation).
The drainage duct is clogged.
The drum was not unlocked correctly during installation (see Installation).
The machine is not level (see Installation ).
The machine is trapped between cabinets and walls (see Installation).
The load is unbalanced (see Detergents and laundry).
The water inlet hose is not screwed on properly (see Installation).
The detergent dispenser is blocked (to clean it, see Care and maintenance).
The drain hose is not fixed in place properly (see Installation).
Switch off the machine and unplug it, wait for approximately 1 minute and
then switch it back on again. If the problem persists, contact the Technical
Assistance Service.
The detergent is not suitable for machine washing (it should display the text
for washer-dryers or hand and machine wash, or the like).
Too much detergent was used.
Perform the manual unlocking procedure (see Precautions and tips).
The appliance is not plugged into the socket, or not enough to make contact.
There has been a power failure.
The appliance door is not shut properly.
A DELAY TIMER has been set.
DRYING is in the OFF position.

EN
12
Before calling for Assistance:
Check whether you can solve the problem by yourself (see Trouble shooting);
Restart the wash cycle to check whether the problem has been solved;
If it has not, contact the Authorised Technical Assistance Service.
If the washer-dryer has been installed or used incorrectly, you will have to pay for the call-out service.
Always request the assistance of authorised technicians.
Please have the following information to hand:
the type of problem;
the appliance model (Mod.);
the serial number (S/N).
The above information can be found on the data plate located on the appliance itself.
Assistance
Note: To exit Demo mode, press and hold the two ON/OFF and START/PAUSE buttons simultaneously for 3 seconds.

13
BG
Áúëãàðñêè
Ñúäúðæàíèå
Èíñòàëèðàíå, 14-15
Ðàçîïàêîâàíå è íèâåëèðàíå
Õèäðàâëè÷íè è åëåêòðè÷åñêè âðúçêè
Òåõíè÷åñêè äàííè
Îïèñàíèå íà ïåðàëíàòà ìàøèíà, 16-17
Êîíòðîëåí ïàíåë touch control
Êàê ñå èçâúðøâà åäèí öèêúë íà ïðàíå èëè
íà ñóøåíå, 18-19
Ïðîãðàìè è îïöèè, 20
Òàáëèöà íà ïðîãðàìèòå
Îïöèè íà ïðàíåòî
Ïåðèëíè ïðåïàðàòè è äðåõè çà ïðàíå, 21
Ïåðèëåí ïðåïàðàò
Ðàçïðåäåëÿíå íà ïðàíåòî
Ñúâåòè çà èçïèðàíå
Ñèñòåìà çà èçìåðâàíå íà òîâàðà
Ìåðêè çà áåçîïàñíîñò è ïðåïîðúêè, 22
Îáùè ìåðêè çà áåçîïàñíîñò
Ðåöèêëèðàíå
Ðú÷íî îòâàðÿíå íà âðàòè÷êàòà
Ïîääðúæêà è ïî÷èñòâàíå, 23
Ñïèðàíå íà âîäàòà è èçêëþ÷âàíå íà åëåêòðîçàõðàíâàíåòî
Ïî÷èñòâàíå íà ìàøèíàòà
Ïî÷èñòâàíå íà ÷åêìåäæåòî çà ïåðèëíèòå ïðåïàðàòè
Ïðåãëåä íà áàðàáàíà
Ïî÷èñòâàíå íà ïîìïàòà
Ïðîâåðêà íà ìàðêó÷à çà ñòóäåíàòà âîäà
Ïðîáëåìè è ìåðêè çà îòñòðàíÿâàíåòî èì, 24
Ñåðâèçíî îáñëóæâàíå, 25
BG
ÏÅÐÀËÍß
AQUALTIS
AQM8D 29 U
Èíñòðóêöèè çà èíñòàëèðàíå
è óïîòðåáà

BG
14
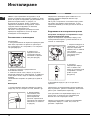
Èíñòàëèðàíå
Âàæíî å äà ñúõðàíÿâàòå èíñòðóêöèèòå, çà äà
ìîæåòå äà ïðàâèòå äîïúëíèòåëíè ñïðàâêè ïî âñÿêî
âðåìå.  ñëó÷àé íà ïðîäàæáà, ïðåóñòàíîâÿâàíå íà
ðàáîòà èëè ïðåìåñòâàíå, ñå óâåðåòå, ÷å
èíñòðóêöèèòå ùå áúäàò çàåäíî ñ ïåðàëíÿòà.
Ïðî÷åòåòå âíèìàòåëíî èíñòðóêöèèòå: çàùîòî
ñúäúðæàò âàæíà èíôîðìàöèÿ çà ìîíòàæà,
èçïîëçâàíåòî è áåçîïàñíîñòòà.
 ïëèêà ñ èíñòðóêöèèòå ùå íàìåðèòå îñâåí
ãàðàíöèÿòà, ïîäðîáíîñòè, êîèòî ùå áúäàò
íåîáõîäèìè çà èíñòàëèðàíåòî.
Ðàçîïàêîâàíå è íèâåëèðàíå
Ðàçîïàêîâàíå
1. Ñëåä ðàçîïàêîâàíå íà ïåðàëíÿòà ïðîâåðåòå äàëè
íÿìà ùåòè, ïðè÷èíåíè ïî âðåìå íà òðàíñïîðòà.
Àêî å ïîâðåäåíà, íå ÿ ñâúðçâàéòå, à ñå îáúðíåòå
êúì äèñòðèáóòîðà.
2. Ñâàëåòå 4-òå
ïðåäïàçíè âèíòà è
ñúîòâåòíàòà âòóëêà,
ïîñòàâåíè îò çàäíàòà
÷àñò (âèæ ôèãóðà).
3. Çàòâîðåòå îòâîðèòå ñ ïðåäîñòàâåíèòå
ïëàñòìàñîâè êàïà÷êè.
4. Çàïàçåòå âñè÷êè ÷àñòè, çàùîòî, â ñëó÷àé ÷å
ïåðàëíÿòà òðÿáâà äà ñå òðàíñïîðòèðà, òå òðÿáâà äà
ñå ìîíòèðàò îòíîâî, çà äà ñå èçáåãíàò âúòðåøíè
ïîâðåäè.
Îïàêîâà÷íèÿ ìàòåðèàë íå òðÿáâà äà ñå äàâà íà
äåöà.
Íèâåëèðàíå
1. Ïîçèöèîíèðàéòå ïåðàëíàòà ìàøèíà íà ðàâåí è
òâúðä ïîä, áåç äà ÿ îïèðàòå â ñòåíè, ìåáåëè è äð.
2. Êîìïåíñèðàéòå
îòêëîíåíèÿòà, êàòî
âúðòèòå êðà÷åòàòà,
äîêàòî ïåðàëíÿòà
äîñòèãíå õîðèçîíòàëíî
ïîëîæåíèå (íå òðÿáâà äà
èìà íàêëîí, ïî-ãîëÿì îò
2 ãðàäóñà).
Ïðåöèçíîòî íèâåëèðàíå äàâà ñòàáèëíîñò è ñå
èçáÿãâàò øóìîâå è âèáðàöèè íàé-âå÷å ïðè
öåíòðîôóãèðàíå.
 ñëó÷àé, ÷å ïåðàëíÿòà å ïîñòàâåíà âúðõó ìîêåò
èëè êèëèì, ðåãóëèðàéòå òàêà êðà÷åòàòà, ÷å ïîä
ïåðàëíàòà ìàøèíà äà îñòàíå äîñòàòú÷íî ìÿñòî çà
âåíòèëàöèÿ.
Õèäðàâëè÷íè è åëåêòðè÷åñêè âðúçêè
Ñâúðçâàíå íà ìàðêó÷à çà çàõðàíâàíå ñ âîäà
êúì âîäîïðîâîäíàòà ìðåæà
Ïðåäè äà ñâúðæåòå çàõðàíâàùèÿ ìàðêó÷ êúì
âîäîïðîâîäíàòà ìðåæà, ïóñíåòå âîäàòà äà ñå
èçòå÷å äî èçáèñòðÿíå.
1. Ñâúðæåòå ìàðêó÷à çà
çàõðàíâàíå ñúñ ñòóäåíà
âîäà êúì ïåðàëíàòà
ìàøèíà, êàòî ãî çàâèåòå
êúì ùóöåðà,
ðàçïîëîæåí íà ãúðáà,
ãîðå âäÿñíî (âèæ
ôèãóðàòà).
2. Ñâúðæåòå
çàõðàíâàùèÿ ìàðêó÷,
êàòî ãî çàâèåòå êúì
êðàíà çà ñòóäåíàòà âîäà
ñ íàêðàéíèê ñ ãàçîâà
ðåçáà 3/4 (âèæ
ôèãóðàòà).
3. Âíèìàâàéòå ìàðêó÷úò äà íå ñå ïðåãúâà è
ïðèòèñêà.
Íàëÿãàíåòî ïî âîäîïðîâîäíàòà ìðåæà òðÿáâà äà
áúäå â ãðàíèöèòå, óêàçàíè â òàáëèöàòà Òåõíè÷åñêè
äàííè (âèæ ñëåäâàùàòà ñòðàíèöà).
Àêî äúëæèíàòà íà çàõðàíâàùèÿ ìàðêó÷ íå å
äîñòàòú÷íà, ñå îáúðíåòå êúì ñïåöèàëèçèðàí
ìàãàçèí èëè êúì îòîðèçèðàí òåõíèê.
Íèêîãà íå èçïîëçâàéòå ñòàðè èëè óïîòðåáÿâàíè
çàõðàíâàùè ìàðêó÷è, à ñàìî òåçè, êîèòî ñå
äîñòàâÿò ñ ïåðàëíÿòà.

15
BG
65 - 100 cm
Ñâúðçâàíå íà ìàðêó÷à çà ìðúñíàòà âîäà
Ñâúðæåòå ìàðêó÷à çà
ìðúñíàòà âîäà êúì
êàíàëèçàöèîííàòà òðúáà
èëè êúì òðúáàòà çà
îòâåæäàíå â ñòåíàòà,
ðàçïîëîæåíè îò ïîäà íà
âèñî÷èíà ìåæäó 65 è
100 ñì, êàòî âíèìàâàòå â
íèêàêúâ ñëó÷àé äà íå ãî
ïðåãúâàòå.
Êàòî àëòåðíàòèâà
ïîäïðåòå ìàðêó÷à çà
ìðúñíàòà âîäà â êðàÿ
íà ìèâêàòà èëè âàíàòà,
êàòî ñâúðæåòå êúì
êðàíà âîäà÷à, äîñòàâåí
â êîìïëåêòà (âèæ
ôèãóðàòà).
Ñâîáîäíèÿò êðàé íà
ìàðêó÷à çà ìðúñíàòà
âîäà íå òðÿáâà äà áúäå
ïîòîïåí âúâ âîäàòà.
Íå ñå ïðåïîðú÷âà èçïîëçâàíåòî íà óäúëæàâàùè
ìàðêó÷è. Àêî å íåîáõîäèìî, óäúëæèòåëÿò òðÿáâà äà
èìà ñúùèÿ äèàìåòúð êàòî îðèãèíàëíèÿ ìàðêó÷ è äà
íå íàäâèøàâà 150 ñì.
Ñâúðçâàíå êúì åëåêòðè÷åñêàòà ìðåæà
Ïðåäè äà ñâúðæåòå ùåïñåëà â êîíòàêòà, ïðîâåðåòå
äàëè:
êîíòàêòúò å çàçåìåí ñúãëàñíî äåéñòâàùèòå
ñòàíäàðòè;
êîíòàêòúò ìîæå äà ïîåìå ìàêñèìàëíàòà ìîùíîñò
íà íàòîâàðâàíå íà ìàøèíàòà, óêàçàíà â òàáëèöàòà
ñ òåõíè÷åñêèòå äàííè (âèæ ñëåäâàùàòà
ñòðàíèöà);
çàõðàíâàùîòî íàïðåæåíèå å â ãðàíèöèòå íà
óêàçàíîòî â òàáëèöàòà ñ òåõíè÷åñêèòå äàííè (âèæ
ñëåäâàùàòà ñòðàíèöà);
êîíòàêòúò å ñúâìåñòèì ñ ùåïñåëà íà ïåðàëíàòà
ìàøèíà.  ïðîòèâåí ñëó÷àé çàìåíåòå ùåïñåëà
èëè êîíòàêòà.
Ïåðàëíàòà ìàøèíà íå òðÿáâà äà ñå ìîíòèðà íà
îòêðèòî, äîðè ïîä íàâåñ, çàùîòî å ìíîãî îïàñíî äà
ñå îñòàâÿ íà âëèÿíèåòî íà àòìîñôåðíèòå óñëîâèÿ.
Çà ìîíòèðàíàòà ïåðàëíà ìàøèíà åëåêòðè÷åñêèÿò
êîíòàêò òðÿáâà äà áúäå ëåñíîäîñòúïåí.
Íå èçïîëçâàéòå óäúëæèòåëè èëè ðàçêëîíèòåëè.
Êàáåëúò íå òðÿáâà äà áúäå îãúíàò èëè ñïëåñêàí.
Çàõðàíâàùèÿò êàáåë è ùåïñåëúò òðÿáâà äà ñå
çàìåíÿò ñàìî îò îòîðèçèðàíè òåõíèöè.
Âíèìàíèå! Ôèðìàòà îòõâúðëÿ âñÿêàêâà îòãîâîðíîñò
â ñëó÷àèòå, â êîèòî òåçè íîðìè íå ñå ñïàçâàò.
Òåõíè÷åñêè äàííè
Ìîäåë
AQM8D 29 U
Ðàçìåðè
øèðè í à 5 9 , 5 ñ ì
âèñî÷èíà 85 ñì
äúëáî÷èíà 64,5 ñì
Âìåñòèìîñò
Îò 1 äî 8 êã çà ïðàíå.
Îò 1 äî 6 êã çà ñóøåíå.
Åëåêòðè÷åñêî
çàõðàíâàíå
Âèæ òàáåëêàòà ñ õàðàêòåðèñòèêèòå,
ïîñòàâåíà íà ìàøèíàòà
Çàõðàíâàíå ñ
âîäà
ìàêñèìàëíî íàëÿãàíå 1 ÌÐà (10 bar)
ìèíèìàë íî íàëÿãàíå 0,05 ÌÐà (0,5 bar)
îáåì íà êàçàíà 62 ëèòðà
Ñêîðîñò íà
öåíòðîôóãàòà
äî 1200 îáîðîòà/ìèíóòà
Ïðîãðàìè çà
ïðîâåðêà
ñúãëàñíî íîðìà
EN 50229
èçïèðàíåòî:
ïðîãðàìà ;
òåìïåðàòóðà 60°; èçâúðøåíà ñ 8 êã
ïðàíå.
ñóøåíå
: ïúðâîíà÷àëíî ñóøåíå ïðè
2
êã. ïðàíå è èçáðàíî íèâî íà ñóøåíå
Çà Ãëàäåíå;
Ïîâòîðíî ñóøåíå ïðè
6
êã ïðàíå è
èçáðàíî íèâî íà ñóøåíå Ñóõè.
Ïåðàëíàòà ìàøèíà ñúîòâåòñòâà íà
ñëåäíèòå Åâðîïåéñêè äèðåêòèâè:
- 89/336/ÑÅÅ îò 03/05/89 (çà
åëåêòðîìàãíèòíà ñúâìåñòèìîñò) è
ïîñëåäâàùèòå èçìåíåíèÿ
- 2 002 / 96/ CE
- 2006/95/CE (çà íèñêî íàïðåæåíèå)

BG
16
ÓÏÐÀÂËßÂÀÙ
ÏÀÍÅË
ÂÐÀÒÀ ÍÀ ËÞÊÀ
ÐÚÊÎÕÂÀÒÊÀ
ÍÀ ÂÐÀÒÀÒÀ
ÍÀ ËÞÊÀ
ÖÎÊÚË
ÐÅÃÓËÈÐÓÅÌÈ
ÊÐÀ×ÅÒÀ
Îïèñàíèå íà ïåðàëíàòà ìàøèíà
ÂÐÀÒÈ×ÊÀ ÍÀ ËÞÊÀ
Çà îòâàðÿíå âðàòè÷êàòà
íà ëþêà âèíàãè
èçïîëçâàéòå ñïåöèàëíàòà
ðúêîõâàòêà (âèæ
÷åðòåæà).
×ÅÊÌÅÄÆÅ ÇÀ ÏÅÐÈËÍÈ ÏÐÅÏÀÐÀÒÈ
Íàìèðà ñå âúòðå â
ïåðàëíÿòà è çà äà ñå
èçïîëçâà, òðÿáâà äà ñå
îòâîðè âðàòè÷êàòà.
Çà äîçèðàíå íà ïåðèëíèòå
ïðåïàðàòè âèæòå ðàçäåë
Ïåðèëíè ïðåïàðàòè è
äðåõè çà ïðàíå.
Çàáåëåæêà: çàëåïåòå íà
÷åêìåäæåòî çà ïåðèëíè
ïðåïàðàòè ñòèêåðà ñ
îïèñàíèåòî íà ïðîãðàìèòå è îïöèèòå. Ñòèêåðúò
ñå íàìèðà â ïëèêà, â êîéòî å ïîñòàâåíà êíèæêàòà
ñ èíñòðóêöèè.
1. âàíè÷êà çà ïðåäïðàíå:
èçïîëçâàéòå ïåðèëåí
ïðåïàðàò íà ïðàõ.
Ïðåäè äà èçñèïåòå
ïðåïàðàòà, ïðîâåðåòå
äàëè íå å ïîñòàâåíî
äîïúëíèòåëíîòî
îòäåëåíèå 3.
2. âàíè÷êà çà ñúùèíñêî ïðàíå: èçïîëçâàéòå
ïðàõîîáðàçåí èëè òå÷åí ïåðèëåí ïðåïàðàò. Â
ïîñëåäíèÿ ñëó÷àé ñå ïðåïîðú÷âà òîé äà ñå ïîñòàâè
íåïîñðåäñòâåíî ïðåäè ïóñêàíå íà ïåðàëíÿòà.
3. äîïúëíèòåëíà âàíè÷êà: Áåëèíà
Èçïîëçâàíåòî íà äîïúëíèòåëíîòî îòäåëåíèå 3
èçêëþ÷âà ïðåäïðàíåòî.
âàíè÷êà çà äîáàâêè: çà îìåêîòèòåë èëè òå÷íè
äîáàâêè. Ïðåïîðú÷âà ñå íèêîãà äà íå ñå ïðåâèøàâà
óêàçàíîòî ìàêñèìàëíî íèâî íà ðåøåòêàòà è äà ñå
ðàçðåæäàò êîíöåíòðèðàíèòå îìåêîòèòåëè.
Êîíòðîëåí ïàíåë touch control
Çà äà ïðîìåíèòå
çàäàäåíîòî, íàòèñíåòå
ëåêî âúðõó èêîíàòà â
÷óâñòâèòåëíàòà îáëàñò
(touch control) òàêà, êàêòî å
ïîñî÷åíî íà ôèãóðàòà.
Ðåæèì íà stand by
 ñúîòâåòñòâèå ñ íîâèòå íîðìàòèâè çà ïåñòåíå íà
åíåðãèÿ òàçè ïåðàëíà ìàøèíà å ñíàáäåíà ñúñ
ñèñòåìà çà àâòîìàòè÷íî èçêëþ÷âàíå (stand by),
êîÿòî ñå çàäåéñòâà ñëåä íÿêîëêî ìèíóòè â ñëó÷àé,
÷å ìàøèíàòà íå ñå èçïîëçâà. Íàòèñíåòå çà êðàòêî
áóòîí ON/OFF
è èç÷àêàéòå ìàøèíàòà äà ñå
çàäåéñòâà îòíîâî.
ÏÐÎÌßÍÀ ÍÀ ÅÇÈÊÀ
Ïðè ïúðâîòî âêëþ÷âàíå íà ìàøèíàòà íà äèñïëåÿ ñå
ïîÿâÿâà ïúðâîíà÷àëíî çàäàäåíèÿò åçèê â ìèãàùà
ñâåòëèíà. Â ñúîòâåòñòâèå ñ 3-òå áóòîíà âäÿñíî íà
äèñïëåÿ ñå ïîÿâÿâàò ñèìâîëèòå
, OK è V.
Åçèöèòå ñå ñìåíÿò àâòîìàòè÷íî íà âñåêè 3 ìèí èëè
÷ðåç íàòèñêàíå íà áóòîíèòå äî ñèìâîëèòå
è V.
Ñ íàòèñêàíåòî íà áóòîí OK ñå ïîòâúðæäàâà åçèêúò,
êîéòî îñòàâà ïîñòîÿííî ñëåä 2 ìèíóòè. Àêî íå ñå
íàòèñíå íèòî åäèí îò áóòîíèòå, ñëåä 30 ìèíóòè
îòíîâî çàïî÷âà àâòîìàòè÷íàòà ñìÿíà íà åçèöèòå.
Åçèêúò ìîæå äà ñå ïðîìåíÿ ñàìî ïðè
èçêëþ÷åíà ìàøèíà.
×ðåç åäíîâðåìåííî íàòèñêàíå íà áóòîíèòå
òåìïåðàòóðà
+öåíòðîôóãà +çàáàâåí ñòàðò
çà 5 ìèíóòè îñâåí êðàòúê çâóêîâ ñèãíàë íà äèñïëåÿ
ñå ïîÿâÿâà çàäàäåíèÿò åçèê ñ ìèãàùà ñâåòëèíà.
×ðåç íàòèñêàíå íà áóòîíèòå äî ñèìâîëèòå
è V ñå
ïðîìåíÿ åçèêúò. Ñ íàòèñêàíåòî íà áóòîíà äî ñèìâîëà
OK ñå ïîòâúðæäàâà åçèêúò, êîéòî îñòàâà ïîñòîÿíåí
ñëåä 2 ìèíóòè. Àêî íå ñå íàòèñíå íèòî åäèí îò
áóòîíèòå, ñëåä 30 ìèíóòè ùå ñå ïîÿâè çàäàäåíèÿò
ïðåäè òîâà åçèê.
3
1
2

17
BG
Êîíòðîëåí ïàíåë touch control
Áóòîí ñúñ ñëåäÿù ñâåòëèíåí èíäèêàòîð ON/OFF:
íàòèñêà ñå, áåç äà ñå çàäúðæà áóòîíúò çà âêëþ÷âàíå è
èçêëþ÷âàíå íà ïåðàëíÿòà. Çåëåíèÿò ñâåòëèíåí
èíäèêàòîð ïîêàçâà, ÷å ïåðàëíÿòà å âêëþ÷åíà. Çà äà
èçêëþ÷èòå ïåðàëíàòà ìàøèíà ïî âðåìå íà ïðàíå, å
íåîáõîäèìî äà çàäúðæèòå áóòîíà íàòèñíàò ïî-äúëãî
âðåìå - îêîëî 3 ñåê. Êðàòêî èëè ñëó÷àéíî íàòèñêàíå
íÿìà äà äîâåäå äî ñïèðàíå íà ìàøèíàòà.
Èçêëþ÷âàíåòî íà ïåðàëíÿòà ïî âðåìå íà çàïî÷íàëî
âå÷å ïðàíå ãî àíóëèðà.
Ïðåâêëþ÷âàòåë ÏÐÎÃÐÀÌÈ: ìîæå äà ñå âúðòè â äâåòå
ïîñîêè. Çà äà èçáåðåòå ïî-ïîäõîäÿùà ïðîãðàìà, âèæòå
Òàáëèöà íà ïðîãðàìèòå. Ïî âðåìå íà ïðàíåòî
ïðîãðàìàòîðúò îñòàâà íåïîäâèæåí.
Áóòîíè M1-M2: çàäðúæòå íàòèñíàò åäèí îò áóòîíèòå, çà
äà çàïàìåòèòå äàäåí öèêúë è ñúîòâåòíèòå
èíäèâèäóàëíè ïðåäïî÷èòàíèÿ. Çà ïîâòîðíî èçâèêâàíå
íà çàïàìåòåí âå÷å öèêúë íàòèñíåòå ñúîòâåòíèÿ áóòîí.
Áóòîí ÑÓØÅÍÅ
: íàòèñêà ñå, çà äà íàìàëè èëè
èçêëþ÷è ñóøåíåòî; èçáðàíàòà ñòåïåí èëè âðåìåòî íà
ñóøåíå ñå èçïèñâàò íà äèñïëåÿ (âèæ Êàê ñå èçâúðøâà
åäèí öèêúë íà ïðàíå èëè íà ñóøåíå).
Áóòîí
ÒÅÌÏÅÐÀÒÓÐÀ: íàòèñíåòå çà çàäàâàíå íà
èçìåíåíèå íà òåìïåðàòóðàòà èëè çà èçêëþ÷âàíå; èçáðàíàòà
ñòîéíîñò ñå óêàçâà îò äèñïëåé, ðàçïîëîæåí îòãîðå (âèæ Êàê
ñå èçâúðøâà åäèí öèêúë íà ïðàíå èëè íà ñóøåíå).
Áóòîí ÖÅÍÒÐÎÔÓÃÀ: íàòèñíåòå çà çàäàâàíå íà
èçìåíåíèå èëè çà èçêëþ÷âàíå íà öåíòðîôóãàòà; èçáðàíàòà
ñòîéíîñò ñå óêàçâà îò äèñïëåé, ðàçïîëîæåí îòãîðå (âèæ Êàê
ñå èçâúðøâà åäèí öèêúë íà ïðàíå èëè íà ñóøåíå).
Áóòîí ÇÀÁÀÂÅÍÎ ÄÅÉÑÒÂÈÅ: íàòèñíåòå çà
çàäàâàíå íà çàáàâåíî çàäåéñòâàíå íà èçáðàíàòà
ïðîãðàìà; ñòîéíîñòòà íà çàäàäåíîòî çàêúñíåíèå ñå
óêàçâà îò ðàçïîëîæåíèÿ îòãîðå äèñïëåé (âèæ Êàê ñå
èçâúðøâà åäèí öèêúë íà ïðàíå èëè íà ñóøåíå).
Áóòîíè ñúñ Ñâåòëèííè èíäèêàòîðè ÎÏÖÈÈ: íàòèñíåòå
çà èçáîð íà âúçìîæíèòå îïöèè. Ñúîòâåòñòâàùèÿò íà
èçáðàíàòà îïöèÿ ñâåòëèíåí èíäèêàòîð îñòàâà äà ñâåòè
(âèæ Êàê ñå èçâúðøâà åäèí öèêúë íà ïðàíå èëè íà ñóøåíå).
ÈêîíèÔÀÇÈ ÍÀ ÏÐÀÍÅ: îñâåòÿâàò ñå, óêàçâàéêè
íàïðåäâàíåòî íà öèêúëà (Ïðàíå
Èçïëàêâàíå
Öåíòðîôóãà
Èçïîìïâàíå ). Íàäïèñúò ñå
îñâåòÿâà ïðè çàâúðøåí öèêúë.
Áóòîí ñúñ ñâåòëèíåí èíäèêàòîð START/PAUSE: êîãàòî
çåëåíèÿò ñâåòëèíåí èíäèêàòîð äàâà áàâíà ìèãàùà
ñâåòëèíà, íàòèñíåòå áóòîíà, çà äà çàïî÷íå ïðàíåòî.
Ïðè çàïî÷íàë öèêúë íà ïðàíå èíäèêàòîðúò ñâåòè
íåïðåêúñíàòî. Çà çàäàâàíå íà ïàóçà â ïðàíåòî
íàòèñíåòå îòíîâî áóòîíà - èíäèêàòîðúò ùå ìèãà ñ
îðàíæåâà ñâåòëèíà. Àêî ñâåòëèííèÿò èíäèêàòîð
Áëîêèðàíà âðàòà
å óãàñíàë, ùå ìîæå äà ñå îòâîðè
âðàòàòà íà ëþêà. Çà ïðîäúëæàâàíå íà öèêúëà ïðàíå îò
ìÿñòîòî, â êîåòî å áèë ïðåêúñíàò, íàòèñíåòå îòíîâî
áóòîíà.
Ñâåòëèíåí èíäèêàòîð ÁËÎÊÈÐÀÍÅ ÍÀ ÂÐÀÒÀÒÀ:
ñèãíàëèçèðà, ÷å âðàòàòà íà ëþêà å áëîêèðàíà. Çà äà ñå
îòâîðè âðàòàòà, òðÿáâà äà ñå çàäàäå ïàóçà íà öèêúëà
(âèæ Êàê ñå èçâúðøâà åäèí öèêúë íà ïðàíå èëè íà ñóøåíå).
Áóòîí è ñâåòëèíåí èíäèêàòîð
ÁËÎÊÈÐÀÍÅ ÍÀ
ÁÓÒÎÍÈÒÅ: çà âêëþ÷âàíå èëè èçêëþ÷âàíå íà
áëîêèðîâêàòà îò óïðàâëÿâàùèÿ ïàíåë çàäðúæòå
íàòèñíàò áóòîíà çà îêîëî 2 ñåêóíäè. Ñâåòåùèÿò
ñâåòëèíåí èíäèêàòîð ñèãíàëèçèðà, ÷å óïðàâëÿâàùèÿò
ïàíåë å áëîêèðàí. Ïî òîçè íà÷èí ñå âúçïðåïÿòñòâàò
ñëó÷àéíè ïðîìåíè â ïðîãðàìèòå, ïðåäè âñè÷êî àêî â
êúùàòà èìà äåöà.
Ñâåòëèíåí èíäèêàòîð EÊO: Èêîíàòà
ñâåòâà, êîãàòî
ñå ïîñòèãà ìèíèìóì 10% ïåñòåíå íà åíåðãèÿ ÷ðåç
ïðîìÿíà íà ïàðàìåòðèòå íà ïðàíå. Îñâåí òîâà, ïðåäè
ìàøèíàòà äà ïðåìèíå â ðåæèì Stand by, èêîíàòà ùå
ñâåòíå çà íÿêîëêî ñåêóíäè; êîãàòî å èçêëþ÷åíà,
ìàøèíàòà ñïåñòÿâà îêîëî 80 % åíåðãèÿ.
ÏÐÎÃÐÀÌÀÒÎÐ
Áóòîí ñúñ ñëåäÿù
ñâåòëèíåí èíäèêàòîð
ON/OFF
Äèñïëåé
M1
M2
Áóòîí
ÒÅÌÏÅÐÀÒÓÐÀ
Áóòîí
ÖÅÍÒÐÎÔÓÃÀ
Áóòîí ÇÀÁÀÂÅÍÎ
ÄÅÉÑÒÂÈÅ
Ñâåòëèíåí
èíäèêàòîð
EÊO
Ñâåòëèíåí èíäèêàòîð
ÁËÎÊÈÐÀÍÅ ÍÀ ÂÐÀÒÀÒÀ
Áóòîí ñúñ ñâåòëèíåí
èíäèêàòîð START/PAUSE
Èêîíè ÔÀÇÈ
ÍÀ ÏÐÀÍÅ
Áóòîí ñúñ ñâåòëèíåí
èíäèêàòîð ÁËÎÊÈÐÀÍÅ
ÍÀ ÁÓÒÎÍÈÒÅ
Áóòîíè
ÎÏÖÈÈ
Áóòîíè
ÑÓØÅÍÅ

BG
18
ÇÀÁÅËÅÆÊÀ: Êîãàòî ïåðàëíÿòà ñå èçïîëçâà çà
ïúðâè ïúò, òðÿáâà äà ñå èçïúëíè åäèí öèêúë ïðàíå
áåç ïîñòàâÿíå íà äðåõè, à ñàìî ñ ïåðèëåí ïðåïàðàò,
êàòî ñå çàäàäå ïðîãðàìà ïàìóê 90° áåç ïðåäïðàíå.
1. ÂÊËÞ×ÂÀÍÅ ÍÀ ÏÅÐÀËÍßÒÀ. Íàòèñíåòå áóòîí
. Âñè÷êè ñâåòëèííè èíäèêàòîðè ùå ñâåòíàò çà 1
ñåêóíäà è íà äèñïëåÿ ùå ñå ïîÿâè íàäïèñ
AQUALTIS; ñëåä òîâà ùå îñòàíå äà ñâåòè
ïîñòîÿííî èíäèêàòîðúò íà áóòîí
, à èíäèêàòîðúò
START/PAUSE ùå ñâåòè ñ ìèãàùà ñâåòëèíà.
2. ÈÇÁÅÐÅÒÅ ÏÐÎÃÐÀÌÀÒÀ. Çàâúðòåòå
ÏÐÎÃÐÀÌÀÒÎÐÀ íàäÿñíî èëè íàëÿâî äî èçáîð íà
æåëàíàòà ïðîãðàìà, íàèìåíîâàíèåòî íà
ïðîãðàìàòà ùå ñå ïîÿâè íà äèñïëåÿ, ñ íåãî ñà
ñâúðçàíè îïðåäåëåíà òåìïåðàòóðà è ñêîðîñò íà
öåíòðîôóãèðàíå,êîèòî ìîãàò äà ñå èçìåíÿò. Íà
äèñïëåÿ ñå èçîáðàçÿâà ïðîäúëæèòåëíîñòòà íà
öèêúëà íà ïðàíå.
3. ÇÀÐÅÆÄÀÍÅ ÍÀ ÄÐÅÕÈÒÅ ÇÀ ÏÐÀÍÅ. Îòâàðÿ ñå
âðàòè÷êàòà íà ëþêà. Çàðåäåòå äðåõèòå çà ïðàíå,
êàòî âíèìàâàòå äà íå ïðåâèøèòå êîëè÷åñòâîòî íà
çàðåæäàíå, ïîñî÷åíî â òàáëèöàòà çà ïðîãðàìèòå
íà ñëåäâàùàòà ñòðàíèöà.
4. ÄOÇÈÐÀÍÅ ÍÀ ÏÅÐÈËÍÈß ÏÐÅÏÀÐÀÒ. Èçâàäåòå
÷åêìåäæåòî è ïîñòàâåòå ïåðèëíèÿ ïðåïàðàò â
ñïåöèàëíèòå âàíè÷êè, êàêòî å îáÿñíåíî â
Îïèñàíèå íà ïåðàëíàòà ìàøèíà.
5. ÇÀÒÂÎÐÅÒÅ ÂÐÀÒÀÒÀ ÍÀ ËÞÊÀ.
6. ÏÅÐÑÎÍÀËÈÇÈÐÀÍÅ ÍÀ ÖÈÊÚË ÏÐÀÍÅ. Ðàáîòè
ñå ñúñ ñïåöèàëíèòå áóòîíè îò ïàíåëà çà
óïðàâëåíèå:
Ïðîìÿíà íà òåìïåðàòóðàòà è/èëè
öåíòðîôóãàòà.
Ìàøèíàòà àâòîìàòè÷íî èçïèñâà ìàêñèìàëíèòå
òåìïåðàòóðà è ñêîðîñò íà öåíòðîôóãèðàíå, êîèòî
ñà ïðåäâèäåíè çà çàäàäåíàòà ïðîãðàìà èëè
ïîñëåäíî èçáðàíèòå òàêèâà ïàðàìåòðè, àêî ñà
ñúâìåñòèìè ñ òîêó-ùî èçáðàíàòà ïðîãðàìà.
Ñ íàòèñêàíå íà áóòîí
ñå íàìàëÿâà
ïðîãðåñèâíî òåìïåðàòóðàòà äî ñòóäåíî ïðàíå
(OFF). Ñ íàòèñêàíå íà áóòîí
ïðîãðåñèâíî
íàìàëÿâà öåíòðîôóãèðàíåòî äî ïúëíîòî ìó
èçêëþ÷âàíå (OFF). Ïîñëåäâàùîòî íàòèñêàíå íà
áóòîíèòå ùå äîâåäå îòíîâî ñòîéíîñòèòå äî
ìàêñèìàëíî ïðåäâèäåíèòå.
Èçêëþ÷åíèå: ñ èçáèðàíå íà ïðîãðàìà ÏÀÌÓÊ
òåìïåðàòóðàòà ìîæå äà ñå ïîâèøè äî 90°.
Çàäàâàíå íà ñóøåíåòî
Ïðè åäíîêðàòíî íàòèñêàíå íà áóòîíà ìàøèíàòà
àâòîìàòè÷íî èçáèðà íàé-ïîäõîäÿùîòî íèâî íà
ñóøåíå, êîåòî å ñúâìåñòèìî ñ èçáðàíàòà
ïðîãðàìà. Âñÿêî ñëåäâàùî íàòèñêàíå íà áóòîíà
íàìàëÿâà íèâîòî, à ñúîòâåòíî è âðåìåòî íà
ñóøåíå äî ïúëíîòî ìó èçêëþ÷âàíå OFF.
Ïîñëåäâàùîòî íàòèñêàíå íà áóòîíèòå ùå äîâåäå
îòíîâî ñòîéíîñòèòå äî ìàêñèìàëíî ïðåäâèäåíèòå.
Ñóøåíåòî ìîæå äà ñå çàäàäå
A - Âúç îñíîâà íà âðåìåòî: îò 20 äî 180 ìèíóòè.
B - âúç îñíîâà íà æåëàíîòî íèâî íà èçñóøàâàíå:
Çà Ãëàäåíå: Ïðåïîðú÷âà ñå çà äðåõè, êîèòî ïî-
êúñíî ùå ñå ãëàäÿò. Ïî-ãîëÿìàòà ñòåïåí íà
âëàæíîñò îìåêîòÿâà ãúíêèòå è óëåñíÿâà òÿõíîòî
îòñòðàíÿâàíå.
Çà îêà÷âàíå: èäåàëíî ñóøåíå çà äðåõè, êîèòî
íå èçèñêâàò ïúëíî èçñóøàâàíå.
Çà Ãàðäåðîáà: ïîäõîäÿùî ñóøåíå çà äðåõè,
êîèòî ùå ñå ïðèáåðàò íàïðàâî â ãàðäåðîáà, áåç
äà ñå ãëàäÿò.
Ñóõè: ñóøåíå, êîåòî å ïîäõîäÿùî çà ïðàíå,
èçèñêâàùî ïúëíî èçñóøàâàíå, êàòî íàïðèìåð
õàâëèåíè êúðïè è õàëàòè.
Àêî ïî èçêëþ÷åíèå ïðàíåòî, êîåòî òðÿáâà äà áúäå
èçïðàíî è èçñóøåíî, íàäõâúðëÿ ïðåäâèäåíîòî
ìàêñèìàëíî êîëè÷åñòâî (âæ. Òàáëèöà íà
ïðîãðàìèòå), èçâúðøåòå èçïèðàíåòî è ñëåä êàòî
ïðîãðàìàòà å çàâúðøèëà, ðàçäåëåòå ïðàíåòî è
âúðíåòå åäíà ÷àñò â áàðàáàíà. Íà òîçè åòàï
ñëåäâàéòå óêàçàíèÿòà çà èçâúðøâàíå íà Ñàìî
ñóøåíå. Ïîâòîðåòå ñúùèòå îïåðàöèè çà
îñòàíàëàòà ÷àñò îò ïðàíåòî.
Ñëåä êðàÿ íà ñóøåíåòî âèíàãè ñëåäâà ïåðèîä íà
îõëàæäàíå.
Ñàìî ñóøåíå
Îò ïðîãðàìàòîðà èçáåðåòå äàäåíî ñóøåíå (
- - )
âúç îñíîâà íà òèïà òúêàí. Âúçìîæíî å ñúùî òàêà
íèâîòî èëè âðåìåòî íà æåëàíîòî ñóøåíå äà ñå
çàäàäå îò áóòîíà ÑÓØÅÍÅ
.
Çàäàâàíå íà çàáàâåíî çàäåéñòâàíå.
Çà äà çàäàäåòå îòëîæåí ñòàðò íà èçáðàíàòà
ïðîãðàìà, íàòèñíåòå ñúîòâåòíèÿ áóòîí äî äîñòèãàíå
íà æåëàíîòî âðåìå íà îòëàãàíå. Ïî âðåìå íà
çàäàâàíåòî ñå ïîêàçâà èçáðàíîòî âðåìå, çàåäíî ñ
íàäïèñà Íà÷àëî: è ñèìâîëúò
, ñâåòåù ñ
ìèãàùà ñâåòëèíà. Ñëåä êàòî å çàäàäåí îòëîæåíèÿò
ñòàðò, íà äèñïëåÿ ùå ñâåòíå ñ ïîñòîÿííà ñâåòëèíà
ñèìâîëúò
è ñëåä òîâà îòíîâî ùå ñå èçïèøå
ïðîäúëæèòåëíîñòòà íà çàäàäåíèÿ öèêúë ñ
íàäïèñèòå Êðàé: è âðåìåòðàåíåòî íà çàäàäåíèÿ
öèêúë. Ïðè åäíîêðàòíî íàòèñêàíå íà áóòîíà
ÇÀÁÀÂÅÍÎ ÄÅÉÑÒÂÈÅ ñå èçîáðàçÿâà
ïðåäâàðèòåëíî çàäàäåíîòî âðåìå íà çàêúñíåíèå.
Ñëåä ïóñêàíå íà äèñïëåÿ ùå ñå ïîêàæå íàäïèñúò
Íà÷àëî: è âðåìåòî íà îòëàãàíå. Ñëåä èçòè÷àíå íà
çàäàäåíîòî âðåìå íà îòëàãàíå ìàøèíàòà ñòàðòèðà è
íà äèñïëåÿ ñå ïîêàçâà Êðàé: è âðåìåòî, îñòàâàùî
äî êðàÿ íà öèêúëà. Çà îòêàç îò çàáàâåíî
çàäåéñòâàíå íàòèñíåòå áóòîíà, äîêàòî íà äèñïëåÿ
ñå ïîÿâè íàäïèñ OFF; ñèìâîëúò
ùå èç÷åçíå.
Ïðîìÿíà íà õàðàêòåðèñòèêèòå íà
öèêúëà.
Íàòèñíåòå áóòîíà çà àêòèâèðàíå íà îïöèÿòà; íà
äèñïëåÿ ùå ñå ïîÿâè íàèìåíîâàíèåòî íà îïöèÿòà
è ñúîòâåòñòâàùàòà íà áóòîíà äúãè÷êà ùå ñâåòíå.
Íàòèñíåòå áóòîíà çà àêòèâèðàíå íà îïöèÿòà; íà
äèñïëåÿ ùå ñå ïîÿâè íàèìåíîâàíèåòî íà
îïöèÿòà è ñúîòâåòñòâàùàòà íà áóòîíà äúãè÷êà
ùå ñâåòíå.
Êàê ñå èçâúðøâà åäèí öèêúë íà
ïðàíå èëè íà ñóøåíå

19
BG
Àêî èçáðàíàòà îïöèÿ íå å ñúâìåñòèìà ñúñ
çàäàäåíàòà ïðîãðàìà, òàçè íåñúâìåñòèìîñò ùå
ñå ñèãíàëèçèðà îò çâóêîâ ñèãíàë (òðèêðàòíî) è
îïöèÿòà íÿìà äà ñå àêòèâèðà.
Àêî èçáðàíàòà îïöèÿ íå å ñúâìåñòèìà ñ äðóãà,
ïðåäâàðèòåëíî çàäàäåíà îïöèÿ, ñâåòëèííèÿò
èíäèêàòîð, ñúîòâåòñòâàù íà ïúðâàòà èçáðàíà
îïöèÿ ùå ìèãà è ùå ñå àêòèâèðà ñàìî âòîðàòà,
ñâåòëèííèÿò èíäèêàòîð íà áóòîíà ùå ñâåòè
íåïðåêúñíàòî.
Îïöèèòå ìîãàò äà ïðîìåíÿò ïðåïîðú÷àíèÿ òîâàð
è/èëè ïðîäúëæèòåëíîñòòà íà öèêúëà.
7. ÑÒÀÐÒÈÐÀÍÅ ÍÀ ÏÐÎÃÐÀÌÀÒÀ. Íàòèñíåòå
êëàâèø START/PAUSE. Ñúîòâåòíèÿò ñâåòëèíåí
èíäèêàòîð ùå ñâåòè íåïðåêúñíàòî è âðàòàòà íà
ëþêà ùå ñå áëîêèðà (èíäèêàòîð ÁËÎÊÈÐÀÍÅ ÍÀ
ÂÐÀÒÀÒÀ
ñâåòè). Èêîíèòå, ñúîòâåòñòâàùè íà
îòäåëíèòå ôàçè íà ïðàíå, ùå ñâåòÿò ïî âðåìå íà
öèêúëà, ñèãíàëèçèðàéêè çà òåêóùàòà ôàçà. Çà
ïðîìÿíà íà ïðîãðàìàòà, äîêàòî âúðâè äàäåí
öèêúë ïðàíå, ïåðàëíÿòà ñå ïîñòàâÿ â ïàóçà ÷ðåç
íàòèñêàíå íà áóòîí START/PAUSE; ñëåä òîâà ñå
èçáèðà æåëàíèÿò öèêúë è ñå íàòèñêà îòíîâî
áóòîíúò START/PAUSE. Çà äà ñå îòâîðè âðàòàòà
ïî âðåìå íà îñúùåñòâÿâàù ñå öèêúë ïðàíå, ñå
íàòèñêà áóòîíà START/PAUSE; àêî ñëåäÿùèÿò
ñâåòëèíåí èíäèêàòîð ÁËÎÊÈÐÀÍÅ ÍÀ ÂÐÀÒÀÒÀ
å èçãàñíàë, âðàòàòà ùå ìîæå äà ñå îòâîðè.
Íàòèñêà ñå îòíîâî áóòîí START/PAUSE, çà äà
ïðîäúëæè ïðîãðàìàòà îò ìÿñòîòî, â êîåòî å áèëà
ïðåêúñíàòà.
8. ÊÐÀÉ ÍÀ ÏÐÎÃÐÀÌÀÒÀ. Ñèãíàëèçèðà ñå îò
ñâåòíàëèÿ íàäïèñ END. Âðàòàòà íà ëþêà ùå ìîæå
äà ñå îòâîðè íåçàáàâíî. Àêî ñâåòëèííèÿò
èíäèêàòîð START/PAUSE ìèãà, íàòèñíåòå áóòîíà,
çà äà çàâúðøè öèêúëúò. Îòâîðåòå âðàòè÷êàòà,
èçâàäåòå ïðàíåòî è èçêëþ÷åòå ïåðàëíÿòà.
Àêî æåëàåòå äà àíóëèðàòå âå÷å ñòàðòèðàíèÿ öèêúë,
íàòèñíåòå ïðîäúëæèòåëíî áóòîíà
. Öèêúëúò ñïèðà
è ïåðàëíàòà ìàøèíà ñå èçêëþ÷âà.

BG
20
Îïöèè íà ïðàíåòî
Ñóïåð èçïèðàíå
Áëàãîäàðåíèå íà èçïîëçâàíåòî íà ïî-ãîëÿìî êîëè÷åñòâî
âîäà â íà÷àëíàòà ôàçà íà öèêúëà è íà ïî-äúëãîòî âðåìå íà
ïðàíå, òàçè îïöèÿ ãàðàíòèðà âèñîêîêà÷åñòâåíî èçïèðàíå.
Ìîæå äà ñå èçïîëçâà ñ èëè áåç áåëèíà. Àêî æåëàåòå
èçáåëâàíå, ïîñòàâåòå
äîïúëíèòåëíàòà âàíè÷êà 3,
êîìïëåêò ñ äîñòàâêàòà âúâ
âàíè÷êà 1. Ïðè äîçèðàíå íà
áåëèíà íå íàäâèøàâàéòå
ìàêñèìàëíîòî íèâî max,
óêàçàíî íà öåíòðàëíàòà îñ
(âèæ ôèãóðàòà). Àêî
æåëàåòå äà èçâúðøèòå ñàìî
èçáåëâàíå áåç ïúëåí öèêúë
ïðàíå, èçñèïåòå èçáåëâàùèÿ
ïðåïàðàò â äîïúëíèòåëíàòà âàíè÷êà 3, çàäàéòå ïðîãðàìà
Èçïëàêâàíå
è âêëþ÷åòå îïöèÿòà Ñóïåð èçïèðàíå .
Íå ìîæå äà ñå àêòèâèðà ñ ïðîãðàìèòå
, , , , , ,
, , , , .
Ëåñíî Ãëàäåíå
Ïðè èçáîð íà òàçè îïöèÿ ïðàíåòî è öåíòðîôóãèðàíåòî
ùå ñå èçìåíÿò öåëåñúîáðàçíî òàêà, ÷å äà ñå íàìàëè
îáðàçóâàíåòî íà ãúíêè. Ïðè çàâúðøâàíå íà öèêúëà
ïåðàëíÿòà ïðàâè áàâíè çàâúðòàíèÿ íà áàðàáàíà, ùå
ìèãàò ñâåòëèííèòå èíäèêàòîðè Ëåñíî Ãëàäåíå è
ÑÒÀÐÒ/ ÏÀÓÇÀ. Çà çàâúðøâàíå íà öèêúëà íàòèñíåòå
áóòîí START/PAUSE èëè áóòîí Ëåñíî Ãëàäåíå. Â
ïðîãðàìàòà Êîïðèíà
ïåðàëíÿòà ùå çàâúðøè öèêúëà
ñ íàêèñíàòèòå äðåõè è ùå çàïî÷íå äà ìèãà ñâåòëèííèÿò
èíäèêàòîð Ëåñíî Ãëàäåíå. Çà äà ñå èçòî÷è âîäàòà è äà
ìîæå äà ñå èçâàäè ïðàíåòî, å íåîáõîäèìî äà ñå
íàòèñíå áóòîí START/PAUSE èëè áóòîí Ëåñíî Ãëàäåíå.
Íå ñå àêòèâèðà çà ïðîãðàìèòå
, , , , , , ,
, .
Áåëåæêà: Àêî æåëàåòå äà èçïîëçâàòå öèêúëà íà ñóøåíå,
íåîáõîäèìî å òîé äà å â êîìáèíàöèÿ ñ íèâî Ãëàäåíå.
Ïåñòåíå íà Âðåìå
Ïðè èçáîð íà òàçè îïöèÿ âðåìåòðàåíåòî íà
ïðîãðàìàòà ñå íàìàëÿâà ñ 30%-50% âúç îñíîâà íà
èçáðàíèÿ öèêúë, êàòî ñúùåâðåìåííî ñå ãàðàíòèðà
ïåñòåíå íà âîäà è åíåðãèÿ. Èçïîëçâàéòå òàçè îïöèÿ çà
íå ìíîãî çàìúðñåíè äðåõè.
Íå ìîæå äà ñå àêòèâèðà ñ ïðîãðàìèòå
, , , , ,
, , , , , .
Äîïúëíèòåëíî èçïëàêâàíå
Ñ èçáîðà íà òàçè îïöèÿ ñå óâåëè÷àâà åôèêàñíîñòòà íà
èçïëàêâàíåòî è ñå ãàðàíòèðà ìàêñèìàëíî îòñòðàíÿâàíå
íà îñòàòúöèòå îò ïåðèëíèÿ ïðåïàðàò. Ïîäõîäÿùà å çà
îñîáåíî ÷óâñòâèòåëíà êúì ïåðèëíè ïðåïàðàòè êîæà.
Ïðåïîðú÷âà ñå òàçè îïöèÿ äà ñå èçïîëçâà ïðè ïúëåí
òîâàð íà çàðåæäàíå íà ïåðàëíàòà ìàøèíà èëè ïðè
ïðàíå ñ ãîëåìè äîçè ïåðèëåí ïðåïàðàò.
Íå ìîæå äà ñå àêòèâèðà ñ ïðîãðàìèòå
, , , , ,
, .
3
1
2
Ïðîãðàìè è îïöèè
Òàáëèöà íà ïðîãðàìèòå
Çà âñè÷êè Test Institutes:
1) Ïðîãðàìà çà ïðîâåðêà ñúãëàñíî ñòàíäàðò EN 50229: çàäàéòå ïðîãðàìà
ñ òåìïåðàòóðà 60 °C.
2) Äúëãà ïðîãðàìà çà ïàìóê; çàäàéòå ïðîãðàìà
ñ òåìïåðàòóðà 40 °C.
3) Êðàòêà ïðîãðàìà çà ïàìóê; çàäàéòå ïðîãðàìà
ñ òåìïåðàòóðà 40 °C.
Èêîíà Îïèñàíèå íà ïðîãðàìàòà
Ìàêñ .
òåìï.
(°C)
Ìàêñ .
ñêîðîñò
(îáîð îòè
â ìèíóòà)
ÑÓØÅÍÅ
Ïåðèëíè ïðåïàðàòè è
äîáàâêè
Çàðå-
æäàíå
ìaêñ.
Ïðîäúë-
æèòåëí-
îñò íà
öèêúëà
Ïåð èëåí
ïð åïàð àò
Îìåê-
îòèòåë
Áåëèíà
Ïðîãð àìè Ïàìóê
Ïàìóê áåëè ñ ïðåäïðàíå
(Äîáàâåòå ïåðèëåí ïðåïàðàò â ïðåäíàçíà÷åíîòî
çà òîâà îòäåëåíèå).
90° 1200
lll
- 8
Ïàìóê (1): áåëè è öâåòíè, óñòîé÷èâè, ñèëíî çàìúðñåíè.
60°
(Max. 90°)
1200
llll
8
Ïàìóê (2): Áåëè è öâåòíè, äåëèêàòíè, ñèëíî çàìúðñåíè.
40° 1200
llll
8
Ïàìóê - öâåòíè (3)
40° 1200
llll
8
Äúíêè
40° 800
lll
- 4
Ñïåöèàëíè ïðîãðàìè
Áåáå: äåëèêàòíè, öâåòíè, ìíîãî çàìúðñåíè.
40° 800
llll
4
Ñìåñåíî 30'íà 30°: çà áúðçî îñâåæàâàíå íà íå ìíîãî
çàìúðñåíè äðåõè (íå ñå ïðåïîðú÷âà çà âúëíà, êîïðèíà è
äðåõè, êîèòî òðÿáâà äà ñå ïåðàò íà ðúêà).
30° 800
lll
- 3,5
Ñèíòåòèêà Óñòîé÷èâè
60° 800
llll
4
Kîïðèíà: Çà äðåõè îò êîïðèíà, âèñêîçà, ôèíî áåëüî.
30° 0 -
ll
- 2
Âúëía: çà â úëíà, êàøìèð è ò.í.
40° 800
lll
- 2
ÑÓØÅÍÅ
ïðîãðàìè
ÏÐÀÍÅ&ÑÓØÅÍÅ ýà 1 ÷
30° 1200
lll
- 1
ÑÓØÅÍÅ
Ïàìóê
- -
l
- - - 6
ÑÓØÅÍÅ
Ñèíòåòèêà
- -
l
- - - 4
ÑÓØÅÍÅ
Âúëía
- -
l
- - - 1,5
×àñòè÷íè ïðîãðàìè
Èçïëàêâàíå
- 1200
l
-
ll
8
Öåíòðîôóãà
- 1200
l
- - - 8
Èçïîìïâàíå
- 0 - - - - 8
(*) Çàáåëåæêà: ñëåä îêîëî 10 ìèíóòè îò çàïî÷âàíåòî íà ðàáîòà, ïåðàëíàòà ìàøèíà ùå ïðåèç÷èñëè è ïîêàæå îñòàâàùîòî âðåìå äî êðàÿ íà èçïúëíåíèå íà ïðîãðàìàòà.
(*) Ïðîäúëæèòåëíîñòòà íà ïðîãðàìàòà çà ïðàíå ñå
èçïèñâà âúðõó äèñïëåÿ.
La pagina sta caricando ...
La pagina sta caricando ...
La pagina sta caricando ...
La pagina sta caricando ...
La pagina sta caricando ...
La pagina sta caricando ...
La pagina sta caricando ...
La pagina sta caricando ...
-
 1
1
-
 2
2
-
 3
3
-
 4
4
-
 5
5
-
 6
6
-
 7
7
-
 8
8
-
 9
9
-
 10
10
-
 11
11
-
 12
12
-
 13
13
-
 14
14
-
 15
15
-
 16
16
-
 17
17
-
 18
18
-
 19
19
-
 20
20
-
 21
21
-
 22
22
-
 23
23
-
 24
24
-
 25
25
-
 26
26
-
 27
27
-
 28
28


Hotpoint AQM8D 29 U (EU) /B Guida utente
- Categoria
- Lavatrici
- Tipo
- Guida utente
in altre lingue
Documenti correlati
Altri documenti
-
Hotpoint-Ariston AQD1070D 69 EU Manuale del proprietario
-
HOTPOINT/ARISTON AQD1070D 69 EU/A Guida utente
-
Whirlpool AQXF 109 (EU)/HA Guida utente
-
-
-
-
-
-
-