Electrolux EW1075F Manuale utente
- Categoria
- Lavatrici
- Tipo
- Manuale utente

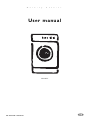
Washing machine
User manual
EW 1075 F
822 943 833-00 - 10.09.03-01
g

2
Dear Customer,
Please read this user manual carefully. Above all,
please observe the “Safety” section on the first few
pages. Please retain this user manual for future refer-
ence. Please pass it on to any future owner of the
appliance.
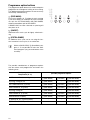
1
Next to the warning triangle and/or exclama-
tory words (Warning, Attention, Impor-
tant) you will find information that is
important for your safety or the efficiency of
the appliance. Please be sure to take note of
such information.
1. The numbers will lead you step-by-step through
the operation of the appliance.
2. ...
3
Next to this symbol you will find additional
information on the operation and practical
use of the appliance.
2
This symbol highlights tips and information
on how to use your appliance economically
and ecologically.
In the event that a malfunction occurs, this user
manual contains instructions on how to remedy the
problem yourself. See section: “What to do if...”.

3
Contents
Operating Instructions . . . . . . . . . . . . . . . . . . . . . . . . . . . . . . . . . . . . . . . . . . . . . . . . . . . . . . . . . . . . . 5
Safety . . . . . . . . . . . . . . . . . . . . . . . . . . . . . . . . . . . . . . . . . . . . . . . . . . . . . . . . . . . . . . . . . . . . . . . . . . . . . . 5
Disposal . . . . . . . . . . . . . . . . . . . . . . . . . . . . . . . . . . . . . . . . . . . . . . . . . . . . . . . . . . . . . . . . . . . . . . . . . . . . 6
Ecological tips . . . . . . . . . . . . . . . . . . . . . . . . . . . . . . . . . . . . . . . . . . . . . . . . . . . . . . . . . . . . . . . . . . . . . . . 6
Description of the appliance . . . . . . . . . . . . . . . . . . . . . . . . . . . . . . . . . . . . . . . . . . . . . . . . . . . . . . . . . . . . 7
Front view . . . . . . . . . . . . . . . . . . . . . . . . . . . . . . . . . . . . . . . . . . . . . . . . . . . . . . . . . . . . . . . . . . . . . . . . . . . 7
Drawer for detergent and conditioner . . . . . . . . . . . . . . . . . . . . . . . . . . . . . . . . . . . . . . . . . . . . . . . . . . . . . . 7
Control panel . . . . . . . . . . . . . . . . . . . . . . . . . . . . . . . . . . . . . . . . . . . . . . . . . . . . . . . . . . . . . . . . . . . . . . . . . 8
Control knob . . . . . . . . . . . . . . . . . . . . . . . . . . . . . . . . . . . . . . . . . . . . . . . . . . . . . . . . . . . . . . . . . . . . . . . . 8
Programme option buttons . . . . . . . . . . . . . . . . . . . . . . . . . . . . . . . . . . . . . . . . . . . . . . . . . . . . . . . . . . . . . 10
Consumption values and time requirements . . . . . . . . . . . . . . . . . . . . . . . . . . . . . . . . . . . . . . . . . . . . . . 11
Before the first wash . . . . . . . . . . . . . . . . . . . . . . . . . . . . . . . . . . . . . . . . . . . . . . . . . . . . . . . . . . . . . . . . . . 11
Preparing for a wash cycle . . . . . . . . . . . . . . . . . . . . . . . . . . . . . . . . . . . . . . . . . . . . . . . . . . . . . . . . . . . . . 12
Sorting and preparing the washing . . . . . . . . . . . . . . . . . . . . . . . . . . . . . . . . . . . . . . . . . . . . . . . . . . . . . . . . 12
Types of washing and care symbols . . . . . . . . . . . . . . . . . . . . . . . . . . . . . . . . . . . . . . . . . . . . . . . . . . . . . . . 12
Detergents and conditioners . . . . . . . . . . . . . . . . . . . . . . . . . . . . . . . . . . . . . . . . . . . . . . . . . . . . . . . . . . . . . 13
Which detergent and conditioner? . . . . . . . . . . . . . . . . . . . . . . . . . . . . . . . . . . . . . . . . . . . . . . . . . . . . . . . 13
How much detergent and conditioner? . . . . . . . . . . . . . . . . . . . . . . . . . . . . . . . . . . . . . . . . . . . . . . . . . . . 13
Water softener . . . . . . . . . . . . . . . . . . . . . . . . . . . . . . . . . . . . . . . . . . . . . . . . . . . . . . . . . . . . . . . . . . . . . . . . 13
Performing a wash cycle . . . . . . . . . . . . . . . . . . . . . . . . . . . . . . . . . . . . . . . . . . . . . . . . . . . . . . . . . . . . . . . 14
Brief guide . . . . . . . . . . . . . . . . . . . . . . . . . . . . . . . . . . . . . . . . . . . . . . . . . . . . . . . . . . . . . . . . . . . . . . . . . . . 14
Switching on the appliance . . . . . . . . . . . . . . . . . . . . . . . . . . . . . . . . . . . . . . . . . . . . . . . . . . . . . . . . . . . . . . 15
Setting a wash programme . . . . . . . . . . . . . . . . . . . . . . . . . . . . . . . . . . . . . . . . . . . . . . . . . . . . . . . . . . . . . . 15
Changing the spin speed/selecting rinse hold . . . . . . . . . . . . . . . . . . . . . . . . . . . . . . . . . . . . . . . . . . . . . . . . 16
Opening and closing the loading door . . . . . . . . . . . . . . . . . . . . . . . . . . . . . . . . . . . . . . . . . . . . . . . . . . . . . . 17
Loading the washing . . . . . . . . . . . . . . . . . . . . . . . . . . . . . . . . . . . . . . . . . . . . . . . . . . . . . . . . . . . . . . . . . . . 17
Adding detergent/additives . . . . . . . . . . . . . . . . . . . . . . . . . . . . . . . . . . . . . . . . . . . . . . . . . . . . . . . . . . . . . . 18
Starting a wash programme . . . . . . . . . . . . . . . . . . . . . . . . . . . . . . . . . . . . . . . . . . . . . . . . . . . . . . . . . . . . . . 19
Wash programme progress . . . . . . . . . . . . . . . . . . . . . . . . . . . . . . . . . . . . . . . . . . . . . . . . . . . . . . . . . . . . . . 19
Changing a wash programme . . . . . . . . . . . . . . . . . . . . . . . . . . . . . . . . . . . . . . . . . . . . . . . . . . . . . . . . . . . . 20
Wash cycle complete/removing the washing . . . . . . . . . . . . . . . . . . . . . . . . . . . . . . . . . . . . . . . . . . . . . . . . 20
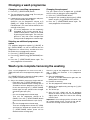
Programme tables . . . . . . . . . . . . . . . . . . . . . . . . . . . . . . . . . . . . . . . . . . . . . . . . . . . . . . . . . . . . . . . . . . . . 21
Washing . . . . . . . . . . . . . . . . . . . . . . . . . . . . . . . . . . . . . . . . . . . . . . . . . . . . . . . . . . . . . . . . . . . . . . . . . . . . . 21
Separate soaking . . . . . . . . . . . . . . . . . . . . . . . . . . . . . . . . . . . . . . . . . . . . . . . . . . . . . . . . . . . . . . . . . . . . . . 22
Separate rinse cycle . . . . . . . . . . . . . . . . . . . . . . . . . . . . . . . . . . . . . . . . . . . . . . . . . . . . . . . . . . . . . . . . . . . 22
Separate conditioning/starching/impregnating . . . . . . . . . . . . . . . . . . . . . . . . . . . . . . . . . . . . . . . . . . . . . . 22
Separate spinning . . . . . . . . . . . . . . . . . . . . . . . . . . . . . . . . . . . . . . . . . . . . . . . . . . . . . . . . . . . . . . . . . . . . . 22
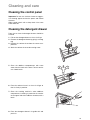
Cleaning and care . . . . . . . . . . . . . . . . . . . . . . . . . . . . . . . . . . . . . . . . . . . . . . . . . . . . . . . . . . . . . . . . . . . . 23
Cleaning the control panel . . . . . . . . . . . . . . . . . . . . . . . . . . . . . . . . . . . . . . . . . . . . . . . . . . . . . . . . . . . . . . . 23
Cleaning the detergent drawer . . . . . . . . . . . . . . . . . . . . . . . . . . . . . . . . . . . . . . . . . . . . . . . . . . . . . . . . . . . 23
Cleaning the wash drum . . . . . . . . . . . . . . . . . . . . . . . . . . . . . . . . . . . . . . . . . . . . . . . . . . . . . . . . . . . . . . . . 24
Cleaning the loading door/rubber collar . . . . . . . . . . . . . . . . . . . . . . . . . . . . . . . . . . . . . . . . . . . . . . . . . . . . 24
What to do if... . . . . . . . . . . . . . . . . . . . . . . . . . . . . . . . . . . . . . . . . . . . . . . . . . . . . . . . . . . . . . . . . . . . . . . . 25
Remedying a malfunction . . . . . . . . . . . . . . . . . . . . . . . . . . . . . . . . . . . . . . . . . . . . . . . . . . . . . . . . . . . . . . . 25
If the wash result is not satisfactory . . . . . . . . . . . . . . . . . . . . . . . . . . . . . . . . . . . . . . . . . . . . . . . . . . . . . . . 27
Performing an emergency emptying procedure . . . . . . . . . . . . . . . . . . . . . . . . . . . . . . . . . . . . . . . . . . . . . . 28
Cleaning the drain pump . . . . . . . . . . . . . . . . . . . . . . . . . . . . . . . . . . . . . . . . . . . . . . . . . . . . . . . . . . . . . . . . 29
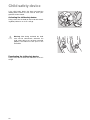
Child safety device . . . . . . . . . . . . . . . . . . . . . . . . . . . . . . . . . . . . . . . . . . . . . . . . . . . . . . . . . . . . . . . . . . . . 30

4
Installation and connection instructions. . . . . . . . . . . . . . . . . . . . . . . . . . . . . . . . . . . . . . . . . . . . 31
Technical data /dimensions . . . . . . . . . . . . . . . . . . . . . . . . . . . . . . . . . . . . . . . . . . . . . . . . . . . . . . . . . . . . 31
Safety information concerning installation . . . . . . . . . . . . . . . . . . . . . . . . . . . . . . . . . . . . . . . . . . . . . . . . 31
Installing the washing machine . . . . . . . . . . . . . . . . . . . . . . . . . . . . . . . . . . . . . . . . . . . . . . . . . . . . . . . . . 32
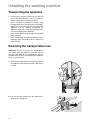
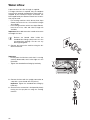
Transporting the appliance . . . . . . . . . . . . . . . . . . . . . . . . . . . . . . . . . . . . . . . . . . . . . . . . . . . . . . . . . . . . . . 32
Removing the transportation lock . . . . . . . . . . . . . . . . . . . . . . . . . . . . . . . . . . . . . . . . . . . . . . . . . . . . . . . . . 32
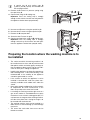
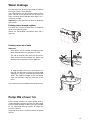
Preparing the location where the washing machine is to be installed . . . . . . . . . . . . . . . . . . . . . . . . . . . . . . 33
Installing the appliance on a concrete base . . . . . . . . . . . . . . . . . . . . . . . . . . . . . . . . . . . . . . . . . . . . . . . . 34
Installing the appliance on floors which oscillate . . . . . . . . . . . . . . . . . . . . . . . . . . . . . . . . . . . . . . . . . . . . 34
Compensating for floor unevenness . . . . . . . . . . . . . . . . . . . . . . . . . . . . . . . . . . . . . . . . . . . . . . . . . . . . . . . 34
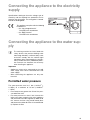
Connecting the appliance to the electricity supply . . . . . . . . . . . . . . . . . . . . . . . . . . . . . . . . . . . . . . . . . 35
Connecting the appliance to the water supply . . . . . . . . . . . . . . . . . . . . . . . . . . . . . . . . . . . . . . . . . . . . . 35
Permitted water pressure . . . . . . . . . . . . . . . . . . . . . . . . . . . . . . . . . . . . . . . . . . . . . . . . . . . . . . . . . . . . . . . . 35
Water inflow . . . . . . . . . . . . . . . . . . . . . . . . . . . . . . . . . . . . . . . . . . . . . . . . . . . . . . . . . . . . . . . . . . . . . . . . . . 36
Water drainage . . . . . . . . . . . . . . . . . . . . . . . . . . . . . . . . . . . . . . . . . . . . . . . . . . . . . . . . . . . . . . . . . . . . . . . . 37
Pump lifts of over 1m . . . . . . . . . . . . . . . . . . . . . . . . . . . . . . . . . . . . . . . . . . . . . . . . . . . . . . . . . . . . . . . . . . . 37
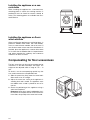
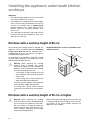
Installing the appliance underneath kitchen worktops . . . . . . . . . . . . . . . . . . . . . . . . . . . . . . . . . . . . . . 38
Kitchens with a worktop height of 85 cm . . . . . . . . . . . . . . . . . . . . . . . . . . . . . . . . . . . . . . . . . . . . . . . . . . . 38
Kitchens with a worktop height of 90 cm or higher . . . . . . . . . . . . . . . . . . . . . . . . . . . . . . . . . . . . . . . . . . . . 38
Index. . . . . . . . . . . . . . . . . . . . . . . . . . . . . . . . . . . . . . . . . . . . . . . . . . . . . . . . . . . . . . . . . . . . . . . . . . . . . . . 42
Service. . . . . . . . . . . . . . . . . . . . . . . . . . . . . . . . . . . . . . . . . . . . . . . . . . . . . . . . . . . . . . . . . . . . . . . . . . . . . 43

5
Operating Instructions
1 Safety
The safety aspects of our electrical appliances com-
ply with accepted technical standards and the Ger-
man Appliance Safety Law. Nevertheless, as a
manufacturer we consider it our obligation to make
you aware of the following safety instructions.
Prior to using the appliance for the
first time
• Follow the “Installation and connection instruc-
tions” further on in this user manual.
• In the event that the appliance is delivered in the
winter months with below-zero temperatures:
Store the washing machine at room temperature
for 24 hours prior to using it for the first time.
Correct use
• The washing machine is intended for household
use in washing normal household items. If the
appliance is used for other purposes, or is used
incorrectly, the manufacturer cannot accept any
liability for any damage caused.
• Additions or modifications to the dishwasher are
not permitted for safety reasons.
• Use only detergents that are suitable for washing
machines. Follow the instructions provided by the
manufacturer.
• The washing must not contain any flammable sol-
vent. Ensure this is the case even when washing
pre-cleaned items.
• The washing machine must not be used for
chemical cleaning.
• Dying and stripping agents may only be used in
the washing machine if the manufacturer of these
products expressly allows it. We cannot accept
liability for possible damages.
• Use only water from the water supply. Use rain-
water or processing water only if it fulfils the
requirements of DIN1986 and DIN1988.
• Frost damage is not covered under the warranty.
If the washing machine is placed in a room which
is at risk of frosting up, in the event that there is a
risk of frost an emergency emptying procedure
must be performed (see section “Carrying out an
emergency emptying procedure”).
Child safety
• Packaging materials (e.g. film, styrofoam) can be
dangerous to children. A risk of suffocation exists.
Keep packaging away from children.
• Children often do not recognise the hazards
associated with the use of electrical appliances. It
is therefore important you ensure that children are
adequately supervised while the washing
machine is operating and that you do not allow
children to play with the washing machine, as
there is a risk that children can shut themselves
inside the appliance.
• Ensure that children and small animals do not
climb into the washing machine drum.
• When disposing of the washing machine: Discon-
nect the power plug from the mains, break the
door lock, cut off the mains cable and dispose of
the plug and remainder of the cable. This will pre-
vent children playing with the appliance from
shutting themselves inside and putting their lives
at risk.
General safety
• Repairs to the washing machine may only be car-
ried out by technicians. Considerable dangers
can arise as the result of improper repairs being
carried out. Should the appliance be in need of
repair, contact our Customer Service or your spe-
cialist dealer.
• Never use the appliance when the electricity cord
is damaged or the control panel, worktop or base
area are damaged to such an extent that the
inside of the appliance is openly accessible.
• Switch off the washing machine prior to cleaning
it and carrying out maintenance. In addition,
remove the power plug from the power point or –
if the appliance has been hard-wired – switch off
the LS switch in the fuse box or completely
unscrew the screw-retaining device.
• If you do not intend to use the appliance for a
period of time, disconnect the appliance from the
mains supply and turn off the tap.
• Never remove the power plug from the power
point by pulling on the cord; pull the power plug
itself.
• Manifold-plugs, connectors and extension cords
must not be used. Resulting overheating may
constitute a fire hazard.
• Do not spray the washing machine with a stream
of water. A risk of electrocution exists.

6
• When using wash programmes with high temper-
atures the glass in the loading door will become
hot. Do not touch it!
• Prior to carrying out an emergency emptying pro-
cedure or cleaning the drain pump, allow the
wash water to cool down.
• Small animals can nibble on electrical cables and
waterhoses. This can constitute a risk of electro-
cution and water damage. Keep small animals
away from the washing machine.
2 Disposal
Dispose of the packaging material.
Dispose of your washing machine’s packaging prop-
erly. All the packaging materials used are harmless to
the environment and can be recycled.
• Plastic parts are marked with standard interna-
tional abbreviations:
• Cardboard packaging is manufactured from recy-
cled paper and should be deposited in the waste
paper collection for recycling.
Dispose of the old appliance.
When you finally cease to use your washing
machine, please take it to the nearest recycling cen-
tre or to your dealer.
2 Ecological tips
• For items that are soiled to an average degree, it
is possible to get by without a pre-wash cycle.
This will save you detergent, water, and time (and
protect the environment as well!).
• The washing machine can be particularly eco-
nomical if you make full use of the loads allowed.
• With small loads, use half to two thirds the rec-
ommended quantity of detergent.
• Stains and certain amount of soiling can be
removed prior to washing with suitable treatment.
Then you can use a lower temperature when
washing.
• Wash lightly to normally soiled whites using the
energy saver programme.
• It is often possible to do without conditioner. Give
it a try! Using a dryer can make your washing just
as soft and fluffy without the use of conditioner.
• With medium to very hard water (for hardness
range II or higher, see “Detergents and condition-
ers”), you should add a water softener. The
amount of detergent used can then always be
that as for hardness range I ( soft).
>PE< for polyethylene, e.g. sheet wrapping
material
>PS< PS for polystyrene, e.g. padding material
(always CFC-free)
>POM< POM for polyoxymethylene, e.g. plastic
clips

7
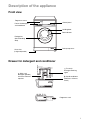
Description of the appliance
Front view
Drawer for detergent and conditioner
Control panel
Rating plate
(behind loading
door)
Drawer for detergent
and conditioner
Programme menu
Screw feet
(height adjustable)
Loading door
Drain pump cover
Door indicator
æ Liquid conditioner
(Softeners, stiffeners,
starch)
k Pre-wash
detergent/Soaking
agent
l Main wash
detergent (powder)
and water softener if
required
Programme card

8
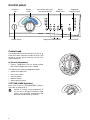
Control panel
Control knob
The control knob selects the type of wash cycle (e. g.
water level, drum movement, number of rinses, spin
speed) to suit the type of washing, and the wash
water temperature.
Ï (Cancel programme)
• Cancels a programme that has already started.
Now another programme can be selected.
The appliance has 5 different programme fields.
• Cottons/linen (light blue)
• Easy-cares (yellow)
• Delicates (black)
• Woollens (black)
• Special functions (blue)
COTTONS/LINEN (light blue)
Main wash cycle for COTTONS/LINEN (cottons/
linen) from G (cold) to 95 °C.
2
Position E: Energy saving programme at
40 °C or 60 °C for lightly to normally soiled
cottons, with increased washing time. Not
able to be combined with B (SHORT).
Programme
Progress Display
Control
knob
Spin button with revolu-
tion speed indicator
START/PAUSE
Programme option buttons
ON/OFF button
Operating
light
Button
RINSE HOLD

9
EASY-CARES (yellow)
Main wash cycle for easy-care textiles (mixed
weaves) from G (cold) to 60 °C.
2
Position E: Energy saving programme at
40 °C for lightly to normally soiled easy-care
textiles, with increased washing time. Not
able to be combined with B (SHORT).
DELICATES (black)
Main wash programme for delicates at 30 °C or
40 °C.
Í WOOLLENS (black)
Main wash cycle from r (cold) to 40 °C for machine-
washable wool with the note “does not ball” and for
handwashable wool and other delicate textiles with
the care symbol ï (handwash).
Special functions (blue)
A (SOAKING)
Separate soaking for approx. 20 minutes at 30 °C.
The washing is left to soak in the final rinse water
(rinse hold). Before the actual wash programme can
be set, the water must first be drained.
B (RINSING)
Separate rinsing e. g. for rinsing handwashed textiles
(3 rinse cycles and spinning).
C (STARCHING/CONDITIONING)
Separate starching, separate conditioning, separate
treatment of damp clothes (1 rinse cycle, liquid addi-
tive rinsed in from the additive compartment, æ,
spin).
D (DRAINING)
Draining the final water rinse water following a rinse
hold (without spinning).
3
o (Rinse hold) means: The washing is left
to soak in the final rinse water; it is not spun.
F (SPINNING)
Final spin at max. spin speed, which can be reduced
by pressing the K button.
G (MINI-PROGRAMME)
A short programme of approximately 30 minutes in
length at 30 °C to briefly wash out lightly soiled tex-
tiles, e. g. sports clothing which was worn once.

10
Programme option buttons
The programme option buttons are used to adapt the
programme to the degree of soiling of the washing.
The additional programme options are not necessary
for normally soiled washing.
k (PRE WASH)
Pre wash at approx. 30 °C before the main washing
cycle which follows on automatically; with intermedi-
ate spin for COTTONS/LINEN and EASY-CARES,
without intermediate spin for DELICATES.
If RINSE HOLD has been selected, no spinning will
take place at all.
B (SHORT)
Shortened main wash cycle for lightly soiled wash-
ing.
È (EXTRA RINSE)
An additional rinse cycle can be set using this but-
ton. Instead of 3 rinse cycles, 4 are carried out.
3
With the (WOOLLENS) / P (Hand Wash) pro-
gram, it is not possible to select the addi-
tional programs (any pressed buttons have
no effect).
The possible combinations of programme options
with the various wash programmes are listed in the
following chart:
Wash programmes
Temperature (in °C)
possible programme options
COTTONS/LINEN 95, 60, 40 (light blue)
k (PRE WASH) B (SHORT) È (EXTRA RINSE)
E (Energy saving) 60, 40
k (PRE WASH)
-
È (EXTRA RINSE)
COTTONS/LINEN 30, r (COLD)
k (PRE WASH) B (SHORT) È (EXTRA RINSE)
EASY-CARES 60, 40 (yellow)
k (PRE WASH) B (SHORT) È (EXTRA RINSE)
E (Energy saving) 40
k (PRE WASH)
-
È (EXTRA RINSE)
EASY-CARES 30, r (COLD)
k (PRE WASH) B (SHORT) È (EXTRA RINSE)
DELICATES 40, 30 (black)
k (PRE WASH) B (SHORT) È (EXTRA RINSE)
Í (WOOL) 40, 30, r (COLD) (black) - - -
G (MINI-PROGRAMME) 30 - - -

11
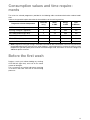
Consumption values and time require-
ments
The values for selected programmes provided in the following table were determined under standard condi-
tions.
However, they provide helpful orientation for household use of the washing machine.
Before the first wash
Perform a wash cycle without loading any washing:
COTTONS 95 (light blue), with half of the normal
amount of detergent.
This is to remove any residual substances remaining
in the drum and water tank due to manufacturing
processes.
Programme selector/temperature
Load size
in kg
Water
in kWh
Energy
in kWh
Time
in Minutes
COTTONS/LINEN 95 (light blue) 5 45 1,70 141
E (Energy saving) 60
1)
(light blue)
1) Note: Programme setting for testing in accordance with EN 60 456. Consumption values will vary from those
quoted depending on the water pressure, water hardness, water temperature as it enters the machine, room
temperature, type and quantity of items to be washed, detergent used, fluctuations in the mains voltage and
additional options selected.
5 42 0,94 126
COTTONS/LINEN 40 (light blue) 5 49 0,60 128
EASY-CARES 40 (yellow) 2,5 54 0,50 84
DELICATES 30 (black) 2,5 50 0,30 54
Í WOOLLENS 30 (black) 2 48 0,20 56

12
Preparing for a wash cycle
Sorting and preparing the washing
• Sort the washing according to care symbols and
type (see “Types of washing and care symbols”).
• Empty out the pockets.
• Remove metal objects (such as paper clips,
safety pins, etc).
• To prevent damage to items and stop the washing
from balling up: Close zips, button up bed and
cushion covers, tie together loose strings for
example from aprons.
• Turn items with double-layered fabrics inside-out
(sleeping bags, anoraks, etc.).
• For treated coloured textiles and textiles with
attached decorations: Turn items inside out.
• Wash small delicate items (baby’s socks, stock-
ings, bras etc.) in a washing bag, in a cushion
cover which has a zip or in larger socks.
• Special care must be taken with curtains.
Remove metal or burred plastic rollers or tie them
up in a net or bag. We cannot accept liability for
any damage.
• Coloured and white items should not be washed
together in the same cycle. White items will other-
wise discolour or become grey.
• New coloured items often contain excess dye. It
is better to wash these items separately the first
time.
• Mix larger items with smaller ones. This will
improve the effectiveness of the wash and distrib-
ute items more evenly during the spin cycle.
• Shake out the items before loading them into the
washing machine.
• Separate items from one another before placing
them inside the drum.
• Pay attention to care instructions such as “Wash
separately” and “Wash separately several times”.
Types of washing and care symbols
The care symbols will help you to choose the correct
wash programme. The washing should be sorted
according to type and care symbol. The tempera-
tures indicated on the care symbols are the maxi-
mum wash temperatures.
Cottons ç
Cotton and linen items with this care symbol are not
sensitive to machine washing or high temperatures.
The COTTONS/LINEN (light blue) programme is suit-
able for such items.
Linen èë
Cotton and linen items with this care symbol are not
sensitive to machine washing. The COTTONS/LINEN
(light blue) programme is suitable for this type of
washing.
Easy-care items êí
Materials such as fine cotton, cotton-blend fabrics
and synthetics with these care symbols require a
gentler machine wash. The EASY-CARES (yellow)
programme is suitable for such items.
Delicates ì
Materials such as layered fibres, micro-fibres, syn-
thetics and curtains with this care symbol require par-
ticularly careful treatment. The DELICATES (black)
programme is suitable for such items.
Wool, silk and especially sensitive items
9ìï
Fabrics such as wool, wool blends and silk with
these care symbols are particularly sensitive to
machine washing. The Í WOOL (black) programme
is suitable for such fabrics.
Important: Items with the care symbol
ñ
(Do not
wash!) must not be washed in washing machines.

13
Detergents and conditioners
Which detergent and conditioner?
Only use detergents and conditioners that are suita-
ble for use in washing machines. Always follow the
manufacturer’s recommendations.
How much detergent and
conditioner?
The amount of detergent or conditioner to be used is
dependent on:
• the degree of soiling of the washing
• the hardness of the tap water
• the load size.
2
If the detergent manufacturer makes no rec-
ommendations concerning the amount of
detergent or conditioner to be used for a
minimum load, for a half-load use a third
less, and for a very small load use only the
half of the amount of detergent that is rec-
ommended for a full load.
Please follow the instructions for use and
dosage provided by the detergent and con-
ditioner manufacturer.
Water softener
Water softener should be used if the water hardess is
medium to hard (from hardness range II). Please take
note of the manufacturer’s instructions. Then use the
same amount of detergent as for hardness range I
(= soft). Your competent water works will provide you
with information about local water hardness.
Water hardness specifications
Hardness range
Water hardness in °dH
(German degree of hardness)
Water hardness in mmol/l
(millimol per litre)
I – soft 0 - 7 up to 1.3
II – medium 7 - 14 1,3 - 2,5
III – hard 14 - 21 2,5 - 3,8
IV – very hard over 21 over 3.8

14
Performing a wash cycle
Brief guide
A wash cycle consists of the following steps:
1. Switch on the appliance by pressing the Q (ON/
OFF) button.
2. Set the desired wash programme:
– Set the programme and temperature using the
programme selector
– Select additional programme option(s) if
required
3. Change the spin speed/press o (RINSE HOLD)
as necessary.
4. Open the loading door and load the washing.
5. Close the loading door.
6. Add detergent/additives.
7. Start the wash programme by pressing the
U
(START/PAUSE) button.
After the wash programme has finished:
Important: If the wash cycle finishes with o (rinse
hold), perform a D (PUMP) or F (SPIN) cycle before
opening the loading door.
8. Open the door and remove the washing.
9. Turn the programme selector to Ï.
10.Switch off the appliance by pressing the Q (ON/
OFF) button.

15
Switching on the appliance
Switch on the appliance by pressing the Q (ON/OFF)
button.
Setting a wash programme
1. Turn the programme selector to the desired wash
programme with the desired temperature.
3
For the appropriate programme, correct
temperature and possible additional pro-
gramme options for each type of item, see
“Programme tables”.
2. Select additional programme option(s) if required:
The indicator for the additional programme option
selected will illuminate.
– To change the selection, press another button.
– Press the button again to de-select.

16
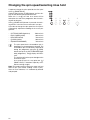
Changing the spin speed/selecting rinse hold
If required, change the spin speed for the final spin/
select o (RINSE HOLD):
Continue pressing the
K (SPIN) button until the dis-
play for the desired spin speed illuminates.
When this is set J the final rinse water will be
drained at the end of the programme but the wash-
ing will not be spun.
If the o (RINSE HOLD) button is pressed, the wash-
ing remains in the final rinse water and is not spun.
If you do not change the spin speed, the final spin is
automatically adjusted according to the wash pro-
gramme:
3
The spin speed for the intermediate spin is
dependent on the programme selected. The
intermediate spin can be totally switched off
during the programme using the
K (SPIN)
button (except in the COTTONS/LINEN (light
blue) programme). The J display will illumi-
nate.
The washing will not be spun throughout the
entire wash cycle.
As a result the cycle is a very quiet one. o
(RINSE HOLD) is therefore especially suita-
ble for washing at night.
Note: The laundry remains lying in the water until you
drain or spin (see section “Ending a wash cycle”).
After 18 hours however, it is automatically drained
and pumped.
– COTTONS/LINEN (light blue) 1000 rev/min
– EASY CARES (yellow) 900 rev/min
– DELICATES (black) 700 rev/min
– Í WOOL (black) 900 rev/min
– G (MINI-PROGRAMME) 700 rev/min

17
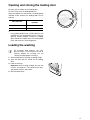
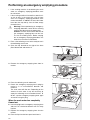
Opening and closing the loading door
To open: pull the handle on the loading door.
To close: firmly push the loading door shut.
When the appliance is switched on, the loading door
indicator shows whether the loading door can be
opened:
If
– the l (MAIN WASH) and C (END) indicators are
flashing, you have attempted to start a wash pro-
gramme without properly shutting the loading
door. Should this happen, press the loading door
firmly and restart the wash programme.
Loading the washing
3
For maximum load amounts, see “Pro-
gramme Tables”. For instructions on how to
correctly prepare the washing, see the
"Sorting and preparing the washing”.
1. Sort and prepare the washing according to type.
2. Open the door: pull the handle on the loading
door.
3. Load the washing.
Important: When shutting the door, be sure that
no items are caught in it. This could result in dam-
age to both machine and clothes.
4. Close the door firmly.
Door indicator
Can the door be
opened?
illuminated no
off yes

18
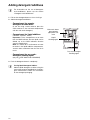
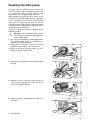
Adding detergent/additives
3
For instructions on the use of detergents
and conditioners, please see the section
“Detergents and conditioners”.
1. Pull out the detergent drawer as far as it will go.
2. Add the detergent/conditioner.
–
Compartment for powder
detergent for main wash
(If you are using a water softener, place the
water softener in the left-hand compartment
with the main wash detergent.)
–
Compartment for liquid additives
(softeners, stiffeners, starch)
Important: Fill the compartment to no more
than the MAX indicator. Viscous liquid can be
diluted up to the MAX indicator; dissolve
starch in powder form.
Note: It is normal for a small amount of water
to remain in the liquid additives compartment,
and this does not detract from the final rinse
result.
–
Compartment for pre-wash-
detergent/soaking agent
(only for
k/PRE WASH and A/SOAKING)
3. Push the detergent drawer in completely.
3
If using liquid detergents/tablets:
Add the liquid detergent or tablets using the
measuring container provided by the deter-
gent manufacturer. Follow the instructions
on the detergent packaging.
Liquid
Soaking agent
Pre-wash detergent
Soaking agent
Main wash deter-
gent (powder
type)/water sof-
tener

19
Starting a wash programme
1. Check that the tap is turned on.
2. Start a wash programme: Press the
U (START/
PAUSE) button. The wash programme will start.
3
The loading door is not shut properly if after
having pressed the
U (START/PAUSE) but-
ton
In such an event, firmly press the loading
door shut and press the
U (START/PAUSE)
button again.
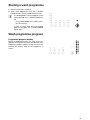
Wash programme progress
Programme progress display
Before the programme starts, the steps of the pro-
gramme which will be carried out are indicated in the
programme progress display. During the wash pro-
gramme the current stage of the programme is
shown.
–
the l (MAIN WASH) and
C (END) indica-
tors are flashing.

20
Changing a wash programme
Changing or cancelling a programme
1. Press the U (START/PAUSE) button.
2. Turn the programme selector to Ï. The wash pro-
gramme has been cancelled.
3. If required, set a new wash programme and press
the
U (START/PAUSE) button again.
Otherwise, turn the programme selector to D
(PUMP) or F (SPIN) and press the
U (START/
PAUSE) button. (The water will be drained, or the
washing will be spun.)
3
The wash programme can be temporarily
interrupted at any time by pressing the
U
(START/PAUSE) button, and then re-started
by pressing the button again. The wash pro-
gramme is only able to be changed after
having turned the programme selector to Ï.
Selecting an additional programme
option
The additional programme options B (SHORT) or
È (EXTRA RINSE) can still be selected after the
programme has started if they are able to be com-
bined with the wash programme selected.
1. Press the
U (START/PAUSE) button.
2. Press the
B (SHORT) or È (EXTRA RINSE) but-
ton.
3. Press the
U (START/PAUSE) button again. The
wash programme will commence.
Changing the spin speed
The spin speed can be changed and o (RINSE
HOLD) can be set during the wash programme.
1. Press the
U (START/PAUSE) button.
2. Change the spin speed by pressing the K (SPIN)
button, or press the
o (RINSE HOLD) button.
3. Press the
U (START/PAUSE) button again. The
wash programme will commence.
Wash cycle complete/removing the washing
Once a wash programme has come to an end, C
(END) will illuminate in the programme progress dis-
play.
If
o (RINSE HOLD) was selected, the display above
the
U (START/PAUSE) button will flash.
1. After a rinse hold the water must first be drained:
– Either press the
U (START/PAUSE) button
(water will be drained and the washing spun in
accordance with the programme that has fin-
ished; after pressing the
U (START/PAUSE)
button again the spin speed can be changed
even during the spin cycle),
or
– first turn the programme selector to Ï
.
Then turn the programme selector to D
(PUMP). Press the
U (START/PAUSE) button
(water will be drained without the spin cycle),
or
– first turn the programme selector to Ï
.
Then turn the programme selector to F (SPIN)
and select the desired spin speed. Press the
U (START/PAUSE) button (water will be
drained and the washing spun).
After this step of the programme has come to an
end,
C (END) will illuminate in the programme
progress display.
2. Open the loading door.
As soon as the door indicator has gone out, the
loading door can be opened.
3. Remove the washing.
4. Turn the programme selector to Ï
.
5. Switch off the appliance by pressing the Q (ON/
OFF) button.
6. Tur n off the tap.
7. After the wash, slightly pull out the detergent
drawer to allow it to dry. Leave the loading door
slightly open to allow the inside of the washing
machine to air.
Important: If the washing machine will not be used
for a longer period of time: Turn off the tap and dis-
connect the washing machine from the mains.
La pagina si sta caricando...
La pagina si sta caricando...
La pagina si sta caricando...
La pagina si sta caricando...
La pagina si sta caricando...
La pagina si sta caricando...
La pagina si sta caricando...
La pagina si sta caricando...
La pagina si sta caricando...
La pagina si sta caricando...
La pagina si sta caricando...
La pagina si sta caricando...
La pagina si sta caricando...
La pagina si sta caricando...
La pagina si sta caricando...
La pagina si sta caricando...
La pagina si sta caricando...
La pagina si sta caricando...
La pagina si sta caricando...
La pagina si sta caricando...
La pagina si sta caricando...
La pagina si sta caricando...
La pagina si sta caricando...
La pagina si sta caricando...
-
 1
1
-
 2
2
-
 3
3
-
 4
4
-
 5
5
-
 6
6
-
 7
7
-
 8
8
-
 9
9
-
 10
10
-
 11
11
-
 12
12
-
 13
13
-
 14
14
-
 15
15
-
 16
16
-
 17
17
-
 18
18
-
 19
19
-
 20
20
-
 21
21
-
 22
22
-
 23
23
-
 24
24
-
 25
25
-
 26
26
-
 27
27
-
 28
28
-
 29
29
-
 30
30
-
 31
31
-
 32
32
-
 33
33
-
 34
34
-
 35
35
-
 36
36
-
 37
37
-
 38
38
-
 39
39
-
 40
40
-
 41
41
-
 42
42
-
 43
43
-
 44
44


Electrolux EW1075F Manuale utente
- Categoria
- Lavatrici
- Tipo
- Manuale utente
in altre lingue
- English: Electrolux EW1075F User manual