Rowenta RO5822 11 SILENCE FORCE Manuale del proprietario
- Categoria
- Aspirapolvere
- Tipo
- Manuale del proprietario
Questo manuale è adatto anche per

www.rowenta.com
733283 - 18/13
RO58xx / RO59 series

25*
27*
28*
23*
24*
26*
22
1
3
11
14
4
8
10a
2
7
8
6
5
9
10b
3
7
4
16
15
17b*
18a*
17a*
18b*
22a
22b
12
13
2
5
21
21a
21b
8
20A a 20A b
20A c
20A
19
20B b
20B c
20B a
20B

CLIC!
PUSH
1
2
fig. 1 fig. 2 fig. 4 fig. 3
fig. 5 fig. 6 fig. 8 fig. 7
fig. 17
2
2
1
1
CLIC!
MAX
MIN
fig. 14
fig. 21
fig. 16
fig. 18
22
1
fig. 10
21
2
fig. 11
fig. 12
fig. 13
fig. 15
fig. 19
fig. 20
fig. 22 fig. 23
fig. 9b* fig. 9a*

fig. 28
fig. 31
fig. 25
CLICK
2
1
fig. 29
fig. 27
fig. 32
CLIC!
fig. 30
fig. 26
fig. 24
fig. 33

1
Pour votre sécurité, cet appareil est
conforme aux normes et
réglementations applicables
(Directives Basse Tension,
Compatibilité Electromagnétique,
Environnement,...).
Cet appareil n’est pas prévu pour
être utilisé par des personnes (y
compris les enfants) dont les
capacités physiques, sensorielles ou
mentales sont réduites, ou des
personnes dénuées d’expérience ou
de connaissance, sauf si elles ont pu
bénéficier, par l’intermédiaire d’une
personne responsable de leur
sécurité, d’une surveillance ou
d’instructions préalables concernant
l’utilisation de l’appareil.
Il convient de surveiller les enfants
pour s’assurer qu’ils ne jouent pas
avec l’appareil.
Cet appareil peut être utilisé par des
enfants âgés de 8 ans et plus et les
personnes manquant d’expérience
et de connaissances ou dont les
capacités physiques, sensorielles ou
mentales sont réduites, si elles ont
été formées et encadrées quant à
l’utilisation de manière sûre et
connaissent les risques encourus.
Les enfants ne doivent pas jouer
avec l’appareil. Le nettoyage et
l’entretien par l’utilisateur ne doit
pas être fait par des enfants à moins
qu’ils ne soient âgés de 8 et plus et
supervisés.
T
enir l’appareil et son
cordon hors de la portée des enfants
de moins de 8 ans.
N’utilisez pas l’appareil : si le cordon
est endommagé. Afin d’éviter un
danger, l’ensemble enrouleur et
cordon de votre aspirateur doit être
remplacé impérativement par un
Centre Service Agréé Rowenta.
1 • Conditions d’utilisation
Votre aspirateur est un appareil électrique : il doit être
utilisé dans les conditions normales d’utilisation. Utilisez
et rangez l’appareil hors de portée des enfants. Ne laissez
jamais l’appareil fonctionner sans surveillance.
Ne tenez pas le suceur ou l’extrémité du tube à portée des
yeux et des oreilles.
N’aspirez pas de surfaces mouillées à l’alcool, de liquides
quelle que soit leur nature, de substances chaudes, de
substances ultrafines (plâtre, ciment, cendres…), de gros
débris tranchants (verre), de produits nocifs (solvants,
décapants...), agressifs (acides, nettoyants ...),
inflammables et explosifs (à base d’essence ou d’alcool).
Ne plongez jamais l’appareil dans l’eau, ne projetez pas
d’eau sur l’appareil et ne l’entreposez pas à l’extérieur.
N’utilisez pas l’appareil s’il est tombé et présente des
détériorations visibles ou des anomalies de
fonctionnement. Dans ce cas, n’ouvrez pas l’appareil, mais
envoyez-le au Centre Service Agréé le plus proche ou
contactez le service consommateurs Rowenta (voir les
coordonnées en dernière page).
2 • Alimentation électrique
Vérifiez que la tension d’utilisation (voltage) de votre
aspirateur corresponde bien à celle de votre installation.
Débranchez l’appareil en retirant la prise de courant, sans
tirer le cordon :
- immédiatement après l’utilisation,
- avant chaque changement d’accessoires,
- avant chaque nettoyage, entretien ou changement de
filtre.
3 • Réparations
Les réparations ne doivent être effectuées que par des
spécialistes avec des pièces détachées d’origine. Réparer
un appareil soi-même peut constituer un danger pour
l’utilisateur, la garantie est annulée.
CONSEILS DE SÉCURITÉ
FR

2
1 • Déballage
Déballez et débarrassez votre appareil de toutes les étiquettes
éventuelles. Conservez votre bon de garantie et lisez
attentivement le mode d’emploi avant la première utilisation
de votre appareil.
2 • Conseils et précautions
Avant chaque utilisation, le cordon doit être déroulé
complètement.
Ne le coincez pas et ne le passez pas sur des arêtes
tranchantes. Si vous utilisez une rallonge électrique, assurez-
vous qu’elle est en parfait état et de section adaptée à la
puissance de votre aspirateur. Ne débranchez jamais
l’appareil en tirant sur le cordon.
Ne faites jamais fonctionner l’aspirateur sans sac et sans
système de filtration (cassette).
Votre appareil est équipé pour cela de deux systèmes de
sécurité de présence : pour le sac (13 et 14) et pour la cassette
filtre (H)EPA* (16).
Ne déplacez pas l’aspirateur en tirant sur le cordon, l’appareil
doit-être déplacé par sa poignée de transport. N’utilisez pas le
cordon pour soulever l’appareil.
Arrêtez et débranchez votre aspirateur après chaque
utilisation. Arrêtez et débranchez toujours votre aspirateur
avant l’entretien ou le nettoyage. N’utilisez que des sacs et
des filtres d’origine Rowenta ou Wonderbag.
N’utilisez que des accessoires d’origine Rowenta. Vérifiez que
tous les filtres sont bien en place.
En cas de difficultés pour obtenir les accessoires et les filtres
pour cet aspirateur, contactez le service consommateurs
Rowenta (voir les coordonnées en dernière page).
AVANT LA PREMIÈRE UTILISATION
FR
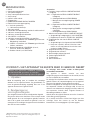
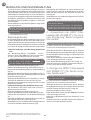
Grâce au système exclusif ROWENTA EXTREME
SILENCE SYSTEM votre aspirateur vous garantit
une forte réduction des nuisances sonores lors de
son utilisation.
* Selon modèles : il s’agit d’équipements spécifiques à
certains modèles ou d’accessoires disponibles en option.
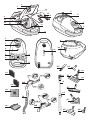
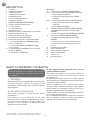
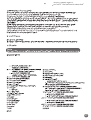
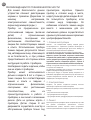
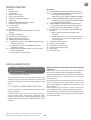
DESCRIPTION
1 Couvercle
2 Ouverture du couvercle
3 Poignée de transport
4 Pédale enrouleur de cordon
5 Pédale Marche/Arrêt
6 Témoin de changement de sac
7 Ouverture d’aspiration
8 ROWENTA EXTREME SILENCE SYSTEM
9 Variateur électronique de puissance
10 a - Parking vertical
b - Parking horizontal
11 Compartiment sac
12 Support de sac pour sac Wonderbag* ou sac textile*
13 Détecteur de présence du sac
14 Détecteur de présence du support sac
15 Compartiment cassette filtre (H)EPA*
16 Détecteur de présence de la cassette filtre (H)EPA*
17 a - Cassette filtre (H)EPA* (réf. ZR002901) adaptée
aux sacs Wonderbag*
b - Cassette filtre (H)EPA* (réf. ZR005201) adaptée
aux sacs textile*
18 a - Sac Wonderbag* UNIVERSAL (Classic, Freshline,
Endura ref. WB4xxx)
b - Sac textile* (ref. RS-RT2274)
Accessoires
19 Flexible avec crosse ERGO COMFORT SILENCE
20A* a - Crosse ergonomique ERGO COMFORT SILENCE
b - Brosse intégrée (Easy Brush)
c - Variateur mécanique de puissance (POWER
CONTROL)
20B* a - Crosse ergonomique ERGO COMFORT SILENCE
b - Variateur mécanique de puissance (POWER
CONTROL)
c - Brosse intégrée (Easy Brush)
21 Tube télescopique métal ERGO COMFORT SILENCE
a - Système de verrouillage crosse/tube (LOCK
SYSTEM)
b - Bouton de réglage du tube (TELESCOPIC SYSTEM)
22 Suceur tous sols ERGO COMFORT SILENCE
a - Système de verrouillage tube/suceur (LOCK
SYSTEM)
b - Bouton 2 positions : brosse rentrée pour tapis
et moquettes / brosse sortie pour parquets et sols
lisses.
23 Suceur fente télescopique*
24 Suceur ameublement*
25 Suceur parquet rectangulaire*
26 Suceur parquet DELTA*
27 Turbobrosse*
28 Mini turbobrosse*

3
FR
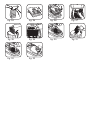
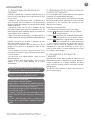
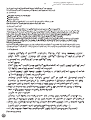
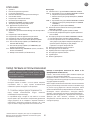
1 • Assemblage des éléments de
l’appareil
Enfoncez le flexible dans l’ouverture d’aspiration (fig.1) et
tournez jusqu’au verrouillage. Pour le retirer, tournez en sens
inverse et tirez.
• Emboîtez le tube télescopique métal à l’extrémité de la
crosse jusqu’à ce que vous entendiez un ‘clic’ de verrouillage
(fig.2) (pour le déboîter, appuyez sur le bouton de verrouillage
du tube et retirez-le).
• Emboîtez le suceur tous sols (22) à l’extrémité du tube
télescopique métal jusqu’à ce que vous entendiez un ‘clic’ de
verrouillage (fig.3) (pour le déboîter, appuyez sur le bouton de
verrouillage du suceur et retirez-le).
• Réglez le tube télescopique métal à la longueur désirée à
l’aide du système télescopique (TELESCOPIC SYSTEM) (fig.4)
Emboîtez l’accessoire qui convient à l’extrémité du tube
télescopique métal ou de la crosse :
- Pour les tapis et moquettes : utilisez le suceur tous sols en
position brosse rentrée ou la Turbobrosse* (fibres et poils
d’animaux).
- Pour les parquets et sols lisses : utilisez le suceur tous sols
en position brosse sortie ou, pour un meilleur résultat, utilisez
le suceur parquet*.
- Pour les recoins et les endroits difficiles : utilisez le suceur
fente télescopique*.
- Pour les meubles et les surfaces fragiles : utilisez la brosse
intégrée à la crosse (EASY BRUSH) ou le suceur
ameublement*.
2 • Branchement du cordon et mise en
marche de l’appareil
Déroulez complètement le cordon, branchez votre aspirateur
et appuyez sur la pédale Marche/Arrêt (fig.7).
Remarque : vous pouvez utiliser votre aspirateur en position
horizontale (traîneau) mais également en position verticale,
notamment lors de l’aspiration des escaliers ou pour
dépoussierer les rideaux.
Réglez la puissance d’aspiration :avec le variateur électronique de puissance (fig.8) :
• Position (MIN) pour l’aspiration des tissus délicats
(voilages, textiles)
• Position (Moyenne) pour l’aspiration quotidienne de
tous types de sols, en cas de faible salissure
• Position (MAX) pour l’aspiration des sols durs et des
tapis et moquettes en cas de fort encrassement
avec le variateur mécanique de puissance de la crosse :
ouvrez le volet du curseur de régulation pour diminuer
manuellement la puissance d’aspiration et éviter que le
suceur ne reste «collé» à la surface aspirée (fig. 9a* ou 9b*)
ex : voilages, surfaces fragiles …
3 • Rangement et transport de
l’appareil
Après utilisation, arrêtez votre aspirateur en appuyant sur la
pédale Marche/Arrêt et débranchez-le (fig.10). Rangez le
cordon en appuyant sur la pédale enrouleur de cordon
(fig.11). En position verticale, placez le suceur dans la position
parking (fig.12).
Vous pourrez ainsi transporter et ranger votre aspirateur en
position parking (fig.13).
UTILISATION
IMPORTANT Ne faites jamais fonctionner l’aspirateur
sans sac et sans système de filtration (cassette).
ATTENTION Arrêtez et débranchez toujours votre
aspirateur avant de changer d’accessoires.
CONSEILS ERGONOMIQUES
Chaîne ERGO COMFORT SILENCE
Ergonomique, la chaîne ERGO COMFORT SILENCE
a été conçue pour faciliter et améliorer le confort de
l’utilisateur lors du passage de l’aspirateur.
Pour éviter de courber le dos et afin de garantir une
posture droite, veillez à :
1. Régler la longueur du tube télescopique métal
ERGO COMFORT SILENCE selon votre morphologie
(fig.5).
2. Placer votre deuxième main à l’avant de la
poignée de la crosse ERGO COMFORT SILENCE
(fig.6).
* Selon modèles : il s’agit d’équipements spécifiques à
certains modèles ou d’accessoires disponibles en option.

4
FR
L’air que nous respirons contient des particules qui peuvent être
allergènes : les larves et déjections d’acariens, les moisissures, le
pollen, les fumées et les résidus animaux (poils, peau, salive,
urine). Les particules les plus fines pénètrent profondément dans
l’appareil respiratoire où elles peuvent provoquer une
inflammation et altérer la fonction respiratoire dans son ensemble.
Les filtres (H)EPA (High) Efficiency Particulate Air Filter, c’est-à-dire
filtres de (Haute) Efficacité pour les Particules Aériennes,
permettent de retenir les particules les plus fines.
Grâce au filtre (H)EPA, l’air rejeté dans la pièce est plus sain que
l’air aspiré.
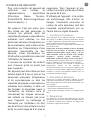
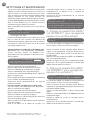
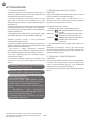
1 • Changez de sac
Le témoin de changement de sac vous indique que le sac est
plein ou saturé. Si vous constatez une diminution de
l’efficacité de votre appareil, réglez la puissance au maximum
et maintenez le suceur levé au-dessus du sol. Si le témoin
reste rouge, remplacez le sac.
a) Si votre aspirateur est équipé d’un sac Wonderbag* (18a) :
IMPORTANT Les sacs Wonderbag* UNIVERSAL
(Classic, Freshline, Endura ref. WB4xxx) sont
disponibles chez votre revendeur ou dans les Centres
Service Agréés.
Ouvrez le couvercle de votre aspirateur (fig.14).
Retirez le support de sac du compartiment sac (fig.15).
Retirez le sac Wonderbag* du support de sac (fig.16).
Jetez le sac Wonderbag* dans une poubelle (fig.17).
Positionnez un nouveau sac Wonderbag* dans le support sac
grâce à sa bague (fig.18).
Placez le support de sac dans le compartiment sac et déployez
le sac à l’intérieur du compartiment (fig.19).
Assurez-vous du bon positionnement du sac avant de
refermer le couvercle.
b) Si votre aspirateur est équipé d’un sac textile* (18b) :
Les sacs textile* (réf. RS-RT2274) sont disponibles
dans les Centres Service Agréés.
Ouvrez le couvercle de votre aspirateur (fig.14).
Retirez le support de sac du compartiment sac (fig.20).
Retirez le sac textile* du support de sac (fig.21).
Ouvrez le sac textile* à l’aide du zip (fig.22) puis videz-le au
dessus d’une poubelle (fig.23).
Veillez à ce que le zip soit bien refermé avant de remettre le
sac en place (fig.24).
Placez le sac textile* sur le support de sac grâce à sa
cartonnette (fig.25), placez le support de sac dans le
compartiment sac et déployez le sac à l’intérieur du
compartiment (fig.26).
Assurez-vous du bon positionnement du sac avant de
refermer le couvercle.
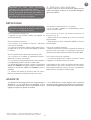
2 • Changez la cassette filtre (H)EPA*
(réf. ZR 0029 01)* (pour les appareils
équipés d’un sac Wonderbag*)
La cassette filtre (H)EPA* réf. ZR 0029 01* est disponible chez
votre revendeur ou dans les Centres Service Agréés.
Ouvrez le couvercle de votre aspirateur (fig.14). Retirez le
support sac du compartiment sac (fig.15), ensuite retirez la
cassette filtre (H)EPA* (fig.27) et jetez la cassette dans une
poubelle (fig.28).
Replacez la nouvelle cassette filtre (H)EPA* (réf. ZR 0029 01*)
dans son compartiment (fig.29).
Remettez le support de sac dans le compartiment (fig.19).
Assurez-vous du bon positionnement de la cassette filtre
(H)EPA* avant de refermer le couvercle.
3 • Nettoyez la cassette filtre HEPA*
(réf. ZR005201*) (pour les appareils
équipés d’un sac textile*)
La cassette filtre (H)EPA* réf. ZR 0052 01* est disponible chez
votre revendeur ou dans les Centres Service Agréés.
Ouvrez le couvercle de votre aspirateur (fig.14). Retirez le
support de sac du compartiment (fig.20), puis retirez ensuite la
cassette filtre (H)EPA* (fig.30).
Tapotez la cassette filtre (H)EPA* au dessus d’une poubelle
(fig.31).
Replacez la cassette filtre (H)EPA* (réf. ZR005201*) dans son
compartiment (fig.32).
Remettez le support de sac avec le sac textile* dans le
compartiment sac.
Assurez-vous du bon positionnement de la cassette filtre
(H)EPA* avant de refermer le couvercle.
NETTOYAGE ET MAINTENANCE
IMPORTANT Arrêtez et débranchez toujours votre
aspirateur avant son entretien.
IMPORTANT Remplacez le système de filtration une
fois par an.
IMPORTANT Ne faites jamais fonctionner
l’aspirateur sans un sac.
Votre appareil est équipé pour cela d’un système de
sécurité de présence de sac (le couvercle ne pourra
pas se fermer si vous n’avez pas installé un sac).
ATTENTION Les sacs Wonderbag* COMPACT ne
sont pas utilisables sur cet appareil. Leur utilisation
endommagerait l’appareil et annulerait la garantie.
* Selon modèles : il s’agit d’équipements spécifiques à
certains modèles ou d’accessoires disponibles en option.
ATTENTION ! Ce nettoyage est exclusivement
réservé à la cassette filtre (H)EPA (réf. ZR005201*).

5
FR
4 • Nettoyez votre aspirateur
Essuyez le corps et les accessoires de votre appareil avec un
chiffon doux (fig.33). N’utilisez pas de produits détergents,
agressifs ou abrasifs.
• Cet appareil est uniquement réservé à un usage ménager et
domestique ; en cas d’utilisation non appropriée ou non
conforme au mode d’emploi, aucune responsabilité ne peut
engager la marque et la garantie est annulée.
• Lisez attentivement le mode d’emploi avant la première
utilisation de votre appareil: une utilisation non conforme au
mode d’emploi dégagerait Rowenta de toute responsabilité.
GARANTIE
Si votre aspirateur ne démarre pas
• L’appareil n’est pas alimenté. Vérifiez que l’appareil est
correctement branché.
Si votre aspirateur n’aspire pas
• Un accessoire ou le flexible est bouché : débouchez
l’accessoire ou le flexible.
• Le couvercle est mal fermé : vérifiez la mise en place du sac,
du support de sac et de la cassette filtre (H)EPA* et refermez
le couvercle.
Si votre aspirateur aspire moins bien, fait du bruit, siffle
• Un accessoire ou le flexible est partiellement bouché :
débouchez l’accessoire ou le flexible.
• Le sac est plein ou saturé par des poussières fines : remplacez
le sac Wonderbag* (18a) ou videz le sac textile* (18b).
• Le système de filtration est saturé : changez la cassette filtre
(H)EPA* (réf. ZR002901*) et replacez-la dans son logement ou
-nettoyez la cassette filtre (H)EPA* (réf. ZR005201*) selon la
procédure.
• Le variateur mécanique de puissance (20c) est ouvert :
fermez le variateur mécanique de puissance de la crosse.
Si le témoin de changement de sac reste Rouge
• Le sac est saturé : remplacez le sac Wonderbag* (18a) ou
videz le sac textile* (18b).
Si le couvercle ne se ferme pas (action des détecteurs de
présence 13, 14, 16)
• Vérifiez la présence du support de sac, du sac ou son bon
positionnement.
• Vérifiez la présence de la cassette filtre (H)EPA* ou son bon
positionnement.
Si le suceur est difficile à déplacer
• Diminuez la puissance en ouvrant le variateur mécanique de
puissance de la crosse (20c) ou en déplaçant le curseur du
variateur électronique de puissance (9) vers la position MIN.
Si le cordon ne rentre pas totalement
• Le cordon est ralenti lors de sa rentrée : ressortez le cordon
et appuyez sur la pédale enrouleur de cordon.
Si un problème persiste, confiez votre aspirateur au Centre Service
Agréé Rowenta le plus proche. Consultez la liste des Centres
Service Agréés Rowenta ou contactez le service consommateurs
Rowenta (voir les coordonnées en dernière page).
DÉPANNAGE
IMPORTANT Ne faites jamais fonctionner
l’aspirateur sans une cassette filtre (H)EPA.
Votre appareil est équipé pour cela d’un système de
sécurité de présence de cassette filtre (H)EPA (le
couvercle ne pourra pas se fermer si vous n’avez
pas installé une cassette filtre (H)EPA).
IMPORTANT Dés que votre aspirateur fonctionne
moins bien et avant toute vérification, arrêtez-le en
appuyant sur la pédale Marche/Arrêt.
* Selon modèles : il s’agit d’équipements spécifiques à
certains modèles ou d’accessoires disponibles en option.

6
FR
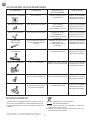
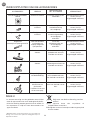
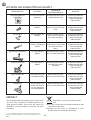
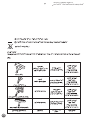
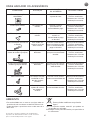
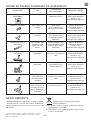
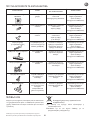
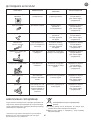
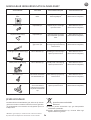
OÙ ACHETER LES ACCESSOIRES
ACCESSOIRES* UTILISATION MISE EN PLACE
DE L’ACCESSOIRE
LIEUX D’ACHAT
Sac Wonderbag
®
UNIVERSAL
Sac universel. Installez la bague sur le
support de sac.
Centres service Agréés
Rowenta (voir la liste
d
es adresses jointes)
Brosse ameublement Pour nettoyer les meubles. Fixez la brosse
ameublement à
l’extrémité de la crosse.
Centres service Agréés
Rowenta (voir la liste
des adresses jointes)
Suceur ameublement Pour nettoyer les meubles. Emboîtez le suceur
ameublement à
l’extrémité de la crosse
ou du tube.
Centres service Agréés
Rowenta (voir la liste
des adresses jointes)
Suceur fente
télescopique
Pour accéder aux recoins
et aux endroits difficiles
d’accès.
Emboîter le suceur fente
télescopique à
l’extrémité de la crosse
ou du tube.
Centres service Agréés
Rowenta (voir la liste
des adresses jointes)
Suceur parquet
rectangulaire
Pour les sols fragiles. Emboîtez le suceur parquet
à l’extrémité du tube.
Centres service Agréés
Rowenta (voir la liste
des adresses jointes)
Suceur parquet DELTA Pour les sols fragiles. Emboîtez le suceur parquet
DELTA à l’extrémité du tube.
Centres service Agréés
Rowenta (voir la liste
des adresses jointes)
Mini turbobrosse Pour nettoyer en profondeur
les tissus d’ameublement.
Emboîtez la mini turbo-
brosse à l’extrémité du tube.
Centres service Agréés
Rowenta (voir la liste
des adresses jointes)
Turbobrosse Pour enlever les fils et poils
d’animaux incrustés dans
les tapis et moquettes.
Emboîtez la turbobrosse
à l’extrémité du tube.
Centres service Agréés
Rowenta (voir la liste
des adresses jointes)
ENVIRONNEMENT
• Conformément à la réglementation en vigueur, tout ap-
pareil hors d’usage doit être rendu définitivement inu-
tilisable : débranchez et coupez le cordon avant de jeter
l’appareil.
Participons à la protection
de l’environnement !
Votre appareil contient de nombreux matériaux
valorisables ou recyclables.
Confiez celui-ci dans un point de collecte pour que
son traitement soit effectué.
* Selon modèles : il s’agit d’équipements spécifiques à
certains modèles ou d’accessoires disponibles en option.

7
For your safety, this appliance meets
the applicable standards and
regulations (Low Voltage Directives,
Electromagnetic Compatibility,
Environment,...).
This appliance is not intended to be
used by persons (including children)
with reduced physical, sensory or
mental capacities or lack of
experience and knowledge, unless
they are supervised or have been
given instructions beforehand
concerning use of the appliance by a
person responsible for their safety.
Children should be supervised to
ensure they do not play with the
appliance.
This device can be used by children
provided that they are at least 8
years old, as well as by people
lacking experience and knowledge
or whose physical, sensorial or
mental abilities are reduced, if they
have been properly trained and duly
informed of the incurred risks.
Children must not play with the
appliance. Cleaning and
maintenance of this appliance must
not be carried out by children unless
they are at least 8 years old and
supervised by a responsible person.
Keep the device and its cord away
from children under 8 years old.
Do not use the appliance if: the cord
is damaged. In order to avoid all
danger, the cord winding system
and the cord itself of your vacuum
cleaner must necessarily be
replaced by a Rowenta Authorized
Service Centre only.
1 • Conditions of use
Your vacuum cleaner is an electrical appliance: it must
only be used under normal operating conditions. Use and
store the appliance out of the reach of children. Never
leave the appliance unattended when it is switched on.
Keep the nozzles and tube ends well away from eyes and
ears.
Do not vacuum damp surfaces, where there is water or
liquids whatever their nature, hot substances, ultrafine
substances (plaster, cement, ashes...), large sharp debris
(glass), harmful products (solvents, paint strippers...),
chemical products (acids, cleaning agents...), inflammable
and explosive products (petrol or alcohol based).
Never immerse the appliance in water, splash water onto
it or store it outdoors.
Do not use the appliance if it has been dropped and shows
visible signs of damage or signs of not functioning
properly.
In this case, do not open the appliance but send it to your
nearest Approved Service Centre or contact Rowenta
Customer Services (you can find their contact details on
the last page).
2 • Electrical power supply
Make sure that the operating voltage (voltage) of your
vacuum cleaner is the same as your supply voltage.
Unplug the appliance by removing the power plug,
without pulling on the power cord:
- immediately after use,
- before each time you change the accessories,
- before cleaning, maintaining or changing the filter.
3 • Repairs
Repairs should only be carried out by specialists using
original replacement parts.
Repairing an appliance oneself can be dangerous for the
user, and will invalidate the guarantee.
SAFETY INSTRUCTIONS
EN

8
1 • Removing packaging
Unpack your appliance and remove any unwanted
stickers, Keep your guarantee form and read the
instructions carefully before using your appliance for the
first time.
2 • Advice and precautions
Each time before use, the power cord must be unwound
completely.
Do not jam it and do not allow it to rub against sharp
edges.
If you’re using an electrical extension, check that it is in
perfect condition and that it is suited to the power of your
vacuum cleaner. Never unplug the appliance by pulling on
the power cord.
Never operate the vacuum cleaner without a bag in it and
without its filtration system (cassette).
For your peace of mind your vacuum cleaner is fitted with
two safety check systems: for the bag (13 & 14) and for the
(H)EPA filter cassette (16).
Do not move the vacuum cleaner by pulling on the power
cord, the appliance must be moved using its carrying
handle. Do not use the power cord for lifting the appliance.
Switch off and unplug your vacuum cleaner each time
you’ve finished using it. Always switch off and unplug
your vacuum cleaner before maintaining or cleaning it.
Only use original Rowenta or Wonderbag bags and filters.
Only use Rowenta original accessories. Check that all the
filters are correctly in place.
If you experience difficulties getting hold of the
accessories and filters for this vacuum cleaner, please
contact Rowenta customer services (you can find their
contact details on the last page).
BEFORE USING FOR THE FIRST TIME
Thanks to the exclusive ROWENTA EXTREME
SILENCE SYSTEM we promise you’ll notice just
how much quieter your vacuum cleaner is.
* Depending on models: either equipment specific to cer-
tain models or available as an optional accessory.
EN
DESCRIPTION
1
Cover
2
Cover opening
3
Carrying power nozzle
4
Power cord rewind button
5
On/Off button
6
Bag change indicator
7
Vacuum inlet
8
ROWENTA EXTREME SILENCE SYSTEM
9
Electronic power switch
10 a
– Vertical parking
b
– Horizontal parking
11
Bag compartment
12
Bag support for Wonderbag* bag or synthetic bag*
13
Bag in vacuum cleaner sensor
14
Bag support sensor
15
(H)EPA* filter cassette compartment
16
(H)EPA* filter cassette sensor
17 a
- (H)EPA* filter cassette (ref. ZR002901) for
Wonderbag* bags
b
- (H)EPA* filter cassette (ref. ZR005201) for
synthetic bags*
18 a
- Wonderbag* UNIVERSAL bag (Classic, Freshline,
Endura ref. WB4xxx)
b
- Textile baf* (ref. RS-RT2274)
Accessories
19
Flexible hose with power nozzle ERGO COMFORT
SILENCE
20A* a - Ergonomic nozzle ERGO COMFORT SILENCE
b - In-built brush (EASY BRUSH)
c - Manual power switch (POWER CONTROL)
20B* a - Ergonomic nozzle ERGO COMFORT SILENCE
b - Manual power switch (POWER CONTROL)
c - In-built brush (EASY BRUSH)
21
Metal telescopic tube ERGO COMFORT SILENCE
a
- Nozzle/tube locking system (LOCK SYSTEM)
b
– Tube adjustment button (TELESCOPIC SYSTEM)
22
All floor type nozzle ERGO COMFORT SILENCE
a
- Tube/nozzle locking system (LOCK SYSTEM)
b
- 2 position button: brush in retracted position for
rugs and carpets / brush in advanced position for
parquets and smooth floors.
23
Telescopic crevice tool*
24
Upholstery nozzle*
25
Rectangular parquet nozzle*
26
Parquet nozzle DELTA*
27
Turbobrush*
28
Mini turbobrush*

9
1 • Assembling the elements of the
appliance
Push the flexible hose into the vacuum inlet (Fig.1) and
turn until it locks. To remove it, turn in the opposite
direction and pull.
• Push the metal telescopic tube into the end of the power
nozzle until you hear a locking ‘click’ (Fig.2) (to release it,
push the locking button on the tube and remove it).
•Push the all floor type nozzle (22) into the end of the metal
telescopic tube until you hear a locking ‘click’ (Fig.3) (to
release it, push the locking button on the nozzle and
remove it).
• Adjust the telescopic metal tube to the required length
using the telescopic system (TELESCOPIC SYSTEM) (Fig.4)
Fit the appropriate accessory to the end of the metal
telescopic tube or the power nozzle:
- For rugs and carpets: use the all floor type nozzle in the
retracted brush nozzle position or the Turbobrush* (fibres
and animal hairs).:
- For parquets and smooth floors: use the all floor type
nozzle in the advanced position or, for a better result, use
the parquet nozzle*.
- For corners and hard to reach spots: use the telescopic
crevice tool*.
- For furniture and fragile surfaces: use the brush built into
the power nozzle (EASY BRUSH) or the upholstery
nozzle*.
2 • Plugging in the power cord and
switching on the appliance
Unwind the power cord completely, plug in your vacuum
cleaner and press on the On/Off button (Fig.7).
Remark: you can use your vacuum cleaner in the
horizontal position (sleigh position) but also in the vertical
position, notably when you are vacuuming the stairs or
removing dust from the curtains.
Adjust the suction power:using the electronic power control (Fig.8) :
• Position (MIN) for vacuuming delicate fabrics (net
curtains, textiles)
• Position (Medium) for everyday vacuuming for all
types of floors, which are only slightly
dirty
• Position (MAX) for vacuuming hard floors and
very dirty rugs and carpets.
with the manual power nozzle switch :
open the power control flap in order to reduce the suction
power manually and avoid the nozzle ”sticking” to the
surface that has been vacuumed (Fig. 9a* or 9b*) e.g.: net
curtains, fragile surfaces…
3 • Storing and carrying your
vacuum cleaner
After use, switch off your vacuum cleaner by pressing the
On/Off switch and unplug it (Fig.10). Rewind the power
cord by pressing the power cord rewind button (Fig.11). In
the vertical position place the nozzle in the parking
position (Fig.12).
This allows you to carry and store your vacuum cleaner
when it is in the parking position (Fig.13).
USING THE APPLIANCE
IMPORTANT Never operate your vacuum cleaner
without its bag and without its filtration system
(cassette).
IMPORTANT Always switch off and unplug your
vacuum cleaner before changing the accessories.
COMFORT TIPS
ERGO COMFORT SILENCE Chain
Comfortable to use, the ERGO COMFORT SILENCE
range has been designed to make using your
vacuum cleaner an easier and more enjoyable
experience.
So that you can keep an upright position and avoid
bending your back, make sure you:
1. Adjust the length of the metal telescopic tube
ERGO COMFORT SILENCE to suit your body build
(Fig.5).
2. Place your second hand in front of the power
nozzle handle ERGO COMFORT SILENCE (Fig.6).
* Depending on models: either equipment specific to cer-
tain models or available as an optional accessory.
EN

10
EN
The air we breathe contains particles that may be allergens:
mite larvae and droppings, mould, pollen, smoke and animal
residues (hair, skin, saliva, urine). The smallest particles
penetrate deep into the respiratory system where they can
cause inflammation and lung impairment.(H)EPA filters (High
Efficiency Particulate Air) are used to filter out the smallest
particles. With the (H)EPA filter, the air released back into the
room is healthier than the air that is vacuumed.
1 • Changing the bag
The change bag light tells you that the bag is full or
saturated. If you notice that your vacuum cleaner is not
working as well as it should be, turn the power up to
maximum and hold the lifted nozzle above the floor. If the
light stays red, replace the bag.
a) If your vacuum cleaner is fitted with a Wonderbag* (18a) :
IIMPORTANT Wonderbag* UNIVERSAL (Classic,
Freshline, Endura ref. WB4xxx) bags are available from
retail outlets and at Approved Service Centres.
Open the cover to your vacuum cleaner (Fig.14).
Remove the bag support from the bag compartment
(Fig.15).
Remove the Wonderbag* bag from the bag support (Fig.16).
Throw the Wonderbag* bag away (Fig.17).
Place a new Wonderbag* bag in the bag support using its
ring (Fig.18).
Place the bag support in the bag compartment and fit the
bag inside the compartment (Fig.19).
Make sure that the bag is correctly positioned before closing
the cover.
b) If your vacuum cleaner is fitted with a synthetic (textile)
bag* (18b) :
Synthetic bags* (ref.RS-RT2274) are available from
Approved Service Centres.
Open the cover to your vacuum cleaner (Fig.14).
Remove the bag support from the bag compartment
(Fig.20).
Remove the synthetic bag* from the bag support (Fig.21).
Open the synthetic bag* using the zip (Fig.22) then empty it
into a dustbin (Fig.23).
Check that the zip is properly closed once more before
putting the bag back in again (Fig.24).
Place the synthetic bag* on the bag support using its
cardboard holder (Fig.25), place the bag support in the bag
compartment and fit the bag inside the compartment
(Fig.26).
Make sure that the bag is correctly positioned before closing
the cover.
2 • Changing the (H)EPA* filter
cassette (ref. ZR 0029 01*) (for all
appliances fitted with a Wonderbag*
bag)
The (H)EPA filter cassette ref. ZR 0029 01* is available from
all retail outlets and at approved Service Centres.
Open the cover to your vacuum cleaner (Fig.14). Remove the
bag support from the bag compartment (Fig.15), then
remove the (H)EPA* filter cassette (Fig.27) and throw the
cassette into a bin (Fig.28).
Fit the new (H)EPA* filter cassette (ref. ZR 0029 01*) into its
compartment (Fig.29)
Put the bag support back into the compartment (Fig.19).
Make sure that the (H)EPA* filter cassette is correctly
positioned before closing the cover.
3 • Cleaning the HEPA* filter cassette
(ref ZR0052 01*) (for appliances which
come with a synthetic bag*)
The (H)EPA* filter cassette ref.ZR0052 01* is available from
all retail outlets and at approved Service Centres.
Open the cover to your vacuum cleaner (Fig.14). Remove the
bag support from the bag compartment (Fig.20), then
remove the (H)EPA* filter cassette (Fig.30).
Tap the (H)EPA* filter cassette above a dustbin (Fig.31).
Put the (H)EPA* filter cassette (ref. ZR005201*) back in its
compartment (Fig.32).
Put the bag support back with the synthetic bag* in the bag
compartment.
Make sure that the (H)EPA* filter cassette is correctly
positioned before closing the cover.
CLEANING AND MAINTAINING
IMPORTANT Always switch off and unplug your
vacuum cleaner before servicing it.
IMPORTANT Replace the filtration system once a
year.
IMPORTANT Never operate the vacuum cleaner
without a bag.
For your peace of mind your vacuum cleaner is fitted
with a safety system which tells you that the bag is
inside (the cover won’t close unless you’ve put the
bag in).
IMPORTANT Wonderbag* COMPACT bags can’t be
used on this appliance. Using them could damage
the vacuum cleaner and may invalidate the
appliance guarantee.
* Depending on models: either equipment specific to cer-
tain models or available as an optional accessory.
IMPORTANT! This cleaning procedure is only for
(H)EPA filter cassettes ref. ZR0052 01*

11
4 • Cleaning your vacuum cleaner
Wipe the body of the appliance and the accessories with a
soft cloth (Fig.33). Do not use detergents, chemical or
abrasive products.
• This appliance has been designed for domestic use only; the
manufacturer will accept no responsibility in the event of any
inappropriate use or failure to comply with the instructions
and the guarantee will cease to apply.
• Read the instructions for use carefully before using your
appliance for the first time: any use of the appliance which
does not conform to these instructions will release Rowenta
from any liability.
GUARANTEE
If your vacuum cleaner won’t start
• The appliance has not got any power: check that the
appliance is correctly plugged in.
If your vacuum cleaner doesn’t have any suction power
• An accessory or the flexible hose is blocked: unblock the
accessory or the flexible hose.
• The cover won’t close properly: check the positioning of the
bag, bag support and (H)EPA filter cassette and close the
cover.
If your vacuum cleaner has less suction power, makes noise,
whistles
• An accessory or the flexible hose is partially blocked:
unblock the accessory or the flexible hose.
• The bag is full or saturated with fine dust: replace the
Wonderbag* bag (18a) or empty the synthetic bag* (18b).
• The filtration system is saturated: change the (H)EPA* filter
cassette (ref ZR002901*) and put it back into its housing or
clean the (H)EPA* filter cassette (ref ZR005201*) as indicated
in the procedure.
• The mechanical power control switch (20c) is open: close the
power nozzle adjustable manual power switch.
If the change bag light stays on Red
• The bag is saturated: replace the Wonderbag* bag (18a) or
empty the synthetic bag* (18b).
If the cover won’t close (presence sensors 13, 14, 16)
• Check that that the bag support is fitted as well as the bag
and that it is positioned correctly.
• Check that the (H)EPA filter cassette is fitted or that it is
correctly positioned.
If the nozzle is difficult to move
• Reduce the power by opening the power nozzle adjustable
manual power switch (20c) or by moving the electronic power
control (9) to the MIN position.
If the power cord does not rewind completely
• The power cord is slowed down when rewinding: pull the
power cord out again and press the power cord rewind button.
If a problem persists, take your vacuum cleaner to your local
Rowenta Approved Service Centre. Check the list of Rowenta
Approved Service Centres or contact Rowenta Customer
Services (you can find contact details on the last page).
TROUBLESHOOTING
IMPORTANT: As soon as you notice that your
vacuum cleaning is not working as well as it should
be and before carrying out any checks, switch it off
using the On/ Off button.
* Depending on models: either equipment specific to cer-
tain models or available as an optional accessory.
EN
IMPORTANT Never use the vacuum cleaner without
a (H)EPA filter cassette.
For your peace of mind your vacuum cleaner is
fitted with a safety system which tells you that the
(H)EPA cassette filter is in place (the cover won’t
close unless you’ve put the (H)EPA) filter cassette
in.

12
EN
WHERE TO BUY ACCESSORIES
ENVIRONMENT
• In accordance with current regulations, any appliance
which is no longer needed must be rendered unusable
once and for all: unplug and cut off the power cord be-
fore disposing of the appliance.
Help us take care of the environment!
Your appliance contains many materials which can
be recovered or recycled.
Leave it at a waste collection point so that it can be
processed.
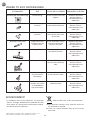
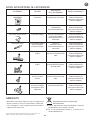
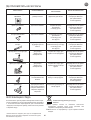
ACCESSORIES* USE FITTING AN ACCESSORY PURCHASE LOCATIONS
Wonderbag® UNIVERSAL Bag Universal bag. Fit the ring on to the bag
support.
Rowenta Approved
Service Centres
(see attached list of
addresses).
Upholstery brush For cleaning
furniture.
Fix the upholstery brush
to the end of the nozzle.
Rowenta Approved
Service Centres
(see attached list of
addresses).
Upholstery nozzle For cleaning
furniture.
Fit the upholstery nozzle
to the end of the nozzle
or the tube.
Rowenta Approved
Service Centres
(see attached list of
addresses).
Telescopic crevice tool To get into corners
and places that are
hard to reach.
Fit the telescopic crevice
tool to the end of the
nozzle or the tube.
Rowenta Approved
Service Centres
(see attached list of
addresses).
Rectangular parquet nozzle For fragile floors. Fit the parquet nozzle to
the end of the tube.
Rowenta Approved
Service Centres
(see attached list of
addresses).
DELTA parquet nozzle For fragile floors. Fit the DELTA parquet
nozzle to the end of the
tube.
Rowenta Approved
Service Centres
(see attached list of
addresses).
Mini turbobrush For cleaning
furniture fabrics
thoroughly.
Fit the mini turbobrush
to the end of the tube.
Rowenta Approved
Service Centres
(see attached list of
addresses).
Turbobrush
For removing
threads and animal
fur embedded in
rugs and carpets.
Fit the turbobrush to the
end of the tube.
Rowenta Approved
Service Centres
(see attached list of
addresses).
* Depending on models: either equipment specific to cer-
tain models or available as an optional accessory.

13
Voor uw veiligheid beantwoord dit
apparaat aan de toepasselijke
normen en reglementen (Richtlijnen
laagspanning, elektromagnetische
compatibiliteit, milieu, ...).
Dit apparaat mag niet gebruikt
worden door personen (of kinderen)
met verminderde, fysieke, zintuiglijke
of mentale capaciteiten, of personen
die te weinig ervaring of kennis
hebben tenzij ze onder de supervisie
staan van een persoon die voor hen
verantwoordelijk is of als ze genoeg
richtlijnen gekregen hebben om het
apparaat correct te hanteren.
Er moet toezicht op kinderen zijn,
zodat zij niet met het apparaat
kunnen spelen.
Dit apparaat mag gebruikt worden
door kinderen vanaf 8 jaar, door
personen zonder ervaring of kennis
en door personen met verminderde
fysieke, mentale of zintuiglijke
capaciteiten als ze genoeg uitleg en
richtlijnen gekregen hebben om het
apparaat veilig te kunnen hanteren en
de risico's kennen. Kinderen mogen
niet met het apparaat spelen. De
reinigings- en
onderhoudswerkzaamheden mogen
niet door kinderen worden
uitgevoerd tenzij ze ouder zijn dan 8
jaar en onder supervisie staan. Houd
het apparaat en het snoer buiten
bereik van kinderen jonger dan 8 jaar.
Gebruik het apparaat niet als het
snoer is beschadigd. Het
oprolsysteem en het snoer van de
stofzuiger moeten vervangen worden
door een Erkend Rowenta Service
Center om gevaarlijke situaties te
voorkomen.
1 • Voorzorgsmaatregelen voor het
gebruik
Uw stofzuiger is een elektrisch apparaat: u dient dit onder
normale gebruiksomstandigheden te gebruiken. Het apparaat
buiten bereik van kinderen gebruiken en opbergen. Zet het
apparaat nooit zonder toezicht aan.
Zorg er voor dat u de zuigmond of het buisuiteinde buiten
bereik van ogen en oren houdt.
De stofzuiger niet op natte oppervlakken gebruiken, verder
geen vloeistoffen van welke aard dan ook: hete stoffen,
bijzonder fijne stofdeeltjes (pleister, cement, as, …), grof afval
met scherpe randen (glas), schadelijke producten (oplos- of
afbijtmiddelen, ...), aggressieve producten (zuren,
reinigingsmiddelen, ...), brandbare en ontplofbare producten
(op benzine of alcoholbasis) opzuigen.
Het apparaat nooit in water onderdompelen en verder ook
geen water op het apparaat spetteren noch buiten laten staan.
Het apparaat niet gebruiken als het is gevallen en zichtbare
beschadigingen vertoont of niet juist werkt.
Maak in dat geval het apparaat niet open maar stuur het naar
het dichtsbijzijnde erkende servicecentrum of neem contact
op met de Rowenta klantenservice (contactgegevens op
laatste pagina).
2 • Elektrische voeding
Controleer of de voedingsspanning van uw stofzuiger
overeenstemt met de netspanning van uw elektrische
installatie.
Verwijder de stekker van het apparaat uit het stopcontact
zonder hierbij aan het snoer te trekken:
- onmiddellijk na het stofzuigen,
- telkens voor het wisselen van accessoires,
- telkens voor het reinigen, onderhoud of vervangen van het
stoffilter.
3 • Reparaties
Reparaties mogen alleen door specialisten worden
uitgevoerd die over de originele vervangstukken beschikken.
Het zelf uitvoeren van reparaties kan de gebruiker in gevaar
brengen en laat de garantie vervallen.
VEILIGHEIDSINSTRUCTIES
NL

14
1 • Uitpakken
Maak de verpakking open en verwijder alle aanwezige
etiketten van het apparaat. Bewaar uw garantiebewijs en
neem de gebruiksaanwijzing zorgvuldig door voor u het
apparaat de eerste keer in gebruik neemt.
2 • Raadgevingen en
voorzorgsmaatregelen
Voor elk gebruik moet het snoer volledig worden afgerold.
Zorg ervoor dat het snoer niet klemt of over scherpe randen
wordt gevoerd. Als u een verlengsnoer gebruikt, controleer
dan of dit in goede staat verkeert en geschikt is voor het
vermogen van uw stofzuiger. Het apparaat nooit uitschakelen
door aan het snoer te trekken.
De stofzuiger nooit zonder stofzak en filtersysteem
(cassettefilter) laten werken.
Uw apparaat is daarom voorzien van twee
veiligheidssystemen voor de detectie van: de stofzak (13 & 14)
en voor het (H)EPA (16) cassettefilter.
De stofzuiger niet verplaatsen door aan het snoer te trekken,
gebruik hiervoor de transporthandgreep van het apparaat.
Het snoer niet gebruiken om het apparaat op te tillen.
Schakel na elk gebruik uw stofzuiger uit en haal de stekker uit
het stopcontact. Schakel uw stofzuiger altijd uit voor het
uitvoeren van onderhoud of reiniging en haal de stekker uit
het stopcontact. Gebruik alleen originele Rowenta of
Wonderbag stofzakken en –filters.
Gebruik alleen de originele Rowenta accessoires. Controleer
of alle filters goed zijn geplaatst.
Als u moeilijk accessoires of filters kunt krijgen voor deze
stofzuiger, neem dan contact op met de Rowenta
klantenservice (zie contactgegevens op laatste pagina).
VOORDAT U HET APPARAAT DE EERSTE KEER IN GEBRUIK NEEMT
NL
Dankzij het exclusieve ROWENTA EXTREME
SILENCE SYSTEM garandeert uw stofzuiger
een sterke geluidsvermindering tijdens het gebruik.
* Afhankelijk van model: het gaat hier over specifieke uit-
rusting of accessoires die optioneel verkrijgbaar zijn voor
bepaalde modellen.
BESCHRIJVING
1
Deksel
2
Openingshendel deksel
3
Transporthandgreep
4
Knop snoeropwindmechanisme
5
Aan/uit-knop
6
Indicatie volle stofzak
7 Zuigopening
8
ROWENTA EXTREME SILENCE SYSTEM
9
Elektronische vermogenregeling
10 a
– Verticale parkeerclip
b
– Horizontale parkeerclip
11
Vak voor stofzak
12
Zakhouder voor Wonderbag* stofzak of stoffen stofzak*
13
Indicator aanwezigheid stofzak
14
Indicator aanwezigheid zakhouder
15
Vak (H)EPA* cassettefilter
16
Indicator aanwezigheid (H)EPA* cassettefilter
17 a
- (H)EPA* cassettefilter (ref. ZR002901) geschikt voor
Wonderbag* stofzakken
b
- (H)EPA* cassettefilter (ref. ZR002901) geschikt voor
stoffen* stofzakken
18 a
- Stofzak Wonderbag* UNIVERSAL (Classic,
Freshline, Endura ref. WB4xxx)
b
– Stoffen stofzak* (ref. RS-RT2274)
Accessoires
19
Flexibele slang met ERGO COMFORT SILENCE
handgreep
20A* a - Ergonomische ERGO COMFORT SILENCE
handgreep
b - Geïntegreerde borstel (EASY BRUSH)
c - Mechanische vermogensregeling (POWER
CONTROL)
20B* a - Ergonomische ERGO COMFORT SILENCE
handgreep
b - Mechanische vermogensregeling (POWER
CONTROL)
c - Geïntegreerde borstel (EASY BRUSH)
21
Metalen telescoopbuis ERGO COMFORT SILENCE
a
- Vergrendeling handgreep/buis (LOCK SYSTEM)
b
- Regelknop van de buis (TELESCOPIC SYSTEM)
22
Zuigmond voor alle vloeren ERGO COMFORT
SILENCE
a
- Vergrendeling buis/zuigmond (LOCK SYSTEM)
b
- Knop met 2 posities: borstel inschuiven voor
matten en vast tapijt/borstel uitschuiven voor
parket en gladde vloeren.
23
Zuigmond telescopisch spleetaccesoire*
24
Zuigmond voor meubels*
25
Rechthoekige parketzuigmond*
26
Parketzuigmond DELTA*
27
Turboborstel*
28
Mini-turboborstel*

15
NL
1 • Het apparaat in elkaar zetten
Plaats de flexibele stofzuigslang in de zuigopening (Fig.1) en
draai deze tot hij vastklikt. Om de slang te verwijderen, draait
u in omgekeerde richting en naar u toe trekken.
• Steek de metalen telescopische buis over de handgreep tot
u
deze hoort vastklikken (Fig.2) (om te verwijderen op de
vergrendelknop drukken en buis lostrekken).
• Steek de zuigmond voor alle vloeren (22) over het uiteinde
van de metalen telescopische buis tot u deze hoort vastklikken
(Fig.3) (om te verwijderen op de vergrendelknop drukken en
zuigmond lostrekken).
• Stel de gewenste lengte van de metalen telescopische buis
in met behulp van het telescopisch systeem (TELESCOPIC
SYSTEM) (Fig.4)
Plaats het geschikte accessoire op het uiteinde van de
metalen telescopische buis of de handgreep:
- voor matten of vast tapijt: de zuigmond voor alle vloeren
gebruiken met uitgeschoven borstel of de Turboborstel*
(vezels en dierenhaar).
- Voor parket en gladde vloeren: de zuigmond voor alle
vloeren gebruiken met uitgeschoven borstel of voor een beter
resultaat kunt u ook de parketzuigmond* gebruiken.
- Voor hoekjes en moeilijk bereikbare plaatsen: het
telescopische spleetaccessoire* gebruiken.
- Voor meubels en kwetsbare oppervlakken: de geïntegreerde
borstel van de handgreep (EASY BRUSH) of de
meubelzuigmond* gebruiken.
2 • Het snoer aansluiten en het
apparaat inschakelen
Rol het snoer volledig af, steek de stekker van uw stofzuiger in
het stopcontact en druk op de aan/uit-knop (Fig.7).
Opmerking: u kunt uw stofzuiger zowel horizontaal
(sledestofzuiger) als verticaal plaatsen tijdens het gebruik,
bijvoorbeeld tijdens het stofzuigen van de trap of om de
gordijnen te stofzuigen.
Het zuigvermogen regelen:gebeurt via de elektronische vermogensregeling (Fig.8) :
• Positie (Min.) voor het stofzuigen van delicate
stoffen (voile, textiel).
• Positie (Gemiddeld) voor het dagelijks stofzuigwerk
van alle soorten vloeren bij lage vuilgraad.
• Positie (Max.) voor het stofzuigen van harde
vloeren, matten en vast tapijt bij hoge
vuilgraad.
met de mechanische vermogenregeling op de handgreep:
open de schuifklep om handmatig het zuigvermogen te
regelen en te vermijden dat de zuigmond aan het te
stofzuigen oppervlak blijft ‘plakken’ (Fig. 9a* of 9b*) bijv.:
voile, kwetsbare oppervlakken, …
3 • Opbergen en verplaatsen van het
apparaat
Na elk gebruik, schakelt u de stofzuiger uit door op de aan/uit-
knop te drukken en de stekker uit het stopcontact te halen
(Fig.10). Berg het snoer op door de knop van het
snoeropwindmechanisme (Fig.11) in te drukken. Plaats de
zuigmond in de parkeerstand in de verticale positie (Fig.12).
U kunt de stofzuiger ook in de parkeerstand verplaatsen
(Fig.13).
GEBRUIK
BELANGRIJK: De stofzuiger nooit zonder stofzak en
filtersysteem (cassettefilter) laten werken.
OPGELET: De stofzuiger altijd uitschakelen en de
stekker uit het stopcontact halen voor u de
accessoires verwisselt.
ERGONOMISCHE TIPS
De ERGO COMFORT SILENCE
is een ergonomische productlijn, de ERGO
COMFORT SILENCE werd ontworpen met het oog
op het (verbeteren) van het gebruikerscomfort
tijdens het stofzuigen.
Om te vermijden dat u met gebogen rug stofzuigt
en u mooi rechtop staat is het belangrijk om:
1. De lengte van de metalen telescopische buis
ERGO COMFORT SILENCE op uw lichaamsbouw in
te stellen (Fig.5).
2. Plaats uw andere hand aan de voorkant van de
ERGO COMFORT SILENCE handgreep (Fig.6).
* Afhankelijk van model: het gaat hier over specifieke uit-
rusting of accessoires die optioneel verkrijgbaar zijn voor
bepaalde modellen.

16
NL
De lucht die we inademen bevat deeltjes die allergieën kunnen
veroorzaken: larven en uitwerpselen van mijtachtigen, schimmels,
pollen, rook en dierresten (haren, huidschilfers, speeksel, urine).
De allerkleinste deeltjes dringen diep door in het
ademhalingsstelsel of kunnen irritatie van de luchtwegen
veroorzaken en het volledige ademhalingsstelsel beïnvloeden.
De (H)EPA-filters of (High) Efficiency Particulate Air Filters, voor de
zwevende deeltjes laten toe om de allerkleinste deeltjes vast te
houden.
Dankzij het (H)EPA-filter is de lucht die terug in de ruimte word
geblazen gezonder dan de aangezogen lucht.
1 • Stofzak vervangen
De indicatie volle stofzak duid aan dat de stofzak vol is of bijna
vol is. Als u merkt dat uw apparaat minder efficiënt stofzuigt,
stel het dan in op maximaal vermogen en houd de zuigmond
boven de vloer. Als de indicatie nog altijd rood blijft, vervang
dan de stofzak.
a) Als uw stofzuiger is uitgerust met een Wonderbag* stofzak
(18a):
De Wonderbag* UNIVERSAL stofzakken (Classic,
Freshline, Endura ref. WB4xxx) zijn verkrijgbaar bij
uw retailer of in de erkende service centers.
Open het deksel van uw stofzuiger (Fig.14).
Trek de zakhouder uit het vak voor de stofzak (Fig.15).
Trek de Wonderbag* stofzak uit de zakhouder (Fig.16).
Gooi de Wonderbag* stofzak in de vuilnisbak (Fig.17).
Plaats een nieuwe Wonderbag* stofzak in de zakhouder met
behulp van de ring (Fig.18).
Plaats de zakhouder in het vak voor de stofzak en verdeel de
stofzak goed in het vak (Fig.19).
Controleer of de stofzak goed is geplaatst voordat u het deksel
opnieuw sluit.
b) Als uw stofzuiger is uitgerust met een stoffen* stofzak
(18b):
De stoffen stofzak* (ref.RS-RT2274) zijn verkrijgbaar
bij de erkende service centers.
Open het deksel van uw stofzuiger (Fig.14).
Trek de zakhouder uit het vak voor de stofzak (Fig.20).
Trek de stoffen* stofzak uit de zakhouder (Fig.21).
Open de stoffen* stofzak met de ritssluitting (Fig.22) en maak
deze leeg boven een vuilbak (Fig.23).
Zorg ervoor dat de ritssluitting goed gesloten is voordat u de
stofzak terugplaatst (Fig.24).
Plaats de stoffen* stofzak op de zakhouder via het kartonnnen
plaatje (Fig.25), plaats de zakhouder in het vak voor de stofzak
en verdeel de stofzak goed in het vak (Fig.26).
Controleer of de stofzak goed is geplaatst voordat u het deksel
opnieuw sluit.
2 • Het (H)EPA* cassettefilter
vervangen (ref. ZR 0029 01*) (voor
de apparaten voorzien van een
Wonderbag* stofzak)
Het (H)EPA cassettefilter réf. ZR 0029 01* is verkrijgbaar bij uw
retailer of in de erkende service centers.
Open het deksel van uw stofzuiger (Fig.14). Trek de zakhouder
uit het vak voor de stofzak (Fig.15) en verwijder daarna het
(H)EPA* cassettefilter (Fig.27) waarna u het in de vuilnisbak
gooit (Fig.28).
Het (H)EPA* cassettefilter terug (ref. ZR 0029 01*) in het vak
plaatsen (Fig.29).
Plaats ook de zakhouder terug in het vak (Fig.19).
Controleer of het (H)EPA* cassettefilter goed is geplaatst
voordat u het deksel opnieuw sluit.
3 • Het HEPA* cassettefilter (ref
ZR0052 01*) reinigen (voor apparaten
voorzien van een stoffen* stofzak)
Het (H)EPA* cassettefilter met ref.ZR0052 01* is verkrijgbaar
bij uw retailer of een van de erkende service centers.
Open het deksel van uw stofzuiger (Fig.14). Trek de
zakkhouder uit het vak voor de stofzak (Fig.20) en verwijder
daarna het (H)EPA* cassettefilter (Fig.30).
Het (H)EPA* cassettefilter leegschudden boven een vuilnisbak
(Fig.31).
Het (H)EPA* cassettefilter terug (ref. ZR005201*) in het vak
plaatsen (Fig.32).
Plaats de zakhouder samen met de stoffen* stofzak terug in
het vak voor de stofzak.
Controleer of het (H)EPA* cassettefilter goed is geplaatst
voordat u het deksel opnieuw sluit.
REINIGING EN ONDERHOUD
BELANGRIJK Schakel uw stofzuiger uit en haal de
stekker uit het stopcontact voor het uitvoeren van
onderhoud.
BELANGRIJK Vervang het filtersysteem eenmaal
per jaar.
BELANGRIJK De stofzuiger nooit zonder stofzak
laten werken.
Uw apparaat is daartoe voorzien van een
veiligheidssysteem voor stofzakdetectie (het deksel
kan niet worden gesloten als u geen stofzak heeft
geplaatst).
OPGELET De Wonderbag* COMPACT stofzakken
zijn niet compatibel met dit apparaat. Het gebruik
van deze stofzakken zal het apparaat beschadigen
en komt de garantie te vervallen.
* Afhankelijk van model: het gaat hier over specifieke uit-
rusting of accessoires die optioneel verkrijgbaar zijn voor
bepaalde modellen.
OPGELET! Deze reiniging beperkt zich uitsluitend
tot het (H)EPA cassettefilter ref. ZR0052 01*.
La pagina si sta caricando...
La pagina si sta caricando...
La pagina si sta caricando...
La pagina si sta caricando...
La pagina si sta caricando...
La pagina si sta caricando...
La pagina si sta caricando...
La pagina si sta caricando...
La pagina si sta caricando...
La pagina si sta caricando...
La pagina si sta caricando...
La pagina si sta caricando...
La pagina si sta caricando...
La pagina si sta caricando...
La pagina si sta caricando...
La pagina si sta caricando...
La pagina si sta caricando...
La pagina si sta caricando...
La pagina si sta caricando...
La pagina si sta caricando...
La pagina si sta caricando...
La pagina si sta caricando...
La pagina si sta caricando...
La pagina si sta caricando...
La pagina si sta caricando...
La pagina si sta caricando...
La pagina si sta caricando...
La pagina si sta caricando...
La pagina si sta caricando...
La pagina si sta caricando...
La pagina si sta caricando...
La pagina si sta caricando...
La pagina si sta caricando...
La pagina si sta caricando...
La pagina si sta caricando...
La pagina si sta caricando...
La pagina si sta caricando...
La pagina si sta caricando...
La pagina si sta caricando...
La pagina si sta caricando...
La pagina si sta caricando...
La pagina si sta caricando...
La pagina si sta caricando...
La pagina si sta caricando...
La pagina si sta caricando...
La pagina si sta caricando...
La pagina si sta caricando...
La pagina si sta caricando...
La pagina si sta caricando...
La pagina si sta caricando...
La pagina si sta caricando...
La pagina si sta caricando...
La pagina si sta caricando...
La pagina si sta caricando...
La pagina si sta caricando...
La pagina si sta caricando...
La pagina si sta caricando...
La pagina si sta caricando...
La pagina si sta caricando...
La pagina si sta caricando...
-
 1
1
-
 2
2
-
 3
3
-
 4
4
-
 5
5
-
 6
6
-
 7
7
-
 8
8
-
 9
9
-
 10
10
-
 11
11
-
 12
12
-
 13
13
-
 14
14
-
 15
15
-
 16
16
-
 17
17
-
 18
18
-
 19
19
-
 20
20
-
 21
21
-
 22
22
-
 23
23
-
 24
24
-
 25
25
-
 26
26
-
 27
27
-
 28
28
-
 29
29
-
 30
30
-
 31
31
-
 32
32
-
 33
33
-
 34
34
-
 35
35
-
 36
36
-
 37
37
-
 38
38
-
 39
39
-
 40
40
-
 41
41
-
 42
42
-
 43
43
-
 44
44
-
 45
45
-
 46
46
-
 47
47
-
 48
48
-
 49
49
-
 50
50
-
 51
51
-
 52
52
-
 53
53
-
 54
54
-
 55
55
-
 56
56
-
 57
57
-
 58
58
-
 59
59
-
 60
60
-
 61
61
-
 62
62
-
 63
63
-
 64
64
-
 65
65
-
 66
66
-
 67
67
-
 68
68
-
 69
69
-
 70
70
-
 71
71
-
 72
72
-
 73
73
-
 74
74
-
 75
75
-
 76
76
-
 77
77
-
 78
78
-
 79
79
-
 80
80


Rowenta RO5822 11 SILENCE FORCE Manuale del proprietario
- Categoria
- Aspirapolvere
- Tipo
- Manuale del proprietario
- Questo manuale è adatto anche per
in altre lingue
- English: Rowenta RO5822 11 SILENCE FORCE Owner's manual
- français: Rowenta RO5822 11 SILENCE FORCE Le manuel du propriétaire
- español: Rowenta RO5822 11 SILENCE FORCE El manual del propietario
- Deutsch: Rowenta RO5822 11 SILENCE FORCE Bedienungsanleitung
- русский: Rowenta RO5822 11 SILENCE FORCE Инструкция по применению
- Nederlands: Rowenta RO5822 11 SILENCE FORCE de handleiding
- português: Rowenta RO5822 11 SILENCE FORCE Manual do proprietário
- Türkçe: Rowenta RO5822 11 SILENCE FORCE El kitabı
Documenti correlati
-
Rowenta RO5925 11 Manuale del proprietario
-
-
-
-
-
-
-
-
-
