Ocean Digital WR-280S Manuale utente
- Categoria
- Sveglie
- Tipo
- Manuale utente
Questo manuale è adatto anche per

WR-282CD
Wooden Internet Radio
with DAB
User Manual
Please read this user manual carefully before using the receiver


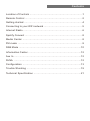
Contents
Location of Controls ...................................................................1
Remote Control .........................................................................2
Getting started ..........................................................................4
Connecting to your WiFi network .................................................5
Internet Radio ...........................................................................6
Spotify Connect .........................................................................8
Media Center ............................................................................8
FM mode ..................................................................................9
DAB Mode ...............................................................................10
Information Center ...................................................................12
Aux In .....................................................................................12
DLNA .....................................................................................12
Configuration ..........................................................................13
Trouble Shooting .....................................................................19
Technical Specification ............................................................21

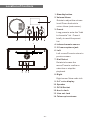
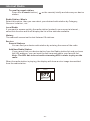
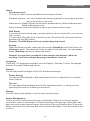
1. Standby button
2. Volume/Home
Rotate to adjust the volume
level/Press the knob to
return Home (main menu).
3. Preset
Long press to enter the "Add
to favourite" list. Press it
briefly to recall the preset
list.
4. Infrared remote sensor
5. 3.5 mm earphone jack
6. Left
Left cursor/Press to return to
previous menu.
7. Dial/Select
Rotate to browse the
menu/Press to confirm a
selection or stop the
playback.
8. Right
Right cursor/View radio info
9. 2.4” color display
10. Speaker
11. DC IN Socket
12. Aux-In Jack
13. Line out Jack
14. Telescopic antenna
14
DC IN
Location of Controls
- 01 -

SELECT
Alarm
Sleep
Vol- Vol+
►
►
►
►
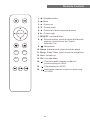
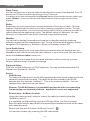
1. : Standby button
2. : Mute
3. ▲ : Cursor up
4. ▼ : Cursor down
5. ◄ : Cursor left / back to previous menu
6. ► : Cursor right
7. SELECT: confirm button
8. : Favorite button, press to recall the favorite
stations, hold to enter the "Add to
favourite" list
9. : Main menu
10. Alarm: Alarm button, press to set the alarm
11. Sleep: Sleep Timer, press to set the sleep time
12. Vol+: Volume up
13. Vol-: Volume down
14. : Previous radio channel on the list /
previous song on UPnP
15. : Play/pause (for UPnP)
16. : Next radio channel on the list / next song
on UPnP
Remote Control
- 02 -

Please ensure the following is ready:
• You have a broadband internet connection.
• A wireless (Wi-Fi) broadband router is connected to the internet successfully. The
radio supports Wireless B, G and N connection (Wireless N router can also be
used with the setting on B or G).
• You know the Wired Equivalent Privacy (WEP) or Wi-Fi Protected Access (WPA)
data encryption code/password. You need to key in the correct code when the
radio is connected to the wireless router for network connection. If you do not
know the code/password, please contact the person /technician who set up the
router/network for you.
• The radio can work via Wireless network connection (Wi-Fi connection).
Precautions
• The radio should not be used in a high temperature or high humidity environment
over prolonged periods of time as this may damage the unit.
• Keep the radio away from liquids as it may get damaged. Please switch off the
radio immediately if water or liquids is spilled into the radio. Consult with the shop
you bought this radio for any question.
• Avoid using or storing the unit in dusty or sandy environment.
• Do not open and repair the radio by yourself.
• Use only the DC adaptor supplied with the radio.
Connecting a power supply with a different rating will cause permanent damage to
the radio and may be hazardous.
• Clean only with dry cloth
Before you start
- 03 -

Connect the mains adaptor to the radio unit, one end to the DC IN on the radio and
the other end to the mains wall outlet.
Caution: Use only the mains adaptor supplied with the radio. Connecting a
power supply with a different rating will cause permanent damage to the radio
and may be hazardous.
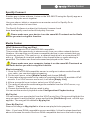
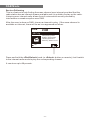
The display on the front of the radio will light up and show:
Then you can select your prefer language on the radio.
It will ask you if you want to Enable the <Check Network when Power on>, it is
suggested to choose <Yes>. Then the radio will always check the available WiFi
network automatically.
Getting started
- 04 -
• English
Deutsch
Español
Français
1/17
01:44
Welcome

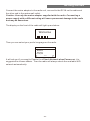
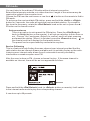
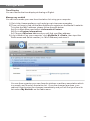
The screen below will appear. You can choose <Yes> to proceed to search for the
available WiFi network. If your router has the WPS function, you can select
<Yes(WPS)> to proceed.
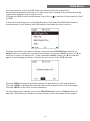
It will then start scanning the network. After the search is done, it will display a list of
the available router.
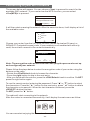
Choose your router from the list, enter the WEP(Wired Equivalent Privacy) or
WPA(Wi-Fi Protected Access) code. If your network is not enabled with security
code, the unit will connect to the router automatically.
Note: The encryption code would have been set up by the person who set up
and configured your network.
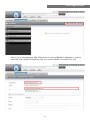
Please follow the steps below to enter the encryption code of your router using the
buttons on the radio:
- Rotate the <Dial/Select> knob to browse the character
- Press the right button to skip to the next entry
- After you finish with the entries, press the <Dial/Select> knob to confirm. Do NOT
press the right button again.
To use the remote control entering the password: Press "▲" or "▼" button to select
the characters. Press the " ► " button for the next entry, press " ◄ " button to delete
the character or to amend it. When the last character is entered, press the
<SELECT> button this time.
Do NOT press the “►” button.
The radio will start connecting to the network.
After the router is connected successfully, it will display the main menu as follow:
You can now start enjoying the internet radio.
08:58
Internet Radio
5
Connecting to your WiFi network
- 05 -
01:44
Linksys
Homeaudio
Demo
01:01
Would you like to
configure Network now?
Yes(WPS) NOYes
Enter
Password
1/1
16:23
Input: Ç È Å Move Æ OK

Choose <Internet Radio> from the menu, you can see several listed options.
To start listening the radio stations worldwide, select <Radio Station/Music>.
My Favorite
This is to show the list of your Favorite stations which have been assigned to the
presets.
To preset a station:
While you are playing the favorite station, long pressing the <Preset> button
( on the remote) and the <Add to My Favorite> menu will display. Press
the rotary knob to confirm. The playing station will be added to the preset list
automatically.
The presets will be stored in ascending order. You can store up to 250
presets.
Note: Preset 1 to 5 are reserved for your own choice of the dedicated
radio channels. Scroll to choose the desired number to save your
favourite channel. To save more channels after the first five presets are
occupied, press and hold the preset button and it will assign to preset
no. 6 onwards.
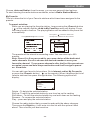
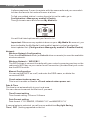
You can edit your favorite list anytime. Go to Internet radio> My Favourite
or press the <Preset> button ( on the remote), When it displays the list of
favorite stations then press the right button. The following options will
display:
Delete – To delete the selected station
Shift up- To shift the selected station by one level up on the ranking
Shift down – To shift the selected station by one level down on the ranking
Rename – To rename the selected station
Play – press and play the selected station
Choose the radio station that you want to make with the above changes.
Then press the Right key, it will enter into the list with the options listed
above. Then choose your desire action.
Press [Dial/Select] knob to confirm
The symbol means the station has
already been added to the favourite list
Internet Radio
- 06 -
Delete
Shift Up
Shift Down
Rename
1/5
iRadio

Internet Radio
To recall a preset station:
Press the <Preset> button ( on the remote) briefly and choose your desire
station.
Radio Station / Music
Select this option, then you can select your desired radio station by Category,
Genre or Location., etc.
Local Radio
If you want to access quickly the radio station located in your area via internet, ,
select this function and it will display the list of the stations available.
History
The radio will memorize the last listened 10 stations.
Service
Search Stations
You can find your desire radio station by entering the name of the radio.
Add New Radio Station
If you cannot find your desire station from the Radio station list and you have
the URL address, you can input the link here and add to your favorite list.
Note: The URL has to be an audio streaming URL in order to play on the
radio.
When the radio station is playing, the display will show a color image transmitted
from the radio station.
iRadio
.977 The 80s Channel
977
Music
Internet Radio
- 07 -

A better way to listen at home. Listen on the WR-282CD using the Spotify app as a
remote. Enjoy the music together.
Use your phone, tablet or computer as a remote control for Spotify.Go to
spotify.com/connect to learn how.
The Spotify Software is subject to third party licenses found
here:www.spotify.com/connect/third-party-licenses
Please make sure your device is on the same Wi-Fi network as the Radio
before you start using this function.
/Media Center
UPnP (Universal Plug and Play)
The device supports UPnP and is DLNA-compatible.
This provides the opportunity to stream music from your other network devices.
However, this requires you to have a compatible device in your network that can
function as a server. This can be e.g., a network hard drive or a conventional PC
with e.g., Windows 8 via which access to the shared folder or media sharing is
permitted. The folders can then be browsed and played on the Tuner.
Please make sure your computer laptop is on the same Wi-Fi network as
the Radio before you start using this function.
Music streaming
1. Once the UPnP/DLNA compatible server is configure to share media files with
your radio, you can start music streaming.
2. On the main menu, select [Media Centre] and choose [UPnP].
3. It may take a few seconds for the radio to complete the scan for available UPnP
servers. If no UPnP servers are found, it will show [Empty List].
4. After a successful scan is done, select your UPnP server.
5. The radio will show the media categories available from the UPnP server, e.g.
‘Music’, ‘Playlists’ etc.
6. Choose the media files that you wish to play.
You can set the mode of playback under Configuration>Playback setup.
My Playlist
You can make your own playlist from the UPnP music files. Choose and highlight the
song you want to add to playlist, press and hold the [Dial/Select] knob, unit the sign
appears. The song will be added to My playlist.
Clear My Playlist
Remove all songs in My playlist to allow a new playlist to be prepared.
Note - If you have DLNA compatible servers available, follow the steps described
above to browse the audio files from DLNA compatible device on the radio to play.
Spotify Connect
Media Center
- 08 -

You can listen to the ordinary FM radios without internet connection.
Extend the telescopic antenna or in other direction / length of the antenna may be
required to optimize the reception level.
Choose the FM from the main menu or use the < > button on the remote to find to
FM mode.
To auto scan the next available FM station, press and hold the <Left> or <Right>
button for 2 seconds, the radio will seek the next available station. If you want to
fine tune the frequency, rotate the <Dial/Select> knob on the unit or press the ▲ /
▼ button on the remote control.
Auto preset scan
There is an option to auto preset the FM station. Press the <Dial/Select>
knob (or Select button on the remote), it will ask you whether to Auto Scan or
not. Choose "Yes" and press <Select> to confirm, and it will start scanning
and preset the station. When it is finished, press the <Preset> button ( on
the remote) and it will display the first preset station.
The preset can be superseded by a new station anytime.
Service Following
This is a feature to help finding the same channel over internet provided that the
radio station has an internet stream available and it is suitable to play on the radio.
Listening over internet radio allows free of noises which usually caused by
interference or weak reception over FM.
After the scan is done on FM, choose a channel to play. If the same channel is
available on Internet, there will be an icon appeared as follow:
Press and hold the <Dial/Select> knob (or <Select> button on remote), it will switch
to the internet radio mode to play the corresponding channel.
It can store up to 99 presets.
FM mode
- 09 -

You can listen to ordinary DAB channels without internet connection.
Extend the telescopic antenna or in other direction / length of the antenna may be
required to optimize the reception level.
Choose the DAB from the main menu or use the < > button on the remote to find
to DAB.
If this is the first time you use the DAB mode, it will scan the DAB radio station
automatically. It will display the DAB station list when the scan is done.
Choose the station you want to listen, and press the <Dial/Select> button (or
Select button on remote) to confirm for playing. Press the <Left> button (or ◄ on
remote) to return to station list. If you press the <Left> button (or ◄ on remote)
again, it will display as follow. It allows for a re-scan of the DAB stations:
Choose <NO>to keep the existing station list and scan for any new stations.
Choose <YES> to delete the existing station list and perform a full scan again.
Choose <ESC> to exit the current operation.
To stop playing the station, press the <Dial/Select> knob (or Select button on
remote). Whenever you want to resume to play, press the same button again.
DAB Mode
- 10 -

DAB Mode
Service Following
This is a feature to help finding the same channel over internet provided that the
radio station has an internet stream available and it is suitable to play on the radio.
Listening over internet radio allows free of noises which usually caused by
interference or weak reception over DAB.
After the scan is done on DAB, choose a channel to play. If the same channel is
available on Internet, there will be an icon appeared as follow:
Press and hold the <Dial/Select> knob (or <Select> button on remote), it will switch
to the internet radio mode to play the corresponding channel.
It can store up to 99 presets.
- 11 -
DAB
ABC dig
Now playing: Don’t
Explain, Artist: Billie
Hoilday (Dzihan &
Kamien), Album:Verve
List

Information Center/Aux-In/DLNA
Weather
The radio provides weather information and can display in Standby mode. To
enable this feature, follow the steps below:
Go to main menu, choose Information Center> Weather Information, choose the
region you want it to display the weather information. After region is selected, press
the <Dial/Select> knob (or Select button on remote) it will display the weather info
of the selected region. Then press the same button again and it shows <Add to
Standby Display>, select to confirm using the <Dial/Select> knob or Select button
on remote. The weather info is enabled now to display in standby.
The date/time and weather info will appear alternatively every 10 seconds.
In standby with the analogue clock display, press the right button (or the ► button
on remote) to see the real time weather information.
Press the same button repeatedly to see the forecast for the next 4 days. To view
more details for a particular day individually, rotate the <Dial/Select> knob to scroll
down for more information ( or the ▲ / ▼ button on the remote).
To refresh the weather information, press the <Dial/Select> knob or Select button
on the remote.
Remark: The weather is just for reference only. It may have deviation to the actual
weather.
System Information
You can view the information of the radio such as the Version of the software / Wlan
Mac / IP address..etc.
Aux In
You can enjoy the music from other audio devices by connecting the audio cable to
the AUX IN connector at the rear of the unit, such as mobile phone, MP3 player, etc.
DLNA
The Internet radio can play music stream from DLNA compatible device, provided
that the Internet radio and other DLNA devices are under the same Wi-Fi network.
The radio will be discovered as “AirMusic” when you try to search it on other
devices. If you want to change other name from AirMusic, go to Configuration and
DLNA setup to make the change.
Information Center
- 12 -

Time Display
You can choose the time display at Analog or Digital.
Manage my mediaU
You can tailor made your own favorite station list using your computer.
1) Go to http://www.mediayou.net/ and sign up to become a member.
2) Then you have to find out the Mac Address to register on the Media U website.
To locate the MAC address, please follow the path below:
2a) Go to Main Menu and select <Information Center>
2b) Go to <System Information>
2c) Choose <Wireless Info> and you will find your Mac address.
3) Log-in Media U on your computer, click My Media U > Radio, then input the
Radio name and Serial number (i.e. MAC Address) and save it.
You can then organize your own favorite stations or add any new station which
is currently not found on the station list. Once the changes are done, your
radio will synchronize the changes immediately and you will find your favorite
list under <My MediaU> on the radio menu.
Configuration
- 13 -

Configuration
Note: If you are going to add URL which is not on Media U database, ensure
the URL is an audio streaming URL or contact Media U to add it for you.
- 14 -

Configuration
It allows maximum 5 users to register with the same radio and you can switch
to listen the favorite list under one user at a time
To find your added station / custom favorite list on the radio, go to
Configuration > Manage my mediaU > Enable
Then go to main menu and choose <My Media U>.
You will find listed options with your favorite list.
Important: Whenever any update is done on your <My Media U> account, you
have to disable the My Media U and enable it again to refresh and get the
latest updated list. (Configuration> Manage my mediaU > Disable>Enable)
Network
Wireless Network Configuration
Press the <Dial/Select> knob (or Select button on remote) to scan the available
wireless network.
Wireless Network (WPS PBC)
The WPS allows to connect the radio with your router by pressing one key on the
radio and a WPS key on your router for wifi connection, provided that your router
has the WPS function.
Manual Configuration
You can set the DHCP on or off, and enter the SSID name, or delete the
connected SSID.
Check network when power on
This is set to enable or disable <Check network when power on>.
Date & Time
The time is set automatically to your local area.
You can choose to manual set the time if you want.
Time Format setting
Time format setting: 12hours / 24hours
Date Format setting
Date format: YYYY/MM/DD, DD/MM/YYYY and MM/DD/YYYY
If manual setup is selected, you will see an added item Daylight Saving
Time(DST) setting appeared on the list.
- 15 -

Configuration
Alarm
Dual alarm clock
There are 2 alarm clocks available and settings as follow:
Scheduling alarm: You can schedule the alarm repeated for every day, particular
day in the week or just once.
Alarm sound: Wake to Radio (must be the preset station), Wake to Melody and
Wake to Beeping sound.
Alarm Volume: select this option to adjust your desire volume level.
NAP Alarm
If you would like to take a nap or need an alarm to due in short time, you can use
this function.
You can select the time from 5 minutes up to 120 minutes. No Snooze function
available for the NAP alarm.
Remark: The NAP Alarm will only release beeping sound.
Snooze
When the Alarm sounds, press any key except <Standby> button will enter into
<Snooze> mode. The alarm will come on again 5 minutes later. You can always
press <Standby> button to cancel the alarm.
Remark: In case there is network issue renders the wake to radio not
working, it will auto release beeping sound after 1 minute.
Language
There are 17 Languages available, such as English, German, French, Norwegian,
Italiano, Svenska, Dansk and others.
Dimmer
You can adjust the backlight of the LCD with below settings:
Power Saving
You can set the backlight to dim down when there is no operation for a certain
time of period.
Turn on
You can adjust the backlight level for the operation mode, i.e. when you are
operating the radio or checking on the menu.
Display
You can choose the display in color or monochrome style.
Power Management
This function is to allow the radio to go to Standby if there is no internet signal
received in order to save power. The default setting is 30 minutes. When the radio
does not receive any internet signal, the radio will go into Standby after 30 minutes.
Other time frame for 5 minutes and 15 minutes are available. You can choose to turn
it off too.
- 16 -

Configuration
Sleep Timer
You can set the timer to put the radio in standby after certain time elapsed, from 15
minutes to 180 minutes with the step of every 15 minute.
You also can do the setting with the <Sleep> button from remote control, when you
press <Sleep>, then you can see the sleep timer on the top right corner of the
display.
Buffer
Sometimes you may experience uneven playback of the internet radio. This can
happen if the internet connection is slow or network congestion occurs. To help
improving the situation, you can choose longer buffer time to get a few seconds of
radio stream before beginning to play. The default value is 2 seconds. You can
choose 4 or 8 seconds if you prefer to have a longer buffering time.
Weather
You can set to display the weather information in standby mode by choosing
different regions and the temperature unit. To turn off the weather display, please
navigate to Configuration > Weather > Show on Standby > select OFF
Local Radio Setup
The radio will detect your local area stations automatically and simply press the
<Local> on the radio to access the radio stations in your local area. You can find it
under the <Internet radio> menu too.
If you would like to change the Local area stations to other countries, you can
choose “Manual setup” to make the change.
Playback Setup
This is to set the preference of UPnP playback. You can set the playback as Off,
Repeat one, Repeat all, Shuffle.
Device
DLNA Setup
The radio can play music from DLNA compatible devices which connected to the
same wifi network as the radio. The radio will be discovered by the DLNA
devices with the name as “AirMusic”. This is the name by default. You can
change other name here as you desire.
Remark: The DLNA feature is compatible and works with corresponding
3rd party Apps on Android platform. Apple devices are not supported.
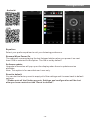
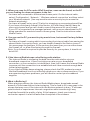
Remote App - AirMusic Control
Using your smart phone / tablet to control the radio by installing the App
"AirMusic Control".
It is available on Android Play store and iOS App Store. It's free of charge.
Both the radio and the device with the remote app installed must be on the same
wifi network to work.
Search the App with the name "AirMusic Control”
You can also locate it by scanning the QR code below:
- 17 -
La pagina si sta caricando...
La pagina si sta caricando...
La pagina si sta caricando...
La pagina si sta caricando...
-
 1
1
-
 2
2
-
 3
3
-
 4
4
-
 5
5
-
 6
6
-
 7
7
-
 8
8
-
 9
9
-
 10
10
-
 11
11
-
 12
12
-
 13
13
-
 14
14
-
 15
15
-
 16
16
-
 17
17
-
 18
18
-
 19
19
-
 20
20
-
 21
21
-
 22
22
-
 23
23
-
 24
24


Ocean Digital WR-280S Manuale utente
- Categoria
- Sveglie
- Tipo
- Manuale utente
- Questo manuale è adatto anche per
in altre lingue
- English: Ocean Digital WR-280S User manual
Documenti correlati

Altri documenti
-
Albrecht DR 884 Hybridradio Internet/DAB+/UKW Manuale del proprietario
-
Sharp DR-I470(BK) Manuale del proprietario
-
Albrecht DR 490 weiß, Digitalradio AUSVERKAUFT ! Manuale del proprietario
-
-
-
-
-
-
Roadstar I-RX16BT Manuale utente
-