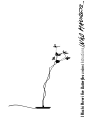
Ingo Maurer I Ricchi Poveri - Five Butterflies Istruzioni per l'uso
- Tipo
- Istruzioni per l'uso

I Ricchi Poveri Five Butteries ambient Instructions

32
Montageanleitung
Bitte vor der Montage aufmerksam lesen und auf-
bewahren!
Instructions for assembly
Please read these instructions carefully before going
any further, and keep them in a safe place for future
reference!
Instructions de montage
À lire attentivement avant le montage et à conserver!
Istruzioni di montaggio
Prima del montaggio, leggere attentamente le
istruzioni e conservarle!
Deutsch Seite 4
English Page 6
Français Page 8
Italiano Pagina 10
Zeichnungen Seite 12
Drawings Page 12
Dessins Page 12
Disegni Pagina 12
I Ricchi Poveri Five Butteries ambient
Ingo Maurer Team 2015 / 2022

54
Halten Sie mit einer Hand die Wicklung des Messingstabs
fest und schrauben mit der anderen Hand die Glühbirne
heraus. ⑥
Verfahren Sie dann wie unter “Einsetzen des Leuchtmittels”
beschrieben.
Pege
Reinigen Sie die Leuchte mit einem Staubwedel oder mit
einem trockenen und fusselfreien Tuch. Verwenden Sie unter
keinen Umständen lösungsmittelhaltige Reinigungsmittel.
Technische Daten
100-240V~, 50/60 Hz., PF 0,9, Sekundär 12V~,
5W LED, 2000-2700K, Sockel E27.
Elektronischer Transformator mit Schieberegler.
Die Helligkeit der Leuchte lässt sich am Regler des
Transformators stufenlos verstellen. Der Dimmer dient zugleich
zum Ein-und Ausschalten der Leuchte.
Die Leuchte wird geliefert mit Lichtquelle der
Energieklasse G (A-G).
Wichtig: Die Leuchtmittel werden exklusiv für die Ingo
Maurer GmbH hergestellt und können nur über unseren
Webshop oder unsere Händler bezogen werden.
Ein defektes LED Leuchtmittel oder Transformator
muss als Elektroschrott entsorgt werden und darf
nicht in den Hausmüll gelangen.
Eventuell notwendige Reparaturen müssen von einer
Elektrofachkraft ausgeführt werden.
Bei Schäden, die durch Nichtbeachten dieser
Bedienungsanleitung, unsachgemäßer Inbetriebnahme und/
oder baulicher Veränderung z.B. durch Fremdbauteile,
Handhabung oder Fremdeingriff verursacht werden, erlischt
der Garantieanspruch.
DeutschDeutsch
Wichtig: Schließen Sie die Lampe erst nach der Montage
ans Netz an.
Montage
Bitte nehmen Sie alle Teile vorsichtig aus der Verpackung.
Entfernen Sie die Kabelbinder und wickeln Sie die Kabel
vollständig ab..
Stecken Sie die beiden Niedervoltstecker bis zum Anschlag
in die Buchsen an der Unterseite der Bodenplatte.
Bitte achten Sie auf festen Sitz der Stecker. ⑦
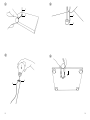
Stecken Sie den Messingdraht (1) in den Haltebolzen (2) der
Bodenplatte und schrauben Sie ihn mit Hilfe des beiliegenden
Inbusschlüssels fest. ①
Einsetzen des Leuchtmittels
Wickeln Sie den angelöteten roten Draht (3) vorsichtig
vom Leuchtmittel und richten Sie ihn weitgehend gerade.
Führen Sie ihn von oben durch die Wicklungen (4) des
Messingstabes und schrauben Sie das Leuchtmittel ein. ②
Legen Sie den roten Draht (3) zwei Mal locker um den
Messingstab, stecken Sie ihn in die Kontaktbuchse (5) der
Bodenplatte. Richten Sie den Draht aus. ③
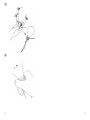
Stecken Sie den Clip mit den fünf Schmetterlingen (6) auf den
Leuchtmittelsockel (7). ⑤
Transformator
Die Helligkeit der Leuchte lässt sich am Schieberegler
des Transformators stufenlos verstellen. Der Regler dient
zugleich zum Ein-und Ausschalten der Lampe.
Wichtig: Der Transformator muss ausreichend belüftet
sein und darf nicht abgedeckt werden
Wechsel des Leuchtmittels
Achtung: Die Lampe vollständig abkühlen lassen.
Nehmen Sie zuerst den Clip mit den fünf Schmetterlingen (6)
vom Leuchtmittelsockel (7). ⑤
Ziehen Sie den roten Draht (3) aus der Buchse (5) ③
und wickeln Ihn vom Messingstab.

76
English
Hold the winding of the brass rod with one hand and un-
screw the lightbulb with the other hand. ⑥
Then proceed as described under “Inserting the light bulb”.
Cleaning
Clean the lamp carefully with a feather duster or dry, lint-free
cloth. Do NOT use cleaners containing solvents.
Technical specication
100-240V~, 50/60 Hz., PF 0,9, Secondary 12V~,
5W LED, 2000-2700K, socket E27.
Electronic transformer with integrated dimmer.
The brightness of the light is freely adjustable via the
dimm controller on the transformer, which also switches
the lamp on and off.
The lamp comes with light source of the energy class G
(A-G).
Important: The LED bulbs are manufactured exclusively
for Ingo Maurer GmbH. Replacements are only available
from our webshop or authorized retailers.
A defective transformer or LED bulb must be
disposed as electronic scrap, it must not get into
domestic waste.
Any repairs that may become necessary must be carried out
by a qualied electrician.
The legal and contractual warranty for defects and product
liability will be void, should the installation instructions not
be duly followed or non-original components be employed.
English
Caution: Do not connect the lamp to the power supply
until the assembly is completed.
Remove all parts carefully from the packaging. Remove the
cable ties and unwind the cables completely.
Assembly
Insert the two low-voltage plugs in the terminals on the
underside of the base. Ensure that the plugs are securely in
position. ④
Insert the brass rod (1) with the dragony in the retaining
bolt (2) on the lamp base, determine how the lamp is to
stand, and tighten the bolt with the Allen key supplied. ①
Inserting the light bulb
Carefully unwind the soldered red wire (3) from the light
bulb. Pull the wire more or less straight and feed it down
through the coil (4) in the brass rod. Screw the bulb into
place. ②
Wind the red wire (3) twice loosely around the brass rod
and insert the end in the contact (5) on the lamp base. ③
Straighten the wire.
Fit the spring clip with the ve butteries (6) on the bulb
holder (7). ⑤
Transformer
The brightness of the light is freely adjustable via the sliding
control on the transformer, which also switches the lamp on
and off.
Important: The transformer must be sufciently ventila-
ted and should never be covered by any object or material
likely to block air circulation.
Changing the light bulb
Caution: Allow the lamp to cool down completely.
Detach the spring clip with the ve butteries (6) from the
bulb holder (7). ⑤
Pull the red wire (3) out of the contact (5) ③ and wind
him off the brass rod.

98
Lenez l‘enroulement de la tige en laiton d‘une main et
dévissez l‘ampoule de l‘autre main. ⑥
Procédez ensuite comme décrit sous „Insertion de la lampe“
Entretien
Nettoyez prudemment la lampe à l‘aide d‘un plumeau ou
d‘un chiffon sec et sans peluches. N‘utilisez jamais de pro-
duits nettoyants contenant des solvants.
Données techniques
100-240V~, 50/60 Hz., PF 0.9, Secondaire 12V~,
5W LED, 2000-2700K, culot E27.
Transformateur électronique avec variateur. Le régula-
teur du transformateur permet de régler sans graduation
l’intensité lumineuse de la lampe. Le variateur sert aussi à
allumer et à éteindre la lampe.
Le luminaire livré avec source de lumière de la classe énergé-
tique G (A-G).
Important: Cette ampoule est produite exclusivement
pour la société Ingo Maurer GmbH. Ampoules de rechange
sont à commander auprès de nos revendeurs et notre
webshop.
Un ampoule LED ou transformateur défectueux
devra être jeté avec des déchets électroniques, ne
pas le jeter avec vos ordures ménagères.
Des réparations éventuellement nécessaires ne sont à
effectuer que par un spécialiste.
La garantie légale et contractuelle pour les défauts et la
responsabilité pour les dommages causés par des produits
défectueux, expireront en cas de dommages ou de réclama-
tions résultant du non-respect des instructions d‘installation
et/ou des modications structurelles, en particulier si des
composants non originaux sont utilisés.
FrançaisFrançais
Important: Branchez la lampe au secteur uniquement
après le montage.
Veuillez ôter avec précaution les pièces de l‘emballage.
Retirez les serre-câbles du transformateur et déroulez com-
plètement les câbles.
Montage
Placez les deux connecteurs à basse tension dans les douilles
de la plaque de base. ④ Veillez au bon ajustement des
connecteurs.
Insérez la tige en laiton (1) xée dans les boulons de maintien
(2) de la plaque de base, dénissez la position souhaitée et
vissez-le à l‘aide de la clé Allen fournie. ①
Insertion de l‘ampoule
Enroulez avec précaution le l rouge brasé (3) depuis
l‘ampoule, redressez-le largement, faites-le passer en haut à
travers les enroulements (4) de la tige en laiton et vissez
l‘ampoule. ②
Desserrez deux fois le l rouge (3) autour de la tige en
laiton, insérez-le dans la douille de contact (5) de la plaque
de base et alignez le l. ③
Enfoncer le clip avec les 5 papillons (6) sur le culot de
l‘ampoule (7). ⑤
Transformateur
Le régulateur du transformateur permet de régler sans
graduation l’intensité lumineuse de la lampe. Le régulateur
sert aussi à allumer et à éteindre la lampe.
Important: Veiller à un refroidissement suffisant du
trans formateur et à ce qu‘il ne se trouve pas recou-
vert d‘un objet.
Remplacement de l‘ampoule
Attention: Laisser refroidir entièrement la lampe.
Retirer d‘abord le clip avec les 5 papillons (6) du culot de
l‘ampoule (7). ⑤
Enlever ensuite le l rouge de la douille de contact (5) ③
et enveloppez-le avec la tige en laiton.

1110
Italiano
Svolgerlo dall‘asta in ottone. Avvolgilo dalla verga di brasso.
Tenere con una mano l‘avvolgimento dell‘asta di ottone e
con l‘altra svitare la lampadina. ⑥
Quindi procedere come descritto in „Inserimento della
lampada“.
Manutenzione
Pulire la lampada con un piumino o con cautela con un pan-
no asciutto e privo di lanugine. Non utilizzare in nessun caso
prodotti detergenti a base di solventi.
Speciche tecniche
100-240V~, 50/60 Hz., PF 0.9, Secondario 12 V~,
5W LED, 2000-2700K, portalampada E27.
Trasformatore elettronico con varialuce.
La luminosità della lampada può essere regolata tramite il
varialuce lineare del trasformatore. Questo cursore serve
anche per accendere e spegnere la lampada.
Il dispositivo è viene fornita con lampadinas di classe
energetica G (A-G).
Importante: Questa lampadina viene prodotta in esclu-
siva per la Ingo Maurer GmbH e può essere acquistata dal
nostro negozio online o i nostri rivenditori autorizzati.
Un lampadine LED o trasformatore difettoso è
da conside rare un ri utto elettrici e non deve
essere smalti to con i ri uti domestici.
Eventuali riparazioni possono essere effettuate esclusivamen-
te da un elettricista.
La garanzia legale e contrattuale per difetti e la responsabilità
per danni da prodotti difettosi, decadono in caso di
danni o reclami conseguenti all’inosservanza delle istruzioni
d’installazione e/o a modiche strutturali, soprattutto se
impiegati componenti non originali.
Italiano
Importante: Collegare la lampada alla rete solo dopo
aver terminato l’installazione.
Estrarre le parti della lampada cautamente dall’imballaggio.
Rimuovere le fascette per cavi sul trasformatore e svolgere
completamente i cavi.
Montaggio
Inserire ora i due spinotti a bassa tensione del trasformatore
nelle apposite boccole sotto la piastra base. Assicurarsi
dell’inserimento saldo e corretto delle spine. ④
Inserire l’asta in ottone (1) nella boccola di ssaggio (2) della
piastra base, determinare la posizione desiderata e ssarla
con l’inclusa chiave a brugola. ①
Inserimento della lampadina
Con cautela distendere accuratamente il lo rosso (3),
ssato alla lampadina, raddrizzarlo quanto possibile, passarlo
dall’alto attraverso la spirale (4) dell’asta in ottone e avvitare
la lampadina. ②
Avvolgere il lo rosso (3) due volte, senza tenderlo, intorno
all’asta in ottone e inserirlo nella piccola boccola (5) della
piastra base. Orientare il lo. ③
Applicare la clip con le cinque farfalle (6) sulla base a vite
della lampadina (7). ⑤
Trasformatore
La luminosità della lampada può essere regolata tramite il va-
rialuce lineare del trasformatore. Questo interruttore serve
anche per accendere e spegnere la lampada.
Importante: Il trasformatore deve essere aerato a sufci-
enza e non deve essere coperto.
Sostituzione della lampadina
Attenzione: Attendere che la lampada sia completamente
fredda.
Rimuovere la clip con le cinque farfalle (6) dalla base a vite
della lampadina (7). ⑤
Estrarre il lo rosso (3) dalla piccola boccola (5). ③

1312
1
2
4
3
①
②
5
3
③
④

1514
6
7
⑤
⑥

16
Ingo Maurer GmbH
Kaiserstrasse 47
D-80801 München
Tel. +49. 89. 381 606-0
Fax +49. 89. 381 606 20
info@ingo-maurer.com
www.ingo-maurer.com
März 2022 Made in Germany
-
 1
1
-
 2
2
-
 3
3
-
 4
4
-
 5
5
-
 6
6
-
 7
7
-
 8
8
-
 9
9


Ingo Maurer I Ricchi Poveri - Five Butterflies Istruzioni per l'uso
- Tipo
- Istruzioni per l'uso
in altre lingue
Documenti correlati
-
Ingo Maurer I Ricchi Poveri - Toto Istruzioni per l'uso
-
-
-
-
-
-
-
-
-

