ELECTROLUX-REX KT6421XE Manuale utente
- Categoria
- Piani cottura
- Tipo
- Manuale utente


CONTENTS
1. SAFETY INFORMATION...................................................................................... 3
2. SAFETY INSTRUCTIONS.....................................................................................4
3. PRODUCT DESCRIPTION................................................................................... 6
4. DAILY USE.......................................................................................................... 8
5. HINTS AND TIPS............................................................................................... 10
6. CARE AND CLEANING......................................................................................11
7. TROUBLESHOOTING........................................................................................12
8. INSTALLATION..................................................................................................13
9. TECHNICAL INFORMATION..............................................................................15
10. ENERGY EFFICIENCY..................................................................................... 15
WE’RE THINKING OF YOU
Thank you for purchasing an Electrolux appliance. You’ve chosen a product that
brings with it decades of professional experience and innovation. Ingenious and
stylish, it has been designed with you in mind. So whenever you use it, you can be
safe in the knowledge that you’ll get great results every time.
Welcome to Electrolux.
Visit our website for:
Get usage advice, brochures, trouble shooter, service information:
www.electrolux.com
Register your product for better service:
www.registerelectrolux.com
Buy Accessories, Consumables and Original spare parts for your appliance:
www.electrolux.com/shop
CUSTOMER CARE AND SERVICE
Always use original spare parts.
When contacting our Authorised Service Centre, ensure that you have the following
data available: Model, PNC, Serial Number.
The information can be found on the rating plate.
Warning / Caution-Safety information
General information and tips
Environmental information
Subject to change without notice.
www.electrolux.com2

1. SAFETY INFORMATION
Before the installation and use of the appliance, carefully
read the supplied instructions. The manufacturer is not
responsible if an incorrect installation and use causes
injuries and damages. Always keep the instructions with
the appliance for future reference.
1.1 Children and vulnerable people safety
• This appliance can be used by children aged from 8
years and above and persons with reduced physical,
sensory or mental capabilities or lack of experience and
knowledge if they have been given supervision or
instruction concerning use of the appliance in a safe
way and understand the hazards involved.
• Do not let children play with the appliance.
• Keep all packaging away from children.
• Keep children and pets away from the appliance when it
operates or when it cools down. Accessible parts are
hot.
• If the appliance has a child safety device, we
recommend you activate it.
• Cleaning and user maintenance shall not be made by
children without supervision.
• Children of less than 3 years should be kept away
unless continuously supervised.
1.2 General Safety
• The appliance and its accessible parts become hot
during use. Do not touch the heating elements.
• Do not operate the appliance by means of an external
timer or separate remote-control system.
• Unattended cooking on a hob with fat or oil can be
dangerous and may result in fire.
• Never try to extinguish a fire with water, but switch off
the appliance and then cover flame e.g. with a lid or a
fire blanket.
• Do not store items on the cooking surfaces.
ENGLISH
3

• Metallic objects such as knives, forks, spoons and lids
should not be placed on the hob surface since they can
get hot.
• Do not use a steam cleaner to clean the appliance.
• If the glass ceramic surface / glass surface is cracked,
switch off the appliance to avoid the possibility of
electric shock.
• If the supply cord is damaged, it must be replaced by
the manufacturer, an authorized Service or similarly
qualified persons in order to avoid a hazard.
2. SAFETY INSTRUCTIONS
2.1 Installation
WARNING!
Only a qualified person must
install this appliance.
• Remove all the packaging.
• Do not install or use a damaged
appliance.
• Obey the installation instruction
supplied with the appliance.
• Keep the minimum distance from the
other appliances and units.
• Always be careful when you move the
appliance because it is heavy. Always
wear safety gloves.
• Seal the cut surfaces with a sealant to
prevent moisture to cause swelling.
• Protect the bottom of the appliance
from steam and moisture.
• Do not install the appliance adjacent to
a door or under a window. This
prevents hot cookware to fall from the
appliance when the door or the
window is opened.
• If the appliance is installed above
drawers make sure that the space,
between the bottom of the appliance
and the upper drawer, is sufficient for
air circulation.
• The bottom of the appliance can get
hot. Make sure to install a non-
combustile separation panel under the
appliance to prevent access to the
bottom.
2.2 Electrical Connection
WARNING!
Risk of fire and electrical
shock.
• All electrical connections should be
made by a qualified electrician.
• The appliance must be earthed.
• Before carrying out any operation make
sure that the appliance is disconnected
from the power supply.
• Make sure that the electrical
information on the rating plate agrees
with the power supply. If not, contact
an electrician.
• Make sure the appliance is installed
correctly. Loose and incorrect
electricity mains cable or plug (if
applicable) can make the terminal
become too hot.
• Use the correct electricity mains cable.
• Do not let the electricity mains cable
tangle.
• Make sure that a shock protection is
installed.
• Use the strain relief clamp on the cable.
• Make sure the mains cable or plug (if
applicable) does not touch the hot
appliance or hot cookware, when you
connect the appliance to the near
sockets
• Do not use multi-plug adapters and
extension cables.
• Make sure not to cause damage to the
mains plug (if applicable) or to the
mains cable. Contact our Authorised
www.electrolux.com4

Service Centre or an electrician to
change a damaged mains cable.
• The shock protection of live and
insulated parts must be fastened in
such a way that it cannot be removed
without tools.
• Connect the mains plug to the mains
socket only at the end of the
installation. Make sure that there is
access to the mains plug after the
installation.
• If the mains socket is loose, do not
connect the mains plug.
• Do not pull the mains cable to
disconnect the appliance. Always pull
the mains plug.
• Use only correct isolation devices: line
protecting cut-outs, fuses (screw type
fuses removed from the holder), earth
leakage trips and contactors.
• The electrical installation must have an
isolation device which lets you
disconnect the appliance from the
mains at all poles. The isolation device
must have a contact opening width of
minimum 3 mm.
2.3 Use
WARNING!
Risk of injury, burns and
electrical shock.
• Remove all the packaging, labelling
and protective film (if applicable) before
first use.
• Use this appliance in a household
environment.
• Do not change the specification of this
appliance.
• Make sure that the ventilation openings
are not blocked.
• Do not let the appliance stay
unattended during operation.
• Set the cooking zone to “off” after each
use.
• Do not put cutlery or saucepan lids on
the cooking zones. They can become
hot.
• Do not operate the appliance with wet
hands or when it has contact with
water.
• Do not use the appliance as a work
surface or as a storage surface.
• If the surface of the appliance is
cracked, disconnect immediately the
appliance from the power supply. This
to prevent an electrical shock.
• When you place food into hot oil, it
may splash.
WARNING!
Risk of fire and explosion
• Fats and oil when heated can release
flammable vapours. Keep flames or
heated objects away from fats and oils
when you cook with them.
• The vapours that very hot oil releases
can cause spontaneous combustion.
• Used oil, that can contain food
remnants, can cause fire at a lower
temperature than oil used for the first
time.
• Do not put flammable products or
items that are wet with flammable
products in, near or on the appliance.
WARNING!
Risk of damage to the
appliance.
• Do not keep hot cookware on the
control panel.
• Do not let cookware to boil dry.
• Be careful not to let objects or
cookware fall on the appliance. The
surface can be damaged.
• Do not activate the cooking zones with
empty cookware or without cookware.
• Do not put aluminium foil on the
appliance.
• Cookware made of cast iron,
aluminium or with a damaged bottom
can cause scratches on the glass /
glass ceramic. Always lift these objects
up when you have to move them on
the cooking surface.
• This appliance is for cooking purposes
only. It must not be used for other
purposes, for example room heating.
2.4 Care and cleaning
• Clean regularly the appliance to
prevent the deterioration of the surface
material.
• Deactivate the appliance and let it cool
down before you clean it.
• Disconnect the appliance from the
electrical supply before maintenance.
• Do not use water spray and steam to
clean the appliance.
ENGLISH
5

• Clean the appliance with a moist soft
cloth. Only use neutral detergents. Do
not use abrasive products, abrasive
cleaning pads, solvents or metal
objects.
2.5 Disposal
WARNING!
Risk of injury or suffocation.
• Contact your municipal authority for
information on how to discard the
appliance correctly.
• Disconnect the appliance from the
mains supply.
• Cut off the mains cable and discard it.
2.6 Service
• To repair the appliance contact an
Authorised Service Centre.
• Use original spare parts only.
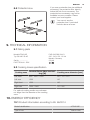
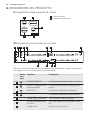
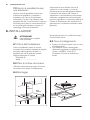
3. PRODUCT DESCRIPTION
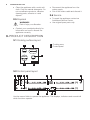
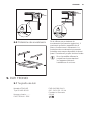
3.1 Cooking surface layout
170 mm
265 mm
170 mm
265 mm
120/175/210
mm
120/175/210
mm
145 mm
145 mm
1
1
1 1
2
1
Cooking zone
2
Control panel
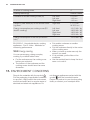
3.2 Control panel layout
81 2 3 4 5
6
7
10 912
11
Use the sensor fields to operate the appliance. The displays, indicators and sounds tell
which functions operate.
www.electrolux.com6

Sen-
sor
field
Function Comment
1
ON / OFF To activate and deactivate the hob.
2
Lock / The Child Safety
Device
To lock / unlock the control panel.
3
STOP+GO To activate and deactivate the function.
4
- To activate and deactivate the outer ring.
5
- Heat setting display To show the heat setting.
6
- Timer indicators of cook-
ing zones
To show for which zone you set the time.
7
- Timer display To show the time in minutes.
8
- To activate and deactivate the outer ring.
9
- To select the cooking zone.
10
/
- To increase or decrease the time.
11
Automatic Heat Up To activate and deactivate the function.
12
- Control bar To set a heat setting.
3.3 Heat setting displays
Display Description
The cooking zone is deactivated.
-
The cooking zone operates.
STOP+GO function operates.
Automatic Heat Up function operates.
+ digit
There is a malfunction.
/ /
OptiHeat Control (3 step Residual heat indicator): continue cook-
ing / keep warm / residual heat.
Lock / The Child Safety Device function operates.
Automatic Switch Off function operates.
ENGLISH
7

3.4 OptiHeat Control (3 step
Residual heat indicator)
WARNING!
/ / There is a risk of
burns from residual heat. The
indicator shows the level of
the residual heat.
4. DAILY USE
WARNING!
Refer to Safety chapters.
4.1 Activating and deactivating
Touch for 1 second to activate or
deactivate the hob.
4.2 Automatic Switch Off
The function deactivates the hob
automatically if:
• all cooking zones are deactivated,
• you do not set the heat setting after
you activate the hob,
• you spill something or put something
on the control panel for more than 10
seconds (a pan, a cloth, etc.). An
acoustic signal sounds and the hob
deactivates. Remove the object or
clean the control panel.
• you do not deactivate a cooking zone
or change the heat setting. After some
time
comes on and the hob
deactivates.
The relation between the heat setting
and the time after which the hob
deactivates:
Heat setting The hob deacti-
vates after
, 1 - 3
6 hours
4 - 7 5 hours
8 - 9 4 hours
10 - 14 1.5 hour
4.3 The heat setting
To set or change the heat setting:
Touch the control bar at the correct heat
setting or move your finger along the
control bar until you reach the correct heat
setting.
4.4 Activating and deactivating
the outer rings
You can adjust the surface you cook to
the dimension of the cookware.
Use sensor field:
To activate the outer ring: touch the
sensor field. The indicator comes on.
To activate more outer rings: touch the
same sensor field again. The subsequent
indicator comes on.
To deactivate the outer ring: touch the
sensor field until the indicator goes out.
When you activate the zone
but do not activate the outer
ring the light that comes out
from the zone may cover the
outer ring. It does not mean
that the outer ring is
activated. To see if the ring is
activated check the indicator.
4.5 Automatic Heat Up
If you activate this function you can get a
necessary heat setting in a shorter time.
The function sets the highest heat setting
for some time and then decreases to the
correct heat setting.
www.electrolux.com8

To activate the function the
cooking zone must be cold.
To activate the function for a cooking
zone: touch ( comes on).
Immediately touch the correct heat
setting. After 3 seconds comes on.
To deactivate the function: change the
heat setting.
4.6 Timer
Count Down Timer
You can use this function to set how long
the cooking zone should operate for a
single cooking session.
First set the cooking zone then set the
function. You can set the heat setting
before or after you set the function.
To set the cooking zone: touch
again and again until the indicator of a
necessary cooking zone comes on.
To activate the function: touch of
the timer to set the time (00 - 99 minutes).
When the indicator of the cooking zone
starts to flash slowly the time counts
down.
To see the remaining time: set the
cooking zone with . The indicator of the
cooking zone starts to flash quickly. The
display shows the remaining time.
To change the time: set the cooking
zone with . Touch or .
To deactivate the function: set the
cooking zone with and touch . The
remaining time counts back to 00. The
indicator of the cooking zone goes out.
When the time comes to an
end, the sound operates and
00 flashes. The cooking zone
deactivates.
To stop the sound: touch .
CountUp Timer (The count up timer)
You can use this function to monitor how
long the cooking zone operates.
To set the cooking zone: touch
again and again until the indicator of a
necessary cooking zone comes on.
To activate the function: touch of
the timer. comes on. When the
indicator of the cooking zone starts to
flash slowly the time counts up. The
display switches between and counted
time (minutes).
To see how long the cooking zone
operates: set the cooking zone with .
The indicator of the cooking zone starts to
flash quickly. The display shows how long
the zone operates.
To deactivate the function: set the
cooking zone with and touch or .
The indicator of the cooking zone goes
out.
Minute Minder
You can use this function as a Minute
Minder when the hob is activated and the
cooking zones do not operate (the heat
setting display shows
).
To activate the function: touch
.
Touch or of the timer to set the
time. When the time comes to an end, the
sound operates and 00 flashes.
To stop the sound: touch .
The function has no effect on
the operation of the cooking
zones.
4.7 STOP+GO
This function sets all cooking zones that
operate to the lowest heat setting.
When the function operates, you cannot
change the heat setting.
The function does not stop the timer
functions.
To activate the function: touch
.
comes on.
To deactivate the function: touch
.
The previous heat setting comes on.
ENGLISH
9

4.8 Lock
You can lock the control panel while
cooking zones operate. It prevents an
accidental change of the heat setting.
Set the heat setting first.
To activate the function: touch .
comes on for 4 seconds. The Timer stays
on.
To deactivate the function: touch .
The previous heat setting comes on.
When you deactivate the
hob, you also deactivate this
function.
4.9 The Child Safety Device
This function prevents an accidental
operation of the hob.
To activate the function: activate the
hob with . Do not set the heat setting.
Touch for 4 seconds. comes on.
Deactivate the hob with .
To deactivate the function: activate the
hob with
. Do not set the heat setting.
Touch for 4 seconds. comes on.
Deactivate the hob with .
To override the function for only one
cooking time: activate the hob with .
comes on. Touch for 4 seconds.
Set the heat setting in 10 seconds.
You can operate the hob. When you
deactivate the hob with the function
operates again.
4.10 OffSound Control
(Deactivation and activation of
the sounds)
Deactivate the hob. Touch for 3
seconds. The display comes on and goes
out. Touch for 3 seconds. or
comes on. Touch of the timer to
choose one of the following:
• - the sounds are off
• - the sounds are on
To confirm your selection wait until the
hob deactivates automatically.
When the function is set to you can
hear the sounds only when:
• you touch
• Minute Minder comes down
• Count Down Timer comes down
• you put something on the control
panel.
5. HINTS AND TIPS
WARNING!
Refer to Safety chapters.
5.1 Cookware
The bottom of the cookware
must be as thick and flat as
possible.
Cookware made of
enamelled steel and with
aluminium or copper bottoms
can cause the colour change
on the glass-ceramic surface.
5.2 Öko Timer (Eco Timer)
To save energy, the heater of the cooking
zone deactivates before the count down
timer sounds. The difference in the
operation time depends on the heat
setting level and the length of the cooking
operation.
5.3 Examples of cooking
applications
The data in the table is for
guidance only.
www.electrolux.com10

Heat setting Use to: Time
(min)
Hints
- 1
Keep cooked food warm. as nec-
essary
Put a lid on the cookware.
1 - 3 Hollandaise sauce, melt: but-
ter, chocolate, gelatine.
5 - 25 Mix from time to time.
1 - 3 Solidify: fluffy omelettes,
baked eggs.
10 - 40 Cook with a lid on.
3 - 5 Simmer rice and milkbased
dishes, heating up ready-
cooked meals.
25 - 50 Add the minimum twice as
much liquid as rice, mix milk
dishes part procedure
through.
5 - 7 Steam vegetables, fish, meat. 20 - 45 Add some tablespoons of liq-
uid.
7 - 9 Steam potatoes. 20 - 60 Use max. ¼ l water for 750 g
of potatoes.
7 - 9 Cook larger quantities of food,
stews and soups.
60 -
150
Up to 3 l liquid plus ingredi-
ents.
9 - 12 Gentle fry: escalope, veal cor-
don bleu, cutlets, rissoles,
sausages, liver, roux, eggs,
pancakes, doughnuts.
as nec-
essary
Turn halfway through.
12 - 13 Heavy fry, hash browns, loin
steaks, steaks.
5 - 15 Turn halfway through.
14 Boil water, cook pasta, sear meat (goulash, pot roast), deep-fry chips.
6. CARE AND CLEANING
WARNING!
Refer to Safety chapters.
6.1 General information
• Clean the hob after each use.
• Always use cookware with clean
bottom.
• Scratches or dark stains on the surface
have no effect on how the hob
operates.
• Use a special cleaner applicable for the
surface of the hob.
• Use a special scraper for the glass.
6.2 Cleaning the hob
• Remove immediately: melted plastic,
plastic foil, and food with sugar. If not,
the dirt can cause damage to the hob.
Put the special scraper on the glass
surface at an acute angle and move
the blade on the surface.
• Remove when the hob is
sufficiently cool: limescale rings,
water rings, fat stains, shiny metallic
discoloration. Clean the hob with a
moist cloth and some detergent. After
cleaning, rub the hob dry with a soft
cloth.
ENGLISH
11

7. TROUBLESHOOTING
WARNING!
Refer to Safety chapters.
7.1 What to do if...
Problem Possible cause Remedy
You cannot activate or op-
erate the hob.
The hob is not connected
to an electrical supply or it
is connected incorrectly.
Check if the hob is correctly
connected to the electrical
supply. Refer to the con-
nection diagram.
The fuse is released. Make sure that the fuse is
the cause of the malfunc-
tion. If the fuse releases
again and again, contact a
qualified electrician.
Activate the hob again and
set the heat setting in less
than 10 seconds.
You touched 2 or more
sensor fields at the same
time.
Touch only one sensor field.
STOP+GO function oper-
ates.
Refer to "Daily use" chapter.
There is water or fat stains
on the control panel.
Clean the control panel.
An acoustic signal sounds
and the hob deactivates.
An acoustic signal sounds
when the hob is deactiva-
ted.
You put something on one
or more sensor fields.
Remove the object from the
sensor fields.
The hob deactivates. You put something on the
sensor field .
Remove the object from the
sensor field.
Residual heat indicator
does not come on.
The zone is not hot be-
cause it operated only for a
short time.
If the zone operated suffi-
ciently long to be hot,
speak to an Authorised
Service Centre.
Automatic Heat Up function
does not operate.
The zone is hot. Let the zone become suffi-
ciently cool.
The highest heat setting is
set.
The highest heat setting has
the same power as the
function.
www.electrolux.com12

Problem Possible cause Remedy
You cannot activate the
outer ring.
Activate the inner ring first.
There is a dark area
on the multiple zone.
It is normal that there is a
dark area on the multiple
zone.
The sensor fields become
hot.
The cookware is too large
or you put it too near to the
controls.
Put large cookware on the
rear zones if possible.
There is no signal when you
touch the panel sensor
fields.
The signals are deactivated. Activate the signals.
Refer to "Daily use" chapter.
comes on.
Automatic Switch Off oper-
ates.
Deactivate the hob and ac-
tivate it again.
comes on.
The Child Safety Device or
the Lock function operates.
Refer to "Daily use" chapter.
and a number come on.
There is an error in the hob. Disconnect the hob from
the electrical supply for
some time. Disconnect the
fuse from the electrical sys-
tem of the house. Connect
it again. If comes on
again, speak to an Author-
ised Service Centre.
7.2 If you cannot find a
solution...
If you cannot find a solution to the
problem yourself, contact your dealer or
an Authorised Service Centre. Give the
data from the rating plate. Give also three
digit letter code for the glass ceramic (it is
in the corner of the glass surface) and an
error message that comes on. Make sure,
you operated the hob correctly. If not the
servicing by a service technician or dealer
will not be free of charge, also during the
warranty period. The instructions about
the Service Centre and conditions of
guarantee are in the guarantee booklet.
8. INSTALLATION
WARNING!
Refer to Safety chapters.
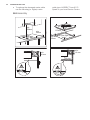
8.1 Before the installation
Before you install the hob, write down the
information bellow from the rating plate.
The rating plate is on the bottom of the
hob.
Serial number ...........................
8.2 Built-in hobs
Only use the built-in hobs after you
assemble the hob into correct built-in units
and work surfaces that align to the
standards.
8.3 Connection cable
• The hob is supplied with a connection
cable.
ENGLISH
13

• To replace the damaged mains cable
use the following (or higher) mains
cable type: H05BB-F Tmax 90°C.
Speak to your local Service Centre.
8.4 Assembly
min.
50mm
min.
500mm
R 5mm
min.
55mm
560
+1
mm
490
+1
mm
min.
28 mm
min.
12 mm
min.
20 mm
www.electrolux.com14

8.5 Protection box
If you use a protection box (an additional
accessory), the protective floor directly
below the hob is not necessary. The
protection box accessory may not be
available in some countries. Please
contact your local supplier.
You can not use the
protection box if you install
the hob above an oven.
9. TECHNICAL INFORMATION
9.1 Rating plate
Modell KT6421XE PNC 949 596 094 01
Typ 58 HAD 56 AO 220 - 240 V 50 - 60 Hz
Made in Germany
Ser.Nr. ................. 2.8 kW
ELECTROLUX - REX
9.2 Cooking zones specification
Cooking zone
Nominal Power (Max heat set-
ting) [W]
Cooking zone diameter [mm]
Left front 800 / 1600 / 2300 120 / 175 / 210
Left rear 1200 145
Right front 1200 145
Right rear 1500 / 2400 170 / 265
For optimal cooking results use cookware
not larger than the diameter of the cooking
zone.
10. ENERGY EFFICIENCY
10.1 Product information according to EU 66/2014
Model identification KT6421XE
Type of hob Built-In Hob
ENGLISH
15

Number of cooking zones 4
Heating technology Radiant Heater
Diameter of circular cooking zones (Ø) Left front
Left rear
Right front
21.0 cm
14.5 cm
14.5 cm
Lenght (L) and width (W) of non circular cook-
ing zone
Right rear L 17.0 cm
W 26.5 cm
Energy consumption per cooking zone (EC-
electric cooking)
Left front
Left rear
Right front
Right rear
191.3 Wh / kg
196.8 Wh / kg
196.8 Wh / kg
182.6 Wh / kg
Energy consumption of the hob (ECelectric
hob)
191.9 Wh / kg
EN 60350-2 - Household electric cooking
appliances - Part 2: Hobs - Methods for
measuring performance
10.2 Energy saving
You can save energy during everyday
cooking if you follow bellow hints.
• Put the cookware on the cooking zone
before you activate it.
• The bottom of the cookware and the
cooking zones should have the same
dimension.
• Put smaller cookware on smaller
cooking zones.
• Put the cookware directly in the centre
of the cooking zone.
• When you heat up water use only the
amount you need.
• If it is possible, put the lids on the
cookware.
• Use the residual heat to keep the food
warm or to melt it.
11. ENVIRONMENT CONCERNS
Recycle the materials with the symbol .
Put the packaging in applicable containers
to recycle it. Help protect the environment
and human health and to recycle waste of
electrical and electronic appliances. Do
not dispose appliances marked with the
symbol with the household waste.
Return the product to your local recycling
facility or contact your municipal office.
www.electrolux.com16

INDICE
1. INFORMAZIONI PER LA SICUREZZA................................................................ 18
2. ISTRUZIONI DI SICUREZZA...............................................................................19
3. DESCRIZIONE DEL PRODOTTO....................................................................... 22
4. UTILIZZO QUOTIDIANO.....................................................................................23
5. CONSIGLI E SUGGERIMENTI UTILI...................................................................26
6. PULIZIA E CURA............................................................................................... 27
7. RISOLUZIONE DEI PROBLEMI.......................................................................... 28
8. INSTALLAZIONE................................................................................................30
9. DATI TECNICI....................................................................................................31
10. EFFICIENZA ENERGETICA.............................................................................. 32
PENSATI PER VOI
Grazie per aver acquistato un'apparecchiatura Electrolux. Avete scelto un prodotto
che ha alle spalle decenni di esperienza professionale e innovazione. Ingegnoso ed
elegante, è stato progettato pensando a voi. Quindi, in qualsiasi momento
desiderate utilizzarlo, potete esser certi di ottenere sempre i migliori risultati.
Benvenuti in Electrolux.
Visitate il nostro sito web per:
Ricevere consigli, scaricare i nostri opuscoli, eliminare eventuali anomalie,
ottenere informazioni sull'assistenza:
www.electrolux.com
Registrare il vostro prodotto e ricevere un servizio migliore:
www.registerelectrolux.com
Acquistare accessori, materiali di consumo e ricambi originali per la vostra
apparecchiatura:
www.electrolux.com/shop
SERVIZIO CLIENTI E MANUTENZIONE
Consigliamo sempre l’impiego di ricambi originali.
Quando si contatta il Centro di Assistenza autorizzato, accertarsi di disporre dei
seguenti dati: Modello, PNC, numero di serie.
Le informazioni si trovano sulla targhetta dei dati.
Avvertenza/Attenzione - Importanti Informazioni per la sicurezza
Informazioni e suggerimenti generali
Informazioni sull'ambiente
Con riserva di modifiche.
ITALIANO
17

1. INFORMAZIONI PER LA SICUREZZA
Leggere attentamente le istruzioni fornite prima di
installare e utilizzare l'apparecchiatura. Il produttore non è
responsabile se un'installazione ed un uso non corretto
dell'apparecchiatura provocano lesioni e danni. Tenere
sempre le istruzioni a portata di mano come riferimento
futuro.
1.1 Sicurezza dei bambini e delle persone vulnerabili
• Questa apparecchiatura può essere usata da bambini a
partire dagli 8 anni e da adulti con limitate capacità
fisiche, sensoriali o mentali o con scarsa esperienza o
conoscenza sull'uso dell'apparecchiatura, solamente se
sorvegliati o se istruiti relativamente all'uso
dell'apparecchiatura e se hanno compreso i rischi
coinvolti.
• Non consentire ai bambini di giocare con
l'apparecchiatura.
• Tenere i materiali di imballaggio al di fuori della portata
dei bambini.
• Tenere i bambini e gli animali domestici lontano
dall'apparecchiatura durante il funzionamento o
raffreddamento. Le parti accessibili sono incandescenti.
• Se l’apparecchiatura dispone di un dispositivo di
sicurezza per i bambini, consigliamo di attivarlo.
• La pulizia e gli interventi di manutenzione non devono
essere eseguiti dai bambini senza supervisione.
• Tenere lontani i bambini al di sotto dei 3 anni se non
costantemente supervisionati.
1.2 Avvertenze di sicurezza generali
• L'apparecchiatura e le parti accessibili si riscaldano
molto durante l'uso. Non toccare le resistenze.
• Non utilizzare un timer esterno o un sistema di controllo
remoto distinto per mettere in funzione
l'apparecchiatura.
www.electrolux.com18

• Non lasciare mai il piano di cottura incustodito durante
la preparazione di cibi in quanto olio e grassi potrebbero
provocare un incendio.
• Non tentare mai di spegnere un incendio con
dell'acqua; spegnere l'apparecchiatura e coprire le
fiamme ad es. con un coperchio o una coperta di
protezione dal fuoco.
• Non conservare nulla sulle superfici di cottura.
• Oggetti metallici quali coltelli, forchette, cucchiai e
coperchi non dovrebbero essere posti sulla superficie
del piano di cottura in quanto possono diventare caldi.
• Non usare una pulitrice a vapore per pulire
l'apparecchiatura.
• Se la superficie di vetroceramica/vetro presenta delle
crepe, spegnere l'apparecchiatura per evitare il rischio
di scossa elettrica.
• Se il cavo di alimentazione è danneggiato, deve essere
sostituito dal produttore, da un tecnico autorizzato o da
una persona qualificata per evitare situazioni di pericolo.
2. ISTRUZIONI DI SICUREZZA
2.1 Installazione
ATTENZIONE!
L’installazione
dell'apparecchiatura deve
essere eseguita da personale
qualificato.
• Rimuovere tutti i materiali di
imballaggio.
• Non installare o utilizzare
l'apparecchiatura se è danneggiata.
• Attenersi alle istruzioni fornite insieme
all'apparecchiatura.
• È necessario rispettare la distanza
minima dalle altre apparecchiature.
• Prestare sempre attenzione in fase di
spostamento dell'apparecchiatura,
dato che è molto pesante. Indossare
sempre guanti di sicurezza.
• Proteggere le superfici di taglio con un
materiale di tenuta per evitare che
l'umidità causi dei rigonfiamenti.
• Proteggere la base
dell'apparecchiatura da vapore e
umidità.
• Non installare l'apparecchiatura
accanto ad una porta o sotto una
finestra, per evitare che pentole calde
cadano dall'apparecchiatura quando la
porta o la finestra sono aperte.
• Se l'apparecchiatura viene installata
sopra dei cassetti, assicurarsi che lo
spazio, tra la base dell'apparecchiatura
e il cassetto superiore, sia sufficiente
per il ricircolo d'aria.
• La base dell'apparecchiatura può
surriscaldarsi. Si consiglia di prevedere
un pannello divisorio in materiale non
infiammabile al di sotto
dell'apparecchiatura per rendere
inaccessibile la base.
ITALIANO
19

2.2 Collegamento elettrico
ATTENZIONE!
Rischio di incendio e scossa
elettrica.
• Tutti i collegamenti elettrici devono
essere realizzati da un elettricista
qualificato.
• L'apparecchiatura deve disporre di una
messa a terra.
• Prima di qualsiasi intervento, è
necessario verificare che
l'apparecchiatura sia scollegata dalla
rete elettrica.
• Verificare che i dati elettrici riportati
sulla targhetta dei dati corrispondano a
quelli dell'impianto. In caso contrario,
contattare un elettricista.
• Verificare che l'apparecchiatura sia
installata correttamente. L'allentamento
di un collegamento elettrico o di una
spina (ove previsti) può provocare il
surriscaldamento del terminale.
• Utilizzare il cavo di alimentazione
appropriato.
• Evitare che i collegamenti elettrici si
aggroviglino.
• Assicurarsi che la protezione da scosse
elettriche sia installata.
• Utilizzare il morsetto fermacavo sul
cavo.
• Assicurarsi che il cavo di alimentazione
o la spina (ove prevista) non sfiori
l'apparecchiatura calda o pentole calde
quando si collega l'apparecchiatura alle
prese vicine
• Non utilizzare prese multiple e
prolunghe.
• Accertarsi di non danneggiare la spina
e il cavo (ove previsti). Contattare il
nostro Centro di Assistenza autorizzato
o un elettricista qualificato per sostituire
un cavo danneggiato.
• I dispositivi di protezione da scosse
elettriche devono essere fissati in modo
tale da non poter essere disattivati
senza l'uso di attrezzi.
• Inserire la spina di alimentazione nella
presa solo al termine dell'installazione.
Verificare che la spina di alimentazione
rimanga accessibile dopo
l'installazione.
• Nel caso in cui la spina di corrente sia
allentata, non collegarla alla presa.
• Non tirare il cavo di alimentazione per
scollegare l’apparecchiatura. Tirare
sempre dalla spina.
• Servirsi unicamente di dispositivi di
isolamento adeguati: interruttori
automatici, fusibili (quelli a tappo
devono essere rimossi dal
portafusibile), sganciatori per correnti di
guasto a terra e relè.
• L'impianto elettrico deve essere dotato
di un dispositivo di isolamento che
consenta di scollegare
l'apparecchiatura dalla presa di
corrente a tutti i poli. Il dispositivo di
isolamento deve avere una larghezza
dell'apertura di contatto non inferiore ai
3 mm.
2.3 Utilizzo
ATTENZIONE!
Rischio di lesioni, ustioni o
scosse elettriche.
• Rimuovere tutti i materiali di
imballaggio, le etichette e la pellicola
protettiva (ove presente) prima del
primo utilizzo.
• Utilizzare l’apparecchiatura in un
ambiente domestico.
• Non apportare modifiche alle specifiche
di questa apparecchiatura.
• Accertarsi che le fessure di ventilazione
non siano ostruite.
• Non lasciare mai l'apparecchiatura
incustodita durante il funzionamento.
• Spegnere la zona di cottura dopo ogni
utilizzo.
• Non appoggiare posate o coperchi
sulle zone di cottura. Possono
diventare roventi.
• Non mettere in funzione
l'apparecchiatura con le mani umide o
quando c'è un contatto con l'acqua.
• Non utilizzare l'apparecchiatura come
superficie di lavoro o come piano di
appoggio.
• Se la superficie dell'apparecchiatura
presenta delle incrinature, scollegare
immediatamente l'apparecchiatura
dall'alimentazione per evitare scosse
elettriche.
• Un alimento immerso nell'olio molto
caldo può provocare degli schizzi.
www.electrolux.com20
La pagina si sta caricando...
La pagina si sta caricando...
La pagina si sta caricando...
La pagina si sta caricando...
La pagina si sta caricando...
La pagina si sta caricando...
La pagina si sta caricando...
La pagina si sta caricando...
La pagina si sta caricando...
La pagina si sta caricando...
La pagina si sta caricando...
La pagina si sta caricando...
La pagina si sta caricando...
La pagina si sta caricando...
La pagina si sta caricando...
La pagina si sta caricando...
-
 1
1
-
 2
2
-
 3
3
-
 4
4
-
 5
5
-
 6
6
-
 7
7
-
 8
8
-
 9
9
-
 10
10
-
 11
11
-
 12
12
-
 13
13
-
 14
14
-
 15
15
-
 16
16
-
 17
17
-
 18
18
-
 19
19
-
 20
20
-
 21
21
-
 22
22
-
 23
23
-
 24
24
-
 25
25
-
 26
26
-
 27
27
-
 28
28
-
 29
29
-
 30
30
-
 31
31
-
 32
32
-
 33
33
-
 34
34
-
 35
35
-
 36
36


ELECTROLUX-REX KT6421XE Manuale utente
- Categoria
- Piani cottura
- Tipo
- Manuale utente
in altre lingue
- English: ELECTROLUX-REX KT6421XE User manual
Documenti correlati
Altri documenti
-
Electrolux EHF8748FOK Manuale utente
-
-
-
-
Electrolux EHF6747FOK Manuale utente
-
Electrolux GK29TCO Manuale utente
-
-
-
-