

ENGLISH
1
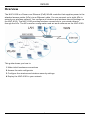
Overview
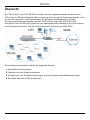
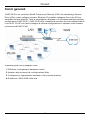
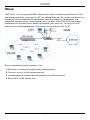
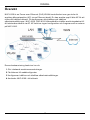
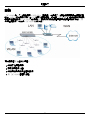
The NXC-8160 is a Power over Ethernet (PoE) WLAN controller that supplies power to the
attached access points (APs) via an Ethernet cable. You can connect up to eight APs to
extend your wireless network. You configure all wireless and wireless security settings on
the NXC-8160. The NXC-8160 provides wireless connectivity to your wired network
through the APs. The APs need no configuration and act as an antenna on the NXC-8160.
This guide shows you how to:
1 Make initial hardware connections
2 Access the web configurator
3 Configure the wireless and wireless security settings
4 Deploy the NXC-8160 in your network
ENGLISH

ENGLISH
2
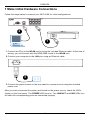
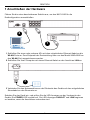
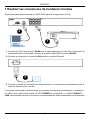
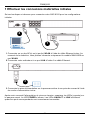
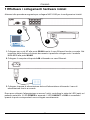
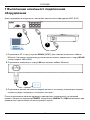
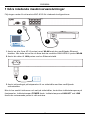
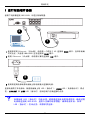
1 Make Initial Hardware Connections
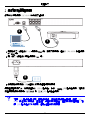
Follow the steps below to connect your NXC-8160 for initial configurations.
1 Connect an AP(s) to the WLAN port(s) using the included Ethernet cable. At the time of
writing, you can connect only the NWA-8500 model to the WLAN port.
2 Connect your computer to the LAN port using an Ethernet cable.
3 Connect the power socket on the rear panel to a power source using the included
power cord.
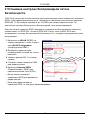
After you have connected the power and turned on the power source, check the LEDs
(lights) on the front panel. The POWER LED turns on. The LINK/ACT and LINK LEDs turn
on when the corresponding ports are connected properly.
1
2
3

ENGLISH
3
V If none of the LEDs are on, check your connections, and inspect your
cables for damage. Make sure that you have the power cord connected to
the NXC-8160 and plugged in to an appropriate power source. Make sure
the power source is turned on. If the LEDs are still off, contact your local
vendor.
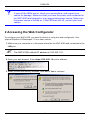
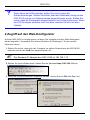
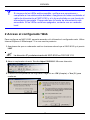
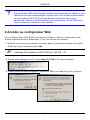
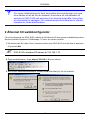
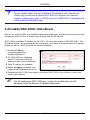
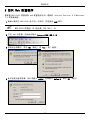
2 Accessing the Web Configurator
To configure your NXC-8160, you need to access it using the web configurator. Use
Internet Explorer 6.0/Netscape 7.0 or a later version.
1 Make sure your computer is in the same subnet as the NXC-8160 and connected to the
LAN port.
" The NXC-8160’s default IP address is 192.168.1.10.
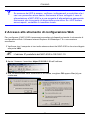
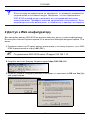
2 Open your web browser. Enter https://192.168.1.10 as the address.
3 When you see the security screens, click OK or Yes to continue.

ENGLISH
4
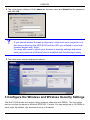
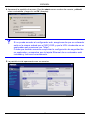
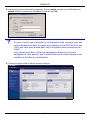
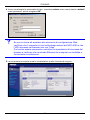
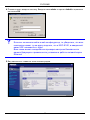
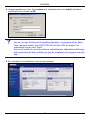
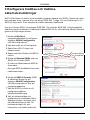
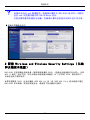
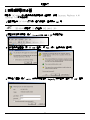
4 The login screen displays. Enter admin as the user name and default as the password
and click OK.
V If you cannot access the web configurator, make sure your computer is in
the same subnet as the NXC-8160 and the URL you entered in your web
browser begins with “https”.
You may also need to check your browser’s security settings and make
sure your computer’s Ethernet card is installed and functioning properly
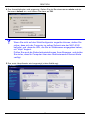
5 The initial main screen displays as shown.
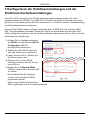
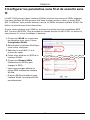
3 Configure the Wireless and Wireless Security Settings
The NXC-8160 allows two radios (using separate channels and SSIDs). The two radios
can be in either the same or different IEEE 802.11 mode. You can assign up to 16 SSIDs to
each radio. By default, the wireless security is disabled.

ENGLISH
5
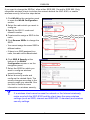
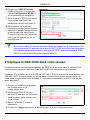
If you want to change the SSID(s), allow either IEEE 802.11a and/or IEEE 802.11b/g
compatible wireless clients to access the network behind the NXC-8160, or enable
wireless security, follow the steps below.
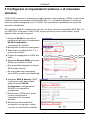
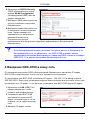
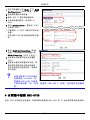
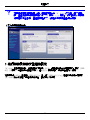
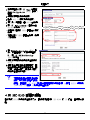
1 Click WLAN on the navigation panel
to open the WLAN Configuration
screen.
2 Select the radio which you want to
configure.
3 Specify the 802.11 mode and
channel number.
4 Create and/or assign a SSID to the
radio.
5 Click Rename SSIDs to change the
SSID.
• You cannot assign the same SSID to
different radios.
• If there is no SSID assigned to a
radio, the radio will be deactivated.
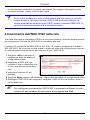
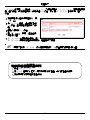
6 Click SSID & Security at the
bottom of the WLAN
Configuration screen or on the
navigation panel.
7 Select the SSID for which you
want to configure wireless
security settings.
8 Select a security mode and
configure the related fields. The
screen changes according to the
security mode you selected. See
the User’s Guide for more
information on wireless security.
V If a wireless client cannot access the network or the Internet wirelessly,
make sure both the NXC-8160 and the client have the same wireless
settings (such as SSID, channel and IEEE 802.11 standard) and wireless
security settings.

ENGLISH
6
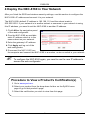
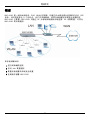
4 Deploy the NXC-8160 in Your Network
After you finish the SSID and wireless security settings, use this section to configure the
NXC-8160’s IP address and connect it to your network.
The NXC-8160’s default IP address is 192.168.1.10 and the subnet mask is
255.255.255.0. If your network is in another subnet or someone in your network is using
this IP address, you need to set the NXC-8160 to another IP address.
1 Click LAN on the navigation panel
of the web configurator.
2 Give the NXC-8160 an available
static IP address which is in the
same subnet as your network.
3 Enter the gateway’s IP address.
4 Click Apply and log out of the
web configurator.
5 Disconnect the NXC-8160 from
the computer and connect the NXC-8160 to a modem, router or switch in your network.
" To configure the NXC-8160 again, you need to use the new IP address to
access the web configurator.
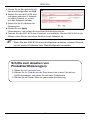
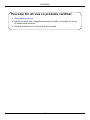
Procedure to View a Product’s Certification(s)
1 Go to www.zyxel.com.
2 Select your product from the drop-down list box on the ZyXEL home
page to go to that product's page.
3 Select the certification you wish to view from this page.

DEUTSCH
7
Übersicht
Der NXC-8160 ist ein PoE-WLAN-Controller, der die angeschlossenen Access-Points
(APs) über ein Ethernet-Kabel mit Strom versorgt. Sie können Ihr Drahtlosnetzwerk um bis
zu acht APs erweitern. Alle Einstellungen für die Drahtlosverbindungen und alle
Sicherheitseinstellungen werden auf dem NXC-8160 konfiguriert. Der NXC-8160
ermöglicht über die APs den Zugriff auf das kabelgebundene Netzwerk. Die APs müssen
nicht konfiguriert werden, und sie funktionieren wie Antennen am NXC-8160.
Dieses Benutzerhandbuch enthält die folgenden Kapitel:
1 Anschließen der Hardware
2 Zugreifen auf den Web-Konfigurator
3 Konfigurieren der Drahtloseinstellungen und der Drahtlossicherheitseinstellungen
4 Benutzen des NXC-8160 im Netzwerk
DEUTSCH

DEUTSCH
8
1 Anschließen der Hardware
Führen Sie die unten beschriebenen Schritte aus, um den NXC-8160 für die
Erstkonfiguration anzuschließen.
1 Schließen Sie einen oder mehrere APs mit dem mitgelieferten Ethernet-Kabel an die
WLAN-Ports an. Zum Zeitpunkt der Druckstellung kann nur das Modell NWA-8500 an
den WLAN-Port angeschlossen werden.
2 Schließen Sie Ihren Computer mit einem Ethernet-Kabel an den Anschluss LAN an.
3 Verbinden Sie den Netzanschluss an der Rückseite des Geräts mit dem mitgelieferten
Stromkabel an das Stromnetz an.
Schalten Sie das Gerät ein, und prüfen Sie die LED-Anzeigen an der Vorderseite des
Geräts. Die POWER LED leuchtet auf. Die LED-Anzeigen LINK/ACT und LINK beginnen
zu leuchten, wenn die Anschlüsse verbunden sind.
1
2
3

DEUTSCH
9
V Wenn keine der LEDs leuchtet, prüfen Sie noch einmal alle
Kabelverbindungen. Stellen Sie sicher, dass das Netzkabel richtig an den
NXC-8160 und an eine Netzsteckdose angeschlossen wurde. Stellen Sie
sicher, dass die Stromquelle eingeschaltet ist und richtig funktioniert. Wenn
die LED-Anzeigen weiterhin nicht leuchten, wenden Sie sich an Ihren
Händler.
2 Zugriff auf den Web-Konfigurator
Um den NXC-8160 zu konfigurieren, müssen Sie zunächst mit dem Web-Konfigrator
darauf zugreifen. Verwenden Sie Internet Explorer 6.0/Netscape 7.0 oder neuere
Versionen davon.
1 Stellen Sie sicher, dass sich der Computer im selben Subnetz wie der NXC-8160
befindet und an den LAN-Port angeschlossen ist.
" Die Standard-IP-Adresse des NXC-8160 ist 192.168.1.10.
2 Starten Sie Ihren Webbrowser. Geben Sie als Adresse https://192.168.1.10 ein.
3 Wenn die Sicherheitsfenster angezeigt werden, klicken Sie auf OK oder Yes (Ja).

DEUTSCH
10
4 Das Anmeldefenster wird angezeigt. Geben Sie als Benutzernamen admin und als
Kennwort default ein, und klicken Sie dann auf OK.
V Wenn Sie nicht auf den Web-Konfigurator zugreifen können, stellen Sie
sicher, dass sich der Computer im selben Subnetz wie der NXC-8160
befindet, und dass die URL, die Sie im Webbrowser eingegeben haben,
mit "https" beginnt.
Prüfen Sie auch die Sicherheitseinstellungen Ihres Browsers, und stellen
Sie sicher, dass Ihr Computer über eine funktionierende Ethernet-Karte
verfügt.
5 Das erste Hauptfenster wird angezeigt (siehe Abbildung).

DEUTSCH
11
3 Konfigurieren der Drahtloseinstellungen und der
Drahtlossicherheitseinstellungen
Der NXC-8160 unterstutzt zwei WLAN-Interfaces angeschlossen werden (für zwei
separate Kanäle und SSIDs). Der IEEE 802.11-Modus der WLAN-Interfaces muss nicht
gleich sein. Sie können jedem WLAN-Interface bis zu 16 SSIDs zuweisen. Standardmäßig
ist die Drahtlossicherheit deaktiviert.
Wenn Sie die SSIDs ändern möchten, entweder den mit IEEE 802.11a und/oder IEEE
802.11b/g kompatiblen Wireless-Clients den Zugriff auf das Netzwerk hinter dem NXC-
8160 ermöglichen möchten oder die Drahtlossicherheit aktivieren möchten, führen Sie die
nachfolgenden Schritte aus.
1 Klicken Sie im Navigationsfenster
auf WLAN, um das Fenster WLAN
Configuration (WLAN-
Konfiguration) aufzurufen.
2 Wählen Sie das WLAN-Interface
aus, das konfiguriert werden soll.
3 Legen Sie den 802.11-Modus und
die Kanalnummer fest.
4 Erstellen Sie für das WLAN-
Interface und/oder weisen Sie ihm
eine SSID zu.
5 Klicken Sie auf Rename SSIDs
(SSIDs umbenennen), um die SSID
zu ändern.
• Den einzelnen WLAN-Interfaces
müssen unterschiedliche SSIDs
zugewiesen werden.
• Wenn einem WLAN-Interface keine
SSID zugewiesen wird, wird dieses deaktiviert.

DEUTSCH
12
6 Klicken Sie unten im Fenster
WLAN Configuration (WLAN-
Konfiguration) oder im
Navigationsfenster auf SSID &
Security (SSID und Sicherheit).
7 Wählen Sie die SSID aus, für die
Sie die
Drahtlossicherheitseinstellungen
konfigurieren möchten.
8 Wählen Sie einen
Sicherheitsmodus aus, und
konfigurieren Sie die
erforderlichen Einstellungen. Das
Fenster ändert sich entsprechend
des ausgewählten Sicherheitsmodus. Weitere Informationen zur Drahtlossicherheit
finden Sie im Anhang des Benutzerhandbuchs.
V Wenn ein Wireless-Client nicht drahtlos auf das Netzwerk oder Internet
zugreifen kann, stellen Sie sicher, dass der NXC-8160 und der Client
dieselben Drahtloseinstellungen (SSID, Kanal und IEEE 802.11-Standard)
und Drahtlossicherheitseinstellungen verwenden.
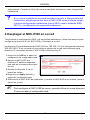
4 Benutzen des NXC-8160 im Netzwerk
Wenn Sie die SSID und Sicherheitseinstellungen konfiguriert haben, konfigurieren Sie nun
die IP-Adresse des NXC-8160, und stellen Sie die Verbindung zu Ihrem Netzwerk her.
Die Standard-IP-Adresse des NXC-8160 ist 192.168.1.10, die Subnetz-Maske ist
255.255.255.0. Wenn sich Ihr Netzwerk in einem anderen Subnetz befindet, oder jemand
in Ihrem Netzwerk diese IP-Adresse verwendet, müssen Sie dem NXC-8160 eine andere
IP-Adresse zuweisen.

DEUTSCH
13
1 Klicken Sie im Navigationsfenster
des Web-Konfigurators auf LAN.
2 Weisen Sie dem NXC-8160 eine
verfügbare statische IP-Adresse
im selben Subnetz zu, in dem
sich das Netzwerk befindet.
3 Geben Sie die IP-Adresse des
Gateways ein.
4 Klicken Sie auf Apply
(Übernehmen), und melden Sie sich beim Web-Konfigurator ab.
5 Trennen Sie den NXC-8160 vom Computer, und schließen Sie den NXC-8160 an ein
Modem, einen Router oder einen Switch in Ihrem Netzwerk an.
" Wenn Sie den NXC-8160 erneut konfigurieren möchten, müssen Sie sich
mit der neuen IP-Adresse beim Web-Konfigurator anmelden.
Schritte zum Ansehen von
Produktzertifizierung(en)
1 Gehen Sie auf www.zyxel.com.
2 Wählen Sie Ihr Produkt aus der Drop-down-Liste in dem Feld auf der
ZyXEL-Homepage, und gehen Sie auf diese Produktseite.
3 Wählen Sie auf dieser Seite die gewünschte Zertifizierung.

DEUTSCH
14

ESPAÑOL
15
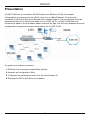
Vista previa
El NXC-8160 es un controlador WLAN Power over Ethernet (PoE) que suministra energía
a los puntos de acceso (PA) conectados a través de cable Ethernet. Puede conectar hasta
ocho PAs para extender su red inalámbrica. Puede ajustar toda la configuración
inalámbrica y de seguridad inalámbrica en el NXC-8160. El NXC-8160 ofrece conectividad
inalámbrica a su red inalámbrica a través de los PAs. Los PAs no necesitan configuración
y actúan como antena en el NXC-8160.
Esta guía le muestra cómo:
1 Realizar las conexiones de hardware iniciales
2 Acceder al configurador web.
3 Ajustar la configuración inalámbrica y de seguridad inalámbrica
4 Desplegar el NXC-8160 en su red
ESPAÑOL

ESPAÑOL
16
1 Realizar las conexiones de hardware iniciales
Siga estos pasos para conectar su NXC-8160 para la configuración inicial.
1 Conecte un PA(s) al puerto(s) WLAN con el cable Ethernet incluido. En el momento de
esta publicación, sólo puede conectar el modelo NWA-8500 al puerto WLAN.
2 Conecte su ordenador al puerto LAN usando un cable Ethernet.
3 Conecte el zócalo de corriente del panel posterior a una fuente de alimentación con el
cable de alimentación incluido.
Tras haber conectado la alimentación y encendido la fuente de alimentación, compruebe
los LEDs (luces) del panel frontal. El LED POWER se encenderá. Los LEDs LINK/ACT y
LINK se encienden cuando los puertos correspondientes están conectados correctamente.
1
2
3

ESPAÑOL
17
V Si ninguno de los LEDs está encendido, verifique sus conexiones y
compruebe si los cables están dañados. Asegúrese de haber conectado el
cable de alimentación al NXC-8160 y si lo ha enchufado en una fuente de
alimentación apropiada. Compruebe que la fuente de alimentación esté
encendida. Si los LEDs continúan apagados, contacte con su vendedor
local.
2 Acceso al configurador Web
Para configurar su NXC-8160, necesita acceder a él utilizando el configurador web. Utilice
Internet Explorer 6.0/Netscape 7.0 o una versión posterior.
1 Asegúrese de que su ordenador esté en la misma subred que el NXC-8160 y el puerto
LAN.
" La dirección IP predeterminada del NXC-8160 es 192.168.1.10.
2 Abra su explorador de web. Escriba https://192.168.1.10 como dirección.
3 Cuando vea las pantallas de seguridad, haga clic en OK (Aceptar) o Yes (Sí) para
continuar.

ESPAÑOL
18
4 Aparecerá la pantalla de acceso. Escriba admin como nombre de usuario y default
como contraseña y haga clic en OK (Aceptar).
V Si no puede acceder al configurador web, asegúrese de que su ordenador
esté en la misma subred que el NXC-8160 y que la URL introducida en su
explorador web comience con "https".
Puede que también necesite comprobar la configuración de seguridad de
su explorador y comprobar que la tarjeta Ethernet de su ordenador está
instalada y funciona correctamente.
5 La pantalla inicial aparecerá como se muestra.

ESPAÑOL
19
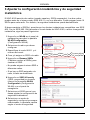
3 Ajustar la configuración inalámbrica y de seguridad
inalámbrica
El NXC-8160 permite dos radios (usando canales y SSIDs separados). Las dos radios
pueden estar en el mismo modo IEEE 802.11 o en uno diferente. Puede asignar hasta 16
SSIDs para cada radio. Por defecto, la seguridad inalámbrica queda deshabilitada.
Si desea cambiar el SSID(s), permita que los clientes inalámbricos compatibles con IEEE
802.11a y/o IEEE 802.11b/g accedan a la red detrás del NXC-8160, o active la seguridad
inalámbrica, siga los pasos siguientes.
1 Haga clic en WLAN en el panel de
navegación para abrir la pantalla
WLAN Configuration
(Configuración WLAN).
2 Seleccione la radio que desee
configurar.
3 Especifique el modo 802.11 y el
número del canal.
4 Cree y/o asigne un SSID a la radio.
5 Haga clic en Rename SSIDs
(Cambiar nombre a SSIDs) para
cambiar el SSID.
• No puede asignar el mismo SSID a
diferentes radios.
• Si no hay un SSID asignado a la
radio, la radio se desactivará.
6 Haga clic en SSID & Security
(SSID y seguridad) en la parte
inferior de la pantalla WLAN
Configuration (Configuración
WLAN) o en el panel de
navegación.
7 Seleccione el SSID para el que
desea ajustar la configuración de
seguridad inalámbrica.
8 Seleccione un modo de
seguridad y configure los campos
relacionados. La pantalla cambia
según el modo de seguridad
La pagina si sta caricando...
La pagina si sta caricando...
La pagina si sta caricando...
La pagina si sta caricando...
La pagina si sta caricando...
La pagina si sta caricando...
La pagina si sta caricando...
La pagina si sta caricando...
La pagina si sta caricando...
La pagina si sta caricando...
La pagina si sta caricando...
La pagina si sta caricando...
La pagina si sta caricando...
La pagina si sta caricando...
La pagina si sta caricando...
La pagina si sta caricando...
La pagina si sta caricando...
La pagina si sta caricando...
La pagina si sta caricando...
La pagina si sta caricando...
La pagina si sta caricando...
La pagina si sta caricando...
La pagina si sta caricando...
La pagina si sta caricando...
La pagina si sta caricando...
La pagina si sta caricando...
La pagina si sta caricando...
La pagina si sta caricando...
La pagina si sta caricando...
La pagina si sta caricando...
La pagina si sta caricando...
La pagina si sta caricando...
La pagina si sta caricando...
La pagina si sta caricando...
La pagina si sta caricando...
La pagina si sta caricando...
La pagina si sta caricando...
La pagina si sta caricando...
La pagina si sta caricando...
La pagina si sta caricando...
La pagina si sta caricando...
La pagina si sta caricando...
La pagina si sta caricando...
La pagina si sta caricando...
La pagina si sta caricando...
La pagina si sta caricando...
La pagina si sta caricando...
-
 1
1
-
 2
2
-
 3
3
-
 4
4
-
 5
5
-
 6
6
-
 7
7
-
 8
8
-
 9
9
-
 10
10
-
 11
11
-
 12
12
-
 13
13
-
 14
14
-
 15
15
-
 16
16
-
 17
17
-
 18
18
-
 19
19
-
 20
20
-
 21
21
-
 22
22
-
 23
23
-
 24
24
-
 25
25
-
 26
26
-
 27
27
-
 28
28
-
 29
29
-
 30
30
-
 31
31
-
 32
32
-
 33
33
-
 34
34
-
 35
35
-
 36
36
-
 37
37
-
 38
38
-
 39
39
-
 40
40
-
 41
41
-
 42
42
-
 43
43
-
 44
44
-
 45
45
-
 46
46
-
 47
47
-
 48
48
-
 49
49
-
 50
50
-
 51
51
-
 52
52
-
 53
53
-
 54
54
-
 55
55
-
 56
56
-
 57
57
-
 58
58
-
 59
59
-
 60
60
-
 61
61
-
 62
62
-
 63
63
-
 64
64
-
 65
65
-
 66
66
-
 67
67


ZyXEL Communications NXC-8160s Manuale utente
- Tipo
- Manuale utente
- Questo manuale è adatto anche per
in altre lingue
- English: ZyXEL Communications NXC-8160s User manual
- français: ZyXEL Communications NXC-8160s Manuel utilisateur
- español: ZyXEL Communications NXC-8160s Manual de usuario
- Deutsch: ZyXEL Communications NXC-8160s Benutzerhandbuch
- русский: ZyXEL Communications NXC-8160s Руководство пользователя
- svenska: ZyXEL Communications NXC-8160s Användarmanual
