HOTPOINT/ARISTON WMSD 723B EU.L Guida utente
- Categoria
- Lavatrici
- Tipo
- Guida utente

GB
1
English,1
Contents
Installation, 2-3
Unpacking and levelling
Connecting the electricity and water supplies
The first wash cycle
Technical data
Care and maintenance, 4
Cutting off the water or electricity supply
Cleaning the washing machine
Cleaning the detergent dispenser drawer
Caring for the door and drum of your appliance
Cleaning the pump
Checking the water inlet hose
Precautions and tips, 5
General safety
Disposal
Description of the washing machine, 6-7
Control panel
Display
Running a wash cycle, 8
Wash cycles and functions, 9
Table of wash cycles
Wash functions
Detergents and laundry, 10
Detergent dispenser drawer
Preparing the laundry
Special wash cycles
Load balancing system
Troubleshooting, 11
Service, 12
GB
WMSD 723
Instructions for use
WASHING MACHINE
Polski,13
PL
UA
Українська,25
Italiano,37
IT
RO
Română,49

2
GB
Installation
! This instruction manual should be kept in a
safe place for future reference. If the washing
machine is sold, transferred or moved, make
sure that the instruction manual remains with
the machine so that the new owner is able to
familiarise himself/herself with its operation
and features.
! Read these instructions carefully: they con-
tain vital information relating to the safe instal-
lation and operation of the appliance.
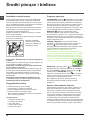
Unpacking and levelling
Unpacking
1. Remove the washing machine from its
packaging.
2. Make sure that the washing machine has
not been damaged during the transportation
process. If it has been damaged, contact the
retailer and do not proceed any further with
the installation process.
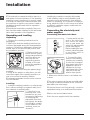
3. Remove the 4 pro-
tective screws (used
during transportation)
and the rubber wa-
sher with the cor-
responding spacer,
located on the rear
part of the appliance
(see figure).
4. Close off the holes using the plastic plugs
provided.
5. Keep all the parts in a safe place: you will
need them again if the washing machine ne-
eds to be moved to another location.
! Packaging materials should not be used as
toys for children.
Levelling
1. Install the washing machine on a flat sturdy
floor, without resting it up against walls, furni-
ture cabinets or anything else.
2. If the floor is not
perfectly level, com-
pensate for any une-
venness by tightening
or loosening the
adjustable front feet
(see figure); the angle
of inclination, measu-
red in relation to the
worktop, must not
exceed 2°.
Levelling the machine correctly will provide
it with stability, help to avoid vibrations and
excessive noise and prevent it from shifting
while it is operating. If it is placed on carpet or
a rug, adjust the feet in such a way as to allow
a sufficient ventilation space underneath the
washing machine.
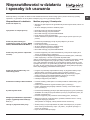
Connecting the electricity and
water supplies
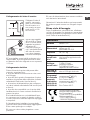
Connecting the water inlet hose
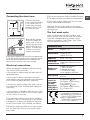
1. Insert seal A into the
end of the inlet hose
and screw the latter
onto a cold water tap
with a 3/4 gas threaded
mouth (see figure).
Before making the con-
nection, allow the water
to run freely until it is
perfectly clear.
2. Connect the inlet
hose to the washing
machine by screwing
it onto the correspon-
ding water inlet of the
appliance, which is
situated on the top
right-hand side of the
rear part of the ap-
pliance (see figure).
3. Make sure that the hose is not folded over
or bent.
! The water pressure at the tap must fall within
the range of values indicated in the Technical
data table (see next page).
! If the inlet hose is not long enough, contact a
specialised shop or an authorised technician.
! Never use second-hand hoses.
! Use the ones supplied with the machine.
A

GB
3
Connecting the drain hose
Connect the drain
hose, without bending
it, to a drain duct or
a wall drain situated
between 65 and 100
cm from the floor;
alternatively, placed
it over the edge of a
basin, sink or tub, fa-
stening the duct sup-
plied to the tap (see
figure). The free end
of the hose should
not be underwater.
! We advise against the use of hose extensions;
if it is absolutely necessary, the extension must
have the same diameter as the original hose
and must not exceed 150 cm in length.
Electrical connections
Before plugging the appliance into the electri-
city socket, make sure that:
• thesocketisearthedandcomplieswithall
applicable laws;
• thesocketisabletowithstandthemaxi-
mum power load of the appliance as indicated
in the Technical data table (see opposite);
• thepowersupplyvoltagefallswithintheva-
lues indicated in the Technical data table (see
opposite);
• thesocketiscompatiblewiththeplugofthe
washing machine. If this is not the case, repla-
ce the socket or the plug.
! The washing machine must not be installed
outdoors, even in covered areas. It is extreme-
ly dangerous to leave the appliance exposed
to rain, storms and other weather conditions.
! When the washing machine has been instal-
led, the electricity socket must remain within
easy reach.
65 - 100 cm
! Do not use extension cords or multiple sockets.
! The cable should not be bent or compressed.
! The power supply cable must only be repla-
ced by authorised technicians.
Warning! The company shall not be held re-
sponsible in the event that these standards are
not observed.
The first wash cycle
Once the appliance has been installed, and
before you use it for the first time, run a wash
cycle with detergent and no laundry, using
wash cycle number “Auto Clean” (see “Clea-
ning the washing machine”).
Technical data
Model
WMSD 723
Dimensions
width 59.5 cm
height 85 cm
depth 43,5 cm
Capacity
from 1 to 7 kg
Electrical
connections
please refer to the technical
data plate fixed to the ma-
chine
Water con-
nections
maximum pressure
1 MPa (10 bar)
minimum pressure
0.05 MPa (0.5 bar)
drum capacity 48 litres
Spin speed
up to 1200 rotations per
minute
Test wash
cycles in
accordan-
ce with
directives
1061/2010
1015/2010
programme (60°)
(3rd press of the button);
Eco Cotton 60°.
programme (40°)
(3rd press of the button);
Eco Cotton 40°.
This appliance conforms to
the following EC Directives:
- 2004/108/EC (Electroma-
gnetic Compatibility)
- 2006/95/EC (Low Voltage)
- 2012/19/EU (WEEE)

4
GB
Care and maintenance
Cutting off the water and electri-
city supplies
•Turnoffthewatertapaftereverywashcycle.
This will limit wear on the hydraulic system in-
side the washing machine and help to prevent
leaks.
•Unplugthewashingmachinewhencleaning
it and during all maintenance work.
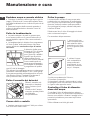
Cleaning the washing machine
•Theouterpartsandrubbercomponents
of the appliance can be cleaned using a soft
cloth soaked in lukewarm soapy water. Do not
use solvents or abrasives.
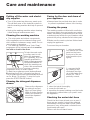
•Thewashingmachinehasa“AutoClean”
programme for its internal parts that must be
run with no load in the drum.
To help the wash cycle
you may want to use
either the detergent
(i.e. a quantity 10% the
quantity specified for
lightly-soiled garments)
or special additives to
clean the washing ma-
chine. We recommend
running a cleaning
programme every 40 wash cycles.
To start the programme press buttons A and
B simultaneously for 5 seconds (see figure).
The programme will start automatically and will
run for about 70 minutes. To stop the cycle
press the START/PAUSE button.
Cleaning the detergent dispenser
drawer
Remove the dispenser
by raising it and pul-
ling it out (see figure).
Wash it under running
water; this operation
should be repeated
frequently.
1
2
BA
Caring for the door and drum of
your appliance
•Alwaysleavetheportholedoorajarinorder
to prevent unpleasant odours from forming.
Cleaning the pump
The washing machine is fitted with a self-clea-
ning pump which does not require any mainte-
nance. Sometimes, small items (such as coins
or buttons) may fall into the pre-chamber which
protects the pump, situated in its bottom part.
! Make sure the wash cycle has finished and
unplug the appliance.
To access the pre-chamber:
1. using a screwdri-
ver, remove the cover
panel on the lower
front part of the wa-
shing machine (see
figure);
2. unscrew the lid
by rotating it anti-
clockwise (see figu-
re): a little water may
trickle out. This is
perfectly normal;
3. clean the inside thoroughly;
4. screw the lid back on;
5. reposition the panel, making sure the hooks
are securely in place before you push it onto
the appliance.
Checking the water inlet hose
Check the inlet hose at least once a year. If
there are any cracks, it should be replaced
immediately: during the wash cycles, water
pressure is very strong and a cracked hose
could easily split open.
! Never use second-hand hoses.

GB
5
Precautions and tips
! This washing machine was designed and constructed in
accordance with international safety regulations. The fol-
lowing information is provided for safety reasons and must
therefore be read carefully.
General safety
•Thisappliancewasdesignedfordomesticuseonly.
• This appliance can be used by children aged
from 8 years and above and persons with re-
duced physical, sensory or mental capabilities
or lack of experience and knowledge if they
have been given supervision or instruction
concerning use of the appliance in a safe way
and understand the hazards involved. Chil-
dren shall not play with the appliance. Clea-
ning and user maintenance shall not be made
by children without supervision.
•Donottouchthemachinewhenbarefootorwithwetor
damp hands or feet.
•Donotpullonthepowersupplycablewhenunplugging
the appliance from the electricity socket. Hold the plug
and pull.
•Donotopenthedetergentdispenserdrawerwhilethe
machine is in operation.
•Donottouchthedrainedwaterasitmayreachextreme-
ly high temperatures.
• Neverforcetheportholedoor.Thiscoulddamagethesafety
lock mechanism designed to prevent accidental opening.
•Iftheappliancebreaksdown,donotunderanycircum-
stances access the internal mechanisms in an attempt
to repair it yourself.
•Alwayskeepchildrenwellawayfromtheappliancewhile
it is operating.
•Thedoorcanbecomequitehotduringthewashcycle.
•Iftheappliancehastobemoved,workinagroupoftwo
or three people and handle it with the utmost care. Never
try to do this alone, because the appliance is very heavy.
•Beforeloadinglaundryintothewashingmachine,make
sure the drum is empty.
Disposal
•Disposingofthepackagingmaterials:observelocalregu-
lations so that the packaging may be re-used.
•TheEuropeanDirective2012/19/EUonWasteElectrical
and Electronic Equipment, requires that old household
electrical appliances must not be disposed of in the normal
unsorted municipal waste stream. Old appliances must be
collected separately in order to optimise the recovery and
recycling of the materials they contain and reduce the im-
pact on human health and the environment. The crossed
out “wheeled bin” symbol on the product reminds you of
your obligation, that when you dispose of the appliance it
must be separately collected. Consumers should contact
their local authority or retailer for information concerning the
correct disposal of their old appliance.

6
GB
Detergent dispenser drawer: used to dispense deter-
gents and washing additives (see “Detergents and laundry”).
ON/OFF button : press this briefly to switch the ma-
chine on or off. The START/PAUSE indicator light, which
flashes slowly in a green colour shows that the machine is
switched on. To switch off the washing machine during the
wash cycle, press and hold the button for approximately 3
seconds; if the button is pressed briefly or accidentally the
machine will not switch off. If the machine is switched off
during a wash cycle, this wash cycle will be cancelled.
WASH CYCLE SELECTOR buttons: used to set the
desired wash cycle (see “Table of wash cycles”).
MY CYCLE button: press and hold the button to store a
cycle with your own set of preferences in the memory of
the machine. To recall a previously stored cycle, press the
MY CYCLE button.
FUNCTION buttons: press the button to select the
desired function. The corresponding indicator light on the
display will switch on.
CLEANING ACTION
button : to select the desired
wash intensity.
ANTI ALLERGY RINSE
button : press to select
the desired rinse type.
SPIN button : press to reduce or completely exclude
the spin cycle - the value is indicated on the display.
TEMPERATURE button : press to decrease the tem-
perature: the value will be shown on the display.
CHILD LOCK button : to activate the control panel
lock, press and hold the button for approximately 2
seconds. When the symbol is illuminated, the control
panel is locked (apart from the ON/OFF button). This
means it is possible to prevent wash cycles from being
modified accidentally, especially where there are children in
the home. To deactivate the control panel lock, press and
hold the button for approximately 2 seconds.
DELAY TIMER button : press to set a delayed start
time for the selected wash cycle. The delay time will be
shown on the display.
START/PAUSE button with indicator light: when the gre-
en indicator light flashes slowly, press the button to start a
wash cycle. Once the cycle has started the indicator light
will remain lit in a fixed manner. To pause the wash cycle,
press the button again; the indicator light will flash in an
orange colour. If the symbol is not illuminated, the door
may be opened (wait approximately 3 minutes). To start
the wash cycle from the point at which it was interrupted,
press the button again.
Standby mode
This washing machine, in compliance with new energy sa-
ving regulations, is fitted with an automatic standby system
which is enabled after about 30 minutes if no activity is
detected. Press the ON-OFF button briefly and wait for the
machine to start up again.
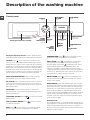
Description of the washing machine
Control panel
TEMPERATURE
button
WASH
CYCLE
SELECTOR
buttons
Detergent dispenser drawer
FUNCTION
buttons
ON/OFF
button
SPIN SPEED
button
START/PAUSE
button with
indicator light
CHILD LOCK
button
DISPLAY
DELAY
TIMER
button
MY
CYCLE
button
CLEANING
ACTION
button
ANTI
ALLERGY
RINSE
button

GB
7
Display
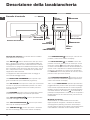
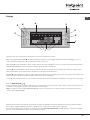
The display is useful when programming the machine and provides a great deal of information.
The two upper strings A and B provide details of the wash cycle selected, the wash cycle phase in progress and all informa-
tion relating to the progress status of the wash cycle.
String C shows the time remaining until the end of the wash cycle in progress and, if a DELAYED START has been set, the
time remaining until the start of the selected wash cycle.
String D shows the maximum spin speed value (this depends on the selected wash cycle); if the wash cycle does not include
a spin cycle, the string remains unused.
String E shows the maximum temperature value which may be selected (this depends on the wash cycle used); if the tempe-
rature of the wash cycle cannot be modified, the string remains unused.
Indicator lights F correspond to the functions and light up when the selected function is compatible with the set wash cycle.
Door locked symbol
If the symbol is lit, this indicates that the washing machine door is blocked to prevent it from being opened accidentally. To
prevent any damage from occurring, wait for the symbol to switch itself off before opening the appliance door (wait approxi-
mately 3 minutes).
N.B.: if the DELAYE TIMER function has been activated, the door cannot be opened; pauses the machine by pressing the
START/PAUSE button if you wish to open it.
! The first time the machine is switched on, you will be asked to select the language and the display will automatically show
the language selection menu.
To select the desired language press the X and Y buttons; to confirm the selection press the Z button.
To change the language switch off the machine and press buttons X, Y, Z simultaneously until an alarm is heard: the
language-selection menu will be displayed again.
A
B
C
D
E
F
Z
X
Y

8
GB
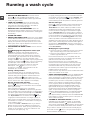
Running a wash cycle
1. SWITCH THE MACHINE ON. Press the On/Off
button ; the text POWER ON will appear on the
display and the START/PAUSE indicator light will flash
slowly in a green colour.
2. LOAD THE LAUNDRY. Open the porthole door.
Load the laundry, making sure you do not exceed
the maximum load value indicated in the table of
programmes on the following page.
3. MEASURE OUT THE DETERGENT. Open the
detergent dispenser drawer and pour the detergent into
the relevant compartments as described in “Detergents
and laundry”.
4. CLOSE THE DOOR.
5. SELECT THE WASH CYCLE. Press one of the WASH
CYCLE SELECTOR buttons to select the required wash
cycle; the name of the wash cycle will appear on the
display. A temperature and spin speed is set for each
wash cycle; these may be adjusted. The duration of the
cycle will appear on the display.
6. CUSTOMISE THE WASH CYCLE. Use the relevant
buttons:
Modifying the temperature and/or spin
speed. The machine automatically selects the
maximum temperature and spin speed set for the
selected wash cycle; these values cannot therefore
be increased. The temperature can be decreased by
pressing the button, until the cold wash “OFF”
setting is reached. The spin speed may be progressively
reduced by pressing the button, until it is completely
excluded (the “OFF” setting). If these buttons are
pressed again, the maximum values are restored.
! Exception: if the
(60°)
(1st press of the button)
programme is selected, the temperature can be
increased up to a value of 90°C.
Setting a delayed start.
To set a delayed start for the selected programme,
press the corresponding button repeatedly until the
required delay period has been reached. When this
option is enabled, the symbol lights up on the
display. To remove the delayed start function press the
button until the text “OFF” appears on the display.
Set the desired wash intensity.
Option makes it possible to optimise washing
based on the level of soil in the fabrics and on desired
wash cycle intensity.
Select the wash programme: the cycle will be
automatically set to “Normal” as optimised for garments
with an average level of soil (this setting is not applicable to
the “Wool” cycle, which is automatically set to “Delicate”).
For heavily-soiled garments press button until
the “Super Wash” level is reached. This level ensures
a high-performance wash due to a larger quantity of
water used in the initial phase of the cycle and due to
increased drum rotation. It is useful when removing the
most stubborn stains.
It can be used with or without bleach. If you wish to
bleach the items insert the additional compartment
(4) into compartment 1. When pouring the bleach, be
careful not to exceed the “max” level marked on the
central pivot (see figure pag. 10).
For lightly-soiled garments or a more delicate treatment
of the fabrics, press button until the “Delicate” level
is reached. The cycle will reduce the drum rotation to
ensure washing results are perfect for delicate garments.
Set the rinse type.
Option makes it possible to select the desired rinse
type for sensitive skin. Press the button once for the
“Extra Rinse” level, which makes it possible to select
an additional rinse after the standard cycle rinse and
remove all traces of detergent. Press the button again
for the “Sensitive Skin” level, which makes it possible to
select two additional rinses to the standard cycle rinses; it
is recommended for very sensitive skin. Press the button
for the third time for the “Anti allergy Rinse” level, which
makes it possible to select three additional rinses to the
standard cycle rinses and remove major allergens such as
pollen, mites, cat and dog hair. Press the button again to
go back to the “Normal Rinse” rinse type. If the current
adjustment can be neither set nor changed, the display will
show “Not allowed”.
Modifying the cycle settings.
• Pressthebuttontoenablethefunction;theindicator
light corresponding to the button will switch on.
• Pressthebuttonagaintodisablethefunction;the
indicator light will switch off.
! If the selected function is not compatible with the
programmed wash cycle, the indicator light will flash
and the function will not be activated.
! If the selected function is not compatible with
another function which has been selected previously,
the indicator light corresponding to the first function
selected will flash and only the second function will
be activated; the indicator light corresponding to the
enabled function will remain lit.
! The functions may affect the recommended load value
and/or the duration of the cycle.
7. START THE PROGRAMME. Press the START/PAUSE
button. The corresponding indicator light will become
green, remaining lit in a fixed manner, and the door will be
locked (the DOOR LOCKED symbol will be on). During
the wash cycle, the name of the phase in progress will
appear on the display. To change a wash cycle while
it is in progress, pause the washing machine using the
START/PAUSE button (the START/PAUSE indicator
light will flash slowly in an orange colour); then select
the desired cycle and press the START/PAUSE button
again. To open the door while a cycle is in progress,
press the START/PAUSE button; if the DOOR LOCKED
symbol is switched off the door may be opened
(wait approximately 3 minutes). Press the START/PAUSE
button again to restart the wash cycle from the point at
which it was interrupted.
8.
THE END OF THE WASH CYCLE. This will be
indicated by the text “END OF CYCLE” on the display;
when the DOOR LOCKED symbol switches off the
door may be opened (wait approximately 3 minutes). Open
the door, unload the laundry and switch off the machine.
! If you wish to cancel a cycle which has already begun,
press and hold the button. The cycle will be stopped
and the machine will switch off.

GB
9
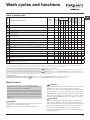
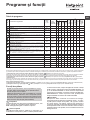
Wash cycles and functions
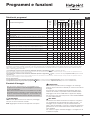
Table of wash cycles
Wash functions
! If the selected function is not compatible with the
programmed wash cycle, the indicator light will flash
and the function will not be activated.
! If the selected function is not compatible with another
function which has been selected previously, the indica-
tor light corresponding to the first function selected will
flash and only the second function will be activated; the
indicator light corresponding to the enabled function will
remain lit.
Prewash
If this function is selected, the pre-wash cycle will run; this
is useful for removing stubborn stains.
N.B.: put the detergent in the relevant compartment.
Easy Iron
By selecting this function, the wash and spin cycles will be
modified in order to reduce the formation of creases.
At the end of the cycle the washing machine will perform
slow rotations of the drum; the “Easy Iron” and START/
PAUSE indicator lights will flash (orange) and the text “END
OF CYCLE” will appear on the display. To end the cycle,
press the START/PAUSE button or the “Easy Iron” button.
Eco Wash
The Eco Wash function saves energy by not heating the
water used to wash your laundry – an advantage both to
the environment and to your energy bill. Instead, intensified
wash action and water optimisation ensure great wash
results in the same average time of a standard cycle.
For the best washing results we recommend the usage of
a liquid detergent.
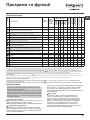
Wash cycles
Description of the wash cycle
Max.
temp.
(°C)
Max.
speed
(rpm)
Detergents
Max. load
(kg)
Residual dam-
pness %
Energy con-
sumption kWh
Total water lt
Cycle dura-
tion
Prewash
Wash
Bleach
Fabric
softener
Anti Stain
40° 1200
-
4 - - -
*
Cottons (1st press of the button): heavily soiled whites and delicate colours.
60°
(Max. 90°)
1200
7 - - -
*
Cottons (2nd press of the button): lightly soiled whites and delicate colours. 20° 1200 -
7 - - -
*
Eco Cottons 60° (3rd press of the button) (1): heavily soiled whites and
delicate colours.
60° 1200 -
-
7 53 1,02 52,5 200’
Eco Cottons 40° (3rd press of the button) (2): lightly soiled whites and
delicate colours.
40° 1200 -
-
7 53 0,99 78 175’
Synths Resistant (1st press of the button): heavily soiled resistant colours. 60° 1000
3,5 49 0,91 53 110’
Synths Resistant (1st press of the button) (3): lightly soiled resistant colours. 40° 1000
3,5 - - -
*
Synths Delicate (2nd press of the button): lightly soiled delicate colours. 40° 1000
3,5 - - -
*
Fast Wash 60' (1st press of the button): to refresh normal soiled garments quic-
kly (not suitable for wool, silk and clothes which require washing by hand).
60° 1200 -
-
3,5 - - -
*
Fast Wash 30' (2nd press of the button): to refresh lightly soiled garments quic-
kly (not suitable for wool, silk and clothes which require washing by hand).
30° 800 -
-
3 71 0,19 39 30’
M
Memory: allows for any wash cycle to be stored.
Bed&Bath: washes bathroom laundry and bedlinen. 60° 1200
-
7 - - -
*
Woolmark Platinum (Wool): for wool, cashmere, etc. 40° 800 -
-
1,5 - - -
*
Delicates
30° 0 -
-
1 - - -
*
Spin (1st press of the button) - 1200 - - - - 7 - - -
*
Rinse (2nd press of the button) - 1200 - - -
7 - - -
*
Pump out (3rd press of the button) - 0 - - - - 7 - - -
*
The length of cycle shown on the display or in this booklet is an estimation only and is calculated assuming standard working conditions. The actual duration can vary according to factors such as
water temperature and pressure, the amount of detergent used, the amount and type of load inserted, load balancing and any wash options selected.
1) Test wash cycle in compliance with directive 1061/2010: set wash cycle 60°C (3rd press of the button).
This cycle is designed for cotton loads with a normal soil level and is the most efficient in terms of both electricity and water consumption; it should be used for garments
which can be washed at 60°C. The actual washing temperature may differ from the indicated value.
2) Test wash cycle in compliance with directive 1061/2010: set wash cycle 60°C (3rd press of the button); temperature of 40°C (press TEMPERATURE button).
This cycle is designed for cotton loads with a normal soil level and is the most efficient in terms of both electricity and water consumption; it should be used for garments
which can be washed at 40°C. The actual washing temperature may differ from the indicated value.
For all Test Institutes:
2) Long wash cycle for cottons: set wash cycle 60°C (3rd press of the button); temperature of 40°C (press TEMPERATURE button).
3) Long wash cycle for synthetics: set wash cycle 60°C (1st press of the button); temperature of 40°C (press TEMPERATURE button).
* The duration of the wash cycles can be checked on the display.

10
GB
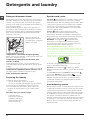
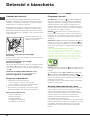
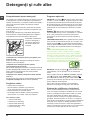
Detergent dispenser drawer
Good washing results also depend on the correct dose of
detergent: adding too much detergent will not necessarily
result in a more efficient wash, and may in fact cause a
build up on the inside of your appliance and contribute to
environmental pollution.
! Use powder detergent for white cotton garments, for
pre-washing, and for washing at temperatures over 60°C.
! Follow the instructions given on the detergent packaging.
! Do not use hand washing detergents because these
create too much foam.
Open the detergent di-
spenser drawer and pour
in the detergent or washing
additive, as follows.
compartment 1: Pre-wash detergent (powder)
Before pouring in the detergent, make sure that extra com-
partment 4 has been removed.
compartment 2: Detergent for the wash cycle
(powder or liquid)
If liquid detergent is used, it is recommended that the
removable plastic partition A (supplied) be used for proper
dosage.
If powder detergent is used, place the partition into slot B.
compartment 3: Additives (fabric softeners, etc.)
The fabric softener should not overflow the grid.
extra compartment 4: Bleach
Preparing the laundry
•Dividethelaundryaccordingto:
- the type of fabric/the symbol on the label
- the colours: separate coloured garments from whites.
•Emptyallgarmentpocketsandcheckthebuttons.
•Donotexceedthelistedvalues,whichrefertothe
weight of the laundry when dry: see “Table of wash
cycles”.
How much does your laundry weigh?
1 sheet 400-500 g
1 pillow case 150-200 g
1 tablecloth 400-500 g
1 bathrobe 900-1200 g
1 towel 150-250 g
Special wash cycles
Anti Stain : this programme is suitable to heavily-soiled
garments with resistant colours. It ensures a washing
class that is higher than the standard class (A class). When
running the programme, do not mix garments of different
colours. We recommend the use of powder detergent.
Pre-treatment with special additives is recommended if
there are obstinate stains.
Cottons : ideal for lightly soiled cotton loads.
The effective performance levels achieved at cold
temperatures, which are comparable to washing at 40°,
are guaranteed by a mechanical action which operates at
varying speed, with repeated and frequent peaks.
Bed&Bath: use programme to wash bed linen
and towels in one single cycle: it optimises softener
performance and helps you save time and energy. We
recommend the use of powder detergent.
Wool - Woolmark Apparel Care - Green:
the wool wash cycle of this machine has been approved
by The Woolmark Company for the washing of wool gar-
ments labelled as “hand wash” provided that the products
are washed according to the instructions on the garment
label and those issued by the manufacturer of this washing
machine (M1253)
In UK, Eire, Hong Kong and India the Woolmark trade
mark is a Certification trade mark.
Delicates: use programme to wash very delicate
garments with decorative features, such as diamantes and
sequins.
To wash silk garments and curtains select the cycle
and set the “Delicate” level from option .
We recommend turning the garments inside out before
washing and placing small items into the special bag
for washing delicates. Use liquid detergent on delicate
garments for best results.
Load balancing system
Before every spin cycle, to avoid excessive vibrations and
to distribute the load in a uniform manner, the drum rotates
continuously at a speed which is slightly greater than the
washing rotation speed. If, after several attempts, the load
is not balanced correctly, the machine spins at a reduced
spin speed. If the load is excessively unbalanced, the
washing machine performs the distribution process instead
of spinning. To encourage improved load distribution and
balance, we recommend small and large garments are
mixed in the load.
M
AX
1
2
4
3
A
B
Detergents and laundry

GB
11
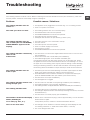
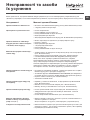
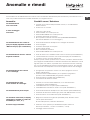
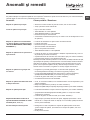
Troubleshooting
Your washing machine could fail to work. Before contacting the Technical Assistance Centre (see “Assistance”), make sure
that the problem cannot be solved easily using the following list.
Problem:
The washing machine does not
switch on.
The wash cycle does not start.
The washing machine does not
take in water (the text “NO WATER,
CHECK SUPPLY” appears on the
display).
The washing machine continuously
takes in and
drains water.
The washing machine does not
drain or spin.
The washing machine vibrates a lot
during the spin cycle.
The washing machine leaks.
The machine is locked and the display
flashes, indicating an
error code (e.g. F-01, F-..).
There is too much foam.
Possible causes / Solutions:
•Theapplianceisnotpluggedintothesocketfully,orisnotmakingcontact.
•Thereisnopowerinthehouse.
•Thewashingmachinedoorisnotclosedproperly.
•TheON/OFFbuttonhasnotbeenpressed.
•TheSTART/PAUSEbuttonhasnotbeenpressed.
•Thewatertaphasnotbeenopened.
•Adelayedstarthasbeenset(see “Running a wash cycle”).
•Thewaterinlethoseisnotconnectedtothetap.
•Thehoseisbent.
•Thewatertaphasnotbeenopened.
•Thereisnowatersupplyinthehouse.
•Thepressureistoolow.
•TheSTART/PAUSEbuttonhasnotbeenpressed.
•Thedrainhoseisnotfittedataheightbetween65and100cmfromthefloor
(see “Installation”).
•Thefreeendofthehoseisunderwater(see “Installation”).
•Thewalldrainagesystemisnotfittedwithabreatherpipe.
If the problem persists even after these checks, turn off the water tap, switch
the appliance off and contact the Assistance Service. If the dwelling is on one of
the upper floors of a building, there may be problems relating to water drainage,
causing the washing machine to fill with water and drain continuously. Special
anti-draining valves are available in shops and help to avoid this inconvenience.
•Thewashcycledoesnotincludedraining:somewashcyclesrequirethedrain
phase to be started manually (see “Wash cycles and functions”).
•TheEASYIRONfunctionhasbeenactivated:Tocompletethewashcycle,
press the START/PAUSE button (see “Wash cycles and functions”).
•Thedrainhoseisbent(see “Installation”).
•Thedrainageductisclogged.
•Thedrumwasnotunlockedcorrectlyduringinstallation(see “Installation”).
•Thewashingmachineisnotlevel(see “Installation”).
•Thewashingmachineistrappedbetweencabinetsandwalls(see “Installation”).
•Thewaterinlethoseisnotscrewedonproperly(see “Installation”).
•Thedetergentdispenserdrawerisblocked(forcleaninginstructions,see “Care
and maintenance”).
•Thedrainhoseisnotfixedproperly(see “Installation”).
•Switchoffthemachineandunplugit,waitforapproximately1minuteandthen
switch it back on again.
If the problem persists, contact the Technical Assistance Service.
•Thedetergentisnotsuitableformachinewashing(itshoulddisplaythetext
“for washing machines” or “hand and machine wash”, or the like).
•Toomuchdetergentwasused.

12
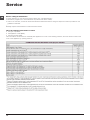
GB
Before calling for Assistance:
• Check whether you can solve the problem alone (see “Troubleshooting”);
•Restarttheprogrammetocheckwhethertheproblemhasbeensolved;
•Ifthisisnotthecase,contactanauthorisedTechnicalAssistanceCentreusingthetelephonenumberprovidedonthe
guarantee certificate.
! Always request the assistance of authorised technicians.
Have the following information to hand:
• thetypeofproblem;
• theappliancemodel(Mod.);
• theserialnumber(S/N).
This information can be found on the data plate applied to the rear of the washing machine, and can also be found on the
front of the appliance by opening the door.
Service

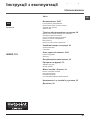
13
PL
Polski
Spis treści
Instalacja, 14-15
Rozpakowanie i wypoziomowanie
Podłączenia hydrauliczne i elektryczne
Pierwszy cykl prania
Dane techniczne
Utrzymanie i konserwacja, 16
Odłączenie wody i prądu elektrycznego
Czyszczenie pralki
Czyszczenie szuadki na środki piorące
Konserwacja okrągłych drzwiczek i bębna
Czyszczenie pompy
Kontrola przewodu doprowadzającego wodę
Zalecenia i środki ostrożności, 17
Ogólne zasady bezpieczeństwa
Utylizacja
Opis pralki, 18-19
Panel sterowania
Wyświetlacz
W jaki sposób wykonać cykl prania, 20
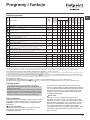
Programy i funkcje, 21
Tabela programów
Funkcje prania
Środki piorące i bielizna, 22
Szuadka na środki piorące
Przygotowanie bielizny
Programy specjalne
System równoważenia ładunku
Nieprawidłowości w działaniu i sposoby
ich usuwania, 23
Serwis Techniczny, 24
PL
WMSD 723
Instrukcja obsługi
PRALKA

14
PL
Instalacja
! Należy zachować niniejszą książeczkę,
aby móc z niej skorzystać w każdej chwili. W
przypadku sprzedaży, odstąpienia lub prze-
niesienia pralki w inne miejsce należy zadbać
o przekazanie instrukcji wraz z nią, aby nowy
właściciel mógł się zapoznać z działaniem
urządzenia i z dotyczącymi go ostrzeżeniami.
! Należy uważnie przeczytać instrukcję
obsługi: zawiera ona ważne informacje
dotyczące instalacji oraz właściwego i
bezpiecznego użytkowania pralki.
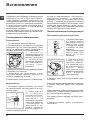
Rozpakowanie i wypoziomowanie
Rozpakowanie
1. Rozpakować pralkę.
2. Sprawdzić, czy nie doznała ona
uszkodzeń w czasie transportu. W przypadku
stwierdzenia uszkodzeń, nie podłączać pralki
i skontaktować się ze sprzedawcą.
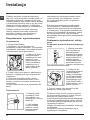
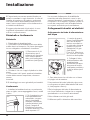
3. Odkręcić 4 śruby
zabezpieczające
urządzenie na czas
transportu oraz
zdjąć gumowy ele-
ment z podkładką,
znajdujący się w
tylnej części pralki
(patrz rysunek).
4. Zatkać otwory przy pomocy plastikowych
zaślepek, znajdujących się w wyposażeniu
urządzenia.
5. Zachować wszystkie części: w razie
konieczności przewiezienia pralki w inne
miejsce, powinny one zostać ponownie za-
montowane.
! Części opakowania nie są zabawkami dla
dzieci.
Poziomowanie
1. Ustawić pralkę
na płaskiej i twar-
dej podłodze, nie
opierając jej o ściany,
meble itp.
2. Jeśli podłoga
nie jest idealnie
pozioma, należy
skompensować
nierówności,
odkręcając lub dokręcając przednie nóżki
(patrz rysunek); kąt nachylenia, zmierzo-
ny na górnym blacie pralki, nie powinien
przekraczać 2°.
Staranne wypoziomowanie pralki zapew-
nia jej stabilność i zapobiega wibracjom,
hałasowi oraz przesuwaniu się urządzenia
w czasie pracy. W przypadku ustawienia na
dywanie lub wykładzinie dywanowej, należy
tak wyregulować nóżki, aby pod pralką
pozostawała wolna przestrzeń niezbędna dla
wentylacji.
Podłączenia hydrauliczne i elektry-
czne
Podłączenie przewodu doprowadzającego
wodę
1. Wsunąć uszczelkę
A do końcówki rury
pobierania wody i
przykręcić ją do kurka
zimnej wody o gwinto-
wanym otworze 3/4’’
(zobacz rysunek).
Przed podłączeniem
spuszczać wodę do
momentu, aż stanie się
ona całkowicie przezroczysta.
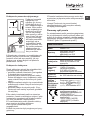
2. Podłączyć do
urządzenia przewód
doprowadzający
wodę, przykręcając
go do odpowiednie-
go przyłącza wody,
znajdującego się w
tylnej części pralki, z
prawej strony u góry
(patrz rysunek).
3. Zwrócić uwagę, aby przewód nie był
pozaginany ani przygnieciony.
! Ciśnienie wody w kurku powinno mieścić
się w przedziale podanym w tabeli Danych
technicznych (patrz strona obok).
! Jeśli długość przewodu doprowadzającego
wodę jest niewystarczająca, należy zwrócić
się do specjalistycznego sklepu lub do auto-
ryzowanego technika.
! Nigdy nie instalować przewodów, które były
już używane.
! Stosować przewody znajdujące się w
wyposażeniu urządzenia.
A

15
PL
Podłączenie przewodu odpływowego
Podłączyć przewód
odpływowy, nie
zginając go, do rury
ściekowej lub do ot-
woru odpływowego w
ścianie, które powin-
ny się znajdować na
wysokości od 65 do
100 cm od podłogi;
albo oprzeć go na br-
zegu zlewu lub wan-
ny, przymocowując
do kranu prowadnik,
znajdujący się w
wyposażeniu pralki
(patrz rysunek). Wo-
lny koniec przewodu
odpływowego nie
powinien być zanur-
zony w wodzie.
! Odradza się używanie rur przedłużających;
jednak jeśli jest to konieczne, przedłużacz
powinien mieć taki sam przekrój, jak ory-
ginalna rura, a jego długość nie powinna
przekraczać 150 cm.
Podłączenie elektryczne
Przed włożeniem wtyczki do gniazdka elekt-
rycznego należy się upewnić, czy:
• gniazdko posiada uziemienie i jest zgodne
z obowiązującymi przepisami;
• gniazdko jest w stanie wytrzymać maksy-
malne obciążenie mocy urządzenia, wska-
zane w tabeli Danych technicznych (patrz
obok);
• napięcie zasilania mieści się w wartościach
wskazanych w tabeli Danych technicznych
(patrz obok);
• gniazdko pasuje do wtyczki pralki. W pr-
zeciwnym razie należy wymienić gniazdko
lub wtyczkę.
! Nie należy instalować pralki na otwartym
powietrzu, nawet w osłoniętym miejscu, gdyż
wystawienie urządzenia na działanie deszc-
zu i burz jest bardzo niebezpieczne.
! Po zainstalowaniu pralki gniazdko elektry-
czne powinno być łatwo dostępne.
! Nie używać przedłużaczy ani
rozgałęźników.
! Kabel nie powinien być pozginany ani przy-
gnieciony.
65 - 100 cm
! Przewód zasilania elektrycznego może być
wymieniany wyłącznie przez autoryzowanych
techników.
Uwaga! Producent nie ponosi żadnej
odpowiedzialności, jeśli powyższe zasady
nie będą przestrzegane.
Pierwszy cykl prania
Po zainstalowaniu pralki, przed przystąpieniem
do jej użytkowania, należy wykonać jeden cykl
prania ze środkiem piorącym, ale bez wsadu,
nastawiając program “OPCJA CZYSZCZENIA
PRALKI” (patrz “Czyszczenie pralki”).
Dane techniczne
Model WMSD 723
Wymiary
szerokość cm 59,5
wysokość cm 85
głębokość cm 43,5
Pojemność od 1 do 7 kg
Dane prądu
elektryczne-
go
dane techniczne umieszc-
zone są na tabliczce na
maszynie
Dane sieci
wodo-
ciągowej
Maksymalne ciśnienie
1 MPa (10 barów)
ciśnienie minimalne
0,05 MPa (0,5 barów)
pojemność bębna 48 litrów
Szybkość
wirowania
do 1200 obrotów na minutę
Programy
testowe
zgodnie z
dyrektywami
1061/2010 i
1015/2010
Program (60°)
(3. naciśnięcie
przycisku)
; Eco Bawełna 60°C.
Program (40°)
(3. naciśnięcie
przycisku)
; Eco Bawełna 40°C.
Urządzenie to zostało wy-
produkowane zgodnie z
następującymi przepisami CE:
- 2004/108/CE (o
Kompatybilności Elektroma-
gnetycznej)
- 2012/19/EU (WEEE)
- 2006/95/CE (o Niskim
Napięciu)

16
PL
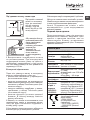
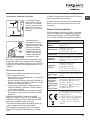
Utrzymanie i konserwacja
Odłączenie wody i prądu elektrycznego
• Zamknąć kurek dopływu wody po każdym
praniu. W ten sposób zmniejsza się zużycie
instalacji hydraulicznej pralki oraz eliminuje
się niebezpieczeństwo wycieków.
• Przed przystąpieniem do czyszczenia pralki
oraz do czynności konserwacyjnych wyjąć
wtyczkę z gniazdka.
Czyszczenie pralki
• Obudowę zewnętrzną i gumowe części
pralki można myć ściereczką zmoczoną
w letniej wodzie z mydłem. Nie stosować
rozpuszczalników ani ściernych środków
czyszczących.
• Pralka jest wyposażona w program
“OPCJA CZYSZCZENIA PRALKI” części
wewnętrznych, który należy przeprowadzać
nie wprowadzając niczego do kosza pralki.
Środek piorący (w ilości równej 10% ilości
zalecanej dla lekko zabrudzonej odzieży) lub
dodatki przeznaczone specjalnie do czyszc-
zenia pralek, mogą zostać użyte jako środki
pomocnicze podczas programu czyszczenia.
Zaleca się przeprowadzanie programu czy-
szczenia co 40 cykli prania.
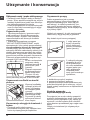
W celu uruchomienia
programu, należy
nacisnąć przycisk A
przez 5 sek. (zob.
rysunek).
Program rozpocznie
się automatycznie i
będzie trwał około
70 minut. W celu
zakończenia cyklu,
należy nacisnąć przycisk START/PAUSE.
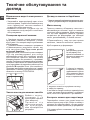
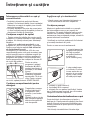
Czyszczenie szuadki na środki
piorące
Wysunąć szuadkę,
unosząc ją lekko ku
górze i wyciągając
na zewnątrz (patrz
rysunek).
Wypłukać szuadkę
pod bieżącą wodą.
Czynność tę należy
wykonywać stosun-
kowo często.
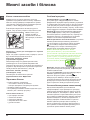
Konserwacja okrągłych drzwiczek i
bębna
• Drzwiczki pralki należy zawsze
pozostawiać uchylone, aby zapobiec twor-
zeniu się nieprzyjemnych zapachów.
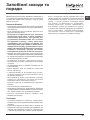
Czyszczenie pompy
Pralka wyposażona jest w pompę
samoczyszczącą, która nie wymaga za-
biegów konserwacyjnych. Może się jed-
nak zdarzyć, że drobne przedmioty (mo-
nety, guziki) wpadną do komory wstępnej
zabezpieczającej pompę, która znajduje się
w jej dolnej części.
! Należy się upewnić, że cykl prania został
zakończony i wyjąć wtyczkę z gniazdka.
Aby dostać się do komory wstępnej:
1. zdjąć panel po-
krywy z przedniej
strony pralki przy
pomocy śrubokrętu
(patrz rysunek);
2. odkręcić pokrywę,
obracając ją w kie-
runku przeciwnym
do ruchu wskazówek
zegara (patrz rysu-
nek): wypłynięcie
niewielkiej ilości
wody jest normalnym
zjawiskiem;
3. dokładnie wyczyścić wnętrze;
4. ponownie przykręcić pokrywę;
5. ponownie założyć panel upewniwszy się,
przed dociśnięciem go do maszyny, czy za-
trzaski zostały umieszczone w odpowiednich
otworach.
Kontrola przewodu
doprowadzającego wodę
Przynajmniej raz w roku należy sprawdzić
przewód doprowadzający wodę. Jeśli wido-
czne są na nim pęknięcia i rysy, należy go
wymienić: w trakcie prania duże ciśnienie
może bowiem spowodować jego nagłe rozer-
wanie.
! Nigdy nie instalować już używanych pr-
zewodów.
1
2
BA

17
PL
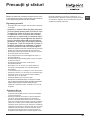
stopień odzysku i recyrkulacji materiałów, z których
są one zbudowane, oraz aby zapobiec potencjal-
nym szkodom dla zdrowia i środowiska. Symbol
przekreślonego kosza jest umieszczony na wszystkich
produktach w celu przypominania o obowiązku ich
segregacji.
Właściciele urządzeń gospodarstwa domowego
mogą uzyskać dodatkowe informacje dotyczące ich
prawidłowej utylizacji, zwracając się do odpowiednich
służb publicznych lub do sprzedawców tych urządzeń.
Zalecenia i środki
ostrożności
! Pralka została zaprojektowana i wyprodukowana zgod-
nie z międzynarodowymi normami bezpieczeństwa. Niniej-
sze ostrzeżenia zostały tu zamieszczone ze względów
bezpieczeństwa i należy je uważnie przeczytać.
Ogólne zasady bezpieczeństwa
• Urządzenie to zostało zaprojektowane wyłącznie do
użytkowania w warunkach domowych.
• Z niniejszego urządzenia mogą korzystać
dzieci powyżej 8 roku życia i osoby o
ograniczonych zdolnościach zycznych,
zmysłowych bądź umysłowych, jak również
osoby nieposiadające doświadczenia lub
znajomości urządzenia, jeśli znajdują się one
pod nadzorem innych osób lub jeśli zostały
pouczone na temat bezpiecznego sposobu
użycia urządzenia oraz zdają sobie sprawę ze
związanych z nim zagrożeń. Dzieci nie powin-
ny bawić się urządzeniem. Prace związane
z czyszczeniem i konserwacją nie mogą być
wykonywane przez dzieci, jeśli nie są one
nadzorowane.
• Nie dotykać pralki stojąc przy niej boso lub mając
mokre lub wilgotne ręce albo stopy.
• Nie wyjmować wtyczki z gniazdka ciągnąc za kabel,
należy trzymać za wtyczkę.
• W trakcie pracy maszyny nie otwierać szuadki na
środki piorące.
• Nie dotykać odprowadzanej wody, gdyż może ona być
bardzo gorąca.
• W żadnym wypadku nie otwierać na siłę drzwiczek pralki:
grozi to uszkodzeniem mechanizmu zabezpieczającego
drzwiczki przed przypadkowym otwarciem.
• W razie wystąpienia usterki nie należy w żadnym
wypadku ingerować w wewnętrzne części pralki z
zamiarem samodzielnego dokonania naprawy.
• Zawsze uważać, aby dzieci nie zbliżały się do
pracującej pralki.
• W czasie prania drzwiczki pralki nagrzewają się.
• Jeśli trzeba przenieść pralkę w inne miejsce, należy to
robić bardzo ostrożnie, w dwie lub trzy osoby. Nigdy
nie należy samodzielnie przenosić urządzenia, gdyż
jest ono bardzo ciężkie.
• Przed włożeniem bielizny sprawdzić, czy bęben jest
pusty.
Utylizacja
• Utylizacja opakowania:
stosować się do lokalnych przepisów, dzięki temu opako-
wanie będzie mogło zostać ponownie wykorzystane.
• Dyrektywa europejska 2012/19/EU dotycząca odpa-
dów urządzeń elektrycznych i elektronicznych przewi-
duje, że elektryczne urządzenia gospodarstwa domo-
wego nie powinny być utylizowane w normalnym ciągu
utylizacji stałych odpadów miejskich. Stare urządzenia
powinny być zbierane oddzielnie, aby zoptymalizować

18
PL
Szuadka na środki piorące: do dozowania środków
piorących i dodatków (patrz „Środki piorące i bielizna”).
Przycisk ON/OFF : nacisnąć krótko przycisk w celu
włączenia lub wyłączenia maszyny. Kontrolka START/PAU-
SE, która pulsuje powoli w kolorze zielonym wskazuje, że
maszyna jest włączona. W celu wyłączenia pralki podczas
prania konieczne jest dłuższe przytrzymanie naciśniętego
przycisku, przez około 3 sek.; krótkie lub przypadko-
we naciśnięcie nie wystarczy do wyłączenia maszyny.
Wyłączenie maszyny podczas trwającego prania anuluje
program prania.
Przyciski PRZEŁĄCZNIKA PROGRAMÓW: w celu wybra-
nia potrzebnego programu (patrz „Tabela programów”).
Przycisk
MY CYCLE
: przytrzymać naciśnięty przycisk
w celu zapisania w pamięci cyklu oraz własnych prefero-
wanych personalizacji. W celu przywołania cyklu zapisa-
nego uprzednio należy nacisnąć przycisk
MY CYCLE
.
Przyciski FUNKCJI: nacisnąć przycisk w celu wybra-
nia potrzebnej funkcji. Na wyświetlaczu zaświeci się
odpowiednia kontrolka.
Przycisk
OPCJE PRANIA
: nacisnąć w celu wybrania
żądanego stopnia intensywności prania.
Przycisk
TYP PŁUKANIA
: nacisnąć w celu wybra-
nia żądanego rodzaju płukania.
Przycisk WIROWANIA : nacisnąć w celu zmniejszenia
lub całkowitego wyłączenia wirówki – wartość ukazana
zostanie na wyświetlaczu.
Przycisk TEMPERATURY : nacisnąć w celu zmniejsze-
nia temperatury: wartość zostaje wyświetlona na ekranie.
Przycisk BLOKADA PRZYCISKÓW : w celu
uruchomienia lub wylaczenia blokady panelu sterowania
nalezy przytrzymac nacisniety przycisk przez okolo 2
sekundy. Podswietlony symbol wskazuje, ze panel
sterowania zostal zablokowany (z wyjątkiem przycisk
ON/OFF). W ten sposób uniemozliwia sie dokonywanie
przypadkowych zmian w programach, zwlaszcza, jesli
w domu obecne sa dzieci. W celu wylaczenia blokady
panelu sterowania nalezy przytrzymac nacisniety
przycisk przez okolo 2 sekundy.
Przycisk URUCHOMIENIE OPÓZNIONE : nacisnąc w
celu ustawienia opóźnionego uruchomienia wybranego
programu. Opóźnienie wyświetlone zostanie na ekranie.
Przycisk z kontrolką START/PAUSE: kiedy zielona kon-
trolka pulsuje powoli, nacisnąć przycisk w celu urucho-
mienia prania. Po uruchomieniu cyklu kontrolka świeci w
sposób ciągły. W celu wybrania pauzy w praniu należy
nacisnąć ponownie przycisk, kontrolka zacznie pulsować
w kolorze pomarańczowym. Jeśli symbol nie świeci
się, można otworzyć drzwiczki (odczekać około 3 minu-
ty). W celu ponownego uruchomienia prania od miejsca,
w którym zostało przerwane, należy ponownie nacisnąć
przycisk.
Funkcja stand by
Pralka ta, w myśl nowych norm europejskich związanych
z oszczędnością elektryczną, posiada system auto
wyłączenia (stand by), który włącza się po 30 minutach
nie użytkowania. Ponownie lekko wcisnąć przycisk
ON/OFF i poczekać, aż pralka ponownie włączy się.
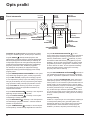
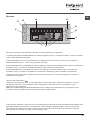
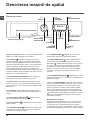
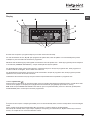
Opis pralki
Panel sterowania
Szuadka na środki piorące
Przycisk z
kontrolką
START/PAUSE
Przycisk
TEMPERATURY
Przyciski
PRZEŁĄCZNIKA
PROGRAMÓW
Przyciski
FUNKCJI
Przycisk
ON/OFF
Przycisk
WIROWANIA
Przycisk
BLOKADA
PRZYCISKÓW
Wyświetlacz
Przycisk
URUCHOMIENIE
OPÓŹNIONE
Przycisk
MY CYCLE
Przycisk
OPCJE
PRANIA
Przycisk
TYP
PŁUKANIA

19
PL
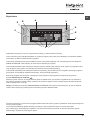
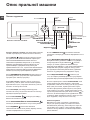
Wyświetlacz
Wyświetlacz potrzebny jest w celu programowania maszyny i dostarcza wielu informacji.
W obu wierszach górnych A i B wyświetlane są: wybrany program prania, faza prania bieżącego oraz wszelkie wskaza-
nia związane ze stanem zaawansowania programu.
W wierszu C wyświetlany jest czas pozostały do końca cyklu prania bieżącego oraz, jeśli zaprogramowano URUCHO-
MIENIE OPÓŹNIONE, czas brakujący do uruchomienia wybranego programu.
W wierszu D wyświetlana jest maksymalna wartość szybkości wirówki, jaką maszyna może uzyskać w przypadku wybra-
nego programu; jeśli program nie przewiduje wirowania wiersz pozostaje wygaszony.
W wierszu E wyświetlana jest maksymalna wartość temperatury, jaką można wybrać w przypadku wybranego programu,
jeśli program nie przewiduje ustawiania temperatury, wiersz pozostaje wygaszony.
Kontrolki F związane są z funkcjami i włączają się, kiedy wybrana funkcja zgodna jest z wybranym programem.
Symbol zablokowanych drzwiczek
Zapalony symbol oznacza, że okrągłe drzwiczki pralki są zablokowane, aby zapobiec przypadkowemu ich otworzeniu.
Aby uniknąć uszkodzenia pralki, należy odczekać, aż symbol ten zgaśnie, zanim przystąpi się do otwierania drzwiczek
pralki (odczekać około 3 minuty).
Uwaga: jeśli aktywna jest funkcja URUCHOMIENIE OPÓŹNIONE drzwiczek nie można otworzyć. W celu ich otwarcia
należy ustawić maszynę w pauzie poprzez naciśnięcie przycisku START/PAUSE.
! Podczas pierwszego uruchomienia wymagane będzie dokonanie wyboru języka a wyświetlacz ustawi się automatycznie
na menu wyboru języka.
W celu wybrania żądanego języka nacisnąć przyciski X i Y, dla potwierdzenia wyboru nacisnąć przycisk Z.
Aby zmienić język, należy wyłączyć urządzenie, nacisnąć równocześnie przyciski X, Y, Z, aż do usłyszenia sygnału
dźwiękowego, wyświetli się menu wyboru języka.
A
B
C
D
E
F
Z
X
Y

20
PL
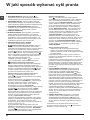
W jaki sposób wykonać cykl prania
1. WŁĄCZENIE MASZYNY. Nacisnąć przycisk , na
wyświetlaczu pojawi się napis WŁĄCZENIE, kontrolka
START/PAUSE zacznie powoli pulsować w kolorze zielonym.
2. WKŁADANIE BIELIZNY. Otworzyć szklane drzwiczki.
Włożyć bieliznę uważając, aby nie przekroczyć wielkości
wsadu wskazanej w tabeli programów na następnej stronie.
3. DOZOWANIE ŚRODKA PIORĄCEGO. Wysunąć
szuadkę i wsypać detergent do odpowiednich komór w
sposób wyjaśniony w „Środki piorące i bielizna”.
4. ZAMKNĄĆ DRZWICZKI.
5. WYBÓR PROGRAMU. Nacisnąć jeden z przycisków
PRZEŁĄCZNIKA PROGRAMÓW w celu wybrania
potrzebnego programu, nazwa programu pojawi się na
wyświetlaczu; z nim powiązana jest temperatura oraz
prędkość wirowania, które mogą zostać zmienione. Na
wyświetlaczu pojawi się czas trwania cyklu.
6. PERSONALIZACJA CYKLU PRANIA.
Przy pomocy odpowiednich przycisków:
Zmienić temperaturę i/lub wirówkę. Maszyna
wybierze automatycznie temperaturę oraz wirówkę
maksymalne przewidziane dla danego programu, dlatego
nie mogą one być zwiększane. Poprzez naciskanie
przycisku stopniowo zmniejsza się temperaturę aż do
prania w zimnej wodzie „OFF”. Naciskając przycisk
stopniowo zmniejsza się wirówkę aż do jej wyłączenia
„OFF”. Dodatkowe naciśnięcie przycisków przywróci
maksymalne wartości przewidywane.
! Wyjątek: wybierając program 60°
(1. naciśnięcie
przycisku)
temperaturę można podnieść aż do 90°.
Ustawienie opóźnionego rozpoczęcia.
W celu ustawienia opóźnionego rozpoczęcia wybranego
programu należy naciskać odpowiedni przycisk aż do
osiągnięcia żądanego czasu opóźnienia. Kiedy opcja ta jest
aktywna, na wyświetlaczu pojawia się symbol . W celu
usunięcia opóźnionego uruchomienia należy naciskać
przycisk aż do pojawienia się napisu “OFF”.
Ustawić żądany stopień intensywności prania.
Opcja umożliwia optymalizację prania w
zależności od stopnia zabrudzenia tkanin oraz żądanej
intensywności prania.
Wybrać program prania, cykl zostanie automatycznie
ustawiony na poziomie „NORMALNY”, przeznaczonym
dla średnio zabrudzonej odzieży, (ustawienie to
nie stosuje się dla cyklu „Wełna”, który ustawia się
automatycznie na poziomie „DELIKATNE”).
W przypadku silnie zabrudzonej odzieży, należy nacisnąć
przycisk aż do przejścia do poziomu „SUPER
PRANIE”. Poziom ten gwarantuje wysokiej jakości
pranie, dzięki użyciu większej ilości wody w początkowej
fazie cyklu i intensywniejszym ruchom mechanicznym
służy do usuwania najoporniejszych plam. Może być
używany z wybielaczem i bez niego.
Jeśli chce się przeprowadzić wybielanie, należy włożyć
dodatkową szuadkę 4, znajdującą się w wyposażeniu,
do szuadki 1. Nie przekraczać poziomu „max”
wybielacza w płynie, podanej na środkowym wskaźniku
(zobacz rysunek na str. 22).
W przypadku lekko zabrudzonej odzieży lub w celu
delikatnego obchodzenia się z tkaninami, należy nacisnąć
przycisk aż do przejścia do poziomu „DELIKATNE”.
Cykl zredukuje ruchy mechaniczne, aby zagwarantować
doskonały efekt prania delikatnej odzieży.
Ustawić rodzaj płukania.
Opcja umożliwia wybranie rodzaju płukania
przeznaczonego do jak największej ochrony delikatnej
skóry. Po pierwszym naciśnięciu przycisku, zostaje
ustawiony poziom „EXTRA PŁUKANIE”, który pozwala
wybrać dodatkowe płukanie, oprócz standardowego,
w celu usunięcia wszelkich pozostałości detergentu.
Po drugim naciśnięciu przycisku, zostaje ustawiony
poziom „WRAŻLIWA SKÓRA”, który pozwala wybrać
dwa dodatkowe płukania, oprócz standardowego, w
celu jak najlepszej ochrony delikatnej skóry. Po trzecim
naciśnięciu przycisku, zostaje ustawiony poziom
„ANTYALERGICZNE”, który pozwala wybrać trzy
dodatkowe płukania, oprócz standardowego, w celu
usunięcia głównych alergenów, takich jak pyłki, roztocza,
sierść psów i kotów. Nacisnąć ponownie przycisk, aby
powrócić do „PŁUKANIE STANDARDOWE” rodzaju
płukania. Jeśli któreś z ustawień lub zmiana ustawienia
nie jest możliwe, na wyświetlaczu pojawi się napis
„ZABLOKOWANE”.
Zmiana charakterystyki cyklu.
• Naciskać przycisk w celu uruchomienia funkcji;
zaświeci się kontrolka odpowiadająca przyciskowi.
• Nacisnąć ponownie przycisk w celu wyłączenia funkcji,
kontrolka zgaśnie.
! Jeśli wybrana funkcja nie jest zgodna z wybranym
programem, kontrolka będzie pulsować, a funkcja nie
zostanie uruchomiona.
! Jeśli wybrana funkcja nie jest zgodna z inną, ustawioną
uprzednio, kontrolka odpowiadająca pierwszej funkcji
będzie pulsowała i uruchomiona zostanie jedynie druga
funkcja a kontrolka uruchomionej funkcji zaświeci się.
! Funkcje mogą zmieniać zalecane obciążenie i/lub czas
trwania cyklu.
7. URUCHOMIENIE PROGRAMU. Nacisnąć przycisk
START/PAUSE. Odpowiednia kontrolka zaświeci się
kolorem zielonym i drzwiczki zostaną zablokowane
(symbol ZABLOKOWANYCH DRZWICZEK świeci
się). Podczas prania na wyświetlaczu pojawi się nazwa
bieżącej fazy. W celu zmiany programu w czasie trwania
cyklu należy ustawić pralkę w pauzie naciskając przycisk
START/PAUSE (kontrolka START/PAUSE zacznie powoli
pulsować w kolorze pomarańczowym); następnie wybrać
potrzebny cykl i ponownie nacisnąć przycisk START/
PAUSE. W celu otwarcia drzwiczek w trakcie wykonywania
cyklu należy nacisnąć przycisk START/PAUSE; jeśli
symbol ZABLOKOWANYCH DRZWICZEK jest
wyłączony możliwe będzie otwarcie drzwiczek (odczekać
około 3 minuty) . Nacisnąć ponownie przycisk START/
PAUSE, aby uruchomić program od punktu, w którym
został przerwany.
8. KONIEC PROGRAMU. Wskazywany jest napisem
„KONIEC CYKLU” na wyświetlaczu, kiedy symbol
ZABLOKOWANYCH DRZWICZEK wyłączy się,
możliwe będzie otwarcie drzwiczek (odczekać około 3
minuty). Otworzyć drzwiczki, wyjąć bieliznę i wyłączyć
maszynę.
! Jeśli zamierza się anulować uruchomiony juz cykl,
przytrzymać dłużej naciśnięty przycisk . Cykl zostanie
przerwany i maszyna wyłączy się.
La pagina sta caricando ...
La pagina sta caricando ...
La pagina sta caricando ...
La pagina sta caricando ...
La pagina sta caricando ...
La pagina sta caricando ...
La pagina sta caricando ...
La pagina sta caricando ...
La pagina sta caricando ...
La pagina sta caricando ...
La pagina sta caricando ...
La pagina sta caricando ...
La pagina sta caricando ...
La pagina sta caricando ...
La pagina sta caricando ...
La pagina sta caricando ...
La pagina sta caricando ...
La pagina sta caricando ...
La pagina sta caricando ...
La pagina sta caricando ...
La pagina sta caricando ...
La pagina sta caricando ...
La pagina sta caricando ...
La pagina sta caricando ...
La pagina sta caricando ...
La pagina sta caricando ...
La pagina sta caricando ...
La pagina sta caricando ...
La pagina sta caricando ...
La pagina sta caricando ...
La pagina sta caricando ...
La pagina sta caricando ...
La pagina sta caricando ...
La pagina sta caricando ...
La pagina sta caricando ...
La pagina sta caricando ...
La pagina sta caricando ...
La pagina sta caricando ...
La pagina sta caricando ...
La pagina sta caricando ...
-
 1
1
-
 2
2
-
 3
3
-
 4
4
-
 5
5
-
 6
6
-
 7
7
-
 8
8
-
 9
9
-
 10
10
-
 11
11
-
 12
12
-
 13
13
-
 14
14
-
 15
15
-
 16
16
-
 17
17
-
 18
18
-
 19
19
-
 20
20
-
 21
21
-
 22
22
-
 23
23
-
 24
24
-
 25
25
-
 26
26
-
 27
27
-
 28
28
-
 29
29
-
 30
30
-
 31
31
-
 32
32
-
 33
33
-
 34
34
-
 35
35
-
 36
36
-
 37
37
-
 38
38
-
 39
39
-
 40
40
-
 41
41
-
 42
42
-
 43
43
-
 44
44
-
 45
45
-
 46
46
-
 47
47
-
 48
48
-
 49
49
-
 50
50
-
 51
51
-
 52
52
-
 53
53
-
 54
54
-
 55
55
-
 56
56
-
 57
57
-
 58
58
-
 59
59
-
 60
60


HOTPOINT/ARISTON WMSD 723B EU.L Guida utente
- Categoria
- Lavatrici
- Tipo
- Guida utente