De'Longhi EN750MB Manuale utente
- Categoria
- Macchine da caffè
- Tipo
- Manuale utente
La pagina sta caricando ...
La pagina sta caricando ...
La pagina sta caricando ...
La pagina sta caricando ...
La pagina sta caricando ...
La pagina sta caricando ...
La pagina sta caricando ...
La pagina sta caricando ...
La pagina sta caricando ...
La pagina sta caricando ...
La pagina sta caricando ...
La pagina sta caricando ...
La pagina sta caricando ...
La pagina sta caricando ...
La pagina sta caricando ...
La pagina sta caricando ...
La pagina sta caricando ...
La pagina sta caricando ...
La pagina sta caricando ...
La pagina sta caricando ...
La pagina sta caricando ...

DE
IT
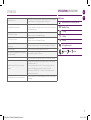
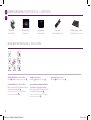
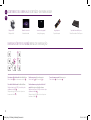
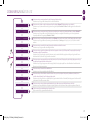
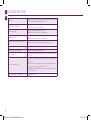
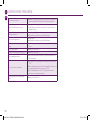
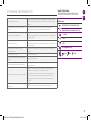
ÜBERSICHT/INDICAZIONI GENERALI
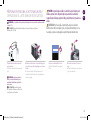
Display (Zubereitungen)/
Display (preparazione)
13
Lungo/Lungo
14
Espresso/Espresso
15
Ristretto/Ristretto
16
Heißwasser/Acqua calda
17
Warme Milch/Latte caldo
18
Cappuccino/Cappuccino
19
Latte Macchiato/Latte Macchiato
Display (Navigation)/
Display (navigazione)
20
Menü/Menu
21
Blättern Sie nach oben bei aktiviertem Menü/
Scorrere verso l’alto quando viene attivato il
Menu
22
Option Auswahl bei aktiviertem Menü/
Opzioni di selezione quando viene attivato
il Menu
23
Blättern Sie nach unten bei aktiviertem Menü/
Scorrere verso il basso quando viene attivato
il Menu
24
Text Display/Visualizzazione del testo
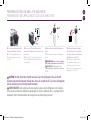
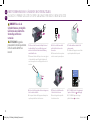
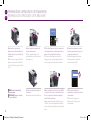
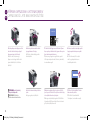
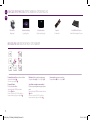
Rapid Cappuccino System (R.C.S.)/
Sistema Rapid Cappuccino (R.C.S.)
25
Schaumregulierer/
Manopola di regolazione della schiuma di latte
26
Steckplatz für Schaumregulierer/
Inserire la manopola di regolazione della schiuma di latte
27
Minimal Milchschaum/Schiuma Min.
28
Maximal Milchschaum/Schiuma Max.
29
Spültaste (Automatische Spülfunktion)/
«PULIRE»: funzione di risciacquo automatica
30
Deckel des Milchbehälters/Coperchio contenitore latte
31
Milchdüse/Tubo di erogazione latte
32
Milchbehälter/Contenitore latte
33
Milchansaugrohr/Condotto del latte
34
Verbindung R.C.S./Connettore R.C.S.
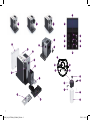
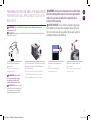
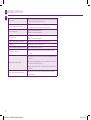
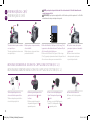
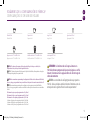
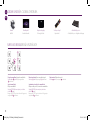
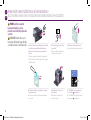
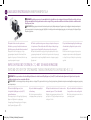
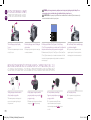
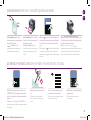
Übersicht der Maschine/
Indicazioni generali
A
Maschine im Kaeemodus/
Macchina congurata in modalità solo caè
B
Maschine mit Rapid Cappuccino System (für Cappuccino)/
Macchina con Rapid Cappuccino System (per Cappuccino)
C
Maschine mit Heißwasserfunktion/
Macchina con erogatore di acqua calda
1
Hebel/Leva
2
Ein/Aus Taste/Pulsante ON/OFF
3
Wassertank/Serbatoio dell’acqua
4
Kaeeauslauf/Erogatore di caè
5
Abtropfgitter/Griglia raccogligocce
6
Abtropfschale/Vassoio raccogligocce
7
Schwenkbare Tassenauage (nicht abnehmbar)/
Supporto girevole per tazza (non removibile)
8
Kapselbehälter/Contenitore capsule usate
9
Klappe des Dampfanschlusses/
Sportello per il connettore di vapore
10
Teleskop-Heißwasserdüse/
Erogatore telescopico di acqua calda
11
Aufbewahrungsfach der Heißwasserdüse/
Vano porta erogatore di acqua calda
12
Dampfanschluss/Connettore di vapore
22
6926_UM_LATTISSIMA_PREMIUM_Z2A.indb 22 17.10.13 19:57

23
DE
IT
INHALT/CONTENUTO
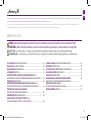
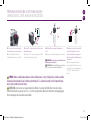
Nespresso ist ein einzigartiges System, welches zu jeder Zeit den perfekten Espresso zubereitet. Alle Nespresso Maschinen sind mit einem einzigartigen Extraktionssystem ausgestattet, welches bis zu 19 bar Druck garantiert.
Jeder einzelne Parameter wurde mit äußerster Präzision durchdacht, um die Aromenvielfalt, den Körper sowie die unvergleichbare Crema jedes einzelnen Grand Crus zum Ausdruck zu bringen.
Nespresso è un sistema esclusivo per preparare un Espresso eccezionale, tazzina dopo tazzina. Tutte le macchine Nespresso sono dotate di un sistema esclusivo che garantisce l’estrazione a 19 bar di pressione. Ogni parametro è
stato calcolato con grande precisione per assicurare che siano estratti tutti gli aromi di ogni Grand Cru, per dare corpo al caè e creare una crema particolarmente densa e liscia.
WERTE WERKSEINSTELLUNG/
RIPRISTINO DELLE IMPOSTAZIONI DI FABBRICA
.............................................
ENTKALKUNG/DECALCIFICAZIONE .................................................................
WASSERHÄRTE EINSTELLEN/IMPOSTAZIONI DELLA DUREZZA DELL’ACQUA .......
FEHLERBEHEBUNG/RICERCA GUASTI .............................................................
SPEZIFIKATIONEN/SPECIFICHE TECNICHE.......................................................
ENTSORGUNG UND UMWELTSCHUTZ/
SMALTIMENTO E PROTEZIONE AMBIENTALE
...................................................
KONTAKTIEREN SIE DEN NESPRESSO CLUB/CONTATTARE IL NESPRESSO CLUB
...
GEWÄHRLEISTUNG/GARANZIA ......................................................................
ÜBERSICHT DER MASCHINE/INDICAZIONI GENERALI ..........................................
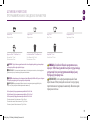
VERPACKUNGSINHALT/CONTENUTO DELLA CONFEZIONE .....................................
MENÜ NAVIGATION/MENU DI NAVIGAZIONE.......................................................
MENÜLISTE/LISTA DEL MENU ............................................................................
INBETRIEBNAHME NACH LÄNGERER NICHTBENUTZUNG/IN CASO DI PRIMO
UTILIZZO O DOPO UN LUNGO PERIODO DI NON UTILIZZO
.....................................
KAFFEEZUBEREITUNG/PREPARAZIONE DEL CAFFÈ ..............................................
MONTAGE/DEMONTAGE VON RAPID CAPPUCCINO SYSTEM R.C.S./
ASSEMBLAGGIO/SMONTAGGIO DEL SISTEMA RAPID CAPPUCCINO R.C.S.
............
ZUBEREITUNG VON CAPPUCCINO ODER LATTE MACCHIATO/
PREPARAZIONE CAPPUCCINO E LATTE MACCHIATO
.............................................
TÄGLICHE PFLEGE/CURA QUOTIDIANA ................................................................
MANUELLE REINIGUNG DES RAPID CAPPUCCINO SYSTEMS R.C.S./
LAVAGGIO A MANO DEL SISTEMA RAPID CAPPUCCINO R.C.S.
.............................
22
24
24
25
26
28
28
29
32
32
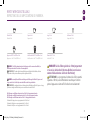
VORSICHT: wenn Sie dieses Zeichen sehen, halten Sie sich bitte an die Sicherheitshinweise, um mögliche Gefahren und Schäden zu vermeiden.
INFORMATION: wenn Sie dieses Zeichen sehen, befolgen Sie den Rat für einen sicheren und einwandfreien Betrieb Ihrer Kaeemaschine.
ATTENZIONE: in presenza di questo simbolo, leggere le precauzioni di sicurezza per evitare eventuali danni.
INFORMAZIONI: in presenza di questo simbolo, leggere le indicazioni per un uso sicuro e adeguato dell’apparecchio.
33
34
35
36
37
38
38
38
6926_UM_LATTISSIMA_PREMIUM_Z2A.indb 23 17.10.13 19:57
La pagina sta caricando ...

25
DE
IT
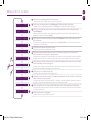
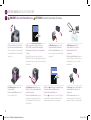
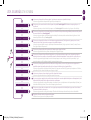
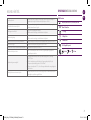
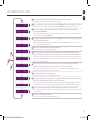
MENÜLISTE/LISTA DEL MENU
1
Wählen Sie diese Option aus um Ihre bevorzugte Sprache auszuwählen. Befolgen Sie die Anweisungen auf dem Display der Maschine.
Selezionare questa opzione per impostare la lingua desiderata. Seguire le istruzioni sul display della macchina.
2
Wählen Sie diese Option aus, wenn der Entkalkungsalarm auf dem Display ausgelöst wird. Siehe Seite 34. Sie werden durch die Entkalkung geführt.
Selezionare questa opzione quando sul display appare l’avviso di decalcicazione. Vedere pagina 34. Riceverà le istruzioni per eseguire il processo di
decalcicazione.
3
Wählen Sie diese Option aus, um Ihre lokale Wasserhärte einzustellen. Nutzen Sie den beiliegenden Aufkleber, um die lokale Wasserhärte zu bestimmen. Die
Einstellung wird die Abstände der Entkalkungen optimieren. Siehe Seite 35.
Selezionare questa opzione per impostare la durezza dell’acqua nella propria regione. Per determinare il livello corretto, utilizzare l’etichetta fornita sulla durezza
dell’acqua. Ciò consentirà di ottimizzare la frequenza di decalcicazione. Vedere pagina 35.
4
Wählen Sie diese Option aus, um das Zeitfenster einzustellen, nachdem sich die Maschine automatisch ausschaltet. (Verfügbare Zeitfenster sind 9 Minuten,
30 Minuten, 2 Stunden, 8 Stunden). Folgen Sie den Anweisungen auf dem Display.
Selezionare questa opzione per impostare l’intervallo di tempo dopo il quale la macchina si spegnerà automaticamente. (Le opzioni possibili sono: 9 minuti,
30 minuti, 2 ore, 8 ore). Seguire le istruzioni sul display della macchina.
5
Wählen Sie diese Option aus, um alle Einstellungen auf die Werkseinstellung zurück zu setzen.
Selezionare questa opzione per ripristinare le impostazioni di fabbrica della macchina.
6
Wählen Sie diese Option aus, um den Wasserkreislauf zu entleeren. Entleeren Sie die Maschine im Falle einer Reparatur oder wenn die Maschine für einen längeren
Zeitraum nicht genutzt wird. Folgen Sie den Anweisungen auf dem Display. Nach der Entleerung kann die Maschine für 10 Minuten nicht genutzt werden.
Selezionare questa opzione per svuotare la macchina nel caso sia necessario mandarla in riparazione o prima di lunghi periodi di inutilizzo. Seguire le istruzioni sul
display della macchina. Dopo questo processo, non sarà possibile utilizzare la macchina per 10 minuti.
7
Wählen Sie diese Option aus, um die Tassenfüllmenge Ihrer Getränke zu programmieren (Kaee-, Milchrezepte und Heißwasser). Folgen Sie den Anweisungen auf
dem Display. Über die Werkseinstellung lassen sich alle Füllmengen auf die Werkseinstellung zurück setzen.
Selezionare questa opzione per programmare il volume delle bevande (preparazione del caè, di acqua calda e di ricette a base di latte). Seguire le istruzioni sul
display della macchina. Inoltre, è possibile resettare i volumi di tutte le bevande, ripristinando le impostazioni di fabbrica.
8
Wählen Sie diese Option aus, um alle vorliegenden Maschineneinstellungen einzusehen.
Selezionare questa opzione per avere la visione completa di tutte le impostazioni della macchina.
9
Wählen Sie diese Option aus, um den allgemeinen Status Ihrer Maschine zu prüfen. Die Verbrauchswerte der Maschine werden entweder von der ersten Nutzung
an (absolut) oder seit der letzten Entkalkung (relativ) dargestellt. Die Seriennummer der Maschine wird ebenfalls abgebildet.
Selezionare questa opzione per controllare lo stato generale della macchina. I dati di consumo sono disponibili sia dal primo utilizzo (dato totale), sia dall’ultima
decalcicazione eettuata (dato relativo). Viene fornito anche il codice seriale della macchina.
10
Wählen Sie diese Option aus, um Hilfestellung zu erhalten, wie Sie Tag für Tag eine ideale Milchschaumqualität erhalten. Über die angegebene Internetadresse
können Sie mehr über diese Funktion erfahren.
Selezionare questa opzione per avere suggerimenti su come ottenere una schiuma di latte eccezionale e di qualità, giorno dopo giorno.
11
Verlassen der Menüliste und Rückkehr in den Bereit-Modus.
Per uscire dalla lista del Menu e ritornare alla modalità «macchina pronta».
1
LINGUASPRACHE
2
DECALCIFICAZIONEENTKALKUNG
3
DUREZZA ACQUA
WASSERHÄRTE EINSTELLEN
4
AUTO-SPEGNIMENTOAUTO POWER OFF
5
IMP. DI FABBRICAWERKSEINSTELLUNG
6
SVUOTARE CIRCUITO
WASSERKREISLAUF ENTLEEREN
7
VOLUME PROGR.
FÜLLMENGENPROGRAMMIERUNG
8
INFO SETTAGGI
EINSTELLUNGSINFORMATION
9
MANUTENZIONEWARTUNG
10
AIUTOHILFE
USCITAMENÜ VERLASSEN
11
6926_UM_LATTISSIMA_PREMIUM_Z2A.indb 25 17.10.13 19:57

DE
IT
max
SET LANGUAGE
to continue
LANGUAGE
Actual value : EN
New value : [ ]
to select
05
max
SET LANGUAGE
to continue
LANGUAGE
Actual value : EN
New value : [ ]
to select
05
max
SET LANGUAGE
to continue
LANGUAGE
Actual value : EN
New value : [ ]
to select
05
max
SET LANGUAGE
to continue
LANGUAGE
Actual value : EN
New value : [ ]
to select
05
max
SET LANGUAGE
to continue
LANGUAGE
Actual value : EN
New value : [ ]
to select
05
max
SET LANGUAGE
to continue
LANGUAGE
Actual value : EN
New value : [ ]
to select
05
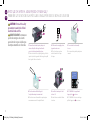
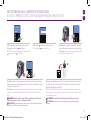
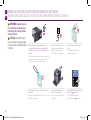
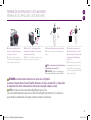
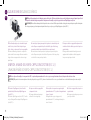
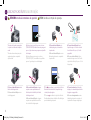
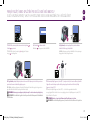
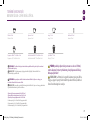
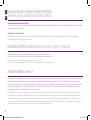
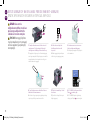
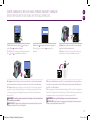
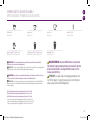
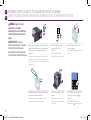
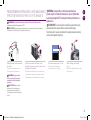
INBETRIEBNAHME NACH LÄNGERER NICHTBENUTZUNG/
IN CASO DI PRIMO UTILIZZO O DOPO UN LUNGO PERIODO DI NON UTILIZZO
VORSICHT: lesen Sie die
Sicherheitshinweise, um mögliche
Gefahren wie einen elektrischen
Stromschlag und Brand zu
vermeiden.
ATTENZIONE: leggere le
precauzioni di sicurezza per evitare
rischi di scariche elettriche e
incendi.
1. Entfernen Sie den Wassertank, die Abtropfschale und
den Kapselbehälter. Passen Sie die Kabellänge an und
verstauen Sie den Rest des Kabels in der Kabelführung
unterhalb der Maschine.
1. Rimuovere il serbatoio dell’acqua, il vassoio raccogligocce
e il contenitore delle capsule. Regolare la lunghezza del
cavo e ssare quello in eccesso nell’apposito vano sotto la
macchina.
5. Platzieren Sie die Heißwasserdüse.
Schalten Sie die Maschine ein.
5. Inserire l’erogatore di acqua calda.
Accendere la macchina.
2. Stellen Sie die Maschine aufrecht
auf und schließen Sie diese an das
Stromnetz an.
2. Posizionare la macchina in posizione
verticale e inserire la spina nella presa.
6. SET LANGUAGE: stellen Sie Ihre bevorzugte
Sprache ein. Drücken Sie
zur Bestätigung.
6. SET LANGUAGE: impostare la lingua
preferita. Premere
per continuare.
3. Der Wassertank kann über den Deckel
getragen werden.
3. Il serbatoio dell’acqua può essere sollevato
e spostato prendendolo dal coperchio.
4. Spülen Sie den Wassertank mir frischem Leitungswasser,
bevor Sie den diesen befüllen.
4. Sciacquare il serbatoio dell’acqua prima di riempirlo con
acqua fresca potabile no al livello massimo.
26
6926_UM_LATTISSIMA_PREMIUM_Z2A.indb 26 17.10.13 19:57

27
max
SET LANGUAGE
to continue
LANGUAGE
Actual value : EN
New value : [ ]
to select
05
max
First read the safety precautions to avoid risks of fatal electrical shock and fire
Remove the plastic films from grid,
lever and machine panels.
Remove the water tank, drip tray, and capsule
container. Adjust the cable length and store the
excess in the cable guide under the machine.
Put the machine in upright position,
plug machine into mains.
The water tank can be carried by
its cover.
Rinse the water tank before filling with
potable water up to maximum level.
Insert the hot water spout.
Switch machine ON
Set your preferred language.
Press to continue.
SET LANGUAGE
to continue
Select your language by scrolling the
options using up/down arrow. Press to
confirm.
LANGUAGE
Actual value : EN
New value : [ ]
to select
Coffee preparation
x3
x3
110 ml
40 ml
25 ml
05 06
4°
15”
Assembling / disassembling of Rapid Cappuccino system (R.C.S)
07
DE
IT
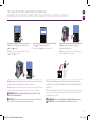
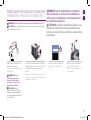
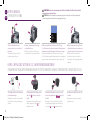
7. LANGUAGE: Wählen Sie Ihre Sprache aus, indem Sie mit den
Pfeilen
blättern. Drücken Sie zur Bestätigung.
7. LANGUAGE: Selezionare la lingua desiderata scorrendo le opzioni
con il cursore. Premere per confermare.
INBETRIEBNAHME NACH LÄNGERER NICHTBENUTZUNG/
IN CASO DI PRIMO UTILIZZO O DOPO UN LUNGO PERIODO DI NON UTILIZZO
11. Zerlegen Sie das Rapid Cappuccino System (R.C.S.) und reinigen Sie alle Einzelteile über das obere Fach
Ihrer Spülmaschine. Wenn Sie keine Spülmaschine besitzen, halten Sie sich an den Abschnitt «manuelle
Reinigung des Rapid Cappuccino Systems (R.C.S.)».
11. Smontare il Sistema Rapid Cappuccino (R.C.S.) e lavare tutti i componenti nello scomparto superiore
della lavastoviglie. Nel caso non si disponga di una lavastoviglie, consultare la sezione Lavaggio a mano del
Sistema Rapid Cappuccino (R.C.S.).
INFORMATION: siehe Abschnitt Montage/Demontage von Rapid Cappuccino System.
INFORMAZIONI: consultare la sezione Assemblaggio/Smontaggio del sistema Rapid
Cappuccino.
10. Spülen: wiederholen Sie den Spülvorgang 3-mal über den Heißwasserdüse. Nach dem Spülvorgang
Heißwasserdüse abnehmen und im Aufbewahrungsfach, rechts an der Maschine, aufbewahren. Schließen
Sie die Klappe des Dampfanschlusses.
10. Risciacquo: ripetere 3 volte per l’erogatore dell’acqua calda. Una volta terminato, rimuoverlo e riporlo
nell’apposito vano situato nella parte destra della macchina. Chiudere lo sportello del connettore del
vapore.
INFORMATION: bei der Produktion werden Maschinen vollständig getestet. Daher kann
beim Spülvorgang das Wasser Spuren von Kaeepulver enthalten.
INFORMAZIONI: le macchine vengono sottoposte a una serie di test completi. È possibile
rilevare tracce di caè in polvere nell’acqua del risciacquo.
9. Spülen: Stellen Sie einen Behälter unter den Kaeeauslauf und
drücken Sie die Lungotaste. Wiederholen Sie diesen Vorgang 3-mal.
9. Risciacquo: Sistemare un contenitore sotto l’erogatore del caè e
premere il pulsante Lungo. Ripetere 3 volte.
8. Nachdem das gedrückt wurde, heizt die Maschine auf.
8. Una volta premuto
, la macchina si riscalda.
6926_UM_LATTISSIMA_PREMIUM_Z2A.indb 27 17.10.13 19:57

DE
IT
max
First read the safety precautions to avoid risks of fatal electrical shock and fire
Remove the plastic films from grid,
lever and machine panels.
Remove the water tank, drip tray, and capsule
container. Adjust the cable length and store the
excess in the cable guide under the machine.
Put the machine in upright position,
plug machine into mains.
The water tank can be carried by
its cover.
Rinse the water tank before filling with
potable water up to maximum level.
Insert the hot water spout.
Switch machine ON
Set your preferred language.
Press to continue.
SET LANGUAGE
to continue
Select your language by scrolling the
options using up/down arrow. Press to
confirm.
LANGUAGE
Actual value : EN
New value : [ ]
to select
Coffee preparation
x3
x3
110 ml
40 ml
25 ml
05 06
4°
15”
Assembling / disassembling of Rapid Cappuccino system (R.C.S)
07
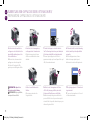
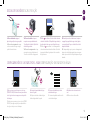
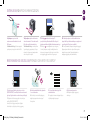
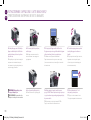
KAFFEEZUBEREITUNG/
PREPARAZIONE DEL CAFFÈ
MONTAGE/DEMONTAGE VON RAPID CAPPUCCINO SYSTEM R.C.S./
ASSEMBLAGGIO/SMONTAGGIO DEL SISTEMA RAPID CAPPUCCINO R.C.S.
1. Önen Sie den Hebel vollständig, um eine
Nespresso Kapsel einzulegen.
1. Alzare completamente la leva e inserire
una capsula Nespresso.
2. Schließen Sie den Hebel und stellen Sie
eine Tasse unter dem Kaeeauslauf.
2. Abbassare la leva e posizionare una tazza
sotto l’erogatore del caè.
3. Drücken Sie die Ristretto- (25 ml), Espresso- (40 ml) oder Lungotaste
(110 ml). Die Zubereitung stoppt automatisch. Um den Kaeeuss frühzeitig
zu stoppen oder um den Kaee zu verlängern, drücken Sie erneut die Taste.
3. Premere i pulsanti Ristretto (25 ml), Espresso (40 ml) o Lungo (110 ml).
L’erogazione terminerà automaticamente. Per bloccare l’erogazione di
caè o per aggiungere ancora caè, premere nuovamente.
4. Entfernen Sie die Tasse. Önen und
Schließen Sie den Hebel um die Kapsel in den
Kapselbehälter auszuwerfen.
4. Prendere la tazza. Sollevare e abbassare la
leva per espellere la capsula direttamente nel
contenitore delle capsule usate.
1. Entfernen Sie den Deckel des
Milchbehälters und lösen Sie das
Milchansaugrohr.
1. Rimuovere il coperchio del contenitore
del latte e staccare il tubicino di aspirazione
del latte.
4. Entfernen Sie die Milchdüse, indem Sie
diese herausziehen.
4. Rimuovere il tubo di erogazione del latte
estraendolo.
2. Entfernen Sie den Schaumregulierer,
indem Sie diesen
bis zur Markierung
drehen und hochziehen.
2. Rimuovere la manopola di regolazione
della schiuma di latte facendola ruotare no
al
e sollevandola.
3. Entfernen Sie die Rapid Cappuccino
System Verbindung, indem Sie diese von
nach entriegeln und herausziehen.
3. Rimuovere il connettore del Sistema Rapid
Cappuccino sbloccandolo dalla posizione
aperta
alla posizione chiusa ed
estraendolo.
HINWEIS: während der Aufheizphase kann bereits eine Taste gedrückt werden. Nach der Aufheizphase
startet automatisch der Brühvorgang.
IMPORTANTE: durante il riscaldamento, è possibile premere qualunque pulsante del caè. Il caè verrà
erogato automaticamente non appena la macchina sarà pronta per l’uso.
28
6926_UM_LATTISSIMA_PREMIUM_Z2A.indb 28 17.10.13 19:57

29
4°
15”
Assembling / disassembling of Rapid Cappuccino system (R.C.S)
07
4°
15”
Assembling / disassembling of Rapid Cappuccino system (R.C.S)
07
4°
15”
Assembling / disassembling of Rapid Cappuccino system (R.C.S)
07
4°
15”
Assembling / disassembling of Rapid Cappuccino system (R.C.S)
07
DE
IT
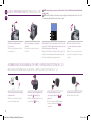
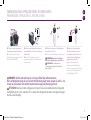
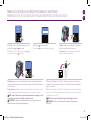
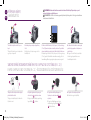
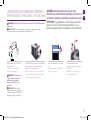
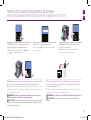
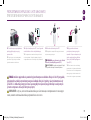
ZUBEREITUNG VON CAPPUCCINO ODER LATTE MACCHIATO/
PREPARAZIONE CAPPUCCINO E LATTE MACCHIATO
1. Befüllen Sie den Milchbehälter mit der
gewünschten Menge an Milch.
1. Versare nel contenitore del latte la quantità
di latte desiderata.
2. Schließen Sie den Milchbehälter. Önen Sie die Klappe
des Dampfanschluss, indem Sie diese nach rechts schieben.
Verbinden Sie das Rapid Cappuccino System an die
Maschine.
2. Chiudere il contenitore del latte. Aprire il connettore del
vapore facendolo scorrere verso destra. Collegare il Sistema
Rapid Cappuccino alla macchina.
3. Maschine heizt für ca. 15 Sekunden auf.
3. La macchina si riscalderà per circa 15
secondi.
4. Önen Sie den Hebel vollständig und
legen Sie eine Nespresso Kapsel ein.
4. Alzare completamente la leva e inserire
una capsula Nespresso.
VORSICHT: nutzen Sie den Milchbehälter ausschließlich für
Milch und Leitungswasser. Verwenden Sie keine Rohmilch und
stellen Sie anhand des Ablaufsdatums auf der Verpackung sicher,
dass die Milch nicht abgelaufen ist.
ATTENZIONE: non utilizzare il contenitore del latte per nessun
altro liquido al di fuori del latte o dell’acqua potabile. Non usare
latte fresco e assicurarsi di non usare latte oltre la scadenza indicata
sulla confezione.
INFORMATION: für ein ideales Milchschaumergebnis nutzen Sie bitte gekühlte H-Milch (ca. 4° C).
INFORMAZIONI: per una schiuma di latte eccezionale, usare latte scremato o parzialmente scremato a
temperatura di frigorifero (circa 4° C).
INFORMATION: wenn der
Milchbehälter leer ist, spülen Sie
diesen und das Milchansaugrohr
mit Leitungswasser, bevor sie den
Milchbehälter erneut befüllen.
INFORMAZIONI: quando il
contenitore del latte è vuoto, prima di
riempirlo, risciacquarlo accuratamente
con acqua potabile insieme al tubicino di
aspirazione del latte.
6926_UM_LATTISSIMA_PREMIUM_Z2A.indb 29 17.10.13 19:57

DE
IT
Preparing Cappuccino and Latte Macchiato
4°
i
When the milk container is empty, before refilling,
thoroughly rinse it and the milk aspiration tube
with potable water.
Close the milk container. Open the steam
connector door by sliding it to the right. Connect
the Rapid Cappuccino System to the machine.
15”
+
LATTE MACCHIATO
Clean
15”
i
Remove Rapid Cappuccino System
connector by unlocking it from (sign ) to
(sign) and pulling it off
Remove the milk container lid and
unplug milk aspiration tube.
Remove the milk froth regulator knob by
turning it until and pulling it up.
Remove the milk spout by pulling it off.
1 2 3 4
Assembling / disassembling of Rapid Cappuccino system (R.C.S)
RINSE MILK SYSTEM
07 08
ZUBEREITUNG VON CAPPUCCINO ODER LATTE MACCHIATO/
PREPARAZIONE CAPPUCCINO E LATTE MACCHIATO
INFORMATION: spülen Sie das
Milchsystem nach jeder Nutzung.
INFORMAZIONI: dopo ogni utilizzo,
risciacquare il sistema del latte.
9. Stellen Sie einen Behälter unter der
Milchdüse.
9. Posizionare un contenitore sotto
l’erogatore del latte.
10. Drehen Sie den Schaumregulierer in die Position
«CLEAN». Der Spülvorgang des Milchsystems startet,
Heißwasser und Dampf strömen aus der Milchdüse.
10. Ruotare la manopola di regolazione del latte sulla
posizione «CLEAN». Inizia così il processo di risciacquo del
sistema del latte e l’acqua calda, combinata al vapore, passa
attraverso l’erogatore del latte.
11. Der Spülvorgang dauert ca. 15 Sekunden und
stoppt automatisch.
11. Il processo di risciacquo dura circa 15 secondi
e si ferma automaticamente.
5. Schließen Sie den Hebel und stellen Sie
eine Cappuccino- oder Latte Macchiato Tasse
unter dem Kaeeauslauf und passen Sie die
Position der Milchdüse an.
5. Abbassare la leva, sistemare una tazza
per Cappuccino o un bicchiere per Latte
Macchiato sotto l’erogatore del caè e
regolare la posizione dell’erogatore del latte.
6. Verstellen Sie den Schaumregulierer, je
nach der gewünschten Schaumkonsistenz.
6. Regolare la manopola per la schiuma
di latte a seconda del volume di schiuma
desiderato.
7. Drücken Sie die Cappuccino- oder Latte Macchiato
Taste. Die Zubereitung startet nach ein paar Sekunden (erst
Milchschaum und dann Kaee) und stoppt automatisch.
7. Premere il pulsante Cappuccino o Macchiato. La
preparazione inizia dopo pochi secondi (prima il latte e poi il
caè) e si ferma automaticamente.
8. Önen und schließen Sie nach der Zubereitung
den Hebel, um die Kapsel in den Kapselbehälter
auszuwerfen.
8. Alla ne della preparazione, sollevare e
abbassare la leva per espellere la capsula
direttamente nel contenitore delle capsule usate.
30
6926_UM_LATTISSIMA_PREMIUM_Z2A.indb 30 17.10.13 19:57

31
PRESS to confirm.
The discaling agent flows alternately
trough the coffee outlet, hot water nozzle
and drip tray.
Descaling
Descaling process: Empty the drip tray and
the used capsules container.
Rinsing process: Empty the drip
tray and the used capsules
container.
Refer to safety precautions
+
100 ml
500 ml
1 2 3
5
7 8
4
6
Lift and close the lever to eject any capsule
in the used capsule container.
Descaling process: Fill water tank with 100
ml of Nespresso descaling agent and 500ml
water.
Descaling process: Insert the hot
water spout.
Enter the Menu, browse the options and
select DESCALING. You will be guided
throughout the whole process. Follow
machine display instructions.
Descaling process: Place one container
of minimum 1 litre under both the coffee
outlet and the hot water spout.
4°
Volume factory settings
LANGUAGE
DESCALING
WATER HARDNESS
09 10
DE
IT
ZUBEREITUNG VON CAPPUCCINO ODER LATTE MACCHIATO/
PREPARAZIONE CAPPUCCINO E LATTE MACCHIATO
12. Drehen Sie nach dem Spülvorgang der
Schaumregulierer zurück in die Milchposition.
12. Una volta terminato il risciacquo,
riportare la manopola per regolare la schiuma
del latte sulla modalità del latte.
13. Entfernen Sie den Milchbehälter und bewahren Sie
diesen im Kühlschrank auf. Schließen Sie die Klappe des
Dampfanschlusses.
13. Rimuovere l’R.C.S. dalla macchina e riporlo
immediatamente nel frigorifero. Chiudere la porta del
connettore di vapore.
15. Reinigen Sie alle Einzelteile über das
obere Fach Ihrer Spülmaschine. Wenn Sie
keine Spülmaschine besitzen, halten Sie sich
an den Abschnitt manuelle Reinigung des
Rapid Cappuccino Systems (R.C.S.).
15. Lavare tutti i componenti nello
scomparto superiore della lavastoviglie.
Nel caso non si disponga di una lavastoviglie,
consultare la sezione Lavaggio a mano del
Sistema Rapid Cappuccino (R.C.S.).
INFORMATION: siehe Abschnitt «Montage/
Demontage von Rapid Cappuccino System (R.C.S.)».
INFORMAZIONI: consultare la sezione
«Assemblaggio/Smontaggio del Sistema Rapid
Cappuccino (R.C.S.)».
VORSICHT: die Milch sollte nicht länger als zwei Tage im Kühlschrank aufbewahrt werden.
Wenn der Milchbehälter länger als 2 Stunden nicht im Kühlschrank gelagert wurde, zerlegen Sie die R.C.S. und
reinigen Sie alle Einzelteile (siehe Abschnitt Spülmaschinenreinigung oder Reinigung per Hand).
ATTENZIONE: non tenere il latte in frigo per più di 2 giorni. Nel caso il contenitore del latte rimanga fuori
dal frigorifero per più di 2 ore, smontare l’R.C.S. e lavare tutti i componenti (consultare i consigli per il lavaggio
manuale o in lavastoviglie).
14. Zerlegen Sie und reinigen Sie das Rapid Cappuccino
System mindestens alle 2 Tage.
14. Smontare il Sistema Rapid Cappuccino ogni due giorni.
6926_UM_LATTISSIMA_PREMIUM_Z2A.indb 31 17.10.13 19:57

DE
IT
PRESS to confirm.
The discaling agent flows alternately
trough the coffee outlet, hot water nozzle
and drip tray.
Descaling
Descaling process: Empty the drip tray and
the used capsules container.
Rinsing process: Empty the drip
tray and the used capsules
container.
Refer to safety precautions
+
100 ml
500 ml
1 2 3
5
7 8
4
6
Lift and close the lever to eject any capsule
in the used capsule container.
Descaling process: Fill water tank with 100
ml of Nespresso descaling agent and 500ml
water.
Descaling process: Insert the hot
water spout.
Enter the Menu, browse the options and
select DESCALING. You will be guided
throughout the whole process. Follow
machine display instructions.
Descaling process: Place one container
of minimum 1 litre under both the coffee
outlet and the hot water spout.
4°
Volume factory settings
LANGUAGE
DESCALING
WATER HARDNESS
09 10
2. Önen und schließen Sie nach der Zubereitung den Hebel, um die Kapsel in den
Kapselbehälter auszuwerfen. Stellen Sie einen Behälter unter dem Kaeeauslauf
und drücken Sie die Lungotaste, um zu spülen. Reinigen Sie den Kaeeauslauf
regelmäßig mit einem weichen, feuchten Tuch.
2. Sollevare e abbassare la leva per espellere la capsula direttamente nel contenitore
delle capsule usate. Sistemare un contenitore sotto l’erogatore del caè e premere
il pulsante Lungo per risciacquare. Pulire regolarmente l’erogatore di caè con un
panno umido pulito.
3. Reinigen Sie Rückstände an der Heißwasserdüse mit
Leitungswasser. Reinigen Sie die Heißwasserdüse mit einem
weichen, feuchten Tuch.
3. Risciacquare accuratamente con acqua potabile
qualunque residuo di sporco sul beccuccio dell’acqua calda.
Pulire con un panno umido pulito.
1. Zerlegen Sie das Rapid Cappuccino System. Siehe
Abschnitt «Montage/Demontage von Rapid Cappuccino
System (R.C.S.)».
1. Smontare il Sistema Rapid Cappuccino. Consultare la
sezione «Assemblaggio/Smontaggio del Sistema Rapid
Cappuccino (R.C.S.)».
2. Spülen Sie mit Leitungswasser sorgfältig
Milchrückstände ab.
2. Risciacquare accuratamente qualunque
residuo di latte con acqua potabile.
3. Legen Sie alle Einzelteile im warmen Wasser (ca. 40° C)
mit Spülmittel für mindestens 30 Minuten ein.
3. Immergere tutti i componenti in acqua calda (circa 40° C)
e detersivo per almeno 30 minuti.
4. Spülen Sie alle Einzelteile mit
Leitungswasser ab und trocken Sie diese mit
einem sauberen, weichen Tuch.
4. Sciacquarli con acqua potabile e asciugarli
con un panno umido pulito.
TÄGLICHE PFLEGE/CURA QUOTIDIANA
INFORMATION: verwenden Sie keine aggressiven Reinigungs- oder Lösungsmittel. Um die Oberäche Ihrer Maschine zu reinigen, verwenden Sie ein
feuchtes Tuch und milde Reinigungsmittel. Stellen Sie das Gerät oder Zubehörteile davon niemals in die Spülmaschine.
INFORMAZIONI: non utilizzare detersivi abrasivi o solventi. Utilizzare un panno umido e un detergente delicato per pulire la supercie della macchina. Non
mettere alcun componente della macchina nella lavastoviglie, ad eccezione dei componenti del Sistema Rapid Cappuccino.
MANUELLE REINIGUNG DES RAPID CAPPUCCINO SYSTEMS R.C.S./
LAVAGGIO A MANO DEL SISTEMA RAPID CAPPUCCINO R.C.S.
INFORMATION: falls keine Spülmaschine vorliegt, können die R.C.S. Einzelteile manuell gereinigt werden. In diesem Falle muss die Reinigung täglich erfolgen, damit die maximale Leistung gewährleistet ist.
INFORMAZIONI: se non si dispone di una lavastoviglie, lavare i componenti dell’R.C.S. manualmente. In tal caso, eseguire questo procedimento ogni giorno per la massima ecienza.
1. Entfernen Sie die Abtropfschale und den Kapselbehälter.
Entleeren und spülen. Entfernen Sie den Wassertank.
Entleeren und spülen Sie den Wassertank, bevor dieser mit
frischem Leitungswasser befüllt wird.
1. Rimuovere il vassoio raccogligocce e il contenitore delle
capsule. Svuotare e sciacquare. Rimuovere il serbatoio
dell’acqua. Svuotare e risciacquare prima di riempirlo con
acqua fresca potabile.
32
6926_UM_LATTISSIMA_PREMIUM_Z2A.indb 32 17.10.13 19:57

33
DE
IT
HINWEIS: *die Milchschaumkonsistenz ist abhängig von Art der verwendeten Milch, der
Milchtemperatur und der Position des Schaumregulierers.
IMPORTANTE: *il volume della schiuma di latte dipende dal tipo di latte utilizzato, dalla sua
temperatura e dalla posizione della manopola di regolazione del latte.
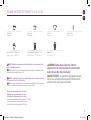
HINWEIS: wir empfehlen die Werkseinstellungen der Füllmengen für Ristretto, Espresso und
Lungo, um das beste Resultat jeder einzelnen Kaeevarietät zu gewährleisten.
IMPORTANTE: consigliamo di attenersi alle impostazioni di fabbrica per Ristretto, Espresso e Lungo,
per ottenere i migliori risultati in tazza per ciascuna delle nostre varietà di caè.
Die Füllmenge von Heißwasser kann zwischen 50 bis 400 ml programmiert werden.
Die Füllmenge von Milchschaum kann zwischen 30 bis 200 ml programmiert werden.
Die Füllmenge von Kaee kann zwischen 25 bis 200 ml programmiert werden.
Il volume dell’acqua può essere programmato da 50 a 400 ml.
Il volume del latte può essere programmato da 30 a 200 ml.
Il volume del caè può essere programmato da 25 a 200 ml.
WERTE WERKSEINSTELLUNG/
RIPRISTINO DELLE IMPOSTAZIONI DI FABBRICA
Ristretto 25 ml
Ristretto 25 ml
Cappuccino Milk*: 50 ml/Kaee: 40 ml
Cappuccino - Latte*: 50 ml/Caè: 40 ml
Lungo 110 ml
Lungo 110 ml
Latte Macchiato Milk*: 150 ml/Kaee: 40 ml
Latte Macchiato - Latte*: 150 ml/Caè: 40 ml
Espresso 40 ml
Espresso 40 ml
Heißwasser 125 ml
Acqua calda 125 ml
Warme Milch* 120 ml
Latte caldo* 120 ml
VORSICHT: falls die Füllmenge höher als 150 ml progammiert
ist: lassen Sie die Maschine 5 Minuten abkühlen, bevor Sie einen
weiteren Kaee zubereiten. Gefahr der Überhitzung!
ATTENZIONE: se si programma il volume del caè in quantità
superiore a 150 ml, lasciar rareddare la macchina per 5 minuti
prima di preparare un altro caè. Rischio di surriscaldamento!
6926_UM_LATTISSIMA_PREMIUM_Z2A.indb 33 17.10.13 19:57

DE
IT
+
100 ml
500 ml
10
+
100 ml
500 ml
10
+
100 ml
500 ml
10
+
100 ml
500 ml
10
+
100 ml
500 ml
10
+
100 ml
500 ml
10
+
100 ml
500 ml
10
+
100 ml
500 ml
10
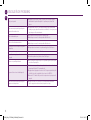
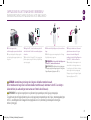
ENTKALKUNG/DECALCIFICAZIONE
1. Önen und schließen Sie den Hebel, um
Kapseln in den Kapselbehälter auszuwerfen.
1. Sollevare e abbassare la leva per espellere
le capsule direttamente nel contenitore delle
capsule usate.
2. Önen Sie das Menü und wählen Sie die Option
ENTKALKUNG. Sie werden durch den kompletten
Entkalkungsprozess geführt. Folgen Sie den Instruktionen
im Display.
2. Aprire il Menu, scorrere le opzioni e selezionare
DECALCIFICAZIONE. La procedura guidata le permetterà
di eseguire tutto il processo. Seguire le istruzioni sul display
della macchina.
VORSICHT: siehe auch Sicherheitshinweise. ATTENZIONE: consultare le precauzioni di sicurezza.
7. Drücken Sie zur Bestätigung. Die Entkalkungslösung
läuft abwechselnd über den Kaeeauslauf, der
Heißwasserdüse und zur Abtropfschale.
7. Premere
per confermare. La soluzione decalcicante
passa alternativamente attraverso l’erogatore del caè,
l’erogatore di acqua calda e il vassoio raccogligocce.
5. Entkalkungsprozess: setzen Sie die
Heißwasserdüse auf.
5. Processo di decalcicazione: inserire il
beccuccio dell’acqua calda.
6. Entkalkungsprozess: platzieren Sie ein
Gefäß (min. 1 Liter) unter dem Kaeeauslauf
und der Heißwasserdüse.
6. Processo di decalcicazione: posizionare
un contenitore con capacità minima di 1 litro
sotto l’erogatore del caè e sotto il beccuccio
dell’acqua calda.
3. Entkalkungsprozess: leeren Sie die
Abtropfschale und den Kapselbehälter.
3. Processo di decalcicazione: svuotare
il vassoio raccogligocce e il contenitore delle
capsule usate.
4. Entkalkungsprozess: füllen Sie
den Wassertank mit 100 ml Nespresso
Entkalkungsmittel und 500 ml
Leitungswasser.
4. Processo di decalcicazione: riempire il
serbatoio dell’acqua con 100 ml di soluzione
decalcicante Nespresso e con 500 ml di
acqua potabile.
8. Spülvorgang: leeren Sie die Abtropfschale
und den Kapselbehälter. Spülen Sie mit
Leitungswasser.
8. Processo di risciacquo: svuotare il
vassoio raccogligocce e il contenitore delle
capsule usate. Sciacquare con acqua potabile.
34
6926_UM_LATTISSIMA_PREMIUM_Z2A.indb 34 17.10.13 19:57

35
max
1”
1
2
3
4
5
11
max
1”
1
2
3
4
5
11
max
1”
1
2
3
4
5
11
max
1”
1
2
3
4
5
11
max
1”
1
2
3
4
5
11
max
1”
1
2
3
4
5
11
max
1”
1
2
3
4
5
11
max
1”
1
2
3
4
5
11
DE
IT
ENTKALKUNG/DECALCIFICAZIONE
2. Halten Sie den Wasserhärte Aufkleber für
1 Sekunde unter Wasser.
2. Mettere l’etichetta per la durezza
dell’acqua sotto l’acqua corrente per
1 secondo.
11. Drücken Sie zur Bestätigung. Der Spülvorgang läuft
abwechselnd über den Kaeeauslauf, der Heißwasserdüse
und zur Abtropfschale, bis der Wassertank leer gelaufen ist.
11. Premere
per confermare. Il ciclo di risciacquo si
alterna fra l’erogatore del caè, l’erogatore dell’acqua calda
e il vassoio raccogligocce no a che il serbatoio dell’acqua
non si svuota.
3. Die Anzahl der roten Quadrate zeigt die
lokale Wasserhärte an.
3. Il numero di quadratini rossi indica il livello
di durezza dell’acqua.
12. Nach dem Spülvorgang schaltet sich die Maschine aus.
Spülen Sie über die Heißwasserdüse und reinigen Sie diese
anschließend mit einem sauberen, feuchtem Tuch.
Die Entkalkung ist abgeschlossen.
12. Una volta terminato il processo di risciacquo, la
macchina si spegne. Sciacquare l’erogatore dell’acqua calda
e pulirlo con un panno umido. A questo punto il processo di
decalcicazione della macchina è terminato.
4. Stellen Sie die Wasserhärte entsprechend
des Wertes ein.
4. Impostare quindi il valore.
WASSERHÄRTE EINSTELLEN/IMPOSTAZIONI DELLA DUREZZA DELL’ACQUA
1. Önen Sie das Menü und wählen Sie die Option
WASSERHÄRTE. Sie werden instruiert Ihre Wasserhärte zu
denieren. Folgen Sie den Instruktionen im Display.
1. Aprire il Menu, scorrere le opzioni e selezionare
DUREZZA ACQUA. La procedura guidata permetterà di
impostare il valore. Seguire le istruzioni sul display della
macchina.
9. Spülvorgang: spülen Sie den Wassertank
und füllen Sie diesen bis zur max. Markierung
mit Leitungswasser.
9. Processo di risciacquo: sciacquare e
riempire con acqua potabile no al livello
MAX.
10. Spülvorgang: platzieren Sie ein Gefäß
(min. 1 Liter) unter dem Kaeeauslauf und
der Heißwasserdüse.
10. Processo di risciacquo: posizionare un
contenitore con capacità minima di 1 litro
sotto l’erogatore del caè e sotto il beccuccio
dell’acqua calda.
6926_UM_LATTISSIMA_PREMIUM_Z2A.indb 35 17.10.13 19:57
La pagina sta caricando ...
La pagina sta caricando ...

DE
IT
Für jegliche weiterführende Information, bei auftretenden Problemen oder auch wenn Sie nur Rat suchen, kontaktieren Sie den Nespresso Club.
Die Kontaktdaten des Nespresso Clubs nden Sie im Ordner «Willkommen bei Nespresso» im Maschinenkarton oder auf www.nespresso.com.
Per ulteriori informazioni, in caso di problemi o per avere assistenza, rivolgersi al Nespresso Club.
Le informazioni per contattare il Nespresso Club sono disponibili nel cofanetto «Benvenuto in Nespresso» oppure su www.nespresso.com
KONTAKTIEREN SIE DEN NESPRESSO CLUB/CONTATTARE IL NESPRESSO CLUB
GEWÄHRLEISTUNG/GARANZIA
ENTSORGUNG UND UMWELTSCHUTZ/SMALTIMENTO E PROTEZIONE AMBIENTALE
Entsorgung und Umweltschutz
Ihr Gerät enthält wertvolle Materialien, die wiedergewonnen und recycelt werden können. Die Trennung der verschiedenen Abfallmaterialien erleichtert das Recycling des wiederverwertbaren Materials. Bringen Sie das Gerät
zu einem Recycling- bzw. Wertstohof. Mehr Information zur Wiederverwertung erhalten Sie bei Ihren örtlichen Behörden.
Smaltimento e protezione ambientale
La macchina contiene materiali di valore che possono essere recuperati o riciclati. La separazione dei materiali di scarto consente il recupero di preziose materie prime. Smaltire l’apparecchio in un apposito centro di raccolta.
A tal proposito, è possibile ottenere maggiori informazioni contattando le autorità locali.
De’Longhi gewährt eine Garantie von 2 Jahren ab dem Kauf des Geräts gegen Materialdefekte und Fehler in der handwerklichen Ausführung. Während dieser Zeitspanne wird De’Longhi jedes defekte Produkt nach eigenem
Ermessen reparieren oder austauschen, ohne Kosten für den Besitzer. Die Austauschprodukte oder reparierten Einzelteile unterstehen der noch verbleibenden Original-Garantiedauer oder einer Garantiedauer von sechs
Monaten, je nachdem, was länger ist. Diese beschränkte Garantie kommt nicht zur Anwendung bei Beschädigungen, die durch einen Unfall, Missbrauch, unsachgemäße Pege oder normalem Verschleiss verursacht wurden.
Ausgenommen im durch das anwendbare Recht zulässigen Umfang, nehmen die Bestimmungen dieser eingeschränkten Garantie keine Ausschließungen, Einschränkungen, Änderungen oder Ergänzungen bezüglich des auf
Ihren Maschinenkauf zwingend anwendbaren Rechts vor. Wenn Sie der Meinung sind, dass Ihr Produkt fehlerhaft ist, kontaktieren Sie den Nespresso Club, um Anweisungen zu erhalten, wohin Sie es senden oder zur Reparatur
bringen können. Nespresso übernimmt keine Garantie für technische Probleme und Defekte, die durch die Verwendung von Nicht-Original Nespresso Kapseln entstehen.
De’Longhi garantisce questo prodotto contro eventuali difetti di fabbricazione o dei materiali per un periodo di due anni dalla data d’acquisto. Durante tale periodo De’Longhi riparerà o sostituirà gratuitamente, a sua
discrezione, qualunque prodotto difettoso. I prodotti sostituiti o i componenti riparati saranno garantiti solamente per la parte di garanzia originale non scaduta o per i successivi sei mesi, a seconda di quale sia il periodo
più lungo. Nei limiti e termini previsti dalla legge vigente, questa garanzia limitata non vale per difetti dovuti a incidenti, uso non corretto, manutenzione inadeguata o normale usura. Le condizioni di questa garanzia non
escludono, riducono o modicano quanto previsto dalla legge vigente applicabile alla vendita del prodotto al consumatore. In caso si ritenga che il prodotto sia difettoso, si prega di contattare De’Longhi che Le indicherà come
procedere per la riparazione.
38
6926_UM_LATTISSIMA_PREMIUM_Z2A.indb 38 17.10.13 19:57
La pagina sta caricando ...
La pagina sta caricando ...
La pagina sta caricando ...
La pagina sta caricando ...
La pagina sta caricando ...
La pagina sta caricando ...
La pagina sta caricando ...
La pagina sta caricando ...
La pagina sta caricando ...
La pagina sta caricando ...
La pagina sta caricando ...
La pagina sta caricando ...
La pagina sta caricando ...
La pagina sta caricando ...
La pagina sta caricando ...
La pagina sta caricando ...
La pagina sta caricando ...
La pagina sta caricando ...
La pagina sta caricando ...
La pagina sta caricando ...
La pagina sta caricando ...
La pagina sta caricando ...
La pagina sta caricando ...
La pagina sta caricando ...
La pagina sta caricando ...
La pagina sta caricando ...
La pagina sta caricando ...
La pagina sta caricando ...
La pagina sta caricando ...
La pagina sta caricando ...
La pagina sta caricando ...
La pagina sta caricando ...
La pagina sta caricando ...
La pagina sta caricando ...
La pagina sta caricando ...
La pagina sta caricando ...
La pagina sta caricando ...
La pagina sta caricando ...
La pagina sta caricando ...
La pagina sta caricando ...
La pagina sta caricando ...
La pagina sta caricando ...
La pagina sta caricando ...
La pagina sta caricando ...
La pagina sta caricando ...
La pagina sta caricando ...
La pagina sta caricando ...
La pagina sta caricando ...
La pagina sta caricando ...
La pagina sta caricando ...
La pagina sta caricando ...
La pagina sta caricando ...
La pagina sta caricando ...
La pagina sta caricando ...
La pagina sta caricando ...
La pagina sta caricando ...
La pagina sta caricando ...
La pagina sta caricando ...
La pagina sta caricando ...
La pagina sta caricando ...
La pagina sta caricando ...
La pagina sta caricando ...
La pagina sta caricando ...
La pagina sta caricando ...
La pagina sta caricando ...
La pagina sta caricando ...
La pagina sta caricando ...
La pagina sta caricando ...
La pagina sta caricando ...
La pagina sta caricando ...
La pagina sta caricando ...
La pagina sta caricando ...
La pagina sta caricando ...
La pagina sta caricando ...
-
 1
1
-
 2
2
-
 3
3
-
 4
4
-
 5
5
-
 6
6
-
 7
7
-
 8
8
-
 9
9
-
 10
10
-
 11
11
-
 12
12
-
 13
13
-
 14
14
-
 15
15
-
 16
16
-
 17
17
-
 18
18
-
 19
19
-
 20
20
-
 21
21
-
 22
22
-
 23
23
-
 24
24
-
 25
25
-
 26
26
-
 27
27
-
 28
28
-
 29
29
-
 30
30
-
 31
31
-
 32
32
-
 33
33
-
 34
34
-
 35
35
-
 36
36
-
 37
37
-
 38
38
-
 39
39
-
 40
40
-
 41
41
-
 42
42
-
 43
43
-
 44
44
-
 45
45
-
 46
46
-
 47
47
-
 48
48
-
 49
49
-
 50
50
-
 51
51
-
 52
52
-
 53
53
-
 54
54
-
 55
55
-
 56
56
-
 57
57
-
 58
58
-
 59
59
-
 60
60
-
 61
61
-
 62
62
-
 63
63
-
 64
64
-
 65
65
-
 66
66
-
 67
67
-
 68
68
-
 69
69
-
 70
70
-
 71
71
-
 72
72
-
 73
73
-
 74
74
-
 75
75
-
 76
76
-
 77
77
-
 78
78
-
 79
79
-
 80
80
-
 81
81
-
 82
82
-
 83
83
-
 84
84
-
 85
85
-
 86
86
-
 87
87
-
 88
88
-
 89
89
-
 90
90
-
 91
91
-
 92
92
-
 93
93
-
 94
94
-
 95
95
-
 96
96
-
 97
97
-
 98
98
-
 99
99
-
 100
100
-
 101
101
-
 102
102
-
 103
103
-
 104
104
-
 105
105
-
 106
106
-
 107
107
-
 108
108
-
 109
109
-
 110
110
-
 111
111
-
 112
112


De'Longhi EN750MB Manuale utente
- Categoria
- Macchine da caffè
- Tipo
- Manuale utente
in altre lingue
- English: De'Longhi EN750MB User manual
- français: De'Longhi EN750MB Manuel utilisateur
- español: De'Longhi EN750MB Manual de usuario
- Deutsch: De'Longhi EN750MB Benutzerhandbuch
- русский: De'Longhi EN750MB Руководство пользователя
- português: De'Longhi EN750MB Manual do usuário
- čeština: De'Longhi EN750MB Uživatelský manuál
- polski: De'Longhi EN750MB Instrukcja obsługi
Altri documenti
-
DeLonghi MAGNIFICA ESAM 03.110.S EX1MAGNIFICA ESAM 03.120 Manuale del proprietario
-
 Nestle Nespresso EN550S Manuale utente
-
Nespresso EN560B Manuale utente
-
DeLonghi NESPRESSO LATTISSIMA EN520B Manuale del proprietario
-
-
-
-
-
Siemens TK911N2DE Manuale del proprietario
-
Jura Glass milk container Manuale utente
