Williams Minijet 280 Owner's Handbook Manual
- Tipo
- Owner's Handbook Manual

Owner’s Handbook

English
English
v
English
4–17
Français
18–31
Italiano
32–45
Hrvatski
46–59
Deutsch
60–73
Español
74–87
Owner’s Handbook
williamsjettenders.com

williamsjettenders.com williamsjettenders.com
English
English
English
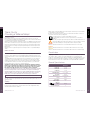
Thank You for
Choosing a Williams Minijet
Dear Williams Customer,
We would like to thank you for purchasing a Williams Tender. In doing so you have now
become part of the worldwide family of Williams owners who have chosen their tender based
on a requirement for performance, style and reliability.
Williams Jet Tenders Limited was established in 2004 by John and Mathew Hornsby, and Roy
Parker. All three founders have long associations with the marine industry, working in various
fields, from volume manufacture of sailboats to the production of handcrafted cold moulded
wooden powerboats. This design and engineering knowledge led to the development of the
Minijet range.
We wish you much enjoyment through the safe and responsible use of your Williams Minijet
Tender.
Williams Jet Tenders
This owner’s handbook has been compiled to help you operate your Minijet with safety and
pleasure. It contains details of the boat and equipment fitted, together with information on its
operation and maintenance. Please read it carefully and familiarise yourself with the boat before
using it.
The Williams Minijet uses water jet propulsion. If this is your first boat or you are changing to
a type of boat you are not familiar with, please ensure that, for your own safety you obtain
handling and operating experience before assuming command of the boat. Maneuverability
is restricted while decelerating. Your dealer, national sailing federation or yacht club will be
pleased to advise you of sea schools, or competent instructors.
The Minijet is a high performance boat. We recommend that a minimum standard of
RYA level 2 or ICC (International Certificate of Competency) is attained by the operator
prior to taking control of this boat. This manual assumes the operator has acquired
this standard of qualification and possesses knowledge of basic seamanship.
On handover your Williams Sales & Service Centre will guide you through the operating
functions and safety features of the boat. Remember to complete and submit your
warranty registration form either by post or online at williamsjettenders.com/warranty_
submission. Make a reference of the boat’s HIN in the box below. Please keep this
handbook in a secure place and hand it to the new owner if you sell the boat.
Hull Identification Number (HIN):
The HIN is located on the right hand side of the transom face below the platform step. Record
it in the box above.
Safety
Williams Jet Tenders consider the safety of our customers of great importance. We recommend
people using our products exercise care and common sense, and comply with the safety
information within the Owner’s Handbook.
English
4 5
Always obey the safety labels fitted to the tender and replace them if they become unreadable.
Contact Williams for replacement labels.
Be aware of local laws and restrictions and never use whilst under the influence of alcohol or
any substance which may affect your judgement.
This symbol appears on a number of labels fitted to the tender.
The symbol draws your attention to the message and refers you to the Owner’s
Handbook.
This safety alert symbol appears throughout the Owner’s Handbook and appears on
various labels fitted to the tender. It means attention, be alert, your safety is involved!
Please read and abide by the message that follows the safety alert symbol.
DANGER
Indicates a hazardous situation which, if not avoided, will result in death or serious injury.
WARNING
Indicates a hazardous situation which, if not avoided, could result in death or serious injury.
CAUTION
Indicates a hazardous situation which, if not avoided, could result in minor or moderate injury.
Classification
Category C – “inshore”: Craft designed for voyages in coastal waters, large bays, estuaries,
lakes and rivers, where conditions up to and including wind force 6 and significant wave
heights up to and including 2m may be experienced. This boat complies with ISO 6185-3. The
CE plate is located in the starboard rear footwell. The CE plate is the certification to European
Directive 94/25/CE. This boat is also compliant with US Coastguard and ABYC regulations.
General Specifications
Minijet 280
Length (OA)*
2.79 m
Beam (OA)*
1.54 m
Height (OA)
0.79 m
Draft (fully loaded)
0.24 – 0.35 m
Dry weight
210 kg
Maximum speed
36 mph/57 kph
Power
45 hp
Fuel capacity
30 litres
Seating capacity
3
Max load
capacity
330 kg
Design category (CE)
C
+

williamsjettenders.com williamsjettenders.com
English
English
6
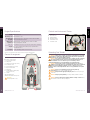
Controls and Instrument Cluster
1 Isolator Key
2 Kill Cord Socket
3 Start/Stop Button
4 Bilge Blower Button
5 Throttle/Shift Control
6 Instrument Cluster
Operating Your Tender
WARNING. This boat uses a water jet propulsion system which may exceed the
performance of and behave differently to other boats you have operated in the
past. At slower speeds, maneuverability is reduced.
WARNING. The Operator of this boat must be of a suitable age and competence,
have read and understood the owner’s manual and safety labels, have been
familiarised with the correct use of this boat, possess knowledge of basic
seamanship and hold the necessary qualifications as required under law.
WARNING. Never permit a guest to operate this boat unless the guest is of
suitable age and competence, has read and understood the owner’s manual and
safety labels, has been familiarised with the correct use of this boat, possesses
knowledge of basic seamanship and holds the necessary qualifications as required
under law.
WARNING. Never exceed maximum passenger capacity under any
circumstances; doing so reduces stability and control.
WARNING. Always wear the appropriate buoyancy aid and ensure all passengers
do the same.
WARNING. Always operate prudently according to visibility and water conditions.
WARNING. Never operate the boat under the influence of drugs or alcohol. They
will slow down reaction time and impair judgment.
Engine Specifications
Please refer to the Rotax Ace Engine Operator’s manual for all engine-related information.
General Arrangement
@
Indicates seating position
1 Passenger grab handles
2 Lifting Points
3 Towing valve (Under engine hatch)
4 Throttle/shift control
5 Fuel Filler (Under front cushion)
6 Engine instrumentation
7 Drain Bungs
8 Hull Indentification Number (HIN)
(located on transom)
9 CE Plate
10 Tube Inflation Valves
11 Waterski bridle attachment points
CAUTION.
Towing weight limit is 70kg
7
6
3
5
2
1
4
English
English
Engine
BRP Rotax ACE 900
Maximum power
45hp/33kW @ 6000 rpm
Recommended
fuel quality
Unleaded gasoline (super), octane rating of at least 95 ROZ or 85 MOZ.
USA: At least Premium 91, unleaded
Minimum fuel
requirement
Unleaded gasoline, octane rating of at least 91 ROZ or 82.5 MOZ.
USA: At least Regular 87, unleaded
Please note
Low-quality fuel can cause loss of power and/or increased fuel consumption.
Oil grade
XPS 4-stroke synthetic blend oil (summer grade) or equivalent 5W-40
semi synthetic-based oil
Oil capacity
3.5 litres at first filling (1.8 litres at service oil change)
6
4
5
1111
10
10
10
10
2
2 2
9
7 7
1
@
@@
8
3

8 9
williamsjettenders.com williamsjettenders.com
English
English
WARNING. Never perform high speed and extreme maneuvers which could result
in loss of control.
WARNING. Always attach the kill cord lanyard to your leg. Removal of the lanyard
will stop the engine in the event of an emergency. Always test the operation of the lanyard
each time you use your boat.
WARNING. Manoeuvrability of the boat is restricted while decelerating. Familiarize
yourself with the boat’s handling.
This boat uses a water-jet propulsion system and has unique characteristics in steering. The
throttle produces thrust from the jet pump, the directional control is provided by opening the
throttle and turning the wheel in the direction of your turn. High thrust will turn the boat sharply;
low thrust will produce less turning force. There is no rudder, so while underway there is no
steering without thrust.
If weed or debris gets caught in the jet unit during use cavitation can occur, causing a decrease
in forward thrust. If this condition is allowed to continue the engine may overheat, resulting in
serious damage. If there is any sign of debris or weeds etc. blocking the jet, remove the boat
from the water.
Remove keyswitch and kill cord. Remove all debris from around the
jet unit. DO NOT make repeated attempts to start a blocked or
jammed tender as engine damage may occur. In case of difficulty
consult your Williams authorized dealer. (A full list of authorized dealers/
engineers is available at williamsjettenders.com)
Recovery
CAUTION. Do not attempt to lift or recover the tender by
the transom. Any stern-up angle will cause water to enter the
engine from exhaust system and will result in serious engine damage.
Towing Valve
CAUTION. Risk of engine flooding exists. Towing valve fitted. Valve must be in
CLOSED position when your tender is being towed and OPEN position when your tender
is being used. Failure to observe correct valve position will result in serious engine damage.
Mooring
CAUTION. Do not leave the Minijet moored for extended periods as this may result
in an accumulation of marine growth and loss of performance.
Beaching
CAUTION. DO NOT operate in less than 0.95 m/3 ft of water as debris may enter
the jet unit. DO NOT drive Minijet onto beach. Stop engine before beaching as
damage to pump/engine cooling system may occur.
After beaching, move boat into deeper water and rock from side to side several times to
remove sand from intake area – failure to do so could cause damage to jet unit.
Trim
CAUTION. Do not overload the boat. At all speeds be aware of trim and keep weight
evenly distributed.
General
CAUTION. Operate the boat with due care and at a speed appropriate to the sea
conditions. Be aware of local laws and restrictions. Always carry out a visual check of
the boat and its components prior to use. Adhere to the maintenance schedule.
New Engine Break-in Period
Consult your BRP engine operator’s manual.
A break-in period of 5 hours is required before continuous operation at full throttle. To achieve a
good break-in, a maximum of
3
/4 throttle should be observed, however, brief acceleration and
speed variations contribute to a good break-in. Williams suggest that after the first 10 hours of
operation, the engine be checked by an authorized Williams dealer.
The break-in period is very important and must not be neglected.
Fuelling
As part of its pre-delivery inspection your new Minijet has been fully tested and
drained of fuel.
• Ensure ignition is in OFF position.
• Re-fuel in a ventilated area.
• Do not overfill the tank; be careful not to spill fuel.
• Tighten fuel cap securely after re-fuelling.
• Open engine hatch and inspect bilges after re-fuelling.
• The filler cap has an integral breather.
Do NOT hose around the fuel filler area as water may enter the fuel tank.
Minimum Octane Rating
CAUTION. Do not use fuel from fuel pumps labeled E85. Use of fuel labeled E15 is
prohibited by US EPA Regulations.
North America Rest of the World
RON+MON/2:
87 91
RON:
92 95
900 (ACE)
• •*
900 (ACE)
• •*
* For optimum engine performance
Fuel containing Ethanol can result in problems in the fuel system and engine, resulting in:
• Starting and operating difficulties.
• Deterioration of rubber or plastic parts.
• Corrosion of metal parts.
• Damage to internal engine parts

williamsjettenders.com williamsjettenders.com
English
English
Before Use
Tube pressure will fluctuate with temperature. Inflate tubes in sequence to 250 mB/3.6 psi.
Failure to observe this will compromise the sea-keeping ability and watertight integrity of the
boat. Inflation valves are fitted with quarter-turn locks to enable rapid deflation.
CAUTION. Tubes must be inflated in the correct sequence to prevent
over-inflation.
• Set valves to shut and inflate tubes evenly, starting at rear/right, rear/left, then forward valves.
• Check bilge for fuel or water contamination.
• Tighten footwell drain plugs.
• Ensure towing valve is set in open position.
• Check engine cover latches are secure.
Power Limit Switch
The power limit switch is located within the engine bay, on starboard side face. To operate boat
in low power mode, turn key to low power section of key plate. For full power mode, turn key
into full power section. In both positions the key can be removed.
Safety Check!
WARNING. ALWAYS attach yourself to the kill cord lanyard before starting the
engine. Before setting off, as a precautionary measure, always test lanyard for its
functionality by pulling away from its seating – the engine should always stop.
WARNING. NEVER operate the boat when bathers are reboarding, as risk of
serious injury exists from reverse deflector.
WARNING.
NEVER investigate engine bay with engine running or ignition on.
Starting Your Minijet
Ensure boat is in a depth of at least
0.95 m/3 ft of water.
1
Turn on ignition key.
2 Run bilge blower for 4 minutes.
3 Secure any loose ropes that could get
sucked into jet unit.
4
Ensure shift lever is in neutral position.
5 Insert kill cord lanyard into socket.
WARNING. Personal injury
may result if not attached.
6
Press Start/Stop button to start
engine.
7
Test kill cord lanyard for correct
functionality (see Safety Check!).
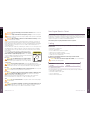
Warning Lights
The Maintenance Reminder (1)
indicator is illuminated when required
maintenance is due. When the light
is illuminated, seek service from your
nearest Williams dealer.
The High Temperature (2) indicator will
become illuminated and sound an alarm
when the engine or exhaust system is,
or may be, overheating. A message will
scroll across the LCD screen identifying
whether the overheating is from the
engine or exhaust. Return to port as soon as possible and contact your nearest Williams dealer.
The Check Engine (3) indicator light is illuminated when an active fault has been detetcted
somewhere in the system. Look for a message on the LCD screen which will display the active
fault which has been detected.
When the check engine indicator blinks, the Limp Home mode is active. Seek service from
your nearest Williams dealer.
The Low Oil Pressure (4) indicator is illuminated and sounds an alarm when low oil pressure
has been detected in the system. A scrolling message will appear
on the LCD screen. Return to port as soon as possible and seek
technical assistance from your nearest Williams dealer.
Safety Whistle (U.S. only)
To comply with current NMMA regulations, included within your
tender pack is a safety whistle. The whistle should be kept with
the tender whilst in use.
Use the whistle to draw attention in an emergency.
Oil Level Check
The engine must be at operating temperature before an accurate level is indicated on the
dipstick. The oil level should be between MIN and MAX on the dipstick. Reinstall dipstick,
pushing in completely. Do not screw cap in to check level.
Use the correct grade of oil: Williams recommends XPS-4 stroke synthetic blend (Summer).
Do not overfill.
1. Full
2. Add oil
3. Operating Range
10 11
English
English
1 4
2 3
MAXMIN
2
3
1
3
5
2
1
4
1 Isolator Key
2 Kill Cord Socket
3 Start/Stop Button
4 Bilge Blower Button
5 Throttle/Shift Control

12 13
williamsjettenders.com williamsjettenders.com
English
English
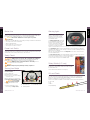
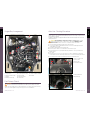
Engine Bay Arrangement
Fuel System Check
WARNING. Pressurised fuel system. Inspect system for leaks at scheduled service
intervals. All elements of the fuel system function under pressure (4 bar). The system
remains pressurised after engine is switched off. Extreme care must be taken when removing
quick connectors during filter change. Wear eye protection. No naked flames.
6
3
4 5
10
2
8
9
7
1
After Use: Flushing Procedure
To prolong engine life it is very important to flush engine of salt water after use and prior to
storage. Failure to carry out flushing will significantly reduce the life of engine components and
may invalidate the warranty.
In addition it is advised to thoroughly wash with fresh water around the jet pump area to remove all
salt deposits after use.
CAUTION. Engine MUST be running before water is connected. Risk of engine
flooding exists if water remains on after engine is switched off. NEVER run engine
longer than 2 minutes. Drive line seal has no cooling when boat is out of water.
1
Clean jet pump by spraying fresh water into its inlet and outlet.
2 Connect a fresh water hose fitted with the female connector to the flushing attachment
coupling fitted to the tender.
3
Start engine and immediately open the water tap.
4 Run the engine for about 20 seconds, between 4000 and 5000 rpm.
5 Ensure water flows out of jet pump whilst flushing. Otherwise, contact your authorized
Williams Dealer.
6
Turn off tap.
7 Allow the engine to run on for no longer than 10 seconds to allow water to exit from the
cooling system, then turn off the engine. Remove hose connector from flushing attachment.
8
Check bilge of boat and dry any residual water. Remove footwell drain plugs.
1 Pump assembly anode
2 Steering cable
3 Reverse cable
4 Footwell drain outlets
1 Flushing attachment
2 Bilge drain plug
2 3
44
1
21
1 Engine fuses
2 Boat fuse inline 30 amp
3 Battery
4 Battery isolator relay
5 Coolant expansion tank
6 Engine air filter
7 Power limit switch
8 Towing valve
9 Engine oil dipstick and filler
10 Fuel filler

williamsjettenders.com williamsjettenders.com
English
English
English
15
Electrical Cable Colour Coding
This chart sets out the corresponding colour to all cable printed abbreviations found on the
craft. Please refer to our website at williamsjettenders.com for the complete wiring diagram.
Code Colour Code Colour
BK
Black
VT
Violet
GN
Green
RD
Red
PK
Pink
GY
Grey
LTGN
Light green
BE
Blue
BN
Brown
WE
White
OE
Orange
YW
Yellow
Fuel System Check
WARNING. Pressurised fuel system. Inspect system for leaks at scheduled service
intervals. All elements of the fuel system function under pressure (4 bar). The system
remains pressurised after engine is switched off. Extreme care must be taken when removing
quick connectors during filter change. Wear eye protection. No naked flames.
Lifting the Minijet
CAUTION. Damage to the tender may result if the following procedure is not
adopted.
Lifting strops are available as an optional accessory. Ensure hooks are attached correctly before
lifting.
WARNING. Risk of injury or death. When Williams lifting strops are used, please
adhere to the Safe Working Load values as follows: Minijet 280: 280 kg max.
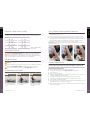
Re-boarding your Minijet
English
14
Quick Release Steering Wheel Operation
The quick release steering wheel is an optional accesory available on the Minijet. It reduces the
overall height of the tender to 0.71m.
1 To remove steering wheel from boat, pull black tab (1) towards steering wheel to release.
2 To replace wheel, pull black tab (1) towards wheel and locate on central steering hub, push
all the way to the base of steering hub before releasing tab. Ensure the wheel is fully locked
by pulling the wheel towards you, ensuring it does not release accidentally. Several ball
bearings will locate in reciprocal holes to lock the wheel to the steering hub.
Please note: When located on the wheel, the quick release collar will spin 360 degrees. The
collar is designed this way.
Routine Maintenance
To ensure long service life and to maintain the tender in a safe and reliable condition
please follow these routine maintenance instructions. Williams cannot accept any
responsibility for damage or injury resulting from incorrect maintenance or improper
adjustment carried out by the owner.
1 Wash tender regularly with fresh water to remove salt deposits.
2 Check engine oil level. (refer to section Oil Level Check in this handbook).
3 Check coolant level.
4 Flush open loop cooling system.
5 Apply a good quality marine grease containing Teflon (e.g. Quicksilver 101) to all control
cables both under the helm and at the pump.
6 Check bilges for water ingress, oil or fuel contamination and clean if necessary.
7 Lightly grease the extending running light pole base using white grease or similar.
8 Check condition of the two pump anodes.
9 Loss of tube pressure over 24 hours is not unusual. Temperature and atmospheric pressure
will affect tube pressures. Check pressures regularly.
10 For boats used in tropical environments, the frequency of the routine maintenance should
be increased accordingly.
1 Approach the boat and
hook both hands over the
tube.
2 Push your body forward
and upwards.
3 Swing your body round
once your waist is above
the water.
Example: GN/YW signifies
Green/Yellow
1

16 17
williamsjettenders.com williamsjettenders.com
English
English
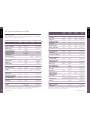
Full Inspection Maintenance Table
Please use this section for servicing guidance and the Rotax engine manual for all engine-
related serviceable items.
These tasks require basic mechanical and/or electrical knowledge. Please refer to a qualified
engineer if you are not confident in carrying them out.
First
50 hours
or 1 year
Every
100 hours
or 1 year
Every
200 hours
or 2 years
To be
carried
out by
Engine
Engine oil and filter
Replace Replace (1) Repair Shop
Rubber mounts
Inspect Inspect Repair Shop
Corrosion protection
(spray an anticorrosion
lubricant to metallic
components in engine
compartment)
Lubricate
(Every 10 hours
in salt water
use)
Operator
PTO Seal and Sleeve
Replace
2
Repair Shop
Exhaust system
Exhaust System
Inspect
Inspect,
Clean
3
Operator/
Repair Shop
Exhaust
system flushing
Clean
1, 3
Operator
Cooling system
Hoses and fasteners
Inspect Inspect Repair Shop
Coolant
Inspect Inspect Replace Repair Shop
Fuel system
Throttle Body
Inspect Inspect Repair Shop
Fuel Lines, connections,
pressure relief valve and
fuel system leak test
Inspect Inspect Repair Shop
Engine management system
Fault Codes
Inspect Inspect Repair Shop
Air intake system
Air Filter
Inspect, replace
if required
Repair Shop
First
50 hours
or 1 year
Every
100 hours
or 1 year
Every
200 hours
or 2 years
To be
carried
out by
Electrical system
Spark plugs
Inspect Inspect
Replace
Repair Shop
Ignition coils
Inspect Inspect Inspect Repair Shop
Electrical connections
and fastening (visual
inspection)
Inspect Inspect Inspect Repair Shop
Monitoring beeper
Inspect Inspect Inspect Repair Shop
Engine cut-off switch
Inspect Inspect Inspect Repair Shop
Steering system
Steering cable and
connections
Inspect Inspect Repair Shop
Steering nozzle bushings
Inspect Inspect Repair Shop
Propulsion system
Carbon ring and rubber
boot (drive shaft)
Inspect Inspect Repair Shop
Shifter system, cable
and connections
Inspect Inspect Repair Shop
Reverse gate
Lubricate Lubricate Repair Shop
Drive shaft/impeller
splines and PTO splines
Inspect,
Lubricate
Repair Shop
Drive shaft
Lubricate
4
Repair Shop
Impeller boot
Inspect Inspect Repair Shop
Impeller shaft seal,
sleeve and O-ring
Inspect Replace
5
Repair Shop
Impeller and wear
ring clearance
Inspect Inspect Repair Shop
Sacrificial anode
Inspect each month (every two weeks
in salt water) and change when necessary
Operator/
Repair Shop
PTO Boot
Replace
6
Repair Shop
Hull and body
Ride plate and water
intake grates
Inspect Repair Shop
1 At storage period or after 100 hours of use whichever comes first. 2 Replace at 200 hours of use,
irrespective of the number of years. 3 Daily flushing in salt water or foul water use.
4 Lubricate for corrosion protection. 5 Replace every 200 hours irrespective of number of years.
6 Replace every 100 hours irrespective of number of years.

19
williamsjettenders.com williamsjettenders.com
English
English
18
Winterising/Dry Storage
Store the boat covered in a clean, ventilated and dry place that is not affected by major
variations in temperature or humidity. For full information on servicing please refer to the
Rotax engine service manual.
Buoyancy Tube
Prior to storing over the winter periods the buoyancy tubes must be deflated and hosed down
with fresh water, removing any small stones and weed from around them, then allowed to dry.
Use a proprietary tube cleaner and polish to ensure optimum condition. Store with the tubes
lightly inflated where possible.
Maintenance of the Hull & Deck
Wash the deck regularly using a mild detergent in warm water and hose down to remove
sand etc. The hull and deck should be regularly polished using a good quality gelcoat polish to
minimise fade and UV chalking.
Battery
The battery used in the Minijet is of the dry cell type. This means that the electrolyte content is
absorbed in a special fabric which requires no ‘topping up’ and is leak proof in any position.
When the boat is not being used for an extended period of time, disconnect the earth terminal.
A trickle-charging device, such as an Accumate, will extend battery life.
Fuel System
Fuel will become stale over a period of several months. A full fuel tank prevents moisture and
mildew from developing within the tank. Fuel begins to break down after approximately 30
days. Adding a fuel stabilizer in the recommended ratio will minimise this.
Cooling System
Flush the open loop water circuit to remove salt, sand, shells and other contaminants that may
be trapped in the raw water cooling circuit (refer to After Use: Flushing Procedure section).
Measure the anti-freeze content of the engine coolant with a commercially available anti-freeze
tester. A 50/50 mixture of distilled water to propylene glycol provides sufficient frost protection
to approx. -37°C. Run the same 50/50 antifreeze mixture through the open loop system using
the flush attachment and a suitable container
Engine Oil Change
It is important to change the oil. Used engine oil contains water, unburned fuel and small metal
particles. When old oil is left in the engine for longer periods, corrosion and degradation of
bearings within the engine may occur.
Conserving the Cylinders
Unscrew the spark plugs and pour approximately 10ml of clean engine oil directly into each
spark plug bore. Crank the engine a few times with the starter. Screw in the spark plugs again.
Grease Cables
Grease all control cables at both ends and exercise them to ensure good coverage
General Corrosion Protection
Use maintenance spray on key switch. Apply a proprietary corrosion guard to engine, electrical
connections, under helm and around jet pump area.
Limited Warranty
Williams Jet Tenders Ltd. Limited Warranty Certificate
Williams Jet Tenders (“Williams”) undertake a PDI (pre-delivery inspection) on all new boats before shipment from factory.
Williams will provide for repairs to their inflatable boats during the specific warranty periods provided herein, in accordance
with the following terms, conditions and limitations. Registration of a Williams boat – Each Williams boat is supplied to the
original customer with a registration card. The limited Warranty contained herein shall not take effect and shall be deemed
null and void unless the original owner submits a completed registration card to Williams Jet Tenders Ltd, Unit 2 Vogue
Business Park, Berinsfield, Oxon OX10 7LN, UK within 30 days from the date of original registration. The registration can
also be completed online at www.williamsjettenders.com. Williams approved dealers shall be entitled to store boats for a
period of up to 6 months prior to registration provided that: a) the boats are stored in original packaging in accordance
with Williams guidelines; b) registration is recorded upon handover with delivery hours only.
Warranty coverage:
Williams warrants to the original private purchaser of a properly registered craft that: a) Hypalon Tubes: all seams of
the tubes, inflation valves, and the fabric used in the construction of the tube shall be free from defects in material and
workmanship for a period of 3 years from the date of the original registration; b) the fabric of the tube shall be free from
deterioration affecting serviceability (i.e. cracking, porosity, but not discolouration, fading or chaffing) for a period of 3
years from the date of the original registration; c) PVC Tubes: all seams of the tubes, inflation valves, and the fabric
used in the construction of the tube shall be free from defects in material and workmanship for a period of 2 years
from the date of the original registration; d) the fabric of the tube shall be free from deterioration affecting serviceability
(i.e. cracking, porosity, but not discolouration, fading or chaffing) for a period of 2 years from the date of the original
registration; e) the fibreglass hull shall be free from defects in material and workmanship for a period of 2 years from the
date of the original registration; f) deck and helm components which are spray finished shall be free from blistering for a
period of 1 year provided that at no time the boat is shrink wrapped in polythene; g) all components fitted to the boat at
the Williams factory or subsequently replaced under warranty shall be free from defects in material and workmanship for a
period of 2 years from the date of the original registration. The warranty period for commercial use will be 4 months from
the date of original registration. The obligation of Williams under this Limited Warranty is limited to repairing or replacing,
as Williams may elect at its sole discretion, any parts that prove, in Williams’ sole judgement, to be defective in material or
workmanship. THIS LIMITED WARRANTY SHALL BE THE ORIGINAL PURCHASER’S SOLE AND EXCLUSIVE REMEDY.
What is not covered:
This Limited Warranty shall not apply to: a) normal wear and tear; b) any minor boat damage, including but not limited
to, gel coat crazing, fading or blistering; c) any damage to Williams boats due to negligence, accident, misuse, alteration,
improper operation, collision, fire, theft, vandalism, riot, explosion, objects striking the boat, improper maintenance
and storage; d) any damage caused by towing a Williams boat, any damage caused by lifting or recovering a Williams
boat; e) tubes exposed to harsh or corrosive chemicals; f) any parts installed by anyone other than Williams factory
personnel; g) any damage caused by after-market parts; h) Williams boats purchased for commercial/governmental
use; i) any work carried out on a Williams boat by an unauthorised service centre and/or without Williams’ prior approval;
j) labour, freight, delivery, storage or other similar charges; k) defects caused or worsened by failure to adhere to
the instructions concerning the treatment, maintenance and care of the boat; l) damage caused by water ingestion.
Sometimes equipment installed on a Williams boat (such as electronics) carry their own individual warranties provided
by their respective manufacturers. In such cases any warranty claims regarding those parts must be directed to those
manufacturers and not Williams. Williams reserves the right to make warranty coverage contingent upon proof of proper
maintenance. m) Damage caused by yacht launch systems that are not designed and installed to a Williams approved
specification, or defective due to lack of maintenance.
How to obtain Warranty repair:
Prior to any work being commenced on a Williams boat, the warranty claim must be approved in writing by Williams
Jet Tenders Ltd. In order to obtain warranty repair approval, the original owner must send written notification, along with
a copy of the bill of sale, and photograph depicting the damage and/or defect sought to be repaired to Williams Jet
Tenders Ltd, Unit 2 Vogue Business Park, Berinsfield, Oxon OX10 7LN, UK. If Williams finds that the specific defect and/
or damage is covered under this Limited Warranty, Williams will advise the owner in writing where to send (via pre-paid
freight) the boat or part(s) for repair or replacement. In many cases the local authorised Sales and Service Centre may
be utilised for repairs. In others the boat or parts must be repaired by Williams personnel only. Williams does not assume
any liability for any work performed on a Williams boat at an unauthorised Service Centre and/or without Williams’ prior
approval. All parts replaced under this Limited warranty become the property of Williams.
Miscellaneous:
Williams does not authorise any person to create for it any other obligation or liability in connection with its boats. THIS
LIMITED WARRANTY AND WILLIAMS’ OBLIGATION HEREUNDER IS IN LIEU OF ALL WARRANTIES EXPRESS
OR IMPLIED, INCLUDING WITHOUT LIMITATION THE WARRANTIES OF MERCHANTABILITY AND FITNESS FOR
A PARTICULAR PURPOSE. Williams will not be liable for any incidental or consequential damages resulting from
breach of this limited warranty, including without limitation, loss of inflatable boat use, storage, payment for loss of time,
inconvenience, boat rental expense, and local taxes required on warranty repairs. Williams reserves the right to alter
models, change colours, specifications, materials, equipment, component parts, prices or cease production of certain
models at any time without prior notice, and such changes, alterations, or cessation shall be made without Williams
incurring any obligations to equip or modify inflatable boats produced prior to the date of such changes or alterations.
This Limited Warranty shall be governed by and construed and enforced in accordance with UK Law.

Williams Jet Tenders Ltd
Vogue Business Park, Berinsfield, Oxfordshire OX10 7LN, United Kingdom
williamsjettenders.com
Supplying Dealer Stamp
Cachet du Concessionnaire
Timbro del Rivenditore
Autorizzato Williams
Pečat Ovlaštenog Zastupnika
Stempel des Händlers
Sello del Proveedor
Part Number 08-0406 Version_1 November 2016
Limited Warranty • This boat is intended for pleasure use only. It is covered by a limited warranty which
applies for defects and aws, which may occur, despite normal use and regular maintenance, for a period of
2 years from the date of registration. Williams reserves the right to make warranty coverage contingent upon
evidence of proper maintenance.
Garantie Limitée • Ce bateau est destiné à un usage de plaisance. Il est couvert par une garantie limitée
qui s’applique pour tous vices ou défauts qui pourraient se déclarer en dépit d’une utilisation normale et
d’un entretien régulier, pendant une période de 2 ans à partir de la date d’enregistrement. La couverture
sous garantie par Williams est applicable sous réserve d’un entretien régulier par un concessionnaire agréé,
conformement au carnet d’entretien.
Garanzia Limitata • Questo tender è adibito ad uso ricreativo. E’ coperto da una garanzia limitata che copre
eventuali difetti che si veri chino nonostante un uso corretto del battello ed una manutenzione regolare,
per un periodo di 2 anni dalla data di registrazione. La Williams Performance Tenders si riserva il diritto di
riconoscere eventuali lavori in garanzia previa veri ca di corretta e costante manutenzione.
Ogranicena Garancija • Ovo plovilo je namijenjeno iskljucivo za privatne svrhe. Pokriveno je ogranicenom
garancijom na kvarove koji mogu nastati usprkos normalnom koristenju i održavanju u periodu od 2 godine od
dana registracije. Williams zadržava pravo reguliranja garancije ovisno o kvaliteti održavanja plovila.
Beschränkte Garantie • Dieses Boot ist ausschließlich für Vergnügungszwecke vorgesehen und nicht
für kommerzielle Zwecke. Die beschränkte Garantie deckt Fehler und Mängel im Rahmen der normalen
Verwendung und regelmäßiger Wartung für einen Zeitraum von 2 Jahren, ab, beginnend mit dem Tag der
Zulassung. Williams behält sich vor im Gewährleistungsfall vom Endbverbraucher einen Nachweis über die
erbrachten Wartungsarbeiten zu verlangen.
Garantia Limitada • Esta embarcación esta diseñada únicamente para uso recreativo. La garantía limitada
cubre defectos y faltas que se produzcan durante su uso normal y mientras se respeten los periodos de
mantenimiento recomendado.
-
 1
1
-
 2
2
-
 3
3
-
 4
4
-
 5
5
-
 6
6
-
 7
7
-
 8
8
-
 9
9
-
 10
10
-
 11
11


Williams Minijet 280 Owner's Handbook Manual
- Tipo
- Owner's Handbook Manual
in altre lingue
- English: Williams Minijet 280
Documenti correlati
-
Williams sportjet Owner's Handbook Manual
-
Williams SportJet 460 Owner's Handbook Manual
-
-
-
-
Williams Turbojet 285s Owner's Handbook Manual
-
-
-
