For questions or help with this product contact Tech Support at (570) 546-9663 or techsupport@grizzly.com
MODEL T26900
52" 10-DRAWER TOOL CHEST
INSTRUCTIONS
COPYRIGHT © AUGUST, 2014 BY GRIZZLY INDUSTRIAL, INC.
NO PORTION OF THIS MANUAL MAY BE REPRODUCED IN ANY SHAPE
OR FORM WITHOUT THE WRITTEN APPROVAL OF GRIZZLY INDUSTRIAL, INC.
FOR MODELS MANUFACTURED SINCE 08/2014 #WK16747 PRINTED IN CHINA
Introduction
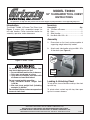
The Model T26900 10-Drawer Tool Chest (see
Figure 1) comes fully assembled except for
two side handles. Follow instructions below for
assembly, operation, and maintenance.
Inventory
Description Qty
A. Tool Box w/Drawers.................................... 1
B. Keys ............................................................ 2
C. Side Handles .............................................. 2
D. Hex Bolts M8-1.25 x 16 .............................. 4
Figure 1. Model T26900.
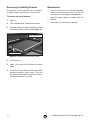
1. Place chest on flat, level surface capable of
supporting weight when fully loaded.
2. Attach each side handle using two M8-1.25 x
16 hex bolts (see Figure 2).
Assembly
Figure 2. Side handle installed.
Side
Handle
x 2
• To reduce risk of crushing injuries from
tool chest tipping over on you:
— Do not stand on tool chest or in drawers.
— Only open one drawer at a time.
— Only move or transport tool chest with
all drawers closed and locked.
• Do not exceed weight capacities:
— Max individual drawer weight limit
is 50 lbs.
— Max tool chest weight limit (including
contents) is 400 lbs.
• Do not allow children to have unsupervised
access to tool chest.
Locking & Unlocking Chest
To lock chest, close all drawers and top, then lock
top with key.
To unlock chest, unlock top with key, then open
top first to access drawers.
V1.08.14

-2-
T26900 10-Drawer Tool Chest (Mfd. 08/14)
To remove and install drawers:
1. Open top.
2. Fully extend drawer and remove contents.
3. Push left locking tab down and hold, then pull
right locking tab up and hold (see Figure 3).
The drawers can be removed and re-installed if
an object inside causes them to not close fully.
Removing & Installing Drawers
Figure 3. Location of drawer locking tabs.
Left Locking Tab
Right Locking Tab
4. Pull drawer out.
5. Apply a thin layer of dry lubricant to drawer
slides.
6. To re-install, insert drawer runners into slides
and push drawer in until it stops. The lock-
ing tabs will automatically snap into place to
secure the drawer in the slides.
Maintenance
• Use soft, clean cloth, and standard cleaning
solution to remove grease, dirt, or oil. Do not
use solvents or flammable cleaning liquids.
• Lubricate drawer slides as needed with dry
lubricant.
• Use graphite to lubricate lock annually.

T26900 10-Drawer Tool Chest (Mfd. 08/14)
-3-
1
2
3
4
5
6
9
7
8
To reduce risk of serious personal injury when using:
1. Read manual before use for full safety, assembly, and adjustment instructions.
2. To reduce risk of tipping chest, do not stand on chest or in drawers, only
open one drawer at a time, and only move after closing and locking all drawers.
3. Do not lift fully loaded chest by side handles.
4. Do not exceed maximum drawer or product weight.
5. Do not allow unsupervised children to access chest.
10
11
12
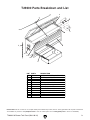
T26900 Parts Breakdown and List
REF PART # DESCRIPTION
1 PT26900001 SIDE HANDLE SET W/HARDWARE
2 PT26900002 GRIZZLY NAMEPLATE-MINI
3 PT26900003 LOCK SET W/2 KEYS
4 PT26900004 ACTUATOR ASSEMBLY
5 PT26900005 LOCKING BAR AND PIN
6 PT26900006 LID LIFT SET
7 PT26900007 DRAWER SLIDE SET
8 PT26900008 DRAWER TRIM 23-3/4"
9 PT26900009 HEX BOLT M8-1.25 X 16
10 PT26900010 WARNING LABEL FOR TOOLBOXES
11 PT26900011 GRIZZLY.COM GOLD LOGO
12 PT26900012 BLACK TOUCH-UP PAINT
Please Note: We do our best to stock replacement parts whenever possible, but we cannot guarantee that all parts shown here
are available for purchase. Call (800) 523-4777 or visit our online parts store at www.grizzly.com to check for availability.

-
 1
1
-
 2
2
-
 3
3
-
 4
4