User Manual
Quick Start Guide
Portable
www.alfaforni.com

STEP 2
Alfa Forni participates in the SAVE THE PLANET initiative;
that’s why the manual has been printed only in English.
To download the other languages, scan the QR code or click the link below.
Alfa Forni partecipa all’iniziativa SAVE THE PLANET,
per questo il manuale è stato stampato esclusivamente il lingua inglese.
Per scaricare le altre lingue scansionare il QRcode oppure digita il link qui sotto.
Alfa Forni nimmt an der SAVE THE PLANET-Initiative teil. Die gedruckte Anleitung ist
deswegen nur auf Englisch verfügbar. Um die anderen Sprachen herunterzuladen,
scannen Sie den QR-Code oder geben Sie den Link hier unten ein
Alfa Forni participe à l’inititiative SAUVER LA PLANÈTE
et pour cela le manuel à été imprimé seulement en anglais.
Pour télécharger les autres langues, ashez le code QR ou cliquez sur ce lien.
Alfa Forni participa en la iniciativa SALVAR EL PLANETA,
por eso el manual fue publicado solo en inglés.
Para descargar los otros idiomas escanea el código QR o haz clic aquí.
DOWNLOAD USER MANUAL
www. alfaforni.com/user-manual-portable.php
SCAN
ME
REGISTER YOUR PRODUCT
www.alfaforni.com/registration.php
SCAN
ME
Identies the
serial number
12345678901234
Enter your
information
Scan the QRcode
or type the link below
STEP 1 STEP 3
SCAN
ME
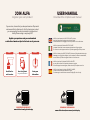
JOIN ALFA
Register your oven product
USER MANUAL
Download the complete user manual
If you are here, it means that you have purchased an Alfa product
and we would like to thank you for this. By choosing our product
you are supporting the search and desire to bring good and
healthy ame cooking in everybody’s life.
Register your purchase and you can download
a collection of must-see tips for the best use of your oven.

1
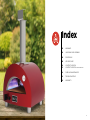
Index
02 WARNINGS
04 UNPACKING AND ASSEMBLY
06 POSITIONING
08 VENTING GUIDE
10 LIGHTING THE OVEN
12 LIGHTINGTHEOVEN-NORTH AMERICA
14 CARE AND MAINTENANCE
16 TROUBLESHOOTING
18 WARRANTY

2 3
PLEASE READ THE FOLLOWING INFORMATION FOR PROPER
INSTALLATION AND OPTIMUM PERFORMANCE OF THE OVEN.
-The identication plate, with technical data, lot number and brand
name is visibly applied on the device. Do not remove this label
-Remove all protective lm before putting the unit into operation. To facilitate the separation,
use warm air (for example, a hairdryer)
-Never use steel sponges or sharp scrapers, it can damage the surfaces. Use ordinary
non-abrasive products. If necessary, use wood or plastic tools. Rinse thoroughly and
dry with a soft cloth or microber cloth.
-Do not use dishes or containers made of plastic material. The high temperatures inside the
oven could melt the plastic, damaging the appliance.
-Use tools and utensils that are resistant to high temperatures.
-Position the oven on a at and level surface.
-Due to the temperature, the colour of the surfaces may vary in time.
-Do not paint or apply objects to the oven.
-Installation of the product must allow for easy access for cleaning.
-Never store, use or put ammable liquids or objects in or near the oven.
-Alfa stainless steel ready-to-use ovens can become hot on the outside even with a layer of high
quality insulation
-Always remove the oven door by gripping the handle and using gloves when hot.
-Do not touch the surfaces of the chimney ue during use.
-Keep any electrical wiring and fuel lines away from hot surfaces.
-Do not use the oven if it’s not working properly or you suspect a fault in operation.
-Do not move the oven during use or when it is hot.
-Do not lean on or rest objects on the oven, this may compromise its stability.
-Never extinguish the ame with water.
-In the event that a grease re occurs, turn o the gas and leave the door closed until the re is
extinguished.
-When using the oven wear heat resistant oven gloves.
-The parts that are sealed by the manufacturer should not be modied by the user.
-Do not block the openings and slots provided for ventilation and heat dissipation.
-Do not lift the oven from the sill or shelf
-The measurements of the refractory cooking oor may vary by a few millimeters, this tolerance
is due to the craftsmanship of the product.
GENERAL WARNINGS
ALWAYS READ THE COMPLETE USER MANUAL.
Additional copies of the manual on www.alfaforni.com
WARNING: improper installation, adjustment, alteration, service or
maintenance can cause property damage, injury or death.
Read the installation, operating and maintenance instructions thoroughly before
installing or servicing this equipment.
SAFETY WARNINGS
FOR YOUR SAFETY: Do not store or use gasoline or other ammable vapors or liquids
in the vicinity of this or any other appliance. Also, always keep the area under and
around this appliance free and clear of any and all combustible materials
READ ALL INSTRUCTIONS BEFORE INSTALLING AND USING THIS APPLIANCE
Do not install where prohibited. Never touch the metal door or ue
during use as they are not insulated and become very hot when in use.
IF YOU SMELL GAS:
1. Turn the gas o.
2. Put out any live re or ames.
3. Open the door to the oven.
4. Consult a licensed gas professional
WARNING: If the gas oven is not used close the gas
supply valve.
WARNING: Do not store unused gas cylinders near the
oven.
GAS LEAKS MAY RESULT IN FIRE OR EXPLOSION AND CAUSE SERIOUS
PERSONAL INJURY OR DEATH, OR PROPERTY DAMAGE.

4 5
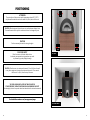
UNPACKING AND ASSEMBLY
1 - Remove the oven packaging.
Simply remove the plastic straps (A)
and lift o the top cap (C).
2 - Empty the combustion chamber
by removing the oven parts and
documentation from inside the
chamber.
3 - Remove the laser protective
lm from all stainless steel parts,
such as: sill, door, ue and chimney.
Use a hair dryer to speed up the
procedure and easily remove the
laser lm.
4 - Install the 4 feet.
Install the feet by screwing them
into the special housings in the
lower part of the oven.
5 - Insert the supplied battery
into the igniter.
Unscrew the igniter button, insert the
battery (E), then screw back the
ignition button. Now when pressing
the button you will see and hear a
small spark.
• Check the indicated polarity.
• Battery type: AA supplied
7 - Assemble the door.
It will be sucient to screw the
black duroplast handle (H) locking it
with the appropriate bolt
contained in the packaging.
A
C
E
H
6 - Install the ue and chimney.
Insert the ue (F) in the appropriate
housing (ange) and then insert the
chimney (G).
F
G
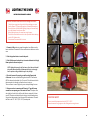
When you unbox the oven for
the rst time, due to shipping,
you may notice the presence of
red refractory powder on the
cooking oor.
If this is the case, you should brush
the powder o. We also recommend
to cook and discard 2 or 3 pizza
dough balls to ensure you remove
the refractory powder before
cooking and eating your rst pizza.
If your are using the oven
for the rst time or after a
prolonged period of inactivity
we recommend to extend
your pre-heating of the oven
by an extra 30 minutes to
allow the dispersion of any
humidity possibly collected by
the refractory bricks during
shipping or after prolonged
inactivity.

6 7
ATTENTION
The outer sides of the oven can reach temperatures above 80°C (176°F).
Any ammable materials must not be within 1m (40 in) radius of the oven.
CAUTION: When being used, place the oven at a safe minimum distance from
ammable materials or any other substance that can be damaged by heat.
CAUTION
Put the oven away from wind or strong draughts.
FOR YOUR SAFETY
Place the oven on a at and stable surface.
Involuntary movements during operation may result
in personal injury and property damage.
CAUTION: Place the oven at a minimum distance of 20 cm (8 in) from the wall
or any other equipment. Increase the minimum distance to 50 cm around
the ue and 1m (40 in) from the top of the oven.
THE OVEN SHOULD BE PLACED ON TABLES, BASES OR
OTHER FIREPROOF SURFACES WITH ENOUGH LOAD-BEARING CAPACITY
(for the weight, refer to the product data sheet attached to the instruction manual).
For installations under a roof, see page next page.
POSITIONING
Front view
View from above
8 in 8 in
8 in8 in
8 in
50 cm
50 cm
20 cm
20 cm20 cm
20 cm 20 cm
20 in
20 in

8 9
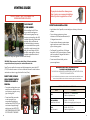
VENTING GUIDE
FLUE EXHAUST
IN THE GARDEN
When installing the ALFA Oven
in your outdoor cooking area
with the venting away from any
structures or low ceilings, the ALFA
supplied high quality stainless steel
pipe and cap are sucient and
no additional piping is necessary.
You can customize these systems
vertically to assist draw or to help
with your install design. ALFA do
not oer custom pipe or chimney.
Supplied single wall wood stove
ue pipe can always be upgraded to double wall chimney.
WARNING: Major causes of vent related res is failure to maintain
required clearances (air spaces) to combustible materials.
Note: The outer walls of oven may reach high temperatures, more than 80°C
(176°F). Position the oven so it is not in contact with the wall or other furniture
and make sure there is a gap of at least 8 inches (20cm).
DO NOT CONNECT THIS TO A CHIMNEY FLUE
SERVING ANOTHER APPLIANCE
DIRECT VENT, DOUBLE
WALL CHIMNEY ON THE
TERRACE OR UNDER A
PERGOLA
• For outdoor settings where your
wood red oven will be under a
roof structures, pergolas, or any
type of ceiling/roof.
• Do not install the oven under
a roof or pergola. If you
are penetrating through an
overhead object OR A ROOF you
must remove supplied single
wall pipe and start WITH PIPE
AND CHIMNEY MANUFACTURED
BY SPECIALIZED COMPANIES
If you plan to extend the chimney more
than 1 meter, we recommend installing a
buttery valve to regulate the air ow.
OFFSET ELBOW INSTALLATION
• Avoid elbows if at all possible, as a vertical pipe or chimney is the most
ecient
OFFSET ELBOW
WARNING: DO NOT USE (2) 30-DEGREE ELBOWS
TO CREATE A 60-DEGREE ANGLE!
THIS VOIDS ALL WARRANTIES AND PRESENTS A FIRE HAZZARD WITHIN
THE PIPE OR CHIMNEY SYSTEM.
If your installation requirement cannot meet the basic standards be sure
to consult a professional and obtain necessary permits in advance.
VENTING SUPPORT AND ASSISTANCE
AREA CONTACTS
ITALY PHONE: 800.77.77.30 numero verde
E-MAIL: [email protected]
NORTH AMERICA
United States & Canada
PHONE: +1 570 350 7939
E-MAIL: [email protected]
ROW
Rest of the world
PHONE: +39.0775.7821
E-MAIL: [email protected]
• Pipe or chimney systems may have a
maximum of 2 osets (two elbows total) of
30-degrees from vertical
• Do not combine elbows to create steeper
angles and never exceed 2 elbows in one
pipe or chimney system
• For Example: You could have a 30-degree
bend with a 0-48” horizontal pipe or chimney
and then another 30-degree bend back to
the vertical position
• Do not use with forced-draft, positive-
pressure appliances.

10 11
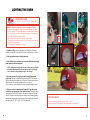
PUSH
LIGHTING THE OVEN
ATTENTION PLEASE!
IF YOU LIVE IN NORTH AMERICA, SEE THE NEXT PAGE
1 - Connect to 10kg tank using regulator hose. Make sure the burner
stabilizer is connected in the correct direction to the burner at the oven.
2 - Push the ignition button to make the spark.
3 - Push IN the burner knob and turn it counter-clockwise to the high
ame symbol on the control panel.
NOTE: Lighting the burner for the rst time or after it has cooled could
take some time and possibly a few attempts due to air in the supply
line. Be patient as the gas makes its way to the pilot light.
4 - Once the burner is lit properly you will see a big ame inside
of the oven. You can now release the ignition button BUT will need to
KEEP the burner knob pushed in for 10 seconds. This will ensure that the
thermocouple is hot enough to allow the burner to stay on.
The oven burner is now on high and you can start preheating the oven.
5 - Return oven door to warming shelf leaving 1-2” gap all the way
around the oven opening so air can enter the oven. Do replace oven
door tightly or the lack of air will force the ame to extinguish. Preheat
oven for 30 minutes to allow the re bricks to get to pizza making temp.
Using a laser thermometer, check the oven oor temperature. You want
the oor to be 370°- 430°C (700°- 800°F) to make pizza.
WARNING: Follow the instructions before turning on the oven.
• Check all gas connections for gas leak before starting your oven.
• Use the proper PTFE gas piping tape for all threaded connections
• Do not lean over the oven when lighting. Keep your face and body
at a safe distance from the oven door.
• When lighting the oven, the oven door must be open.
• The burner control knob must be in the o position before turning
on the LGP cylinder valve.
• Do not move the oven while it is in use.
1a 1b
2 4
1c
5
3
FOR YOUR SAFETY:
• Do not exceed the temperature limit of 500°C / 950°F.
• Never disconnect the gas pipe or other ttings when using the oven.

12 13
1 - Connect to 10kg tank using supplied regulator hose. Make sure the
burner stabilizer is connected in the correct direction to the burner at the
oven.
2 - Push the ignition button to make the spark.
3 - Push IN the burner knob and turn it counter-clockwise to the high
ame symbol on the control panel.
NOTE: Lighting the burner for the rst time or after it has cooled could
take some time and possibly a few attempts due to air in the supply
line. Be patient as the gas makes its way to the pilot light.
4 - Once the burner is lit properly you will see a big ame inside
of the oven. You can now release the ignition button BUT will need to
KEEP the burner knob pushed in for 10 seconds. This will ensure that the
thermocouple is hot enough to allow the burner to stay on.
The oven burner is now on high and you can start preheating the oven.
5 - Return oven door to warming shelf leaving 1-2” gap all the way
around the oven opening so air can enter the oven. Do replace oven
door tightly or the lack of air will force the ame to extinguish. Preheat
oven for 30 minutes to allow the re bricks to get to pizza making temp.
Using a laser thermometer, check the oven oor temperature. You want
the oor to be 370°- 430°C (700°- 800°F) to make pizza.
LIGHTING THE OVEN
INSTRUCTIONS FOR NORTH AMERICA
WARNING: Follow the instructions before turning on the oven.
• Check all gas connections for gas leak before starting your oven.
• Use the proper PTFE gas piping tape for all threaded connections
• Do not lean over the oven when lighting. Keep your face and body
at a safe distance from the oven door.
• When lighting the oven, the oven door must be open.
• The burner control knob must be in the o position before turning
on the LGP cylinder valve.
• Do not move the oven while it is in use.
1a 1b 1c
PUSH
2 4
5
3
FOR YOUR SAFETY:
• Do not exceed the temperature limit of 500°C / 950°F.
• Never disconnect the gas pipe or other ttings when using the oven.

14 15
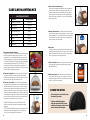
1. Clean the combustion chamber.
Pyrolysis 500°C (1 000°F). The Alfa ovens clean themselves
thankstoaprocesscalledpyrolysis(pyro“re”+lysis
“separating”).Itisaprocedurethatusesveryhighheat
to decompose organic materials and to transform them
into volatile compounds. To activate pyrolysis we suggest
you keep the temperature at 500°C (1 000°F) for 2-3
minutes. Do not clean the Combustion Chamber with
abrasive sponges and acidic or basic solvents which could
compromise the integrity of the oven.
2. Clean the cooking oor. Oncethepyrolysisisnished,
wait for the oven to cool down and remove any food
residues with the help of a brush and a damp cloth. You
shouldcleanyourovenooraftereachuse.
3. Clean the oven outside. Like all stainless and powder-
coatproducts,Alfaovensarebuilttowithstandadverse
weather conditions including salt air corrosion as long
as punctual and effective maintenance is ensured. To
cleanstainlesssteel,useasoftclothsoakedinasolution
of water and soap or alternatively with baking soda and
dish detergent. Rub gently when the oven is completely
cold.Useneutral,neitheracidicnorbasicsolutionsand
always do the operation with the oven cold
IMPORTANT:alwayscheckthecerticationofthe
product you use and that the components are those
declared.
ATTENTION: Steels subjected to high temperatures and
directamestendtochangecolouronthesurface.
This is an inherent feature of the material.
MAINTENANCE DIARY
CLEANING TIME SCHEDULE
1 Combustion chamber Every use
2Cookingoor Every use
3 Oven outside Weekly
4 Stainless-steel parts Weekly
5 Steel protection Monthly
6 Burner Monthly
7 Nozzles Yearly
8 Rust spots Biennially
CARE AND MAINTENANCE
4. Clean the stainless-steel parts
ALFA ovens are made with stainless-steel outside and
inside.Tocleantheseparts,werecommendthatyou
use a stainless-steel cleaner. Please carefully read the
warnings and the instructions. Do not use detergents
containingacids,whitespiritorxylene.Rinsewellafter
cleaning the oven.
5. Protect stainless steel. To better protect the stainless-
steelparts,wesuggestusingVaselineoroliveoilorbaby
oilassubstitutes.Inthecaseofbeachfrontinstallations,
toavoidsaltyaircorrosionandwhitethinlayers,often
clean the oven with fresh water.
6. Gas burner
The gas burner must be cleaned from time to time by
removing food residues with the help of a brush. When
cleaningvalvesandburners,becarefulnottodamage
the burner and not to enlarge the holes.
7. Clean the nozzles at least once a year to prevent them
fromcloggingthusreducingthegasow(contact
qualiedpersons).
8. Remove rust spots. Stainless steel is rust-proof but in
somecases(humidity,saltyair,seaspray…)somerust
stains might appear. Use a rust remover to make your
oven shiny and new once again.
COVER THE OVEN
-Do not forget to use the Alfa cover
to protect your oven.
-Visit our dedicated page to
nd out some advice on how to
maintain the ovens, to clean them
and to extend their lifespan.

16 17
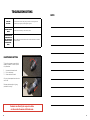
CANT GET
THE LIGHT
- Check that the knob is not going in too far and hitting the oven
preventing the gas tap to allow gas for ignition.
IGNITION DOESN’T
WORK - Make sure the battery is new and has power
CAN YOU PUT THE
OVENS RIGHT ON
THE COUNTERTOP
WITHOUT USING
THE SUPPLIED
FEET?
- No,thefeetmustbeusedtoallowforairtoowbeneaththebottom
oftheovenoor
TROUBLESHOOTING
ELECTRONIC BUTTON
The ignition button comes with AA
batteryincluded.Toinstallit,follow
this procedure.
1. Unscrew the button head.
2. Put in the battery.
3. Screw the button head.
Carry out these operations when the
oven is off.
Remove the battery during long
periods of inactivity.
Contact us directly for expert advice
on the web site www.alfaforni.com
NOTE

STEP 2
REGISTER YOUR PRODUCT
www.alfaforni.com/registration.php
SCAN
ME
Identies the
serial number
12345678901234
Enter your
information
Scan the QRcode
or type the link below
STEP 1 STEP 3
SCAN
ME
JOIN ALFA
Register your oven product
If you are here, it means that you have purchased an Alfa product
and we would like to thank you for this. By choosing our product
you are supporting the search and desire to bring good and
healthy ame cooking in everybody’s life.
Register your purchase and you can download
a collection of must-see tips for the best use of your oven.
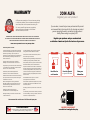
US AND CANADA WARRANTY
Customers residing in the United States and Canada have
an additional year of warranty on the gas burner.
ALFA ovens are covered by a 24-month warranty relating
to conformity defects. Correct maintenance and proper
useoftheproductwillhelpextenditsworkinglife.
Forcountryspeciclegalwarrantyregulations,
please refer to what is stated in the individual
national reference provisions.
PLEASE RETAIN YOUR PURCHASE RECEIPT OR INVOICE TO SHOW TO YOUR DEALER.
WE SUGGEST YOU NOTE DOWN BELOW THE OVEN SERIAL NUMBER INDICATED ON THE
IDENTIFICATION LABEL LOCATED ON THE BACK OF THE PRODUCT.
Transportdamage,intheeventofsuchdamage,
it should be immediately noted on the transport
documentbyafxing,uponreceiptofthe
product,thewords“acceptancewithreservation”
and immediately contacting the dealer for for
furtherclarication;
Improper use of the oven and installation
differing from that described in this manual.
Anytamperingwiththeoven,eitherintentionally
or unintentionally or alterations to the condition
theovenwasinwhendelivered;
Should the product be damaged due to
obstructionofallthesmokeoutletholes;
Cases of failure to follow the instructions relating
to proper maintenance and product cleaning as
indicatedinthemanual;
Burner damage due to cooking residues or
damage caused by using fuels other than that
recommendede.g.liquidbarbecuecharcoal,
chemicalsorotherfuels;
Cases of the use of components not
manufacturedorrecommendedbyAlfa;
Damage caused by the use of chemicals inside
oroutsidetheoven;
The label located on the back of the product
havingbeenremoved,alteredorerased;
Cases of normal wear and tear of the product
duetousebytheconsumer;
Damagecausedbyexceedingthetemperature
indicatedbythepyrometerprovided,above
500°C(950°F),duetoimproperuseofwoodfuel;
Possibleoxidationspotsonthesteeldueto
exposuretosalineenvironmentsorclosenessto
thesea.Alfapointsoutthatpossibleoxidationis
notduetoqualitydefectsintheproduct,butto
inherent chemical and physical characteristics
ofsteelsincaseofprolongedexposuretosaline
environments;
Possible deterioration of paint in case of
prolongedcontactwithames;
Small surface imperfections present on painted
or aesthetic parts that do not affect the normal
useoftheproduct;
Accessory parts of the product such as door and
glass;
The refractory stone and the undertop insulation
arenotcoveredbywarranty;however,Alfaovens
come with a replacement stone.
Please contact your dealer in case of any warranty claims.
We recommend the exclusive use of ALFA branded spare parts
WARRANTY
The warranty does not cover:

www.alfaforni.com
V.20221201
-
 1
1
-
 2
2
-
 3
3
-
 4
4
-
 5
5
-
 6
6
-
 7
7
-
 8
8
-
 9
9
-
 10
10
-
 11
11
-
 12
12
-
 13
13