


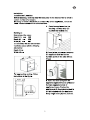
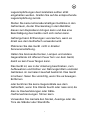
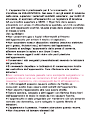
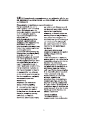
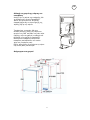
12
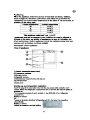
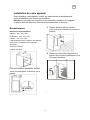
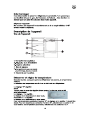
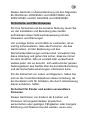
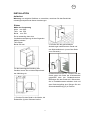
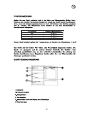
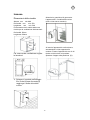
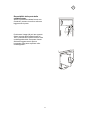
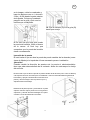
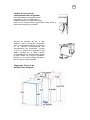
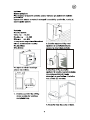
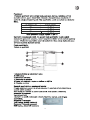
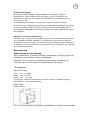
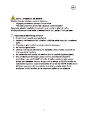
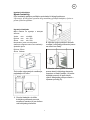
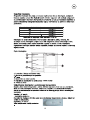
4.Apply blanking covers (B) as
indicated.
5. Separate parts A,B,C,D as shown
in the figure.
6. Place guide (A) on the side part of
the furniture door, up and down as
shown in the figure and mark the
position of external holes. After
having drilled holes, fix the guide
with the screws supplied.
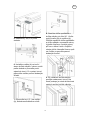
7. Fix cover ( C ) on guide (A) until it
clips into place.
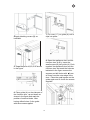
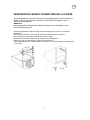
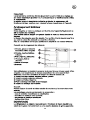
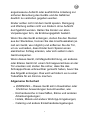
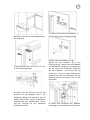
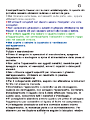
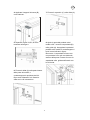
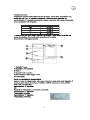
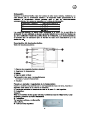
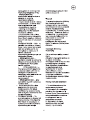
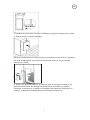
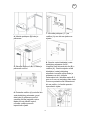
8. Open the appliance door and the
furniture door at 90
.Insert the
small square (B) into guide (A) .Push
together the appliance door and the
furniture door and mark the holes as
indicated in the figure remove the
squares and drill holes with
2mm
at 8 mm from the outer edge of the
door . Place the small square on the
guide again and fix it with the screws
supplied.

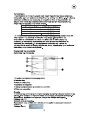
13
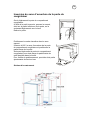
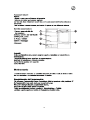
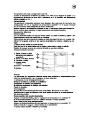
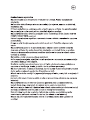
9. Should the lining up of the
furniture door be necessary , use the
clearance of slots .At the end of
operations, it is necessary to check
the door of the furniture closes
properly.
10. Fix cover (D) on guide (B) until it
clips into place.
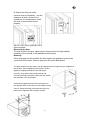
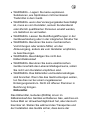
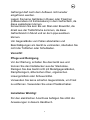
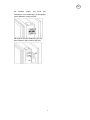
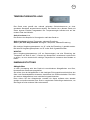
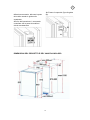
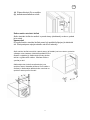
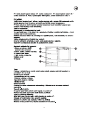
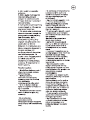
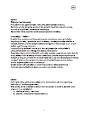
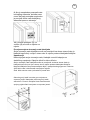
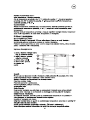
Reversing the door
The side at which the door opens can be changed from the right side(as
supplied) to the left side, if the installation site requires.
Warning!
When changing the side at which the door opens, the appliance must not be
connected to the mains. Remove plug from the mains beforehand.
The side at which the door opens can be changed from the right side (as supplied) to
the left side, if the installation site requires. Tilt the
appliance slightly towards the rear and prop it
securely. Unscrew the door hinge screws and
remove the hinge pin bracket. Open the door a little
way and take it out downwards.
Unscrew the upper pin and screw it into place on
the opposite side. Fit the door into the upper pin and
close it. Screw the hinge pin bracket securely into
place on the opposite side using the screws.

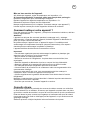
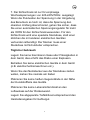
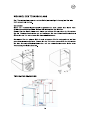
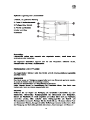
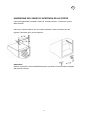
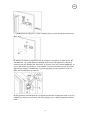
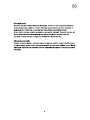
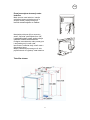
Changing over the freezer
compartment door
Open the freezer compartment door a little way.Using a
small screwdriver, press the spring in the opening of the
lower door bearing slightly upwards and take the door
bearing out complete with the door.
Position the covering cap (M) on
the opposite side.Turn the freezer
compartment door through 180 and fit the
lower door bearing into the lower bearing
cavity of the freezer compartment door.
Lift the freezer compartment doora little
way upwards, fit it into the upper door
bearing, and at the same time insert the
lower door bearing into the square hole.
Small upward and downward adjustments
of the freezer compartment door will make
fitting easier.
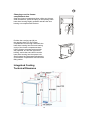
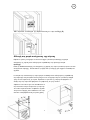
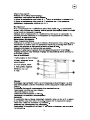
Integrated Cooling
Technical Diagrams
M


Cleaning and Care
For hygienic reasons the appliance interior, including interior accessories, should be
cleaned regularly.
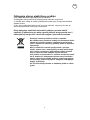
Warning!
The appliance may not be connected to the mains during cleaning. Danger of
electrical shock! Before cleaning switch the appliance off and remove the plug from
the mains, or switch off or turn out the circuit breaker or fuse.
Never clean the appliance with a steam cleaner. Moisture could accumulate in
electrical components, danger of electrical shock! Hot vapors can lead to the damage
of plastic parts.
The appliance must be dry before it is placed back into service.
Important!
Ethereal oils and organic solvents can attack plastic parts, e.g. lemon juice or the
juice from orange peel, butyric acid, cleanser that contain acetic acid.
Do not allow such substances to come into contact with appliance parts.
Do not use any abrasive cleansers.
Remove the food from the refrigerator. Store it in a cool place, well covered.
Switch the appliance off and remove the plug from the mains, or switch off or turn out
the circuit breaker or fuse.
Clean the appliance and the interior accessories with a cloth and lukewa
rm water.
Commercially available dish washing detergents may also be used.
After cleaning wipe with fresh water and rub dry.
Accumulation of dust at the condenser increases energy consumption.
For this reason carefully clean the condenser at the back of the appliance once a
year with a soft brush or a vacuum cleaner.
Check the water drain hole on the rear wall of the fridge.
Clear a blocked drain hole with the aid of the green peg in the pack of accessories
included with the appliance.
After everything is dry place appliance back into service.
Energy Saving tips
1. Do not place warm foods into the appliance. Allow warm foods to cool first. Do
not install the appliance near cookers, radiators or other sources of warmth.
High ambient temperatures cause longer, more frequent operation of the
compressor
2. In order to make the cooling system work efficiently, please make sure the side
plates and back plate of the product are with some distance from the wall. It is
strongly recommended that the distance should be more than 50mm.
3. When the product works, please do not open the door too often or leave the
door open any longer than necessary.
4. Do not set temperature any colder than necessary.
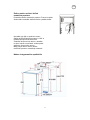
5. The sketch map shows the right combination of the drawers, baskets and
shelves which can lead to the more
energy efficiency. If users adjusted the
combination, it would result the energy-consuming.
Trouble shooting
Correcting Malfunctions
Spare parts:
The following spare parts can be ordered.
You can fit these yourself without any special skill or training, e.g.:
butter/cheese compartment,
egg holders,
door racks,
fruit and vegetable drawers,

18
storage racks.
A malfunction may be caused by only a minor fault that you can rectify yourself using
the following instructions. Do not perform any other work on the appliance if the
following information does not provide assistance in your specific case.
Important!
Repairs to refrigerators/freezers may only be performed by competent service
engineers. Improper repairs can give rise to significant hazards for the user. If your
appliance needs repairing, please contact your specialist dealer or your local Service
Force Center.
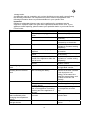
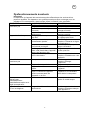
Symptom Possible Cause Remedy
Appliance is not switched on. Switch on the appliance.
Mains plug is not plugged in or is
loose.
Insert mains plug.
Fuse has blown or is defective. Check fuse, replace if
necessary.
Appliance does not work.
Socket is defective. Mains malfunctions are to be
corrected by an electrician.
Appliance cools too much. Temperature is set too cold. Turn the temperature
regulator to a warmer setting
temporarily.
Temperature is not properly
adjusted.
Please look in the “initial Start
Up” section.
Door was open for an extended
period.
Open the door only as long
as necessary.
A large quantity of warm food was
placed in the appliance within the
last 24 hours.
Turn the temperature
regulation to a colder setting
temporarily.
The food is too warm.
The appliance is near a heat
source.
Please look in the “installation
location” section.
Interior lighting does not
work.
Light bulb is defective. Please look in the “changing
the Light Bulb “section.
Heavy build-up of frost,
possibly also on the door
seal.
Door seal is not air-tight(possibly
after reversing the door).
Carefully warm the leaking
sections of the door seal with
a hair dryer(on a cool
setting). At the same time
shape the warmed door seal
by hand such that it sits
correctly.
Appliance is not level. Readjust the feet.
The appliance is touching the wall
or other objects.
Move the appliance slightly.
Unusual noises.
A component, e.g. a pipe, on the
rear of the appliance is touching
another part of the appliance or
the wall.
If necessary, carefully bend
the component out of the
way.
The compressor does not
start immediately after
changing the temperature
setting.
This is normal, no error has
occurred.
The compressor starts after a
period of time.
Water on the floor or
storage shelves.
Water drain hole is blocked. See the “cleaning and care”
section.

19
La pagina si sta caricando...
La pagina si sta caricando...
La pagina si sta caricando...
La pagina si sta caricando...
La pagina si sta caricando...
La pagina si sta caricando...
La pagina si sta caricando...
La pagina si sta caricando...
La pagina si sta caricando...
La pagina si sta caricando...
La pagina si sta caricando...
La pagina si sta caricando...
La pagina si sta caricando...
La pagina si sta caricando...
La pagina si sta caricando...
La pagina si sta caricando...
La pagina si sta caricando...
La pagina si sta caricando...
La pagina si sta caricando...
La pagina si sta caricando...
La pagina si sta caricando...
La pagina si sta caricando...
La pagina si sta caricando...
La pagina si sta caricando...
La pagina si sta caricando...
La pagina si sta caricando...
La pagina si sta caricando...
La pagina si sta caricando...
La pagina si sta caricando...
La pagina si sta caricando...
La pagina si sta caricando...
La pagina si sta caricando...
La pagina si sta caricando...
La pagina si sta caricando...
La pagina si sta caricando...
La pagina si sta caricando...
La pagina si sta caricando...
La pagina si sta caricando...
La pagina si sta caricando...
La pagina si sta caricando...
La pagina si sta caricando...
La pagina si sta caricando...
La pagina si sta caricando...
La pagina si sta caricando...
La pagina si sta caricando...
La pagina si sta caricando...
La pagina si sta caricando...
La pagina si sta caricando...
La pagina si sta caricando...
La pagina si sta caricando...
La pagina si sta caricando...
La pagina si sta caricando...
La pagina si sta caricando...
La pagina si sta caricando...
La pagina si sta caricando...
La pagina si sta caricando...
La pagina si sta caricando...
La pagina si sta caricando...
La pagina si sta caricando...
La pagina si sta caricando...
La pagina si sta caricando...
La pagina si sta caricando...
La pagina si sta caricando...
La pagina si sta caricando...
La pagina si sta caricando...
La pagina si sta caricando...
La pagina si sta caricando...
La pagina si sta caricando...
La pagina si sta caricando...
La pagina si sta caricando...
La pagina si sta caricando...
La pagina si sta caricando...
La pagina si sta caricando...
La pagina si sta caricando...
La pagina si sta caricando...
La pagina si sta caricando...
La pagina si sta caricando...
La pagina si sta caricando...
La pagina si sta caricando...
La pagina si sta caricando...
La pagina si sta caricando...
La pagina si sta caricando...
La pagina si sta caricando...
La pagina si sta caricando...
La pagina si sta caricando...
La pagina si sta caricando...
La pagina si sta caricando...
La pagina si sta caricando...
La pagina si sta caricando...
La pagina si sta caricando...
La pagina si sta caricando...
La pagina si sta caricando...
La pagina si sta caricando...
La pagina si sta caricando...
La pagina si sta caricando...
La pagina si sta caricando...
La pagina si sta caricando...
La pagina si sta caricando...
La pagina si sta caricando...
La pagina si sta caricando...
La pagina si sta caricando...
La pagina si sta caricando...
La pagina si sta caricando...
La pagina si sta caricando...
La pagina si sta caricando...
La pagina si sta caricando...
La pagina si sta caricando...
La pagina si sta caricando...
La pagina si sta caricando...
La pagina si sta caricando...
La pagina si sta caricando...
La pagina si sta caricando...
La pagina si sta caricando...
La pagina si sta caricando...
La pagina si sta caricando...
La pagina si sta caricando...
La pagina si sta caricando...
La pagina si sta caricando...
La pagina si sta caricando...
La pagina si sta caricando...
La pagina si sta caricando...
La pagina si sta caricando...
La pagina si sta caricando...
La pagina si sta caricando...
La pagina si sta caricando...
La pagina si sta caricando...
La pagina si sta caricando...
La pagina si sta caricando...
La pagina si sta caricando...
La pagina si sta caricando...
La pagina si sta caricando...
La pagina si sta caricando...
La pagina si sta caricando...
La pagina si sta caricando...
La pagina si sta caricando...
La pagina si sta caricando...
La pagina si sta caricando...
La pagina si sta caricando...
La pagina si sta caricando...
La pagina si sta caricando...
La pagina si sta caricando...
-
 1
1
-
 2
2
-
 3
3
-
 4
4
-
 5
5
-
 6
6
-
 7
7
-
 8
8
-
 9
9
-
 10
10
-
 11
11
-
 12
12
-
 13
13
-
 14
14
-
 15
15
-
 16
16
-
 17
17
-
 18
18
-
 19
19
-
 20
20
-
 21
21
-
 22
22
-
 23
23
-
 24
24
-
 25
25
-
 26
26
-
 27
27
-
 28
28
-
 29
29
-
 30
30
-
 31
31
-
 32
32
-
 33
33
-
 34
34
-
 35
35
-
 36
36
-
 37
37
-
 38
38
-
 39
39
-
 40
40
-
 41
41
-
 42
42
-
 43
43
-
 44
44
-
 45
45
-
 46
46
-
 47
47
-
 48
48
-
 49
49
-
 50
50
-
 51
51
-
 52
52
-
 53
53
-
 54
54
-
 55
55
-
 56
56
-
 57
57
-
 58
58
-
 59
59
-
 60
60
-
 61
61
-
 62
62
-
 63
63
-
 64
64
-
 65
65
-
 66
66
-
 67
67
-
 68
68
-
 69
69
-
 70
70
-
 71
71
-
 72
72
-
 73
73
-
 74
74
-
 75
75
-
 76
76
-
 77
77
-
 78
78
-
 79
79
-
 80
80
-
 81
81
-
 82
82
-
 83
83
-
 84
84
-
 85
85
-
 86
86
-
 87
87
-
 88
88
-
 89
89
-
 90
90
-
 91
91
-
 92
92
-
 93
93
-
 94
94
-
 95
95
-
 96
96
-
 97
97
-
 98
98
-
 99
99
-
 100
100
-
 101
101
-
 102
102
-
 103
103
-
 104
104
-
 105
105
-
 106
106
-
 107
107
-
 108
108
-
 109
109
-
 110
110
-
 111
111
-
 112
112
-
 113
113
-
 114
114
-
 115
115
-
 116
116
-
 117
117
-
 118
118
-
 119
119
-
 120
120
-
 121
121
-
 122
122
-
 123
123
-
 124
124
-
 125
125
-
 126
126
-
 127
127
-
 128
128
-
 129
129
-
 130
130
-
 131
131
-
 132
132
-
 133
133
-
 134
134
-
 135
135
-
 136
136
-
 137
137
-
 138
138
-
 139
139
-
 140
140
-
 141
141
-
 142
142
-
 143
143
-
 144
144
-
 145
145
-
 146
146
-
 147
147
-
 148
148
-
 149
149
-
 150
150
-
 151
151
-
 152
152
-
 153
153
-
 154
154
-
 155
155
-
 156
156
-
 157
157
-
 158
158
-
 159
159
-
 160
160
-
 161
161


ROSIERES CBO 150E Manuale utente
- Tipo
- Manuale utente
- Questo manuale è adatto anche per
Documenti correlati
Altri documenti
-
Candy CIO 225E Manuale utente
-
Hoover HBOD 882 E Manuale utente
-
Candy CCOUN 5162WH Manuale utente
-
-
Samsung RB41J7859S4 Manuale del proprietario
-
Samsung RSJ1KERS Manuale utente
-
Samsung RSH1DBPE Manuale utente
-
Samsung RS7568THCSR Manuale utente
-
Samsung RSH7ZNRS Manuale utente
-