
IT
Tosaerba con conducente a piedi -
MANUALE DI ISTRUZIONI
ATTENZIONE: prima di usare la macchina, leggere attentamente il presente libretto
EN
Pedestrian controlled lawnmower
- OPERATOR’S MANUAL
WARNING: read thoroughly the instruction booklet before using the machine.
CS
Sekačka se stojící obsluhou
SK
Kosačka so stojacou obsluhou
171505670/7 10/2022
NTL 434-R
NTL 434 TR-R
NTL 484-R
NTL 484 TR-R
NTL 484 TR/E-R


1
ITALIANO - Istruzioni Originali ............................................................................................. IT
ENGLISH - Translation of the original instruction .................................................................... EN
................................................................... CS
......................................................... SK

2
11 13 12
14 15
17 18 19
16
6 14
23 75
9 8
41
42
43
NTL 434-R, NTL 434 TR-R NTL 484-R, NTL 484 TR-R
NTL 484 TR/E-R
kW 1,5 ÷ 2,75 1,5 ÷ 3,3
min-1 2800±100 ÷
2900±100
2800±100 ÷
2900±100
kg 31 - 33 33 - 44
cm 41 46
dB(A)
dB(A)
79
1,37
80
2,01
dB(A)
dB(A)
93
0,9
96
1,09
dB(A) 94 96
m/s2
m/s2
6
1,35
4,8
1,53
81004341/3 81004458/0
36
ab
44
45
46
IMPORTER FOR UK
2

3
1 1
2
2
3
34
5 5
6 6
8
7
9
10
1.1
12 11
13
1515 1116
12
14
15
5-7 mm
16
1.2
1.3

4
1
1
1
2
2.1 2.2 2.3
3.1
3.2a
2.4
4
4
6
3.2b
I
III IV

5
4.1
1
3.3
1
6
3.2b
4.2
3.5

6
EN
IMPORTANT - READ CAREFULLY BEFORE USING THE MACHINE. Keep for future reference
Replace damaged or unreadable labels (see pictures on page 2).
41. Warning: Read the instruction manual before using the machine.
42. Risk of thrown objects. Keep all persons away from the work area
whilst mowing.
43. Danger of cutting yourself
feet near or under the opening of the blade housing. Disconnect
the spark plug cap and read the instructions before carrying out any
maintenance or repairs.
44. Only for electric lawnmowers
45. Only for electric lawnmowers
46. Danger of cutting yourself
near or under the opening of the blade housing.
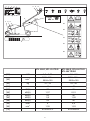
Technical specications (see page 2)
[61] Nominal power
[62] Max. engine operation speed
[63] Machine weight
[64] Cutting width
[65]
[66] Measurement uncertainty
[67]
[68]
[69]
[70] Blade code
SAFETY REGULATIONS
to be observed scrupulously
A) TRAINING
1) Read the instructions carefully. Become familiar with the controls and
the proper use of the lawnmower. Learn how to stop the engine quickly.
use the lawnmower. Local regulations can restrict the minimum age of
the operator.
– when people, especially children or pets are nearby;
– if the operator is tired or unwell, or has taken medicine, drugs, alcohol
4) Bear in mind that the operator or user is responsible for accidents or
B) PRELIMINARY OPERATIONS
1) While mowing, always wear sturdy slip-resistant footwear and long
trousers. Do not operate the lawnmower when barefoot or wearing open
sandals.
be thrown by the machine or damage the cutting unit or engine (stones,
branches, iron wire, bones, etc.).
– store the fuel in suitable containers;
petrol tank cap while the engine is running or when it is hot;
– always put the tank and fuel container caps back on and tighten well;
4) Replace faulty silencers
5) Before use, always inspect generally the machine and in particular:
return automatically and rapidly back to the neutral position determining
cutting means stopping;
- to see that the blade, screws and cutting unit are not worn or damaged.
-
place damaged or unreadable labels.
GETTING TO KNOW THE MACHINE
DESCRIPTION OF THE MACHINE AND ITS RANGE OF USE
This machine is a garden equipment, namely a pedestrian controlled lawn-
mower.
enclosed in a casing, equipped with wheels and a handle. The operator
is able to operate the machine and use the main controls, always staying
behind the handle at a safe distance from the rotating blade. If the operator
Intended use
This machine was designed and manufactured for cutting (and collecting)
grass in gardens and grassy areas, in areas in proportion to its cutting
capacity, done by a pedestrian operator. The presence of accessories or
grass on the ground.
Improper use 
things. Examples of improper use may include, but are not limited to:
– transporting persons, children or animals on the machine;
– letting oneself be transported by the machine;
– using the machine to tow or push loads;
– using the machine for leaf or debris collection;
grass;
– use of the machine by more than one person;
– using the blades on surfaces other than grass.
IDENTIFICATION LABEL AND MACHINE COMPONENTS
(see pictures on page 2)
1.
2. Conformity marking
3.
4. Type of lawnmower
5. Serial number
6. Name and address of Manufacturer
7. Article Code
8. Engine power and speed
9. Machine mass with empty tank in kg.
11. Chassis
12. Engine
13. Blade (Blade)
14. Stone-guard
15. Grass-catcher
16. Handle
17. Throttle trigger
18.
19.
-
bers (3 - 4 - 5) in the spaces on the last page of the manual.
The example of the declaration of conformity can be found on the penulti-
mate page of the manual.
DESCRIPTION OF SYMBOLS ON CONTROLS
(where applicable) (see pictures on page 2)
21. Slow 22. Fast 23. Choke
24. Engine Stop 25
26. Idle 27. Engine ignition
36. Grass-catcher contents indicator: lifted (a) = empty / lowered (b) = full
SAFETY REQUIREMENTS
remind you of the main precautions to be taken. Their meaning is explained

7
C) DURING USE
-
ditions.
there is a thunderstorm risk.
7) Be extremely carefully when changing directions on slopes.
8) Do not mow on land that slopes more than 20°.
10) Be extremely careful when pull the lawnmower toward you.
11) Immobilise the blade if the lawnmower must be inclined for transport,
transported from or to an area that must be cut.
grass-catcher or stone-guard.
13) Do not tamper with or disable safety systems.
the engine.
16) Start up the engine carefully according to the instructions, keeping feet
away from the blade.
17) Do not incline the lawnmower for start up. Start up the machine on a
keep away from the discharge opening.
19) Do not start the machine when standing in front of the discharge open-
ing.
20) Do not lift or transport the lawnmower when the engine is running.
21) Stop the engine and disconnect the spark plug cable:
-
ging the chute:
– before checking, cleaning or working on the lawnmower;
the lawnmower and make the necessary repairs before using it again;
inspections).
22) Stop the engine:
models with electric start up;
– before refuelling;
fuel supply when mowing is done, following the instructions in the engine
manual.
24) When mowing, always keep a safe distance from the rotary blades,
25) WARNING - If something breaks or an accident occurs during mowing,
-
and contact the medical authorities for any necessary health care. Carefully
should it not be seen.
-
maintenance, wear ear protection, make breaks during the work.
D) MAINTENANCE AND STORAGE
1) Keep all nuts and screws tight to be sure the equipment is in safe
working condition. Routine maintenance is essential for safety and for
2) Do not store the lawnmower with fuel in the tank in an area where fuel
3) Allow the engine to cool before storing the lawnmower in any enclosure.
5) Check the stone-guard and grass-catcher frequently for wear or de-
terioration.
6) If the fuel tank has to be emptied, this should be done outdoors once
the engine has cooled down.
8) Keep the blade balanced during sharpening. All work on the blade
(disassembly, sharpening, balancing, reassembly and/or replacing) are
parts. Parts must be replaced and not repaired. Use original spare parts.
Parts that are not of the same quality can damage the equipment and
impair your safety
E) TRANSPORTATION AND HANDLING
you must:
the weight and its distribution.
– use an appropriate number of people for the weight of the machine and
or collected.
2) During transport, fasten the machine securely with cables or chains.
OPERATING INSTRUCTIONS
For information on the engine and the battery (if supplied), read the
relevant manuals.
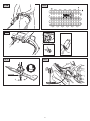
1. COMPLETE ASSEMBLY
NOTE - The number which precedes each paragraph links the refer-
ences in the text to the respective illustrations (listed on page 2 and
following pages).
NOTE - The machine can be supplied with some parts already as-
sembled.
WARNING - Unpacking and completing the assembly should be done
on a at and stable surface, with enough space for moving the ma-
chine and its packaging, always using suitable equipment.
Disposal of the packaging should be done in accordance with the
local regulations in force.
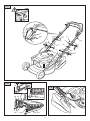
1.1 Handle assembly
Loosen the two lower nuts (1).
Return the lower part of the handle, which is made up of two pre-assembled
elements (2), to the work position and lock into place by means of the nuts
(1) and the lower knobs (3).
Fit the upper part of the handle (4) to the lower ones (2) by means of the
clamps (5), as shown.
The ring nuts (6) on the clamps (5) must be screwd so they keep the top
Hook the starter cable (7) to the guide spiral (8).
Tighten the nut (9) to secure the spiral 8).
Fit the cable clamp (10) as shown and secure the control cables.
1.2 Grass-catcher assembly
With the plastic part (11) upside-down, fasten the frame (12) to the plastic
part using the screws (13). Insert the frame (12) into the sack (14) and

8
(11), starting 5-7 mm from the ends.
1.3 Battery connection (if present)
• Electric key ignition models
Connect the battery cable to the general wiring connector on the lawn-
mower.
• Electric push-button ignition models
3.2b, “III - “IV”).
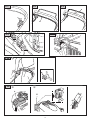
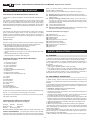
2. CONTROL DESCRIPTION
NOTE - The meanings of the symbols on controls are explained in
the previous pages.
2.1 Throttle
of a throttle.
2.2 Blade brake
the handle for ignition and during lawnmower operations.
.
STOP
14356687/2
release: engine stop.
IMPORTANT - The blade must stop within a few seconds of when the
lever is released; if you notice that more time is required for it to stop,
contact a Specialised Centre immediately.
2.3 Drive lever (if provided)
.
2.4 Cutting height adjustment
DO THIS WHEN THE BLADE IS STOPPED.
3. GRASS CUTTING
3.1 Fastening the grass-catcher
Lift the stone-guard and fasten the grass-catcher (1) correctly as shown
in the illustration.
3.2 Engine ignition
During ignition, follow the instructions in the engine manual.
3.2a
• Manual ignition models (“I”)
the knob on the ignition cable (2).
• Electric key ignition models
ignition key (3).
3.2b
• Electric push-button ignition models (“III - “IV”)
-
NOTE Keep pulling the engine / cutting means brake or the engine
will stop.
– Press and hold the starter button until the engine switches on (6).
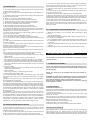
3.3 Grass cutting
directions at the same height.
• If there is a grass-catcher with contents indicator device (if appli-
cable): while working, with the blade in motion, the indicator remains
lifted as long as the grass-catcher is able to hold cut grass; when it
lowers, it means that the grass-catcher is full and it must be emptied.
3.4 Emptying the grass-catcher
the sound of the lawnmower changes and the grass-catcher is no longer
– stop the engine and wait for the blade to stop;
keeping it in an erect position.
3.5 When work is finished
-
nect the spark plug cap (2).
• Electric key ignition models
• Electric push-button ignition models
WAIT UNTIL THE CUTTING MEANS STOPS before proceeding any
further.
3.6 Lawn care recomendation
ways to care for the lawn; always read the instructions on seed boxes for
mowing height for the growth conditions in the work area.
Keep in mind that the most grass is made up of a stem and one or more lea-
The following indications generally apply:
• too low a cut causes grass tears and uprooting, with a “spotted” aspect;
grass and tear the lawn;
• for particularly high grass, initially mow at maximum admitted machine
height followed by a second mow after two or three days.
4. ROUTINE MAINTENANCE
MPORTANT - Routine and accurate maintenance is essential in maintain-
.
Store the lawnmower in a dry place.
1)
machine.
2)
drying and causing problems the next time the lawnmower is used.
select the lowest cutting height and always stand behind the lawnmower
handle when cleaning
-
of the rust that would lead to corrotion of the metal .

9
The mower’s blade housing is
dirty underneath
Clean the blade housing so as to
to the grass box
3. Mower struggles to cut grass
The blade is not in good
conditions
Sharpen the blade or replace it
For any doubts or problems, please do not hesitate to contact your
.
5) If accessing the lower part is necessary, only tilt the machine on the
.
6) Do not drip petrol onto the plastic parts of the engine or the machine
-
by petrol.
4.1 Blade maintenance
that has the most appropriate tools.
On this machine must be used blades with code shown in the table on
page 2.
time by others, with similar interchangeable and operating safety features.
Reassemble the blade (2) with the code facing the ground, following the
steps indicated in the illustration.
Tighten the central screw (1) using a torque wrench set to 35-40 Nm.
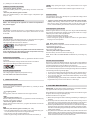
4.2 Battery recharging (where applicable)
• Electric key ignition models
the instructions in the battery maintenance manual.
Do not connect the battery charger directly to the engine terminal. It is
not possible to ignite the engine using the battery charger as a power
source, as it may get damaged.
If you do not use the lawnmower for a long period of time, disconnect
• Electric push-button ignition models
Read the engine instruction manual for instructions regarding autono-
my, recharging, reinstating and maintenance of the battery.
5. ENVIRONMENTAL PROTECTION
.
– Try not to cause any disturbance to the surrounding area.
– Scrupulously comply with local regulations for the disposal of waste ma-
terials after mowing.
– Seguire scrupolosamente le norme locali per lo smaltimento di imballi,
Scrupulously comply with local regulations for the disposal of packaging,
this waste must not be disposed of as normal waste, it must be separated
recycled.
– -
regulations in force.
6. DIAGNOSTIC
What to do when ...
Source of problem
1. Petrol mower does not work
There is no oil or fuel in the
engine
not in working order
Clean the spark plug and the
replace
The fuel has not been emptied
by the mower at the end of last
season
the carburetor side
2. Cut grass is not blown into the grass box
Sharpen, the blade or replace it.
Check the guides which direct the
grass towards the grass box

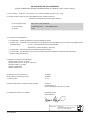
DICHIARAZIONE CE DI CONFORMITÀ (Istruzioni Originali)
(Direttiva Macchine 2006/42/CE, Allegato II, parte A)
1. La Società: ST. S.p.A. – Via del Lavoro, 6 – 31033 Castelfranco Veneto (TV) – Italy
2. Dichiara sotto la propria responsabilità, che la macchina:
Tosaerba con conducente a piedi (taglio erba)
3. È conforme alle speciche delle direttive:
• MD: 2006/42/EC
• OND: 2000/14/EC, ANNEX VI - 2005/88/EC
e) Notied body N. 0197 – TÜV Rheinland LGA Products GmbH
Tillystrasse 2, 90431 Nürnberg – Germany
• EMCD: 2014/30/EU
• RoHS II: 2011/65/EU - 2015/863/EU
4. Riferimento alle norme armonizzate::
g) Livello di potenza sonora misurato:
h) Livello di potenza sonora garantito:
i) Ampiezza di taglio::
n) Persona autorizzata a costituire il Fascicolo Tecnico:
o) Castelfranco Veneto, 01/10/2022 CEO Stiga Group
Sean Robinson
171514006/12
93 dB(A)
94 dB(A)
41 cm
ST. S.p.A.
Via del Lavoro, 6
31033 Castelfranco Veneto (TV) - Italia
EN ISO 5395-1:2013 + A1:2018
EN ISO 5395-2:2013 + A1:2016 + A2:2017
EN 55012:2007 + A1:2009
EN ISO 14982:2009
EN IEC 63000:2018
a) Tipo / Modello Base: NTL 434-R - NTL 434-TR-R
c) Numero di Serie: 22A••WBH000001 ÷ 99L••WBH999999
d) Motore:: a scoppio

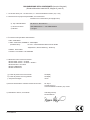
UK DECLARATION OF CONFORMITY
(Supply of Machinery (Safety) Regulations 2008, S.I. 2008 No. 1597, Annex II, part A)
1. The company: ST. S.p.A. – Via del Lavoro, 6 – 31033 Castelfranco Veneto (TV) – Italy
2. Hereby declares under its own responsibility that the machine (function):
Pedestrian-controlled lawn mower (grass cutting)
3. Conforms to UK Regulations:
• S.I. 2008/1597 - Supply of Machinery (Safety) Regulations 2008
• S.I. 2001/1701 - Schedule 9 - Noise Emission in the Environment by Equipment for use Outdoors Regulations 2001
e) Notied body: N. 0197 – TÜV Rheinland LGA Products GmbH
Tillystrasse 2, 90431 Nürnberg – Germany
• S.I. 2016/1091 - Electromagnetic Compatibility Regulations 2016
• S.I. 2012/3032 - The Restriction of the Use of Certain Hazardous Substances in Electrical and Electronic
Equipment Regulations 2012
4. Reference to harmonised standards:
g) Measured sound power level:
h) Guaranteed sound power level:
i) Cutting width:
n) Person authorised to compile the technical le:
o) Castelfranco Veneto, 01/10/2022 CEO Stiga Group
Sean Robinson
171514006/12
ST. S.p.A.
Via del Lavoro, 6
31033 Castelfranco Veneto (TV) - Italia
EN ISO 5395-1:2013 + A1:2018
EN ISO 5395-2:2013 + A1:2016 + A2:2017
EN 55012:2007 + A1:2009
EN ISO 14982:2009
EN IEC 63000:2018
93 dB(A)
94 dB(A)
41 cm
a) Homologation type: NTL 434-R - NTL 434-TR-R
c) Serial number: 22A••WBH000001 ÷ 99L••WBH999999
d) Engine: petrol
STIGA LTD
Unit 8, Bluewater Estate Plympton,
Devon, PL7 4JH, England
UK Importer:

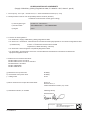
DICHIARAZIONE CE DI CONFORMITÀ (Istruzioni Originali)
(Direttiva Macchine 2006/42/CE, Allegato II, parte A)
1. La Società: ST. S.p.A. – Via del Lavoro, 6 – 31033 Castelfranco Veneto (TV) – Italy
2. Dichiara sotto la propria responsabilità, che la macchina:
Tosaerba con conducente a piedi (taglio erba)
3. È conforme alle speciche delle direttive:
• MD: 2006/42/EC
• OND: 2000/14/EC, ANNEX VI - 2005/88/EC
e) Notied body N. 0197 – TÜV Rheinland LGA Products GmbH
Tillystrasse 2, 90431 Nürnberg – Germany
• EMCD: 2014/30/EU
• RoHS II: 2011/65/EU - 2015/863/EU
4. Riferimento alle norme armonizzate::
g) Livello di potenza sonora misurato:
h) Livello di potenza sonora garantito:
i) Ampiezza di taglio::
n) Persona autorizzata a costituire il Fascicolo Tecnico:
o) Castelfranco Veneto, 01/10/2022 CEO Stiga Group
Sean Robinson
171513905/13
96 dB(A)
96 dB(A)
46 cm
ST. S.p.A.
Via del Lavoro, 6
31033 Castelfranco Veneto (TV) - Italia
EN ISO 5395-1:2013 + A1:2018
EN ISO 5395-2:2013 + A1:2016 + A2:2017
EN 55012:2007 + A1:2009
EN ISO 14982:2009
EN IEC 63000:2018
a) Tipo / Modello Base: NT 484 •••• - NTL 484 ••••
c) Numero di Serie: 22A••WBH000001 ÷ 99L••WBH999999
d) Motore:: a scoppio

UK DECLARATION OF CONFORMITY
(Supply of Machinery (Safety) Regulations 2008, S.I. 2008 No. 1597, Annex II, part A)
1. The company: ST. S.p.A. – Via del Lavoro, 6 – 31033 Castelfranco Veneto (TV) – Italy
2. Hereby declares under its own responsibility that the machine (function):
Pedestrian-controlled lawn mower (grass cutting)
3. Conforms to UK Regulations:
• S.I. 2008/1597 - Supply of Machinery (Safety) Regulations 2008
• S.I. 2001/1701 - Schedule 9 - Noise Emission in the Environment by Equipment for use Outdoors Regulations 2001
e) Notied body: N. 0197 – TÜV Rheinland LGA Products GmbH
Tillystrasse 2, 90431 Nürnberg – Germany
• S.I. 2016/1091 - Electromagnetic Compatibility Regulations 2016
• S.I. 2012/3032 - The Restriction of the Use of Certain Hazardous Substances in Electrical and Electronic
Equipment Regulations 2012
4. Reference to harmonised standards:
g) Measured sound power level:
h) Guaranteed sound power level:
i) Cutting width:
n) Person authorised to compile the technical le:
o) Castelfranco Veneto, 01/10/2022 CEO Stiga Group
Sean Robinson
171513905/13
ST. S.p.A.
Via del Lavoro, 6
31033 Castelfranco Veneto (TV) - Italia
EN ISO 5395-1:2013 + A1:2018
EN ISO 5395-2:2013 + A1:2016 + A2:2017
EN 55012:2007 + A1:2009
EN ISO 14982:2009
EN IEC 63000:2018
96 dB(A)
96 dB(A)
46 cm
a) Homologation type: NT 484 •••• - NTL 484 ••••
c) Serial number: 22A••WBH000001 ÷ 99L••WBH999999
d) Engine: petrol
STIGA LTD
Unit 8, Bluewater Estate Plympton,
Devon, PL7 4JH, England
UK Importer:

EN (Translation of the original instruction)
EC Declaration of Conformity
(Machine Directive 2006/42/EC, Annex II, part A)
1. The Company
2. Herby declares under its own responsibility that the
machine: Pedestrian controlled lawn mower / Grass
cutting
a) Type / Base Model
c) Serial number
d) Motor: petrol
3. Conforms to directive specifications:
e) Certifying body
4. Reference to harmonised Standards
g) Sound power level measured
h) Sound power level guaranteed
i) Range of cut
n) Person authorised to create the Technical Folder:
o) Place and Date
CS (Překlad původního návodu k používání)
ES – Prohlášení o shodě
(Směrnice o Strojních zařízeních 2006/42/ES, Příloha II,
část A)
1. Společnost
2. Prohlašuje na vlastní odpovědnost, že stroj: Sekačka
se stojící obsluhou / sekačka na trávu
a) Typ / Základní model
c) Výrobní číslo
d) Motor: spalovací motor
3. Je ve shodě s nařízeními směrnic:
e) Certifikační orgán
4. Odkazy na Harmonizované normy
g) Naměřená úroveň akustického výkonu
h) Zaručená úroveň akustického výkonu
i) Šířka řezání
n) Osoba autorizovaná pro vytvoření Technického
spisu:
o) Místo a Datum
SK (Preklad pôvodného návodu na použitie)
ES vyhlásenie o zhode
(Smernica o Strojných zariadeniach 2006/42/ES,
Príloha II, časť A)
1. Spoločnosť
2. Vyhlasuje na vlastnú zodpovednosť, že stroj:
Kosačka so stojacou obsluhou / kosačka na trávu
a) Typ / Základný model
c) Výrobné číslo
d) Motor: spaľovací motor
3. Je v zhode s nariadeniami smerníc:
e) Certifikačný orgán
4. Odkaz na Harmonizované normy
g) Nameraná úroveň akustického výkonu
h) Zaručená úroveň akustického výkonu
i) Šírka kosenia
j) Čistý inštalovaný výkon
n) Osoba autorizovaná na vytvorenie Technického
spisu:
o) Miesto a Dátum

© by ST. S.p.A.
IT • Il contenuto e le immagini del presente manuale d’uso sono stati realizzati per conto di ST. S.p.A. e sono tutelati da diritto d’autore – E’
vietata ogni riproduzione o alterazione anche parziale non autorizzata del documento.
EN • The content and images in this User Manual were produced expressly for ST. S.p.A. and are protected by copyright – any unauthori-
sed reproduction or modication to the document, either partially or in full, is prohibited.
CS • Obsah a obrázky v tomto návodu k použití byly zpracovány jménem společnosti ST. S.p.A. a jsou chráněny autorským právem –
Reprodukce či nepovolené pozměňování tohoto dokumentu, a to i částečné, je zakázáno.
SK • Obsah a obrázky v tomto návode na používanie boli spracované menom spoločnosti ST. S.p.A. a sú chránené autorským právom –
Reprodukcie či nepovolené pozmeňovanie tohto dokumentu, a to aj čiastočné, je zakázané.

ST. S.p.A.
Via del Lavoro, 6
31033 Castelfranco Veneto (TV) ITALY
STIGA LTD (UK Importer)
Unit 8, Bluewater Estate Plympton,
Devon, PL7 4JH, England
dB
L
WA
Type:
................................
.................. -s/n ........................................
Art.N .......................................................
-
 1
1
-
 2
2
-
 3
3
-
 4
4
-
 5
5
-
 6
6
-
 7
7
-
 8
8
-
 9
9
-
 10
10
-
 11
11
-
 12
12
-
 13
13
-
 14
14
-
 15
15
-
 16
16
-
 17
17
-
 18
18


