Ingo Maurer aR-ingo Istruzioni per l'uso
- Tipo
- Istruzioni per l'uso

aR-ingoInstructions

Deutsch Seite 4
English Page 6
Français Page 8
Italiano Pagina 10
Zeichnungen Seite 12
Drawings Page 12
Dessins Page 12
Disegni Pagina 12
3
Montageanleitung
Bitte vor der Montage aufmerksam lesen und aufbe-
wahren!
Instructions for assembly
Please read these instructions carefully before going
any further, and keep them in a safe place for future
reference!
Instructions de montage
Alire attentivement avant le montage et à conserver
soigneusement!
Istruzioni di montaggio
Prima del montaggio leggereattentamente le pre-
senti istruzionieconservarle!
2

Einsetzen des Leuchtmittels
Wichtig: Das Leuchtmittel nicht mit bloßen Händen
berühren (Einbrenngefahr)!
Drehen Sie das Leuchtmittel vorsichtig von oben in die
Fassung ein. Beachten Sie bitte dabei, dass die Aluminium-
wabe (3)scharfe Kanten haben könnte:Verletzungsgefahr! 2
Wechsel des Leuchtmittels
Achtung: Ziehen Sie den Netzstecker und lassen Sie die
Aluminiumwabe und das Leuchtmittel vollständig abkühlen!
Das neue Leuchtmittel nicht mit bloßen Händen berühren
(Einbrenngefahr).
Drehen Sie das defekte Leuchtmittel vorsichtig von oben
aus der Fassung heraus und setzen Sie das neue Leuchtmit-
tel ein. Beachten Sie bitte dabei, dass die Aluminiumwabe (3)
scharfe Kanten haben könnte:Verletzungsgefahr! 2
Pflege
Die brünierte Grundplatte der Leuchte sollte mit beilie-
gendem Ölpflegetuch eingerieben werden, um Korrosion
vorzubeugen. Bitte beachten Sie die Herstellerangaben.
Technische Daten
230 V: max. 150 Watt, klar, Sockel E27.
125 V: Leuchtmittel: Standard A-19, max. 150 W, klar,
Sockel E27.
Eventuell notwendige Reparaturen dürfen nur von einer
Elektrofachkraft durchgeführt werden. Die äußere Leitung
darf bei Beschädigung nur von der Ingo Maurer GmbH
ausgetauscht werden.
Achtung: Die Lampe nur in spannungsfreiem Zustand
montieren! Schließen Sie die Lampe erst nach abgeschlos-
sener Montage und dem Einsetzen des Leuchtmittels an
das Netz an.
aR-ingo ist ein in Handarbeit hergestelltes Produkt: Ab-
weichungen in der Form der Wabenstruktur sind möglich.
Beigepackt sind
1Inbusschlüssel
1Leuchtmittel
1Ölpflegetuch
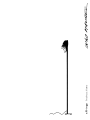
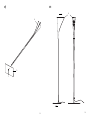
Montage
Legen Sie die Leuchte flach auf den Boden oder einen
Tisch.Verwenden Sie eine weiche Unterlage, um Kratzer
auf den Oberflächen zu vermeiden. Schrauben Sie mit dem
beiliegenden Inbusschlüssel die Befestigungsschraube (1)
am Ende des Leuchtenfußes ganz heraus.
Halten Sie die Oberseite der Fußplatte (2)mit der Bohrung
so an das Ende des Leuchtenfußes, dass der längere Teil der
Fußplatte nach unten und die Aluminiumwabe (3)nach
oben zeigt. 1
Achten Sie bitte darauf, dass das Zuleitungskabel nicht
zwischen Leuchtenfuß und Fußplatte eingeklemmt wird.
Schrauben Sie die Befestigungsschraube (1) durch die
Bohrung der Fußplatte bis zum Anschlag in den Leuchten-
fuß ein und ziehen Sie sie mit dem Inbusschlüssel gut fest. 1
Stellen Sie die Leuchte auf die Fußplatte. Die Aluminium-
wabe sollte nun nach hinten, der längere Teil der Fußplatte
nach vorne zeigen. 2
5
4
4
4
4
4
DeutschDeutsch
4
4
4
4
4
4
4
4

English
Please be aware that the aluminium honeycomb (3) may
have sharp edges. 2
Switch the lamp on with the foot switch on the power
lead.
Changing the light bulb
Important: Use only bulbs of the following type with
125 V current: Standard A-19 light bulb 150 W, clear,
E27 base.
Caution: Unplug the lamp and allow the aluminium
honeycomb and the bulb to cool down completely! Do
not touch the bulb with your bare hands (risk of finger-
mark damage)!
Remove the spent bulb by carefully grasping it from above
and screwing it out of the socket, and fit the replacement.
Please be aware that the aluminium honeycomb (3) may
have sharp edges. 2
Cleaning
To prevent corrosion, the browned base plate should be
wiped lightly with the oil-impregnated cloth supplied.
Please follow the manufacturer's instructions.
Technical specification
230 V: max. 150 W, clear, E27 base.
125 V: Standard A-19 light bulb max. 150 W, clear, E27
base.
Any repairs that may become necessary must be carried
out by a professional electrician. In the event of damage
to the external power lead, replacements may only be
fitted by Ingo Maurer GmbH.
6
English
Caution: Leave the lamp unplugged while assembling it.
Do not connect it to the power supply before completing
the assembly and inserting the light bulb.
aR-ingo is a hand-made product: variations in the honey-
comb structure are possible.
Accessories
1 Allen key
1 light bulb
1 oil-impregnated cleaning cloth
Assembly
Lay the lamp flat on the floor or on a table, with some
form of cushioning to prevent damage to the surface.
With the Allen key supplied, undo and remove the retai-
ning screw (1) at the foot of the lamp. Align the base
plate (2) with the drill hole at the foot of the lamp so
that the longer part of the base plate faces downwards
and the aluminium honeycomb (3) upwards. 1
Take care that the power lead does not become trapped
between the foot of the lamp and the base plate.Thread
the retaining screw (1) through the drill-hole in the base
plate,push it into the foot of the lamp until it reaches the
stop,and tighten it with the Allen key. 1
Stand the lamp upright on the base plate.The aluminium
should now face to the rear and the longer part of the
base plate to the front. 2
Inserting the light bulb
Important: Do not touch the bulb with your bare hands
(risk of fingermark damage)!
Carefully grasp the bulb and screw it down into the socket.
4
4
7
4
4
4
4
4
4
4
4
4
4

Français
9
Installer l’ampoule
Important: Ne touchez pas l’ampoule à mains nues
(risque de claquage)!
Vissez prudemment l’ampoule dans la douille. Attention,
les bords de la structure alvéolaire en aluminium (3) peu-
vent être tranchants: risque de blessure! 2
Changer l’ampoule
Attention: Retirez la fiche de secteur et laissez totale-
ment refroidir la structure alvéolaire en aluminium et
l’ampoule! Ne touchez pas la nouvelle ampoule à mains
nues (risque de claquage).
Dévissez prudemment l’ampoule usagée, sortez-la de la
douille par le haut et installez la nouvelle ampoule.
Attention, les bords de la structure alvéolaire en alumini-
um (3) peuvent être tranchants: risque de blessure! 2
Entretien
Afin d’éviter des traces de corrosion veiller à entretenir
le plateau de base bruni avec le chiffon imprégné d‘huile
joint. Veuiller respecter les indications du fabricant.
Informations techniques
230 V: max. 150 watts, claire, culot E27.
125 V: ampoule Standard A-19, max. 150 W, claire, culot
E27.
Seul un électricien spécialisé est autorisé à effectuer les
réparations éventuellement nécessaires. Seule la société
Ingo Maurer GmbH est autorisée à remplacer le câble
extérieur en cas de dommage.
4
4
4
4
8
Français
Attention: La lampe doit impérativement être hors ten-
sion lors du montage! Branchez uniquement la lampe au
réseau une fois le montage terminé et l’ampoule installée.
aR-ingo est un produit entièrement fait à la main. De
minimes différences de constructions sont possibles.
Accessoires
1 clé Allen
1 ampoule
1 chiffon imprégné d‘huile
Montage
Posez la lampe à plat sur le sol ou sur une table. Utilisez
un support doux afin d’éviter de griffer la surface de la
lampe. Dévissez totalement la vis de fixation (1) située à
l’extrémité du pied de la lampe à l’aide de la clé Allen
fournie.
Placez la face supérieure de la plaque de support du pied (2)
avec le trou contre le pied de la lampe de manière à ce
que la partie plus longue de la plaque de support du pied
soit orientée vers le bas et la structure alvéolaire en alu-
minium (3) vers le haut. 1
Veillez à ce que le câble d’alimentation ne soit pas coincé
entre le pied de la lampe et la plaque de support du pied.
Introduisez la vis de fixation (1) dans le trou de la plaque
de support du pied, vissez-la dans le pied de la lampe jus-
qu’à la butée et serrez-la fermement à l’aide de la clé
Allen. 1
Placez la lampe sur la plaque de support du pied. La
structure alvéolaire en aluminium doit maintenant être
orientée vers l’arrière et la partie plus longue de la pla-
que de support du pied vers l’avant. 2
4
4
4
4
4
4
4
4

Attenzione: Collegate la lampada alla rete solamente
dopo aver concluso completamente il montaggio e inserito
la lampadina nel portalampada!
aR-ingo è un oggetto artigianale fatto a mano: alcune diffe-
renze di forma nella struttura a nido d'ape sono normali.
Dotazioni
1 Chiave per esagono incassato (brugola)
1 Lampadina
Montaggio
Posate la lampada orizzontalmente a terra o su un tavolo
dopo aver protetto la superficie con un panno per evitare
che si graffi durante il montaggio!
Inserite completamente la vite di fissaggio (1) nel foro
della base con l’aiuto della chiave in dotazione. Reggete la
base (2) dalla parte superiore e fate combaciare la parte
filettata della vite con l’estremità dello stelo della lampada,
vegliando che la parte lunga della base guardi verso il
basso e il nido d’ape in alluminio (3) verso l’alto.1
Controllate che il cavo elettrico non venga incastrato tra
la base e lo stelo della lampada! Avvitate la vite nello stelo
fino in battuta e stringete forte con la chiave. 1
A questo punto potete alzare la lampada in piedi e posar-
la sulla sua base. La maglia d'alluminio deve essere dietro
e la parte lunga della base davanti. 2
Inserimento della lampadina
Importante: Non maneggiate la lampadina a mani nude
(rischio di bruciature)!
Avvitate cautamente la lampadina, dall’alto, nel portalam-
pada. Fate attenzione perché le maglie d’alluminio(3) pot-
rebbero avere spigoli vivi ed essere taglienti. 2
Accendete la lampada azionando l’interruttore sul cavo a
terra.
Sostituzione della lampadina
Attenzione: Togliete la spina dalla presa e aspettate che,
sia le maglie d’alluminio che la lampadina si siano raffred-
date! Non maneggiate la lampadina a mani nude (rischio
di bruciature)!
Svitate cautamente la lampadina da sostituire, e sfilatela
dall’alto e poi inserite quella nuova. Fate attenzione perché
le maglie d’alluminio (3) potrebbero avere spigoli vivi ed
essere taglienti. 2
Cura
Per evitare corrosione, lucidare la piastra di base brunita
con la salvietta anticorrosiva in dotazione. Osservare le
indicazioni del produttore.
Dati tecnici
230 V: max. 150 Watt chiara, base E27.
125 V: lampadina Standard A-19, max. 150 W chiara, base
E27.
Eventuali riparazioni possono essere eseguite esclusiva-
mente da un elettricista specializzato. Il cavo esterno, se
danneggiato, può essere sostituito soltanto dalla Ingo
Maurer GmbH.
4
4
Italiano
4
4
Italiano
4
4
11
10
4
4
4
4
4
4

13
2
1
12
3
2
1
3

Ingo Maurer GmbH
Kaiserstrasse 47
80801 München
Germany
T. +49. 89. 381606-0
F. +49. 89. 381606 20
info@ingo-maurer.com
www.ingo-maurer.com
Februar 2008 Made in Germany
F
Made in Germany
F
Made in Germany
F
Made in Germany
-
 1
1
-
 2
2
-
 3
3
-
 4
4
-
 5
5
-
 6
6
-
 7
7
-
 8
8


Ingo Maurer aR-ingo Istruzioni per l'uso
- Tipo
- Istruzioni per l'uso
in altre lingue
Documenti correlati
-
Ingo Maurer Tu-Be Two Istruzioni per l'uso
-
-
-
-
-
-
-
-
-