
Thanks for choosing
Cooking gestures are
invisible ingredients.
They turn inspiration
into emotions and
emotions into a
masterpiece.
It’s all about artisanality,
that’s why we take it so
seriously.
Quick Reference Guide


3
Lamp Std
Oven
AR
Cooking gestures are
invisible ingredients.
They turn inspiration
into emotions and
emotions into a
masterpiece.
It’s all about artisanality
,
that’s why we take it so
seriously.

4
�
12:00“
15
Istruzioni per l'uso del forno
A
B C D
E
I H G F
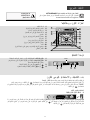
DESCRIZIONE DISPLAY
A. Visualizzazione degli elementi riscaldanti attivi per le diverse funzioni
B. Simboli riguardanti la gestione del tempo: timer, durata di cottura, ora di fine cottura, ora corrente
C. Informazioni relative alle funzioni prescelte
D. Funzione PANE/PIZZA automatica selezionata
E. Indicazione porta forno chiusa durante il ciclo di pulizia automatica (pirolisi)
F. Temperatura interna forno
G. Funzione pirolisi (non disponibile su questo modello)
H. Doratura
I. Funzioni speciali: SCONGELAMENTO, MANTENERE IN CALDO, YOGURT, COTTURA LENTA
CARNE, COTTURA LENTA PESCE, VENTILATO ECO
ATTIVAZIONE DEL FORNO - IMPOSTAZIONE LINGUA
Alla prima accensione del forno, nel display è impostata la lingua INGLESE
Ruotare la manopola "Navigazione" finché sul display non compare la lingua desiderata, quindi premere il
tasto per confermare.
IMPOSTAZIONE DELL'ORA
Dopo aver impostato la lingua, è necessario impostare l’ora corrente. Sul display lampeggiano le due cifre
relative all’ora.
1. Ruotare la manopola “Navigazione” fino a visualizzare l’ora corretta.
2. Premere il tasto per confermare; sul display lampeggiano le due cifre relative ai minuti.
3. Ruotare la manopola “Navigazione” fino a visualizzare i minuti corretti.
4. Premere il tasto per confermare.
Per modificare l’ora corrente, per esempio a seguito di un’interruzione dell’alimentazione elettrica, vedere
il paragrafo successivo (IMPOSTAZIONI).
SELEZIONE DELLE FUNZIONI DI COTTURA
1. Ruotare la manopola “Funzioni” su quella prescelta: le impostazioni di cottura appaiono sul display.
2. Se i parametri proposti corrispondono a quelli desiderati, premere il tasto . Per modificarli
procedere come indicato di seguito.
www . kitchenaid . eu/ register
12
PER IL COLLEGAMENTO ELETTRICO CONSULTARE LA PARTE RELATIVA
ALL'INSTALLAZIONE
1. Pannello comandi
2. Resistenza superiore/grill
3. Ventola raffreddamento (non visibile)
4. Targhetta matricola (da non rimuovere)
5. Lampade
6. Resistenza circolare (non visibile)
7. Ventola
8. Girarrosto (se in dotazione)
9. Resistenza inferiore (non visibile)
10. Porta
11. Posizione dei ripiani (il numero di livello è indicato sul frontale del forno)
12. Paratia
NOTA:
- Durante la cottura, è possibile che la ventola di raffreddamento si attivi ad intermittenza per ridurre il
consumo energetico.
- A fine cottura, dopo lo spegnimento del forno, la ventola di raffreddamento può continuare a
funzionare per un certo intervallo di tempo.
- Aprendo la porta durante la cottura, gli elementi riscaldanti si disattivano.
Istruzioni per l'uso del forno
1
12
5
2
4
8
9
11
10
7
6
3
14
Istruzioni per l'uso del forno
DESCRIZIONE PANNELLO COMANDI
DISPLAY
1. MANOPOLA FUNZIONI: accensione/spegnimento e selezione delle funzioni
2. MANOPOLA NAVIGAZIONE: navigazione nel menù, regolazione valori preimpostati
3. TASTO : per tornare alla schermata precedente
4. TASTO : per selezionare e confermare le impostazioni
1 3 4 2
INSERIMENTO DI GRIGLIE E ALTRI ACCESSORI ALL’INTERNO DEL FORNO
1. Inserire la griglia orizzontalmente, con la parte rialzata “A” orientata verso l’alto (fig. 1).
2. Gli altri accessori, come la leccarda e la piastra dolci, vanno inseriti con la parte sollevata sulla sezione
piatta “B” rivolta verso l’alto (fig. 2).
(fig. 1)
(fig. 2)

5
DEFROST
To delay the end of cooking time, and thus also the cooking start time, proceed as follows:
1. Turn the "Browse" knob to display the time you wish cooking to end (for example 16:00).
2. Confirm the selected value by pressing button : the two dots of end of cooking time flash,
indicating that the setting has been made correctly.
3. The oven will automatically delay the start of cooking so as to finish cooking at the set time.
At any time, however, set values (temperature, grill setting, cooking time) can be changed using
button to go back, followed by the "Browse" knob to change values and button to
confirm.
TIMER
This function can be used only with the oven switched off and is useful, for example, for monitoring the
cooking time of pasta.
The maximum time which can be set is 23 hours and 59 minutes.
1. With the "Functions" knob at zero, turn the "Browse" knob to display the desired time.
2. Press button to start the countdown. When the set time has elapsed, the display will show "END"
and an acoustic signal will sound. To mute the acoustic signal, press button (the time of day
appears on the display).
SELECTING SPECIAL FUNCTIONS
Turn the "Functions" knob indicator to the symbol to access a submenu containing seven special
functions.
To browse, select and start one of these functions, proceed as follows:
1. Turn the "Functions" knob to symbol : the display shows " DEFROST" along with this function's
corresponding symbol.
2. Turn the "Browse" knob to scroll the list of functions: DEFROST, KEEP WARM, YOGURT, RISING,
SLOW COOKING MEAT, SLOW COOKING FISH, ECO FORCED AIR.
3. Press button to confirm.
17
Instructions for oven use
warm risin
DEFRO
�www.kitchenaid.eu
T
TLamp
13
13
11
12
1
3
13
1
3
T
13
121
T
13
T
13
24 ,1
35 ,3 ,1
T2�5121
G1
54
G1
1
T
T
www.kitchenaid.eu

6
www�kitchenaid�eu


AR
400011163282
-
 1
1
-
 2
2
-
 3
3
-
 4
4
-
 5
5
-
 6
6
-
 7
7
-
 8
8


KitchenAid KOHSS 60602 Daily Reference Guide
- Tipo
- Daily Reference Guide
- Questo manuale è adatto anche per
Documenti correlati
-
KitchenAid Lamp Std Manuale utente
-
KitchenAid KOHSS 60603 Setup and user guide
-
KitchenAid KOHSSB 60604 Daily Reference Guide
-
KitchenAid KOHSS 60604 Setup and user guide
-
-
-
-