
USER MANUAL
For Domestic Hot Water Heat Pump
BOMBA DE CALOR PARA AGUA CALIENTE
SANITARIA
WARMWASSER – WÄRMEPUMPE
POMPA DI CALORE PER ACQUA CALDA
SANITARIA
DOMESTIC HOT WATER HEAT PUMP
EN
ES
DE
IT
HPWH 3.1 200/260 U02
HPWH 3.1 200/260 U02 S
POMPY CIEPŁA DO CIEPŁEJ WODY
WARMTEPOMP VOOR SANITAIR WARM WATER
BOMBA DE CALOR PARA ÁGUA QUENTE
SANITÁRIA
POMPE À CHALEUR EAU CHAUDE SANITAIRE
FR
PL
NL
PT
ТЕРМОПОМПА ЗА БИТОВА ГОРЕЩА ВОДА
TOPLINSKA PUMPA ZA TOPLU VODU U
KUĆANSTVU
TOPLOTNA ČRPALKA ZA SANITARNO TOPLO
VODO
ΟΙΚΙΑΚΗ ΑΝΤΛΙΑ ΘΕΡΜΑΝΤΙΚΗΣ ΘΕΡΜΑΝΣΗΣ
ΝΕΡΟΥ
GR
BG
HR
SL
TOPLOTNA PUMPA ZA VRUĆU VODU U
DOMAĆINSTVU
POMPĂ DE CALDURĂ PENTRU APĂ CALDĂ
MENAJERĂ
SRB
RO
206824 Rev.00


2
DOMESTIC HOT WATER HEAT PUMP
EN
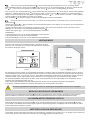
Dear Customer,
Thank you for choosing this product!
TESY, has always paid a great deal of attention to environmental problems, therefore, we have used technologies and materials
with a low environmental impact to manufacture products in conformity with RAEE – ROHS (2002/95/CE and 2003/108/CE) com-
munity standards.
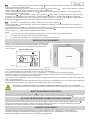
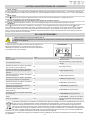
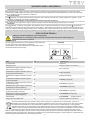
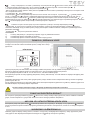
IMPORTANT RULES AND SAFETY INSTRUCTIONS
IMPORTANT! Non observance of below described rules leads to warranty fault and the producer bear no more responsi-
bilities for your appliance!
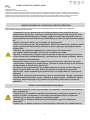
• This appliance is not intended for use by persons (including children) with re-
duced physical, sensory or mental capabilities, or lack of experience and knowl-
edge, unless they have been given supervision or instruction concerning use of the
appliance by a person responsible for their safety.
• Children should be supervised to ensure that they do not play with the appli-
ance.
• Children must not play with the equipment. Cleaning and maintenance intended
to be carried out by the user must not be performed by unsupervised children.
• The use of the appliance for any purpose other than that it is intended is prohib-
ited
• Do not use the storage tank if it is not lled with water.
• Installation, commissioning and maintenance of the device must be performed
by qualied and authorized personnel. Do not attempt to install the device yourself.
• The appliance must only be installed in premises with normal re resistance.
• Usage of this device at temperature and pressure level above prescribed leads
to warranty violation!
• This device is intended for heating of potable water in liquid state. using dier-
ent uids in dierent states leads to warranty violation!
• Device’s heat exchangers are intended for use with circulating clean water and
mixture of it and Propylene GLYCOL at liquid state. The presence of anticorrosion
additives is obligatory. Using dierent uids in dierent states leads to warranty
violation!
• Read carefully the “Installation and maintenance manual”, that is an integral part
of
your appliance!
• Check if the unit is installed and connected according to the “Installation and
maintenance manual”, that is an integral part of your appliance!
• Check if the tank is full with water!
• • Check if the electric main supply is present an it is with accordance to the lo-
cal regulations!
• Check that the air ducts or air inlet/outlet are not blocked!
BEFORE STARTING THE UNIT!

3
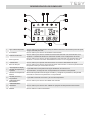
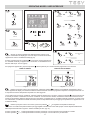
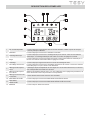
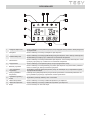
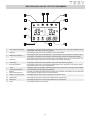
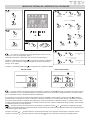
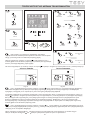
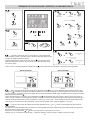
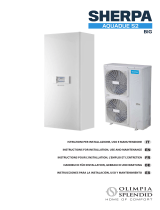
OPERATING MODES. USER INTERFACE
Enable/Disable
Fan Ventilation
5s5s
Turn ON
E-Heater
Turn ON
Standby
2s2s
Lock/Unlock
Buttons
5s5s
Set Temp
Set
Hour/Minute
Adjust
Hour/Minute
Set
Hour
Timer
5s5s
Set
Minute
Save & Exit Cancel
Timer
5s5s
OFF
C
WATE R TEMP
C
SE T TEMP
ON
ERRO R
Check Parameters
A-H
Check Parameters
1-35
1
2
3
4
5
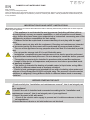
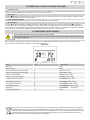
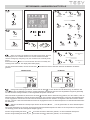
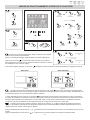
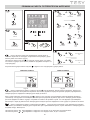
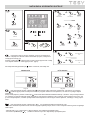
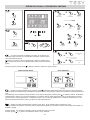
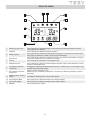
1 When connecting the appliance to the main power supply, all icons
are displayed on the controller screen for 3 seconds. After that an initial
check is undergoing.If everything is ok, the unit enters into a standby mode
(g.01)
Press and hold the button for 2 seconds when the unit is in standby. The
“Heating mode” will start. The display will look like (g02)
2
While the heat pump is running, press this button to turn ‘ON’ “Boost mode”. The heater icon will be shown, and the
electrical heater will work according to the control program together with the compressor until theset temperature is reached.
When the heat pump is ON, press this button and hold for 5 seconds to enable or disable the fan ventilation function. If this func-
tion is enabled the fan will continue working to ventilate the air, even when the water temperature reaches the set point and the unit
is in standby mode. On the contrary If this function is disabled the fan will stop, when the water temperature reaches the set point
and the unit is in standby mode.
C
WATE R TEM P
STANDBY MODE
C
WATE R TEM P
C
SE T TEM P
HEATING MODE
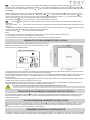
3
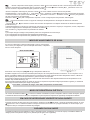
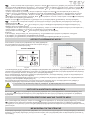
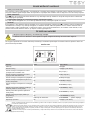
During running status, press or button to adjust the set temperature of water tank directly.
The maximum achievable water temperature by heat pump only, depends on outside air inlet temperature and
could be seen on picture:
Press and buttons at the same time and hold for 5 seconds, the buttons are locked.
Press and buttons at the same time and hold for 5 seconds again, the buttons are unlocked
Fig. 01 Fig. 02
To switch the unit OFF press button and hold it for 2 seconds while the unit is running.

4
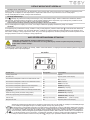
NOTE:
1) The timer ‘ON’ and timer ‘OFF’ functions can be set at the same time.
2) The timer settings are repeating.
3) The timer settings are still valid after a sudden power cut.
4
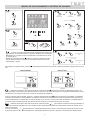
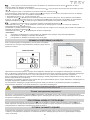
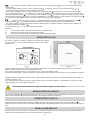
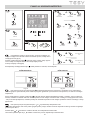
-After switching the appliance on, press button to entry the clock setting interface, hour and minute icons “88:88”
ash together;> Press button to switch hour/minute setting, press the and buttons to set the exact hour(s) and minute(s);
>Press button again to conrm and exit.
After switching the appliance on, press and hold button for 5 seconds to enter the timer setting interface, the timer
on icon and hour icon “88:” will ash together;>- Press the and buttons to set the exact hour(s).>- Press button to transfer
to minute setting, minute icon “:88” will ash, press the and buttons to set the exact minute(s).>- Press button again to
save and exit the timer setting interface.
Press button to cancel the timer, while the “timer settings“ mode is active
5
Press this button to enter temp and EXV open step checking.
-Press the and buttons to check the temp sensor values and EXV open steps (parameters A-F).
-In any status, press this button and hold for 5 seconds, entry the system parameter checking interface.
-Press the and buttons to check the system parameters.
When connecting the appliance to the main power supply, all icons are
displayed on the controller screen for 3 seconds. After that an initial check
is undergoing.If everything is ok, the unit enters into a standby mode
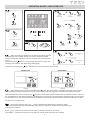
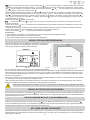
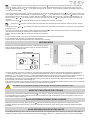
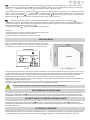
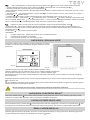
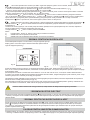
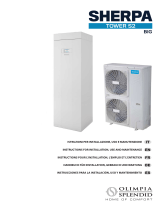
The heat pump will start working continuously in order to reach the set temperature. If the set temperature is adjusted to above
65oC, E-Heater will start working to continue heating the water to the set temperature.
If the outside air temperature is less than -10oC or above 44oC, theE-Heater will work only!
While the heat pump is working at a low outside air temperature, defrosting mode could be activated automatically in order to melt
the ice collected on the evaporator. This is a normal situation.
The maximum achievable water temperature by heat pump only, depends on outside air inlet temperature and could be seen on
picture (g. 04)
If the set temperature (via control display) is more than achievable one as per picture, the E-heater will be switch ON automatically
to reach it.
In order to save energy, avoid setting the temperature above 55oC if not necessary! This way the heat pump
will work without the help of the E-Heater!
URGENT NEED OF HOT WATER!
While the heat pump is running, press this button to turn ‘ON’ “Boost mode”. The heater icon will be shown, and the electrical
heater will work according to the control program together with the compressor until theset temperature is reached.
WITH CARE FOR YOUR HEALTH!
The E-heater will start each week at the setting time automatically, regardless if the machine is on or in standby mode. E-heater will
stop working, when the tank temperature reaches 70oC (disinfection against legionella bacteria)
“E heater only”
If the E-heater button on the control panel has been turned on manually when the unit is instandby mode, the E-heater will work
only, until the temperature of the upper tank (5) reaches the set temperature TS2;
HEATING MODE
C
WATE R TEM P
C
SE T TEM P
HEATING MODE
Fig. 04Fig. 03

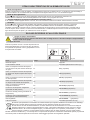
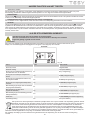
5
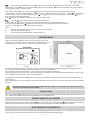
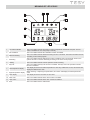
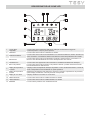
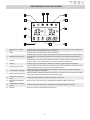
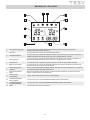
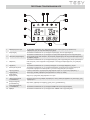
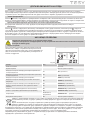
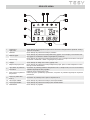
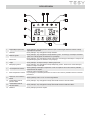
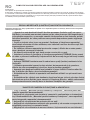
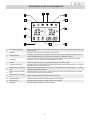
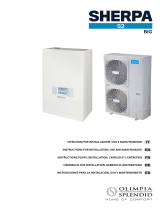
1 Hot water available The icon indicates that the domestic hot water temperature reaches the set point. The hot
water is available for use. Heat pump is standby
2 Fan ventilation The icon indicates that the fan ventilation function is enabled.
3 Electrical heating The icon indicates that the electrical heating function is enabled. The electrical heater will work
according to the control program.
4 Defrosting The icon indicates that the defrosting function is enabled. This is an automatic function, the
system will enter or exit the defrosting according to the inner control program
5 Heating The icon indicates that the current operation mode is Heating.
6 Key lock The icon indicates the key lock function is enabled. The keys cannot be operated until this
function is disabled
7 Left temperature display The display shows the set water temperature.In case any malfunction occurs, this section will
display the related error code.
8 Right temperature display When checking or adjusting the parameters, this section will display the related parameter
value
9 Time display The display shows the clock time or timer time.
10 Timer ‘ON’ The icon indicates that the timer ‘ON’ function is enabled.
11 Timer ‘OFF’ The icon indicates that the timer ‘OFF’ function is enabled.
12 Error The icon indicates there is malfunction.
OFF
C
WATE R TEM P
C
SE T TEM P
ON
ERRO R
2
1
7
12
10
5
6
8
9
11
4
3
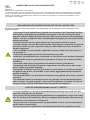
MEANING OF LED ICONS!

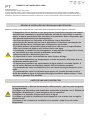
6
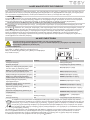
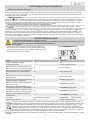
Error Code LED indicator
Stand by Dark
Normal running Bright
Lower tank water temp sensor failure P1 ★●(1 ash 1 dark)
Upper tank water temp sensor failure P2 ★★●(2 ash 1 dark)
Coil temp sensor failure P3 ★★★●(3 ash 1 dark)
Air return temp sensor failure P4 ★★★★●(4 ash 1 dark)
Ambient temp sensor failure P5 ★★★★★●(5 ash 1 dark)
High pressure protection E1 ★★★★★★●(6 ash 1 dark)
Low pressure protection E2 ★★★★★★★●(7 ash 1 dark)
Over heat protection E3 ★★★★★★★★●(8 ash 1 dark)
Defrosting ★★★★★★★★……(long ash)
Communication failure E8 Bright
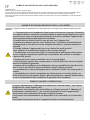
This symbol on the product(s) and / or accompanying documents means that used electrical and electronic equipment
(WEEE) should not be mixed with general household waste. For proper treatment, recovery and recycling, please take
this product(s) to designated collection points where it will be accepted free of charge. Disposing of this product correctly
will help save valuable resources and prevent any potential negative eects on human health and the environment,
which could otherwise arise from inappropriate waste handling.
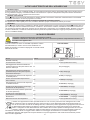
IF SOMETHING GOES WRONG!
• Switch o the unit! Disconnect it the from main power supply!
• Call to the service and inform them about the error code or describe all abnormalities and strange behavior
or noise of your appliance!
During standby or running status, if there is a malfunction, the unit will stop automatically and show the error code on the left
screen of the controller. See the installation and maintenance manual
WATE R TEM P
C
SE T TEM P
ERRO R
ERROR CODE
IF SOMETHING LOOKS & SOUNDS STRANGE!
When the unit is in standby mode, if the water temperature in the tank isbelow 5°C (tank water frozen protection),only the E-heater
will work, until tank temperature increases above 10°C or the unit is turned on.
The icon indicates that the defrosting function is enabled. This is an automatic function, the system will enter or exit the defrost-
ing function according to the inner control program.
When the external pump (if any) stops for 12 hours, it will be forced to run for 2 minutes.
The icon indicates that the fan ventilation function is enabled. When the heat pump is ON, press this button and hold for 5
seconds to enable or disable the fan ventilation function. If this function is enabled the fan will continue working to ventilate the air,
even when the water temperature reaches the set point and the unit is in standby mode. On the contrary If this function is disabled
the fan will stop, when the water temperature reaches the set point and the unit is in standby mode.
Antifreeze mode
Defrosting
Pump anti-block function
Fan ventilation
Error codes
Fig. 05

7
BOMBA DE CALOR PARA AGUA CALIENTE SANITARIA
ES
Estimados clientes
Gracias por comprar este producto.
El equipo de TESY siempre ha prestado gran atención a los problemas ambientales, por lo que utiliza tecnologías y materiales
de bajo impacto para producir sus productos de acuerdo con las Directivas de la Comunidad sobre la limitación de ciertas
sustancias peligrosas en equipos eléctricos y electrónicos, y sobre RAEE y residuos de RoHS (2011/65 / UE y 2012/19 / UE).
NORMAS E INSTRUCCIONES IMPORTANTES DE SEGURIDAD
¡Importante! La garantía queda anulada y el fabricante exento de responsabilidad de las posibles consecuencias
generadaspor no seguir estas instrucciones.
• El aparato no está diseñado para ser utilizado por personas con capacidades
físicas, sensoriales o mentales limitadas o falta de experiencia y conocimiento, a
menos que hayan sido capacitados o instruidos para usar el aparato por una per-
sona cualicada y responsable de su seguridad.
• Los niños deben ser supervisados para evitar que jueguen con el aparato.
• La limpieza y el mantenimiento del aparato, que debe ser realizado por el usuario,
no puede ser llevada a cabo por menores sin supervisión.
• Está prohibido usar el aparato para cualquier otro propósito que no sea su uso
previsto.
• No use el tanque de agua si no está lleno de agua.
• La instalación, la puesta en servicio y el mantenimiento del aparato deben ser
realizados por una persona cualicada y autorizada. No intente instalar el aparato
usted mismo.
• El aparato solo debe instalarse en habitaciones con protección contra el fuego.
• El uso de este aparato a temperaturas y niveles de presión diferentes a los esp-
cicados anulará la garantía.
• El aparato está diseñado para calentar agua potable en estado líquido. El uso de
otros uidos en diferentes condiciones anulará la garantía.
• El intercambiador de calor del aparato está diseñado para usarse con agua de
circulación limpia.
• El intercambiador de calor está diseñado para funcionar en un circuito cerrado
con agua limpia y una mezcla de propileno GLYCOL en estado liquido. y aditivos
anticorrosión. De lo contrario, se anulará la garantía.
• Lea atentamente el Manual de instalación y mantenimiento, que constituye una
parte integral de su equipo.
• Asegúrese de que el equipo esté instalado y conectado de acuerdo con el “Manu-
al de instalación y mantenimiento”.
• Asegúrese de que el tanque de agua esté lleno de agua
• Asegúrese de que la fuente de alimentación está disponible y en línea con la
normativa local.
• Asegúrese de que los conductos de aire o los terminales de entrada / salida de
aire no estén bloqueados.
ANTES DE ENCENDER LA UNIDAD

8
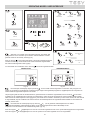
MODOS DE FUNCIONAMIENTO. INTERFAZ DE USUARIO
Enable/Disable
Fan Ventilation
5s5s
Turn ON
E-Heater
Turn ON
Standby
2s2s
Lock/Unlock
Buttons
5s5s
Set Temp
Set
Hour/Minute
Adjust
Hour/Minute
Set
Hour
Timer
5s5s
Set
Minute
Save & Exit Cancel
Timer
5s5s
OFF
C
WATE R TEMP
C
SE T TEMP
ON
ERRO R
Check Parameters
A-H
Check Parameters
1-35
1
2
3
4
5
1 Cuando conecta la unidad a la fuente de alimentación, todos los ico-
nos aparecen en la pantalla durante 3 segundos. Después de la vericación
automática y si el equipo funciona correctamente, la unidad entra en modo
de espera:(g.01)
Mantenga presionado el botón durante 2 segundos mientras la unidad
está en modo de espera. Tras esto se encenderá e iniciará el “Modo de
calentamiento”. (g02)
2
Mientras la bomba de calor está funcionando, presione el botón para activar el “Modo de calentamiento rápido”. El
icono aparecerá en la pantalla y la resistencia eléctrica comenzará a funcionar de acuerdo con el programa establecidoy de forma
simultánea con el compresor hasta que se alcance la temperatura establecida.
Cuando el aparato está encendido, presione y mantenga presionado el botón durante 5 segundos para habilitar o deshabilitar
la función del ventilador. Si está habilitado, el ventilador continuará funcionando incluso cuando la temperatura del agua alcance
el punto especicado y la unidad esté en modo de espera. De lo contrario, si esta función está desactivada, el ventilador deja de
funcionar cuando la temperatura del agua alcanza el punto de ajuste y la unidad está en modo de espera.
C
WATE R TEM P
MODO DE ESPERA
C
WATE R TEM P
C
SE T TEM P
MODO DE CALE-
3
Mientras la bomba de calor está funcionando, presione el botón o para ajustar la temperatura del agua deseada.La
temperatura máxima alcanzable solo con la bomba de calor depende directamente de la temperatura del aire de entrada. Vea la
tabla a continuación:
Presione los botones y simultáneamente y manténgalos presionados durante 5 segundos para bloquear el panel de control.
Presione los botones y simultáneamente y manténgalo presionado durante 5 segundos nuevamente para desbloquearlo.
Fig. 01 Fig. 02
Para apagar la bomba de calor, presione y mantenga presionado el botón durante 2 segundos mientras el equipo está funciona-
ndo

9
NOTA:
1) Las funciones de encendido y apagado del temporizador se pueden congurar de manera simultánea.
2) La conguración del temporizador se repite automáticamente.
3) La conguración del temporizador se guarda aun en el caso de un corte eléctrico.
4
- Cuando el aparato esté encendido, presione el botón para acceder a la conguración del reloj. Los iconos88:88 horas
y minutos parpadearán simultáneamente;
>Para activar la conguración de hora y minutos, presione el botón Use los botones y para congurar las horas y minutos.
>Presione el botón de nuevo para conrmar la conguración y salir del reloj.
Cuando el aparato está encendido, presione el botón para acceder a la conguración del reloj. Los iconos de 88:88 horas y
minutos parpadearán simultáneamente;
- Use los botones y para congurar la hora;>- Presione el botón para acceder a la conguración de los minutos, el ícono
de minutos “: 88” parpadeará y use los botones y para congurar los minutos.>- Presione el botón para acceder a la
conguración de apagado del temporizador; el ícono de temporizador apagado y el ícono 88: reloj parpadearán simultáneamente.
Presione el botón para detener el temporizador, mientras el modo temporizador está activado.
5
Vericación de las temperaturas y pasos de apertura de la válvula de expansión.
-Use los botones y , para vericar los valores de los sensores de temperatura y los pasos de apertura de la válvula de ex-
pansión (Parámetros A-F).
-Independientemente del modo en que esté funcionando la bomba de calor, mantenga presionado el botón durante 5 segundos; el
instrumento ingresa a la conguración de vericación de parámetros del sistema.
-Use los botones y para vericar los parámetros del sistema.
Cuando conecta la unidad a la fuente de alimentación, todos los iconos
aparecen en la pantalla durante 3 segundos. Después de la vericación
automática y si el equipo funciona correctamente, la unidad entra en
modo de espera:
La bomba de calor comienza a funcionar para alcanzar la temperatura establecida. Si la temperatura establecida es superior a
65 °C, la resistencia eléctrica se enciende como fuente de apoyo para alcanzarla.
Si la temperatura del aire exterior es inferior a -10 ° C o superior a 44 ° C, solo funciona el la resistencia eléctrica.
Mientras la bomba de calor funciona con aire exterior a baja temperatura, se puede activar el modo anticongelaciónde forma au-
tomática para derretir el hielo acumulado en el evaporador.
La temperatura máxima alcanzable solo con la bomba de calor depende directamente de la temperatura del aire de entrada. Vea la
tabla a continuación:(g. 04)
Si la temperatura establecida (a través del panel de control) es más alta que la alcanzable solo por la bomba de calor (mostrada en
el gráco), la resistencia eléctrica se enciende automáticamente para alcanzar la temperatura.
Para reducir el consumo de energía, evite establecer temperaturas superiores a 55° C si no es necesario
EN CASO DE NECESIDAD URGENTE DE AGUA CALIENTE
Mientras la bomba de calor está funcionando, presione el botón para activar el “Modo de calentamiento rápido”. El icono
aparecerá en la pantalla y la resistencia eléctrica comenzará a funcionar de acuerdo con el programa establecidoy de forma
simultánea con el compresor hasta que se alcance la temperatura establecida.
HIGIENE Y SEGURIDAD
La resistencia eléctrica se enciende semanalmente, ya esté el aparatoencendido o apagado (en modo de espera). La
resistencia se apagará automáticamente cuando la temperatura alcanza los 70 °C (temperatura a la cual se garantiza la
desinfección del agua para evitar la aparición de bacterias como la legionela)
MODO RESISTENCIA ELÉCTRICA
Si el botón de control de la resistencia eléctricase activa manualmente cuando el aparato está en modo de espera, solo la resis-
tencia eléctrica funcionará hasta que el agua en la parte superior del tanque alcance la temperatura establecidaa..
MODO DE CALENTAMIENTO
C
WATE R TEM P
C
SE T TEM P
MODO DE CALEFACCIÓN
Fig. 04
Fig. 03

10
1 Agua caliente disponible El icono indica que la temperatura del agua caliente sanitaria ha alcanzado el punto de ajuste.
El agua está lista para usar.
2 El ventilador El icono indica que la función del ventilador está activada.
3 Resistencia eléctrica El icono indica que la función resistencia eléctrica está activada. Esta característica es au-
tomática. La resistencia eléctrica se activará de acuerdo con la conguración de control.
4 Descongelación El icono indica que la función de descongelamiento está activada. Esta característica es au-
tomática. La función se activará / desactivará de acuerdo con la conguración de control
5 Calentamiento El icono indica que el aparato está funcionando en modo de calentamiento de agua.
6 Botón de bloqueo El icono indica que la función de bloqueo de teclas está activada. Los botones permanecerán
bloqueados hasta que se desactive la función.
7
Left temperature display
Pantalla de temperatura
izquierda
La pantalla indica la temperatura del agua establecida. En caso de mal
funcionamiento, el código de error correspondiente se mostrará en esta pantalla.
8Indicador de temperatura
derecho
Muestra la temperatura real del agua.Al vericar y congurar los parámetros, esta pantalla
mostrará los valores de los parámetros correspondientes
9Pantalla para hora y
temporizador La pantalla muestra la hora exacta y la hora del temporizador.
10 TEMPORIZADOR
ENCENDIDO El icono indica que la función ON TIMER está activada
11
TEMPORIZADOR
APAGADO El icono indica que la función OFF TIMER /de apagado/ del temporizador está activada.
12 ERROR El icono indica un mal funcionamiento.
OFF
C
WATE R TEM P
C
SE T TEM P
ON
ERRO R
2
1
7
12
10
5
6
8
9
11
4
3
DESCRIPCIÓN DE LOS ICONOS LED

11
Error Código ndicador LED
Modo de espera Apagado
Funcionamiento normal Encendido (Se ilumina en color rojo)
Daño con respecto al sensor de tempera-
tura del agua en la parte inferior del tanque
de agua
P1 ★●(1 parpadeo)
Daño con respecto al sensor de temperatu-
ra del agua en la parte superior del tanque
de agua.
P2 ★★●(2 parpadeos)
Daño con respecto al sensor de temperatu-
ra del evaporador P3 ★★★●(3 parpadeos)
Daño con respecto al sensor de temperatu-
ra del gas en la entrada del compresor P4 ★★★★●(4 parpadeos)
Daño con respecto al sensor de
temperatura ambiente P5 ★★★★★●(5 parpadeos)
Protección de alta presión refrigerante
(presostato de alta presión) E1 ★★★★★★●(6 parpadeos)
Protección de baja presión (presostato de
baja presión) E2 ★★★★★★★●(7 parpadeos)
Protección contra sobrecalentamiento
(interruptor de sobrecalentamiento) E3 ★★★★★★★★●(8 parpadeos)
Descongelación ★★★★★★★★……(parpadeos)
Fallo de conexión E8 Encendido (se ilumina en rojo)
El símbolo que representa un contenedor con ruedas tachado que se puede visualizar en la unidad o en su embalaje,
indica que la unidad debe recogerse por separado de otros desechos al nal de su ciclo de vida.
Al nal del ciclo de vida del electrodoméstico, el usuario debe llevar el electrodoméstico a un centro de reciclaje de
desechos electrónicos y eléctricos apropiado libre de costes, o devolverlo al distribuidor cuando compre un electro-
doméstico idéntico. El correcto reciclajedel equipo y sus elementosjunto con su posterior procesamiento y / o elim-
inación ecológica contribuye a evitar posibles efectos negativos tanto al medio ambiente como a la salud humana;
También fomenta la reutilización y / o el reciclaje de los componentes del aparato.La eliminación indebida del aparato por parte del
consumidor puede conllevarla aplicación de sanciones administrativas previstas en la legislación aplicable.
EN CASO DE ERROR O FALLO DEL EQUIPO
• Apague el equipo. Desenchúfelo.
• Llame servicio técnico ocial e infórmeles sobre el código de error o describa cualquier comportamiento
inusual o ruido de su equipo.
Cuando se produce un error o el modo de protección se
activa automáticamente, el número de error se indicará
en la pantalla del panel de control y parpadeará un icono
en la placa del controlador.
WATE R TEM P
C
SE T TEM P
ERRO R
CÓDIGO DE ERROR
OTRAS CARACTERÍSTICAS DE LA BOMBA DE CALOR
Cuando el equipo está en modo de espera, si la temperatura el agua cae por debajo de los 5 °C (protección contra heladas), la
resistencia eléctrica se encenderá hasta que la temperatura del agua aumente a 10 °C o se encienda el equipo.
El icono indica que la función de descongelamiento está activada. Esta es una característica automática. El
sistema entrará o saldrá del modo de descongelamiento de acuerdo con el programa de control.
Si la unidad ha estado apagada durante 12 horas, la función activará la bomba de circulación externa durante 2 minutos.
El icono iindica que la función del ventilador está activada. Cuando el aparato está encendido, presione y mantenga
presionado el botón durante 5 segundos para habilitar o deshabilitar la función del ventilador. Si está habilitado, el
ventilador continuará funcionando incluso cuando la temperatura del agua alcance el punto especicado y la unidad esté en
modo de espera. De lo contrario, si esta función está desactivada, el ventilador deja de funcionar cuando la temperatura del
agua alcanza el punto de ajuste y la unidad está en modo de espera.
Modo anticongelación
Modo de descongelamiento
Función antibloqueo al conectar una bomba de circulación externa
Ventilador
Códigos de errores
Fig. 05

12
POMPA DI CALORE PER ACQUA CALDA SANITARIA
IT
Spettabili clienti,
Grazie per aver acquistato questo prodotto.
Il team di TESY ha sempre prestato grande attenzione alle questioni ambientali, quindi utilizza tecnologie e materiali a basso
impatto sulla natura per la produzione dei suoi prodotti, in conformità con le direttive comunitarie sulla limitazione di
determinate sostanze pericolose nelle apparecchiature elettriche ed elettroniche, nonchè sui riutiWEEE e RоHS (2011/65/ЕU
e 2012/19/EU).
NORME E ISTRUZIONI IMPORTANTI PER LA SICUREZZA
Importante! La garanzia è nulla e il produttore non è responsabile per le conseguenze del mancato rispetto di queste
istruzioni!
• • L’apparecchio non è destinato all’uso da parte di persone (compresi i bambini)
con capacità siche, sensoriali o mentali limitate o mancanza di esperienza e cono-
scenza a meno che non siano state addestrate o istruite a utilizzare l’apparecchio
da una persona responsabile della loro sicurezza.
• I bambini devono essere istruiti a non giocare con l’apparecchio.
• I bambini non devono giocare con l’apparecchio . La pulizia e la manutenzione
dell’apparecchio, che devono essere eseguite dall’utente, è vietata a bambini in-
custoditi.
• È vietato utilizzare l’apparecchio per scopi diversi da quelli previsti.
• Non utilizzare il serbatoio dell’acqua se non è pieno d’acqua.
• L’installazione, la messa in servizio e la manutenzione dell’apparecchio devono
essere eseguite da personale qualicato e autorizzato. Non tentare di installare
l’apparecchio da soli.
• L’apparecchio deve essere installato solo in locali ignifughi.
• L’uso di questo apparecchio a temperature e livelli di pressione diversi da quelli
descritti invaliderà la garanzia!
• L’apparecchio è destinato al riscaldamento di acqua potabile allo stato sico liq-
uido. L’uso di altri uidi in diversi stati sici renderà nulla la garanzia!
• Lo scambiatore di calore dell’apparecchio è destinato all’uso con acqua pura cir-
colante.
• Lo scambiatore di calore è progettato per funzionare in un circuito chiuso con
uido di servizio acqua oppure acqua + glicole propilenico + additivi anticorrosivi.
In caso di mancanza di tale condizione, la garanzia verrà annullata!
• Leggere attentamente il “Manuale di installazione e manutenzione”, che è parte
integrante del vostro apparecchio!
• Assicurarsi che l’apparecchio sia installato e collegato secondo il “Manuale di
installazione e manutenzione”, che è parte integrante del vostro apparecchio!
• Assicurarsi che il serbatoio dell’acqua sia pieno d’acqua!
• Assicurarsi che l’alimentazione sia disponibile e in conformità con le normative
locali!
• Accertarsi che le prese d’aria o l’ingresso/l’uscita non siano bloccate!
PRIMA DI AVVIARE L’APPARECCHIO

13
OPERATING MODES. USER INTERFACE
Enable/Disable
Fan Ventilation
5s5s
Turn ON
E-Heater
Turn ON
Standby
2s2s
Lock/Unlock
Buttons
5s5s
Set Temp
Set
Hour/Minute
Adjust
Hour/Minute
Set
Hour
Timer
5s5s
Set
Minute
Save & Exit Cancel
Timer
5s5s
OFF
C
WATE R TEMP
C
SE T TEMP
ON
ERRO R
Check Parameters
A-H
Check Parameters
1-35
1
2
3
4
5
1 Quando si collega l’apparecchio all’alimentazione, tutte le icone
vengono visualizzate sul display per 3 secondi. Dopo il controllo automatico,
l’apparecchio entra in modalità di standby:(g.01)
Premere e tenere premuto il pulsante per 2 secondi, mentre l’apparecchio
è in modalità di standby e l’apparecchio si accenderà. La “Modalità di riscal-
damento dell’acqua” si avvia. (g02)
2
Mentre la pompa di calore è in funzionamento, premere il pulsante per attivare la “Modalità di riscaldamento veloce”.
L’icona apparirà sul display e la resistenza elettrica inizierà funzionare secondo il programma impostato contemporaneamente con
il compressore nché la temperatura impostata non sarà raggiunta.
L’icona indica che la funzione “ventilatore” è attivata. Quando l’apparecchio è eccesso, premere il pulsante e tenere premuto per
5 secondi per attivare o disattivare la funzione “ventilatore“. Se la funzione è attivata, il ventilatore continuerà a funzionare anche
quando la temperatura dell’acqua raggiunge il punto specicato e l’apparecchio è in modalità di standby. Altrimenti, se questa funzi-
one è disattivata, il ventilatore smette di funzionare quando la temperatura dell’acqua raggiunge l’impostazione e l’apparecchio è in
modalità di standby.
C
WATE R TEM P
MODALITÀ STANDBY
C
WATE R TEM P
C
SE T TEM P
MODALITÀ RISCALDAMENTO
3
Mentre la pompa di calore è in funzione, premere il pulsante o per regolare la temperatura dell’acqua
desiderata. La massima temperatura dell’acqua raggiungibile solo attraverso l’unità della pompa di calore dipende direttamente
dalla temperatura dell’aria in ingresso. Vedere la tabella qui sotto: (g. 04)
Premere i pulsanti e contemporaneamente e tenere premuti per 5 secondi per bloccare il pannello di controllo.
Premere i pulsanti e contemporaneamente e tenere premuti per 5 secondi di nuovo per sbloccarlo.
Fig. 01 Fig. 02
Per spegnere l’apparecchio, premere il pulsante e tenere premuto per 2 secondi mentre l’apparecchio è in funzione.

14
NOTA:
1) Le funzioni di “Accensione” e “Spegnimento” del timer possono essere impostate contemporaneamente.
2) Le impostazioni del timer vengono ripetute automaticamente.
3) Le impostazioni del timer vengono salvate anche in caso di mancanza di energia elettrica.
4
-Quando l’apparecchio è acceso, per accedere alle impostazioni dell’orologio premere il pulsante Le icone per l’ora
e i minuti “88:88” lampeggeranno contemporaneamente;> Per accendere le impostazioni di ora e minuta premere il pulsante ;
per impostare l’ora e i minuti utilizzare i pulsanti e >Per confermare l’uscita dall’impostazione dell’orologio premere di nuovo il
pulsante .
Quando l’apparecchio è acceso, per accedere alle impostazioni dell’orologio premere il pulsante Le icone per l’ora e i minuti
“88:88” lampeggeranno contemporaneamente;>- Utilizzare i pulsant e , per impostare l’ora;>- Premere il pulsante b, per
entrare nell’ impostazione per i minuti, l’icona per i minuti “:88 lampeggerà e utilizzare i pulsanti e , per impostare i minuti.>-
Premere il pulsante di nuovo per memorizzare e uscire dall’impostazione del timer
- Premere il pulsante di nuovo per memorizzare e uscire dall’impostazione del timer.
5
- Premere questo pulsante e accedere all’opzione per controllare le temperature e le fasi di apertura della valvola di
espansione.
-Utilizzare I pulsanti e , per vericare i valori dei sensori di temperatura e le fasi di apertura della valvola di espansione (para-
metri А-F).
- Indipendentemente dalla modalità di funzionamento della pompa di calore, tenere premuto per 5 second and hold for 5 secl’ap-
parecchio entra nelle impostazioni di controllo dei parametri di sistema.
-Utilizzare I pulsanti e ,per vericare i parametri di sistema.
Quando si collega l’apparecchio all’alimentazione, tutte le icone vengono
visualizzate sul display per 3 secondi. Dopo il controllo automatico, l’ap-
parecchio entra in modalità di standby.
La pompa di calore inizia a funzionare per raggiungere la temperatura impostata. Se la temperatura impostata è superiore a 65°C,
la resistenza elettrica viene accesa come fonte secondaria per raggiungerla.
Se la temperatura esterna è inferiore a -10°C o superiore a 44 ° C, funziona solo la resistenza elettrica. Mentre la pompa di calore
funziona a bassa temperatura esterna, la “Modalità di sbrinamento” può essere attivata per sciogliere il ghiaccio accumulato
sull’evaporatore.
La massima temperatura dell’acqua raggiungibile solo attraverso l’unità della pompa di calore dipende direttamente dalla tempera-
tura dell’aria in ingresso. Vedere la tabella qui sotto:(g. 04)
Se la temperatura impostata (tramite il pannello di controllo) è superiore alla temperatura raggiungibile (mostrata nel graco), la
resistenza elettrica si accende automaticamente per raggiungere la temperatura.
Per ridurre il consumo di energia, evitare di impostare temperature superiori a 55°C
IN CASO DI BISOGNO URGENTE DI ACQUA CALDA
Mentre la pompa di calore è in funzionamento, premere il pulsante , per attivare la “Modalità di riscaldamento veloce”. L’icona
apparirà sul display e la resistenza elettrica inizierà funzionare secondo il programma impostato contemporaneamente con il
compressore nché la temperatura impostata non sarà raggiunta.
PRENDERSI CURA DELLA VOSTRA SALUTE
La resistenza elettrica si accende settimanalmente, indipendentemente dal fatto che l’apparecchio sia acceso o spento (in modalità
di standby). La resistenza elettrica si spegne quando la temperatura raggiunge i 70°C (disinfezione dell’acqua contro la legionella).
MODALITÀ RISCALDAMENTO CON RESISTENZA ELETTRICA
Se il pulsante della resistenza elettrica del controllo viene attivato manualmente quando l’apparecchio è in modalità di standby,
solo la resistenza elettrica funzionerà no a quando la temperatura della parte superiore del serbatoio dell’acqua raggiunge la
temperatura impostata.
MODALITÀ DI RISCALDAMENTO DELL’ACQUA
C
WATE R TEM P
C
SE T TEM P
MODALITÀ RISCALDAMENTO
Fig. 04Fig. 03

15
1Acqua calda
disponibile
L’icona indica che la temperatura dell’acqua calda per usi domestici ha raggiunto
il valore impostato. L’acqua è pronta per l’uso.
2 Ventilatore L’icona indica che la funzione “ventilatore” è attivata.
3 Resistenza elettrica L’icona indica che la funzione di riscaldamento con resistenza elettrica è attivata. Questa funzi-
one è automatica. La resistenza elettrica verrà attivato in base all’impostazione del controllo.
4 Sbrinamento L’icona indica che la funzione di sbrinamento è attivata. Questa funzione è automatica. La
funzione verrà attivata/disattivata in funzione all’impostazione del controllo.
5 Riscaldamento L’icona indica che l’apparecchio sta funzionando in modalità di riscaldamento dell’acqua.
6 Blocco dei pulsanti L’icona indica che la funzione di blocco dei pulsanti è attivata. I pulsanti rimarranno bloccati
no alla disattivazione della funzione.
7Display di temperatura
a sinistra
Il display indica la temperatura dell’acqua impostata. In caso di malfunzionamento, il codice di
errore corrispondente verrà visualizzato in questa posizione.
8Display di temperatura
a destra
Visualizza la temperatura reale dell’acqua. Durante il controllo e l’impostazione dei parametri,
questo display visualizzerà i valori dei parametri corrispondent
9 Display di ora e timer Il display visualizza l’ora esatta e l’ora del timer.
10 TIMER ACCESO L’icona indica che la funzione “TIMER ACCESO” è attivata
11 TIMER SPENTO L’icona indica che la funzione “TIMER SPENTO” è attivata
12 ERRORE L’icona indica la presenza di un malfunzionamento.
OFF
C
WATE R TEM P
C
SE T TEM P
ON
ERRO R
2
1
7
12
10
5
6
8
9
11
4
3
DESCRIZIONE DELLE ICONE LED

16
Errore Codice Indicatore LED
Modalità di standby Spento
Funzionamento normale Acceso (Si illumina in rosso)
Danneggiamento del sensore della tem-
peratura dell’acqua nella parte inferiore del
serbatoio dell’acqua
P1 ★●(1 lampeggio)
Danneggiamento del sensore della tem-
peratura dell’acqua nella parte superiore
del serbatoio dell’acqua.
P2 ★★●(2 lampeggi)
Danneggiamento del sensore di temperatu-
ra dell’evaporatore P3 ★★★●(3 lampeggi)
Guasto al sensore della temperatura di
ritorno dell’aria P4 ★★★★●(4 lampeggi)
Danneggiamento del sensore di temperatu-
ra dell’aria ambiente P5 ★★★★★●(5 lampeggi)
Protezione da alta pressione circuito frigo
(Pressostato di alta pressione) E1 ★★★★★★●(6 lampeggi)
Protezione da bassa pressione (Pressosta-
to di bassa pressione) E2 ★★★★★★★●(7 lampeggi)
Protezione da surriscaldamento
(interruttore di surriscaldamento) E3 ★★★★★★★★●(8 lampeggi)
Sbrinamento ★★★★★★★★......(Lampeggio costante)
Malfunzionamento del collegamento E8 Acceso (Si illumina in rosso)
Il simbolo che rappresenta il cestino per riuti barrato con una croce che può essere visto sull’apparecchio o sulla
sua confezione indica che l’apparecchio deve essere raccolto in modo dierenziato dagli altri riuti alla ne del suo
ciclo di vita. Al termine del ciclo di vita dell’apparecchio, l’utente deve portare l’apparecchio negli appositi centri di raccol-
ta dierenziata di riuti elettronici ed elettrici o restituirlo al rivenditore al momento dell’acquisto di un apparecchio
identico. L’adeguata raccolta dierenziata dei riuti correlata alla successiva spedizione dell’apparecchio fuori uso per
riciclaggio, trattamento e/o smaltimento rispettoso dell’ambiente contribuisce a evitare potenziali eetti negativi sia
sull’ambiente che sulla salute; incoraggia inoltre il riutilizzo e/o il riciclaggio dei materiali di cui è costituito l’apparecchio.
Lo smaltimento improprio dell’apparecchio da parte dell’utente comporta l’applicazione delle sanzioni amministrative previste
dalla normativa applicabile.
IN CASO DI ERRORE!
• Spegnere l’apparecchio! Staccare l’alimentazione elettrica!
• Chiamare l’assistenza e informarla del codice di errore o descrivere qualsiasi comportamento insolito o ru-
more del vostro apparecchio!
Quando si verica un errore o la modalità di protezione si attiva
automaticamente, il numero di errore verrà visualizzato sul
display del pannello di controllo e lampegerà un led sulla scheda
dell’unità di controllo.
WATE R TEM P
C
SE T TEM P
ERRO R
CODICE DI ERRORE
ALTRE CARATTERISTICHE DELL’APPARECCHIO
Quando l’apparecchio è in modalità di standby, se la temperatura nella parte inferiore del serbatoio dell’acqua scende al di sotto
di 5°C (protezione antigelo), la resistenza elettrica si accenderà no a quando la temperatura nella parte inferiore del serbatoio
dell’acqua aumenta a 10°C o l’apparecchio viene acceso.
L’icona indica che la funzione di sbrinamento è attivata. Questa è una funzione automatica. Il sistema entrerà o uscirà dalla
“Modalità di sbrinamento” in base al programma di controllo.
Se l’apparecchio è stato spento per 12 ore, la funzione attiverà la pompa di circolazione esterna per 2 minuti.
L’icona indica che la funzione “ventilatore” è attivata. Quando l’apparecchio è eccesso, premere il pulsante e tenere premuto
per 5 secondi per attivare o disattivare la funzione “ventilatore“. Se la funzione è attivata, il ventilatore continuerà a funzionare an-
che quando la temperatura dell’acqua raggiunge il punto specicato e l’apparecchio è in modalità di standby. Altrimenti, se questa
funzione è disattivata, il ventilatore smette di funzionare quando la temperatura dell’acqua raggiunge l’impostazione e l’apparec-
chio è in modalità di standby.
Modalità antigelo
Modalità di sbrinamento
La funzione antibloccaggio quando si collega una pompa di circolazione esterna
Ventilatore
Codici di errore
Fig. 05

17
WARMWASSER – WÄRMEPUMPE
DE
Sehr geehrte Kunden,
Danke für Ihren Einkauf.
Das Team von TESY hat immer eine große Aufmerksamkeit den Umweltprobleme geschenkt und verwendet dazu
Technologien und Stoe mit niedriger Einwirkung auf die Natur bei der Herstellung seiner Produkte entsprechend der
Richtlinien der Gemeinschaft zur Einschränkung bestimmter gefährlichen Stoen in elektrischen und elektronischen Geräte,
sowie bezüglich der Abfälle WEEE und RоHS (2011/65/ЕU и 2012/19/EU).
WICHTIGE SICHERHEITSREGELN UND -HINWEISE
Wichtig! Die Garantie fällt weg und der Hersteller übernimmt keine Haftung für die Folgen bei Nichteinhaltung der
gegebenen Anweisungen!
• Das Gerät ist nicht zur Verwendung von Personen (einschl. Kinder) mit bes-
chränkten leiblichen, sensitiven oder Sinnmöglichkeiten oder fehlender ausre-
ichender Erfahrung und Kenntnisse, ausgenommen wenn sie zur Verwendung des
Geräts von einer Person ausgebildet und angewiesen sind, die für ihre Sicherheit
verantwortlich ist.
• Die Kinder sollen untergewiesen werden, mit dem Gerät nicht zu spielen.
• Die Kinder dürfen nicht mit dem Gerät spielen. Die Ausführung der Reinigung und
Wartung des Geräts, die durch Verbraucher erfolgen sollen, ist verboten für Kinder
ohne Aufsicht.
• Die Anwendung des Geräts für ein anderes Ziel ist verboten, ausgenommen zum
Zweck, für welches es bestimmt ist.
• Nutzen Sie den Wasserbehälter nicht, wenn er nicht mit Wasser voll ist.
• Der Einbau, die Inbetriebnahme und die Wartung des Geräts sollen durch eine
qualizierte und zuständige Person erfolgen. Probieren Sie nicht das Gerät allein
einzubauen.
• Das Gerät darf nur in brandgeschützten Räumen eingebaut werden.
• Die Verwendung dieses Geräts bei Temperaturen und Druckhöhen, die verschie-
den als die angegebenen sind, führt zum Wegfallen der Garantie!
• Das Gerät ist bestimmt zur Erwärmung vom Trinkwasser im üssigen Zustand.
Die Nutzung anderer Medien in verschiedenen Aggregatzuständen führt zum Weg-
fallen der Garantie!
• Der Wärmetauscher des Geräts ist zur Verwendung mit reinem kreislaufenden
Wasser bestimmt.
• Der Wärmetauscher ist zum Betrieb in einer geschlossenen Kreislaufkette mit
Arbeitsmedium Wasser oder Wasser + Propylenglykol + Korrosionsschutzzusätze
bestimmt. Nichteinhaltung dieser Bedingung führt zum Verstoß der Garantiebedin-
gungen
Lesen Sie gründlich die „Einbau- und Wartungsanleitung“ durch, die untrennbarer
Teil Ihres Geräts ist!
• Überzeugen Sie sich, dass das Gerät laut der “Einbau- und Wartungsanleitung“
eingebaut und angeschlossen ist, die untrennbarer Teil Ihres Geräts ist!
• Versichern Sie sich, dass der Wasserbehälter voll mit Wasser ist!
• Versichern Sie sich, dass die Stromversorgung vorliegt und den örtlichen Normen
entspricht!
• Überzeugen Sie sich, dass die Luftleitungen oder Lufteingang/-ausgang nicht
gesperrt sind!
VOR DEM STARTEN DES GERÄTS

18
BETRIEBSMODI. ANWENDERSCHNITTSTELLE
Enable/Disable
Fan Ventilation
5s5s
Turn ON
E-Heater
Turn ON
Standby
2s2s
Lock/Unlock
Buttons
5s5s
Set Temp
Set
Hour/Minute
Adjust
Hour/Minute
Set
Hour
Timer
5s5s
Set
Minute
Save & Exit Cancel
Timer
5s5s
OFF
C
WATE R TEMP
C
SE T TEMP
ON
ERRO R
Check Parameters
A-H
Check Parameters
1-35
1
2
3
4
5
1 When connecting the appliance to the main power supply, all icons
are displayed on the controller screen for 3 seconds. After that an initial
check is undergoing.If everything is ok, the unit enters into a standby mode
(g.01)
Press and hold the button for 2 seconds when the unit is in standby. The
“Heating mode” will start. The display will look like (g02)
2
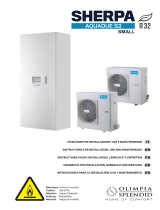
Solange die Thermopumpe Arbeitet, drücken Sie die Taste , um das “Modus schnelle Erwärmung” zu aktivieren. Die
Ikone wird sich am Bildschirm erscheinen und das elektrische Heizelement wird nach dem eingestellten Programm gleichzeitig
mit dem Verdichter solange arbeiten, bis die eingestellte Temperatur erreicht wird.
Wenn das Gerät eingeschaltet ist, drücken Sie die Taste und halten diese 5 Sekunden lang gedrückt, um die Funktion „Lüfter“ zu
aktivieren oder zu deaktivieren. Falls die Funktion aktiviert ist, dann wird der Lüfter weiterarbeiten, sogar wenn die Wassertempera-
tur die angegebene Höhe erreicht und das Gerät im Bereitschaftsmodus sich bendet. Im Gegenfall – falls diese Funktion deaktiv-
iert wird – hört der Lüfter seine Arbeit beim Erreichen der angegebenen Höhe von Wassertemperatur und beim Bereitschaftsmodus
des Geräts auf.
C
WATE R TEM P
STANDBY MODUS
C
WATE R TEM P
C
SE T TEM P
HEIZMODUS
3
Während der Arbeit der Thermopumpe drücken Sie die Taste oder , um die gewünschte von Ihnen Wassertempera-
tur einzustellen.
Die höchste erreichbare nur durch den Thermopumpenaggregat Wassertemperatur ist direkt von der Temperatur der eingehenden
Luft abhängig. Sehen Sie die nachfolgende Graphik: (g.04)
Drücken Sie gleichzeitig die Tasten und und halten Sie diese 5 Sekunden gedrückt, um die Kontrolltafel abzusperren.
Drücken Sie gleichzeitig die Tasten und und halten Sie diese 5 Sekunden gedrückt, um sie aufzuriegeln.
Fig. 01 Fig. 02
Um das Gerät auszuschalten, drücken Sie die Taste und halten Sie diese 2 Sekunden während des Betriebs des Geräts
gedrückt.

19
BEMERKUNG:
1) Die Funktionen „Einschalten“ und „Ausschalten“ des Timers dürfen gleichzeitig eingestellt werden.
2) Die Timereinstellungen werden automatisch widerholen.
3) Die Timereinstellungen werden nach einem Stromstoß beibehalten.
4
-Wenn das Gerät eingeschaltet ist, drücken Sie die Taste , um in die Uhreinstellungen zu gelangen. Die Ikonen für Stunden
und Minuten “88:88” werden gleichzeitig blinken ;> Um die Einstellungen für Stunden und Minuten einzuschalten, drücken Sie die
taste ; und für Einstellung von Stunden und Minuten nutzen Sie die Tasten und ;>Um den Ausgang aus der Einstellung der
Uhr zu bestätigen, drücken Sie wieder die Taste .
Wenn das Gerät eingeschaltet ist, drücken Sie die Taste , um die Uhreinstellungen zu gelangen. Die Ikonen der Stunden und
Minuten “88:88” werden gleichzeitig blinken;>- Nutzen Sie die Tasten und , um die Stunden einzustellen;>- Drücken Sie die
Taste , um die Minuteneinstellung zu gelangen, dann wird die Ikone für Minuten “:88” blinken und Sie müssen die Tasten
und nutzen, um die Minuten einzustellen.>- - Drücken Sie die Taste wieder, um die Timerseinstellungen zu sichern und das
Einstellungsmenü zu verlassen.
Drücken Sie die Taste Drücken Sie die Taste!
5
Drücken Sie diese Taste und gehen Sie in der Option zur Überprüfung der Temperaturen und Önungsschritte des
Expansionsventils ein.
-Nutzen Sie die Tasten und um die Werte der Temperaturfühler und die Schritte der Önung des Expansionsventils zu über-
prüfen (Kennzahlen А-F).
-IUnabhängig vom Modus, in welchem sich die Thermopumpe bendet, drücken Sie die Taste und halten Sie diese5 Sekunden
gedrückt; das Gerät geht in die Einstellungen zur Überprüfung der Systemkennzahlen ein.
-Nutzen Sie die Tasten und , um die Systemkennzahlen zu überprüfen.
Wenn Sie das Gerät an die Stromspeisung anschließen, erscheinen sich
alle Ikonen 3 Sekunden lang am Bildschirm. Nach einer automatischen
Prüfung geht das Gerät ins Bereitschaftsmodus über:
Die Thermopumpe beginnt zu arbeiten, um die angegebene Temperatur zu erreichen. Falls die angegebene Temperatur höher als
65°C ist, wird auch das elektrische Heizelement als Sekundärquelle eingeschaltet, um die Temperatur erreicht zu werden.Falls die
Außentemperatur niedriger als -10°C oder höher als 44°C ist, dann arbeitet nur das elektrische Heizelement.Solange die Thermo-
pumpe bei niedriger Außentemperatur arbeitet, kann das „Modus Auftauen“ aktiviert werden, um das auf dem Verdampfer aufge-
häufte Eis sich aufzutauen.
Die höchste erreichbare nur durch den Thermopumpenaggregat Wassertemperatur ist direkt von der Temperatur der eingehenden
Luft abhängig. Sehen Sie die nachfolgende Graphik:(g. 04)
Falls die eingestellte (mittels der Kontrolltafel) Temperatur höher als die erreichbare ist (an der Graphik gezeigt), dann wird das
elektrische Heizelement automatisch eingeschaltet, um die Temperatur zu erreichen.
Damit Sie das Energieverbrauch mindern zu können, vermeiden Sie die Einstellung der Temperatur über 55oC
BEI DRINGENDEM BEDARF VOM WARMWASSER
Solange die Thermopumpe Arbeitet, drücken Sie die Taste um das “Modus schnelle Erwärmung” zu aktivieren. Die Ikone
wird sich am Bildschirm erscheinen und das elektrische Heizelement wird nach dem eingestellten Programm gleichzeitig mit dem
Verdichter solange arbeiten, bis die eingestellte Temperatur erreicht wird.
MIT SIRGE UM IHRE GESUNDHEIT
Das elektrische Heizelement wird wöchentlich unabhängig davon eingeschalten, ob das Gerät eingeschaltet oder ausgeschaltet ist
(Bereitschaftsmodus). Das elektrische Heizelement ausschaltet sich vom selbst, wenn die Temperatur70°C erreicht (Wasserdesin-
fektion gegen Legionelle).
MODUS ELEKTRISCHES HEIZELEMEN
Wenn die Taste des elektrischen Heizelements der Steuerung vom Hand betätigt wurde, wann das Gerät sich im Bereitschafts-
modus bendet, wird einzig das elektrische Heizelement arbeiten, bis hin die Temperatur des oberen Teils des Wasserbehälters die
eingestellte Temperatur erreicht.
MODUS FÜR WASSERERWÄRMUNG
C
WATE R TEM P
C
SE T TEM P
HEIZMODUS
Fig. 04
Fig. 03
La pagina si sta caricando...
La pagina si sta caricando...
La pagina si sta caricando...
La pagina si sta caricando...
La pagina si sta caricando...
La pagina si sta caricando...
La pagina si sta caricando...
La pagina si sta caricando...
La pagina si sta caricando...
La pagina si sta caricando...
La pagina si sta caricando...
La pagina si sta caricando...
La pagina si sta caricando...
La pagina si sta caricando...
La pagina si sta caricando...
La pagina si sta caricando...
La pagina si sta caricando...
La pagina si sta caricando...
La pagina si sta caricando...
La pagina si sta caricando...
La pagina si sta caricando...
La pagina si sta caricando...
La pagina si sta caricando...
La pagina si sta caricando...
La pagina si sta caricando...
La pagina si sta caricando...
La pagina si sta caricando...
La pagina si sta caricando...
La pagina si sta caricando...
La pagina si sta caricando...
La pagina si sta caricando...
La pagina si sta caricando...
La pagina si sta caricando...
La pagina si sta caricando...
La pagina si sta caricando...
La pagina si sta caricando...
La pagina si sta caricando...
La pagina si sta caricando...
La pagina si sta caricando...
La pagina si sta caricando...
La pagina si sta caricando...
La pagina si sta caricando...
La pagina si sta caricando...
La pagina si sta caricando...
La pagina si sta caricando...
La pagina si sta caricando...
La pagina si sta caricando...
La pagina si sta caricando...
La pagina si sta caricando...
La pagina si sta caricando...
La pagina si sta caricando...
La pagina si sta caricando...
-
 1
1
-
 2
2
-
 3
3
-
 4
4
-
 5
5
-
 6
6
-
 7
7
-
 8
8
-
 9
9
-
 10
10
-
 11
11
-
 12
12
-
 13
13
-
 14
14
-
 15
15
-
 16
16
-
 17
17
-
 18
18
-
 19
19
-
 20
20
-
 21
21
-
 22
22
-
 23
23
-
 24
24
-
 25
25
-
 26
26
-
 27
27
-
 28
28
-
 29
29
-
 30
30
-
 31
31
-
 32
32
-
 33
33
-
 34
34
-
 35
35
-
 36
36
-
 37
37
-
 38
38
-
 39
39
-
 40
40
-
 41
41
-
 42
42
-
 43
43
-
 44
44
-
 45
45
-
 46
46
-
 47
47
-
 48
48
-
 49
49
-
 50
50
-
 51
51
-
 52
52
-
 53
53
-
 54
54
-
 55
55
-
 56
56
-
 57
57
-
 58
58
-
 59
59
-
 60
60
-
 61
61
-
 62
62
-
 63
63
-
 64
64
-
 65
65
-
 66
66
-
 67
67
-
 68
68
-
 69
69
-
 70
70
-
 71
71
-
 72
72


Tesy AquaThermica Eco 260 S Manuale utente
- Tipo
- Manuale utente
- Questo manuale è adatto anche per
in altre lingue
Documenti correlati
Altri documenti
-
Panasonic WHUD09HE5 Istruzioni per l'uso
-
-
 Olimpia Splendid Sherpa AQUADUE S2 Guida d'installazione
-
 Olimpia Splendid Sherpa TOWER S2 Manuale d'installazione
-
 Olimpia Splendid Sherpa S2 Manuale d'installazione
-
-
 Olimpia Splendid Sherpa AQUADUE TOWER S2 Manuale d'installazione
-
-
 Olimpia Splendid SHERPA Tower S2 SMALL Guida d'installazione


