Thermapen THS-235-447 Manuale utente
- Categoria
- Misurazione
- Tipo
- Manuale utente

ADVERTENCIA: El alcohol isopropílico (IPA) y otros disolventes pueden
causar daños en la carcasa y la pantalla de este instrumento.
REEMPLAZO DE LA BATERÍA - Aparecerá un símbolo de batería baja
' ' indicando que debe sustituir la batería (1 x AAA). En esta
condición, la retroiluminación funcionará a bajo nivel para ahorrar
batería. El instrumento continúa funcionando, pero para mantener la
precisión le recomendamos sustituir las baterías lo antes posible.
Para sustituir la pila, es necesario aojar la tapa del compartimento de
la pila con un destornillador Pozi (PZ1) para retirarla. Cambie la pila por
otra del tipo AAA, teniendo en cuenta la polaridad. Apriete el tornillo
de la tapa del compartimento de la pila hasta que se ajuste con cierta
holgura a la junta. No apretar demasiado. Para obtener más
información sobre el cambio de pila, visite thermapen.co.uk.
MENSAJES DE ERROR
• 'Lo' aparecerá en la pantalla si está midiendo por debajo del rango
del instrumento.
• 'Hi' indicará que está midiendo por encima del rango del
instrumento.
• 'Err' en la pantalla advierte que hay un fallo en la sonda. Si el
mensaje de error persiste, póngase en contacto con nuestro
departamento de servicio al cliente para obtener ayuda.
Operating Instructions
545-5100/06.04.21
UK Patent No GB 2504936, US Patent No US 9470560
German Utility Patent DE 202013103605 U1
EC Regd.Des.No. 002535161-0003, EC Regd.Des.No. 002535161-0005
Designed to meet BS EN 61010, BS EN 60529
Manufactured in Britain by
Electronic Temperature Instruments Ltd
01903 202151 · sales@etiltd.com · thermapen.co.uk
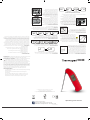
INSTRUMENT OPERATION - The instrument is
switched on by unfolding the probe and turned
off by folding the probe until fully located into
the rubber probe retainer. The probe should not
be rotated more than 180 degrees as damage
will occur. It is recommended to store the
probe in the closed position, when not in use.
This instrument will automatically sleep if no
movement is detected; any movement such as
handling or using the instrument will cause the
unit to wake up.
Apply the tip of the probe to the substance,
medium or surface to be measured. The sensor
is located at the tip of the probe, therefore the
minimum depth insertion should be 3 mm.
The probe tip is very sharp and therefore
caution should be taken when using.
Care should also be taken when closing
the probe after taking hot temperatures
as the probe may remain hot.
INTELLIGENT BACKLIGHT - This instrument
features a light sensor which will automatically
turn the backlight on in low light conditions. The
backlight will remain on for 10 seconds
and automatically turn off if no movement
is detected.
INSTRUMENT CONFIGURATION - This
instrument has two small buttons inside
the battery cover: MENU, which is used to
enter, save settings and exit the menu and
SET, which is used to select the desired
settings. To alter any of the settings,
open the battery cover using a Pozi (PZ1)
screwdriver to gain access to the buttons.
Open the probe to turn the unit on.
Settings are saved once ‘End’ is displayed.
To abort settings, close the probe.
Press the MENU button to cycle through the following settings:
Menu Cycle (Default settings shown)
!
ERROR MESSAGES
• ‘Lo’ will be displayed if you are measuring below the
instrument’s range.
• ‘Hi’ will be displayed if you are measuring above the
instrument’s range.
• ‘Err’ will be displayed if the probe develops a fault. If the
error message remains, contact our service department for
further assistance.
GUARANTEE - This instrument carries a two-year guarantee against
defects in either components or workmanship. During this period,
products that prove to be defective will, at the discretion of ETI, be
either repaired or replaced without charge. This guarantee does not
apply to probes, where a six-month period is offered. The product
guarantee does not cover damage caused by fair wear and tear,
abnormal storage conditions, incorrect use, accidental misuse,
abuse, neglect, misapplication or modication. Full details of liability
are available within ETI’s Terms & Conditions of Sale at etiltd.com/
terms. In line with our policy of continuous development, we reserve
the right to amend our product specication without prior notice.
RESOLUTION - Press the MENU button so that ‘0.1°’ or ‘1°’ is
displayed, press the SET button to select the required display.
SCREEN ROTATION - Press the MENU button until ‘Display’ is
shown, use the SET button to scroll through and select rotation.
AUTO OFF/SLEEP MODE - Press the MENU button until ‘SLEEP’
is displayed and use the SET button to scroll through the time
delays, selectable from 10 to 180 seconds in 10 second increments.
Alternatively you can select ‘oFF’ which inhibits sleep mode.
INSTRUMENT CLEANING - Clean the instrument regularly with an
anti-bacterial probe wipe to avoid potential food-borne bacteria growth.
WARNING: IPA and other solvents may cause damage to the case
and screen of this instrument.
BATTERY REPLACEMENT - A low battery
symbol ‘ ’ will appear when the
battery (1 x AAA) needs replacing, in this
condition the backlight is set to a low
level to save battery life. The instrument
continues to measure accurately but we
recommend that the battery is changed
as soon as possible.
To replace the battery, loosen the
battery cover screw using a Pozi (PZ1)
screwdriver to remove the battery cover.
Replace with a single AAA battery noting
the polarity. Tighten the battery cover
screw until the battery cover is snug
onto the seal. Do not over-tighten.
For further information on changing
the battery visit thermapen.co.uk.
.
ONE

FR - UTILISATION DE L’INSTRUMENT - L’instrument se met en
marche en dépliant la sonde et s’éteint lorsque celle-ci est repliée sous
le boîtier, de sorte qu’elle repose entièrement contre le dispositif de
retenue en caoutchouc. Ne pas tenter de déplier la sonde à un angle
d’ouverture supérieur à 180 degrés, sous peine de l’endommager.
Lorsque l’instrument n’est pas utilisé, il est recommandé de replier
la sonde sous le boîtier avant de le ranger. L’instrument se mettra
automatiquement en veille s’il ne détecte aucun mouvement ; s’il
détecte des mouvements - lors de la manipulation ou de l’utilisation
de l’instrument, par exemple - il se remettra en marche.
Insérer la sonde dans la substance ou la matière pour en mesurer
la température ; vous pouvez également l’appliquer sur une surface
pour obtenir un relevé de température. Le capteur se trouve dans
la pointe de la sonde, ce qui signie que la profondeur d’insertion
minimale est de 3 mm.
Il est conseillé de prendre des précautions lors de l’utilisation
de l’instrument, car la pointe de la sonde est très aiguisée. Il est
également recommandé de prendre garde en repliant la sonde
après avoir mesuré de hautes températures, an d’éviter les
brûlures.
RÉTROÉCLAIRAGE INTELLIGENT - Cet instrument est équipé
d’un capteur de lumière qui déclenche automatiquement le
rétroéclairage en cas de faible luminosité. Le rétroéclairage reste ainsi
allumé pendant 10 secondes et s’éteint automatiquement si aucun
mouvement n’est détecté.
CONFIGURATION DE L’INSTRUMENT - Cet instrument est muni
de deux petits boutons, situés à l’intérieur du couvercle de pile : le
bouton MENU, qui sert à saisir et à enregistrer les paramètres, puis à
sortir du menu; et le bouton SET (DÉFINIR), qui sert à sélectionner les
paramètres désirés. Pour modier un ou plusieurs des paramètres,
ouvrir le couvercle de pile à l’aide d’un tournevis cruciforme (PZ1), an
d’accéder aux boutons. Déplier la sonde pour mettre l’instrument
en marche. Les paramètres seront enregistrés une fois le message
‘End’ (Fin) afché. Pour abandonner le paramétrage, replier la sonde.
Appuyer sur le bouton MENU pour faire déler les paramètres
suivants:
RESOLUTION - Appuyer sur le bouton MENU pour afcher
les options ‘0.1°’ ou ‘1°’ et appuyer sur le bouton SET an de
sélectionner l’afchage désiré.
ROTATION DE L’ECRAN - Appuyer sur le bouton MENU pour
afcher le menu ‘Display’ (Afchage), puis appuyer sur le bouton
SET pour faire déler les options et sélectionner le type de rotation
désiré.
MODES AUTO OFF/SLEEP - Appuyer sur le bouton MENU pour
afcher le menu ‘SLEEP’ (VEILLE), puis utiliser le bouton SET
pour faire déler les délais de temporisation et sélectionner un
délai compris entre 10 et 180 secondes, par incréments de 10
secondes. Il est également possible de sélectionner l’option ‘oFF’
(DÉSACTIVÉ), qui permet de désactiver le mode SLEEP.
NETTOYAGE DE L’INSTRUMENT - Nettoyer l’instrument
régulièrement, à l’aide d’un chiffon antibactérien adapté, an de
prévenir la croissance de bactéries d’origine alimentaire.
AVERTISSEMENT: L'alcool isopropylique et d'autres solvants peuvent
endommager le boîtier et l'écran de cet instrument.
REMPLACEMENT DE LA PILE - Un symbole de batterie ' ' faible
s'afchera si la pile (1 x AAA) nécessite d'être remplacée ; dans ce cas,
l'intensité du rétroclairage sera réduite an d'optimiser l'autonomie de
la pile. L'instrument continuera de fournir des relevés précis, bien que
nous recommandions de remplacer la pile dès que possible. Pour
remplacer la pile, dévissez la vis du couvercle en utilisant un tournevis
Pozi (Pz1) an d’enlever le couvercle du compartiment à pile.
Remplacez la pile AAA en faisant attention à la polarité. Serrez la vis du
couvercle jusqu’à tant que le couvercle soit bien ajusté au niveau du
joint. Ne serrez pas excessivement la vis. Pour obtenir plus
d’informations sur le changement de la pile, rendez-vous sur
thermapen.co.uk.
MESSAGES D'ERREUR
• Le message 'Lo' (Faible) s'afchera si la température mesurée est
inférieure à la plage de mesure de l'instrument.
• Le message 'Hi' (Élevé) s'afchera si la température mesurée est
supérieure à la plage de mesure de l'instrument.
• Le message 'Err' (Erreur) s'afchera si la sonde est défectueuse. Si
le message d'erreur continue de s'afcher, contactez notre service
d'assistance qui vous aidera à résoudre le problème.
DE - HANDHABUNG DES INSTRUMENTS - Das Instrument wird
durch Ausklappen der Messsonde eingeschaltet. Zum Ausschalten die
Messsonde einklappen, bis sie sich vollständig in der Gummihalterung
für die Sonde bendet. Die Messsonde sollte nicht um mehr als
180 Grad gedreht werden, da sonst Schäden auftreten könnten.
Es wird empfohlen, die Messsonde eingeklappt zu lassen, wenn
das Instrument nicht verwendet wird. Dieses Instrument schaltet
automatisch in den Stand-by-Modus, wenn es keine Bewegung
registriert. Durch Bewegungen wie Anfassen oder Benutzen wird es
erneut aktiviert.
Die Spitze der Messsonde auf die Substanz, das Medium oder die
Oberäche setzen, wo eine Messung durchgeführt werden soll. Der
Sensor bendet sich an der Spitze der Messsonde, daher sollte sie
mindestens 3 mm tief eingeführt werden.
Die Spitze der Messsonde ist sehr scharfkantig, daher sollten Sie
bei der Anwendung vorsichtig sein. Auch beim Einklappen der
Messsonde nach der Messung hoher Temperaturen ist Vorsicht
geboten, da die Sonde möglicherweise noch heiß ist.
INTELLIGENTER GEGENLICHTAUSGLEICH - Dieses Instrument
ist mit einem Lichtsensor ausgestattet, der das Hintergrundlicht
bei schlechten Lichtverhältnissen automatisch einschaltet. Das
Hintergrundlicht bleibt 10 Sekunden lang eingeschaltet und geht
automatisch aus, wenn keine Bewegung festgestellt wird.
EINSTELLUNG DES INSTRUMENTS - Dieses Instrument verfügt über
zwei kleine Knöpfe in der Abdeckung des Batteriefachs: MENU, mit
dem man zum Menü gelangen, Einstellungen speichern und das
Menü verlassen kann und SET (EINSTELLUNGEN), über den man
die gewünschten Einstellungen festlegen kann. Zum Verändern der
Einstellungen das Batteriefach mit einem Pozi (PZ1)-Schraubenzieher
öffnen, um an die Knöpfe zu gelangen. Die Messsonde ausklappen,
um das Gerät einzuschalten. Die Einstellungen wurden
gespeichert, wenn 'End' ('Ende') angezeigt wird. Zum Verlassen des
Einstellungsmenüs die Messsonde einklappen. Auf MENU drücken,
um folgende Einstellungen durchzugehen:
AUFLÖSUNG - MENU drücken, sodass '0,1°' oder '1°' angezeigt
wird, dann SET drücken, um die gewünschte Anzeige
auszuwählen.
DEN BILDSCHIRM DREHEN - MENU drücken, bis 'Display'
angezeigt wird, SET (EINSTELLUNGEN) so lange drücken bis die
gewünschte Bildschirmausrichtung angezeigt wird.
AUTOMATISCH AUSSCHALTEN/STAND-BY-MODUS - MENU
drücken, bis 'SLEEP' (STAND-BY) angezeigt wird und die
Einschaltverzögerung über SET (EINSTELLUNGEN) einstellen. Es
kann eine Spanne zwischen 10 und 180 Sekunden in Schritten
von 10 Sekunden eingestellt werden. Alternativ kann auch
'oFF' (AUS) ausgewählt werden, wodurch der Stand-by-Modus
gesperrt wird.
REINIGUNG DES INSTRUMENTS - Das Instrument muss regelmäßig
mit einem antibakteriellen Tuch für Sonden gereinigt werden, um
ein mögliches Wachstum von Lebensmittelbakterien zu vermeiden.
WARNUNG: IPA und andere Reiniger können das Gehäuse und den
Bildschirm dieses Instruments beschädigen.
BATTERIEWECHSEL - Das Symbol für niedrige Batterieleistung ' '
erscheint, wenn die Batterie (1 x AAA) ersetzt werden muss. In
diesem Fall leuchtet das Hintergrundlicht nur schwach, um die
Batterie zu schonen. Mit dem Instrument können auch weiterhin
genaue Messungen durchgeführt werden, aber es wird empfohlen,
die Batterie so bald wie möglich zu ersetzen. Lösen Sie zum
Auswechseln der Batterie die Schraube der Batterieabdeckung mit
einem Pozidriv-Schraubenzieher und entfernen Sie die
Batterieabdeckung. Setzen Sie eine einzelne AAA-Batterie ein.
Achten Sie auf die richtige Polarität. Ziehen Sie die Schraube der
Batterieabdeckung an, bis die Batterieabdeckung fest sitzt. Nicht zu
fest anziehen. Weitere Informationen zum Batteriewechsel nden
Sie auf thermapen.co.uk.
FEHLERMELDUNGEN
• Falls die gemessene Temperatur unterhalb des Messbereichs des
Instruments liegt, wird 'Lo' angezeigt.
• Bei einer Messung oberhalb des Messbereichs des Instruments
wird 'Hi' angezeigt.
• Tritt bei der Messsonde ein Fehler auf, wird 'Err' angezeigt.
Bleibt die Fehlermeldung bestehen, nehmen Sie mit unserer
Serviceabteilung Kontakt auf, um weitere Hilfe zu erhalten.
IT - UTILIZZO DELLO STRUMENTO - Lo strumento viene
acceso svolgendo la sonda e spento avvolgendo la sonda nché
completamente inserita nel fermasonda in gomma. La sonda non
dev’essere ruotata di oltre 180 gradi altrimenti potrebbe danneggiarsi.
Si raccomanda di conservare la sonda in posizione chiusa, se non
utilizzata. Il presente strumento entrerà automaticamente in
standby qualora non venga rilevato alcun movimento, mentre la
manipolazione o l’utilizzo dello strumento lo renderà attivo.
Applicare la punta della sonda alla sostanza, al mezzo o alla supercie
da misurare. Il sensore è situato alla punta della sonda, quindi la
profondità d’inserimento minima è di 3 mm.
La punta della sonda è molto aguzza quindi durante l’uso si
deve prestare la massima attenzione. Si deve anche prestare
attenzione quando si chiude la sonda dopo aver misurato
temperature calde dato che la sonda resta calda.
RETROILLUMINAZIONE INTELLIGENTE - Il presente strumento
include un sensore che accende automaticamente la
retroilluminazione in condizioni di luce scarsa. La retroilluminazione
resterà accesa per 10 secondi e si spegnerà automaticamente se non
viene rilevato alcun movimento.
CONFIGURAZIONE DELLO STRUMENTO - Il presente strumento
presenta due piccoli pulsanti all’interno del coperchio del vano
batterie: MENU, utilizzato per immettere e salvare le impostazioni
e uscire dal menu e SET, utilizzato per selezionare le impostazioni
desiderate. Per modicare qualsiasi impostazione, aprire il coperchio
del vano batterie utilizzando un cacciavite pozi (PZ1) per accedere ai
pulsanti. Aprire la sonda per accendere l’unità. Le impostazioni sono
salvate quando viene visualizzato 'End'. Per annullare le impostazioni,
chiudere la sonda. Premere il pulsante MENU per scorrere le
impostazioni seguenti:
RISOLUZIONE - Premere il pulsante MENU in modo da
visualizzare '0.1°' o '1°' premere il pulsante SET per selezionare la
visualizzazione richiesta.
ROTAZIONE DELLO SCHERMO - Premere il pulsante MENU
nché viene visualizzato 'Display', utilizzare il pulsante IMPOSTA
per scorrere e selezionare la rotazione.
SPEGNIMENTO AUTOMATICO/MODALITA’ STANDBY - Premere
il pulsante MENU nché 'SLEEP' viene visualizzato e utilizzare
il pulsante SET per scorrere attraverso i ritardi di tempo,
selezionabili da 10 a 180 secondi in incrementi da 10 secondi.
In alternativa si può selezionare 'oFF' che inibisce la modalità
di standby.
PULIZIA DELLO STRUMENTO - Pulire lo strumento regolarmente con
un panno per sonde antibatterico per evitare la crescita potenziale di
batteri di origine alimentare.
ATTENZIONE: L’IPA e altri solventi possono causare danni all’involucro
e allo schermo del presente strumento.
SOSTITUZIONE DELLA PILA - Un simbolo di batteria scarica ' '
comparirà quando la batteria (1 x AAA) dev’essere sostituita, in tale
condizione la retroilluminazione viene impostata a un livello basso
per prolungare la durata della batteria. Lo strumento continua a
misurare accuratamente ma consigliamo di sostituire la batteria il
prima possibile. Per sostituire la pila, allentare la vite del coperchio
batteria utilizzando un cacciavite Pozi (PZ1) per rimuoverlo. Sostituire
con un’unica pila AAA facendo attenzione alla polarità. Stringere la
vite del coperchio batteria no a portarlo aderente alla guarnizione.
Non stringere eccessivamente. Per ulteriori informazioni sulla
sostituzione della pila, visitare thermapen.co.uk.
MESSAGGI DI ERRORE
• 'Lo' verrà visualizzato se si sta effettuando la misurazione al di sotto
dell’intervallo dello strumento.
• 'Hi' verrà visualizzato se si sta effettuando la misurazione al di
sopra dell’intervallo dello strumento.
• 'Err' verrà visualizzato se la sonda presenta un guasto. Se il
messaggio di errore persiste, contattare il nostro dipartimento di
servizio alla clientela per ricevere ulteriore assistenza.
PT - MODO DE FUNCIONAMENTO DO INSTRUMENTO - O
instrumento é ligado desdobrando a sonda e desligado dobrando a
sonda até estar totalmente colocada no retentor de borracha da sonda.
A sonda não deve ser rodada mais de 180 graus porque tal causará
danos. Recomenda-se guardar a sonda na posição fechada, sempre
que não estiver em uso. Este instrumento desliga-se automaticamente
se não for detetado movimento, qualquer movimento como o
manuseamento ou uso do instrumento ativará a unidade.
Aplique a ponta da sonda na substância, meio ou superfície a ser
medida. O sensor está localizado na ponta da sonda, pelo que, a
profundidade mínima de inserção deve ser de 3 mm.
A ponta da sonda é muito aguçada, pelo que, devem ser
tomadas precauções ao usar. Deve também ter cuidado ao
fechar a sonda após medir temperaturas quentes porque a
sonda pode permanecer quente.
RETROILUMINAÇÃO INTELIGENTE - Este instrumento apresenta um
sensor de luz que acende automaticamente a luz de retroiluminação
em condições de pouca luz. A luz de retroiluminação permanecerá
acesa por 10 segundos e desliga-se automaticamente se não for
detetado qualquer movimento.
CONFIGURAÇÃO DO INSTRUMENTO - Este instrumento tem
dois pequenos botões dentro da tampa da pilha: MENU, usado
para introduzir, guardar congurações e sair do menu e SET
[CONFIGURAR], usado para selecionar as congurações desejadas.
Para alterar as congurações, abra a tampa da pilha, usando uma
chave de fendas pozi (PZ1) para aceder aos botões. Abra a sonda
para ligar a unidade. As congurações são guardadas quando é
exibido 'End' [Fim]. Se desejar anular as congurações, feche a
sonda. Pressione o botão MENU para alternar entre as seguintes
congurações:
RESOLUÇÃO - Pressione o botão MENU para exibir '0.1°' ou '1°',
pressione o botão SET para selecionar o visor solicitado.
ROTAÇÃO DE ECRÃ - Pressione o botão MENU até aparecer
'Display' [Visualizar], use o botão SET para percorrer e selecionar a
rotação.
MODO AUTOMÁTICO OFF/SLEEP [DESLIGAR/LATÊNCIA] -
Pressione o botão MENU até aparecer 'SLEEP' [LATÊNCIA] e use
o botão SET para percorrer os atrasos de tempo, selecionáveis
de 10 a 180 segundos em incrementos de 10 segundos.
Alternativamente, pode selecionar 'oFF' que inibe o modo de
latência.
LIMPEZA DO INSTRUMENTO - Limpe o instrumento regularmente
com uma compressa de sonda antibacteriana para evitar o potencial
crescimento de bactérias de origem alimentar.
ATENÇÃO: IPA e outros solventes podem causar danos à caixa e ecrã
deste instrumento
SUBSTITUIÇÃO DA PILHA - Um símbolo de pilha ' ' fraca será
exibido quando a pilha (1 x AAA) precisar de ser substituída, nesta
situação, a luz de retroiluminação é denida para um nível baixo para
poupar pilha. O instrumento continua a medir com precisão, mas é
recomendável que a pilha seja substituída o mais rápido possível.
Para substituir a pilha, desapertar o parafuso da tampa da pilha
usando uma chave de parafusos Pozi (PZ1) para remover a tampa da
pilha. Substituir por uma única pilha AAA, observando a polaridade.
Apertar o parafuso da tampa da pilha até que a tampa da pilha esteja
apertada ao vedante. Não apertar em demasia. Para mais informações
sobre a mudança da pilha, consultar thermapen.co.uk.
MENSAGENS DE ERRO
• 'Lo' será exibida se estiver a medir abaixo da escala do
instrumento.
• 'Hi' será exibida se estiver a medir acima da escala do instrumento.
• 'Err' será exibida se a sonda tiver uma avaria. Se a mensagem de
erro persistir, contacte o nosso departamento de assistência para
obter assistência adicional.
ES - FUNCIONAMIENTO DEL INSTRUMENTO - El instrumento se
enciende al desplegar la sonda y se apaga plegándola de nuevo hasta
colocarla completamente en el retedor de goma de la sonda. No girar
la sonda más de 180 grados ya que podría dañarse. Se recomienda
guardar la sonda en la posición cerrada cuando no esté en uso. Este
instrumento entrará en modo suspensión si no se detecta ningún
movimiento; cualquier movimiento, como manipular o utilizar el
instrumento, reanudará su funcionamiento.
Coloque la punta de la sonda en la sustancia, el medio o la supercie
a medir. El sensor está situado en la punta de la sonda, por lo que la
profundidad mínima de inserción debe ser de 3 mm.
La punta de la sonda es muy alada, así que tenga cuidado
cuando la utilice. Tenga también precaución al cerrar la sonda
tras haber tomado temperaturas elevadas, ya que la sonda
podría estar todavía caliente.
RETROILUMINACIÓN INTELIGENTE - Este instrumento cuenta con
un sensor de luz que encenderá automáticamente la retroiluminación
en condiciones de poca luz. La retroiluminación permanecerá
encendida 10 segundos y se apagará automáticamente si no se
detecta ningún movimiento.
CONFIGURACIÓN DEL INSTRUMENTO - Este instrumento tiene dos
pequeños botones dentro de la tapa de la batería: MENU, que se
utiliza para introducir, guardar la conguración y salir del menú, y SET,
que se utiliza para seleccionar los ajustes deseados. Para modicar
cualquier ajuste, abra la tapa de la batería con un destornillador
pozi (PZ1) para acceder a los botones. Abra la sonda para encender
la unidad. Los ajustes se guardan una vez que se visualiza 'End' en
la pantalla. Cierre la sonda si desea anular la conguración. Pulse el
botón MENU para alternar entre los siguientes ajustes:
RESOLUCIÓN - Pulse el botón MENU hasta que aparezca '0,1°' o
'1°' y a continuación pulse SET para seleccionar la visualización
requerida.
ROTACIÓN DE LA PANTALLA - Pulse el botón MENU hasta que
aparezca 'Display', y luego utilice el botón SET para desplazarse y
seleccionar la rotación.
MODO APAGADO/SUSPENSIÓN AUTOMÁTICO - Pulse el botón
MENU hasta que aparezca 'SLEEP' y utilice el botón SET para
desplazarse por las demoras de tiempo, seleccionables de 10 a
180 segundos en incrementos de 10 segundos. Alternativamente,
puede seleccionar 'oFF' para inhibir el modo suspensión.
LIMPIEZA DEL INSTRUMENTO - Limpie el instrumento
periódicamente con una toallita antibacteriana para sondas, para
evitar el desarrollo de posibles bacterias transmitidas por alimentos.
!
!
!
!
!
-
 1
1
-
 2
2


Thermapen THS-235-447 Manuale utente
- Categoria
- Misurazione
- Tipo
- Manuale utente
in altre lingue
- français: Thermapen THS-235-447 Manuel utilisateur
- español: Thermapen THS-235-447 Manual de usuario
- Deutsch: Thermapen THS-235-447 Benutzerhandbuch
- português: Thermapen THS-235-447 Manual do usuário
Altri documenti
-
Microlife MT 700 Manuale utente
-
Tigex THERMOMETRE FRONTAL ULTRA COMPACT Manuale del proprietario
-
Microlife MT 410 Manuale utente
-
Microlife MT 200 Digital Fever Thermometer Manuale utente
-
-
Microlife MT 800 Manuale utente
-
FLIR Extech 445713-TP Manuale utente
-
-
Microlife MT 3001 Manuale utente