
English
Before operating the unit, please read this manual thoroughly
and retain it for future reference.
WARNING
To reduce the risk of fire or electric shock, do not
expose this apparatus to rain or moisture.
To reduce the risk of electrical shock, do not open the
cabinet. Refer servicing to qualified personnel only.
To reduce the risk of fire, do not cover the ventilation of the
apparatus with newspapers, tablecloths, curtains, etc. And do
not place lighted candles on the apparatus.
To reduce the risk of fire or electric shock, do not place objects
filled with liquids, such as vases, on the apparatus.
Do not install the appliance in a confined space, such as a
bookcase or built-in cabinet.
Connect the AC power adaptor to an easily accessible AC
outlet. Should you notice an abnormality in the AC power
adaptor, disconnect it from the AC outlet immediately.
CAUTION
You are cautioned that any changes or modification not
expressly approved in this manual could void your authority to
operate this equipment.
Disposal of Old Electrical & Electronic
Equipment (Applicable in the European
Union and other European countries with
separate collection systems)
This symbol on the product or on its packaging
indicates that this product shall not be treated as
household waste. Instead it shall be handed over to
the applicable collection point for the recycling of electrical and
electronic equipment. By ensuring this product is disposed of
correctly, you will help prevent potential negative consequences
for the environment and human health, which could otherwise
be caused by inappropriate waste handling of this product. The
recycling of materials will help to conserve natural resources.
For more detailed information about recycling of this product,
please contact your local Civic Office, your household waste
disposal service or the shop where you purchased the product.
NOTICE FOR THE CUSTOMERS IN THE
U.S.A.
INFORMATION
This equipment has been tested and found to comply with the
limits for a Class B digital device, pursuant to Part 15 of the
FCC Rules. These limits are designed to provide reasonable
protection against harmful interference in a residential
installation. This equipment generates, uses, and can radiate
radio frequency energy and, if not installed and used in
accordance with the instructions, may cause harmful
interference to radio communications. However, there is no
guarantee that interference will not occur in a particular
installation. If this equipment does cause harmful interference to
radio or television reception, which can be determined by
turning the equipment off and on, the user is encouraged to try
to correct the interference by one or more of the following
measures:
– Reorient or relocate the receiving antenna.
– Increase the separation between the equipment and receiver.
– Connect the equipment into an outlet on a circuit different
from that to which the receiver is connected.
– Consult the dealer or an experienced radio/TV technician for
help.
If you have any questions about this product, you may call;
Sony Customer Information Services Center 1-800-222-7669 or
http://www.sony.com/
Declaration of Conformity
Trade Name : SONY
Model No. : SRS-ZX1
Responsible Party : Sony Electronics Inc.
Address : 16530 Via Esprillo, SanDiego, CA
92127 USA
Telephone No. : 858-942-2230
This device complies with Part 15 of the FCC Rules.
Operation is subject to the following two conditions: (1)
This device may not cause harmful interference, and (2) this
device must accept any interference received, including
interference that may cause undesired operation.
Precautions
On safety
The nameplate indicating operating voltage, power
consumption, etc., is located on the bottom exterior.
• Before operating the system, be sure that the operating
voltage of the system is identical with that of your local
power supply.
Where purchased Operating voltage
U. S. A. 120 V AC, 60 Hz
Other countries/regions 100 – 240 V AC, 50/60 Hz
• Use only the supplied AC power adaptor.
• After operating the system with the AC power adaptor,
disconnect the AC power adaptor from the wall outlet if the
system is not to be used for an extended period of time. Just
switching the 1 button to standby does not turn the AC
power adaptor off.
On placement
• Do not set the speakers in an inclined position.
• Do not leave the system in a location near heat sources, or in
a place subject to direct sunlight, excessive dust, moisture,
rain or mechanical shock.
On operation
• Do not open the cabinet. Refer servicing to qualified
personnel only.
• Should any solid object or liquid fall into the system, have the
system checked by qualified personnel before operating it any
further.
• Although this system is magnetically shielded, do not leave
recorded tapes, watches, personal credit cards, or floppy disks
with magnetic coding in front of the system for an extended
period of time.
On cleaning
Do not use alcohol, benzine, or thinner to clean the cabinet.
If the TV picture or monitor display is
magnetically distorted
Although this system is magnetically shielded, there may be
cases that the picture on some TV sets/personal computer sets
may become magnetically distorted. In such a case, turn off the
power of the TV set/personal computer set once, and after 15 to
30 minutes turn it on again. For the personal computer set, take
the appropriate measures such as data storage before turning it
off.
When there seems to be no improvement, locate the system
further away from the TV set/personal computer set.
Furthermore, be sure not to place objects in which magnets are
attached or used near the TV set/personal computer set, such as
audio racks, TV stands, toys etc. These may cause magnetic
distortion to the picture due to their interaction with the system.
If you have any questions or problems concerning your speaker
system, please consult your nearest Sony dealer.
Identifying parts
Front (See fig. A-1)
1 1 (power) indicator/button
2 % (muting) indicator
3 VOL (volume) +/– button
4 Remote sensor
5 Speaker grille
The speaker grille can be removed.
Rear (See fig. A-2)
1 Speaker connecting port
2 DC IN 16V jack
3 INPUT 1 (audio input) jack
4 INPUT 2 (audio input) jack
5 Speaker connecting cord
Connect the right speaker.
Card remote commander
(See fig. A
-3
)
1 % (muting) button
2 VOL (volume) +/– buttons
3 1 (power) button
The operating distance of the card remote commander is approx.
5 m in maximum.
Power sources
Using on house current (See fig. B)
Connect the AC power adaptor to the system.
Notes on the AC power adaptor
• Use only the supplied AC power adaptor. Do not use any
other AC power adaptor to avoid damaging the speaker.
Polarity of the plug
• Before connecting or disconnecting the AC power adaptor,
turn off the system. Otherwise, it may cause a malfunction.
SRS-ZX1
3-268-114-11(2)
Operating Instructions
Mode d’emploi
Bedienungsanleitung
Manual de instrucciones
Gebruiksaanwijzing
Istruzioni per l’uso
Manual de instruções
Инструкция по эксплуатации
Français
Avant de faire fonctionner cet appareil, lisez attentivement le
présent mode d’emploi et conservez-le pour toute référence
ultérieure.
AVERTISSEMENT
Afin de réduire les risques d’incendie ou de choc
électrique, n’exposez pas cet appareil à la pluie ni à
l’humidité.
Pour éviter tout risque d’électrocution, n’ouvrez pas le
coffret. Ne confiez les réparations qu’à un technicien
qualifié.
Pour réduire les risques d’incendie, ne couvrez pas les orifices
d’aération de l’appareil avec des journaux, nappes, rideaux, etc.
Ne placez pas non plus de bougies allumées sur l’appareil.
Pour réduire les risques d’incendie ou d’électrocution, ne placez
pas de récipients remplis de liquides (vases, etc.) sur l’appareil.
N’installez pas l’appareil dans un espace confiné comme
une bibliothèque ou un meuble encastré.
Branchez l’adaptateur secteur à une prise secteur aisément
accessible. Si vous remarquez que l’adaptateur secteur ne convient
pas, débranchez-le immédiatement de la prise.
Traitement des appareils électriques et
électroniques en fin de vie (Applicable
dans les pays de l’Union Européenne et
aux autres pays européens disposant de
systèmes de collecte sélective)
Ce symbole, apposé sur le produit ou sur son
emballage, indique que ce produit ne doit pas être
traité avec les déchets ménagers. Il doit être remis à un point de
collecte approprié pour le recyclage des équipements électriques
et électroniques. En s’assurant que ce produit est bien mis au
rebut de manière appropriée, vous aiderez à prévenir les
conséquences négatives potentielles pour l’environnement et la
santé humaine. Le recyclage des matériaux aidera à préserver
les ressources naturelles. Pour toute information supplémentaire
au sujet du recyclage de ce produit, vous pouvez contacter votre
municipalité, votre déchetterie ou le magasin où vous avez
acheté le produit.
Précautions
Sécurité
La plaque signalétique indiquant la tension, la consommation,
etc., est située sous l’appareil, à l’extérieur.
• Avant de le faire fonctionner, vérifiez que la tension de
fonctionnement du système est identique à celle de votre
alimentation secteur.
Lieu d’achat Tension de fonctionnement
Tous pays 100 – 240 V CA, 50/60 Hz
et/ou régions
• Utilisez uniquement l’adaptateur secteur fourni.
• Après utilisation du système avec l’adaptateur secteur,
débranchez l’adaptateur secteur de la prise murale si vous
envisagez de ne pas utiliser le système pendant une période
prolongée. Commuter l’interrupteur 1 (Attente) ne met pas
l’adaptateur secteur hors tension.
Installation
• N’installez pas les enceintes en position inclinée.
• N’installez pas votre système à proximité de sources de
chaleur ni dans un endroit poussiéreux, humide ou soumis à
la pluie, aux rayons directs du soleil ou à des chocs
mécaniques.
Fonctionnement
• N’ouvrez pas le boîtier. Confiez l’entretien à un technicien
qualifié uniquement.
• Au cas où un objet ou un liquide tomberait à l’intérieur du
système, faites vérifier ce dernier par un technicien qualifié
avant de l’utiliser de nouveau.
• Bien que ce système soit magnétiquement blindé, ne laissez
pas de bandes enregistrées, de montres, de cartes de crédit ou
de disquettes employant un codage magnétique devant le
système pendant une période prolongée.
Nettoyage
Pour nettoyer le boîtier, n’utilisez pas d’alcool, d’essence ni de
diluant.
Si l’image affichée à l’écran du téléviseur ou
du moniteur présente des distorsions
magnétiques
Bien que ce système soit doté d’un écran magnétique, il est
possible que l’image de certains téléviseurs ou écrans
d’ordinateur présente des distorsions magnétiques. Dans ce cas,
mettez le téléviseur ou l’ordinateur hors tension une fois, puis
remettez-le sous tension au bout de 15 à 30 minutes. Pour
l’ordinateur, prenez les précautions nécessaires, telles que la
sauvegarde des données, avant de le mettre hors tension.
Si vous ne constatez pas d’amélioration, éloignez le système du
téléviseur ou de l’ordinateur. En outre, n’utilisez et ne posez pas
d’objets contenant des aimants, comme les meubles audio, les
supports de téléviseurs et les jouets, à proximité du téléviseur ou
de l’ordinateur. Leur interaction avec le système peut entraîner
des distorsions magnétiques.
Pour toute question ou problème concernant votre système
d’enceintes, adressez-vous à votre revendeur Sony le plus
proche.
Identification des pièces
Avant (Voir fig. A-1)
1 Témoin/touche 1 (marche)
2 Témoin % (mise en sourdine)
3 Touche VOL (volume) +/–
4 Capteur de télécommande
5 Grille de l’enceinte
La grille de l’enceinte peut être retirée.
Arrière (Voir fig. A-2)
1 Port de raccordement de l’enceinte
2 Prise DC IN 16V
3 Prise INPUT 1 (entrée audio)
4 Prise INPUT 2 (entrée audio)
5 Cordon de raccordement de l’enceinte
Permet de raccorder l’enceinte droite.
Mini-télécommande (Voir fig. A-3)
1 Touche % (mise en sourdine)
2 Touches VOL (volume) +/–
3 Touche 1 (marche)
La portée maximale de la mini-télécommande est d’environ 5
m.
Sources d’alimentation
Utilisation sur courant
domestique (Voir fig. B)
Raccordez l’adaptateur secteur au système.
Remarques sur l’adaptateur secteur
• Utilisez uniquement l’adaptateur secteur fourni. N’utilisez
aucun autre adaptateur secteur, afin de ne pas endommager
les enceintes.
Polarité de la fiche
• Avant le branchement ou le débranchement de l’adaptateur
secteur, mettez préalablement le système hors tension. Sinon,
cela pourrait entraîner un problème de fonctionnement.
Raccordement des
enceintes (Voir fig. C)
1 Raccordez les enceintes et le périphérique
source.
Si le système est raccordé à la prise
monophonique du périphérique source, etc.
Il est possible que le son ne soit pas émis par l’enceinte droite.
Dans ce cas, utilisez l’adaptateur de fiche PC-236MS en
option*.
Raccordement du système à une prise de
casque stéréo de type prise téléphonique
Utilisez le cordon d’alimentation RK-G22 ou le cordon
d’alimentation RK-G136 et l’adaptateur de fiche PC-234S en
option*.
* Les accessoires ci-dessus en option ne sont pas fournis dans
certains pays et/ou régions.
Installation d’une pile au
lithium dans la mini-
télécommande (Voir fig. D)
1 Ouvrez le logement de la pile.
2 Insérez une pile au lithium CR2025 en
option, avec le côté + vers le haut.
3 Remettez le logement de la pile en place.
Remplacement de la pile au lithium
La portée de la mini-télécommande diminue au fur et à mesure
que la pile s’épuise.
Remplacez la pile par une nouvelle pile. Sa durée de vie est
d’environ 6 mois dans des conditions d’utilisation normales.
Remarques sur la pile au lithium
• Gardez la pile au lithium hors de portée des enfants. En cas
d’ingestion de la pile, consultez immédiatement un médecin.
• Essuyez la pile avec un chiffon sec pour assurer un bon contact.
• Veillez à installer la pile en respectant la polarité.
• Pour éviter un court-circuit, ne tenez pas la pile avec des pinces
métalliques.
• L’utilisation de tout autre type de pile que la pile CR2025 peut
entraîner un risque d’incendie ou d’explosion.
AVERTISSEMENT
La pile peut exploser si elle est manipulée de façon
inappropriée. Ne rechargez pas la pile, ne la démontez et ne
la jetez pas au feu.
Ecoute audio
1 Appuyez sur la touche 1 pour mettre cet
appareil sous tension.
Le témoin 1 s’allume.
2 Démarrez la lecture sur le périphérique
source.
3 Réglez le volume.
Réglez le volume du périphérique source sur un niveau
moyen, puis appuyez sur la touche VOL +/– de cet
appareil.
z Conseil
Pour mettre le son en sourdine, appuyez sur la touche % de la
mini-télécommande. Pour rétablir le son, appuyez de nouveau
sur cette touche.
Remarque
Un bip retentit lorsque le volume est réglé au minimum ou au
maximum.
4 Appuyez sur la touche 1 pour mettre cet
appareil hors tension après utilisation.
Le témoin 1 s’éteint.
Remarques
• Si la lecture sur l’appareil raccordé à la prise INPUT 1 et celle sur
l’appareil raccordé à la prise INPUT 2 sont lancées en même
temps, les deux sources audio sont lues.
• Si vous raccordez le haut-parleur à un périphérique à l’aide d’un
syntoniseur ou d’une radio intégré(e), la réception radio peut être
inexistante ou la sensibilité risque d’être réduite de manière
significative.
• Si le périphérique source est équipé d’une fonction d’égaliseur ou
d’amplificateur de graves, désactivez-la. Si ces fonctions sont
activées, le son risque d’être déformé.
• Si la sortie de casque du périphérique source est équipée d’un
interrupteur de ligne, vous obtiendrez un son de meilleure qualité si
cet interrupteur est activé. Reportez-vous au mode d’emploi du
périphérique source.
Dépannage
En cas de problème avec votre système d’enceintes, vérifiez les
points suivants et prenez les mesures suggérées. Si le problème
persiste, consultez votre revendeur Sony le plus proche.
Pas de son
• Vérifiez que cet appareil ainsi que le périphérique source sont
sous tension.
• Augmentez le volume de l’appareil.
• Réglez le volume du périphérique source à un niveau aussi
élevé que possible sans que le son soit déformé. Pour plus de
détails sur le réglage du volume, reportez-vous au mode
d’emploi fourni avec le périphérique.
• Assurez-vous que tous les raccordements sont réalisés
correctement.
Niveau sonore faible
• Réglez le volume du périphérique source à un niveau aussi
élevé que possible sans que le son soit déformé. Pour plus de
détails sur le réglage du volume, reportez-vous au mode
d’emploi fourni avec le périphérique.
• Augmentez le volume de l’appareil.
Le son est déformé
• Réglez le volume du périphérique source à un niveau
suffisamment bas pour que le son ne soit plus déformé. Pour
plus de détails sur le réglage du volume, reportez-vous au
mode d’emploi fourni avec le périphérique.
• Si le périphérique source est équipé d’une fonction
d’amplificateur de graves, désactivez-la.
• Diminuez le volume de l’appareil.
Un ronronnement ou un bruit est émis par
les enceintes.
• Vérifiez que tous les raccordements sont corrects.
• Vérifiez qu’aucun appareil audio n’est placé trop près du
téléviseur.
La luminosité du témoin 1 est instable.
La luminosité du témoin 1 peut devenir instable si vous
augmentez le volume. Ceci n’est pas un problème de
fonctionnement.
La pile ne peut être insérée ou semble trop
grosse pour la mini-télécommande.
La pile est conçue pour permettre son insertion dans le bon sens
uniquement. Vérifiez la polarité (+/–) et insérez-la dans le bon
sens.
Il est impossible d’utiliser la mini-
télécommande.
• Utilisez la mini-télécommande en la pointant vers le capteur
de télécommande de l’enceinte.
• Retirez tout obstacle situé entre l’enceinte et la mini-
télécommande.
• Evitez d’exposer le capteur de télécommande de l’enceinte à
une lumière vive (lumière directe du soleil ou lampe
fluorescente d’un éclairage haute fréquence).
• Si les solutions ci-dessus ne résolvent pas le problème, la pile
est peut-être épuisée. Remplacez-la par une pile neuve.
Spécifications
Enceintes
Système de haut-parleur 57 mm, gamme étendue, doté d’un
blindage magnétique
Type d’enceinte acoustique Bass reflex
Impédance 4 Ω
Puissance d’entrée nominale
20 W
Puissance d’entrée maximale
40 W
Amplificateur (Enceinte gauche)
Sortie nominale 20 W + 20 W
(T.H.D. : 10 %, 1 kHz, 4 Ω)
Entrée Mini-prise stéréo × 2
Impédance d’entrée 4,7 kΩ (à 1 kHz)
Généralités
Alimentation 16 V CC (adaptateur secteur fourni)
Dimensions (l/h/p) Environ 80 × 187 × 169 mm
Masse Environ 1 200 g (enceinte gauche)
Environ 1 100 g (enceinte droite)
Accessoires fournis
Adaptateur secteur (1)
Cordon d’alimentation (1)
Cordon de raccordement (mini-fiche stéréo y mini-fiche stéréo,
1 m) (1)
Mini-télécommande (1)
Mode d’emploi (1)
Garantie (1)
Accessoires en option
Cordon de raccordement RK-G22, RK-G129, RK-G136, RK-G138
Adaptateur de fiche PC-234S, PC-236MS
Les accessoires ci-dessus proposés en option ne sont pas disponibles
dans certaines régions.
La conception et les spécifications sont sujettes à modification
sans préavis.
D
B
C
AC power adaptor (supplied)
Adaptateur secteur (fourni)
Netzteil (mitgeliefert)
Adaptador de alimentación de ca
(suministrado)
to wall outlet
vers une prise murale
an eine Netzsteckdose
a la toma de pared
to INPUT 1 jack
vers la prise INPUT 1
an Buchse INPUT 1
a la toma INPUT 1
(rear)
(arrière)
(Rückseite)
(parte posterior)
Right speaker (rear)
Enceinte droite (arrière)
Rechter Lautsprecher
(Rückseite)
Altavoz derecho
(parte posterior)
to LINE OUT or to headphones
jack (stereo minijack)
vers LINE OUT ou vers la prise
de casque (mini-prise stéréo)
an LINE OUT oder an
Kopfhörerbuchse
(Stereominibuchse)
a la toma LINE OUT o la toma de
auriculares (minitoma estéreo)
Connecting cord
(supplied)
Cordon de
raccordement
(fourni)
Verbindungskabel
(mitgeliefert)
Cable de conexión
(suministrado)
PC, etc.
Ordinateur, etc.
PC usw.
Ordenador, etc.
A
3
4
1
25
1
2
3
4
5
Left speaker (rear)
Enceinte gauche (arrière)
Linker Lautsprecher
(Rückseite)
Altavoz izquierdo (parte
posterior)
to INPUT 2
jack
vers la prise
INPUT 2
an Buchse
INPUT 2
a la toma
INPUT 2
to speaker connecting port
vers le port de
raccordement de l’enceinte
an Lautsprecheranschluss
al puerto de conexión del
altavoz
12
1
Card remote
commander (rear)
Mini-télécommande
(arrière)
Kartenfernbedienung
(Rückseite)
Control remoto de
tarjeta (parte
posterior)
1
2
Portable audio
device
Appareil audio
portatif
Tragbares
Audiogerät
Dispositivo de
audio portátil
CD/MD player, etc.
Lecteur CD/MD, etc.
CD/MD-Player usw.
Reproductor de CD/
MD, etc.
RK-G136 connecting
cord (optional)
Cordon de
raccordement RK-G136
(en option)
Verbindungskabel RK-
G136
(gesondert erhältlich)
Cable de conexión RK-
G136 (opcional)
Hooking up the speakers
(See fig. C)
1 Connect the speakers and the source
device.
When the system is connected to the
monaural jack of the source device
The sound may not come through the right speaker. In such a
case, use the optional* plug adaptor PC-236MS.
To connect to a stereo phone-type
headphones jack
Use the optional* connecting cord RK-G22 or connecting cord
RK-G136 and plug adaptor PC-234S.
* The above optional accessories are not provided in some areas.
Installing a lithium battery
in the card remote
commander (See fig. D)
1 Take out the battery case.
2 Insert an optional lithium battery CR2025
with the + side facing up.
3 Place the battery case back in position.
When to replace the lithium battery
The working distance of the card remote commander shortens as
the battery becomes exhausted.
Replace the battery with a new one. It will last about 6 months
in normal.
Notes on the lithium battery
• Keep the lithium battery out of the reach of children. Should the
battery be swallowed, immediately consult a doctor.
• Wipe the battery with a dry cloth to assure a good contact.
• Be sure to install the battery with the correct polarity.
• Do not hold the battery with metallic tweezers as doing so may
cause a short-circuit.
• Use of other batteries than the CR2025 may cause a risk of fire or
explosion.
WARNING
Battery may explode if mistreated. Do not recharge,
disassemble or dispose of in fire.
© 2007 Sony Corporation Printed in China
Listening to the sound
1 Press the 1 button to turn on the unit.
The 1 indicator lights up.
2 Start playing on the source device.
3 Adjust the volume.
Set the volume of the source device to moderate level, and
press the VOL +/– button on this unit.
z Tip
To silence the sound, press the % button on the card remote
commander. To resume the sound, press the button again.
Note
A beep sounds when the volume is set to minimum or
maximum.
4 Press the 1 button to turn off the unit after
use.
The 1 indicator goes off.
Notes
• If both the device connected to the INPUT 1 jack and the one
connected to the INPUT 2 jack are played at the same time, both
sounds can be heard.
• If connecting the speaker to a device with a built-in radio or tuner,
radio reception may not occur or sensitivity may be reduced
significantly.
• If the source device has a bass boost function or equalizer function,
set them to off. If these functions are on, sound may be distorted.
• If the source device’s headphone output has a line switch, better
sound will be heard if it is set to on. See the operating instructions
of the source device.
Troubleshooting
Should you have a problem with your speaker system, check the
following list and take the suggested measures. If the problem
persists, consult your nearest Sony dealer.
No sound
• Check that both this unit and the source device are turned on.
• Turn up the volume of the unit.
• Turn up the volume of the source device as high as possible
to the extent that sound is not distorted. For details on volume
adjustment, refer to the operating instructions supplied with
the device.
• Make sure all the connections have been correctly made.
Low sound level
• Turn up the volume of the source device as high as possible
to the extent that sound is not distorted. For details on volume
adjustment, refer to the operating instructions supplied with
the device.
• Turn up the volume of the unit.
Distorted sound
• Turn down the volume of the source device to the point
where the sound is no longer distorted. For details on volume
adjustment, refer to the operating instructions supplied with
the device.
• If the source device has a bass boosts function, set it to off.
• Turn down the volume of the unit.
There is hum or noise in the speaker output.
• Make sure all the connections have been correctly made.
• Make sure none of the audio devices are positioned too close
to a TV set.
The brightness of the 1 indicator is
unstable.
The brightness of the 1 indicator may become unstable when
the volume is turned up. This is not a malfunction.
The battery cannot be inserted, or fits too
tightly in the Card Remote Commander.
The battery is designed so as not be inserted in the wrong
direction. Confirm polarity (+/–) and insert correctly.
Card Remote Commander operation is not
possible.
• Operate the card remote commander pointed toward the
remote sensor of the speaker.
• Remove any obstacle between the speaker and the card
remote commander.
• Avoid exposing the remote sensor of the speaker to strong
light (direct sunlight or fluorescent lamp of high frequency
lighting).
• If the above remedies do not solve the problem, the battery
might be worn out. Replace it with a new one.
Specifications
Speaker section
Speaker system 57 mm, Full range, magnetically
shielded
Enclosure type Bass reflex
Impedance 4 Ω
Rated input power 20 W
Maximum input power 40 W
Amplifier section (Left speaker)
Rated output 20 W + 20 W
(10 % T.H.D., 1 kHz, 4 Ω)
Input Stereo minijack × 2
Input impedance 4.7 kΩ (at 1 kHz)
General
Power DC 16 V (supplied AC power adaptor)
Dimensions (w/h/d) Approx. 80 × 187 × 169 mm
(3
1
/
4
× 7
3
/
8
× 6
3
/
4
in.)
Mass
Approx. 1,200 g (2 lb. 11 oz.) (left
speaker)
Approx. 1,100 g (2 lb. 7 oz.) (right
speaker)
Supplied accessories
AC power adaptor (1)
Mains lead (1)
Connecting cord (stereo-mini plug y stereo-mini plug, 1 m) (1)
Card Remote Commander (1)
Operating Instructions (1)
Warranty (1)
Optional accessories
Connecting cord RK-G22, RK-G129, RK-G136, RK-G138
Plug adaptor PC-234S, PC-236MS
The above optional accessories are not provided in some areas.
Design and specifications are subject to change without notice.
Deutsch
Lesen Sie diese Anleitung vor Inbetriebnahme des Systems bitte
genau durch und bewahren Sie sie zum späteren Nachschlagen
sorgfältig auf.
WARNUNG
Um die Gefahr eines Brands oder elektrischen
Schlags zu reduzieren, darf dieses Gerät weder Regen
noch Feuchtigkeit ausgesetzt werden.
Um einen elektrischen Schlag zu vermeiden, öffnen
Sie das Gehäuse nicht. Überlassen Sie
Wartungsarbeiten stets nur qualifiziertem
Fachpersonal.
Um die Brandgefahr zu reduzieren, decken Sie die
Ventilationsöffnungen des Gerätes nicht mit Zeitungen, Tischdecken,
Vorhängen usw. ab. Stellen Sie auch keine brennenden Kerzen auf
das Gerät.
Um die Brand- oder Stromschlaggefahr zu reduzieren, stellen Sie
keine mit Flüssigkeiten gefüllten Gegenstände, wie z.B. Vasen, auf
das Gerät.
Stellen Sie das Gerät nicht an einem Ort auf, an dem
ausreichende Luftzufuhr nicht gegeben ist, zum Beispiel in
einem engen Regalfach oder in einem Einbauschrank.
Schließen Sie das Netzteil an eine leicht zugängliche
Netzsteckdose an. Nehmen Sie das Netzteil sofort aus der
Netzsteckdose heraus, sobald Sie eine Funktionsstörung des
Netzteils feststellen.
Entsorgung von gebrauchten elektrischen
und elektronischen Geräten (anzuwenden
in den Ländern der Europäischen Union
und anderen europäischen Ländern mit
einem separaten Sammelsystem für diese
Geräte)
Das Symbol auf dem Produkt oder seiner
Verpackung weist darauf hin, dass dieses Produkt nicht als
normaler Haushaltsabfall zu behandeln ist, sondern an einer
Annahmestelle für das Recycling von elektrischen und
elektronischen Geräten abgegeben werden muss. Durch Ihren
Beitrag zum korrekten Entsorgen dieses Produkts schützen Sie die
Umwelt und die Gesundheit Ihrer Mitmenschen. Umwelt und
Gesundheit werden durch falsches Entsorgen gefährdet.
Materialrecycling hilft den Verbrauch von Rohstoffen zu
verringern. Weitere Informationen über das Recycling dieses
Produkts erhalten Sie von Ihrer Gemeinde, den kommunalen
Entsorgungsbetrieben oder dem Geschäft, in dem Sie das Produkt
gekauft haben.
Sicherheitsmaßnahmen
Sicherheit
Das Typenschild mit Betriebsspannung, Leistungsaufnahme
usw. befindet sich außen an der Geräteunterseite.
• Bevor Sie das System in Betrieb nehmen, überprüfen Sie, ob
die Betriebsspannung des Systems der lokalen
Stromversorgung entspricht.
Erworben in Betriebsspannung
Alle Länder/Regionen 100-240 V Wechselstrom, 50/60 Hz
• Verwenden Sie ausschließlich das mitgelieferte Netzteil.
• Wenn Sie das System mit dem Netzteil betrieben haben und
es längere Zeit nicht mehr verwendet werden soll, trennen Sie
das Netzteil von der Netzsteckdose. Das Netzteil lässt sich
nicht ausschalten, indem Sie einfach mit dem Schalter 1 in
den Bereitschaftsmodus wechseln.
Aufstellung
• Stellen Sie die Lautsprecher nicht in geneigter Position auf.
• Stellen Sie das System nicht in der Nähe von Wärmequellen
oder an Orten auf, an denen es direktem Sonnenlicht,
außergewöhnlich viel Staub, Feuchtigkeit, Regen oder
mechanischen Erschütterungen ausgesetzt ist.
Betrieb
• Öffnen Sie das Gehäuse nicht. Überlassen Sie
Wartungsarbeiten stets nur qualifiziertem Fachpersonal.
• Sollten Fremdkörper oder Flüssigkeiten in das System
gelangen, lassen Sie es von qualifiziertem Fachpersonal
überprüfen, bevor Sie es wieder benutzen.
• Dieses System ist magnetisch abgeschirmt. Lassen Sie
bespielte Bänder, Uhren, Kreditkarten oder Disketten mit
Magnetcodierung trotzdem nicht längere Zeit vor dem
System liegen.
Reinigung
Reinigen Sie das Gehäuse nicht mit Alkohol, Benzin oder
Verdünner.
Wenn Fernsehbild oder Monitoranzeige
verzerrt ist
Dieses System ist zwar magnetisch abgeschirmt, in einigen
Fällen kann das Bild auf einem in der Nähe aufgestellten
Fernsehschirm/PC-Monitor jedoch verzerrt sein. Schalten Sie in
einem solchen Fall das Fernsehgerät/den PC einmal aus und
nach 15 bis 30 Minuten wieder ein. Führen Sie vor dem
Ausschalten eines PCs die erforderlichen Maßnahmen, wie z. B.
das Speichern von Daten, durch.
Lässt sich die Störung so nicht beheben, stellen Sie das System
weiter vom Fernsehgerät/PC entfernt auf. Stellen Sie außerdem
keine Gegenstände mit Magneten in die Nähe des
Fernsehgeräts/PCs, wie z. B. Phonowagen, Fernsehwagen,
Spielzeuge usw. Diese können aufgrund von Interferenzen für
magnetische Verzerrungen auf dem Bild verantwortlich sein.
Sollten an Ihrem Lautsprechersystem Probleme auftreten oder
sollten Sie Fragen haben, wenden Sie sich bitte an Ihren Sony-
Händler.
Lage und Funktion der
Teile und Bedienelemente
Vorderseite (siehe Abb. A-1)
1 Anzeige/Taste 1 (Ein)
2 Anzeige % (Stummschalten)
3 Lautstärketasten VOL +/–
4 Fernbedienungssensor
5 Lautsprechergitter
Das Lautsprechergitter kann abgenommen werden.
Rückseite (siehe Abb. A-2)
1 Lautsprecheranscshluss
2 Buchse DC IN 16V
3 Buchse INPUT 1 (Audioeingang)
4 Buchse INPUT 2 (Audioeingang)
5 Lautsprecherverbindungskabel
Zum Anschließen des rechten Lautsprechers.
Kartenfernbedienung
(siehe Abb. A-3)
1 Taste % (Stummschalten)
2 Lautstärketasten VOL +/–
3 Taste 1 (Ein)
Die Reichweite der Kartenfernbedienung beträgt maximal etwa
5 m.
Stromquellen
Anschließen an Netzstrom
(siehe Abb. B)
Schließen Sie das Netzteil an das System an.
Hinweise zum Netzteil
• Verwenden Sie ausschließlich das mitgelieferte Netzteil.
Benutzen Sie kein anderes Netzteil. Andernfalls kann der
Lautsprecher beschädigt werden.
Polarität des Steckers
• Schalten Sie das System aus, bevor Sie das Netzteil
anschließen bzw. lösen. Andernfalls kann es zu
Fehlfunktionen kommen.
Anschließen der
Lautsprecher (siehe Abb. C)
Einlegen einer
Lithiumbatterie in die
Kartenfernbedienung
(siehe Abb. D)
1 Ziehen Sie das Batteriefach heraus.
2 Legen Sie eine gesondert erhältliche
Lithiumbatterie CR2025 mit der Seite +
nach oben ein.
3 Schieben Sie das Batteriefach wieder
zurück.
Austauschen der Lithiumbatterie
Die Reichweite der Kartenfernbedienung verkürzt sich, wenn
die Batterie schwächer wird.
Ersetzen Sie die Batterie durch eine neue. In der Regel hält sie
etwa 6 Monate.
Hinweise zur Lithiumbatterie
• Bewahren Sie die Lithiumbatterie außerhalb der Reichweite von
Kindern auf. Sollte eine Lithiumbatterie verschluckt werden, ist
umgehend ein Arzt aufzusuchen.
• Wischen Sie die Batterie mit einem trockenen Tuch ab, um einen
guten Kontakt zwischen Batteriepol und -anschluss sicherzustellen.
• Legen Sie die Batterie unbedingt polaritätsrichtig ein.
• Halten Sie die Batterie nicht mit einer Metallpinzette. Dies könnte
zu einem Kurzschluss führen.
• Andere Batterien als die CR2025 können zu Feuer oder einer
Explosion führen.
ACHTUNG
Die Batterie kann bei falscher Handhabung explodieren!
Laden Sie sie nicht auf, zerlegen Sie sie nicht und werfen
Sie sie nicht ins Feuer.
Tonwiedergabe
1 Schalten Sie das Gerät mit der Taste 1 ein.
Die Anzeige 1 leuchtet auf.
2 Starten Sie die Wiedergabe am
Ausgangsgerät.
3 Stellen Sie die Lautstärke ein.
Stellen Sie die Lautstärke am Ausgangsgerät auf einen
moderaten Wert ein und drücken Sie dann die Tasten
VOL +/– an diesem Gerät.
z Tipp
Drücken Sie die Taste % auf der Kartenfernbedienung, wenn
Sie den Ton stummschalten wollen. Wenn der Ton wieder zu
hören sein soll, drücken Sie die Taste erneut.
Hinweis
Ein Signalton wird ausgegeben, wenn die Lautstärke auf den
niedrigsten bzw. höchsten Wert eingestellt wird.
4 Schalten Sie das Gerät nach Gebrauch mit
der Taste 1 aus.
Die Anzeige 1 erlischt.
Hinweise
• Wenn ein Gerät an die Buchse INPUT 1 und ein weiteres an die
Buchse INPUT 2 angeschlossen ist und bei beiden Geräten die
Wiedergabe läuft, ist der Ton von beiden Geräten zu hören.
• Wenn Sie den Lautsprecher an ein Gerät mit eingebautem Radio
oder Tuner anschließen, ist unter Umständen kein Radioempfang
möglich oder die Empfindlichkeit ist erheblich reduziert.
• Wenn das Ausgangsgerät über eine Bassverstärkungsfunktion oder
Equalizer-Funktion verfügt, schalten Sie diese aus. Andernfalls
kann der Ton verzerrt sein.
• Ist der Kopfhörerausgang des Ausgangsgeräts mit einem Line-
Schalter ausgestattet, so erhöht sich die Tonqualität, wenn Sie
diesen Schalter einschalten. Schlagen Sie dazu in der
Bedienungsanleitung zum Ausgangsgerät nach.
Störungsbehebung
Sollte an Ihrem Lautsprechersystem ein Problem auftreten, lesen
Sie bitte in der folgenden Aufstellung nach und führen Sie die
empfohlene Abhilfemaßnahme durch. Sollte die Störung
bestehen bleiben, wenden Sie sich an Ihren Sony-Händler.
Es ist kein Ton zu hören.
• Vergewissern Sie sich, dass dieses Gerät und das
Ausgangsgerät eingeschaltet sind.
• Erhöhen Sie die Lautstärke am Gerät.
• Stellen Sie die Lautstärke am Ausgangsgerät möglichst hoch
ein, ohne dass der Ton verzerrt wird. Einzelheiten zum
Einstellen der Lautstärke finden Sie in der mit dem Gerät
gelieferten Bedienungsanleitung.
• Überprüfen Sie, ob alle Verbindungen ordnungsgemäß
hergestellt wurden.
Der Ton ist sehr leise
• Stellen Sie die Lautstärke am Ausgangsgerät möglichst hoch
ein, ohne dass der Ton verzerrt wird. Einzelheiten zum
Einstellen der Lautstärke finden Sie in der mit dem Gerät
gelieferten Bedienungsanleitung.
• Erhöhen Sie die Lautstärke am Gerät.
Der Ton ist verzerrt
• Drehen Sie die Lautstärke am Ausgangsgerät so weit
herunter, dass der Ton nicht mehr verzerrt ist. Einzelheiten
zum Einstellen der Lautstärke finden Sie in der mit dem Gerät
gelieferten Bedienungsanleitung.
• Wenn das Ausgangsgerät über eine Bassverstärkungsfunktion
verfügt, schalten Sie diese aus.
• Verringern Sie die Lautstärke am Gerät.
Die Tonausgabe über Lautsprecher ist durch
Summen oder Rauschen gestört.
• Überprüfen Sie, ob alle Verbindungen ordnungsgemäß
hergestellt wurden.
• Achten Sie darauf, dass keine Audiogeräte zu nahe am
Fernsehgerät aufgestellt sind.
Die Helligkeit der Anzeige 1 schwankt.
Die Helligkeit der Anzeige 1 kann schwanken, wenn die
Lautstärke erhöht wird. Dies ist keine Fehlfunktion.
Die Batterie lässt sich nicht einlegen oder
sitzt zu fest in der Kartenfernbedienung.
Die Batterie ist so konzipiert, dass sie sich nicht falsch herum
einlegen lässt. Überprüfen Sie die Polarität (+/–) und legen Sie
die Batterie richtig herum ein.
Das Gerät lässt sich nicht mit der
Kartenfernbedienung steuern.
• Richten Sie die Kartenfernbedienung auf den
Fernbedienungssensor am Lautsprecher.
• Entfernen Sie gegebenenfalls Hindernisse zwischen dem
Lautsprecher und der Kartenfernbedienung.
• Schützen Sie den Fernbedienungssensor am Lautsprecher vor
hellem Licht (z. B. direktem Sonnenlicht oder dem Licht
hochfrequenter Leuchtstoffröhren).
• Wenn sich das Problem durch die Abhilfemaßnahmen oben
nicht beheben lässt, ist die Batterie möglicherweise erschöpft.
Tauschen Sie sie gegen eine neue aus.
Technische Daten
Lautsprecher
Lautsprechersystem 57 mm, Breitbandlautsprecher,
magnetisch abgeschirmt
Gehäusetyp Bassreflexsystem
Impedanz 4 Ω
Nennbelastbarkeit 20 W
Maximale Belastbarkeit 40 W
Verstärker (linker Lautsprecher)
Nennleistung 20 W + 20 W
(10 % gesamte harmonische
Verzerrung, 1 kHz, 4 Ω)
Eingang Stereominibuchse
×
2
Eingangsimpedanz 4,7 kΩ (bei 1 kHz)
Allgemeines
Betriebsspannung
16 V Gleichstrom (mitgeliefertes
Netzteil)
Abmessungen (B/H/T)
ca. 80 × 187 × 169 mm
Gewicht ca. 1.200 g (linker Lautsprecher)
ca. 1.100 g (rechter Lautsprecher)
Mitgeliefertes Zubehör
Netzteil (1)
Netzkabel (1)
Verbindungskabel (Stereoministecker y Stereoministecker, 1 m) (1)
Kartenfernbedienung (1)
Bedienungsanleitung (1)
Garantie (1)
Sonderzubehör
Verbindungskabel RK-G22, RK-G129, RK-G136, RK-G138
Zwischenstecker PC-234S, PC-236MS
Das oben genannte Sonderzubehör ist in einigen Gebieten nicht
erhältlich.
Änderungen, die dem technischen Fortschritt dienen, bleiben
vorbehalten.
Español
Antes de utilizar la unidad, lea este manual atentamente y
consérvelo para consultarlo en el futuro.
ADVERTENCIA
Para reducir el riesgo de incendios o electrocución,
no exponga el aparato a la lluvia ni a la humedad.
Para evitar descargas eléctricas, no abra la unidad. En
caso de avería, solicite los servicios de personal
cualificado.
Para reducir el riesgo de incendio, no cubra los agujeros de
ventilación del aparato con periódicos, manteles, cortinas, etc. Y no
ponga velas encendidas encima del aparato.
Para reducir el riesgo de incendio o sacudida eléctrica, no ponga
objetos que contengan líquido, tal como fl oreros, encima del
aparato.
No instale el aparato en un espacio cerrado, como una
estantería para libros o un armario empotrado.
Conecte el adaptador de alimentación de ca a una toma de
corriente de ca de fácil acceso. Si detecta alguna anomalía en el
adaptador de alimentación de ca, desconéctelo inmediatamente
de la toma de corriente de ca.
Tratamiento de los equipos eléctricos y
electrónicos al final de su vida útil
(aplicable en la Unión Europea y en países
europeos con sistemas de recogida
selectiva de residuos)
Este símbolo en el equipo o el embalaje indica que el
presente producto no puede ser tratado como
residuos domésticos normales, sino que debe entregarse en el
correspondiente punto de recogida de equipos eléctricos y
electrónicos. Al asegurarse de que este producto se desecha
correctamente, Ud. ayuda a prevenir las consecuencias negativas
para el medio ambiente y la salud humana que podrían derivarse de
la incorrecta manipulación en el momento de deshacerse de este
producto. El reciclaje de materiales ayuda a conservar los recursos
naturales. Para recibir información detallada sobre el reciclaje de
este producto, póngase en contacto con el ayuntamiento, el punto
de recogida más cercano o el establecimiento donde ha adquirido
el producto.
Precauciones
Seguridad
La placa de características donde se indica el voltaje de
funcionamiento, el consumo energético, etc. se encuentra en la
parte inferior externa de la unidad.
• Antes de utilizar el sistema compruebe si la tensión de la
alimentación de éste es idéntica a la de la fuente de
alimentación local.
Lugar de adquisición Tensión de alimentación
Todos los países y ca de 100 – 240 V, 50/60 Hz
regiones
•
Utilice solamente el adaptador de alimentación de ca
suministrado.
• Después de utilizar el sistema con el adaptador de
alimentación de ca, desconéctelo de la toma de pared si el
sistema no se va a utilizar durante un período de tiempo
prolongado. El adaptador de alimentación de ca no se apaga
simplemente con cambiar el interruptor 1 a la posición de
espera.
Colocación
• No coloque los altavoces en posición inclinada.
•
No deje el sistema cerca de fuentes de calor, ni en lugares
expuestos a la luz solar directa, polvo excesivo, humedad, lluvia
o
golpes.
Funcionamiento
• No abra la unidad. Solicite asistencia técnica únicamente a
personal especializado.
•
Si se introduce algún objeto sólido o líquido en el sistema, haga
que sea revisado por personal especializado antes de volver a
usarlo.
• Aunque este sistema está magnéticamente protegido, no deje
cintas grabadas, relojes, tarjetas de crédito o disquetes que
utilicen codificación magnética delante de éste durante un
período prolongado de tiempo.
Limpieza
No utilice alcohol, bencina ni disolvente para limpiar la unidad.
Si la imagen del televisor o la pantalla del
monitor aparece distorsionada debido al
magnetismo
Aunque este sistema está magnéticamente protegido, en algunos
casos la imagen de algunos televisores u ordenadores personales
puede distorsionarse debido al magnetismo. Si esto ocurre,
apague el televisor o el ordenador y enciéndalo de nuevo
transcurridos de 15 a 30 minutos. En el caso del ordenador
personal, tome medidas adecuadas, como guardar los datos
antes de apagarlo.
Si no se produce ninguna mejora, aleje el sistema del televisor o
del ordenador. Asimismo, no coloque objetos que contengan o
utilicen imanes cerca del televisor o del ordenador, como
soportes de audio, mesas de televisores, juguetes, etc., ya que
pueden provocar una distorsión magnética de la imagen debido
a la interacción con el sistema.
Si tiene alguna pregunta o problema relacionados con el sistema
de altavoces, consulte con su distribuidor Sony más cercano.
Identificación de los
componentes
Parte frontal (consulte la figura A-1)
1 Indicador/botón 1 (encendido)
2 Indicador % (silenciamiento)
3 Botón VOL (volumen) +/–
4 Sensor remoto
5 Rejilla de los altavoces
Es posible extraer la rejilla de los altavoces.
Parte posterior
(consulte la figura A-2)
1 Puerto de conexión del altavoz
2 Toma DC IN 16V
3 Toma INPUT 1 (entrada de audio)
4 Toma INPUT 2 (entrada de audio)
5 Cable de conexión del altavoz
Conecta el altavoz derecho.
Control remoto de tarjeta
(consulte la figura A-3)
1 Botón % (silenciamiento)
2 Botones VOL (volumen) +/–
3 Botón 1 (encendido)
La distancia máxima de funcionamiento del control remoto de
tarjeta es de aproximadamente 5 metros.
Fuentes de alimentación
Uso con corriente doméstica
(consulte la figura B)
Conecte el adaptador de alimentación de ca al sistema.
Notas sobre el adaptador de alimentación de ca
• Utilice solamente el adaptador de alimentación de ca
suministrado. No utilice ningún otro adaptador de
alimentación de ca para evitar dañar el altavoz.
Polaridad de la clavija
• Apague el sistema antes de conectar o desconectar el
adaptador de alimentación de ca. De lo contrario, podría
producirse un fallo de funcionamiento.
Conexión de los altavoces
(consulte la figura C)
1 Conecte los altavoces y el dispositivo
fuente.
Si el sistema está conectado a la toma
monoaural del dispositivo fuente
Es posible que no se emita sonido a través del altavoz derecho.
En tal caso, utilice el adaptador de clavija opcional*
PC-236MS.
Para la conexión a una toma fonográfica
para auriculares estéreo
Utilice el cable de conexión opcional* RK-G22 o el cable de
conexión RK-G136 y el adaptador de clavija PC-234S.
*Los accesorios opcionales mencionados anteriormente no se
suministran en algunas áreas.
Instalación de la pila de
litio en el control remoto
de tarjeta (consulte la figura D)
1 Extraiga el compartimiento de la pila.
2 Inserte una pila de litio CR2025 opcional
con el polo + hacia arriba.
3 Coloque de nuevo el compartimiento de la
pila.
Cuándo sustituir la pila de litio
La distancia de funcionamiento del control remoto de tarjeta se
acorta a medida que se agota la energía de la pila.
Sustituya la pila por una nueva. La pila dura unos 6 meses en
condiciones normales.
Notas sobre la pila de litio
• Mantenga la pila de litio fuera del alcance de los niños. En caso de
ingestión, póngase en contacto inmediatamente con un médico.
• Limpie la pila con un paño seco para garantizar un contacto
óptimo.
•Asegúrese de insertar la pila con la polaridad correcta.
•No sujete la pila con pinzas metálicas, ya que podría producirse un
cortocircuito.
• El uso de pilas diferentes de la CR2025 puede suponer un riesgo de
incendio o explosión.
ADVERTENCIA
La pila puede explotar si no se emplea adecuadamente. No
la recargue, desmonte ni arroje al fuego.
Recepción del sonido
1 Pulse el botón 1 para encender la unidad.
El indicador 1 se ilumina.
2 Inicie la reproducción en el dispositivo
fuente.
3 Ajuste el volumen.
Ajuste el volumen del dispositivo fuente a un nivel
moderado y, a continuación, pulse el botón VOL +/– de la
unidad.
z Sugerencia
Para silenciar el sonido, pulse el botón % en el control remoto
de tarjeta. Para reanudar el sonido, vuelva a pulsar el botón.
Nota
Sonará un pitido cuando el volumen se ajuste en el nivel
máximo o mínimo.
4 Pulse el botón 1 para apagar la unidad
después de utilizarla.
El indicador 1 se apaga.
Notas
• Si reproduce al mismo tiempo el dispositivo conectado a la toma
INPUT 1 y el conectado a la toma INPUT 2, podrá escuchar el
sonido de ambos dispositivos.
• Si conecta el altavoz a un dispositivo con radio o sintonizador
incorporado, es posible que no se reciban señales de radio o que la
sensibilidad se reduzca de manera significativa.
• Si el dispositivo fuente dispone de función de potenciación de
graves o ecualizador, desactívela. Si está activada, el sonido podría
distorsionarse.
• Si la salida de auriculares del dispositivo fuente dispone de un
conmutador de línea, actívelo para escuchar sonido de mejor
calidad. Consulte el manual de instrucciones del dispositivo fuente.
Solución de problemas
Si experimenta algún problema con el sistema de altavoces,
compruebe la lista siguiente y tome las medidas que se sugieren.
Si el problema persiste, póngase en contacto con el distribuidor
Sony más cercano.
No hay sonido
• Compruebe que tanto la unidad como el dispositivo fuente
están encendidos.
• Suba el volumen de la unidad.
• Suba el volumen del dispositivo fuente al máximo posible sin
que se produzca una distorsión del sonido. Para obtener más
información del ajuste del volumen, consulte el manual de
instrucciones suministrado con el dispositivo conectado.
• Asegúrese de que todas las conexiones se han realizado
correctamente.
El nivel de sonido es bajo
• Suba el volumen del dispositivo fuente al máximo posible sin
que se produzca una distorsión del sonido. Para obtener más
información del ajuste del volumen, consulte el manual de
instrucciones suministrado con el dispositivo conectado.
• Suba el volumen de la unidad.
El sonido aparece distorsionado
• Baje el volumen del dispositivo fuente hasta que el sonido ya
no aparezca distorsionado. Para obtener más información del
ajuste del volumen, consulte el manual de instrucciones
suministrado con el dispositivo conectado.
• Si el dispositivo fuente tiene la función de potenciador de
graves, desactívela.
• Baje el volumen de la unidad.
Se perciben zumbidos o ruidos en la salida
del altavoz.
• Asegúrese de que todas las conexiones se han realizado
correctamente.
• Compruebe que ninguno de los dispositivos de audio se
encuentra demasiado cerca del televisor.
El brillo del indicador 1 es inestable.
Es posible que el brillo del indicador 1 se vuelva inestable al
subir el volumen. No se trata de un fallo de funcionamiento.
No es posible insertar la pila, o encaja
demasiado justa en el control remoto de
tarjeta.
La pila se ha diseñado de modo que no pueda insertarse en la
dirección incorrecta. Confirme la polaridad (+/–) e insértela
correctamente.
No es posible realizar operaciones con el
control remoto de tarjeta.
• Para utilizar el control remoto de tarjeta, oriéntelo hacia el
sensor remoto del altavoz.
• Elimine cualquier obstáculo que haya entre el altavoz y el
control remoto de tarjeta.
• Evite la exposición del sensor remoto del altavoz a la luz
intensa (luz solar directa o lámparas fluorescentes con
iluminación de alta frecuencia).
• Si las soluciones anteriores no resuelven el problema, es
posible que la pila se haya agotado. Reemplácela por una
nueva.
Especificaciones
Sección del altavoz
Sistema de altavoces 57 mm, gama completa, protegido
magnéticamente
Tipo cerrado Reflejo de graves
Impedancia 4 Ω
Potencia nominal de entrada 20 W
Potencia máxima de entrada 40 W
Sección del amplificador (altavoz izquierdo)
Salida nominal 20 W + 20 W
(10% THD, 1 kHz, 4 Ω)
Entrada Minitoma estéreo × 2
Impedancia de entrada 4,7 kΩ (a 1 kHz)
Generales
Alimentación 16 V de cc (adaptador de alimentación
de ca suministrado)
Dimensiones (an/al/pr) Aprox. 80 × 187 × 169 mm
Peso Aprox. 1.200 g (altavoz izquierdo)
Aprox. 1.100 g (altavoz derecho)
Accesorios suministrados
Adaptador de alimentación de ca (1)
Cable de corriente (1)
Cable de conexión (miniclavija estéreo y miniclavija estéreo, 1 m) (1)
Control remoto de tarjeta (1)
Manual de instrucciones (1)
Garantía (1)
Accesorios opcionales
Cable de conexión RK-G22, RK-G129, RK-G136, RK-G138
Adaptador de clavija PC-234S, PC-236MS
En determinadas áreas no se suministran los accesorios opcionales
mencionados anteriormente.
El diseño y las especificaciones están sujetos a cambios sin
previo aviso.
1 Schließen Sie die Lautsprecher an das
Ausgangsgerät an.
Wenn das System an eine monaurale
Buchse des Ausgangsgeräts angeschlossen
wird
Über den rechten Lautsprecher wird unter Umständen kein Ton
ausgegeben. Verwenden Sie in diesem Fall den gesondert
erhältlichen* Zwischenstecker PC-236MS.
So schließen Sie das System an eine
Stereokopfhörerbuchse (Klinkenbuchse) an
Verwenden Sie das gesondert erhältliche* Verbindungskabel
RK-G22 oder das Verbindungskabel RK-G136 und den
Zwischenstecker PC-234S.
* Das oben genannte Sonderzubehör ist in einigen Gebieten nicht
erhältlich.
Lithium battery
CR2025 × 1 (optional)
Pile au lithium
CR2025 × 1 (en option)
Lithiumbatterie
CR2025 × 1
(gesondert erhältlich)
Pila de litio
CR2025 × 1 (opcional)
Active Speaker
System
23
to DC IN16V jack
vers la prise 16V DC IN
an Buchse DC IN 16V
a la toma DC IN 16V

3
4
1
25
1
23
Pyccкий
Пepeд экcплyaтaциeй aппapaтa внимaтeльно
пpочтитe дaнноe pyководcтво и cоxpaнитe eго для
дaльнeйшиx cпpaвок.
BHИMAHИE
Для пpeдотвpaщeния возгоpaния или поpaжeния
элeктpичecким током нe подвepгaйтe aппapaт
воздeйcтвию дождя или влaги.
Для cнижeния опacноcти поpaжeния
элeктpичecким током нe откpывaйтe коpпyc
ycтpойcтвa. Для peмонтa обpaщaйтecь только к
квaлифициpовaнномy cпeциaлиcтy.
Для пpeдотвpaщeния возгоpaния нe нaкpывaйтe
вeнтиляционныe отвepcтия aппapaтa гaзeтaми,
cкaтepтями, штоpaми т.п. A тaкжe нe cтaвьтe нa
aппapaт зaжжeнныe cвeчи.
Для пpeдотвpaщeния возгоpaния или поpaжeния
элeктpичecким током нe cтaвьтe нa коpпyc aппapaтa
пpeдмeты, cодepжaщиe жидкоcть, нaпpимep
цвeточныe вaзы и т.п.
He ycтaнaвливaйтe этот aппapaт в изолиpовaнном
пpоcтpaнcтвe, нaпpимep, в книжном шкaфy или во
вcтpоeнной мeбeли.
Подключите адаптер питания к расположенной в
легкодоступном месте розетке сети питания. Если вы
заметите какие-либо отклонения в работе адаптера,
немедленно отключите его от розетки.
Утилизaция элeктpичecкого и
элeктpонного обоpyдовaния (диpeктивa
пpимeняeтcя в cтpaнax Eвpоcоюзa и
дpyгиx eвpопeйcкиx cтpaнax, гдe
дeйcтвyют cиcтeмы paздeльного cбоpa
отxодов)
Дaнный знaк нa ycтpойcтвe или eго
yпaковкe обознaчaeт, что дaнноe ycтpойcтво нeльзя
yтилизиpовaть вмecтe c пpочими бытовыми отxодaми.
Eго cлeдyeт cдaть в cоотвeтcтвyющий пpиeмный пyнкт
пepepaботки элeктpичecкого и элeктpонного
обоpyдовaния. Heпpaвильнaя yтилизaция дaнного
издeлия можeт пpивecти к потeнциaльно нeгaтивномy
влиянию нa окpyжaющyю cpeдy и здоpовьe людeй,
поэтомy для пpeдотвpaщeния подобныx поcлeдcтвий
нeобxодимо выполнять cпeциaльныe тpeбовaния по
yтилизaции этого издeлия. Пepepaботкa дaнныx
мaтepиaлов поможeт cоxpaнить пpиpодныe pecypcы.
Для полyчeния болee подpобной инфоpмaции о
пepepaботкe этого издeлия обpaтитecь в мecтныe
оpгaны гоpодcкого yпpaвлeния, cлyжбy cбоpa бытовыx
отxодов или в мaгaзин, гдe было пpиобpeтeно издeлиe.
Mepы пpeдоcтоpожноcти
Бeзопacноcть
Taбличкa c yкaзaниeм paбочeго нaпpяжeния,
потpeбляeмой мощноcти и т.п. нaxодитcя нa нижнeй
cтоpонe aппapaтa.
• Пepeд экcплyaтaциeй cиcтeмы yбeдитecь, что ee
paбочee нaпpяжeниe cоотвeтcтвyeт нaпpяжeнию в
мecтной элeктpичecкой ceти.
Mecто покyпки Paбочee нaпpяжeниe
Bce cтpaны/peгионы 100 - 240 B пepeмeнного токa,
50/60 Гц
• Иcпользyйтe только пpилaгaeмый aдaптep ceтeвого
питaния.
• По зaвepшeнии paботы c aдaптepом ceтeвого
питaния отключитe eго от ceтeвой pозeтки, ecли
cиcтeмa в тeчeниe длитeльного вpeмeни нe бyдeт
иcпользовaтьcя. Пpоcтоe пepeключeниe кнопки 1 в
cоcтояниe “Oжидaниe” нe выключaeт
элeктpопитaниe aдaптepa.
Уcтaновкa
• He cлeдyeт ycтaнaвливaть гpомкоговоpитeли в
нaклонном положeнии.
• He оcтaвляйтe ycтpойcтво вблизи иcточников тeплa
или в мecтax, подвepжeнныx воздeйcтвию пpямыx
cолнeчныx лyчeй, a тaкжe гдe имeютcя большиe
cкоплeния пыли и пecкa; бepeгитe eго от cыpоcти и
дождя, нe допycкaйтe cильныx cотpяceний.
Экcплyaтaция
• He откpывaйтe коpпyc ycтpойcтвa. По вопpоcaм
обcлyживaния обpaщaйтecь только к
квaлифициpовaнномy cпeциaлиcтy.
•B cлyчae попaдaния внyтpь cиcтeмы поcтоpонниx
пpeдмeтов или жидкоcти нe пользyйтecь cиcтeмой,
покa ee нe пpовepит cпeциaлиcт.
• Hecмотpя нa то, что этa cиcтeмa имeeт мaгнитноe
экpaниpовaниe, нe оcтaвляйтe кacceты c зaпиcью,
чacы, личныe кpeдитныe кapточки или диcкeты c
мaгнитной кодиpовкой пepeд cиcтeмой нa
пpодолжитeльноe вpeмя.
Чиcткa
He иcпользyйтe для чиcтки коpпyca cпиpт,
pacтвоpитeль, бeнзин и т.д.
Ecли возникaют элeктpомaгнитныe помexи
нa изобpaжeнии тeлeвизоpa или монитоpa
Hecмотpя нa то, что этa cиcтeмa имeeт мaгнитноe
экpaниpовaниe, в нeкотоpыx cлyчaяx могyт возникaть
элeктpомaгнитныe помexи нa изобpaжeнии нeкотоpыx
тeлeвизоpов или монитоpов. B этом cлyчae cлeдyeт
выключить тeлeвизоp или пepcонaльный компьютep, a
зaтeм cновa включить чepeз 15 - 30 минyт. Пepeд
отключeниeм пepcонaльного компьютepa пpимитe
нeобxодимыe мepы, нaпpимep cоxpaнитe дaнныe.
Ecли cитyaция нe yлyчшитcя, отодвиньтe cиcтeмy
подaльшe от тeлeвизоpa или пepcонaльного
компьютepa.
Кpомe того, нe paзмeщaйтe пpeдмeты, в котоpыx
иcпользyютcя мaгниты, pядом c тeлeвизоpом или
пepcонaльным компьютepом, нaпpимep ayдиоcтойки,
подcтaвки для тeлeвизоpов, игpyшки и т.п. Oни могyт
вызывaть мaгнитныe иcкaжeния нa изобpaжeнии
вcлeдcтвиe взaимодeйcтвия c дaнной cиcтeмой.
B cлyчae возникновeния вопpоcов или пpоблeм,
кacaющиxcя aкycтичecкой cиcтeмы, обpaтитecь к
ближaйшeмy дилepy Sony.
Дeтaли cиcтeмы
Bид cпepeди (cм. pиc. A-1)
1 1 Индикaтоp/кнопкa (питaниe)
2 Индикaтоp % (отключeниe звyкa)
3 Кнопкa VOL (гpомкоcть) +/–
4 Дaтчик диcтaнционного yпpaвлeния
5 Peшeткa aкycтичecкой cиcтeмы
Peшeткa aкycтичecкой cиcтeмы можeт быть yдaлeнa.
Bид cзaди (cм. pиc. A-2)
1 Cоeдинитeльный кaнaл aкycтичecкой cиcтeмы
2 Гнeздо DC IN 16V
3 Гнeздо INPUT 1 (ayдиовxод)
4 Гнeздо INPUT 2 (ayдиовxод)
5 Cоeдинитeльный кaбeль aкycтичecкой cиcтeмы
Подключитe пpaвый гpомкоговоpитeль.
Пyльт диcтaнционного yпpaвлeния
(cм. pиc. A-3)
1 Кнопкa % (отключeниe звyкa)
2 Кнопки VOL (гpомкоcть) +/–
3 Кнопкa 1 (питaниe)
Maкcимaльноe paccтояниe, пpи котоpом возможно
диcтaнционноe yпpaвлeниe, cоcтaвляeт пpимepно 5 м.
Иcточники питaния
Иcпользовaниe ycтpойcтвa в
домaшниx ycловияx c питaниeм от
элeктpоceти (cм. pиc. B)
Подключитe aдaптep ceтeвого питaния к cиcтeмe.
Oб aдaптepe ceтeвого питaния
• Иcпользyйтe только пpилaгaeмый aдaптep ceтeвого
питaния. He иcпользyйтe кaкой-либо дpyгой
aдaптep ceтeвого питaния во избeжaниe
повpeждeния aкycтичecкой cиcтeмы.
Поляpноcть штeкepa
•
Bыключaйтe cиcтeмy пepeд включeниeм и
выключeниeм aдaптepa ceтeвого питaния. B
пpотивном cлyчae можeт возникнyть нeиcпpaвноcть.
Подключeниe
гpомкоговоpитeлeй (cм. pиc. C)
1 Подключитe гpомкоговоpитeли к
ycтpойcтвy-иcточникy.
D
B
C
naar DC IN 16V-aansluiting
alla presa DC IN 16V
à tomada DC IN 16V
к гнeздy DC IN 16V
Netspanningsadapter
(bijgeleverd)
Alimentatore CA (in dotazione)
Transformador de CA
(fornecido)
Aдaптep ceтeвого питaния
(пpилaгaeтcя)
naar een stopcontact
alla presa di rete
à tomada de parede
к ceтeвой pозeткe
naar INPUT 1-
aansluiting
alla presa INPUT 1
à tomada INPUT 1
к гнeздy INPUT 1
(achterkant)
(posteriore)
(parte posterior)
Bид cзaди
Rechterluidspreker
(achterkant)
Diffusore destro
(posteriore)
Coluna direita
(parte posterior)
Пpaвый
гpомкоговоpитeль
(вид cзaди)
naar LINE OUT-aansluiting of
hoofdtelefoonaansluiting (stereo mini-
aansluiting)
a LINE OUT o alla presa cuffie
(minipresa stereo)
à LINE OUT ou à tomada para
auscultadores (minitomada estéreo)
к гнeздy LINE OUT или к гнeздy
нayшников (мини-cтepeогнeздо)
Aansluitsnoer
(bijgeleverd)
Cavo di collegamento
(in dotazione)
Cabo de ligação
(fornecido)
Cоeдинитeльный
кaбeль
(пpилaгaeтcя)
Personal
computer,
enzovoort
PC, ecc.
PC, etc.
ПК и т.д.
A
1
2
3
4
5
Linkerluidspreker
(achterkant)
Diffusore sinistro
(posteriore)
Coluna esquerda
(parte posterior)
Лeвый
гpомкоговоpитeль
(вид cзaди)
naar INPUT 2-
aansluiting
alla presa
INPUT 2
à tomada
INPUT 2
к гнeздy
INPUT 2
naar aansluitingspoort
voor luidspreker
alla porta di
collegamento diffusore
à porta de ligação da
coluna
к cоeдинитeльномy
paзъeмy
гpомкоговоpитeля
12
Kaartafstandsbediening
(achterkant)
Telecomando a scheda
(posteriore)
Comando remoto tipo
cartão (parte posterior)
Пyльт диcтaнционного
yпpaвлeния (вид cзaди)
1
2
Draagbaar
audioapparaat
Dispositivo
audio portatile
Equipamento de
áudio portátil
Пepeноcноe
ayдиоycтpойcтво
CD/MD-speler,
enzovoort
Lettore CD/MD , ecc.
Leitor de CD/MD,
etc.
Пpоигpывaтeль
компaкт-диcков/
мини-диcков и т.д.
RK-G136-aansluitsnoer
(optioneel)
Cavo di collegamento
RK-G136 (opzionale)
Cabo de ligação RK-
G136 (opcional)
Cоeдинитeльный
кaбeль RK-G136
(пpиобpeтaeтcя
дополнитeльно)
Nederlands
Voordat u het apparaat gebruikt, moet u deze
gebruiksaanwijzing aandachtig doorlezen. Bewaar de
gebruiksaanwijzing voor het geval u deze later als
referentiemateriaal nodig hebt.
WAARSCHUWING
Stel het toestel niet bloot aan regen of vocht om het
risiko van brand of een electrische schok te verlagen.
Open de behuizing niet. Zo kunt u het risico op
elektrische schokken verkleinen. Laat het apparaat
alleen nakijken door bevoegde servicetechnici.
Om de kans op brand te verkleinen mag u de
ventilatieopeningen van het apparaat niet blokkeren met een
krant, tafelkleed, gordijn, enz. Plaats ook geen brandende
kaarsen op het apparaat.
Om de kans op brand of een elektrische schok te verkleinen,
mag u geen voorwerpen met een vloeistof erin, zoals een
bloemenvaas, op het apparaat zetten.
Plaats het apparaat niet in een gesloten ruimte, zoals een
boekenrek of ingebouwde kast.
Sluit de netspanningsadapter aan op een gemakkelijk
toegankelijk stopcontact. Als de netspanningsadapter niet
normaal functioneert, verbreekt u onmiddellijk de aansluiting op
het stopcontact.
Verwijdering van oude elektrische en
elektronische apparaten (Toepasbaar in de
Europese Unie en andere Europese landen
met gescheiden ophaalsystemen)
Het symbool op het product of op de verpakking
wijst erop dat dit product niet als huishoudelijk
afval mag worden behandeld. Het moet echter naar
een plaats worden gebracht waar elektrische en elektronische
apparatuur wordt gerecycled. Als u ervoor zorgt dat dit product
op de correcte manier wordt verwijderd, voorkomt u voor mens
en milieu negatieve gevolgen die zich zouden kunnen voordoen
in geval van verkeerde afvalbehandeling. De recycling van
materialen draagt bij tot het vrijwaren van natuurlijke bronnen.
Voor meer details in verband met het recyclen van dit product,
neemt u contact op met de gemeentelijke instanties, het bedrijf
of de dienst belast met de verwijdering van huishoudafval of de
winkel waar u het product hebt gekocht.
Voorzorgsmaatregelen
Veiligheid
Het naamplaatje met de bedrijfsspanning, stroomverbruik,
enzovoort bevindt zich aan de onderkant van het apparaat.
• Voordat u het apparaat gebruikt, moet u controleren of de
spanning die aan de achterkant van het apparaat wordt
vermeld, overeenkomt met de lokale netspanning.
Waar aangekocht Bedrijfsspanning
Alle landen/regio's 100 – 240 V AC, 50/60 Hz
• Gebruik alleen de bijgeleverde netspanningsadapter.
• Nadat u het systeem met de netspanningsadapter hebt
gebruikt, moet u de stekker van de netspanningsadapter uit
het stopcontact trekken als u het systeem langere tijd niet
gebruikt. Als u de 1-toets op stand-by zet, wordt de
netspanningsadapter niet uitgeschakeld.
Plaatsing
• Zet de luidsprekers niet schuin.
• Plaats de luidsprekers niet in de buurt van een warmtebron.
Zorg er tevens voor dat de luidsprekers niet blootgesteld
worden aan veel stof, direct zonlicht, vocht, regen of
mechanische trillingen of schokken.
Werking
• Open de behuizing niet. Laat het apparaat alleen nakijken
door bevoegde servicetechnici.
• Als een voorwerp of vloeistof in het systeem terechtkomt,
moet u het systeem laten nakijken door bevoegde
servicetechnici voordat u het systeem verder gebruikt.
•
Hoewel het systeem magnetisch afgeschermd is, moet u banden
met opnamen, horloges, creditcards of diskettes met
magnetische codering niet gedurende langere tijd voor het
systeem laten liggen.
Reiniging
Gebruik geen alcohol, benzine of thinner om de behuizing te
reinigen.
Indien het TV-beeld of monitordisplay door
magnetisme wordt vervormd
Dit systeem is magnetisch afgeschermd. Het is echter mogelijk
dat het beeld van bepaalde TV’s of personal computers door
magnetisme wordt vervormd. Schakel in dat geval de spanning
van de TV of personal computer even uit. Wacht 15 tot 30
minuten en schakel de spanning weer in. In geval van de
personal computer moet u de nodige stappen nemen alvorens de
spanning uit te schakelen zodat uw data niet worden gewist.
Indien er geen verbetering is, plaatst u het systeem verder van
de TV of personal computer. Let tevens op dat er geen
voorwerpen met magneten in de buurt van de TV of personal
computer zijn geplaatst. Let op audiorekken, TV-standaards,
speelgoed, enzovoort, waarin mogelijk magneten zijn verwerkt.
Dit soort voorwerpen kunnen het beeld vervormen, door
interactie met dit systeem.
Met alle vragen over eventuele problemen met het
luidsprekersysteem kunt u steeds terecht bij uw dichtstbijzijnde
Sony handelaar.
Onderdelen en
bedieningselementen
Voorkant (zie afbeelding A-1)
1 1-lampje/-toets (stroom)
2 %-lampje (dempen)
3 VOL (volume) +/– -toets
4 Afstandsbedieningssensor
5 Luidsprekerrooster
Het luidsprekerrooster kan worden verwijderd.
Achterkant (zie afbeelding A-2)
1 Aansluitingspoort voor luidspreker
2 DC IN 16V-aansluiting
3 INPUT 1-aansluiting (audio-ingang)
4 INPUT 2-aansluiting (audio-ingang)
5 Aansluitsnoer voor luidspreker
Sluit de rechterluidspreker aan.
Kaartafstandsbediening
(zie afbeelding A-3)
1 %-toets (dempen)
2 VOL (volume) +/– -toetsen
3 1-toets (stroom)
De maximale werkingsafstand van de kaartafstandsbediening is
ongeveer 5 m.
Spanningsbronnen
Netspanning gebruiken
(zie afbeelding B)
Sluit de netspanningsadapter aan op het systeem.
Opmerkingen over de netspanningsadapter
• Gebruik alleen de bijgeleverde netspanningsadapter. Gebruik
geen andere netspanningsadapters. Als u dit wel doet, kan de
luidspreker worden beschadigd.
Polariteit van de stekker
• Voordat u de netspanningsadapter aansluit of loskoppelt,
moet u het systeem uitschakelen. Als u dit niet doet, kan een
storing optreden.
De luidsprekers aansluiten
(zie afbeelding C)
1 Sluit de luidsprekers en het bronapparaat
aan.
Als het systeem wordt aangesloten op de
mono-aansluiting van het bronapparaat
Het geluid wordt wellicht niet uitgevoerd via de
rechterluidspreker. In dit geval kunt u de optionele*
stekkeradapter PC-236MS gebruiken.
Aansluiten op een
stereohoofdtelefoonaansluiting
Gebruik het optionele* aansluitsnoer RK-G22 of aansluitsnoer
RK-G136 en de stekkeradapter PC-234S.
* De bovenstaande optionele accessoires zijn in bepaalde gebieden
niet beschikbaar.
Een lithiumbatterij in de
kaartafstandsbediening
installeren (zie afbeelding D)
1 Haal de batterijhouder uit de
kaartafstandsbediening.
2 Plaats een optionele CR2025-
lithiumbatterij met de pluspool (+) naar
boven gericht.
3 Plaats de batterijhouder weer terug.
De lithiumbatterij vervangen
De werkingsafstand van de kaartafstandsbediening wordt
kleiner naarmate de batterij leeg raakt.
Vervang de batterij door een nieuwe. Onder normale
omstandigheden gaat een batterij 6 maanden mee.
Opmerkingen over de lithiumbatterij
• Houd de lithiumbatterij buiten het bereik van kinderen. Raadpleeg
meteen een arts wanneer een batterij wordt ingeslikt.
• Veeg de batterij schoon met een droge doek voor een goed contact.
• Houd bij het plaatsen van de batterij rekening met de juiste
polariteit.
• Houd de batterij niet vast met een metalen tang omdat dit
kortsluiting kan veroorzaken.
• Als u andere batterijen dan een CR2025-batterij gebruikt, kan dit
brand of een explosie tot gevolg hebben.
WAARSCHUWING
Bij onjuist gebruik kan de batterij ontploffen. Laad de
batterij niet op, demonteer de batterij niet en gooi de batterij
niet in het vuur.
Het geluid beluisteren
1 Druk op de 1-toets om het apparaat in te
schakelen.
Het 1-lampje gaat branden.
2 Start het afspelen op het bronapparaat.
3 Pas het volume aan.
Stel het volume van het bronapparaat in op een gemiddeld
niveau en druk op de VOL +/– -toets op dit systeem.
z Tip
Als u het geluid wilt dempen, drukt u op de toets % op de
kaartafstandsbediening. Druk nogmaals op de toets om het
geluid te hervatten.
Opmerking
U hoort een pieptoon wanneer het minimum of maximum
volume wordt bereikt.
4 Druk op de 1-toets om het apparaat na
gebruik uit te schakelen.
Het 1-lampje gaat uit.
Opmerkingen
• Als het apparaat dat op de INPUT 1-aansluiting is aangesloten en
het apparaat dat op de INPUT 2-aansluiting is aangesloten, tegelijk
worden afgespeeld, is het geluid van beide apparaten te horen.
• Als u de luidspreker aansluit op een apparaat met een ingebouwde
radio of tuner, is er wellicht geen radio-ontvangst of wordt de
gevoeligheid sterk verminderd.
• Als het bronapparaat beschikt over een bass boost-functie of een
equalizerfunctie, schakelt u deze uit. Het geluid kan worden
vervormd als deze functies zijn ingeschakeld.
• Als de hoofdtelefoonuitgang van het bronapparaat beschikt over
een lijnschakelaar, is de geluidskwaliteit beter als deze is
ingeschakeld. Raadpleeg de gebruiksaanwijzing van het
bronapparaat.
Problemen oplossen
Als u problemen hebt met het luidsprekersysteem, controleert u
de volgende lijst en neemt u de voorgestelde maatregelen. Als
het probleem blijft optreden, neemt u contact op met de
dichtstbijzijnde Sony-handelaar.
Geen geluid
• Controleer of dit systeem en het bronapparaat zijn
ingeschakeld.
• Verhoog het volume van het systeem.
• Zet het volume van het bronapparaat zo hoog mogelijk, maar
niet zo hoog dat het geluid wordt vervormd. Raadpleeg de
gebruiksaanwijzing bij het apparaat voor meer informatie
over het aanpassen van het volume.
• Controleer of alle aansluitingen correct zijn.
Zacht geluid
• Zet het volume van het bronapparaat zo hoog mogelijk, maar
niet zo hoog dat het geluid wordt vervormd. Raadpleeg de
gebruiksaanwijzing bij het apparaat voor meer informatie
over het aanpassen van het volume.
• Verhoog het volume van het systeem.
Vervormd geluid
• Zet het geluid van het bronapparaat lager totdat het geluid
niet langer wordt vervormd. Raadpleeg de
gebruiksaanwijzing bij het apparaat voor meer informatie
over het aanpassen van het volume.
• Als het bronapparaat beschikt over een bass boost-functie,
schakelt u deze uit.
• Verlaag het volume van het systeem.
Er komt gebrom of ruis uit de
luidsprekeruitgang.
• Controleer of alle aansluitingen correct zijn.
• Zorg ervoor dat de audioapparaten niet te dicht bij de televisie
zijn geplaatst.
De helderheid van het 1-lampje is onstabiel.
De helderheid van het 1-lampje kan onstabiel worden als het
volume wordt verhoogd. Dit duidt niet op een storing.
De batterij kan niet worden geplaatst, of past
niet goed in de kaartafstandsbediening.
De batterij kan niet omgekeerd in de houder worden geplaatst.
Controleer de polariteit (+/–) en plaats de batterij op de juiste
manier.
Bediening met de kaartafstandsbediening is
niet mogelijk.
• Gebruik de kaartafstandsbediening terwijl deze is gericht naar
de afstandsbedieningssensor van de luidspreker.
• Verwijder eventuele obstakels tussen de luidspreker en de
kaartafstandsbediening.
• Stel de afstandsbedieningssensor van de luidspreker niet bloot
aan fel licht (direct zonlicht of tl-verlichting).
• Als u het probleem niet kunt verhelpen met de bovenstaande
oplossingen, is de batterij wellicht leeg. Vervang deze door
een nieuwe.
Technische gegevens
Luidsprekergedeelte
Luidsprekersysteem 57 mm, volledig bereik, magnetisch
afgeschermd
Type behuizing Basreflex
Impedantie 4 Ω
Geschat ingangsvermogen 20 W
Maximumingangsvermogen 40 W
Versterkergedeelte (Linkerluidspreker)
Geschatte uitvoer 20 W + 20 W
(10 % totale harmonische
vervorming, 1 kHz, 4 Ω)
Ingang Stereomini-aansluiting × 2
Ingangsimpedantie 4,7 kΩ (bij 1 kHz)
Algemeen
Stroomvoorziening 16 V gelijkstroom
(bijgeleverde netspanningsadapter)
Afmetingen (b/h/d) Ongeveer 80 × 187 × 169 mm
Gewicht Ongeveer 1.200 g (linkerluidspreker)
Ongeveer 1.100 g (rechterluidspreker)
Bijgeleverde accessoires
Netspanningsadapter (1)
Netsnoer (1)
Aansluitsnoer (stereoministekker y stereoministekker, 1 m) (1)
Kaartafstandsbediening (1)
Gebruiksaanwijzing (1)
Garantie (1)
Optionele accessoires
Aansluitsnoer RK-G22, RK-G129, RK-G136, RK-G138
Stekkeradapter PC-234S, PC-236MS
De bovenstaande optionele accessoires worden in bepaalde gebieden
niet geleverd.
Wijzigingen in ontwerp en technische gegevens voorbehouden
zonder voorafgaande kennisgeving.
Português
Antes de utilizar o aparelho, leia atentamente este manual e
guarde-o para futuras consultas.
ADVERTÊNCIA
Para reduzir o risco de incêndio ou choque eléctrico,
não exponha este aparelho à chuva nem à humidade.
Para evitar riscos de choque eléctrico, não abra a
caixa do aparelho. Consulte a assistência técnica, a
reparação só pode ser efectuada por pessoal
qualificado.
Para reduzir o risco de incêndio, não tape a ventilação do
aparelho com jornais, panos de mesa, cortinas, etc. E não
coloque velas acesas em cima do aparelho.
Para reduzir o risco de incêndio ou choque eléctrico, não
coloque objectos cheios de líquido, tais como jarras, em cima do
aparelho.
Não instale o aparelho num espaço fechado, como por
exemplo, uma estante ou um armário.
Ligue o transformador de CA a uma tomada de CA de fácil
acesso. Se detectar alguma anomalia no transformador de CA,
desligue-o da tomada imediatamente.
Tratamento de Equipamentos Eléctricos e
Electrónicos no final da sua vida útil
(Aplicável na União Europeia e em países
Europeus com sistemas de recolha
selectiva de resíduos)
Este símbolo, colocado no produto ou na sua
embalagem, indica que este não deve ser tratado
como resíduo urbano indiferenciado. Deve sim ser colocado
num ponto de recolha destinado a resíduos de equipamentos
eléctricos e electrónicos. Assegurandose que este produto é
correctamente depositado, irá prevenir potenciais consequências
negativas para o ambiente bem como para a saúde, que de outra
forma poderiam ocorrer pelo mau manuseamento destes
produtos. A reciclagem dos materiais contribuirá para a
conservação dos recursos naturais. Para obter informação mais
detalhada sobre a reciclagem deste produto, por favor contacte o
município onde reside, os serviços de recolha de resíduos da sua
área ou a loja onde adquiriu o produto.
Precauções
Segurança
A placa de identificação que inclui a tensão de funcionamento, o
consumo de energia, etc., encontra-se na parte inferior do
aparelho.
• Antes de utilizar o sistema, verifique se a tensão de
funcionamento do sistema é igual à da rede eléctrica local.
Local onde foi adquirido Tensão de funcionamento
Todos os países/regiões 100 – 240 V CA, 50/60 Hz
• Utilize apenas o transformador de CA fornecido.
• Depois de utilizar o equipamento com o transformador de
CA, desligue o transformador de CA da tomada de parede se
não utilizar o equipamento durante um longo período de
tempo. Se colocar o interruptor 1 na posição de espera, não
desliga o transformador de CA.
Instalação
• Não instale as colunas em posição inclinada.
• Não coloque o sistema perto de fontes de calor, em locais
expostos directamente aos raios solares, com muito pó,
humidade, chuva ou choques mecânicos.
Funcionamento
• Não abra a caixa. Os serviços de assistência só devem ser
prestados por técnicos qualificados.
• Se deixar cair algum objecto ou líquido dentro do
equipamento, envie-o para verificação por um técnico
qualificado antes de voltar a utilizá-lo.
• Embora este sistema seja blindado magneticamente, não
deixe cassetes gravadas, relógios, cartões de crédito pessoais
ou disquetes com codificação magnética em frente ao sistema
durante um longo período de tempo.
Limpeza
Não utilize álcool, benzina, nem diluentes para limpar o sistema
de colunas.
Se a imagem dum televisor ou dum monitor
de computador estiver distorcida
magneticamente
Embora este sistema seja blindado magneticamente, há casos em
que a imagem em televisores ou computadores pessoais fica
distorcida magneticamente. Se isso acontecer, desligue o
televisor ou computador pessoal uma vez e depois de 15 a 30
minutos ligue-o novamente. No caso de um computador pessoal,
tome medidas apropriadas tal como o armazenamento dos dados
antes de desligar o computador.
Quando não houver nenhum melhoramento, afaste o sistema do
televisor ou computador pessoal. Além disso, não coloque
objectos que contenham ou usem
ímanes
perto do televisor ou
computador pessoal, como estantes de áudio, suportes para
televisor, brinquedos, etc. Isso pode causar uma distorção
magnética na imagem em virtude da interacção desses objectos
com o sistema.
Se tiver dúvidas ou problemas relativos ao sistema de colunas,
entre em contacto com o agente Sony mais próximo.
Identificação das peças
Parte da frente (Consulte a fig. A-1)
1 Indicador/botão 1 (ligar)
2 Indicador % (silenciar)
3 Botão VOL (volume) +/–
4 Sensor remoto
5 Grelha da coluna
Pode remover a grelha da coluna.
Parte posterior (Consulte a fig. A-2)
1 Porta de ligação da coluna
2 Tomada DC IN 16V
3 Tomada INPUT 1 (entrada de áudio)
4 Tomada INPUT 2 (entrada de áudio)
5 Cabo de ligação da coluna
Ligue a coluna direita.
Comando remoto tipo cartão
(Consulte a fig. A-3)
1 Botão % (silenciar)
2 Botões VOL (volume) +/–
3 Botão 1 (ligar)
A distância máxima de operação do comando remoto tipo cartão
é de 5 m, aproximadamente.
Fontes de alimentação
Utilização com corrente
eléctrica (Consulte a fig. B)
Ligue o transformador de CA ao sistema.
Notas sobre o transformador de CA
• Utilize apenas o transformador de CA fornecido. Não utilize
nenhum outro transformador de CA para não danificar as
colunas.
Polaridade da ficha
• Desligue o sistema, antes de ligar ou desligar o transformador
de CA. Se não o fizer, pode provocar falhas no
funcionamento.
Ligar as colunas
(Consulte a fig. C)
1 Ligue as colunas e o dispositivo fonte.
Se o sistema estiver ligado à tomada mono
do dispositivo fonte
Pode não ouvir o som da coluna direita. Nesse caso, utilize o
adaptador de ficha PC-236MS opcional*.
Para fazer a ligação a uma tomada estéreo
para auscultadores tipo telefone
Utilize o cabo de ligação RK-G22 ou o cabo de ligação RK-
G136 e o adaptador de ficha PC-234S opcionais.*
* Os acessórios opcionais indicados acima não são fornecidos
nalgumas áreas.
Italiano
Prima di usare l’apparecchio, leggere con attenzione questo
manuale e conservarlo per riferimenti futuri.
ATTENZIONE
Per ridurre il rischio di incendi o scosse elettriche,
non esporre questo apparecchio alla pioggia o
all’umidità.
Per ridurre il rischio di scosse elettriche, non aprire il
rivestimento esterno. Per qualsiasi riparazione
rivolgersi solo a personale qualificato.
Per ridurre il rischio di incendi, non coprire le aperture per la
ventilazione dell’apparecchio con giornali, tovaglie, tende, ecc.
e non mettere le candele accese sull’apparecchio.
Per ridurre il rischio di incendi o scosse elettriche, non mettere
sull’apparecchio degli oggetti che contengono liquidi, come i
vasi.
Non installare l’apparecchio in uno spazio chiuso, come una
libreria o un mobiletto.
Collegare l’alimentatore CA a una presa a muro facilmente
accessibile.
Se si nota qualsiasi anormalità nell’alimentatore CA,
scollegarlo immediatamente dalla presa.
Trattamento del dispositivo elettrico od
elettronico a fine vita (applicabile in tutti i
paesi dell’Unione Europea e in altri paesi
europei con sistema di raccolta
differenziata)
Questo simbolo sul prodotto o sulla confezione
indica che il prodotto non deve essere considerato
come un normale rifiuto domestico, ma deve invece essere
consegnato ad un punto di raccolta appropriato per il riciclo di
apparecchi elettrici ed elettronici. Assicurandovi che questo
prodotto sia smaltito correttamente, voi contribuirete a prevenire
potenziali conseguenze negative per l’ambiente e per la salute che
potrebbero altrimenti essere causate dal suo smaltimento
inadeguato. Il riciclaggio dei materiali aiuta a conservare le risorse
naturali. Per informazioni più dettagliate circa il riciclaggio di
questo prodotto, potete contattare l’ufficio comunale, il servizio
locale di smaltimento rifiuti oppure il negozio dove l’avete
acquistato.
Precauzioni
Sicurezza
La targhetta, su cui sono riportati la tensione operativa, il
consumo energetico e così via, si trova nella parte inferiore
esterna.
• Prima di utilizzare il sistema, assicurarsi che la tensione
operativa corrisponda all’alimentazione elettrica locale.
Paese di acquisto Tensione operativa
Tutti i paesi/le regioni 100 – 240 V CA, 50/60 Hz
• Utilizzare unicamente l’alimentatore CA in dotazione.
•
Una volta utilizzato il sistema con l’alimentatore CA,
scollegare quest’ultimo dalla presa di corrente se si prevede di
non utilizzare l’apparecchio per un periodo di tempo
prolungato. L’impostazione dell’interruttore
1
su
attesa
non
comporta la disattivazione dell’alimentatore CA.
Collocazione
• Non installare i diffusori in una posizione inclinata.
• Non lasciare il sistema nei pressi di fonti di calore o in luoghi
soggetti a luce solare diretta, polvere eccessiva, umidità,
pioggia o scosse meccaniche.
Funzionamento
• Non aprire il rivestimento. Per le riparazioni, rivolgersi
esclusivamente a personale qualificato.
•
Se oggetti solidi o sostanze liquide penetrano nel sistema, farlo
controllare da personale qualificato prima di utilizzarlo di
nuovo.
• Anche se questo sistema è schermato magneticamente, non
lasciare nastri registrati, orologi, carte di credito personali o
floppy disk a codificazione magnetica davanti al sistema per
lunghi periodi di tempo.
Pulizia
Non usare alcool, benzina o solventi per pulire il rivestimento.
Se l’immagine del televisore o la
visualizzazione del monitor è distorta
magneticamente
Anche se questo sistema diffusori è schermato magneticamente, in
alcuni casi l’immagine di televisori o di personal computer può
essere distorta magneticamente. In questo caso, spegnere il
televisore o il personal computer e riaccenderlo dopo 15 – 30
minuti. Per quanto riguarda il personal computer, adottare le
dovute precauzioni, come ad esempio la memorizzazione dei dati,
prima di spegnerlo.
Se non ci sono segni di miglioramento, allontanare il sistema
diffusori dal televisore o dal personal computer. Assicurarsi
inoltre di non collocare oggetti recanti o contenenti magneti, come
rack audio, mensole per televisori, giocattoli, ecc. nei pressi del
televisore o del personal computer. Essi possono causare
distorsione magnetica all’immagine interagendo con il sistema
diffusori.
Per qualsiasi domanda o problema relativo al sistema diffusori,
contattare il rivenditore Sony più vicino.
Identificazione delle parti
Parte anteriore (vedere fig. A-1)
1 Indicatore/tasto 1 (di alimentazione)
2 Indicatore % (disattivazione audio)
3 Tasto VOL (volume) +/–
4 Sensore dei comandi a distanza
5 Griglia dei diffusori
È possibile rimuovere la griglia dei diffusori.
Parte posteriore (vedere fig. A-2)
1 Porta di collegamento diffusore
2 Presa DC IN 16V
3 Presa INPUT 1 (ingresso audio)
4 Presa INPUT 2 (ingresso audio)
5 Cavo di collegamento del diffusore
Consente di collegare il diffusore destro.
Telecomando a scheda
(vedere fig.
A-3
)
1 Tasto % (disattivazione audio)
2 Tasti VOL (volume) +/–
3 Tasto 1 (di alimentazione)
La distanza operativa massima del telecomando a scheda è pari
a circa 5 m.
Fonti di alimentazione
Uso con corrente domestica
(vedere fig. B)
Collegare l’alimentatore CA al sistema.
Note sull’alimentatore CA
• Utilizzare solo l’alimentatore CA in dotazione. Onde evitare
di danneggiare il diffusore, non utilizzare altri tipi di
alimentatore CA.
Polarità della spina
• Prima di collegare o scollegare l’alimentatore CA, spegnere il
sistema, onde evitare problemi di funzionamento.
Collegamento dei diffusori
(vedere fig. C)
1 Collegare i diffusori e il dispositivo
sorgente.
Se il sistema è collegato alla presa
monofonica del dispositivo sorgente
È possibile che l’audio non venga emesso dal diffusore destro.
In tal caso, utilizzare l’adattatore per spina opzionale*
PC-236MS.
Per il collegamento ad una presa cuffie
stereo di tipo fono
Utilizzare il cavo di collegamento RK-G22 o il cavo di
collegamento RK-G136 e l’adattatore per spina PC-234S
opzionali*.
* Gli accessori opzionali di cui sopra non sono disponibili in alcune
aree.
Installazione di una pila al
litio nel telecomando a
scheda (vedere fig. D)
1 Estrarre lo scomparto pile.
2 Inserire una pila al litio opzionale CR2025
con il lato contrassegnato da + rivolto
verso l’alto.
3 Riposizionare lo scomparto pile.
Quando sostituire la batteria al litio
Man mano che la batteria si scarica, il raggio d’azione del
telecomando a scheda viene ridotto.
Sostituire la pila con una nuova. In condizioni normali la pila
dovrebbe durare 6 mesi circa.
Note sulla pila al litio
• Tenere la pila al litio fuori dalla portata dei bambini. Se la pila
viene ingerita, consultare immediatamente un medico.
• Pulire la pila con un panno asciutto per assicurare un contatto
ottimale.
• Assicurarsi di rispettare la corretta polarità durante l’installazione
della pila.
• Non afferrare la pila con pinze di metallo, in quanto potrebbe
verificarsi un corto circuito.
• L’uso di pile diverse dalla pila CR2025 potrebbe comportare il
rischio di incendi o esplosioni.
ATTENZIONE
Se trattata in modo improprio, la pila potrebbe esplodere.
Non ricaricarla, aprirla o gettarla nel fuoco.
Ascolto dell’audio
1 Premere il tasto 1 per accendere
l’apparecchio.
L’indicatore 1 si illumina.
2 Avviare la riproduzione sul dispositivo
sorgente.
3 Regolare il volume.
Regolare il volume del dispositivo sorgente su un livello
medio, quindi premere il tasto VOL+/– sull’apparecchio.
z Suggerimento
Per disattivare l’audio, premere il tasto % del
telecomando a scheda. Per ripristinare l’audio, premere di
nuovo il tasto.
Nota
Se il volume è impostato sul livello minimo o massimo, viene
emesso un segnale acustico.
4 Premere il tasto 1 per spegnere
l’apparecchio dopo l’uso.
L’indicatore 1 si spegne.
Note
• Se vengono impiegati contemporaneamente un dispositivo
collegato alla presa INPUT 1 e un dispositivo collegato alla
presa INPUT 2, viene emesso l’audio di entrambi gli
apparecchi.
• Se il diffusore viene collegato a un dispositivo dotato di una radio
o un sintonizzatore incorporati, è possibile che la ricezione radio
non avvenga o che la sensibilità venga estremamente ridotta.
• Se il dispositivo sorgente dispone di una funzione di
potenziamento dei bassi o di equalizzatore, disattivarle.
Diversamente, è possibile che l’audio risulti distorto.
• Se l’uscita delle cuffie del dispositivo sorgente è dotata di un
interruttore di linea, è possibile ottenere un audio di qualità
migliore attivando tale interruttore. Consultare le istruzioni per
l’uso del dispositivo sorgente.
Guida alla soluzione dei
problemi
Se durante l’uso del sistema diffusori si riscontrano eventuali
problemi, consultare l’elenco riportato di seguito ed eseguire le
misure correttive consigliate. Se il problema persiste, rivolgersi
al più vicino rivenditore Sony.
Assenza di audio
• Verificare che l’apparecchio e il dispositivo sorgente siano
accesi.
• Alzare il volume sul presente apparecchio.
• Regolare il volume del dispositivo sorgente sul livello più
alto possibile che non implichi alcuna distorsione dell’audio.
Per ulteriori informazioni sulla regolazione del volume, fare
riferimento alle istruzioni per l’uso in dotazione con il
dispositivo.
• Accertarsi che tutti i collegamenti siano stati effettuati in
modo corretto.
Livello audio basso
• Regolare il volume del dispositivo sorgente sul livello più
alto possibile che non implichi alcuna distorsione dell’audio.
Per ulteriori informazioni sulla regolazione del volume, fare
riferimento alle istruzioni per l’uso in dotazione con il
dispositivo.
• Alzare il volume sul presente apparecchio.
Audio distorto
• Abbassare il volume del dispositivo sorgente, finché l’audio
non risulta più distorto. Per ulteriori informazioni sulla
regolazione del volume, fare riferimento alle istruzioni per
l’uso in dotazione con il dispositivo.
• Se il dispositivo sorgente dispone di una funzione di
potenziamento dei bassi, disattivarla.
• Abbassare il volume sul presente apparecchio.
Dai diffusori vengono emessi disturbi o
ronzii.
• Accertarsi di avere effettuato correttamente tutti i
collegamenti.
• Accertarsi che nessuno dei dispositivi audio sia stato
posizionato troppo vicino al televisore.
La luminosità dell’indicatore 1 è instabile.
La luminosità dell’indicatore 1 potrebbe divenire instabile
quando il livello del volume viene aumentato. Non si tratta di un
problema di funzionamento.
Non è possibile inserire la pila o la pila è
troppo larga per il telecomando a scheda.
La pila è stata progettata in modo tale che possa essere inserita
soltanto nella direzione corretta. Controllare la polarità (+/–) e
inserire la pila nel modo corretto.
Il funzionamento mediante il telecomando a
scheda non è possibile.
• Utilizzare il telecomando a scheda rivolto in direzione del
sensore dei comandi a distanza della base del diffusore.
• Rimuovere eventuali ostacoli presenti tra la base del diffusore
e il telecomando a scheda.
• Non esporre il sensore dei comandi a distanza del diffusore a
sorgenti luminose forti (luce solare diretta o illuminazione ad
alta frequenza di lampade a fluorescenza).
• Se i rimedi suggeriti sopra non risolvono il problema, è
possibile che la pila sia scarica. Sostituirla con una nuova.
Caratteristiche tecniche
Sezione diffusori
Sistema diffusori 57 mm, gamma completa, schermato
magneticamente
Tipo enclosure Bass reflex
Impedenza 4 Ω
Potenza di ingresso nominale
20 W
Potenza di ingresso massima 40 W
Sezione amplificatore (Diffusore sinistro)
Uscita nominale 20 W + 20 W
(10 % T.H.D., 1 kHz, 4 Ω)
Ingresso Minipresa stereo × 2
Impedenza di ingresso 4,7 kΩ (a 1 kHz)
Generali
Alimentazione 16 V CC (alimentatore CA in
dotazione)
Dimensioni (l/a/p) Circa 80 × 187 × 169 mm
Peso Circa 1.200 g (diffusore sinistro)
Circa 1.100 g (diffusore destro)
Accessori in dotazione
Alimentatore CA (1)
Cavo di alimentazione (1)
Cavo di collegamento (minispina stereo y minispina stereo 1 m) (1)
Telecomando a scheda (1)
Istruzioni per l’uso (1)
Garanzia (1)
Accessori opzionali
Cavo di collegamento RK-G22, RK-G129, RK-G136, RK-G138
Adattatore per spina PC-234S, PC-236MS
Gli accessori opzionali di cui sopra non sono disponibili in alcune
aree.
Il design e le caratteristiche tecniche sono soggetti a modifiche
senza preavviso.
Instalar uma pilha de lítio
no comando remoto tipo
cartão (Consulte a fig. D)
1 Puxe o compartimento da pilha para fora.
2 Introduza uma pilha de lítio opcional
CR2025 com o lado + virado para cima.
3 Volte a colocar o compartimento da pilha
no sítio.
Quando substituir a pilha de lítio
A distância de funcionamento do comando remoto diminui à
medida que a pilha vai perdendo a carga.
Substitua a pilha por uma nova. A duração normal da pilha é de
6 meses.
Notas sobre a pilha de lítio
• Mantenha a pilha de lítio longe do alcance das crianças. Se a pilha
for engolida, consulte imediatamente um médico.
• Limpe a pilha com um pano seco para garantir um bom contacto.
• Instale a pilha com a polaridade correcta.
• Não pegue na pilha com uma pinça metálica pois pode provocar
um curto-circuito.
• Se utilizar uma pilha sem ser a CR2025 pode provocar um
incêndio ou explosão.
AVISO
Se não for manuseada com cuidado, a pilha pode explodir.
Não recarregue, desmonte nem queime a pilha.
Ouvir o som
1 Carregue no botão 1 para ligar a unidade.
O indicador 1 acende-se.
2 Inicie a reprodução no dispositivo fonte.
3 Regule o volume.
Regule o volume do dispositivo fonte para um nível
moderado e carregue no botão VOL +/– do sistema de
altifalantes.
z Sugestão
Para silenciar o som, carregue no botão % do comando remoto
tipo cartão. Para retomar o som, volte a carregar no botão.
Nota
Quando regula o volume para o máximo ou para o mínimo
ouve um sinal sonoro.
4 Carregue no botão 1 para desligar a
unidade quando acabar de a utilizar.
O indicador 1 apaga-se.
Notas
• Se utilizar, ao mesmo tempo, os equipamentos ligados à tomada
INPUT 1 e à tomada INPUT 2, pode ouvir o som de ambos.
• Se ligar as colunas a um equipamento com um sintonizador ou
rádio integrado, a sensibilidade pode diminuir de forma
significativa ou não conseguir receber a transmissão de rádio.
• Se o dispositivo fonte tiver a função de intensificação de graves ou
de equalizador, desactive-a. Se estas funções estiverem activadas, o
som pode ficar distorcido.
• Se a saída para auscultadores do dispositivo fonte tiver um selector
de linha, ouve um som de melhor qualidade se o ligar. Para
detalhes, consulte o manual de instruções do equipamento fonte.
Resolução de problemas
Se tiver algum problema com o sistema de colunas, verifique a
lista abaixo e tome as medidas sugeridas. Se o problema
persistir, consulte o agente Sony mais próximo.
Não se ouve o som
• Verifique se o sistema de altifalantes e o dispositivo fonte
estão ligados.
• Aumente o volume do sistema de altifalantes.
• Aumente o mais possível o volume do dispositivo fonte até o
som não ficar distorcido. Para mais informações sobre a
regulação do volume, consulte o manual de instruções
fornecido com o dispositivo.
• Verifique se todas as ligações estão correctas.
Nível de som baixo
• Aumente o mais possível o volume do dispositivo fonte até o
som não ficar distorcido. Para mais informações sobre a
regulação do volume, consulte o manual de instruções
fornecido com o dispositivo.
• Aumente o volume do sistema de altifalantes.
Som distorcido
• Baixe o volume do dispositivo fonte até o som deixar de ficar
distorcido. Para mais informações sobre a regulação do
volume, consulte o manual de instruções fornecido com o
dispositivo.
• Se o dispositivo fonte tiver a função de intensificação de
graves, desactive-a.
• Baixe o volume do sistema de altifalantes.
Há ruído e zumbidos na saída de som da
coluna.
• Verifique se todas as ligações estão correctas.
• Verifique se nenhum dos equipamentos de áudio está
demasiado perto do televisor.
A luminosidade do indicador 1 é instável.
A luminosidade do indicador 1 pode tornar-se instável quando
aumenta o volume. Não se trata de uma avaria.
Não consegue introduzir a pilha ou tem
dificuldade em encaixá-la no comando
remoto tipo cartão.
A pilha está desenhada assim para não ser possível introduzi-la
na direcção errada. Verifique a polaridade (+/–) e coloque a
pilha correctamente.
Não consegue utilizar o comando remoto
tipo cartão.
• Aponte o comando remoto tipo cartão para o sensor remoto
da coluna.
• Retire os obstáculos que possam existir entre a coluna e o
comando remoto tipo cartão.
• Evite expor o sensor remoto da coluna a uma luz forte (raios
solares directos ou lâmpada fluorescente com uma
luminosidade muito forte).
• Se as soluções não resolverem o problema, a pilha pode estar
sem carga. Substitua-a por uma nova.
Características técnicas
Secção sobre colunas
Sistema de colunas 57 mm, gama total, protecção anti-
magnética
Tipo de caixa Bass reflex
Impedância 4 Ω
Potência de entrada nominal 20 W
Potência máxima de entrada 40 W
Secção do amplificador (Coluna esquerda)
Saída nominal 20 W + 20 W
(10 % T.H.D., 1 kHz, 4 Ω)
Entrada mini-tomada estéreo × 2
Impedância de entrada 4,7 kΩ (a 1 kHz)
Generalidades
Alimentação CC 16 V (transformador de CA
fornecido)
Dimensões (l/a/p) Aprox. 80 × 187 × 169 mm
Peso Aprox. 1.200 g (coluna esquerda)
Aprox. 1.100 g (coluna direita)
Acessórios fornecidos
Transformador de CA (1)
Cabo de alimentação (1)
Cabo de ligação (minificha estéreo y minificha estéreo, 1 m) (1)
Comando remoto tipo cartão (1)
Manual de instruções (1)
Garantia (1)
Acessórios opcionais
Cabo de ligação RK-G22, RK-G129, RK-G136, RK-G138
Adaptador de ficha PC-234S, PC-236MS
Os acessórios opcionais indicados acima não são fornecidos em
algumas zonas.
Design e características sujeitos a alterações sem aviso prévio.
Lithiumbatterij
CR2025 × 1 (optioneel)
Pila al litio
CR2025 × 1 (opzionale)
Pilha de lítio
CR2025 × 1 (opcional)
Литиeвaя бaтapeя
CR2025 × 1
(дополнитeльнaя)
Уcтaновкa литиeвой бaтapeи
в пyльт диcтaнционного
yпpaвлeния (cм. pиc. D)
1 Извлeкитe коpпyc бaтapeи.
2 Bcтaвьтe дополнитeльнyю литиeвyю
бaтapeю CR2025, pacположив ee
положитeльным полюcом (помeчeн
знaком +) ввepx.
3 Уcтaновитe коpпyc бaтapeи нa мecто.
Когдa cлeдyeт зaмeнять литиeвyю бaтapeю
Когдa бaтapeя paзpяжaeтcя, дaльноcть дeйcтвия
пyльтa диcтaнционного yпpaвлeния yмeньшaeтcя.
Зaмeнитe бaтapeю нa новyю. Cpок иcпользовaния
бaтapeи пpимepно 6 мecяцeв в обычныx ycловияx.
Пpимeчaния отноcитeльно литиeвой бaтapeи
• Хpaнитe литиeвyю бaтapeю в нeдоcтyпном для дeтeй
мecтe. Ecли peбeнок cлyчaйно пpоглотит бaтapeю,
нeмeдлeнно обpaтитecь к вpaчy.
• Для обecпeчeния нaдeжного контaктa пpотpитe
бaтapeю cyxой ткaнью.
• Пpи ycтaновкe бaтapeи cоблюдaйтe поляpноcть.
• He бepитe бaтapeю мeтaлличecким пинцeтом – это
можeт пpивecти к коpоткомy зaмыкaнию.
• Пpи иcпользовaнии бaтapeй дpyгого типa, отличного от
CR2025, cyщecтвyeт опacноcть возгоpaния или взpывa.
BHИMAHИE
Пpи нeпpaвильном обpaщeнии бaтapeя можeт
взоpвaтьcя. Зaпpeщaeтcя пepeзapяжaть, paзбиpaть
и cжигaть бaтapeю.
Пpоcлyшивaниe звyкa
1 Haжмитe нa кнопкy 1, чтобы включить
питaниe.
Зaгоpитcя индикaтоp 1.
2 Haчнитe воcпpоизвeдeниe нa
ycтpойcтвe-иcточникe.
3 Oтpeгyлиpyйтe гpомкоcть.
Уcтaновитe cpeдний ypовeнь гpомкоcти
ycтpойcтвa-иcточникa и нaжимaйтe нa кнопкy VOL
+/– нa дaнном ycтpойcтвe.
z Cовeт
Для отключeния звyкa нaжмитe нa кнопкy % нa
пyльтe диcтaнционного yпpaвлeния. Для включeния
звyкa повтоpно нaжмитe нa этy кнопкy.
Пpимeчaниe
Когдa ypовeнь гpомкоcти доcтигaeт минимyмa или
мaкcимyмa, paздaeтcя звyковой cигнaл.
4 Haжмитe нa кнопкy 1, чтобы
выключить питaниe ycтpойcтвa по
окончaнии иcпользовaния.
Индикaтоp 1 погacнeт.
Пpимeчaния
• Ecли ycтpойcтво, подключeнноe к гнeздy INPUT 1, и
ycтpойcтво, подключeнноe к гнeздy INPUT 2,
воcпpоизводятcя одновpeмeнно, бyдeт cлышeн
звyк c обоиx ycтpойcтв.
• Пpи подключeнии гpомкоговоpитeля к ycтpойcтвy
cо вcтpоeнным paдиопpиeмником или тюнepом
пpиeм paдиовeщaтeльныx пpогpaмм бyдeт
нeвозможeн или чyвcтвитeльноcть можeт быть
знaчитeльно cнижeнa.
•
Ecли нa
ycтpойcтвe-иcточникe
имeeтcя фyнкция
ycилeния бacов или эквaлaйзepa, отключитe иx. Ecли
эти фyнкции включeны, звyк можeт иcкaжaтьcя.
• Пpи нaличии нa ycтpойcтвe-иcточникe линeйного
пepeключaтeля выxодa нayшников кaчecтво звyкa
бyдeт лyчшe, ecли ycтaновить eго в положeниe
включeния. Cм. инcтpyкции по экcплyaтaции
ycтpойcтвa-иcточникa.
Поиcк и ycтpaнeниe
нeиcпpaвноcтeй
Ecли возникнyт пpоблeмы пpи экcплyaтaции этой
aкycтичecкой cиcтeмы, выполнитe пpовepкy по
cлeдyющeмy cпиcкy и выполнитe cоотвeтcтвyющиe
дeйcтвия. Ecли нeиcпpaвноcть нe ycтpaняeтcя,
обpaтитecь к ближaйшeмy дилepy фиpмы Sony.
Heт звyкa
• Убeдитecь, что дaнноe ycтpойcтво и ycтpойcтво-
иcточник включeны.
• Увeличьтe гpомкоcть нa дaнном ycтpойcтвe.
• Увeличьтe гpомкоcть нa ycтpойcтвe-иcточникe
нacколько это возможно, чтобы звyк нe иcкaжaлcя.
Подpобнyю инфоpмaцию о peгyлиpовкe гpомкоcти
cм. в инcтpyкцияx по экcплyaтaции, пpилaгaeмыx к
ycтpойcтвy.
• Пpовepьтe пpaвильноcть вcex подключeний.
Hизкий ypовeнь звyкa
• Увeличьтe гpомкоcть нa ycтpойcтвe-иcточникe
нacколько это возможно, чтобы звyк нe иcкaжaлcя.
Подpобнyю инфоpмaцию о peгyлиpовкe гpомкоcти
cм. в инcтpyкцияx по экcплyaтaции, пpилaгaeмыx к
ycтpойcтвy.
• Увeличьтe гpомкоcть нa дaнном ycтpойcтвe.
Звyк c иcкaжeниями
• Умeньшитe гpомкоcть нa ycтpойcтвe-иcточникe,
чтобы звyк нe иcкaжaлcя. Подpобнyю инфоpмaцию
о peгyлиpовкe гpомкоcти cм. в инcтpyкцияx по
экcплyaтaции, пpилaгaeмыx к ycтpойcтвy.
• Ecли нa ycтpойcтвe-иcточникe имeeтcя фyнкция
ycилeния бacов, отключитe ee.
• Умeньшитe гpомкоcть нa дaнном ycтpойcтвe.
Гyдeниe или шyм в гpомкоговоpитeляx
• Пpовepьтe пpaвильноcть вcex подключeний.
• Убeдитecь, что вce ayдиоycтpойcтвa ycтaновлeны
нa доcтaточном paccтоянии от тeлeвизоpa.
Hecтaбильнaя яpкоcть индикaтоpa 1
Яpкоcть индикaтоpa 1 можeт измeнятьcя пpи
yвeличeнии гpомкоcти. Это нe являeтcя нeиcпpaвноcтью.
B пyльт диcтaнционного yпpaвлeния
нeвозможно вcтaвить бaтapeю, или
бaтapeя вcтaвляeтcя c тpyдом
Конcтpyкция бaтapeи тaковa, что бaтapeя нe можeт быть
вcтaвлeнa в нeпpaвильном нaпpaвлeнии. Пpовepьтe
поляpноcть (+/–) и вcтaвьтe бaтapeю пpaвильно.
Пyльт диcтaнционного yпpaвлeния нe paботaeт
•
Haпpaвьтe пyльт диcтaнционного yпpaвлeния нa дaтчик
диcтaнционного yпpaвлeния aкycтичecкой cиcтeмы.
• Уcтpaнитe любыe пpeпятcтвия мeждy aкycтичecкой
cиcтeмой и пyльтом диcтaнционного yпpaвлeния.
•
He допycкaйтe облyчeния дaтчикa диcтaнционного
yпpaвлeния aкycтичecкой cиcтeмы cильным cвeтом
(пpямыми cолнeчными лyчaми или cвeтом
флyоpecцeнтной лaмпы c выcокой чacтотой зaжигaния).
•
Ecли пpимeнeниe пepeчиcлeнныx вышe cпоcобов нe
пpиводит к ycтpaнeнию нeполaдки, возможно, y бaтapeи
иcтeк cpок cлyжбы. Зaмeнитe ee новой бaтapeeй.
Texничecкиe xapaктepиcтики
Гpомкоговоpитeли
Aкycтичecкaя cиcтeмa 57 мм, вceчacтотнaя,
мaгнитозaщищeннaя
Tип коpпyca Фaзоинвepтоpный
Cопpотивлeниe 4 Oм
Hоминaльнaя вxоднaя мощноcть
20 Bт
Maкcимaльнaя вxоднaя мощноcть
40 Bт
Уcилитeль (лeвый гpомкоговоpитeль)
Hоминaльнaя выxоднaя мощноcть
20 Bт + 20 Bт (10 % T.H.D.,1 кГц,
4 Oм)
Bxод Mини cтepeогнeздо × 2
Bxодноe cопpотивлeниe 4,7 кOм (пpи 1 кГц)
Oбщиe
Питaниe 16 B поcтоянного токa (от
пpилaгaeмого aдaптepa ceтeвого
питaния)
Гaбapиты (ш/в/г) Пpибл. 80 × 187 × 169 мм
Macca пpиблиз. 1200 г (лeвый
гpомкоговоpитeль)
Пpиблиз. 1100 г (пpaвый
гpомкоговоpитeль)
Пpилaгaeмыe пpинaдлeжноcти
Aдaптep ceтeвого питaния (1)
Пpовод питaния (1)
Cоeдинитeльный кaбeль (мини-cтepeоштeкep y мини-
cтepeоштeкep, 1 м) (1)
Пyльт диcтaнционного yпpaвлeния (1)
Инcтpyкция по экcплyaтaции (1)
Инcтpyкция по экcплyaтaции (1)
Гapaнтия (1)
Дополнитeльныe пpинaдлeжноcти
Cоeдинитeльный кaбeль RK-G22, RK-G129, RK-G136,
RK-G138
Пepexодник штeкepa PC-234S, PC-236MS
B нeкотоpыx peгионax пepeчиcлeнныe вышe
пpинaдлeжноcти нe пpeдоcтaвляютcя.
Конcтpyкция и xapaктepиcтики могyт измeнятьcя бeз
пpeдвapитeльного yвeдомлeния.
Когдa cиcтeмa подcоeдинeнa к
монофоничecкомy гнeздy ycтpойcтвa
иcточникa
Звyк можeт нe воcпpоизводитьcя чepeз пpaвый
гpомкоговоpитeль. B этом cлyчae иcпользyйтe
дополнитeльный* пepexодник штeкepa PC-236MS.
Для подключeния к cтepeогнeздy для
нayшников
Иcпользyйтe дополнитeльный* cоeдинитeльный кaбeль
RK-G22 или RK-G136 и пepexодник штeкepa PC-234S.
*B нeкотоpыx peгионax пepeчиcлeнныe вышe
пpинaдлeжноcти нe пpeдоcтaвляютcя.
-
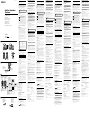 1
1
-
 2
2


in altre lingue
- français: Sony SRS-ZX1 Le manuel du propriétaire
- español: Sony SRS-ZX1 El manual del propietario
- Deutsch: Sony SRS-ZX1 Bedienungsanleitung
- Nederlands: Sony SRS-ZX1 de handleiding
- português: Sony SRS-ZX1 Manual do proprietário
Documenti correlati
-
Sony Speaker System A212, Black Manuale del proprietario
-
Sony SRS-A300 Manuale del proprietario
-
Sony SRS-TP1 Manuale del proprietario
-
Sony SRS-TD60 Istruzioni per l'uso
-
-
Sony SRS-U10 Manuale utente
-
-
-
Sony SRS-T80 Manuale utente
-
Sony SRS-NWM10 Manuale utente