DSE DK-HT2 Manuale del proprietario
- Categoria
- Lampadine a infrarossi
- Tipo
- Manuale del proprietario

Document: DK-HT2-1M7 Document: DK-HT2-1M7 Document: DK-HT2-1M7
Page: 1 Page: 1
OWNER'S MANUAL DK-HT2 - camouflage camera for the campaign
DSE srl - Digital Surveillance Equipment - www.dse.eu
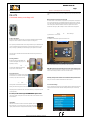
DK-HT2
Camera with battery camouflage VCR
Product description
DK-HT2 is a camera with a video recorder on an SD card in a watertight container and mimetic
developed for outdoor surveillance. It includes a microphone for recording sound.
And 'it powered by AA batteries and SD card recording to internal memory. The batteries and SD
card are not included. Thanks to its infrared sensor, the camera remains in stand-by for a long
time by consuming very little battery and starts recording only in the presence of movements.
The camera has an infrared illuminator with invisible LED that allows viewing in the dark up to
about 30 meters.
Inserting batteries
DK-HT1 works with normal AA batteries, both
normal and rechargeable. They can put 4 or 8
depending on autonomy
that Yes
It requires. With 8 batteries the camera has a
range of about 7 months in stand-by.
Insert the SD Card
The first thing to do is to insert the micro SD card into
this slot in DVR. To access the SD card compartment
is necessary to open the front cover. Caution
to the sense of
inserting the SD card that will slide into place only
with the gold contacts facing upward, as shown in the figure.
The package does not include an SD card, or the SD card reader for your computer that you must
purchase separately.
E 'can use any micro SD card with a capacity of 4 to 64 GB CLASS 10 or higher. An SD card E 'can use any micro SD card with a capacity of 4 to 64 GB CLASS 10 or higher. An SD card E 'can use any micro SD card with a capacity of 4 to 64 GB CLASS 10 or higher. An SD card
class 10 has a 10 MB / s write speed. Do not use the SD card with a lower rate because it could
lead to malfunction.
registration
The camera records audio and video in VGA resolution adjustable, 720P or 1080P (Full HD) with
H264 compression. You can use any SD card (or micro SD card with adapter) with a maximum
capacity of 64GB. One minute of footage in Full HD 1080 takes up about 80MB. A
32GB SD card can hold up to 6 hours of video, a 64GB over 12 hours. The camera also records
audio.
Motion detection with infrared sensor PIR
The camera records in motion detection, namely registers only in the presence of living beings in
front of it. The word living beings, is not accidental because this camera does not use, like most
of our other systems, changing pixels to detect the intruder but an infrared sensor such as those
used in alarm systems. This does not detect the movement of objects such as bushes or
branches and consuming very little on standby can wait for months intrusion. The apparatus
records file Video of the length
programmable from 1 to 120 seconds.
Configuration
The camera is controlled with the keyboard and internal monitor.
First, you notice that the device has two power buttons: TEST / OFF and ON
TEST / OFF - Press this button will launch the device in test mode. And 'the mode that is used to TEST / OFF - Press this button will launch the device in test mode. And 'the mode that is used to
position the camera and set the functions. In this test mode, you can also record still images with
manual controls. Pressing this button for 3 seconds to turn off the camera.
ON - briefly pressing this button will start the normal surveillance functionality of the camera that ON - briefly pressing this button will start the normal surveillance functionality of the camera that
allows you to record in accordance with the detections of the front sensor.
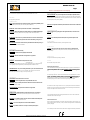
in test mode settings
First you should start the unit in test mode to set operating options as needed and to position the
camera. Press the red button TEST. The DVR will beep and will start up the on-screen setup
menu.

Document: DK-HT2-1M7 Document: DK-HT2-1M7 Document: DK-HT2-1M7
Page: 2 Page: 2
OWNER'S MANUAL DK-HT2 - camouflage camera for the campaign
DSE srl - Digital Surveillance Equipment - www.dse.eu
To act in the menu using the arrow buttons and the central MENU button to save
MMS / SMTP
Not supported by this camera
CAMERA SETTING
MODE - Following the detection of the IR sensor the camera can: take pictures (CAMERA), record MODE - Following the detection of the IR sensor the camera can: take pictures (CAMERA), record
a video (VIDEO) or record both photo and video (VIDEO CAMERA +).
IMAGE SIZE - Set the resolution of photos taken from the DVR 1 to 12MP (4608x2592) IMAGE SIZE - Set the resolution of photos taken from the DVR 1 to 12MP (4608x2592)
VIDEO SIZE - Sets the video resolution from 480P to 1080P. It 'also available 1080P HDR (high VIDEO SIZE - Sets the video resolution from 480P to 1080P. It 'also available 1080P HDR (high
dynamic range) for higher yield in the recovery of light and dark areas nel'inquadratura.
No SHOOTING - Indicates how many consecutive shots take as a result of an intrusion detection No SHOOTING - Indicates how many consecutive shots take as a result of an intrusion detection
(1 to 5)
LENGTH VIDEO - Indicates the length of the video to be recorded following a survey (from 1 to LENGTH VIDEO - Indicates the length of the video to be recorded following a survey (from 1 to
120 seconds)
MAX SHOOTING - Defines the maximum number of permissible intrusion detections per day (1 to MAX SHOOTING - Defines the maximum number of permissible intrusion detections per day (1 to
255). Set this to 0 if you want no restrictions.
AUDIO SETTING
PLAY SOUND - Enable audio recording PLAY SOUND - Enable audio recording
BOOT SOUND - Activate the sound signaling the start of the DVR BOOT SOUND - Activate the sound signaling the start of the DVR
KEY SOUND -This button activates the sound signal when a key is pressed. KEY SOUND -This button activates the sound signal when a key is pressed.
RIP SETTING
SENSITIVITY - Sets the detection sensitivity of the motion sensor SENSITIVITY - Sets the detection sensitivity of the motion sensor
Infrared (PIR). Yes can he
recommend the AUTO setting, but in case of wrong measurements, you can set High, Normal,
Low. Typically it requires high sensitivity in ambient temperature conditions over 30 °.
TRIGGER INTERVAL - Here you set a waiting time between any one of the sensor detection and TRIGGER INTERVAL - Here you set a waiting time between any one of the sensor detection and
the next (from 1 to 59 seconds or from 1 to 60 minutes). And 'useful if you do not need to
document every movement, but simply a movie / photo every time.
TIME AND DATE
TIME FORMAT - Sets the time format in 12 or 24 hours TIME FORMAT - Sets the time format in 12 or 24 hours
DATE FORMAT - Set the writing date format, usually in Italian DD / MM / YYYY DATE FORMAT - Set the writing date format, usually in Italian DD / MM / YYYY
TIME SETUP - Here you manually insert the current date and time. The first number is the time TIME SETUP - Here you manually insert the current date and time. The first number is the time
zone, which is set to +1 in Italy
TIME ZONE SETTING - Not required on this model does not support NTP. TIME ZONE SETTING - Not required on this model does not support NTP.
TIMER SETTING
TIMER SHOOTING - Enables the detection control based on time of day. If this function is TIMER SHOOTING - Enables the detection control based on time of day. If this function is
enabled the sensor detection will only be active during the time slots that are set below.
TIME LAPSE - It you enable this function, the motion sensor is excluded and the DVR performs TIME LAPSE - It you enable this function, the motion sensor is excluded and the DVR performs
only one survey a day at a time that can be set.
TIMER 1-4 - You can set 4 daily time slots in which to enable the detection TIMER 1-4 - You can set 4 daily time slots in which to enable the detection
REPEAT - It 's possible to exclude one or more days of the week by the recognition REPEAT - It 's possible to exclude one or more days of the week by the recognition
SETTING NIGHT VISION
NIGHT VISION MODE - Here you set the night vision mode. Normally, the parameter must be NIGHT VISION MODE - Here you set the night vision mode. Normally, the parameter must be
maintained to AUTO so that the camera resumes at day and night colors white / black exploiting
its IR illuminator. For special situations, it is always possible to force the color camera, without IR
illuminator (DAY) or always in B / N (NIGHT).
WHITE LED - This parameter should be kept OFF because this camera does not use white LEDs WHITE LED - This parameter should be kept OFF because this camera does not use white LEDs
but infrared.
USER INTERFACE STAMP
ON / OFF - Enable overlay in photographs of the equipment information, such as the camera ON / OFF - Enable overlay in photographs of the equipment information, such as the camera
name, date, etc.
PASSWORD
ON / OFF - If you enable the password it will be required to log in the test operation mode. ON / OFF - If you enable the password it will be required to log in the test operation mode.
TF CARD FORMAT
In this situation it formats the SD memory card erasing all the content
TF CARD CYCLE
ON / OFF - If this option is set to ON, once out of space in memory, the DVR will continue ON / OFF - If this option is set to ON, once out of space in memory, the DVR will continue
recording over the oldest data. IF this option is set to OFF, the DVR will stop when run out of
space in memory.
DEFAULT SETUP
This option restores the factory settings of the DVR
VERSION
Show the data on the product version
Positioning the Camera
In the natural environment filming the camera position is key to a good result. As first thing the
camera must be positioned in such a way that the sunlight is not direct against the target in the camera must be positioned in such a way that the sunlight is not direct against the target in the camera must be positioned in such a way that the sunlight is not direct against the target in the
day.
The angle range is about 50 ° and also the PIR motion sensor has approximately 50 ° of action
spectrum. It is advisable to position the camera so as to frame the route the likely target for an spectrum. It is advisable to position the camera so as to frame the route the likely target for an spectrum. It is advisable to position the camera so as to frame the route the likely target for an
extended period. For example, if you take a path should resume in an almost parallel to the
transverse passage and not to have more chances to capture significant images.
The motion sensor has a range of about 20 m so it is good to place the camera at a distance of
between 5 and 20 m from the target. The camera is provided with a fixing band and the back is
thought to be solidly anchored to a branch or a tree.
It 'well, if possible, place the camera at a height of between 3 and 6 m in order to make it less
visible and to allow a better view angle.
Camera attachment
When you find the right placement for the camera, press the red button to start test mode. If you
have not already done so in the menu you set your favorite recording functions as indicated in the
previous paragraph.
To see exactly the center of the framed area, this camera is equipped with a laser pointer that is

Document: DK-HT2-1M7 Document: DK-HT2-1M7 Document: DK-HT2-1M7
Page: 3 Page: 3
OWNER'S MANUAL DK-HT2 - camouflage camera for the campaign
DSE srl - Digital Surveillance Equipment - www.dse.eu
activated by pressing the LASER button. It fixes the camera in such a way that the pointer is
positioned in the center of the area to be shot.
Once fixed the camera, always in TEST mode, you can verify the good detection of the motion
sensor looking at the front red LED flashing at every detection.
Remember that the PIR sensor detects an abnormal temperature that moves so you will not
detect if it remains in a stationary position.
If the application allows it, on the base is a standard photographic thread for a tripod.
Once the device is firmly attached, close the
tin lid, taking care that the gasket is securely housed in its seat so as to ensure the
impermeability.
Adjustments TEST mode
The test mode, as well as allowing to better position the camera, allows the following functions.
- REVIEWING THE RECORDINGS - Press the OK button
- CONFIGURE OPTIONS - MENU button and arrows
- ACTIVATE LASER - LASER Button
- HOW TO REGISTER IN SURVEY - Button SHOOT
- QUICK CHANGE METHOD 'REGISTRATION - Buttons PHOTOS / VIDEOS
Start mode REAL
Once you configured and positioned the device can boot
the its normal operation by pressing
Briefly green ON button. You can press the green button or with the device switched off in test
mode. The front LED flashes for about 5 seconds and then remains lit for 2-3 seconds and then
turns off. Now the DVR appears to be off, but it is actually in operation and records every event
on the occurrence of an intrusion in the monitored area. You can let it run and get away. During
the actual operation of the device does not emit any sound or brightness.
Local Playback of movies
You can review movies and photos directly on the DVR screen. Open the DVR and turn off by
holding down the red button OFF. Press again the red button to start in test mode.
Review your movies with the OK button. You can fast forward or slow motion with the left / right
buttons
Viewing files on PC
To review and manage files recorded by the DVR you can use a PC and a reader for SD card
(not supplied). We must shut down the DVR, remove the SD card and insert it into an SD card
reader to the computer.
The device is detected in the computer's resources as a removable disk and behaves like a
common USB stick. Depending on your operating system you may start an automatic procedure,
or you'll have to explore your PC to find the new disc.
And 'possible to copy movies on your PC and play them back with any video player
(recommended VLC - VideoLAN).
E 'can play video files directly from the SD card, without copying them to your PC, but may affect
the quality of play so it is recommended only to preview, then download.
Connection to PC
You can review movies even recorded without removing the SD card by connecting the DVR to a
PC via the mini USB port with the supplied cable. You can explore the contents of memory
directly with Windows Explorer.
Main technical features
Sensor CMOS
maximum resolution Adjustable Full HD 1080p (1920x1080) 30 f / s HD
720p (1280x720) 30 f / s VGA (640x480) 30 f / s
video Format MP4
photo Size JPG
overlay Time Date (excluded)
Functions Recording motion pictures Motion
Capture + Photo Timelapse
IR Illuminator LED IR 940 nm flow rate 30 m.
motion detector Passive infrared, range 20 m. Detection area 50 °
Tests performed at time slots It strips + 4-day week
video Archiving Over 12 hours 64GB 1080P
operating temperature - 30 ° + 70 ° C
Memory SD Class 10 or higher
Memory Capacity 4..64 GB
Monitor Built 2 "TFT
Supply 4 or 8 AA batteries or external power supply 6VDC
Weight 248 gr (without batteries)
dimensions 140x95x60 mm
-
 1
1
-
 2
2
-
 3
3


DSE DK-HT2 Manuale del proprietario
- Categoria
- Lampadine a infrarossi
- Tipo
- Manuale del proprietario
in altre lingue
- English: DSE DK-HT2 Owner's manual
Documenti correlati
Altri documenti
-
DRIFT Stealth 2 Manuale utente
-
Trendnet RB-TV-DVR104K Guida utente
-
Midland Street Guardian GPS+, Dashcam Kamera Manuale del proprietario
-
König SEC-DVRMON20 Manuale utente
-
Elvox 46340.F08 Manuale utente
-
Caliber DVR125DUAL Manuale del proprietario
-
-
Atlantis NetDVR V400 Manuale utente
-
-
Midland Street Guardian Manuale del proprietario