
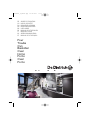
FR GUIDE D'UTILISATION
CS NÁVOD K POUŽITÍ
DA BRUGERVEJLEDNING
DE BETRIEBSANLEITUNG
EN USER GUIDE
ES MANUAL DE UTILIZACIÓN
IT MANUALE D'USO
NL GEBRUIKSAANWIJZING
PT MANUAL DE UTILIZAÇÃO
Four
Trouba
Ovn
Backofen
Oven
Horno
Forno
Oven
Forno
99641551_A_MULTI.qxp 20/03/2007 11:20 Page 1
La pagina sta caricando ...
La pagina sta caricando ...
La pagina sta caricando ...

5
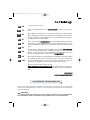
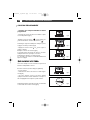
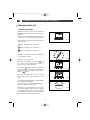
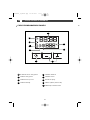
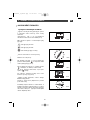
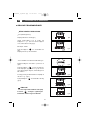
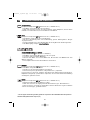
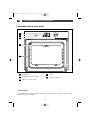
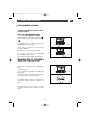
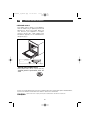
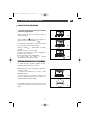
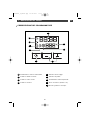
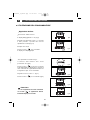
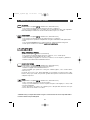
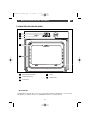
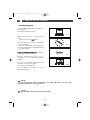
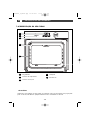
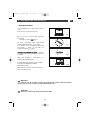
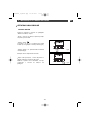
1 / DESCRIPTION DE VOTRE APPAREIL
FR
PRESENTATION DU PROGRAMMATEUR
••
A
D
A
B
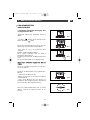
Affichage de l’heure et des durées
Indicateur de durée de cuisson
Indicateur de fin de cuisson
Indicateur du minuterie
C
D
E
Indicateur de verrouillage
Indicateur de nettoyage
Affichage de la température
Touche de sélection (durées et heures)
Touches de réglage du temps
F
G
G
H
H
C
B
F
I
E
I
99641551_A_MULTI.qxp 20/03/2007 11:20 Page 5

6
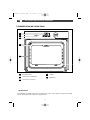
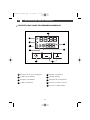
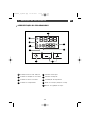
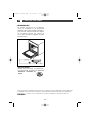
2 / UTILISATION DE VOTRE APPAREIL
FR
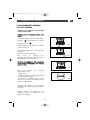
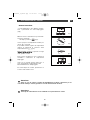
UTILISATION DU PROGRAMMATEUR
•
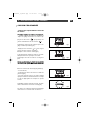
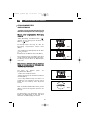
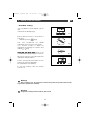
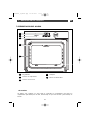
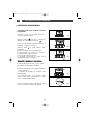
Comment régler l’heure
--
A la mise sous tension
L’afficheur clignote à 12:00 (fig.1).
Réglez l’heure en appuyant sur les touches +
et - (le maintien de la touche permet d’obtenir
un défilement rapide) (fig.2).
Exemple : 12H30
Appuyez sur la touche “ ” pour valider.
L’affichage ne clignote plus.
- Pour remettre à l’heure l’horloge
Le sélecteur de fonction doit obligatoirement
être sur la position 0 (fig.1).
Appuyez sur la touche “ ” pendant
quelques secondes jusqu’à faire clignoter
l’afficheur (fig.2), puis relâchez. Des bips
sonores indiquent que le réglage est alors
possible.
Ajustez le réglage de l’heure avec les
touches + et - (fig.3).
Appuyez sur la touche “ ” pour valider
(fig.4).
fig.1
fig.2
fig.2
fig.3
fig.4
fig.1
Attention
S’il n’y a pas de validation par la
touche “ ”, l’enregistrement est automa-
tique au bout de quelques secondes.
••
99641551_A_MULTI.qxp 20/03/2007 11:20 Page 6

7
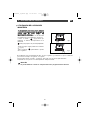
2 / UTILISATION DE VOTRE APPAREIL
FR
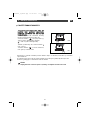
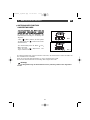
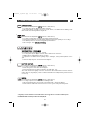
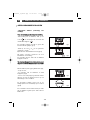
•Cuisson immédiate
— Le programmateur ne doit afficher que
l’heure.
Celle-ci ne doit pas clignoter (fig.1).
Tournez le sélecteur de fonctions sur la posi-
tion de votre choix.
Exemple : position (fig.2).
Votre four vous propose la température opti-
male pour ce type de cuisson.
Il vous est cependant possible d’ajuster la
température en actionnant la manette de sé-
lection de température vers
++
ou
--
(fig.3).
PPllaacceezz vvoottrree ppllaatt ddaannss llee ffoouurr
selon les re-
commandations fournies par le guide de cuis-
son.
Après ces actions, le four chauffe, et l’indica-
teur de température clignote.
Une série de bips sonores retentit lorsque le
four atteint la température choisie.
Celle-ci cesse de clignoter.
Pour arrêter la cuisson, ramenez le sélecteur
de fonctions sur 0.
fig.2
fig.4
Attention
Toutes les cuissons se font porte fermée.
Attention
Après un cycle de cuisson, la turbine de refroidissement continue de fonctionner
pendant un certain temps, afin de garantir une bonne fiabilité du four.
fig.1
fig.3
99641551_A_MULTI.qxp 20/03/2007 11:20 Page 7
La pagina sta caricando ...
La pagina sta caricando ...
La pagina sta caricando ...
La pagina sta caricando ...
La pagina sta caricando ...
La pagina sta caricando ...
La pagina sta caricando ...
La pagina sta caricando ...
La pagina sta caricando ...

17
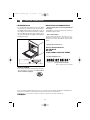
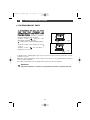
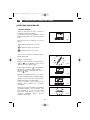
1 / POPIS VAŠEHO SPOTŘEBIČE
CS
POPIS PŘÍSTROJE
••
A
B
Programový panel
Volič teploty
Volič funkcí
C
D
E
Žárovka
Stupeň lišty
E
D
B
A
C
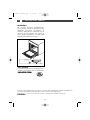
•Příslušenství
Váš přístroj je vybaven dvěmi bezpečnostními mřížkami s úchytkou, jedním grilem s úchytkou
pro plech o 45mm, formou na pečení Lissium a plechem 45mm.
99641551_A_MULTI.qxp 20/03/2007 11:21 Page 17

18
1 / POPIS VAŠEHO SPOTŘEBIČE
CS
••
POPIS PROGRAMAČNÍHO PANELU
••
A
D
A
B
Zobrazení času a doby pečení
Ukazatel doby pečení
Ukazatel konce pečení
Ukazatel minutky
C
D
E
Ukazatel uzamčení
Ukazatel čistění
Zobrazení teploty
Tlačítko výběru (dob a hodin)
Tlačítka pro nastavení času
F
G
G
H
H
C
B
F
I
E
I
99641551_A_MULTI.qxp 20/03/2007 11:21 Page 18

19
2 / POUŽITÍ PŘÍSTROJE
CS
•
Jak nastavit čas
--
Při zapojení do elektrické sítě
Na displeji bliká údaj 12:00h (obr.1).
Nastavte hodinu stiskem tlačítka + nebo -
(přidržením prstu na tlačítku umožníte
rychlejší změnu hodin) (obr.2)
Příklad: 12H30
Potvrďte stiskem tlačítka “ ”.
Hodiny přestanou blikat.
- Pro seřízení hodin
Musí být volič funkcí v poloze 0 (obr.1).
Stiskněte tlačítko “ ” a přidržte jej, až
začne blikat symbol doby pečení (obr.2), pak
pusťte. Zvukové signály značí, že je možno
provést nastavení.
Seřiďte hodiny pomocí tlačítka + nebo -
(obr.3).
Stiskem tlačítka nastavení potvrdíte
(obr.4).
obr.1
obr.2
obr.2
obr.3
obr.4
obr.1
Pozor
Pokud nedošlo k potvrzení
tlačítkem “ ”, nastavení se za několik
vteřin uloží automaticky.
OVLÁDÁNÍ PROGRAMAČNÍHO PANELU
••
99641551_A_MULTI.qxp 20/03/2007 11:21 Page 19
La pagina sta caricando ...

21
2 / POUŽITÍ PŘÍSTROJE
CS
--
Pečení s okamžitým startem a
naprogramovanou dobou.
- Vyberte způsob pečení a nastavte teplotu
(obr.1).
Stiskněte tlačítko “ ”, dokud nezačne blikat
ukazatel doby pečení .
Na displeji bliká 0h00, což Vám oznamuje, že lze
provést nastavení (obr.
2).
- Stiskněte tlačítko
++
nebo
--
, čímž nastavíte
požadovanou dobu.
Příklad: Pečení po dobu 30 min (obr.
3).
Uložení konce pečení se provede automaticky po
několika vteřinách.
Zobrazená doba pečení už nebliká.
Doba pečení se začne odpočítávat ihned po
nastavení.
PPoo ttěěcchhttoo 33 úúkkoonneecchh ssee ttrroouubbaa zzaaččnnee vvyyhhřříívvaatt::
Jakmile trouba dosáhne nastavené teploty, ozve
se série zvukových signálů.
Na konci pečení (konec naprogramovaného času)
- trouba se zastaví,
- symbol doby pečení a 0:00 blikají (obr.
4),
- během několika minut se vydávají zvukové
signály. Definitivne je zastavíte stlačením
jakéhokoliv tlačítka.
Zobrazení na displeji se vrátí na zobrazení času,
když vrátíme volič funkcí do polohy 0 (obr.5
).
obr.2
obr.3
PEČENÍ NAPROGRAMOVANÉ
••
obr.1
obr.4
obr.5
99641551_A_MULTI.qxp 20/03/2007 11:21 Page 21
La pagina sta caricando ...

23
2 / POUŽITÍ PŘÍSTROJE
CS
-- PPrrooggrraammoovvýý ppaanneell VVaaššíí ttrroouubbyy mmůůžžee bbýýtt
ppoouužžíívváánn jjaakkoo nneezzáávviisslléé ooddppooččííttaaddlloo,,
uummoožžnnuujjííccíí ooddppooččííttáávvaatt č
čaass,, aanniižž bbyy bbyyllaa
ttrroouubbaa zzaappnnuuttaa..
V tomto případě má zobrazení minutky
přednost před zobrazením hodiny dne.
- Stiskněte tlačítko “ ” (obr.1) a podržte jej,
dokud nezačne blikat symbol minutky.
-> 0.00 et symbol minutky blikají.
- Nařiďte požadovaný čas stiskem tlačítek
++
nebo
--
(obr.2).
- Stiskem tlačítka “ ” potvrďte nastavení,
nebo vyčkejte několik vteřin.
Pozor
Naprogramování časového spínače (minutky) lze kdykoliv změnit nebo zrušit.
obr.1
obr.2
POUŽITÍ FUNKCE MINUTKY
••
Zobrazení po několika vteřinách přestane blikat a zapne se minutka, která začne po vteřinách
odpočítávat čas.
Po uplynutí doby začne časový spínač vydávat sérii zvukových signálů, aby Vás upozornil.
Zvukové signály vypnete stlačením kterékoliv tlačítka.
99641551_A_MULTI.qxp 20/03/2007 11:21 Page 23
La pagina sta caricando ...
La pagina sta caricando ...
La pagina sta caricando ...

27
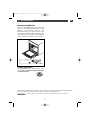
5 / POPRODEJNÍ SERVIS
CS
Případné opravy na Vašem přístroji musí
provádět kvalifikovaný personál spolupracující
s výrobcem. Při objednávání opravy uveďte
kompletní referenci Vašeho přístroje (typ,
druh, sériové číslo). Tyto informace jsou
uvedeny na výrobním štítku
(obr.1).
PŮVODNÍ SOUČÁSTKY
Při zákroku údržby, požadujte
používání
výlučně originálních certifikovaných
náhradních dílů.
•OPRAVY
**
Služba poskytovaná společností Brandt Customer Services, akciovou společností se jměním 2.5000.000 euro,
5/7 avenue des Béthunes, 95310 Saint Ouen l’Aumône - RCS Pontoise 440 303 303
BBrraannddtt AApppplliiaanncceess
- akciová společnost se jměním 10.000.000 euro RCS Nanterre 440 302 347.
BRANDT APPLIANCES SAS
7 rue Henri Becquerel
92500 RUEIL MALMAISON
230V ~ 50 Hz
MADE IN FRANCE
obr.1
99641551_A_MULTI.qxp 20/03/2007 11:21 Page 27
La pagina sta caricando ...
La pagina sta caricando ...
La pagina sta caricando ...

31
1 / BESKRIVELSE AF APPARATET
DA
OVERSIGT OVER PROGRAMVÆLGER
••
A
D
A
B
Klokkeslætsdisplay og varigheder
Indikator for varighed af bagning eller stegning
Indikator for afsluttet bagning eller stegning
Indikator til minutur
C
D
E
Indikator til fastlåsning
Indikator for rengøring
Temperaturdisplay
Vælgerknap (varighed og tider)
Knapper til tidsregulering
F
G
G
H
H
C
B
F
I
E
I
99641551_A_MULTI.qxp 20/03/2007 11:21 Page 31

32
2 / ANVENDELSE AF APPARATET
DA
BRUG AF PROGRAMVÆLGER
•
Sådan indstilles klokkeslættet
--
Ved spændingsføring
Displayet blinker kl. 12:00 (fig.1)
Indstil klokkeslættet ved at trykke på
knapperne + og - (hvis du holder knappen
nede, ruller tallene forbi) (fig.2).
Eksempel: 12H30
Tryk på knappen “ ” for at bekræfte dit
valg.
Displayet holder op med at blinke.
- For at indsætte det aktuelle klokkeslæt igen
Funktionsvælgeren skal være i positionen 0
(fig.1).
Tryk på knappen “ ” i nogle få sekunder,
indtil displayet (fig.2) blinker, og slip tasten
igen. Nogle biplyde angiver, at indstillingen nu
kan udføres.
Foretag justering af klokkeslættet ved hjælp af
tasterne + og - (fig.3).
Tryk på knappen “ ” for at bekræfte dit valg
(fig.4).
fig.1
fig.2
fig.2
fig.3
fig.4
fig.1
Advarsel!
Hvis valget ikke bekræftes ved hjælp
af tasten “ ”, foretages registreringen
automatisk i løbet af nogle få sekunder.
••
99641551_A_MULTI.qxp 20/03/2007 11:21 Page 32

33
2 / ANVENDELSE AF APPARATET
DA
•Omgående kogning eller stegning
— Programvælgeren skal kun vise
klokkeslættet.
Den skal ikke blinke (fig.1).
Drej funktionsvælgeren til den ønskede
position.
Eksempel: Stilling (fig.2).
Ovnen foreslår den optimale temperatur til
den valgte ret.
Du kan dog justere temperaturen ved at
sætte temperaturvælgeren manuelt mod
++
eller
--
(fig.3).
AAnnbbrriinngg rreetttteenn ii oovvnneenn
i henhold til
anvisningerne i bage- og stegeguiden.
Efter denne handling opvarmes ovnen, og
temperaturindikatoren begynder at blinke.
Der lyder en række biplyde, når den valgte
temperatur er nået.
Temperaturdisplayet ophører med at blinke.
For at stoppe tilberedningen skal du sætte
funktionsvælgeren på 0.
fig.2
fig.4
Advarsel!
Al bagning og stegning udf’øres med lukket ovnlåge.
Advarsel!
Efter en bage- eller stegecyklus fortsætter ovnens ventilator med at køre i en periode
for at sikre en nedkøling af ovnens elementer.
fig.1
fig.3
99641551_A_MULTI.qxp 20/03/2007 11:21 Page 33
La pagina sta caricando ...
La pagina sta caricando ...
La pagina sta caricando ...
La pagina sta caricando ...
La pagina sta caricando ...
La pagina sta caricando ...
La pagina sta caricando ...

41
FR
02
DE
41
EN
54
ES
67
IT
80
NL
93
PT
106
DA
28
CS
15
Liebe Kundin, lieber Kunde,
Sie haben soeben einen
DDEE DDIIEETTRRIICCHH
Backofen erworben, und wir
danken Ihnen dafür.
Unsere Forschungsteams haben für Sie diese neue Generation von
Geräten entwickelt, die durch Qualität, Ästhetik, Funktionen und
technische Fortentwicklung Ausnahmeprodukte sind und unser
Know-how unter Beweis stellen.
Ihr neuer
DDEE DDIIEETTRRIICCHH
Ofen fügt sich harmonisch in Ihre Küche ein
und verbindet perfekt Kochleistung mit einfacher Benutzung. Wir
wollten Ihnen ein exzellentes Produkt bieten.
In der
DDEE DDIIEETTRRIICCHH
Produktpalette finden Sie auch eine große
Auswahl an Küchenherden, Kochfeldern, Dunstabzugshauben,
Geschirrspülern und Einbaukühlschränken, die Sie auf Ihren neuen
DDEE DDIIEETTRRIICCHH
Ofen abstimmen können.
Wir sind stets darum bemüht, Ihrer Anforderungen an unsere
Produkte so gut wie möglich zu erfüllen. Unser Verbraucherservice
steht Ihnen daher selbstverständlich immer zur Verfügung und geht
auf alle Ihre Fragen und Anregungen ein (Adresse am Schluss dieser
Anleitung).
Besuchen Sie uns auch unter:
wwwwww..ddeeddiieettrriicchh--eelleeccttrroommeennaaggeerr..ccoomm
. Dort finden Sie unsere letzten
Innovationen und weitere nützliche Information.
DDEE DDIIEETTRRIICCHH
DDiiee nneeuueenn WWeerrttoobbjjeekkttee
Da wir unsere Produkte ständig verbessern möchten, behalten wir uns im Zuge der technischen
Weiterentwicklung das Recht vor, ihre technischen, funktionellen und ästhetischen Merkmale zu
verändern.
Wichtig:
Bitte lesen Sie die vorliegenden Hinweise zu Einbau und Gebrauch aufmerksam vor
der ersten Inbetriebnahme durch, damit Sie Ihr Gerät schnell beherrschen.
99641551_A_MULTI.qxp 20/03/2007 11:22 Page 41
La pagina sta caricando ...

43
1 / BESCHREIBUNG DES GERÄTS
DE
ÜBERSICHT ÜBER DEN OFEN
••
A
B
Programmierer
Temperaturwahlschalter
Funktionswahlschalter
C
D
E
Lampe
Einschubleistenhalter
E
D
B
A
C
•Zubehör
Ihr Ofen wird mit einem Sicherheitsrost mit Griff, einem Rost mit Griff für ein 45 mm Blech,
einem Lissium-Backblech und einem Blech 45 mm geliefert.
99641551_A_MULTI.qxp 20/03/2007 11:22 Page 43
La pagina sta caricando ...

45
2 / BENUTZUNG DES GERÄTS
DE
NUTZUNG DES PROGRAMMIERERS
•
Einstellung der Uhrzeit
--
Bei Anschluss an den Strom
In der Anzeige blinkt 12:00 (Abb.1).
Die Uhrzeit durch Drücken der Tasten + und -
einstellen (bei Festhalten der Taste erfolgt ein
Schnelldurchlauf) (Abb.2).
Beispiel: 12.30 Uhr
Zur Bestätigung die Taste “ ” drücken.
Die Anzeige blinkt nicht mehr.
- Einstellung der korrekten Uhrzeit
Der Funktionswahlschalter muss sich in
Position 0 (Abb.1) befinden.
Taste “ ” einige Sekunden lang gedrückt
halten, bis die Anzeige blinkt (Abb.2), dann
loslassen. Signaltöne geben an, dass eine
Einstellung vorgenommen werden kann.
Die Uhrzeit mit den Tasten + und - einstellen
(Abb.3).
Zur Bestätigung die Taste “ ” drücken
(Abb.4).
Abb.1
Abb.2
Abb.2
Abb.3
Abb.4
Abb.1
Achtung
Wenn keine Bestätigung über Taste
“ ” erfolgt, wird nach einigen Sekunden
automatisch gespeichert.
••
99641551_A_MULTI.qxp 20/03/2007 11:22 Page 45
La pagina sta caricando ...
La pagina sta caricando ...
La pagina sta caricando ...
La pagina sta caricando ...
La pagina sta caricando ...
La pagina sta caricando ...
La pagina sta caricando ...

53
5 / KUNDENDIENST
DE
Eventuelle Reparaturarbeiten an dem Gerät
müssen von qualifiziertem Fachpersonal des
Händlers vorgenommen werden. Bei
Benachrichtigung des Kundendienstes die
vollständigen Geräteangaben (Modell, Typ
und Seriennummer) mitteilen. Diese Angaben
sind dem Typenschild
(Abb.1)
zu entnehmen.
ORIGINAL ERSATZTEILE
Bei Reparaturarbeiten darum bitten, dass
ausschließlich
zertifizierte Original Ersatzteile
verwendet werden.
•REPARATURARBEITEN
**
Dienstleistung des Brandt Customer Service, einfache Aktiengesellschaft mit einem Kapital von 2.5000.000 Euro,
5/7 avenue des Béthunes, 95310 Saint Ouen l’Aumône - RCS Pontoise 440 303 303
BBrraannddtt AApppplliiaanncceess
- vereinfachte Aktiengesellschaft mit einem Kapital von 10.000.000 Euro RCS Nanterre 440 302 347.
BRANDT APPLIANCES SAS
7 rue Henri Becquerel
92500 RUEIL MALMAISON
230V ~ 50 Hz
MADE IN FRANCE
Abb.1
99641551_A_MULTI.qxp 20/03/2007 11:22 Page 53

54
FR
02
DE
41
EN
54
ES
67
IT
80
NL
93
PT
106
DA
28
CS
15
Dear Customer,
You have just acquired a
DDEE DDIIEETTRRIICCHH
oven and we would like to
thank you.
Our research teams have created this new generation of appliances
for you. Their quality, appearance, functions and technological
advances make them exceptional products, showcases of our unique
know-how.
Your new
DDEE DDIIEETTRRIICCHH
oven will blend harmoniously into your
kitchen and perfectly combine cooking performance and ease of use.
We wanted to offer you a product of excellence.
In the line of
DDEE DDIIEETTRRIICCHH
products, you will also find a wide range of
cookers, hobs, ventilation hoods, dishwashers, and refrigerators, all of
which can be built in and coordinated with your new
DDEE DDIIEETTRRIICCHH
oven.
Of course, in an ongoing effort to better satisfy your demands with
regard to our products, our after-sales service department is at your
disposal and ready to listen in order to respond to all of your questions
and suggestions (contact information at the end of this booklet).
You can also log onto our site:
wwwwww..ddeeddiieettrriicchh--eelleeccttrroommeennaaggeerr..ccoomm
where you will find our latest
new ideas and useful additional information.
DDEE DDIIEETTRRIICCHH
SSeettttiinngg NNeeww VVaalluueess
As part of our commitment to constantly improving our products, we reserve the right to make
changes to them based on advances to their technical, functional and/or aesthetic properties.
Important:
Before installing and using your appliance, please read this Installation and Usage
Guide carefully, as it will allow you to quickly familiarise yourself with its operation.
99641551_A_MULTI.qxp 20/03/2007 11:22 Page 54
La pagina sta caricando ...
La pagina sta caricando ...

57
1 / DESCRIPTION OF YOUR APPLIANCE
EN
INTRODUCTION TO THE PROGRAMMER
••
A
D
A
B
Time and cooking time display
Cooking time indicator
Cooking end time indicator
Timer display
C
D
E
Lock indicator
Cleaning indicator
Temperature display
Selection button (cooking time and time)
Time setting buttons
F
G
G
H
H
C
B
F
I
E
I
99641551_A_MULTI.qxp 20/03/2007 11:22 Page 57

58
2 / USING YOUR APPLIANCE
EN
USING THE PROGRAMMER
•
How to set the time
--
When plugged in
The display flashes 12:00 (fig.1).
Set the time by pressing the + or - buttons
(holding your finger on the button allows you
to scroll through the numbers rapidly) (fig.2).
Example: 12:30
Press the “ ” button to confirm.
The display stops flashing.
- To set the time on the clock
The function selector switch must be in the 0
position (fig.1).
Press and hold the “ ” button for a few
seconds until the display starts flashing (fig.2),
then release. Audible beeps indicate that it is
now possible to set the time.
Adjust the clock setting with the + and -
buttons (fig.3).
Press the “ ” button to confirm (fig.4).
fig.1
fig.2
fig.2
fig.3
fig.4
fig.1
Warning
If there is no confirmation from the
“ ” button, the time is recorded
automatically after a few seconds.
••
99641551_A_MULTI.qxp 20/03/2007 11:22 Page 58
La pagina sta caricando ...
La pagina sta caricando ...
La pagina sta caricando ...
La pagina sta caricando ...
La pagina sta caricando ...
La pagina sta caricando ...
La pagina sta caricando ...
La pagina sta caricando ...
La pagina sta caricando ...
La pagina sta caricando ...
La pagina sta caricando ...
La pagina sta caricando ...
La pagina sta caricando ...
La pagina sta caricando ...
La pagina sta caricando ...
La pagina sta caricando ...
La pagina sta caricando ...
La pagina sta caricando ...
La pagina sta caricando ...
La pagina sta caricando ...
La pagina sta caricando ...
La pagina sta caricando ...
La pagina sta caricando ...
La pagina sta caricando ...
La pagina sta caricando ...
La pagina sta caricando ...
La pagina sta caricando ...
La pagina sta caricando ...
La pagina sta caricando ...
La pagina sta caricando ...
La pagina sta caricando ...
La pagina sta caricando ...
La pagina sta caricando ...
La pagina sta caricando ...
La pagina sta caricando ...
La pagina sta caricando ...
La pagina sta caricando ...
La pagina sta caricando ...
La pagina sta caricando ...
La pagina sta caricando ...
La pagina sta caricando ...
La pagina sta caricando ...
La pagina sta caricando ...
La pagina sta caricando ...
La pagina sta caricando ...
La pagina sta caricando ...
La pagina sta caricando ...
La pagina sta caricando ...
La pagina sta caricando ...
La pagina sta caricando ...
La pagina sta caricando ...
La pagina sta caricando ...
La pagina sta caricando ...
La pagina sta caricando ...
La pagina sta caricando ...
La pagina sta caricando ...
La pagina sta caricando ...
La pagina sta caricando ...
La pagina sta caricando ...
La pagina sta caricando ...
La pagina sta caricando ...
La pagina sta caricando ...
-
 1
1
-
 2
2
-
 3
3
-
 4
4
-
 5
5
-
 6
6
-
 7
7
-
 8
8
-
 9
9
-
 10
10
-
 11
11
-
 12
12
-
 13
13
-
 14
14
-
 15
15
-
 16
16
-
 17
17
-
 18
18
-
 19
19
-
 20
20
-
 21
21
-
 22
22
-
 23
23
-
 24
24
-
 25
25
-
 26
26
-
 27
27
-
 28
28
-
 29
29
-
 30
30
-
 31
31
-
 32
32
-
 33
33
-
 34
34
-
 35
35
-
 36
36
-
 37
37
-
 38
38
-
 39
39
-
 40
40
-
 41
41
-
 42
42
-
 43
43
-
 44
44
-
 45
45
-
 46
46
-
 47
47
-
 48
48
-
 49
49
-
 50
50
-
 51
51
-
 52
52
-
 53
53
-
 54
54
-
 55
55
-
 56
56
-
 57
57
-
 58
58
-
 59
59
-
 60
60
-
 61
61
-
 62
62
-
 63
63
-
 64
64
-
 65
65
-
 66
66
-
 67
67
-
 68
68
-
 69
69
-
 70
70
-
 71
71
-
 72
72
-
 73
73
-
 74
74
-
 75
75
-
 76
76
-
 77
77
-
 78
78
-
 79
79
-
 80
80
-
 81
81
-
 82
82
-
 83
83
-
 84
84
-
 85
85
-
 86
86
-
 87
87
-
 88
88
-
 89
89
-
 90
90
-
 91
91
-
 92
92
-
 93
93
-
 94
94
-
 95
95
-
 96
96
-
 97
97
-
 98
98
-
 99
99
-
 100
100
-
 101
101
-
 102
102
-
 103
103
-
 104
104
-
 105
105
-
 106
106
-
 107
107
-
 108
108
-
 109
109
-
 110
110
-
 111
111
-
 112
112
-
 113
113
-
 114
114
-
 115
115
-
 116
116
-
 117
117
-
 118
118
-
 119
119
-
 120
120


De Dietrich DOP720X Manuale del proprietario
- Categoria
- Microonde
- Tipo
- Manuale del proprietario
in altre lingue
- English: De Dietrich DOP720X Owner's manual
- français: De Dietrich DOP720X Le manuel du propriétaire
- español: De Dietrich DOP720X El manual del propietario
- Deutsch: De Dietrich DOP720X Bedienungsanleitung
- Nederlands: De Dietrich DOP720X de handleiding
- português: De Dietrich DOP720X Manual do proprietário
- dansk: De Dietrich DOP720X Brugervejledning
- čeština: De Dietrich DOP720X Návod k obsluze