Yamaha MOTIF XF6 EDITOR Manuale del proprietario
- Categoria
- Attrezzatura musicale
- Tipo
- Manuale del proprietario

MOTIF XF Editor Owner’s Manual 1
Contents
What is the MOTIF XF Editor? .................................................2
Studio Manager.........................................................................2
Studio Connections..................................................................2
About Open Plug-in Technology.............................................3
Data Structure of the MOTIF XF Editor ...................................4
Starting the MOTIF XF Editor ..................................................5
An Example of MOTIF XF Editor in Use..................................7
MOTIF XF Editor Window.......................................................13
Basic Operations....................................................................35
Menu ........................................................................................37
Troubleshooting .....................................................................53
• Copying of the commercially available music sequence data and/or digital audio files is strictly prohibited except for
your personal use.
• The software and this owner’s manual are exclusive copyrights of Yamaha Corporation.
• Copying of the software or reproduction of this manual in whole or in part by any means is expressly forbidden without
the written consent of the manufacturer.
• Yamaha makes no representations or warranties with regard to the use of the software and documentation and cannot
be held responsible for the results of the use of this manual and the software.
• The screen displays as illustrated in this Owner’s Manual are for instructional purposes, and may appear somewhat
different from the screens which appear on your computer.
• The company names and product names in this Owner’s Manual are the trademarks or registered trademarks of their
respective companies.
• Click on the red
-colored text to jump to the related item in this manual.
© 2010 Yamaha Corporation. All rights reserved.
This owner’s manual assumes that you are already familiar with basic Windows/Mac operations. If you are not,
please refer to the owner’s manual which came with your Windows/Mac software before using the MOTIF XF Editor.
For information about hardware requirements, the interconnection of devices and the installation of the MOTIF XF
Editor software, refer to the separate Installation Manual as well as the Owner’s Manual for the respective MIDI
device.
MOTIF XF Editor
Owner’s Manual
MOTIF XF Editor
Owner’s Manual

What is the MOTIF XF Editor?
MOTIF XF Editor Owner’s Manual
2
What is the MOTIF XF Editor?
MOTIF XF Editor is a convenient tool which lets you edit and save the various parameters of your MOTIF XF
tone generator. These include Voice and Mixing parameters (edited in the Voice or Mixing mode of the
MOTIF XF) such as Volume, Pan, EG, and Cutoff and other settings. Thanks to its easy-to-understand
graphical interface, you can edit various parameters of the MOTIF XF right from your computer — using the
mouse to adjust the virtual knobs, sliders, and buttons and entering values from the computer keyboard.
Finally, all the changes you have made can be saved to your computer or transmitted to the MOTIF XF
instrument.
You can use this MOTIF XF Editor as a plug-in for the software below
• Studio Manager
• DAW application software compatible with Studio Connections
The MOTIF XF Editor lets you adjust the hue as desired (page 6). This manual uses example screen shots
having the most universal color visibility, allowing the manual to be easily viewed by many people having
different types of color recognition.
Studio Manager
Studio Manager V2 is a cross-platform application that enables you to start multiple Editors for controlling
Yamaha hardware products remotely, and to save multiple Editor settings. You can run Studio Manager as a
stand-alone application, or as a plug-in within DAW applications compatible with Studio Connections such
as Cubase or Cubase AI.
For more information, refer to the Studio Manager PDF manual.
Studio Connections
Studio Connections is a joint project begun by Steinberg and Yamaha.
Music production systems now increasingly rely on both software and
hardware, and there is a pressing need for closer integration between the
two. Studio Connections provides a comprehensive and seamless music
production environment — making the use of hardware and software both
easier and much more efficient. The following functions are available in
Studio Connections.
Recall
With the Recall function, all settings in each Editor can be saved within Studio Manager, and then called up
again when needed. This enables you to recall all the settings of multiple devices from Studio Manager and
control the entire system easily, instantly and automatically.
Recall is especially convenient when used with a DAW application compatible with Studio Connections. This
lets you save the Editor data directly to the project file of the DAW letting you recall all necessary hardware
settings automatically by simply opening the project file.
When executing the Recall function in the Studio Manager, the parameter settings of either device (MOTIF XF or
DAW software on a computer) are synchronized with the other. You can determine which device (MOTIF XF or DAW
software) is regarded as the master of the parameter settings by setting the Auto Sync Setting (page 41).

About Open Plug-in Technology
MOTIF XF Editor Owner’s Manual
3
Audio Integration
Plug-in software such as software synthesizers and software samplers are exceptionally convenient in that
they let you easily change the various settings and parameters within the host application. However, control
over hardware is not so easy — with the need for various setups such as audio connections, driver settings
and MIDI port connections.
By using a Studio Connections-compatible DAW software, you can control the external hardware synthesizer
within the application, without the need to set up complex connections within a DAW software application —
just as easily and conveniently as you would with plug-in software. The Audio Integration function makes all
this possible. For details about Recall and Audio Integration, visit our web site at:
http://www.studioconnections.org/
About Open Plug-in Technology
Open Plug-in Technology (OPT) is a software format that enables you to control MIDI devices from a music
DAW application software. For example, this allows you to start up and operate various parts of your music
system, such as voice editors of the synthesizer and mixing control editors — directly from an OPT-
compatible software, without having to use each separately. OPT also makes it unnecessary to set MIDI
drivers for each application, streamlining your music production system and making all operations more
convenient and seamless.
In addition to the original OPT, Open Plug-in Technology Version 2 (OPT 2), designed for Studio Connections,
is also available. The host application Studio Manager supports OPT 2.
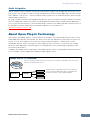
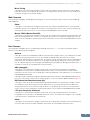
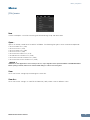
About the OPT 2 Overview
OPT 2 is a plug-in format that enhances OPT Level 1 (Panels) and adds some convenient
functions for Studio Connections.
Plug-in software compatible with OPT 2 is indirectly
connected to the DAW application compatible with
Studio Connection, via the Studio Manager.
Host
Application
Editor
Editor
Editor
Studio
Manager
OPT 2

Data Structure of the MOTIF XF Editor
MOTIF XF Editor Owner’s Manual
4
Data Structure of the MOTIF XF Editor
The MOTIF XF Editor lets you create the following data and save them as a single file (extension: X3E).
• Current Global data (latest status of edited global parameters)
• Current data in the Voice mode (latest status of edited Voice)
• Current data in the Song/Pattern mode (consisting of Mixing setup, latest status of edited Voice and 16 Mixing Voices)
• User Voice data (consisting of three Normal Voice Banks and one Drum Voice Bank)
Current settings includes the latest settings of the Common and Element parameters for the Voice last assigned to
each of Parts 1 – 16, as well as Mixing parameter settings such as Voice assignment, pan, volume and effect for
each Part. Among the Voice Banks, only the Mixing Voice Bank data belongs to the Current settings. The MOTIF
XF Editor lets you edit parameters (including Element parameters) of the Voice assigned to each Part and save the
latest edit status as a file without storing it as a User Voice or a Mixing Voice. This means that you can easily recall
the latest status of the previous edit simply by opening the file.
n The MOTIF XF Editor handles the Global data which includes some of the parameters shown on the “G” row in the Mixer
section and all the parameters in the Global Settings of the Parameter Category section (pages 21 and 24).
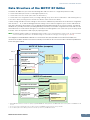
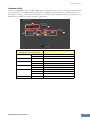
The diagram illustrated below indicates the structure of the data created via the MOTIF XF Editor, the
structure of the data stored in the internal memory of the MOTIF XF instrument and the relationship between
those two types of data.
*1 When the MOTIF XF instrument is connected to the computer properly with the ONLINE status, editing a parameter on the MOTIF XF Editor affects the same parameter on the MOTIF XF itself, and
vice versa.
*2 The Store Voice operation on the Editor will store the Voice data to the memory of the MOTIF XF instrument as well as the memory of the Editor.
*3 The Store Global operation and Store Mixing operation will store the data only to the memory of the MOTIF XF instrument.
MOTIF XF Editor (computer)
Current Global data
Current data in the Voice mode
Current data in the Song or
Pattern mode
• Mixing data
• Multi Common data
Part Voice data
(16 Voices)
Mixing Voice data
(16 Voices)
Store Voice
*2
(page 48)
Store Voice
*2
(page 48)
User Voice data
• Normal User 1 (128 Voices)
• Normal User 2 (128 Voices)
• Normal User 3 (128 Voices)
• Normal User 4 (128 Voices)
• Drum User (32 Voices)
Editor file
(Extension: .X3E)
Data sync
*1
Data sync
*1
Data sync
*1
Current Global data
Current data in the Voice mode
Current data in the Song or
Pattern mode
• Mixing data
• Multi Common data
Global data
User Voice data
• Normal User 1 (128 Voices)
• Normal User 2 (128 Voices)
• Normal User 3 (128 Voices)
• Normal User 4 (128 Voices)
• Drum User (32 Voices)
Part Voice data
(16 Voices)
Mixing data
• Multi Common data
Mixing Voice data
(16 Voices)
Store Voice
*2
(page 48)
Store Voice
*2
(page 48)
Store Voice
*2
(page 48)
Store Mixing
*3
(page 49)
Store Global
*3
(page 48)
MOTIF XF instrument
Store Voice
*2
(page 48)

Starting the MOTIF XF Editor
MOTIF XF Editor Owner’s Manual
5
Starting the MOTIF XF Editor
Install the driver (USB-MIDI driver or Yamaha Steinberg FW Driver), Studio Manager and MOTIF XF Editor by
following the respective Installation Guides, then install the host application such as Cubase if necessary.
After making the required connection and setting the MIDI IN/OUT parameter to “USB” or “FW” in the Utility
mode, follow the instructions below to start the MOTIF XF Editor.
n For details about connection between the MOTIF XF and a computer, refer to the Owner’s Manual of the MOTIF XF.
1. Start the Studio Manager.
Studio Manager can be started as a plug-in within a Studio Connections-compatible DAW software, or
can be started as a stand-alone application.
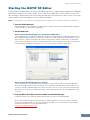
2. Set the MIDI Ports.
When starting Studio Manager as a stand-alone application:
Set the MIDI Ports by calling up the MIDI Ports window via [File] [Setup] ([SM2] [Preference] for
Mac) [MIDI Settings]. When the connection is done via a USB cable, enter the checkmarks to the
boxes of Ports 1 and 4 for the MOTIF XF in both the Input Ports and the Output Ports, as illustrated
below. When connection is made via the IEEE1394 cable, enter checkmarks to the boxes of the Ports
corresponding to the Main of the MOTIF XF, in both the Input Ports and the Output Ports.
When starting Studio Manager as a plug-in:
Set the MIDI Ports on the DAW application. For details, refer to the manual of your DAW application.
When connecting the MOTIF XF to a computer via a USB cable, the MIDI Ports are automatically set
simply by starting Studio Manager from Cubase or Cubase AI. This is also true when connecting the
MOTIF XF to a computer via an IEEE1394 cable and installing “Extensions for Steinberg DAW” to the
computer.
3. Start the MOTIF XF Editor from the window of the Studio Manager.
For details, refer to the Installation Guide and the PDF manual of the Studio Manager.
When using Studio Manager as a plug-in with the Audio Integration features of Studio Connections
(within a compatible DAW), you can start the MOTIF XF Editor just as you would any other software
synthesizer. For details, visit the following web site.
http://www.studioconnections.org/

Starting the MOTIF XF Editor
MOTIF XF Editor Owner’s Manual
6
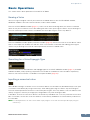
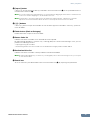
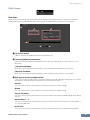
Adjusting the hue of the display
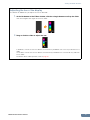
The MOTIF XF Editor lets you adjust the hue as desired.
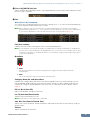
1. At the left bottom of the Editor window, click the triangle button to call up the slider.
Click the triangle button again to close the slider.
2. Drag or click the slider to adjust the hue.
In Windows, to reset the hue to its default, simultaneously hold down the <Ctrl> key and click on the
slider.
On the Mac, to reset the hue to its default, simultaneously hold down the <Command> key and click
on the slider.
For details about slider operation, refer to page 36.

An Example of MOTIF XF Editor in Use: Editing in the Voice mode
MOTIF XF Editor Owner’s Manual
7
An Example of MOTIF XF Editor in Use
There is no single way to use the many components in the MOTIF XF Editor. Your editing needs and
preferences may differ; however, the following example gives you a simple step-by-step guide in how to use
the MOTIF XF Editor. As an example, this section explains how to edit a Voice in the Voice mode, edit a
Mixing program in the Song mode, then store the edited data to the memory of the MOTIF XF instrument and
save the final results of your editing to a file.
Editing in the Voice mode
n If the [Song] or [Pattern] indication (at the top left of the display) is on, perform the instructions below from step 1. If the
[Voice] indication is on, perform the instructions below from step 2.
1. Change the mode to the Voice mode by clicking the [Voice] indication (at the top left of
the display).
If the [ONLINE]/[OFFLINE] indication is set to [ONLINE] before changing the mode, the Auto Sync
window will be called up automatically when this step is executed. As step 2 is thus unnecessary, you
should proceed to step 3.
2. Click the [OFFLINE] to call up the Auto Sync window if the [ONLINE]/[OFFLINE]
indication is set to [OFFLINE].
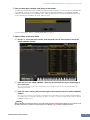
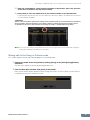
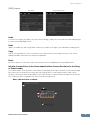
3. On the Auto Sync window, set communication-related parameters such as Input Port,
Output Port and Device Number in the Data Port section, then set the direction of Data
Auto Synchronization (Global, Current and Voice) in the Auto Sync Setting section.
When you want to use the settings on the MOTIF XF itself as starting data for editing, set the boxes of
Global, Current and Voice in the Auto Sync Setting to on so that the data flows from the instrument to the
computer. To use the settings on the MOTIF XF Editor as starting data, set both Global, Current and
Voice to the opposite, so that the arrow indicates data flow from the computer to the keyboard. For
details, see page 40.
NOTICE
• Keep in mind that when you set Global, Current and Voice to On, enable data sync from the computer to the MOTIF
XF (instrument), and then click the [Start] button at the bottom, this operation transmits these types of data
currently on the Editor to the MOTIF XF itself, automatically overwriting and erasing all the corresponding data
already existing on memory of the MOTIF XF instrument. When you want to use the settings on the MOTIF XF itself
as starting data for editing, set the boxes of Global, Current and Voice in the Auto Sync Setting to on so that the
data flows from the instrument to the computer.
• Make sure to set the desired data transfer direction in order to avoid data loss.
• Any data which was overwritten and lost accidentally cannot be recovered.

An Example of MOTIF XF Editor in Use: Editing in the Voice mode
MOTIF XF Editor Owner’s Manual
8
4. From the Auto Sync window, click [Start] at the bottom.
The data synchronization will be started if the Port settings are correct. As soon as data synchronization
is completed, the Auto Sync window is closed, then the OFFLINE indication is changed to ONLINE
indication automatically. In this ONLINE status, editing a parameter on the MOTIF XF Editor affects the
same parameter on the MOTIF XF itself, and vice versa.
For more information, refer to “ONLINE/OFFLINE” on page 13.
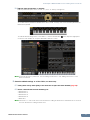
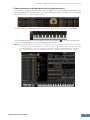
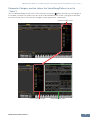
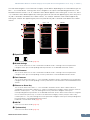
5. Edit the Voice in the Voice mode.
5-1 On the “V” row of the Voice section, click the Bank name or Voice name to call up the
VOICE LIBRARY window.
5-2 From the list in the VOICE LIBRARY, select the desired Voice to assign it temporarily to
the current Part.
You can confirm the sound of the selected Voice by clicking any note on the virtual keyboard or the
MOTIF XF keyboard.
5-3 Click the Voice name or [OK] at bottom right of the window to close the VOICE LIBRARY
window.
You can cancel the Voice selection by clicking the Close (X) button or [Cancel] button at bottom right of
the window. By executing this operation, the Voice selection is reset to the original status and the VOICE
LIBRARY window closes.
NOTICE
When a different Voice has been selected, your edits of the previously selected Voice will be lost. If you want to store
the edits, make sure to store the Voice by using the Store window (page 48) before changing the Voice.

An Example of MOTIF XF Editor in Use: Editing in the Voice mode
MOTIF XF Editor Owner’s Manual
9
5-4 Edit the Voice parameters as desired.
Edit the parameters (EQ, chorus, reverb, etc.) in the “V” row by clicking them.
To confirm how the parameter edit affects the Voice sound, click any note on the virtual keyboard or the
MOTIF XF keyboard.
To make detailed settings of the selected Voice, click the arrow button at the top of the right panel
next to the main window to call up the Detailed Parameter section.
n For details about Voice parameters, refer to “Editing a Normal Voice” and “Editing a Drum Voice” in the
Reference Manual.
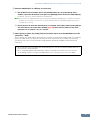
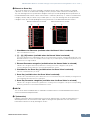
6. Store the edited settings as a User Voice, as necessary.
6-1 Click [Store Voice] under [Edit] in the menu bar to open the Store window (page 48).
6-2 Select a Voice Bank from the following list:
• Normal User 1
• Normal User 2
• Normal User 3
• Normal User 4
• Drum User
n Normal User 1 – 4 are shown in the Store window when editing the Normal Voice while Drum User is shown in
the Store window when editing the Drum Voice.

An Example of MOTIF XF Editor in Use: Mixing edit in the Song or Pattern mode
MOTIF XF Editor Owner’s Manual
10
6-3 Open the selected Bank, select the desired number as destination, then enter the name
of the Voice in the box at the top of this window.
6-4 Click [Store] to store the edited Voice to the selected number in the selected Bank.
Performing this operation will store the Voice data to the User Voice Bank in the MOTIF XF instrument as
well as that within the Editor.
NOTICE
When you execute the Store operation, the settings for the destination memory (of both the Editor and instrument)
will be overwritten. Select the destination Voice number carefully to prevent important data from being erased
accidentally. For this reason, important data should always be saved to a separate USB storage device.
n You can store the settings of the parameters in the “G” row except for the Chorus and Reverb settings by
clicking [Store Global] under [Edit] in the menu bar.
Mixing edit in the Song or Pattern mode
This section explains how to edit a Mixing program in the Song mode.
1. Change the mode to the Song mode by clicking [Song] of the [Voice]/[Song]/[Pattern]
indication.
The Auto Sync appears automatically during ONLINE status.
2. From the Auto Sync window, click [Start] at the bottom.
Data synchronization will be started if the Port settings are correct. As soon as data synchronization is
completed, the Auto Sync window is closed.

An Example of MOTIF XF Editor in Use: Mixing edit in the Song or Pattern mode
MOTIF XF Editor Owner’s Manual
11
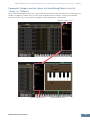
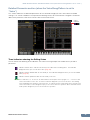
3. Edit the parameters of the Mixing and Voice assigned to each Part.
If you want to change the parameter values from the original ones of the selected Song or Pattern, click
(drag and drop) each of the parameters such as EQ and effect lined up to the right of “G” in the Global/
Multi section and “1” – “16” in the Part section.
To confirm how the parameter edit affects the Voice sound, click any note on the virtual keyboard.
To make detailed settings of the selected Multi, click the arrow button at the top of the right panel
next to the main window to call up the Detailed Parameter section.
n The MOTIF XF Editor lets you edit the Voice parameters in the Song or Pattern mode as well as Voice mode.
In the Voice mode, you can edit only the selected Voice. In the Song or Pattern mode, on the other hand, you
can edit the parameters of the Voice assigned to each Part as well as the Mixing parameters. The edited
Voice can be stored to the same Voice Bank as a User Voice regardless of the mode used for editing.

An Example of MOTIF XF Editor in Use: Mixing edit in the Song or Pattern mode
MOTIF XF Editor Owner’s Manual
12
4. Store the edited Voice or a Mixing, as necessary.
4-1 On the MOTIF XF instrument, press the [STORE] button to call up the Mixing Store
window, select the destination, then press the [ENTER] button to store the edited Mixing.
For details, refer to the Owner’s Manual of the MOTIF XF.
n You can store the edited Mixing also by selecting [Store Mixing] under [Edit] in the menu bar. Note that this
operation does not allow you to select the Song as destination and the edited Mixing will be stored to the
currently selected Song.
4-2 Select the Part to which the desired Voice is assigned, select [Store Voice] under [Edit] in
the menu bar to call up the Store window (page 48) then store the Voice via the same
operations as in steps 6-1, 6-2, 6-3 and 6-4.
5. Select [Save] or [Save As] under [File] on the menu bar to save the edited data as a file
(extension: *.X3E).
All the settings you made and the Voice data you stored to the User Banks will be saved as a single file
(extension: X3E). When you open this file next time to call up the Auto Sync window, click [Start] to
synchronize the status of the parameter settings between the MOTIF XF Editor and the MOTIF XF
instrument.
• When starting the MOTIF XF Editor from Studio Manager, you can save the MOTIF XF Editor data into a
Document file of Studio Manager.
• When using DAW (digital audio workstation) software compatible with Studio Connections and the
Studio Manager together, the MOTIF XF Editor data can be saved into a project file of the DAW.

MOTIF XF Editor Window: Overall section
MOTIF XF Editor Owner’s Manual
13
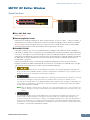
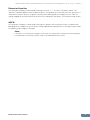
MOTIF XF Editor Window
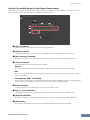
Overall section
File, Edit, Bulk, Help
Refer to page 37.
Voice/Song/Pattern mode
Determines the mode of the MOTIF XF, Voice, Song or Pattern. As soon as “Voice,” “Song” or “Pattern” is
selected here, the mode of the MOTIF XF instrument changes accordingly and the Auto Sync window
(page 52) opens. After setting parameters as necessary on this window, click [Start] to execute data
synchronization between the MOTIF XF Editor and the MOTIF XF instrument.
ONLINE/OFFLINE
Clicking this switches the status of the Editor between “ONLINE” and “OFFLINE.” When “ONLINE” is
indicated, the edited status is completely synchronized between the MOTIF XF Editor and the MOTIF XF
instrument, meaning that any parameter edit you make on the MOTIF XF Editor is reflected in the same
parameter on the MOTIF XF instrument and vice versa. When OFFLINE is selected, editing on the MOTIF
XF Editor will not affect the MOTIF XF instrument and vice versa even if the MOTIF XF instrument is
connected to a computer.
Note that the indication here is automatically changed according to the status of communication
between the MOTIF XF Editor and the MOTIF XF instrument. For example, the ONLINE status changes
automatically to OFFLINE when the cable is disconnected accidentally.
Indicates that the current status is set to ONLINE. Clicking this calls up OFFLINE ( ) described below.
Keep in mind that the ONLINE indication cannot be enabled when the MIDI Port is not set properly or the
MOTIF XF instrument is not properly connected to a computer.
This OFFLINE indication shows that the MIDI Port is set properly and the MOTIF XF is properly connected
to a computer. Clicking this calls up the Auto Sync window. From the Auto Sync window, you can
synchronize the settings between the MOTIF XF Editor and the MOTIF XF by clicking the [Start] button. As
soon as data synchronization is completed, the Auto Sync window is closed and the status of the Editor
changes from OFFLINE to ONLINE.
n When the Global, Current and Voice settings are set to “Off” and Auto Start is set to “On” in the Auto Sync
window, clicking here changes the Editor status from OFFLINE to ONLINE without opening the Auto Sync
window.
This OFFLINE indication shows that the MIDI Port is not set properly or the MOTIF XF instrument is not
connected to a computer properly. Clicking this calls up the Auto Sync window. After making sure to
connect the MOTIF XF instrument to a computer, set the MIDI Port properly then click the [Start] button in
the Auto Sync window to execute data synchronization between the MOTIF XF Editor and the MOTIF XF
instrument. As soon as data synchronization is completed, the Auto Sync window is closed and the status
of the Editor is changed from OFFLINE to ONLINE.

MOTIF XF Editor Window: Mixer section (when the Voice/Song/Pattern is set to “Voice”)
MOTIF XF Editor Owner’s Manual
14
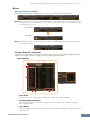
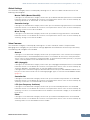
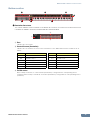
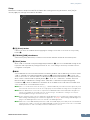
Mixer section (when the Voice/Song/Pattern is set to “Voice”)
Global
This strip lets you edit the main parameters in the Voice mode, such as effect-related ones.
n When editing any of the Global parameters described below, a small square appears at the top right of the
“G” box until you save the edited data as a file. This indication is the same as the [F] indicator (page 26).
Lo, Lo-M, Mid, Hi-M, Hi (Master EQ)
Edits the Master EQ parameters.
Chorus
Selects the Chorus type.
Reverb
Selects the Reverb type.
Master Effect
Turns the Master Effect on or off and selects the Master Effect type.
Volume
Adjust the entire volume.
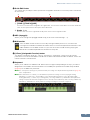
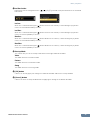
[Voice]/[AD/FW Part] tab
Selects the Parts to be edited from [Voice] and [AD/FW Part]. The illustration below indicates that the
[Voice] tab is active.
Before editing
After editing

MOTIF XF Editor Window: Mixer section (when the Voice/Song/Pattern is set to “Voice”)
MOTIF XF Editor Owner’s Manual
15
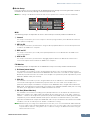
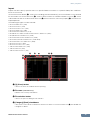
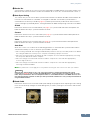
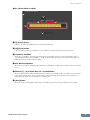
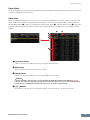
Voice
When the [Voice] is selected:
Edits the Voice parameters. Clicking the “V” row turns this section on as illustrated below.
n When editing any of the Voice parameters described below, a small square appears at the top right of the “V”
box until you save the edited data as a file or you store the edited data as a Voice. This indication is the same
as the [V] indicator (page 29).
n The MIDI monitor mark is at the left side of the “V” mark. A small LED lights when the specific MIDI channel
receives MIDI messages.
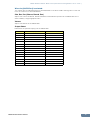
Category, Bank, No., Voice Name
Indicates the Category Bank and name of the Voice. When clicking here, the VOICE LIBRARY window
appears at the right half section, letting you select a different Voice for editing.
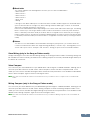
VOICE LIBRARY
Close button
Click this to close this window without applying the changes to the MOTIF XF Editor.
[Category]/[Bank] checkboxes
Click either of these boxes to determine whether the Voices listed here are divided into Category
folders or Bank folders.
[+]/[–] buttons
Click the [+] button to open all the folders so that all Voices appear in all folders. Click the [–] button to
close all folders.
Before editing
After editing

MOTIF XF Editor Window: Mixer section (when the Voice/Song/Pattern is set to “Voice”)
MOTIF XF Editor Owner’s Manual
16
Folder (Category or Bank)
Click each folder to open or close it.
Voices
Indicates the Voices included in the folder. You can select the Voice temporarily by clicking it. When
double-clicking a Voice, the Voice is actually selected and this window closes. You can also copy the
Preset Voice(s) and User Voice(s) from the original location to any location in the User Bank by
dragging-and-dropping the Voice(s). In the User Bank, you can rearrange the Voices by dragging-and-
dropping the Voice(s) to a new location.
When the Category checkbox is entered, a checkbox is shown at left of each Voice. If you enter
checkmarks to the checkboxes of your most-used or favorite Voice, you can call up a list of these
Voices on the VOICE LIBRARY by setting the [Favorites] checkbox to on.
n Selecting, copying, pasting or dragging-and-dropping multiple Voices is done in the same way as
normal on your computer OS.
n By right-clicking on Windows / <control> key + clicking on Mac this section and selecting a menu,
you can use the following functions.
• Opening/closing all the folders
• Determining whether the Voices listed here are divided into Category folders or Bank folders.
• Copying/pasting
• Changing the Voice name
• Deleting all the checkmarks of the Favorites checkboxes at left of the Voices
Search Box
You can search for your desired Voice by inputting a keyword here.
[Favorites] checkbox
By entering the checkmark to this checkbox, you can call up a list of your favorite Voices on the VOICE
LIBRARY. You can select your favorite or most-used Voices for this list by entering checkmarks to the
appropriate checkboxes (appearing only when the [Category] checkbox is entered) at the left of each
Voice.
[OK]/[Cancel] buttons
Click the [OK] button to apply the settings and close this window. Click the [Cancel] button to quit
without applying the Voice selection.
Refresh
When the VOICE LIBRARY is shown in the Editor and you store the Voice(s) on the MOTIF XF itself, the
name(s) of the Voice(s) in the VOICE LIBRARY may be different from the Voice name(s) on the MOTIF
XF. If this happens, click this button to update the Voice names of the VOICE LIBRARY.
EQ Lo, Mi, Hi (Part EQ)
Adjusts the equalizer settings for the current Voice.
Cho, Rev, Pan (Chorus, Reverb, Pan)
Adjusts the Chorus Send level, Reverb Send level and stereo Pan position for the current Voice by using
the graphic knobs.
Volume
Adjusts the volume of the current Voice.
ARP (Arpeggio)
Turns Arpeggio playback on or off for the current Voice.

MOTIF XF Editor Window: Mixer section (when the Voice/Song/Pattern is set to “Voice”)
MOTIF XF Editor Owner’s Manual
17
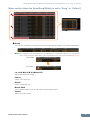
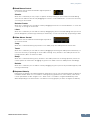
When the [AD/FW Part] is selected:
This section lets you edit parameters for the AD/FW Part in the Voice mode. Clicking “AD” or “FW” row
turns this section on as illustrated below.
Cho, Rev, Pan (Chorus, Reverb, Pan)
Adjusts the Chorus Send level, Reverb Send level and stereo Pan position for the AD/FW Part in the
Voice mode by using the graphic knobs.
Volume
Adjusts the Volume for the AD/FW Part.
Output Select
Determines the specific output(s) for the AD/FW Part.
LCD Output jacks Stereo/Mono
L&R OUTPUT L and R Stereo
asL&R ASSIGNABLE OUTPUT L and R Stereo
FW1&2 FW OUTPUT 1 and 2 Stereo (1: L, 2: R)
FW3&4 FW OUTPUT 3 and 4 Stereo (3: L, 4: R)
FW5&6 FW OUTPUT 5 and 6 Stereo (5: L, 6: R)
FW7&8 FW OUTPUT 7 and 8 Stereo (7: L, 8: R)
FW9&10 FW OUTPUT 9 and 10 Stereo (9: L, 10: R)
FW11&12 FW OUTPUT 11 and 12 Stereo (11: L, 12: R)
FW13&14 FW OUTPUT 13 and 14 Stereo (13: L, 14: R)
asL ASSIGNABLE OUTPUT L Mono
asR ASSIGNABLE OUTPUT R Mono
FW1 FW OUTPUT 1 Mono
:: :
FW14 FW OUTPUT 14 Mono
insL (AD Part) Effect L (Voice Part) Mono (for Vocorder effect)

MOTIF XF Editor Window: Mixer section (when the Voice/Song/Pattern is set to “Song” or “Pattern”)
MOTIF XF Editor Owner’s Manual
18
Mixer section (when the Voice/Song/Pattern is set to “Song” or “Pattern”)
Global
This strip lets you edit the main parameters in the Song or Pattern mode, such as effect-related ones.
n When editing any of the Global parameters described below, a small square appears at the top right of the
“G” box until you save the edited data as a file. This indication is the same as the [F] indicator (page 29).
Lo, Lo-M, Mid, Hi-M, Hi (Master EQ)
Adjusts the Master EQ setting.
Chorus
Selects the Chorus type.
Reverb
Selects the Reverb type.
Master Effect
Turns the Master Effect on or off and selects the Master Effect type.
Volume
Adjusts the entire volume.
Before editing
After editing

MOTIF XF Editor Window: Mixer section (when the Voice/Song/Pattern is set to “Song” or “Pattern”)
MOTIF XF Editor Owner’s Manual
19
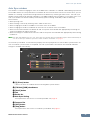
[Part 1-16]/[AD/FW Part] tab
Selects the Parts to be edited from [Part 1-16] and [AD/FW Part]. The illustration below indicates that the
[Part 1-16] tab is selected.
Part
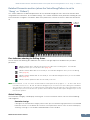
When [Part 1-16] is selected:
This section lets you edit parameters for each Part. Clicking any of 1 – 16 turns the corresponding Part
on. In the example illustration below, Part 1 is active.
n When editing any of the Voice parameters such as Element parameters for each Part, a small square
appears at the top right of the “1” – “16” box until you store the edited Voice as a User Voice or Mixing Voice
or you save the edited data as a file. This indication is the same as the [V] indicator (page 29).
Part (Part number)
Indicates the Part number. Clicking here turns the corresponding Part on.
n In some situations, selecting a Part number on the Editor may not change a Part number on the MOTIF XF
and vice versa, even if the Editor is in the ONLINE status. If you come across such a situation and you want
to match the Part number of the MOTIF XF with the one in the Editor, change the Part number via the panel
controls of the MOTIF XF.
Mute/Solo
Mute
Sets the Mute status for each Part. Clicking “M” here changes the Mute status for all Parts
simultaneously.
Solo
Selects the Solo Part. Only one Part can be soloed at a time.
Category, Bank, No. and Voice Name
Indicates the Category Bank and name of the Voice assigned to each Part. When clicking here, the
VOICE LIBRARY window appears at the right half section, letting you select a different Voice for the
current Part. Using the VOICE LIBRARY is the same here as in the Voice mode; for details, refer to
page 15.
EQ Lo, Mi, Hi (Part EQ)
Adjusts the equalizer settings for each Part.
Ins.FX (Insertion Effect Switch)
Switches the Insertion Effect on or off.
n Insertion Effects can be applied up to eight Parts.
Cho, Rev, Pan (Chorus, Reverb, Pan)
Adjusts the Chorus Send level, Reverb Send level, and stereo Pan position for each Part by using the
graphic knobs.
Volume
Adjusts the Volume for each Part.

MOTIF XF Editor Window: Mixer section (when the Voice/Song/Pattern is set to “Song” or “Pattern”)
MOTIF XF Editor Owner’s Manual
20
Rcv Channel (Receive Channel)
Determines the MIDI Receive Channel for each Part.
Output Select
Determines the specific output(s) for the individual Part. The following settings are available.
* When a Normal Voice is assigned to the edited Part, this value is indicated as “L&R (dr)” and the sound will be
output via the OUTPUT L and R jacks in stereo. When a Drum Voice is assigned to the edited Part, this value is
indicated as “drum” and the sound will be output via the jacks set in the Drum Key Edit as the Output Select
parameter on the MOTIF XF Editor.
n Depending on the setting of the Quick Setup (page 33), the audio signal of Parts which are set to “L&R” or
“FW1” – “FW14” or “FW1&2” – “FW13&14” will be output via the OUTPUT L/R jack as well as FW.
ARP (Arpeggio)
Turns Arpeggio playback on or off for each Part.
n Up to four Parts can play back the Arpeggio simultaneously.
When [AD/FW Part] is selected:
This section lets you edit parameters for the AD/FW Part in the Song or Pattern mode. Clicking “AD” or
“FW” row turns this section on as illustrated below.
Ins FX (Insertion Effect)
Switches the Insertion Effect on or off (only in the AD Part).
Cho, Rev, Pan (Chorus, Reverb, Pan)
Adjusts the Chorus Send level, Reverb Send level and stereo Pan position for the AD/FW Part by using
the knob icons.
Volume
Adjusts the Volume for the AD/FW Part.
Output Select
Determines the specific output(s) for the AD/FW Part. The available settings are the same as those of the
AD/FW Part in the Voice mode. Refer to page 17.
LCD Output jacks Stereo/Mono
L&R OUTPUT L and R Stereo
asL&R ASSIGNABLE OUTPUT L and R Stereo
FW1&2 FW OUTPUT 1 and 2 Stereo (1: L, 2: R)
FW3&4 FW OUTPUT 3 and 4 Stereo (3: L, 4: R)
FW5&6 FW OUTPUT 5 and 6 Stereo (5: L, 6: R)
FW7&8 FW OUTPUT 7 and 8 Stereo (7: L, 8: R)
FW9&10 FW OUTPUT 9 and 10 Stereo (9: L, 10: R)
FW11&12 FW OUTPUT 11 and 12 Stereo (11: L, 12: R)
FW13&14 FW OUTPUT 13 and 14 Stereo (13: L, 14: R)
asL ASSIGNABLE OUTPUT L Mono
asR ASSIGNABLE OUTPUT R Mono
FW1 FW OUTPUT 1 Mono
:: :
FW14 FW OUTPUT 14 Mono
drum See below* See below*
La pagina si sta caricando...
La pagina si sta caricando...
La pagina si sta caricando...
La pagina si sta caricando...
La pagina si sta caricando...
La pagina si sta caricando...
La pagina si sta caricando...
La pagina si sta caricando...
La pagina si sta caricando...
La pagina si sta caricando...
La pagina si sta caricando...
La pagina si sta caricando...
La pagina si sta caricando...
La pagina si sta caricando...
La pagina si sta caricando...
La pagina si sta caricando...
La pagina si sta caricando...
La pagina si sta caricando...
La pagina si sta caricando...
La pagina si sta caricando...
La pagina si sta caricando...
La pagina si sta caricando...
La pagina si sta caricando...
La pagina si sta caricando...
La pagina si sta caricando...
La pagina si sta caricando...
La pagina si sta caricando...
La pagina si sta caricando...
La pagina si sta caricando...
La pagina si sta caricando...
La pagina si sta caricando...
La pagina si sta caricando...
La pagina si sta caricando...
-
 1
1
-
 2
2
-
 3
3
-
 4
4
-
 5
5
-
 6
6
-
 7
7
-
 8
8
-
 9
9
-
 10
10
-
 11
11
-
 12
12
-
 13
13
-
 14
14
-
 15
15
-
 16
16
-
 17
17
-
 18
18
-
 19
19
-
 20
20
-
 21
21
-
 22
22
-
 23
23
-
 24
24
-
 25
25
-
 26
26
-
 27
27
-
 28
28
-
 29
29
-
 30
30
-
 31
31
-
 32
32
-
 33
33
-
 34
34
-
 35
35
-
 36
36
-
 37
37
-
 38
38
-
 39
39
-
 40
40
-
 41
41
-
 42
42
-
 43
43
-
 44
44
-
 45
45
-
 46
46
-
 47
47
-
 48
48
-
 49
49
-
 50
50
-
 51
51
-
 52
52
-
 53
53


Yamaha MOTIF XF6 EDITOR Manuale del proprietario
- Categoria
- Attrezzatura musicale
- Tipo
- Manuale del proprietario
in altre lingue
- English: Yamaha MOTIF XF6 EDITOR Owner's manual
- français: Yamaha MOTIF XF6 EDITOR Le manuel du propriétaire
- español: Yamaha MOTIF XF6 EDITOR El manual del propietario
- Deutsch: Yamaha MOTIF XF6 EDITOR Bedienungsanleitung
- русский: Yamaha MOTIF XF6 EDITOR Инструкция по применению
- Nederlands: Yamaha MOTIF XF6 EDITOR de handleiding
- português: Yamaha MOTIF XF6 EDITOR Manual do proprietário
- dansk: Yamaha MOTIF XF6 EDITOR Brugervejledning
- čeština: Yamaha MOTIF XF6 EDITOR Návod k obsluze
- polski: Yamaha MOTIF XF6 EDITOR Instrukcja obsługi
- svenska: Yamaha MOTIF XF6 EDITOR Bruksanvisning
- Türkçe: Yamaha MOTIF XF6 EDITOR El kitabı
- suomi: Yamaha MOTIF XF6 EDITOR Omistajan opas
- română: Yamaha MOTIF XF6 EDITOR Manualul proprietarului
Documenti correlati
-
Yamaha XS7 Manuale del proprietario
-
-
-
Yamaha MOX6 Manuale del proprietario
-
Yamaha MOTIF XF6 Manuale del proprietario
-
Yamaha S70 Manuale utente
-
Yamaha MO6 Manuale del proprietario
-
-
-