
Built-in oven
OB60SC single models
NZ AU
USER GUIDE


1
CONTENTS
Safety and warnings 2
Introduction 5
Oven, clock and timer controls
Analogue 60’ timer model 8
Analogue 120’ timer model 9
Seven function, touch control clock model 10
First use 12
Using your oven 13
Cooking guide 14
Oven functions 16
Cooking charts 18
Cooking with auto-off 18
Using the electronic timer 20
Automatic cooking 22
Care and cleaning 24
Cleaning the door glass – top-opening models 32
Cleaning the door glass – side-opening models 38
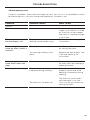
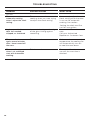
Troubleshooting 40
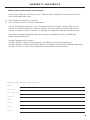
Warranty and service 41
IMPORTANT!
SAVE THESE INSTRUCTIONS
The models shown in this user guide may not be available in all markets and are subject
to change at any time. For current details about model and specification availability in
your country, please go to our website www.elba.co.nz/www.elba.com.au or contact your
local Fisher & Paykel dealer.

2
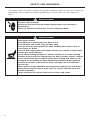
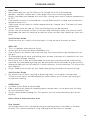
SAFETY AND WARNINGS
Your built-in oven has been carefully designed to operate safely during normal cooking
procedures. Please keep the following guidelines in mind when you are using your
oven:
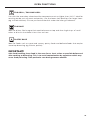
WARNING!
Electrical Shock Hazard
Disconnect the oven from the power supply before any cleaning or
maintenance.
Failure to follow this advice may result in electrical shock.
!
WARNING!
Hot Surface Hazard
Accessible parts may become hot when in use.
To avoid burns and scalds, keep children away.
Use oven mitts or other protection when handling hot surfaces such as
oven shelves or dishes.
Use care when opening the oven door. Let hot air or steam escape before
removing or replacing food.
Do not touch heating elements or interior surfaces of the oven. Heating
elements may be hot even though they are dark in colour. Interior surfaces
of an oven become hot enough to cause burns. During and after use, do
not touch, or let clothing or other flammable materials contact heating
elements or interior surfaces of the oven until they have had sufficient
time to cool.
Other surfaces of the appliance may become hot enough to cause burns -
among these surfaces are the oven vent, the surface near the oven vent,
and the oven door.
Failure to follow this advice could result in burns and scalds.
!

3
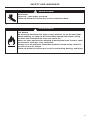
SAFETY AND WARNINGS
WARNING!
Fire Hazard
Do not place aluminium foil, dishes, trays, water or ice on the oven floor
during cooking, as doing so will irreversibly damage the enamel; lining
the oven with aluminium foil may even cause fire.
Never use your appliance for warming or heating the room. Persons could
be burned or injured or a fire could start.
Storage in or on appliance: flammable materials should not be stored in
an oven or near its surface.
Failure to follow this advice may result in overheating, burning, and injury.
WARNING!
Cut Hazard
Take care - some edges are sharp.
Failure to follow this advice may result in electrical shock.
!
!

4
SAFETY AND WARNINGS
IMPORTANT SAFETY INSTRUCTIONS
To reduce the risk of fire, electrical shock, injury to persons, or damage when using the
oven, follow the important safety instructions listed below:
Read all the instructions before using the oven. Use the oven only for its intended
purpose as described in these instructions.
Proper installation: be sure your appliance is properly installed and earthed by a
qualified technician.
Isolating switch: make sure this oven is connected to a circuit which incorporates an
isolating switch providing full disconnection from the power supply.
Household appliances are not intended to be played with by children.
Do not leave children alone. Children should not be left alone or unattended in the
area where the appliance is in use. They should never be allowed to sit or stand on
any part of the appliance.
Children of less than 8 years old must be kept away from the appliance unless
continuously supervised. This appliance can be used by children aged from 8 years
and above, and persons with reduced physical, sensory or mental capabilities or
lack of experience and knowledge, if they have been given supervision or instruction
concerning the use of the appliance in a safe way and they understand the hazards
involved. Cleaning and user maintenance shall not be done by children without
supervision.
Do not place heavy objects on the oven door.
Wear proper apparel. Do not wear loose fitting or hanging garments when using the
appliance. They could ignite or melt if they touch an element or hot surface and you
could be burned.
User servicing: do not repair or replace any part of the appliance unless specifically
recommended in the manual. All other servicing should be referred to a qualified
technician.
Do not use water on grease fires. Smother the fire or flame or use a dry chemical or
foam type extinguisher.
Use only dry oven mitts or potholders. Moist or damp potholders on hot surfaces
could result in burns from steam. Do not let potholders touch hot areas or heating
elements. Do not use a towel or a bulky cloth for a potholder. It could catch fire.
Do not heat unopened food containers. They can build up pressure that may cause the
container to burst and result in injury.
Safe food handling: leave food in the oven for as short a time as possible before and
after cooking. This is to avoid contamination by organisms which may cause food
poisoning. Take particular care during warm weather.
Always keep oven vents unobstructed.

5
SAFETY AND WARNINGS
IMPORTANT SAFETY INSTRUCTIONS
Do not operate your appliance by means of an external timer or separate remote-
control system.
Caution: Hot air can blow from the vent at the top of the oven as part of the oven’s
cooling system.
Placement of oven shelves: always position shelves in the desired location while the
oven is cool (before preheating). If a shelf must be removed while the oven is hot, do
not let the oven mitts or potholder contact hot heating elements in the oven or the
base of the oven.
Do not clean the oven seal or use any oven-cleaning products on it. It is essential for a
good seal, which ensures that the oven operates efficiently. Care should be taken not
to rub, damage or move it.
Do not use oven cleaners, harsh/abrasive cleaning agents, waxes, or polishes. No
commercial oven cleaner, oven liner, or protective coating of any kind should be
used in or around any part of the oven. Do not use harsh/abrasive cleaners, scourers
or sharp metal scrapers to clean the oven door glass since they scratch the surface,
which may result in the glass shattering.
Clean only the parts listed in this manual.
Do not use a steam cleaner to clean any part of the oven.
Do not store things children might want above the oven. Children could be burned or
injured while climbing on the oven to retrieve items.
Do not install or operate the appliance if it is damaged or not working properly. If you
receive a damaged product, contact your dealer or installer immediately.
Use only bakeware approved for oven use. Follow the bakeware manufacturer’s
instructions.

6
INTRODUCTION
Congratulations on your new purchase. Your ELBA by Fisher & Paykel oven has a
number of features to make cooking a great experience for you:
a wide choice of oven functions
intuitive controls and displays
Before you start
Make sure the installer has completed the ‘Final checklist’ in the Installation instructions.
Read this guide, taking special note of the ‘Safety and warnings’ section.
Remove all packaging and dispose of it responsibly. Recycle items that you can.
Fit the side racks and catalytic panels (see ‘Fitting the side racks and catalytic panels’).
We recommend you then condition the oven, using the instructions following.
Note: Not all accessories are provided with all models. To purchase other accessories,
contact your nearest ELBA by Fisher & Paykel Authorised Service Centre, Customer
Care or visit our local website listed on the back cover.
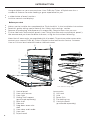
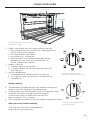
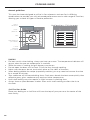
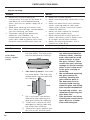
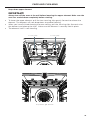
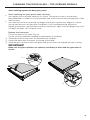
oven features may vary.
1 Control panel
2 Oven vent louvres
3 Oven light
4 Sliding shelf support
(purchased separately)
5 Wire shelf
6 Side rack
7 Step down oven wire
shelf
8 Oven door and handle
9 Oven seal
!0 Drip channel
Accessories:
!1 Grill rack
!2 Grid
!3 Roast Dish
!4 Flat baking tray
!5 Catalytic panels
(purchased separately)
!1
!3
!2
!4
!0
!5
2
4
3
5
6
7
8
1
9

7
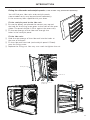
oven features may vary.
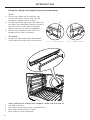
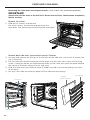
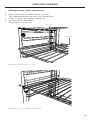
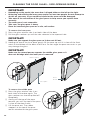
Fitting the side racks and catalytic panels (some models only, purchased separately)
You will find your side racks and catalytic panels
(some models only, may be purchased separately)
in the accessory box supplied with your oven.
Fit the catalytic panel to the side rack
1 Ensure the panels are placed the correct way around:
the hole for the fixing screw goes to the front of the oven.
(Note: The panel should sit flush against the oven wall).
2 Fit the rear prongs of the side rack through the
holes in the catalytic panel.
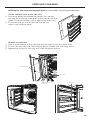
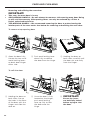
Fit the side racks
1 Slide the rear prongs of the side rack into the holes at
the rear of the oven
2 Fit the side rack front tab (and catalytic panel if fitted)
over the fixing screw.
3 Replace the fixing nut. You may use a coin to tighten the nut.
Fixing nut
Side rack
Rear prongs
Catalytic panel
(if fitted)
INTRODUCTION

8
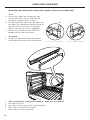
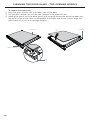
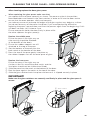
Fitting the sliding shelf supports (purchased separately)
To fit
1 Ensure the slides are the correct way
around (the front of the slide has the
triangular shaped tab as shown).
2 Fit the top of the clips over the side rack,
the front clip should be fitted as close to
the front of the side rack as possible.
Make sure the rear clip has engaged.
3 Rotate the slide down and ‘click’ the
bottom of the clips into place.
To remove
Grasp the slide and rotate the bottom
up to release the the clips and remove.
When refitting the sliding shelf supports, make sure that you fit:
the side racks first
the slides to the top wire of a shelf position
both sides of each pair of slides
both slides on the same level.
Front of Left Hand Slide
Clip Clip
Ta b Ta b
Front of Right Hand Slide
INTRODUCTION

9
5
10
15
20
25
30
35
40
45
50
55
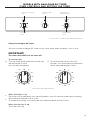
Function
knob
Analogue 60’
timer
Temperature
indicator light
Function indicator
light
Control panel – models with analogue 60’ timer
Setting the analogue 60’ timer
Using the analogue 60’ timer
You can use the analogue 60’ timer at any time, even when the oven is not in use.
IMPORTANT!
The timer does NOT turn the oven off.
To set the timer
1 Turn the timer knob clockwise all the way
around to the O mark
(60-minute countdown).
When the timer is set
The timer will immediately start counting down: you will see the knob slowly rotating
anti-clockwise towards the O mark.
To cancel the setting, turn the knob anti-clockwise back to the O mark.
When the set time is up
The timer will ring.
2 To set the timer to less than 60
minutes, turn the knob anti-clockwise
to the required length of time.
FU NCTION
TEMPERATURE TIMER
FU NCTION
TEMPERATURE TIMER
555
1050
1545
2040
2535
30
555
1050
1545
2040
2535
30
30
15
45
6075
90
105
120
30
15
45
6075
90
105
120
TEMPE RATURE
FUNCTION
TEMPERATURE
FUNCTION
LOWER OVEN
UPPER OVEN
FU NCTION
TEMPERATURE TIMER
FU NCTION
TEMPERATURE TIMER
555
1050
1545
2040
2535
30
555
1050
1545
2040
2535
30
30
15
45
6075
90
105
120
30
15
45
6075
90
105
120
TEMPE RATURE
FUNCTION
TEMPERATURE
FUNCTION
LOWER OVEN
UPPER OVEN
MODELS WITH ANALOGUE 60’ TIMER
OVEN CONTROLS AND SETTING THE TIMER
Temperature
knob

10
FINAL PIECE:
FINAL PIECE:
FINAL PIECE:
FINAL PIECE:
FINAL PIECE:
FINAL PIECE:
FINAL PIECE:
FINAL PIECE:
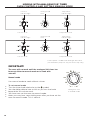
Function knob
Function knob
Temperature knob
Temperature knob
Analogue 120’
timer
Analogue 120’
timer
Temperature
indicator light
Temperature
indicator light
Function
indicator light
Function
indicator light
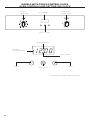
IMPORTANT!
The oven will not work until the analogue 120’ timer has
been set either to manual mode or to cook with
auto-off.
Manual mode
Use manual mode to cook without a timer.
To set manual mode
Turn the timer knob clockwise to the
FUNCTION
TEMPERATURE TIMER
FUNCTION
TEMPERATURE TIMER
555
1050
1545
2040
2535
30
555
1050
1545
2040
2535
30
30
15
45
6075
90
105
120
30
15
45
6075
90
105
120
TEMPERATURE
FUNCTION
TEMPERATURE
FUNCTION
LOWER OVEN
UPPER OVEN
symbol.
You should be able to hear a click as you turn the knob
beyond the 120-minute mark.
You have now set the oven to manual mode.
Note: you may hear some ticking even after you have set the
oven to manual mode. This is normal.
Control panel – models with analogue 120’ timer
(For illustration purposes only, functions may vary)
Setting the oven
to manual mode
FU NCTION
TEMPERATURE TIMER
FU NCTION
TEMPERATURE TIMER
555
1050
1545
2040
2535
30
555
1050
1545
2040
2535
30
30
15
45
6075
90
105
120
30
15
45
6075
90
105
120
TEMPE RATURE
FUNCTION
TEMPERATURE
FUNCTION
LOWER OVEN
UPPER OVEN
MODELS WITH ANALOGUE 120’ TIMER
OVEN CONTROLS AND SETTING MANUAL MODE

11
Control panel – models with analogue 120’ timer
(For illustration purposes only, functions may vary)
Setting the oven
to manual mode
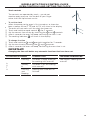
MODELS WITH ANALOGUE 120’ TIMER
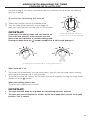
COOKING WITH AUTO-OFF
Use the analogue 120’ timer to automatically turn the oven off when the set cooking
time has elapsed.
To set the oven for cooking with auto-off
1 Select the function and set the temperature.
2 Turn the timer knob clockwise to the length of
time you want the oven to cook (up to 120 minutes).
IMPORTANT!
If the oven is in manual mode and you want to set
it to cook with auto-off, make sure you turn the
timer knob anti-clockwise to set the cooking time.
Forcing the knob from the symbol clockwise to O (off) could damage it.
When auto-off is set
The timer will immediately start counting down: you will see the knob slowly rotating
anti-clockwise towards the O (off) position.
To cancel the auto-off setting, set the oven to manual mode by turning the timer knob
clockwise to the symbol.
When the cooking time is over
The oven will automatically turn off.
IMPORTANT!
The oven will NOT beep or ring when the set cooking time has elapsed.
The oven may turn off before the marker on the timer knob lines up with the O (off)
position. This is normal.
Setting the analogue 120’ timer
to turn the oven off automatically
Changing from manual mode to cooking with auto-off
FU NCTION
TEMPERATURE TIMER
FU NCTION
TEMPERATURE TIMER
555
1050
1545
2040
2535
30
555
1050
1545
2040
2535
30
30
15
45
6075
90
105
120
30
15
45
6075
90
105
120
TEMPE RATURE
FUNCTION
TEMPE RATURE
FUNCTION
LOWER OVEN
UPPER OVEN
FUNCTION
TEMPE R ATU RE TIMER
FUNCTION
TEMPE R ATU RE TIMER
555
1050
1545
2040
2535
30
555
1050
1545
2040
2535
30
30
15
45
6075
90
105
120
30
15
45
6075
90
105
120
TEMPERATURE
FUNCTION
TEM PE RATURE
FUNCTION
LOWER OVEN
UPPER OVEN
FUNCTION
TEMPE R ATU RE TIMER
FUNCTION
TEMPE R ATU RE TIMER
555
1050
1545
2040
2535
30
555
1050
1545
2040
2535
30
30
15
45
6075
90
105
120
30
15
45
6075
90
105
120
TEMPERATURE
FUNCTION
TEM PE RATURE
FUNCTION
LOWER OVEN
UPPER OVEN

12
MODELS WITH TOUCH CONTROL CLOCK
OVEN CONTROLS AND SETTING THE CLOCK
FINAL PIECE:
FINAL PIECE:
FINAL PIECE:
FINAL PIECE:
Temperature
indicator light
Function
indicator light
Touch controls
Clock Display
Control panel – models with touch control
OB60S7CEW1 EL AA
WHITE GLASS CONTROL PANEL, TOUCH CONTROL CLOCK: GRAPHICS SCREENED ONTO BACK SIDE OF GLASS, PANTONE 440
OB60S4CRW1 EL AA
WHITE GLASS CONTROL PANEL: GRAPHICS SCREENED ONTO BACK SIDE OF GLASS, PANTONE 440
Cooking indicator
Automatic
Cooking indicator
Timer indicator
- control
+ control
Mode control

13
MODELS WITH TOUCH CONTROL CLOCK
OVEN CONTROLS AND SETTING THE CLOCK
Touch controls
The controls are operated by touch - you do not
need to apply pressure. Use the ball of your finger
rather than the tip for best results.
To set the clock
When the power to the oven is first turned on, or there has
been a power failure, 0
.
00 and ‘AUTO’ will show in the display.
The oven will not work until the clock has been set.
1 Touch and hold the mode control
OB60S7CEW1 EL AA
WHITE GLASS CONTROL PANEL, TOUCH CONTROL CLOCK: GRAPHICS SCREENED ONTO BACK SIDE OF GLASS, PANTONE 440
OB60S4CRW1 EL AA
WHITE GLASS CONTROL PANEL: GRAPHICS SCREENED ONTO BACK SIDE OF GLASS, PANTONE 440
for 3 seconds.
2 Set the correct time of day by touching the
OB60S7CEW1 EL AA
WHITE GLASS CONTROL PANEL, TOUCH CONTROL CLOCK: GRAPHICS SCREENED ONTO BACK SIDE OF GLASS, PANTONE 440
OB60S4CRW1 EL AA
WHITE GLASS CONTROL PANEL: GRAPHICS SCREENED ONTO BACK SIDE OF GLASS, PANTONE 440
and
OB60S7CEW1 EL AA
WHITE GLASS CONTROL PANEL, TOUCH CONTROL CLOCK: GRAPHICS SCREENED ONTO BACK SIDE OF GLASS, PANTONE 440
OB60S4CRW1 EL AA
WHITE GLASS CONTROL PANEL: GRAPHICS SCREENED ONTO BACK SIDE OF GLASS, PANTONE 440
controls.
3 After 8 seconds the oven will beep confirming the time is set.
4 The cooking indicator
OB60S7CEW1 EL AA
WHITE GLASS CONTROL PANEL, TOUCH CONTROL CLOCK: GRAPHICS SCREENED ONTO BACK SIDE OF GLASS, PANTONE 440
OB60S4CRW1 EL AA
WHITE GLASS CONTROL PANEL: GRAPHICS SCREENED ONTO BACK SIDE OF GLASS, PANTONE 440
will show in the display.
To change the time
1 Touch and hold the
OB60S7CEW1 EL AA
WHITE GLASS CONTROL PANEL, TOUCH CONTROL CLOCK: GRAPHICS SCREENED ONTO BACK SIDE OF GLASS, PANTONE 440
OB60S4CRW1 EL AA
WHITE GLASS CONTROL PANEL: GRAPHICS SCREENED ONTO BACK SIDE OF GLASS, PANTONE 440
and
OB60S7CEW1 EL AA
WHITE GLASS CONTROL PANEL, TOUCH CONTROL CLOCK: GRAPHICS SCREENED ONTO BACK SIDE OF GLASS, PANTONE 440
OB60S4CRW1 EL AA
WHITE GLASS CONTROL PANEL: GRAPHICS SCREENED ONTO BACK SIDE OF GLASS, PANTONE 440
controls together for 3 seconds.
2 Set the new time by touching the
OB60S7CEW1 EL AA
WHITE GLASS CONTROL PANEL, TOUCH CONTROL CLOCK: GRAPHICS SCREENED ONTO BACK SIDE OF GLASS, PANTONE 440
OB60S4CRW1 EL AA
WHITE GLASS CONTROL PANEL: GRAPHICS SCREENED ONTO BACK SIDE OF GLASS, PANTONE 440
and
OB60S7CEW1 EL AA
WHITE GLASS CONTROL PANEL, TOUCH CONTROL CLOCK: GRAPHICS SCREENED ONTO BACK SIDE OF GLASS, PANTONE 440
OB60S4CRW1 EL AA
WHITE GLASS CONTROL PANEL: GRAPHICS SCREENED ONTO BACK SIDE OF GLASS, PANTONE 440
controls.
3 After 8 seconds the oven will beep, confirming the new time is set.
IMPORTANT!
Changing the time will delete any automatic functions that have been set.
IF THE DISPLAY SHOWS IT MEANS THAT FOR MORE INFORMATION
A
U
T
O
Flashing The oven is ready to be set
for cooking with auto-off.
See section ‘Cooking with
auto-off’
Steadily
lit
The oven is set for cooking
with auto-off.
Flashing
and
Beeping
Cooking with auto-off has
finished.

14
MODELS WITH TOUCH CONTROL CLOCK
USING THE ELECTRONIC TIMER
IMPORTANT!
The timer does not turn the oven off.
You may use the timer at any time, even when you are not cooking.
The timer may be set for up to 23 hours and 59 minutes.
To set the timer
1 Touch and hold the mode control
OB60S7CEW1 EL AA
WHITE GLASS CONTROL PANEL, TOUCH CONTROL CLOCK: GRAPHICS SCREENED ONTO BACK SIDE OF GLASS, PANTONE 440
OB60S4CRW1 EL AA
WHITE GLASS CONTROL PANEL: GRAPHICS SCREENED ONTO BACK SIDE OF GLASS, PANTONE 440
for 3 seconds.
The timer indicator
OB60S7CEW1 EL AA
WHITE GLASS CONTROL PANEL, TOUCH CONTROL CLOCK: GRAPHICS SCREENED ONTO BACK SIDE OF GLASS, PANTONE 440
OB60S4CRW1 EL AA
WHITE GLASS CONTROL PANEL: GRAPHICS SCREENED ONTO BACK SIDE OF GLASS, PANTONE 440
will flash continously.
2 Set the time by touching the
OB60S7CEW1 EL AA
WHITE GLASS CONTROL PANEL, TOUCH CONTROL CLOCK: GRAPHICS SCREENED ONTO BACK SIDE OF GLASS, PANTONE 440
OB60S4CRW1 EL AA
WHITE GLASS CONTROL PANEL: GRAPHICS SCREENED ONTO BACK SIDE OF GLASS, PANTONE 440
and
OB60S7CEW1 EL AA
WHITE GLASS CONTROL PANEL, TOUCH CONTROL CLOCK: GRAPHICS SCREENED ONTO BACK SIDE OF GLASS, PANTONE 440
OB60S4CRW1 EL AA
WHITE GLASS CONTROL PANEL: GRAPHICS SCREENED ONTO BACK SIDE OF GLASS, PANTONE 440
controls.
After 8 seconds the oven will tone confirming the timer is set.
The timer indicator
OB60S7CEW1 EL AA
WHITE GLASS CONTROL PANEL, TOUCH CONTROL CLOCK: GRAPHICS SCREENED ONTO BACK SIDE OF GLASS, PANTONE 440
OB60S4CRW1 EL AA
WHITE GLASS CONTROL PANEL: GRAPHICS SCREENED ONTO BACK SIDE OF GLASS, PANTONE 440
will glow steadily.
The display will return to time of day.
To check the time remaining
1 Touch and hold the mode control
OB60S7CEW1 EL AA
WHITE GLASS CONTROL PANEL, TOUCH CONTROL CLOCK: GRAPHICS SCREENED ONTO BACK SIDE OF GLASS, PANTONE 440
OB60S4CRW1 EL AA
WHITE GLASS CONTROL PANEL: GRAPHICS SCREENED ONTO BACK SIDE OF GLASS, PANTONE 440
for 3 seconds.
The display will show the time remaining.
If the time remaining is greater than one minute, it will show in hours and minutes.
If the time remaining is less than one minute it will show in seconds.
After 8 seconds the display will return to the time of day.
To change or cancel the timer
1 Touch and hold the mode control
OB60S7CEW1 EL AA
WHITE GLASS CONTROL PANEL, TOUCH CONTROL CLOCK: GRAPHICS SCREENED ONTO BACK SIDE OF GLASS, PANTONE 440
OB60S4CRW1 EL AA
WHITE GLASS CONTROL PANEL: GRAPHICS SCREENED ONTO BACK SIDE OF GLASS, PANTONE 440
for 3 seconds.
The time remaining will be displayed.
2 Set the new time by touching the
OB60S7CEW1 EL AA
WHITE GLASS CONTROL PANEL, TOUCH CONTROL CLOCK: GRAPHICS SCREENED ONTO BACK SIDE OF GLASS, PANTONE 440
OB60S4CRW1 EL AA
WHITE GLASS CONTROL PANEL: GRAPHICS SCREENED ONTO BACK SIDE OF GLASS, PANTONE 440
and
OB60S7CEW1 EL AA
WHITE GLASS CONTROL PANEL, TOUCH CONTROL CLOCK: GRAPHICS SCREENED ONTO BACK SIDE OF GLASS, PANTONE 440
OB60S4CRW1 EL AA
WHITE GLASS CONTROL PANEL: GRAPHICS SCREENED ONTO BACK SIDE OF GLASS, PANTONE 440
controls.
3 After 8 seconds the oven will beep to indicate the new time is set.
4 To cancel, set the new time to O.

15
MODELS WITH TOUCH CONTROL CLOCK
USING THE ELECTRONIC TIMER
When the time is up
The timer will beep.
The timer indicator
OB60S7CEW1 EL AA
WHITE GLASS CONTROL PANEL, TOUCH CONTROL CLOCK: GRAPHICS SCREENED ONTO BACK SIDE OF GLASS, PANTONE 440
OB60S4CRW1 EL AA
WHITE GLASS CONTROL PANEL: GRAPHICS SCREENED ONTO BACK SIDE OF GLASS, PANTONE 440
will flash continously.
1 Touch and hold the mode control
OB60S7CEW1 EL AA
WHITE GLASS CONTROL PANEL, TOUCH CONTROL CLOCK: GRAPHICS SCREENED ONTO BACK SIDE OF GLASS, PANTONE 440
OB60S4CRW1 EL AA
WHITE GLASS CONTROL PANEL: GRAPHICS SCREENED ONTO BACK SIDE OF GLASS, PANTONE 440
for 3 seconds.
The beeping will stop.
The timer indicator light
OB60S7CEW1 EL AA
WHITE GLASS CONTROL PANEL, TOUCH CONTROL CLOCK: GRAPHICS SCREENED ONTO BACK SIDE OF GLASS, PANTONE 440
OB60S4CRW1 EL AA
WHITE GLASS CONTROL PANEL: GRAPHICS SCREENED ONTO BACK SIDE OF GLASS, PANTONE 440
will go out.
OR
1 Touch the
OB60S7CEW1 EL AA
WHITE GLASS CONTROL PANEL, TOUCH CONTROL CLOCK: GRAPHICS SCREENED ONTO BACK SIDE OF GLASS, PANTONE 440
OB60S4CRW1 EL AA
WHITE GLASS CONTROL PANEL: GRAPHICS SCREENED ONTO BACK SIDE OF GLASS, PANTONE 440
and
OB60S7CEW1 EL AA
WHITE GLASS CONTROL PANEL, TOUCH CONTROL CLOCK: GRAPHICS SCREENED ONTO BACK SIDE OF GLASS, PANTONE 440
OB60S4CRW1 EL AA
WHITE GLASS CONTROL PANEL: GRAPHICS SCREENED ONTO BACK SIDE OF GLASS, PANTONE 440
controls to stop the beep and then touch and hold the mode
control
OB60S7CEW1 EL AA
WHITE GLASS CONTROL PANEL, TOUCH CONTROL CLOCK: GRAPHICS SCREENED ONTO BACK SIDE OF GLASS, PANTONE 440
OB60S4CRW1 EL AA
WHITE GLASS CONTROL PANEL: GRAPHICS SCREENED ONTO BACK SIDE OF GLASS, PANTONE 440
for 3 seconds to turn off the timer indicator.
2 Turn off the oven (function and temperature knobs) to O (off) if cooking is completed.
To change the timer volume
You may choose from three volume levels.
To select a volume
1 Touch and hold the
OB60S7CEW1 EL AA
WHITE GLASS CONTROL PANEL, TOUCH CONTROL CLOCK: GRAPHICS SCREENED ONTO BACK SIDE OF GLASS, PANTONE 440
OB60S4CRW1 EL AA
WHITE GLASS CONTROL PANEL: GRAPHICS SCREENED ONTO BACK SIDE OF GLASS, PANTONE 440
and
OB60S7CEW1 EL AA
WHITE GLASS CONTROL PANEL, TOUCH CONTROL CLOCK: GRAPHICS SCREENED ONTO BACK SIDE OF GLASS, PANTONE 440
OB60S4CRW1 EL AA
WHITE GLASS CONTROL PANEL: GRAPHICS SCREENED ONTO BACK SIDE OF GLASS, PANTONE 440
controls together for 3 seconds.
2 Touch the Mode control
OB60S7CEW1 EL AA
WHITE GLASS CONTROL PANEL, TOUCH CONTROL CLOCK: GRAPHICS SCREENED ONTO BACK SIDE OF GLASS, PANTONE 440
OB60S4CRW1 EL AA
WHITE GLASS CONTROL PANEL: GRAPHICS SCREENED ONTO BACK SIDE OF GLASS, PANTONE 440
.
the display will show the current volume (ton1, ton2 or ton3)
3 Touch the
OB60S7CEW1 EL AA
WHITE GLASS CONTROL PANEL, TOUCH CONTROL CLOCK: GRAPHICS SCREENED ONTO BACK SIDE OF GLASS, PANTONE 440
OB60S4CRW1 EL AA
WHITE GLASS CONTROL PANEL: GRAPHICS SCREENED ONTO BACK SIDE OF GLASS, PANTONE 440
control.
the oven will beep at the level displayed
4 Repeat until you have chosen a volume
5 After 8 seconds the oven will beep confirming the new volume setting and the display
will return to the time of day.

16
MODELS WITH TOUCH CONTROL CLOCK
AUTOMATIC COOKING
To set the oven for automatic cooking
1 Set the oven
Check the clock shows the correct time (eg 11:10).
Select the function and set the temperature. The oven will turn on.
2 Set the cooking (duration) time
Decide how long the food will take to cook, allowing time for preheating if necessary
(eg 40 minutes)
Touch and hold the mode control
OB60S7CEW1 EL AA
WHITE GLASS CONTROL PANEL, TOUCH CONTROL CLOCK: GRAPHICS SCREENED ONTO BACK SIDE OF GLASS, PANTONE 440
OB60S4CRW1 EL AA
WHITE GLASS CONTROL PANEL: GRAPHICS SCREENED ONTO BACK SIDE OF GLASS, PANTONE 440
for 3 seconds, then
Touch the mode control
OB60S7CEW1 EL AA
WHITE GLASS CONTROL PANEL, TOUCH CONTROL CLOCK: GRAPHICS SCREENED ONTO BACK SIDE OF GLASS, PANTONE 440
OB60S4CRW1 EL AA
WHITE GLASS CONTROL PANEL: GRAPHICS SCREENED ONTO BACK SIDE OF GLASS, PANTONE 440
again. dur will show in the display
Touch the
OB60S7CEW1 EL AA
WHITE GLASS CONTROL PANEL, TOUCH CONTROL CLOCK: GRAPHICS SCREENED ONTO BACK SIDE OF GLASS, PANTONE 440
OB60S4CRW1 EL AA
WHITE GLASS CONTROL PANEL: GRAPHICS SCREENED ONTO BACK SIDE OF GLASS, PANTONE 440
and
OB60S7CEW1 EL AA
WHITE GLASS CONTROL PANEL, TOUCH CONTROL CLOCK: GRAPHICS SCREENED ONTO BACK SIDE OF GLASS, PANTONE 440
OB60S4CRW1 EL AA
WHITE GLASS CONTROL PANEL: GRAPHICS SCREENED ONTO BACK SIDE OF GLASS, PANTONE 440
controls to set the cooking time. ‘AUTO’
and the cooking indicator
OB60S7CEW1 EL AA
WHITE GLASS CONTROL PANEL, TOUCH CONTROL CLOCK: GRAPHICS SCREENED ONTO BACK SIDE OF GLASS, PANTONE 440
OB60S4CRW1 EL AA
WHITE GLASS CONTROL PANEL: GRAPHICS SCREENED ONTO BACK SIDE OF GLASS, PANTONE 440
will flash
After 8 seconds the time will be set and the ‘AUTO’ indicator remains on.
3 Set the End time
Decide when you want your food to be ready (eg 12.40)
Touch and hold the mode control
OB60S7CEW1 EL AA
WHITE GLASS CONTROL PANEL, TOUCH CONTROL CLOCK: GRAPHICS SCREENED ONTO BACK SIDE OF GLASS, PANTONE 440
OB60S4CRW1 EL AA
WHITE GLASS CONTROL PANEL: GRAPHICS SCREENED ONTO BACK SIDE OF GLASS, PANTONE 440
for 3 seconds, then
Touch the mode control
OB60S7CEW1 EL AA
WHITE GLASS CONTROL PANEL, TOUCH CONTROL CLOCK: GRAPHICS SCREENED ONTO BACK SIDE OF GLASS, PANTONE 440
OB60S4CRW1 EL AA
WHITE GLASS CONTROL PANEL: GRAPHICS SCREENED ONTO BACK SIDE OF GLASS, PANTONE 440
twice. The display will show End.
Note: while dur is being displayed you can change to End by touching the mode
control
OB60S7CEW1 EL AA
WHITE GLASS CONTROL PANEL, TOUCH CONTROL CLOCK: GRAPHICS SCREENED ONTO BACK SIDE OF GLASS, PANTONE 440
OB60S4CRW1 EL AA
WHITE GLASS CONTROL PANEL: GRAPHICS SCREENED ONTO BACK SIDE OF GLASS, PANTONE 440
once.
Use the
OB60S7CEW1 EL AA
WHITE GLASS CONTROL PANEL, TOUCH CONTROL CLOCK: GRAPHICS SCREENED ONTO BACK SIDE OF GLASS, PANTONE 440
OB60S4CRW1 EL AA
WHITE GLASS CONTROL PANEL: GRAPHICS SCREENED ONTO BACK SIDE OF GLASS, PANTONE 440
and
OB60S7CEW1 EL AA
WHITE GLASS CONTROL PANEL, TOUCH CONTROL CLOCK: GRAPHICS SCREENED ONTO BACK SIDE OF GLASS, PANTONE 440
OB60S4CRW1 EL AA
WHITE GLASS CONTROL PANEL: GRAPHICS SCREENED ONTO BACK SIDE OF GLASS, PANTONE 440
controls to set the time of day you wish to turn the oven off.
The ‘AUTO’ indicator and the cooking indicator
OB60S7CEW1 EL AA
WHITE GLASS CONTROL PANEL, TOUCH CONTROL CLOCK: GRAPHICS SCREENED ONTO BACK SIDE OF GLASS, PANTONE 440
OB60S4CRW1 EL AA
WHITE GLASS CONTROL PANEL: GRAPHICS SCREENED ONTO BACK SIDE OF GLASS, PANTONE 440
will flash.
After 8 seconds the time will be set and the ‘AUTO’ indicator remains on.
You can turn the oven on manually and just set it to turn off automatically by setting the
end time.
4 When automatic cooking is set
If there is time before cooking starts, the oven will turn off and the current time of
day and ‘AUTO’ will show in the clock display, indicating that the oven is set for
automatic cooking. Note: the cooling fan may stay on.
The oven will automatically turn on at the required time (eg 12:00) and turn off at the
set end time (eg 12:40).
When the oven starts the ‘AUTO’ and the cooking indicator
OB60S7CEW1 EL AA
WHITE GLASS CONTROL PANEL, TOUCH CONTROL CLOCK: GRAPHICS SCREENED ONTO BACK SIDE OF GLASS, PANTONE 440
OB60S4CRW1 EL AA
WHITE GLASS CONTROL PANEL: GRAPHICS SCREENED ONTO BACK SIDE OF GLASS, PANTONE 440
will show in the
display.
Note: The grill element may come on while the oven is heating up. Uncovered foods
may become browned on top.
5 To see the remaining cooking time
Touch and hold the mode control
OB60S7CEW1 EL AA
WHITE GLASS CONTROL PANEL, TOUCH CONTROL CLOCK: GRAPHICS SCREENED ONTO BACK SIDE OF GLASS, PANTONE 440
OB60S4CRW1 EL AA
WHITE GLASS CONTROL PANEL: GRAPHICS SCREENED ONTO BACK SIDE OF GLASS, PANTONE 440
for 3 seconds.
Touch the mode control
OB60S7CEW1 EL AA
WHITE GLASS CONTROL PANEL, TOUCH CONTROL CLOCK: GRAPHICS SCREENED ONTO BACK SIDE OF GLASS, PANTONE 440
OB60S4CRW1 EL AA
WHITE GLASS CONTROL PANEL: GRAPHICS SCREENED ONTO BACK SIDE OF GLASS, PANTONE 440
again to see the cooking time, or touch the mode
control
OB60S7CEW1 EL AA
WHITE GLASS CONTROL PANEL, TOUCH CONTROL CLOCK: GRAPHICS SCREENED ONTO BACK SIDE OF GLASS, PANTONE 440
OB60S4CRW1 EL AA
WHITE GLASS CONTROL PANEL: GRAPHICS SCREENED ONTO BACK SIDE OF GLASS, PANTONE 440
twice to see the end time.

17
MODELS WITH TOUCH CONTROL CLOCK
AUTOMATIC COOKING
6 When the stop time is reached
The oven will turn off, the timer will beep and ‘AUTO’ will flash.
Touch any control to stop the timer beeping.
Touch and hold the mode control
OB60S7CEW1 EL AA
WHITE GLASS CONTROL PANEL, TOUCH CONTROL CLOCK: GRAPHICS SCREENED ONTO BACK SIDE OF GLASS, PANTONE 440
OB60S4CRW1 EL AA
WHITE GLASS CONTROL PANEL: GRAPHICS SCREENED ONTO BACK SIDE OF GLASS, PANTONE 440
for 3 seconds to return the oven to manual
mode. The cooking indicator
OB60S7CEW1 EL AA
WHITE GLASS CONTROL PANEL, TOUCH CONTROL CLOCK: GRAPHICS SCREENED ONTO BACK SIDE OF GLASS, PANTONE 440
OB60S4CRW1 EL AA
WHITE GLASS CONTROL PANEL: GRAPHICS SCREENED ONTO BACK SIDE OF GLASS, PANTONE 440
will glow steadily.
Turn the temperature and function knobs to O (off).
To Cancel Auto-off
Touch and hold the
OB60S7CEW1 EL AA
WHITE GLASS CONTROL PANEL, TOUCH CONTROL CLOCK: GRAPHICS SCREENED ONTO BACK SIDE OF GLASS, PANTONE 440
OB60S4CRW1 EL AA
WHITE GLASS CONTROL PANEL: GRAPHICS SCREENED ONTO BACK SIDE OF GLASS, PANTONE 440
and
OB60S7CEW1 EL AA
WHITE GLASS CONTROL PANEL, TOUCH CONTROL CLOCK: GRAPHICS SCREENED ONTO BACK SIDE OF GLASS, PANTONE 440
OB60S4CRW1 EL AA
WHITE GLASS CONTROL PANEL: GRAPHICS SCREENED ONTO BACK SIDE OF GLASS, PANTONE 440
controls together for 3 seconds.
Turn the oven temperature and function knobs to O (off).
IMPORTANT!
If you have a power interruption, it will cause any automatic cooking functions to be
cancelled.
Turn off the oven manually.

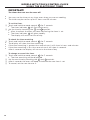
18
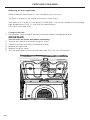
FIRST USE
Before using your new oven for cooking or baking, please:
1 Models with analogue 120’ timer and electronic clock only: set manual mode (models
with analogue 120’ timer) or set the clock (models with electronic clock). The oven will
not work until this has been done.
For models with analogue 120’ timer, see ‘Oven controls and setting manual mode’
for instructions.
For models with electronic clock, see ‘Oven controls and setting the clock’ for
instructions.
2 Slide in the shelf/shelves and grill tray as shown in ‘Using your oven’.
3 Condition the oven. Heat it on maximum temperature for the times below:
60 minutes using
FU NCTION
TEM PERATU RE TIMER
FU NCTION
TEM PERATU RE TIMER
555
1050
1545
2040
2535
30
555
1050
1545
2040
2535
30
30
15
45
6075
90
105
120
30
15
45
6075
90
105
120
TEMPE R ATU RE
FU NCTION
TEMPERATURE
FU NCTION
LOWER OVEN
UPPER OVEN
Bake
30 minutes using
FU NCTION
TEM PERATU RE TIMER
FU NCTION
TEM PERATU RE TIMER
555
1050
1545
2040
2535
30
555
1050
1545
2040
2535
30
30
15
45
6075
90
105
120
30
15
45
6075
90
105
120
TEMPE R ATU RE
FU NCTION
TEMPERATURE
FU NCTION
LOWER OVEN
UPPER OVEN
Fan Forced
15 minutes using
FU NCTION
TEM PERATU RE TIMER
FU NCTION
TEM PERATU RE TIMER
555
1050
1545
2040
2535
30
555
1050
1545
2040
2535
30
30
15
45
6075
90
105
120
30
15
45
6075
90
105
120
TEMPE R ATU RE
FU NCTION
TEMPERATURE
FU NCTION
LOWER OVEN
UPPER OVEN
Grill
Note: some of these functions may not be available in some models.
There will be a distinctive smell during the conditioning. This is normal, but make sure
your kitchen is well ventilated.
4 Once cooled, wipe out the oven with a damp cloth and mild detergent, and dry
thoroughly.
La pagina si sta caricando...
La pagina si sta caricando...
La pagina si sta caricando...
La pagina si sta caricando...
La pagina si sta caricando...
La pagina si sta caricando...
La pagina si sta caricando...
La pagina si sta caricando...
La pagina si sta caricando...
La pagina si sta caricando...
La pagina si sta caricando...
La pagina si sta caricando...
La pagina si sta caricando...
La pagina si sta caricando...
La pagina si sta caricando...
La pagina si sta caricando...
La pagina si sta caricando...
La pagina si sta caricando...
La pagina si sta caricando...
La pagina si sta caricando...
La pagina si sta caricando...
La pagina si sta caricando...
La pagina si sta caricando...
La pagina si sta caricando...
La pagina si sta caricando...
La pagina si sta caricando...
La pagina si sta caricando...
La pagina si sta caricando...
La pagina si sta caricando...
La pagina si sta caricando...
La pagina si sta caricando...
La pagina si sta caricando...
-
 1
1
-
 2
2
-
 3
3
-
 4
4
-
 5
5
-
 6
6
-
 7
7
-
 8
8
-
 9
9
-
 10
10
-
 11
11
-
 12
12
-
 13
13
-
 14
14
-
 15
15
-
 16
16
-
 17
17
-
 18
18
-
 19
19
-
 20
20
-
 21
21
-
 22
22
-
 23
23
-
 24
24
-
 25
25
-
 26
26
-
 27
27
-
 28
28
-
 29
29
-
 30
30
-
 31
31
-
 32
32
-
 33
33
-
 34
34
-
 35
35
-
 36
36
-
 37
37
-
 38
38
-
 39
39
-
 40
40
-
 41
41
-
 42
42
-
 43
43
-
 44
44
-
 45
45
-
 46
46
-
 47
47
-
 48
48
-
 49
49
-
 50
50
-
 51
51
-
 52
52


in altre lingue
- English: Elba OB60SC5LCX1 User manual
Altri documenti
-
Grundig GEBM62000 X Manuale del proprietario
-
Inalto IDO6013T Guida Rapida
-
Grundig GEBM11400X Manuale utente
-
KitchenAid Recording Equipment KERS505 Manuale utente
-
Zonet ZEN3301E - REV 01 Istruzioni per l'uso
-
DeLonghi EO1200 Series Manuale utente
-
G3 Ferrari G10009 Scheda dati
-
Fisher & Paykel 900MR805 Heater Wire Adapter Manuale utente
-
Hoover HPWD 140/2 X Manuale utente
-
Candy CPWD140/3X Manuale utente