

2
CONTENT
INTRODUCTION.......................................................................3
SAFETY
PRECAUTION..........................................................3-4
MOUNTING INSTALLATION.................................................... 5
INSTALLATION
(VENT
INSIDE)............................................. 6
LAMP MODEL INSTALLATION........................................... 7-8
OPERATION........................................................................... 9
MAINTENANCE...................................................................... 10
TROUBLESHOOTING...............................................................11
ENVIRONMENTAL
PROTECTION............................................11
INSTALLATION AND USER’S MANUAL

3
INTRODUCTION
Thank you for choosing this cooker hood.
This instruction manual is designed to provide you with all required
instructions related to the installation, use and maintenance of the
appliance.
In order to operate the unit correctly and safety, please read this instruction
manual carefully before installation and usage.
The cooker hood use high quality materials, and is made with a
streamlined design. Equipped with large power electric motor and
centrifugal fan, it also provides strong suction power, low noise operation,
non-stick grease filter and easy assembly installation.
SAFETY PRECAUTION
Never let the children operate the machine.
The cooker hood is for home use only, not
suitable for barbecue, roast shop and other
commercial purpose.
The cooker hood and its filter should be
clean regularly in order to keep in good
working condition.
Clean the cooker hood according to the
instruction manual and keep the unit from
danger of burning. There is a fire risk if
cleaning is not carried out in accordance
with the instructions.
Forbid the direct baking from the gas
cooker.
Please keep the kitchen room a good
convection.
If the supply cord is damaged, it must be
replaced by the manufacturer, its service
agent or similarly qualified persons in order
to avoid a hazard.
There shall be adequate ventilation of the
room when the range hood is used at the
same time as appliances burning gas or
•
•
•
•
•
•
•

4
other fuels;
The air must not be discharged into a flue
that is used for exhausting fumes from
appliances burning gas or other fuels;
Regulations concerning the discharge of air
have to be fulfilled.
This appliance can be used by children
aged from 8 years and above and persons
with reduced physical, sensory or mental
capabilities or lack of experience and
knowledge if they have been given
supervision or instruction concerning use of
the appliance in a safe way and understand
the hazards involved.
Children should be supervised to ens ure that
they
do not play with the appliance.
Cleaning and user maintenance shall not be
made by children without supervision.
Do
not flame under the range hood.
CAUTION: Accessible parts may become hot
when used with cooking appliance.
The warning shall be in the same part of the
instructions that include details of how to
mount the equipment.
Electrical Shock Hazard
Only plug this unit into a properly earthed outlet. If
in doubt seek advice from a suitably qualified
engineer.
Failure to follow these instructions can result in
death, fire, or electrical shock.
•
•
•
•
•
•
•
•

5
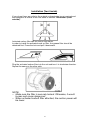
MOUNTING INSTALLATION
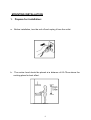
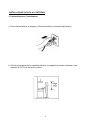
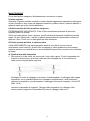
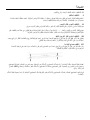
1. Prepare for installation:
a. Before installation, turn the unit off and unplug it from the outlet.
b. The cooker hood should be placed at a distance of 65~75cm above the
cooking plane for best effect.

6
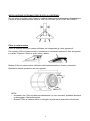
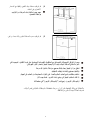
Installation (Vent inside)
If you do not have an outlet to the outside, exhaust pipe is not required and
the installation is similar to the one show in section
“Installation (Vent
outside)
”.
Activated carbon filter can be used to trap odors.
In order to install the activated carb on filter, the grease filter should be
detached first. Press the lock and pull it downward.
Plug the activated carbon filter into the unit and turn it in clockwise direction.
Repeat the same on the other side.
NOTE:
o Make sure the filter is securely locked. Otherwise, it would
loosen and cause dangerous.
o When activated carbon filter attached, the suction power will
be lower.

7
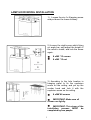
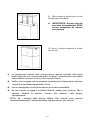
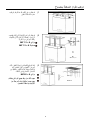
LAMP HOOD MODEL INSTALLATION
1) Loosen the six 4 x 8 tapping screw
and put down the lower chimney
2) Loosen the eight screw which fixing
on angle bar, and adjust the height of
the need to install, and lock the screw
again.
8 x M5 *12 screws
8 x M5 *12 nut
3)
According to the hole location in
hanging panel to fix the explosion
screw on the ceiling, and put up the
cooker hood and lock it with the
explosion screw on the ceiling
8 x M6*60 screws
IMPORTANT: Make sure all
screws are tightly.
IMPORTANT: This stage of the
installation process MUST be
completed by two people.

8
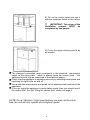
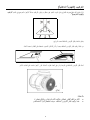
4) Put up the cooker hood and lock it
with the explosion screw on the ceiling
IMPORTANT: This stage of the
installation process MUST be
completed by two people.
5) Put up the upper chimney and fix by
six screws.
.
The electrical connection must correspond to the electrical requirement
noted on the rating plate, which is placed inside the cooker hood. The
appliance should now be connected to the electrical supply.
Check that the appliance is operating correctly by selecting each speed and
switching the light bulbs on and off.
Use a stainless steel cleaner and polish on the stainless steel sections of the
appliance.
If you are using the appliance in recirculation mode, then
you
should now fit
the carbon filter. See the “fitting the carbon filter" section on page 6.
NOTE: If Low / Medium / High speed buttons are press at the same
time, the unit will only operate at the highest speed.

40
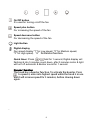
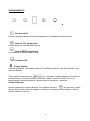
On/Off button
It’s used for turning on/off the fan.
Speed plus button
For increasing the speed of the fan
Speed decrease button
For decreasing the speed of the fan.
Light button
Digital display
Fan speed display:"1" for Low speed, "2" for Medium speed,
"3" for High speed
Quick timer: Press
& hold for 1 second, Digital display will
flashing & into 5 minutes count down, after 5 minutes motor & light
will turn off automatic & Buzzer sound for 1 second.
9

10
MAINTENANCE
Before cleaning switch the unit off and pull out the plug.
I. Regular Cleaning
Use a soft cloth moistened with hand-warm mildly soapy water or household
cleaning detergent. Never use metal pads, chemical, abrasive material or stiff
brush to clean the unit.
II. Monthly Cleaning for Grease Filter
ESSENTIAL: Clean the filter every month can prevent any risk of fire.
The filter collects grease, smoke and dust…... so the filter is directly affecting
the efficiency of the cooker hood. If not cleaned, the grease residue (potential
flammable) will saturate on the filter. Clean it with household cleaning
detergent.
III. Annual Cleaning for Activated Carbon Filter
Apply SOLELY to unit that installed as a recirculation unit (not vented to the
outside). This filter traps odours and must be replaced at least once a year
depending on how frequent the cook
er hood
used.
IV. Changing a light bulb
Remove the screws on the glass, take off the hood glass. Find the
bulb that requires replacement, you will find it located in the light
fixture which is inside the exposed section of the canopy.
Disconnect the light wiring point and remove the bulb holders and
wiring from the hood. Important: It’s not possible to replace the bulbs
individually, it will be necessary to obtain the bulbs, bulb holders and
wiring as a complete part. (LED light: MAX 1.5W)
Fit the replacement bulbs, bulb holders and wiring in the same
manners as the originals. Then reconnect the light wiring point.

11
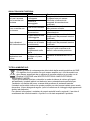
TROUBLESHOOTING
Fault Cause Solution
Light on, but fan
does not work
The fan blade is jammed.
Switch of the unit and repair by
qualified service personnel only.
The motor is damaged.
Both light and
fan do not work
light bulb burn.
Replace the bulb with correct rating.
Power cord looses. Plug in to the power supply again.
Serious
Vibration of the
unit
The fan blade is
damaged.
Switch of the unit and repair by
qualified service personnel only.
The fan motor is not fixed
tightly.
Switch of the unit and repair by
qualified service personnel only.
The unit is not hung
properly on the bracket.
Take down the unit and check
whether the bracket is in proper
location.
Suction
performance
not good
Too long distance
between the unit and the
cooking plane
Readjust the distance to 65-75cm
ENVIRONMENTAL PROTECTION
Waste electrical products should not be disposed of with
household waste. Please recycle where facilities exist. Check
with your Local Authority or retailer for recycling advice.
This appliance is marked according to the European directive 2012/19/EU on
Waste Electrical and Electronic Equipment (WEEE).
By ensuring this product is disposed of correctly, you will help prevent potential
negative consequences for the environment and human health, which could
otherwise be caused by inappropriate waste handling of this product.
The symbol on the product indicates that this product may not be treated as
household waste. Instead it shall be handed over to the applicable collection
point for the recycling of electrical and electronic equipment
Disposal must be carried out in accordance with local environmental regulations
for
waste
disposal.
For more detailed information about treatment, recovery and recycling of this
product, please contact your local city office, your household waste disposal
service or the shop where you purchased the product

INDICE
INTRODUZIONE …………………………………….
13
AVVERTENZE PER LA SICUREZZA ……………..
13-15
INSTALLAZIONE E FISSAGGIO ………………….
16
INSTALLAZIONE (VENTOLA)……………………..
17
INSTALLAZIONE LAMPADINE…………………….
18-19
OPERAZIONI……………………………………….. 20
MANTENIMENTO…………………………………… 21
QUALCOSA NON FUNZIONA…………………….. 22
TUTELA AMBIENTALE…………………………….. 22-23
12
MANUALE D’ISTRUZIONE

INTRODUZIONE
Grazie per avere scelto questa cappa.
Questo libretto di istruzioni mira a fornirvi tutte le informazioni relative all'installazione,
all'uso e alla manutenzione dell'elettrodomestico. Per azionare l'elettrodomestico
correttamente e in piena sicurezza, si consiglia di leggere attentamente il presente libretto
di istruzioni prima dell'installazione e dell'uso.
Questa cappa usa materiali di alta qualità ed è costituita da un design
aerodinamico.Equipaggiata con motore elettric
o di grande potenza e una ventola
centrifuga, offre anche una forte potenza di aspirazione, funzionamento a bassa
rumorosità, filtro antigrasso antiaderente e facile installazione.
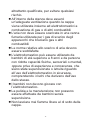
AVVERTENZE PER LA SICUREZZA
Non lasciare mai che i bambini azionino la
macchina
La cappa è progettata solo per uso domestico,
non è adatta per barbecue, rosticcerie e altri
scopi commerciali.
La cappa e i suoi filtri devono essere puliti
regolarmente per tenerle nelle ottimali
condizioni di funzionamento
Pulire l'elettrodomestico con regolarità
seguendo le istruzioni and tenerla lontana dal
pericolo di incendio. Ci può essere rischio di
incendio se la pulizia non è eseguita secondo
le istruzioni.
E’ vietata la cottura diretta dal forno a gas
Mantenere l’ambiente cucina con una buona
ventilazione
Se il cavo di aliment
azione è danneggiato,
deve essere sostituito dal produttore, da un
suo tecnico manutentore o da persone
13

altrettanto qualificate, per evitare qualsiasi
rischio.
All'interno della stanza deve esserci
un'adeguata ventilazione quando la cappa
viene utilizzata insieme ad elettrodomestici a
combustione di gas o di altri combustibili
L'aria non deve essere scaricata in una canna
fumaria utilizzata per i gas di scarico degli
apparecchi che bruciano gas o altri
combustibili
Le norme relative allo scarico di aria devono
essere soddisfatte
L'elettrodomestico può essere utilizzato da
bambini di età superiore a 8 anni e da persone
con ridotte capacità fisiche, sensoriali o mentali,
oppure prive
di esperienza e conoscenza, che
siano state supervisionate o istruite riguardo
all’uso dell’elettrodomestico in sicurezza,
comprendendo i rischi che derivano dall'uso
dello stesso.
I bambini non devono giocare con
l’elettrodomestico.
La pulizia e la manutenzione non possono
essere effettuate da bambini senza
supervisione.
Non lasciare mai fiamme libere al di sotto della
cappa.
14

ATTENZIONE: Le parti accessibili possono
surriscaldarsi quando utilizzate con
elettrodomestici di cottura.
L'elettrodomestico e le sue parti accessibili
possono surriscaldarsi durante il
funzionamento. Non toccare le parti calde. I
bambini al di sotto degli 8 anni devono
rimanere a distanza salvo i casi in cui si trovino
sotto una supervisione permanente.
Le avvertenze devono essere nella stessa
parte delle istruzioni che includono dettagli su
come montare l'apparecchiatura.
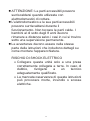
RISCHIO DI SHOCK ELETTRICO
• Collegare questa unità solo a una presa
correttamente collegata a terra. In caso di
dubbio, r
ivolgersi a un tecnico
adeguatamente qualificato.
• La mancata osservanza di queste istruzioni
può provocare morte, incendio o scosse
elettriche.
15

INSTALLAZIONE (SFIATO ALL'ESTERNO)
1. Preparazione per l’installazione:
a. Prima dell'installazione, spegnere l'elettrodomestico e staccarlo dalla presa.
b. Perché possa garantire la massima efficacia, la cappa deve essere installata a una
distanza di 65÷75 cm dal piano cottura.
16

Se non avete uno sfiato verso l'esterno, il tubo di scarico non è necessario e l'installazione
è simile a quella descritta nella sezione "INSTALLAZIONE (SFIATO ALL'ESTERNO)”.
INSTALLAZIONE (OPZIONALE PER SFIATO ALL'INTERNO)
Il filtro al carbone attivo può essere utilizzato per intrappolare gli odori sgradevoli.
Filtro al carbone attivo
Per montare il filtro al carbone attivo, innanzitutto è necessario staccare il filtro anti-grasso
in metallo. Premere il fermo e tirarlo verso il basso.
Mettere il filtro al carbone attivo all'interno dell'elettrodomestico e fissarlo ruotandolo.
Ripetere la stessa operazione sul lato opposto.
NOTA:
o Accertarsi che il filtro sia bloccato saldamente. In caso contrario, potrebbe allentarsi
e danneggiare l'elettrodomestico.
o Quando il filtro al carbone attivo è collegato, la potenza d
i aspirazione diminuisce.
Chiuso
Aperto
17

18
1) ALLENTARE LE SEI 4 X 8 VITI
SOPRA EABBASSARE IL
CAMINO INFERIORE
INSTALLAZIONE MODELLO CAPPA LAMPADA
2) Allentare le otto viti che fissano la
barra angolare e regolare l'altezza
alla necessità di installazione e
bloccare nuovamente la vite
8 x M5 * 12 VITI
8x M5 * 12 DADI
3) Secondo la posizione del foro nel
pannello a pendolo per fissare la vite di
esplosione sul soffitto, e mettere la
cappa della cucina e bloccarla con la
vite di esplosione sul soffitto
8 x M6 * 60 VITI
IMPORTANTE: Assicurarsi che
tutte le viti siano ben serrate
IMPORTANTE: Questo step del
processo di installazione DEVE
essere completato da almeno due
persone

19
4) Sfila la cappa e bloccala con la vite
di esplosione sul soffio
IMPORTANTE: Questo step del
processo di installazione DEVE
essere completato da almeno
due persone
5) Tira su il camino superiore e fissalo
con sei vi
La connessione elettrica deve corrispondereai requisiti segnalati nella rating
plate (targa dati) che è posizionata dentro la cappa. L’elettrodomestico dovrebbe
essere adesso connesso di nuovo alla corrente elettrica.
Verifica che la cappa stia funzionando correttamente selezionando ciascuna
velocità e accendendo/spegnendo la luce.
Usa un detergente e lucida sulle sezioni di acciaio inossidabile.
Se stai usando la cappa in modalità filtrante, adesso puoi inserire i filtri a
carbone. Guarda la sezione “inserire filtri carbone” nella pagina
corrispondente.
NOTA: Se i pulsanti della Bassa/ Media/ Alta velocità sono premuti
contemporaneamente, l’elettrodomestico opererà alla più alta velocità.

FUNZIONAMENTO
Pulsante on/off
Premere questo pulsante per azionare/spegnere il funzionamento della ventola.
Velocità PIU’ del pulsante
Per aumentare la velocità della ventola
Velocità MENO del pulsante
Per diminuire la velocità della ventola
Pulsante LUCE
Display digitale
Velocità sul display: 1 per Bassa velocità, 2 per Media velocità, 3 per Alta velocità, 4 per
funzione Booster.
Timer rapido: tenere premuto per 1 secondo, il display digitale si illuminerà a
intermittenza e in 5 minuti and
rà in count down, dopo 5 minuti il motore e la luce si
spegneranno automaticamente & il suono buzzer suonerà per 1 secondo.
Funzione Booster:
Questa cappa ha la funzione Booster. Per attivarla, premere alla velocità 4, andrà
alla più alta velocità mentre la cappa è in funzione e aumenterà la velocità per 5 minuti,
prima di rallentare ancora.
20
La pagina si sta caricando...
La pagina si sta caricando...
La pagina si sta caricando...
La pagina si sta caricando...
La pagina si sta caricando...
La pagina si sta caricando...
La pagina si sta caricando...
La pagina si sta caricando...
La pagina si sta caricando...
La pagina si sta caricando...
La pagina si sta caricando...
La pagina si sta caricando...
La pagina si sta caricando...
-
 1
1
-
 2
2
-
 3
3
-
 4
4
-
 5
5
-
 6
6
-
 7
7
-
 8
8
-
 9
9
-
 10
10
-
 11
11
-
 12
12
-
 13
13
-
 14
14
-
 15
15
-
 16
16
-
 17
17
-
 18
18
-
 19
19
-
 20
20
-
 21
21
-
 22
22
-
 23
23
-
 24
24
-
 25
25
-
 26
26
-
 27
27
-
 28
28
-
 29
29
-
 30
30
-
 31
31
-
 32
32
-
 33
33


Documenti correlati
Altri documenti
-
ROSIERES RDSV985PN Manuale utente
-
-
NEUTRO IHC 6.5 A M IX Guida utente
-
NEUTRO IHP 6 5F C M K Manuale utente
-
Johnson Happy Manuale utente
-
Bosch TCC78K751A/09 Guida d'installazione
-
Omron Healthcare NE-C801S-KDE(V) Manuale utente
-
mothercare Plum Tamarin wooden play centre Guida utente